1
Windows Version 1.08
MacOS X Version 1.01
Copyright © 2012-2014 by Harald Heim & The Plugin Site
Support
Web site: http://thepluginsite.com
E-mail: http://www.thepluginsite.com/about/contact.htm
User Forum:
http://www.thepluginsite.com/forum/viewforum.php?f=26
Credits
Idea and Concept: Harald Heim
Framework Code: Harald Heim, Alex Hunter, Martijn Van
Der Lee
Windows Development: Harald Heim
Mac Development: Nick Utenkov
Logo and Artwork: Steve Upham
Beta Testers: Roberto Muscia, Kohan Ilkin, Andrew
Bokelman, Robin Rowlands, Gerd Dollhopf, Robert Terrell,
Eric Seavey, Shannon Carnevale, Kay Michael Kuhnlein
ColorStyler Manual
Contents
1 Introduction.......................................................................................................................................1
1.1 Description............................................................................................................................1
1.2 Compatibility.........................................................................................................................2
1.3 Supported Image Formats....................................................................................................5
1.4 Installation............................................................................................................................8
1.4.1 Installing the Plugin Version under Windows...............................................................8
1.4.2 Installing the Plugin Version under MacOS X..............................................................9
1.4.3 Installing the Standalone/Lightroom Version under Windows.....................................9
1.4.4 Installation in Lightroom 1.x under Windows.............................................................10
1.5 Product Launch..................................................................................................................11
1.5.1 Running the Plugin....................................................................................................11
1.5.2 Running the Standalone............................................................................................11
1.5.3 Running the Lightroom Version.................................................................................11
1.6 General Usage...................................................................................................................13
1.6.1 The Main Dialog.........................................................................................................13
1.6.2 Differences between the Plugin, Lightroom and Standalone Versions......................16
1.7 Standalone/Lightroom Features.........................................................................................18
1.7.1 Opening Images........................................................................................................18
1.7.2 RAW Settings............................................................................................................19
1.7.3 Switching Between Images........................................................................................20
1.7.4 Using Different Settings for Each Image....................................................................20
1.7.5 Closing an Image.......................................................................................................20
1.7.6 Saving an Image........................................................................................................21
1.7.7 Color Management....................................................................................................22
1.7.8 Metadata and Auto Rotation......................................................................................23
1.8 Step By Step Guide............................................................................................................24
1.8.1 Sample Workflow 1 (Easy Mode)..............................................................................24
1.8.2 Sample Workflow 2 (Photography Mode & Quick Edit Mode)...................................25
1.8.3 Sample Workflow 3 (Advanced Mode)......................................................................26
2 General Features.............................................................................................................................28
2.1 The Menu Bar.....................................................................................................................28
2.2 Tools & Reset.....................................................................................................................30
2.2.1 The Hand Tool...........................................................................................................30
2.2.2 The Eyedropper Tool.................................................................................................30
2.2.3 The Cross Tool..........................................................................................................31
2.2.4 The Brush Tool..........................................................................................................32
2.2.5 The Split View Tool....................................................................................................33
2.2.6 The Reset Button.......................................................................................................33
2.3 Split View............................................................................................................................34
2.4 The Bottom Tab Sheets......................................................................................................35
2.4.1 Help...........................................................................................................................35
2.4.2 Navigator...................................................................................................................35
2.4.3 Info.............................................................................................................................35
2.4.4 Prefs..........................................................................................................................36
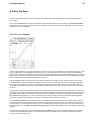
2.5 Histo Tab Sheet..................................................................................................................39
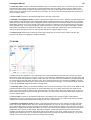
2.6 Smart Filtering....................................................................................................................43
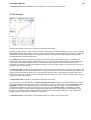
2.7 Batch Processing................................................................................................................44
2.7.1 Batch Processing in Photoshop.................................................................................44
2.7.2 Batch Processing in Paint Shop Pro..........................................................................46
2.7.3 Batch Processing in Other Applications.....................................................................47
2.8 Key Shortcuts.....................................................................................................................48
i
ColorStyler Manual
Contents
3 Effect Controls.................................................................................................................................50
3.1 Modes.................................................................................................................................50
3.1.1 Modes Workflow........................................................................................................50
3.1.2 Easy Mode.................................................................................................................50
3.1.3 Quick Edit Mode........................................................................................................51
3.1.4 Photography Mode....................................................................................................51
3.1.5 Advanced Mode.........................................................................................................52
3.2 Presets Tab Sheet..............................................................................................................53
3.2.1 The Preset List...........................................................................................................53
3.2.2 Adjusting the Preset List............................................................................................54
3.2.3 Opening and Saving Presets.....................................................................................55
3.2.4 Displaying Only Certain Preset Groups.....................................................................56
3.2.5 Combining Presets....................................................................................................56
3.2.6 Collapsing Preset Groups and Making the Preset List Larger...................................57
3.3 Main Tab Sheet..................................................................................................................58
3.3.1 The Curve Diagram...................................................................................................58
3.3.2 Tone...........................................................................................................................59
3.3.3 Color..........................................................................................................................59
3.3.4 RGB...........................................................................................................................60
3.3.5 Saturation..................................................................................................................61
3.4 Select Tab Sheet................................................................................................................62
3.4.1 Tonal Controls...........................................................................................................62
3.4.2 Color Controls............................................................................................................63
3.5 FX1 Tab Sheet...................................................................................................................64
3.5.1 Filter...........................................................................................................................64
3.5.2 Colorshift....................................................................................................................65
3.5.3 Grad...........................................................................................................................66
3.5.4 ND-Grad....................................................................................................................67
3.6 FX2 Tab Sheet...................................................................................................................68
3.6.1 Diffusion.....................................................................................................................68
3.6.2 Halo...........................................................................................................................69
3.6.3 Detail..........................................................................................................................70
3.6.4 Frame........................................................................................................................71
3.7 Mask Tab Sheet.................................................................................................................72
3.7.1 Brush.........................................................................................................................72
3.7.2 Mask..........................................................................................................................72
3.7.3 Fade...........................................................................................................................75
ii
1 Introduction
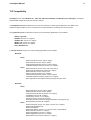
1.1 Description
ColorStyler provides impressive photo effects, recreates traditional color film effects and gives your photos a special
style. It features more than 20 effect types and 600 presets as well as plenty of masking options for applying the effect to
only selected areas of a photo.
ColorStyler is available as a Photoshop-compatible plugin for Windows and MacOS X as well as a standalone
application and Lightroom external editor for Windows. The plugin works in dozens of graphics applications, including
Photoshop, Photoshop Elements, Paint Shop Pro, GIMP and IrfanView. All versions support batch processing and
process RGB images with 8-bit and 16-bit/channel. The standalone application supports JPEG, TIFF, PNG, PSD, Camera
Raw and DNG image formats among others.
Overview
ColorStyler reproduces the whole workflow of color film photography from shooting a photo to processing it in the lab and
framing the end result. It recreates the look of color films, lens filters, lab effects and photo papers that are popular in
traditional color photography, but it even goes beyond that. With the help of more than 600 built-in presets you can
transform dull photos into interesting color pictures. ColorStyler lets you enrich images by colorizing them, manipulating
brightness and contrast, masking certain image areas, adding soft focus and glow effects, simulating film grain, adding
special effects and framing the image.
For Beginners as well as Experts
ColorStyler contains modes for inexperienced, intermediate and advanced users that let you gradually add and tweak
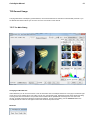
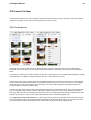
effects and improve your image one by one. Easy Mode displays thumbnails of all 600 presets and displays one or more
sliders for further adjusting a selected presets. Photography Mode lets you quickly combine up to 12 different groups of
presets, e.g. color film types, film grain simulations, lens filters, lab development strategies, paper types, special lab
effects, vignettes, frames and many more. These effects can be further adjusted in Advanced Mode. Quick Edit Mode
offers the most useful controls for quickly enhancing images whereas Advanced Mode provides full control over all effects
with dozens of features and dozens of controls.
Sophisticated Functionality
ColorStyler also offers various features known from our other PhotoWiz plugins. There are three preview tab sheets for
quickly comparing and adjusting three versions of the image at the same time. A Navigator tab sheet lets you quickly
scroll the preview image and the preview zoom can be set between 6% and 3200%. Fifteen types of histogram help you
tweak your images without damaging them. ColorStyler also supports multi-core CPUs for faster rendering and can be
used as a smart filter in Photoshop.
On the other hand ColorStyler contains several innovative features. Preset thumbnails help you to choose appropriate
effects by letting you see the preset effect without applying it. The new curve tools allows you to visually and precisely
adjust brightness, contrast, color and saturation in the shadows, midtones and highlights. A masking brush tool gives you
absolute control over which image areas ColorStyler changes and which it keeps untouched. New UI features let you
reposition or expand main UI elements to better match your workflow.
Why ColorStyler Is Different
ColorStyler combines a whole range of photographic effects and tool in a single plugin, which saves you time and allows
you to creatively enhance your photos according to your imagination. Unlike other tools, ColorStyler also supplies many
useful masking features, including a masking brush tool. Best of all, ColorStyler is available at an affordable price and
offers more features and possibilities than other tools in the same price range.
ColorStyler Manual
2
1.2 Compatibility
ColorStyler works under Windows 8, 7, Vista, XP, 2000 (32-bit & 64-bit) and MacOS X (10.4 and higher). ColorStyler
supports RGB images with 8-bit and 16-bit per channel.
The Standalone Version for Windows runs on its own and does not need another application. For details on its
supported image formats see here. It can also be run under MacOS X by following the instructions here.
The Lightroom Version for Windows requires one of the following applications to be installed:
• Adobe Lightroom
• ACDSee (Version 12 or higher)
• ACDSee Pro (Version 3 or higher)
• Bibble Lite (Version 5 or higher)
• Bibble Pro (Version 5 or higher)
• Corel AfterShot Pro
The Plugin Version requires one of the following applications to be installed:
MacOS X:
64-bit:
32-bit:
◊ Adobe Photoshop (Version CS5 or higher)
◊ Adobe Illustrator (Version CS6 or higher)
◊ Computerinsel Photoline (Version 16.50 or higher)
◊ LemkeSoft GraphicConverter (Version 8.2 or higher)
◊ Adobe Photoshop (Version CS3, CS4, CS5, CS5.5)
◊ Adobe Photoshop Elements (Version 6 or higher)
◊ Adobe Illustrator (Version CS2 to CS5)
◊ Adobe Fireworks (Version CS3 or higher)
◊ Computerinsel Photoline (Version 16.50 or higher)
◊ LemkeSoft GraphicConverter (Version 8.2 or higher)
Other applications that support Photoshop plugins may also work.
Windows:
64-bit:
32-bit:
◊ Adobe Photoshop (Version CS4 or higher)
◊ Adobe Illustrator (Version CS6 or higher)
◊ Computerinsel Photoline 64 (Version 16 or higher)
◊ CorelDRAW (Version X6 or higher)
◊ Corel Painter (Version 12.1 or higher)
◊ Corel Photo-Paint (Version X6 or higher)
◊ Paint.NET (with the PSFilterPdn plugin) (Freeware: www.getpaint.net)
◊ Serif PhotoPlus (Version X6 or higher)
◊ Adobe Photoshop (Version 3 or higher, Version CS1 or higher)
◊ Adobe Photoshop Elements
◊ Adobe PhotoDeluxe
◊ Adobe After Effects (Version 4.1, 5.0 and 5.5, but not animatable)
◊ Adobe Illustrator (Version 7 or higher)
◊ Adobe ImageReady (Version 2 or higher)
◊ Adobe PageMaker (Version 6.5 or higher)
◊ ACDSystems Photo Canvas (Version 2 or higher)
ColorStyler Manual
3
◊ ACDSystems Photo Editor (Version 3 or higher)
◊ ACDSystems Canvas (Version X or higher)
◊ albelli photo book creator (Freeware: www.albelli.co.uk)
◊ Ambient Design ArtRage Studio Pro (Version 3 and higher)
◊ Arcadia PhotoPerfect (Version 2.9 or higher)
◊ ArcSoft PhotoStudio (Version 5.5 or higher)
◊ Artweaver Plus (Version 3 or higher)
◊ Aurora Borealis Mandala Painter (Version 3 or higher)
◊ CADlink SignLab (Version 5 or higher)
◊ CDH Image Explorer Pro (Version 4 or higher)
◊ Computerinsel Photoline 32 (Version 5 or higher)
◊ CorelDRAW (Version 9 or higher)
◊ Corel Paint Shop Pro (Version 10 or higher)
◊ Corel Photo-Paint (Version 9 or higher)
◊ Corel Bryce (Version 4 or higher)
◊ Corel Painter (Version 6 and higher, except Version 10 and 11)
◊ Deneba Canvas (Version 6 or higher)
◊ DigiFoto (Version 3.5 or higher) (Freeware: www.klausdoege.de)
◊ DigiSoft ProMedia (Version 2 or higher)
◊ DigiSoft ImagePro 2K1
◊ Discreet Combustion (Version 2 or higher, but not animatable and preview is
bluish)
◊ Equilibrium DeBabelizer Pro (Version 4.5 or higher)
◊ GIMP (Version 1.2.4 or higher with the PSPI plugin) (Preview doesn't work
correctly and may crash if you scroll it too often)
◊ Helicon Filter (Version 4.2 or higher)
◊ Image Analyzer (with the 8bf Interface plugin) (Freeware:
meesoft.logicnet.dk)
◊ imageN (Freeware: www.pixoid.com)
◊ IrfanView (Version 3.85 or higher, Freeware: www.irfanview.com)
◊ Jasc Paint Shop Pro (Version 4.12 or higher)
◊ KnowledgeAdventure HyperStudio (Version 4.2 or higher)
◊ Logipole Konverter (Version 4 or higher)
◊ Macromedia Freehand (Version 7 or higher)
◊ Macromedia Fireworks (Version 2 or higher, but transparency isn't correctly
displayed in the preview)
◊ Magix Xtreme Photo Designer (Version 6 or higher, but applying the plugin to
a selection or object causes problems and sometimes random crashes occur,
Freeware: www.magix.com)
◊ Mediachance PhotoBrush
◊ Megalux Ultimate Paint (Version 2 or higher)
◊ Megalux Ultimate FX (Freeware)
◊ Metacreations Painter (Version 6 or higher)
◊ Microfrontier Digital Darkroom (Version 1.2 or higher)
◊ Micrografx Picture Publisher (Version 8 or higher, but the preview zoom won't
work)
◊ Microsoft Image Composer (Version 1.5 or higher, but dragging the preview
isn't possible)
◊ Microsoft PhotoDraw 2000
◊ Microsoft Picture It! Digital Image Pro (Version 7 or higher, but a 100% zoom
may not work correctly and Cancel sometimes produces a crash)
◊ Newave Chaos Fx: Twilight'76 (Version 1.2 or higher)
◊ New World Focus PhotoEditor (Version 4 or higher)
◊ Paint.NET (with the PSFilterPdn plugin) (Freeware: www.getpaint.net)
◊ 19th Parallel Sagelight (Version 3 or higher)
◊ Photobie Design Studio (Version 1.8 or higher) (Freeware:
www.photobie.com)
◊ Photo Filter Factory (Version 9 and higher)
◊ Picmaster (Version 1.25 or higher)
◊ Plugin Commander Pro (Version 1.5 or higher)
◊ PluginMaster
◊ PhotoFiltre Studio (Version 7 or higher)
◊ PhotoFiltre (Version 6.5 or higher) (with the 8bf Filters plugin) (Freeware:
photofiltre.free.fr)
◊ RealWorld Paint.com (Version 2008.1 or higher) (Freeware:
www.rw-designer.com)
◊ QFX / QFX LE (Version 7 or higher)
◊ Right Hemisphere Deep Paint
◊ Satori PhotoXL (Version 2.29 or higher)
ColorStyler Manual
4
◊ Serif PhotoPlus (Version 6 or higher)
◊ Serif PhotoPlus Starter Edition (Version 2 or higher) (Freeware:
www.serif.com)
◊ SigmaPi Pixopedia 24 (Version 1.0.5 or higher)
◊ SigmaPi NiGulp (Version 1.5 or higher) (Freeware: www.sigmapi-design.com)
◊ Stoik PictureMan Pro (Version 5 or higher)
◊ ThinkTank Ameri-Imager (Version 2 or higher)
◊ Ulead Gif Animator (Version 4 or higher)
◊ Ulead PhotoImpact (Version 4 or higher)
◊ Ulead PhotoExpress (Version 6 or higher)
◊ VCW Vicman's Photo Editor (Version 6.9 or higher, but preview dragging
causes crash) (Freeware: www.photo-editor.net)
◊ WebSuperGoo Achroma
◊ Xara X
◊ XnView (Version 1.70 or higher) (Freeware: www.xnview.com)
◊ Zoner Photo Studio (Version 9 or higher)
Processing images with 16-bit/channel is possible with one of the following applications:
♦ Adobe Photoshop (Version 5 or higher)
♦ Adobe Photoshop Elements (Version 3 or higher)
♦ Computerinsel Photoline (Version 5 or higher)
♦ Corel Paint Shop Pro (Version X3 (Service Pack 3) or higher)
♦ 19th Parallel Sagelight (Version 3 or higher)
ColorStyler Manual
5
1.3 Supported Image Formats
The Standalone/Lightroom version supports the following image formats:
Saving
• JPEG (8-bit/channel only)
• TIFF (8-bit and 16-bit/channel)
• PNG (8-bit and 16-bit/channel)
• PSD (8-bit/channel only)
Opening
• BMP (8-bit/channel only)
• Camera RAW including DNG (16-bit/channel)
• JPEG (8-bit/channel only)
• TIFF (8-bit and 16-bit/channel)
• PNG (8-bit and 16-bit/channel)
• PSD (16-bit/channel images are opened as 8-bit/channel)
• WMF, EMF, AMF (8-bit/channel only)
• PCD (8-bit/channel only)
• PCX (8-bit/channel only)
• TGA (8-bit/channel only)
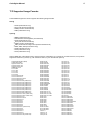
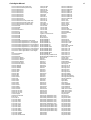
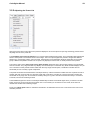
Camera RAW files of the following 430+ camera types are supported (If your camera is not mentioned here, it may still be
supported. Please see yourself, e.g. with the demo version, if your raw files are opened):
Adobe Digital Negative (DNG)
AgfaPhoto DC-833m
Apple QuickTake 100
Apple QuickTake 150
Apple QuickTake 200
ARRIRAW format
AVT F-080C
AVT F-145C
AVT F-201C
AVT F-510C
AVT F-810C
Canon PowerShot 600
Canon PowerShot A5
Canon PowerShot A5 Zoom
Canon PowerShot A50
Canon PowerShot A460 (CHDK hack)
Canon PowerShot A470 (CHDK hack)
Canon PowerShot A530 (CHDK hack)
Canon PowerShot A570 (CHDK hack)
Canon PowerShot A590 (CHDK hack)
Canon PowerShot A610 (CHDK hack)
Canon PowerShot A620 (CHDK hack)
Canon PowerShot A630 (CHDK hack)
Canon PowerShot A640 (CHDK hack)
Canon PowerShot A650 (CHDK hack)
Canon PowerShot A710 IS (CHDK hack)
Canon PowerShot A720 IS (CHDK hack)
Canon PowerShot Pro70
Canon PowerShot Pro90 IS
Canon PowerShot Pro1
Canon PowerShot G1
Canon PowerShot G2
Canon PowerShot G3
Canon PowerShot G5
Canon PowerShot G6
Canon PowerShot G7 (CHDK hack)
Canon PowerShot G9
Canon PowerShot G10
Canon PowerShot G11
Canon PowerShot G12
Canon PowerShot S2 IS (CHDK hack)
Canon PowerShot S3 IS (CHDK hack)
Kodak DC120
Kodak DCS200
Kodak DCS315C
Kodak DCS330C
Kodak DCS420
Kodak DCS460
Kodak DCS460A
Kodak DCS520C
Kodak DCS560C
Kodak DCS620C
Kodak DCS620X
Kodak DCS660C
Kodak DCS660M
Kodak DCS720X
Kodak DCS760C
Kodak DCS760M
Kodak EOSDCS1
Kodak EOSDCS3B
Kodak NC2000F
Kodak ProBack
Kodak PB645C
Kodak PB645H
Kodak PB645M
Kodak DCS Pro 14n
Kodak DCS Pro 14nx
Kodak DCS Pro SLR/c
Kodak DCS Pro SLR/n
Kodak C330
Kodak C603
Kodak P850
Kodak P880
Kodak Z980
Kodak Z981
Kodak Z990
Kodak Z1015
Kodak KAI-0340
Konica KD-400Z
Konica KD-510Z
Leaf AFi 7
Leaf AFi-II 12
Leaf Aptus 17
Leaf Aptus 22
Olympus E-30
Olympus E-300
Olympus E-330
Olympus E-400
Olympus E-410
Olympus E-420
Olympus E-500
Olympus E-510
Olympus E-520
Olympus E-620
Olympus E-P1
Olympus E-P2
Olympus E-P3
Olympus E-PL1
Olympus E-PL1s
Olympus E-PL2
Olympus E-PL3
Olympus E-PM1
Olympus SP310
Olympus SP320
Olympus SP350
Olympus SP500UZ
Olympus SP510UZ
Olympus SP550UZ
Olympus SP560UZ
Olympus SP570UZ
Olympus XZ-1
Panasonic DMC-FZ8
Panasonic DMC-FZ18
Panasonic DMC-FZ28
Panasonic DMC-FZ30
Panasonic DMC-FZ35/FZ38
Panasonic DMC-FZ40
Panasonic DMC-FZ50
Panasonic DMC-FZ100
Panasonic DMC-FZ150
Panasonic DMC-FX150
Panasonic DMC-G1
Panasonic DMC-G2
Panasonic DMC-G3
Panasonic DMC-GF1
Panasonic DMC-GF2
ColorStyler Manual
Canon PowerShot S5 IS (CHDK hack)
Canon PowerShot SD300 (CHDK hack)
Canon PowerShot S30
Canon PowerShot S40
Canon PowerShot S45
Canon PowerShot S50
Canon PowerShot S60
Canon PowerShot S70
Canon PowerShot S90
Canon PowerShot S95
Canon PowerShot SX1 IS
Canon PowerShot SX110 IS (CHDK hack)
Canon PowerShot SX120 IS (CHDK hack)
Canon PowerShot SX20 IS (CHDK hack)
Canon PowerShot SX30 IS (CHDK hack)
Canon EOS D30
Canon EOS D60
Canon EOS 5D
Canon EOS 5D Mark II
Canon EOS 7D
Canon EOS 10D
Canon EOS 20D
Canon EOS 30D
Canon EOS 40D
Canon EOS 50D
Canon EOS 60D
Canon EOS 300D / Digital Rebel / Kiss Digital
Canon EOS 350D / Digital Rebel XT / Kiss Digital N
Canon EOS 400D / Digital Rebel XTi / Kiss Digital X
Canon EOS 450D / Digital Rebel XSi / Kiss Digital X2
Canon EOS 500D / Digital Rebel T1i / Kiss Digital X3
Canon EOS 550D / Digital Rebel T2i / Kiss Digital X4
Canon EOS 600D / Digital Rebel T3i / Kiss Digital X5
Canon EOS 1000D / Digital Rebel XS / Kiss Digital F
Canon EOS 1100D / Digital Rebel T3 / Kiss Digital
X50
Canon EOS D2000C
Canon EOS-1D
Canon EOS-1DS
Canon EOS-1D Mark II
Canon EOS-1D Mark II N
Canon EOS-1D Mark III
Canon EOS-1D Mark IV
Canon EOS-1Ds Mark II
Canon EOS-1Ds Mark III
Casio QV-2000UX
Casio QV-3000EX
Casio QV-3500EX
Casio QV-4000
Casio QV-5700
Casio QV-R41
Casio QV-R51
Casio QV-R61
Casio EX-S20
Casio EX-S100
Casio EX-Z4
Casio EX-Z50
Casio EX-Z55
Casio EX-Z60
Casio EX-Z75
Casio EX-Z750
Casio EX-Z850
Casio EX-Z1050
Casio EX-Z1080
Casio Exlim Pro 505
Casio Exlim Pro 600
Casio Exlim Pro 700
Contax N Digital
Creative PC-CAM 600
Epson R-D1
Foculus 531C
Fuji FinePix E550
Fuji FinePix E900
Fuji FinePix F700
Fuji FinePix F710
Fuji FinePix F800
Fuji FinePix F810
Fuji FinePix S2Pro
Fuji FinePix S3Pro
Fuji FinePix S5Pro
Fuji FinePix S20Pro
Fuji FinePix S100FS
Fuji FinePix S5000
Fuji FinePix S5100/S5500
6
Leaf Aptus 54S
Leaf Aptus 65
Leaf Aptus 75
Leaf Aptus 75S
Leaf Cantare
Leaf CatchLight
Leaf CMost
Leaf DCB2
Leaf Valeo 6
Leaf Valeo 11
Leaf Valeo 17
Leaf Valeo 22
Leaf Volare
Leica Digilux 2
Leica Digilux 3
Leica D-LUX2
Leica D-LUX3
Leica D-LUX4
Leica D-LUX5
Leica V-LUX1
Leica V-LUX2
Logitech Fotoman Pixtura
Mamiya ZD
Micron 2010
Minolta RD175
Minolta DiMAGE 5
Minolta DiMAGE 7
Minolta DiMAGE 7i
Minolta DiMAGE 7Hi
Minolta DiMAGE A1
Minolta DiMAGE A2
Minolta DiMAGE A200
Minolta DiMAGE G400
Minolta DiMAGE G500
Minolta DiMAGE G530
Minolta DiMAGE G600
Minolta DiMAGE Z2
Minolta Alpha/Dynax/Maxxum 5D
Minolta Alpha/Dynax/Maxxum 7D
Motorola PIXL
Nikon D1
Nikon D1H
Nikon D1X
Nikon D2H
Nikon D2Hs
Nikon D2X
Nikon D2Xs
Nikon D3
Nikon D3s
Nikon D3X
Nikon D40
Nikon D40X
Nikon D50
Nikon D60
Nikon D70
Nikon D70s
Nikon D80
Nikon D90
Nikon D100
Nikon D200
Nikon D300
Nikon D300s
Nikon D700
Nikon D3000
Nikon D3100
Nikon D5000
Nikon D5100
Nikon D7000
Nikon E700 ("DIAG RAW" hack)
Nikon E800 ("DIAG RAW" hack)
Nikon E880 ("DIAG RAW" hack)
Nikon E900 ("DIAG RAW" hack)
Nikon E950 ("DIAG RAW" hack)
Nikon E990 ("DIAG RAW" hack)
Nikon E995 ("DIAG RAW" hack)
Nikon E2100 ("DIAG RAW" hack)
Nikon E2500 ("DIAG RAW" hack)
Nikon E3200 ("DIAG RAW" hack)
Nikon E3700 ("DIAG RAW" hack)
Nikon E4300 ("DIAG RAW" hack)
Nikon E4500 ("DIAG RAW" hack)
Nikon E5000
Nikon E5400
Nikon E5700
Panasonic DMC-GF3
Panasonic DMC-GH1
Panasonic DMC-GH2
Panasonic DMC-L1
Panasonic DMC-L10
Panasonic DMC-LC1
Panasonic DMC-LX1
Panasonic DMC-LX2
Panasonic DMC-LX3
Panasonic DMC-LX5
Pentax *ist D
Pentax *ist DL
Pentax *ist DL2
Pentax *ist DS
Pentax *ist DS2
Pentax K10D
Pentax K20D
Pentax K100D
Pentax K100D Super
Pentax K200D
Pentax K2000/K-m
Pentax K-x
Pentax K-r
Pentax K-5
Pentax K-7
Pentax Optio S
Pentax Optio S4
Pentax Optio 33WR
Pentax Optio 750Z
Pentax 645D
Phase One LightPhase
Phase One H 10
Phase One H 20
Phase One H 25
Phase One P 20
Phase One P 25
Phase One P 30
Phase One P 45
Phase One P 45+
Pixelink A782
Polaroid x530
Redcode R3D format
Rollei d530flex
RoverShot 3320af
Samsung EX1
Samsung GX-1S
Samsung GX10
Samsung GX20
Samsung NX10
Samsung NX11
Samsung NX100
Samsung WB550
Samsung WB2000
Samsung S85 (hacked)
Samsung S850 (hacked)
Sarnoff 4096x5440
Sigma SD9
Sigma SD10
Sigma SD14
Sinar 3072x2048
Sinar 4080x4080
Sinar 4080x5440
Sinar STI format
SMaL Ultra-Pocket 3
SMaL Ultra-Pocket 4
SMaL Ultra-Pocket 5
Sony DSC-F828
Sony DSC-R1
Sony DSC-V3
Sony DSLR-A100
Sony DSLR-A200
Sony DSLR-A230
Sony DSLR-A290
Sony DSLR-A300
Sony DSLR-A330
Sony DSLR-A350
Sony DSLR-A380
Sony DSLR-A450
Sony DSLR-A500
Sony DSLR-A550
Sony DSLR-A580
Sony DSLR-A700
Sony DSLR-A850
Sony DSLR-A900
ColorStyler Manual
Fuji FinePix S5200/S5600
Fuji FinePix S6000fd
Fuji FinePix S7000
Fuji FinePix S9000/S9500
Fuji FinePix S9100/S9600
Fuji FinePix S200EXR
Fuji FinePix HS10/HS11
Fuji FinePix HS20EXR
Fuji FinePix F550EXR
Fuji FinePix X100
Fuji IS-1
Hasselblad CFV
Hasselblad H3D
Hasselblad H4D
Hasselblad V96C
Imacon Ixpress 16-megapixel
Imacon Ixpress 22-megapixel
Imacon Ixpress 39-megapixel
ISG 2020x1520
Kodak DC20
Kodak DC25
Kodak DC40
Kodak DC50
7
Nikon E8400
Nikon E8700
Nikon E8800
Nikon Coolpix P6000
Nikon Coolpix P7000
Nikon Coolpix S6 ("DIAG RAW" hack)
Nokia N95
Nokia X2
Olympus C3030Z
Olympus C5050Z
Olympus C5060WZ
Olympus C7070WZ
Olympus C70Z,C7000Z
Olympus C740UZ
Olympus C770UZ
Olympus C8080WZ
Olympus X200,D560Z,C350Z
Olympus E-1
Olympus E-3
Olympus E-5
Olympus E-10
Olympus E-20
Sony NEX-3
Sony NEX-5
Sony NEX-5N
Sony NEX-C3
Sony SLT-A33
Sony SLT-A35
Sony SLT-A55V
Sony SLT-A65V
Sony SLT-A77V
Sony XCD-SX910CR
STV680 VGA
ColorStyler Manual
8
1.4 Installation
1.4.1 Installing the Plugin Version under Windows
Method 1: Using Plugin Installer
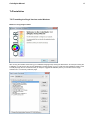
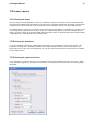
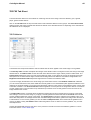
After running the installer and choosing your installation language keep clicking the Next button. At some point during the
installation you will arrive at the "Choose Destination Location" dialog. On it you could enter the installation location of the
ColorStyler plugin. But we recommend that you keep the suggested installation path as you can later use the Plugin
Installer tool to conveniently install the plugin.
ColorStyler Manual
9
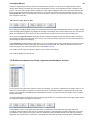
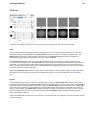
At the end of the installation process the Plugin Installer dialog will be shown with a list of compatible applications, which
are installed on your computer. The application at the top of the list is always activated by default. If you want to install
ColorStyler into other applications, you should activate them, too. Then press the Install button to copy the ColorStyler
plugin into the plugin folder of the selected application(s). Finally leave Plugin Installer with the Exit button.
You can run Plugin Installer again at any time from Start > Program > ColorStyler to add ColorStyler to a new or
previously installed compatible application.
Note: If your application is not listed in Plugin Installer or if Plugin Installer terminates telling you that it didn't manage to
find an application, we suggest to try Method 2 below.
Method 2: Choosing a different installation folder and ignoring Plugin Installer
Method 1 is usually the most convenient way of installing ColorStyler. If you keep your plugins in a folder outside your
application's plugin folder, prefer to enter the installation folder in your application's preferences dialog or use an
application that is not recognized by Plugin Installer, please do the following: On the "Choose Destination Location" dialog
during installation choose your preferred plugin folder. When Plugin Installer opens next, ignore it by closing it with the
Exit button.
1.4.2 Installing the Plugin Version under MacOS X
The MacOS X installer automatically displays all installed and supported Photoshop and Elements versions. You just
need to activate the check box of the Photoshop and Elements that you want to have it installed to. If you are using
another applications, please use the provided button on the same dialog to choose its plugin folder. If you are unsure
which folder to choose, please see the general installation instructions below.
1.4.3 Installing the Standalone/Lightroom Version under Windows
It is best to run the installation and use the default settings, e.g. the suggested installation folder. If you have Lightroom
(Version 2 or higher) installed, the installer automatically adds a ColorStyler menu item to the Photo > Edit In menu of all
Lightroom installations.
If ColorStyler does not appear in Lightroom, please deactivate the following check box: Edit > Preferences > Presets >
Store presets with catalog. If this option is activated, Lightroom uses different external editors for each catalog. To support
this option the installer would need to search all your hard drives for Lightroom catalogs and install ColorStyler into each
catalog, which would be quite time intensive and would probably not work for archived catalogs. If you nevertheless want
to keep this option activated, we recommend that you either add ColorStyler manually as described in the next paragraph
or manually copy the ColorStyler .lrtemplate file into the External Editor Presets sub folder of your catalogs.
ColorStyler Manual
10
1.4.4 Installation in Lightroom 1.x under Windows
While the installation automatically adds ColorStyler to Version 2 and higher of Lightroom, Version 1 of Lightroom requires
manual installation as described below. Please note that of Lightroom 1.x only supports one external editor, which means
that you have to repeat the following step every time you want to use another external editor, such as the other PhotoWiz
editors.
In Lightroom 1.x choose Edit > Preferences, then click on the External Editing tab sheet. in the Additional External Editor
group set the File Format combo box to "TIFF", Color Space to "sRGB", Bit Depth to "16bits/component" and
Compression to "None". Press the Choose button to navigate to the ColorStyler installation folder. Select the file
ColorStylerLR.exe, then press OK. Now you will be able to access ColorStyler from the menu under "Photo > Edit in
ColorStylerLR.exe" or by right clicking on an image and selecting "Edit in ColorStylerLR.exe" from the context menu.
ColorStyler Manual
11
1.5 Product Launch
1.5.1 Running the Plugin
Run your image processing application of choice, e.g. Photoshop, and open an image file. To launch ColorStyler please
open the menu that leads to the plugin filters (e.g. the Filter menu in Photoshop and Elements, the Image > Plug-ins menu
in Paint Shop Pro or the Effects menu in Photo-Paint) and choose "ColorStyler" from the "The Plugin Site" sub menu.
If ColorStyler appears grayed out on the menu, then the mode of the opened image is not supported by it. That is the case
if your image has e.g. only 256 colors, 32-bit per channel or is a CMYK image. Before you can use ColorStyler with the
image, you have to change its color mode to RGB and 8-bit/16-bit per channel. In Photoshop that is done using the Image
> Image Mode menu. Other applications have similar options.
1.5.2 Running the Standalone
To run the standalone of ColorStyler, double click the ColorStyler icon on the desktop or choose it from the Start > All
Programs > The Plugin Site > ColorStyler Standalone menu. After ColorStyler shows up click the Open button in the
bottom right corner to open one or more image files. You can also click arrow-down button in the top left corner to display
a menu with file options.
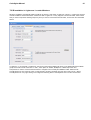
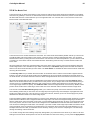
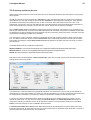
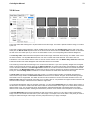
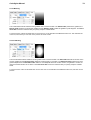
1.5.3 Running the Lightroom Version
To run ColorStyler in Lightroom, select one or more images and choose the ColorStyler menu item on the Photo > Edit In
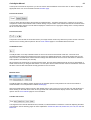
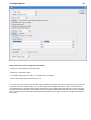
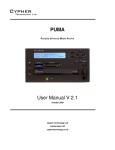
menu. Alternatively right click on an image and choose Edit In > ColorStyler from the context menu. The following dialog
will appear:
ColorStyler Manual
12
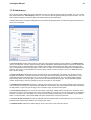
If you selected RAW files, you will only be able to select the option "Edit a Copy with Lightroom Adjustments". If you edit a
JPEG or TIFF file, you will also see the other two radio buttons. We recommend that you use the first or second option in
this case. Never use "Edit Original" unless you have a backup copy of the file(s).
We suggest that you keep the Copy File Options settings as they are to avoid reduced image quality or a slower startup of
ColorStyler. By using "ProPhoto RGB" for the Color Space option you preserve as many image colors as possible. If you
use other external editors in Lightroom that do not support color management, changing the option to "sRGB" may be a
viable compromise. If you do not use the "16 bits/component" setting, you may get reduced image quality. If you do not
use the "None" compression settings, ColorStyler will need longer to start up. On the other hand the "Stack with original"
keeps the original and ColorStyler-processed copy of the image side by side in Lightroom, so it is rather a question of your
workflow if you want that or not.
Finally press the Edit button to run ColorStyler. If you selected one or more RAW image files, Lightroom now creates TIFF
copies of them, which may take some time. For JPEG and TIFF files ColorStyler appears much faster.
ColorStyler Manual
13
1.6 General Usage
This page describes ColorStyler's general features, most of these features are the same in all PhotoWiz products. If you
are familiar with these features you can move on to the next section of the manual.
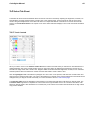
1.6.1 The Main Dialog
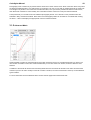
Changing the Window Size
Under Windows you can move the mouse cursor to the borders of the ColorStyler window or to the grip in the bottom right
corner to turn it into a sizing arrow. On a Mac you can only use the sizing grip. Hold down the left mouse button and drag
to change the size of the window. The preview and all controls will be repositioned according to the new size of the
window. A smaller preview will speed up the preview rendering. For full screen editing, use the maximize icon in the
ColorStyler title bar. Click the icon again to return the window to its previous size.
Menu Bar
ColorStyler Manual
14
In the top left corner above the preview you can see a menu bar with different menu items. Click on them to display the
appropriate menu. For more information see the Menu Bar page.
Preview Tab Control
There are three tab buttons above the preview box called Preview 1, Preview 2 and Preview 3. These let you view and
compare the results of three different sets of effects settings. Only the effect of the selected Preview tab is rendered when
you press OK. Right clicking on the tab buttons displays a context menu for copying the settings of the currently selected
tab to one of the other tabs.
Preview and Tools
The preview on the left side of the window shows your image and the result of any effect that you have chosen. There are
various tools for working with the preview. See the Tools & Reset page for more details about these tools.
Undo/Redo Arrows
ColorStyler offers a one-step undo/redo feature in the form of arrows near the Mode combo box. The Undo arrow
recreates the filter settings that existed before the preview was updated the last time. That usually means that your last
step is undone. The Redo arrow restores the filter settings that existed before the Undo arrow was clicked. It undoes the
Undo operation and restores your last step.
When switching the Preview tab or choosing another image, the undo data is deleted and both arrows are deactivated. A
similar result occurs if you drag the slider thumb or a curve point with the Instant Preview check box activated on the Prefs
tab sheet. Then the last value before the drag operation is also not stored.
Modes & Reset
ColorStyler offers four different modes ranging from the simplest options in Easy Mode to the full use of all effects in
Advanced Mode. For full explanations read the Modes page.
Clicking the Reset button sets all controls to their default values. This is useful if you want to start over with adjusting the
effect. Clicking on the small arrow button at the right hand side of the Reset button displays a menu with various reset
options. See the Tools & Reset page for more information.
The Main Tab Control
The large tab control with tab sheets like Auto, Manual, Fix, Mask and Effect contains the controls for adjusting the effect
of ColorStyler. See the following pages for more explanations: Preset Tab, Main Tab, Select Tab, FX1 Tab, FX2 Tab and
Mask Tab.
ColorStyler Manual
15
Sliders
Sliders are one of the most important types of controls. They can be used to select a certain value within a specific value
range. You can drag the slider button with the mouse (or arrow keys or mouse wheel), enter a numerical value in the text
box at the right hand side of the slider bar, click somewhere on the slider bar for large value steps or use the two arrow
buttons for small value steps.
Although there are various other controls available for adjusting the image effect the main controls are sliders. Sliders can
be used to select a certain value within a specific value range. To do that you can drag the slider knob with the mouse (or
keyboard), enter a numerical value in the white text box at the right of the slider bar, click somewhere on the slider bar for
large value steps or use the two arrow buttons for small value steps. If the Instant Preview check box on the Prefs tab
sheet is not activated, you can hold down the Shift key while dragging the slider knob to make the preview update with
every movement of the knob. If the Instant Preview is activated, you don't need to hold down the Shift key for the same
effect.
You can now also use the mouse wheel to change the slider values. You need to give the slider the focus by clicking on it
or using the tab key. After that you can scroll the mouse wheel to move the slider knob. After you stopped moving the
wheel the preview will automatically update.
The Bottom Tab Control
The Help tab sheet displays useful information about a control if you move the cursor over it. The Navigator tab sheet lets
you quickly display an image area in the preview. The Info tab sheet shows the currently used sharpening settings and
color values of the image pixels. Finally, the Prefs tab sheet contains options for changing the general behavior of
ColorStyler. Please read further on the following pages: The Bottom Tab Sheets.
Preview Check Box and Progress Bar
A deactivated Preview check box does not render the effect and therefore does not display any effect in the preview. This
way you can see before/after versions of the image and adjust a number of controls without provoking a repeated
rendering of the effect. When the effect is rendered, you will see a bar running from left to right in the progress bar control.
After the rendering is completed and the preview updated, you will see the time that was needed for rendering as well as
an approximation of the time that is needed to render the full image.
Split View
ColorStyler offers some split views for comparing the original with the processed image. If one of the Split Views is
activated, you can select one of the split areas by holding down the Shift key and clicking on it. For more information,
please read the Split View page.
Zoom
ColorStyler Manual
16
Controls to adjust the preview zoom level are located below the preview. You can zoom the image between 6% and
3200%. When starting ColorStyler the zoom rate is automatically set to Fit, which displays the image completely in the
preview. The 100% option means that the original size of the image is displayed. There are Fit and 100% buttons at the
left for quickly switching between these zoom states. To jump from one preview zoom rate to another you can use the
zoom combo box which is located between the two zoom buttons. With the Ctrl and minus/plus key shortcuts you can
also change the zoom ratio.
OK, Cancel or Open, Save As, Exit
When using the ColorStyler plugin clicking on the OK button closes the plugin and applies the effect to the image. Cancel
closes the plugin without applying any changes to the image. The settings, which will be used the next time you open the
plugin, are determined by which option you have chose from the On Start Up combo box on the Prefs tab sheet.
When using the Lightroom version clicking the OK button makes ColorStyler process the opened images. ColorStyler
automatically exits after all images were saved and you can continue working in Lightroom. Cancel exits ColorStyler and
does not apply an effect to the image(s).
In the Standalone version the Open button opens one or more images with the help of a file dialog. The Save As button
displays a file dialog for entering a file name and choosing the image format, then renders and saves the image. Exit
closes the porgram. For further information refer to the Standalone page.
You can also cancel or exit ColorStyler by clicking on the x button in the title bar.
The ? buttons displays the html manual.
1.6.2 Differences between the Plugin, Lightroom and Standalone Versions
If you only open one image in the Lightroom version of ColorStyler, you will see no difference to the Plugin version. If you
select two or more images in Lightroom, the Lightroom version of ColorStyler displays an Images tab control left of the
preview. This Image tab is also displayed in the Standalone version if you open more than one image. It lets you switch
between the images.
As result of displaying the Images tab control the preview gets smaller. To increase the preview size again please enlarge
the ColorStyler window. See below for instructions.
The Standalone version on the other hand offers a few more features than the Lightroom and Plugin versions of
ColorStyler. That is because it does not rely on another program for opening/saving or selecting image files. As a result
the OK button of the Lightroom and Plugin versions is replaced by Open and Save As buttons for opening and saving
image files. The Cancel button is called "Exit", which saves the effect settings unlike the Cancel button. Additionally the
ColorStyler Manual
17
Standalone versions offers an additional File menu in the menu bar above the preview. Clicking on it displays a menu with
various options.
Apart from these minor differences, all versions of ColorStyler behave and work the same. For more information visit the
Standalone/Lightroom Features page.
ColorStyler Manual
18
1.7 Standalone/Lightroom Features
This section discusses the features that are only available in the Standalone and Lightroom versions of ColorStyler.
1.7.1 Opening Images
The Lightroom version of ColorStyler does not let you open any images. You need to select the images in Lightroom
before running ColorStyler.
The Standalone version supports various ways of opening images. There is an Open button at the bottom right of the
window and an Open menu item on the File menu above the preview. Both displays a file dialog for selecting image files.
To select multiple image files please hold down the Ctrl or Shift key and click on them. Alternatively draw a rectangle
around them to select them.
You can also open images from the Recent Files sub menu on the File menu. This sub menu shows the last 20 images
files that were opened in the standalone.
Another way of opening image files is to drag them, e.g. from Explorer, and drop them onto the ColorStyler window. It is
also possible to drag and drop files onto the ColorStyler icon on the desktop. This runs ColorStyler and immediately opens
the dropped images. Yet another way to open image files is to run ColorStyler from the command line which supplies the
image paths as parameters.
ColorStyler Manual
19
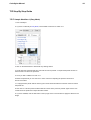
1.7.2 RAW Settings
When opening camera RAW files with the Standalone version, the Options dialog shows up by default. If you do not want
that, please activate the "Don't Display" check box. You can then still change these settings from the File menu. You can
also access this dialog from the Save Options and Batch dialog as discussed below.
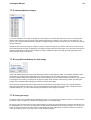
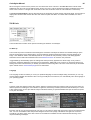
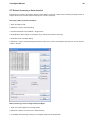
The RAW tab sheet of the Options dialog defines how the RAW image data will be converted and preprocessed before it
shows up in ColorStyler.
The Preview group contains options that are used when opening RAW images for preview display. The Output group
options are used when saving or batch processing images. With default settings RAW images are opened at quarter size
and medium quality for preview display, which speeds up the loading. Before applying the effect and saving the image,
they are reopened at full size and high quality. There is also an option to open the JPEG image that is embedded into the
RAW file, which is only recommended for the Preview group, unless you want to quickly convert your RAW files for the
web or screen display.
The Style combo box determined how much the RAW file is preprocessed when it is opened. This process involves
adjusting the brightness, contrast and saturation of the image. The Neutral setting performs little preprocessing, which
makes the image look a bit flat but does not cut off any shadow or highlight values. The Vivid setting applies stronger
preprocessing, which may be just right if you do not want to extensively tweak the image. The Normal setting applies
medium preprocessing, which will probably be what you may want for most images.
The White Balance combo box controls the automatic white balancing process. The Camera Settings option performs a
color correction according to the data stored in the RAW file. The Automatic option white balances the image according to
the image data. If you do not want to apply a color correction, simply choose the None option.
The Color Space options let you choose the color space of the image. "sRGB" retains the least color information, but is
practical if you want to use the image for the web or screen display or if you want to open the image later in an application
that does not support color management. If you plan to print the image professionally, you should rather choose "Adobe
RGB" or "ProPhoto RGB". The ProPhoto RGB color space preserves the most color information.
The 4-Color-Sensor check box is meant for RAW files that were captured with a camera that uses a 4-color-sensor. If
RAW files have artifacts when displayed, you should try this option.
The Defaults button restores the default settings, which can be seen in the screen shot above.
ColorStyler Manual
20
1.7.3 Switching Between Images
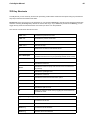
If you open more than one image, an Images tab control appears on the left hand side of the preview. The Images tab
sheet contains a list box with the names of the opened image files. By clicking on one of them you can display it in the
preview. You can also switch between the images by using the Images sub menu of the File menu. This sub menu lists all
opened image files.
ColorStyler does not load or keep the images in memory. It loads an image as you select it and removes it from memory
when selecting another image. So displaying a big image for the first time may take longer, but on the other hand opening
multiple images takes the same time as loading one image. Additionally it prevents image processing operations from
slowing down through of low memory.
1.7.4 Using Different Settings for Each Image
There is an Individual Settings check box located at the bottom of the Images tab sheet. It is activated by default, which
means that you can adjust each image differently. When switching from one image to another, the settings of the
previously selected image are automatically saved and the settings of the newly selected image are restored. If you switch
to an image for the first time, the settings of the previous image will be inherited. When saving or batch processing the
images, these individual effect settings are used for processing each image.
If this check box is deactivated, each image will be processed with the same effect settings. The currently displayed
settings are then applied to all images. You can also deactivate and activate the check box again to delete the stored
individual settings, e.g. in order to start adjusting the settings for each image from scratch.
1.7.5 Closing an Image
Closing an image is only possible with the Standalone version. If you are using the Lightroom version, you need to cancel
ColorStyler, return to Lightroom to deselect the image(s) and run ColorStyler again.
Closing an image means that the currently selected image is removed from the Images list box and the next image on the
list is displayed. If you only have one image open, the preview becomes blank when closing that image. You can close an
image by using the Close button at the bottom of the Images tab sheet. Alternatively, choose the Close item on the File
menu. The Close All option on the same menu closes all opened images.
ColorStyler Manual
21
1.7.6 Saving an Image
The Lightroom version applies the effect and automatically saves the images when you press the OK button. It does not
offer any special save options.
The Standalone version on the other hand offers various options for saving the displayed image. You can use the Save
As button at the bottom right or the Save As menu item on the File menu. Both display a file dialog for choosing a folder,
editing the file name and choosing an image format. After you pressed the Save button, you can choose additional file
format options from the appearing Save Options dialog.
The Save Options dialog also allows you to adjust additional settings. For the JPEG format you can choose a quality
setting and for the TIFF format you can select a lossless compression type. If at least one of the current images uses
16-bit/channel, you are also able to use a "Reduce to 8-bit/channel" check box for the TIFF and PNG formats.
A button that displays the RAW Options dialog is also available. This lets you readjust the settings for camera RAW files.
In this case only the settings on its Output tab sheet have an effect. We do not recommend changing its Look or White
Balance options, otherwise the end result will differ from what you saw in the preview. See above for more information on
the RAW Options.
After you press OK on the Save Options dialog, the effect is applied to the image and the image is saved.
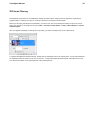
Batch Processing
Whereas the Save As command only lets you save one image, you can also process and save all opened images in one
pass with the Batch command of the Standalone version. The Lightroom version does not offer a Batch command, but
when you press its OK button, it automatically starts batch processing without showing a dialog.
The Batch feature of the Standalone version processes all opened images, so if you want to process only some of the
opened images, please close the others. You can access it by pressing the Batch button on the Images tab sheet or with
the Batch menu item of the File menu. This brings up the Batch dialog.
ColorStyler Manual
22
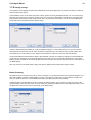
You can also choose image formats and options (see Save Options above), an output folder and a suffix that will be
appended to the file name. Clicking on the Choose button displays a folder selection dialog, which also offers an option for
creating new folders. If you only want to convert the image(s) to another image format without applying an effect, you
should activate the Deactivate Effect check box.
The RAW Options button displays a dialog for adjusting the RAW file output. In this case only the settings of its Output
group have an effect. We do not recommend changing the Look or White Balance options, otherwise the end result will
differ from what you saw in the preview. See above for more information on the RAW Settings.
After you press the Batch button ColorStyler starts processing all opened images. A window with a progress bar appears
telling you how many images still have to be processed and approximately how long this will take.
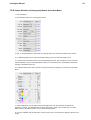
1.7.7 Color Management
Whereas color management support depends on the host application for the plugin version, the Standalone and
Lightroom versions of ColorStyler fully support color management. This means that ColorStyler uses profiles that are
embedded in JPEG, TIFF and PNG files to correctly display the image colors. In the case of camera RAW files
ColorStyler automatically converts the image to a selectable color space (see the RAW Settings section above). Color
management is currently not supported for image formats other than the four mentioned. For other image files and for
images without a profile ColorStyler automatically assumes that they contain sRGB data.
Embedded profiles are preserved when opening JPEG, TIFF and PNG files and saving them again. If an image file does
not includes a profile but mentions the sRGB color space in its EXIF data, ColorStyler automatically embeds a sRGB
profile when saving the image. When saving RAW files as JPEG, TIFF or PNG, a profile is also embedded. When saving
an image as PSD, no profile is embedded.
You can adjust the color management option by choosing "Options" from the File menu and then switching to the Color
tab sheet.
The Deactivate Color Management check box prevents the embedded or assigned profile from being used when an
image is displayed. This means that images with a color space that is different from your monitor will be displayed
incorrectly. For example, an Adobe RGB image will be displayed with faded colors on a sRGB monitor. Unless you have a
good reason, we do not recommend activating this option.
The Use Monitor Profile check box makes ColorStyler use the profile, which is set at Start > Control Panel > Display >
Settings > Advanced > Color Management, as the target profile when displaying images. In most cases it is wise to keep
this check box deactivated. ColorStyler then assumes that your monitor supports sRGB (which is the case for 99.9% of all
monitors) and uses the sRGB profile as the target profile. ColorStyler also assumes that your monitor is calibrated.
There are only two possible reasons for activating this check box:
ColorStyler Manual
23
1. Your monitor supports a color space other than sRGB and you have set the appropriate profile at Start > Control Panel
> Display > Settings > Advanced > Color Management. For example, if your monitor is an Adobe RGB monitor and you
have set the Adobe RGB profile at the mentioned location. In this case activating Use Monitor Profile check box makes
sure that ColorStyler displays the colors correctly on your non-sRGB monitor. Please notice that your monitor additionally
needs to be calibrated and the calibration applied when Windows starts up, otherwise you will still not see the image
colors correctly.
2. Your monitor was not calibrated and no calibration data is loaded when Windows starts up, but want to use a monitor
profile from the manufacturer previously added under Start > Control Panel > Display > Settings > Advanced > Color
Management. Be aware that only the image in ColorStyler (and other applications that support it) will be displayed with
correct colors. The rest of the screen is displayed uncalibrated and with incorrect colors. This is only an emergency
solution. We recommend that you calibrate your monitor instead.
The Conversion group offers two options for defining how ColorStyler converts the colors when displaying an image.
The Intent combo box offers four choices that control the method used for mapping the colors from the source color space
to the target color space. The activated Black Point Compensation check box changes the black point during the
conversion to better match the target color space. In many cases changing these settings has little influence, but we
recommend keeping "Relative Colorimetric" and the Black Point Compensation check box activated. For more information
please read the web or literature about color management.
1.7.8 Metadata and Auto Rotation
ColorStyler currently preserves the metadata of JPEG files (e.g. EXIF, IPTC) when saving the image again as a JPEG.
When opening and saving TIFF images, ColorStyler only preserves the XMP, IPTC and Photoshop tags. When saving an
image as a different format, no metadata is currently preserved. This will be fixed in a future update.
In Adobe Lightroom you can copy the original metadata to the ColorStyler-processed images by selecting all images, e.g.
with Edit > Select All, and choosing Metadata > Sync Metadata.
Some cameras add EXIF data to JPEG and RAW files if the photo was shot at a 90 degree angle. ColorStyler checks for
this information and automatically rotates the image before displaying it.
ColorStyler Manual
1.8 Step By Step Guide
1.8.1 Sample Workflow 1 (Easy Mode)
1. Run ColorStyler.
2. If you are not already in Easy Mode, use the Mode combo box to switch to it.
3. Click on the Reset button to deactivate any existing effects.
4. Scroll down the preset list and have a look at the various presets. To expand the preset list click on
the arrow-left icon above the preset list.
5. Once you find a suitable one click on it.
6. Below the preset list you now see one or more controls for adjusting the presets. Use them to
fine-tune the effect.
7. To apply another preset without removing the current effects activate the Combine check box above
the preset list.
8. Now click on a second preset to add its effects to those of the previous presets. Again use the new
control below the preset list to adjust the effect further.
9. If you are satisfied, click the OK button in the top right corner of the window to apply the effects to the
image.
24
ColorStyler Manual
1.8.2 Sample Workflow 2 (Photography Mode & Quick Edit Mode)
1. Run ColorStyler.
2. Set the Mode combo box to Photography Mode.
3. Click on the Reset button to deactivate any existing effects. All combo boxes will be set to "None".
4. Try different presets for the combo boxes depending on how you want the image to look.
5. To adjust one of the effects click on the corresponding More link. This will take you to the controls in
Advanced Mode. Once you have adjusted the effect you can switch back to "Photography Mode" with
the help of the Mode combo box.
6. To add a finishing touch and to fine-tune the general look of the image you can switch to Quick Edit
Mode.
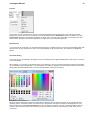
7. In Quick Edit Mode you can adjust the general brightness, color and saturation as well as the
brightness, contrast, hue and saturation of image areas with a certain color. Double click on a slider
label to reset to the default value if you do not like the adjustment.
8. If you are satisfied, click the OK button in the top right corner of the window to apply the effects to the
image.
25
ColorStyler Manual
1.8.3 Sample Workflow 3 (Advanced Mode)
1. Run ColorStyler.
2. Switch the Mode combo box to Advanced Mode.
3. Click on the Reset button to deactivate any existing effects.
4. Select a preset from the Preset tab sheet that approximates what you want to do with the image. You
can also select presets from the Preset menu above the preview. To combine different presets activate
the Combine check box above the preset list and click on other presets.
5. To fine-tune a preset's effects right click on it to display a context menu. This shows the name of the
effects that the preset has activated, and also indicates their location on the a tab sheet and sub tab.
Click on one of these items to display the appropriate effect controls. In the case of a Color Grad preset,
you will also see seven preset variations (from "Up" to "Reflector") on the context menu, which apply
another gradient type.
6. Alternatively switch between the Main, Select, FX1, FX2 and Mask tab sheets and adjust the effects
as you see fit.
26
ColorStyler Manual
7. If you would like to create a classic photographic effect, you can also try Photography Mode. If you
only want to fine-tune the brightness, color and saturation of your image, try Quick Edit Mode.
8. If you are satisfied, click the OK button in the top right corner of the window to apply the effects to the
image.
27
2 General Features
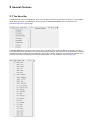
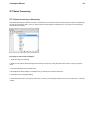
2.1 The Menu Bar
ColorStyler's menu bar is located between the Preview tab button and the tool icons above the preview. The ColorStyler
plugin offers four menus. The Standalone version provides an additional File menu, which is discussed on the
Standalone/Lightroom Features page.
The Preset menu features items for opening and saving presets as well as setting the default preset folder. The Open
Preset and Save Preset (As) items are for opening and saving preset files. The sub menus on the Preset menu represent
the different preset groups that are also displayed in the preset list and the combo box on the Preset tab. Clicking one of
these sub menu items immediately opens the appropriate preset. For more details see the Preset Tab page.
ColorStyler Manual
29
The Show menu contains the names of all ColorStyler effects. Clicking one of these menu items displays the effect
controls in Advanced Mode. If one of these effects is active, there is a check mark at the left hand side of its menu entry.
The Disable menu displays the names of the currently active ColorStyler effects. Clicking a menu item disables the
selected effect. This can be useful for removing individual effects of a preset that you do not want to use, e.g. the grain or
brightness adjustements.
The Help menu lets you display the ColorStyler manual, the ColorStyler web page and an About dialog.
ColorStyler Manual
30
2.2 Tools & Reset
ColorStyler features four tools which are located at the top right corner of the preview. These tools enable you to perform
various preview-related tasks.
2.2.1 The Hand Tool
The hand tool is the primary tool for scrolling the image in the preview. To do that click the left mouse button over the
preview, hold it down and move the mouse. During scrolling the original image is shown. Once the preferred part of the
image shows up you can release the mouse button, which recalculates the effect on the newly visible image section. If
one of the other tools is active, you can still scroll the image in the preview by using the right mouse button. You can also
use the hand tool to click on the preview in order to reveal the original image. Double click the hand icon to fit the whole
image into the preview.
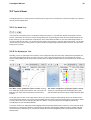
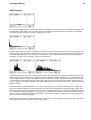
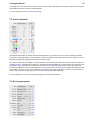
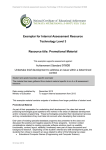
2.2.2 The Eyedropper Tool
Normally you use an eyedropper tool to select a color or brightness value from the image. ColorStyler's eyedropper tool
uses a two-pass approach. Firstly you click on a tone or color in the preview and then you move the mouse over the
preview (while keeping the left mouse button pressed down) to adjust the slider value that corresponds to the chosen tone
or color.
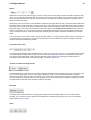
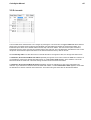
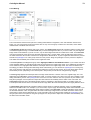
The "Main - Tone" eyedropper option in action: Clicking
on a middle gray image area creates a new curve point and
dragging up or down (with pressed down mouse button)
moves it.
The "Select - Brightness" eyedropper option in action:
Clicking on a blue image area and dragging left or right
(with pressed down mouse button) changes the Blue slider.
So the first step is to click on an image area for which you want to change an effect setting. But do not release the left
mouse button after clicking! You have to keep it pressed down and move the mouse left and right or up and down. While
you move the mouse you are changing the value of a slider or curve point (which was automatically selected by
ColorStyler) as if you had clicked it directly.
To see the result of your adjustment while dragging either activate the Instant Preview check box on the Prefs tab sheet
beforehand or hold down the Shift key. Holding down the Shift key while dragging makes the preview update with each
mouse movement. Alternatively you can also do multiple short click and drag movements to make the preview update
between them.
ColorStyler Manual
31
The slider or curve point, which you change while dragging, is selected depending on the mode of the eye dropper tool
and the clicked pixels in the preview. To select one of these modes hold down the mouse button over the eyedropper icon
a bit longer than usual. Then a menu for choosing one of these four modes is displayed. You can see which mode is
currently used from the bullet mark on this menu. Click on another menu item to activate that mode. You can also click on
one of the eyedropper icons on a tab sheet to switch to the appropriate mode.
The eyedropper tool features four groups of modes: The Main options adjust the curves on the Main tab sheet by
selecting an existing curve point or by creating a new one. The Select options choose one of the color sliders of the Select
tab sheet. The "FX2 - Glow" option adjusts the Glow effect by setting a value for the Tone slider and changing the Limit
slider while you move the mouse. The Mask options work similarly by choosing a brightness, color and saturation value
and adjusting its range.
2.2.3 The Cross Tool
The cross tool allows you to set a point in the preview, which is used as a coordinate for various gradient based effects.
You can choose which effect the cross tool influences from the menu that appears when you hold down the mouse button
over the cross icon. You can also click the cross icon on the appropriate tab sheet to activate the appropriate cross tool
option.
With the cross tool activated click on the preview at the point where you want the center of the linear or circular gradient to
be. You can also drag over the preview to scroll the center of the gradient. To move the gradient center to the center of
the image again double click the cross icon.
ColorStyler Manual
32
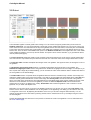
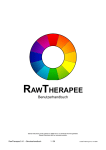
2.2.4 The Brush Tool
The brush tool lets you draw brush strokes on the preview for defining which image areas will be affected by ColorStyler
and which only partially or not at all. To activate the brush tool click on the brush icon above the preview. In this case the
tab sheet with the brush controls will show up on the right-hand side. You can also click on one of the two icons on the
Brush sub tab of the Mask tab sheet.
The brush tool has two modes called brush and eraser. The eraser mode is activated by default and lets you remove the
ColorStyler effect with brush strokes on the preview. The brush mode is used for reapplying the effect. You can switch
between both modes by holding down the mouse button over the brush icon above the preview or you can click the brush
or eraser icon on the Brush sub tab of the Mask tab sheet. Alternatively press the X key to switch between eraser and
brush mode.
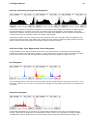
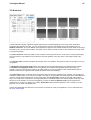
All brush strokes are stored in a grayscaled image, the brush mask, which is used to remove the ColorStyler effect from
certain image areas. This is simular to a layer mask in Photoshop. The M button displays the brush mask and makes it
easier to see the brush strokes that you have drawn. The Clear button on the Mask tab sheet clears the brush mask thus
removing all brush strokes.
The Intensity slider lets you weaken all brush strokes. At the default value of 100 the brush strokes is applied with full
intensity. At a value of zero the brush strokes are not applied at all. The Invert check box applies an inverted version of
the brush strokes. This means that areas where the effect was applied before will have the effect removed and vice versa.
Whereas the Intensity slider can also be adjusted after brush strokes have been performed, the Tool Settings sliders
define how the brush behaves when you draw with it on the preview. So you always have to set these sliders before you
use the brush tool. The Size slider defines the size of the brush tip. Smaller values draw finer lines and larger values
cover larger image areas more quickly. The Hardness slider controls the edge hardness of the brush tip. Smaller values
produce brush strokes with a softer edge, which results in a brush mask with softer transitions between image areas.
The controls of the Last Brush Stroke group enable you to reduce the opacity of the brush strokes as well as mask
them. Masking means that you can brush over an image object more generously and ColorStyler only applies the brush
stroke to the image object only. This can save you some time and work, because you do not need to apply many small
detailed brush strokes to mask out a certain image object.
The brush masking feature analyzes pixels as you use the brush, attempting to ensure that the brush strokes do not affect
pixels that have a different color or brightness than the image object. The color of the targeted image object is selected
with the small center circle of the brush cursor when you start drawing the brush stroke. So when you click with the brush
tool on the preview, the color in the center circle is assigned to the color box at the left-hand side of the Mask bar. This
color is used for masking the brush stroke. For example, if you want to mask a red image object make sure that the center
circle of the brush cursor is placed over red pixels before you press down the mouse button and start drawing. You can
still adjust the mask color after you finished the brush stroke by clicking on the color box. Adjusting the color also helps
refining the masking of the brush stroke.
You can also change the other masking and opacity settings after you performed a brush stroke. If you want to use other
settings for the next brush stroke (and do not want to do that after the next brush stroke), you can press the Apply button
ColorStyler Manual
33
to apply the current settings and lock the last brush stroke. You can then change the settings for the next brush stroke
without modifying the last one. If you do not like your last brush stroke, you can remove it with the Remove button.
The Mask bar allows to switch off masking and draw normal brush strokes by clicking on its "Off" item. The +1 to +5 items
represent different masking options. +1 produces the weakest masking and +5 the strongest, but all of them also produce
different types of transitions between the image object and the background. So depending on contrast between the image
object and background as well as the precision of your brush strokes, either one of the five options may produce better
results in one cases or the other.
If you want to fine tune the masking even more, click on the check box at the right-hand side of the Mask bar. This
reveals two sliders: The Amount slider controls the intensity of the masking. The Tolerance slider increases the contrast
between the image object and background thus amplifying the masking. Sometimes a higher and sometimes a lower
value of this slider will produce a better result.
The Opacity slider reduces the opacity of the brush strokes and lets you modify the intensity of the ColorStyler effect on
a certain image area. A slider value of 100 therefor either removes or applies the effect 100%, whereas a slider value of
50 either removes or reapplies it at 50% intensity.
2.2.5 The Split View Tool
Clicking the split view tool automatically activates the split view option that is displayed below the preview. When the split
view tool is active, you can click anywhere on the preview to change the position of the split divider. If the Multi check box
is activated, you can click on the preview to display a different part of the image in the split areas. Also see the Split View
page.
2.2.6 The Reset Button
If you want to restart with the default settings or just started processing on a new image, it is a good idea to click on the
Reset button. The Reset button performs the action that was last chosen on its menu. This menu appears when you click
on the arrow button at the right of the Reset button.
Clicking the small arrow button at the right of the Reset button displays a menu with various reset options. Default
Settings resets all controls to their default values. Previous Settings loads the settings that were used for processing the
previous image. Own Defaults opens the preset file that was either already specified, or if this is not the case, will prompt
you for one. You can choose a new preset file with the "Define Own Defaults" menu item.
The Logged Settings item automatically opens the settings that were previously applied to the same image. This option
looks into the folder at
Windows 2000/XP: c:\Documents and Settings\<user>\Application Data\ThePluginSite\ColorStyler\logfiles\
Windows Vista/7: c:\Users\<user>\AppData\Roaming\ThePluginSite\ColorStyler\logfiles\
MacOS X: /Library/Application Support/PhotoWiz/ColorStyler/logfiles/
to see if a log file with the same name as the file name exists. If such a log file is found, it is immediately applied. If no
such file exists or if the host application does not support this feature, nothing happens. Log files with effect settings are
saved when you apply ColorStyler to an image provided that the Log Settings check box is activated on the Prefs tab
sheet.
The Define Own Defaults item lets you choose a new preset file that will be used with the Own Defaults function.
ColorStyler Manual
34
2.3 Split View
The various split views let you compare the original image side by side with the resulting image in the preview. Please
also see the split view tool.
Using Left, Right, Bottom and Top View
Split views in ColorStyler show the original image on one side of the preview and the ColorStyler effects on the other. The
combo box at the bottom center of the preview allows you to choose whether split view will be horizontal or vertical. Which
view you choose determines which side of the split view shows ColorStyler's effects.
The Multi check box allows you to preview the same image section on both sides of the dividing line simultaneously. You
can click with the split view tool somewhere on the preview to display another different part of the image. You can use the
split view tool to click anywhere on the image to display a different area of the image.
If the Multi check box is not checked, the whole image is split in half. Clicking anywhere on the preview with the split tool
moves the dividing line to where you have clicked.
ColorStyler Manual
35
2.4 The Bottom Tab Sheets
2.4.1 Help
The Help sheet is located at the right bottom of the ColorStyler window. This feature was built in to make it easier for
beginners to get started and makes it possible to use ColorStyler without having to refer to the manual. When you move
your mouse over a certain control, the text box will display some explanations and hints about the control.
Although you can deactivate Help by by unchecking the check box at the right bottom of the help sheet, keeping it activate
is usefil for refreshing your memory or learning about features you might have missed.
2.4.2 Navigator
The Navigator tab works just like the Navigator panel in Photoshop. It displays a thumbnail of the image with a red
rectangle that indicates which part of the image is displayed in the preview. You can use the Navigator to display a certain
image area in the preview by clicking on it in the thumbnail. To quickly scroll around in the preview click somewhere on
the thumbnail, hold down the mouse button and move the mouse.
2.4.3 Info
The Info tab shows information that is not essential but which may be helpful under certain circumstances.
If the Show Blown Highlights check box is active, a line pattern will be displayed over highlight areas that were cut.
Additionally a value in the label of the check box indicates the percentage of blown highlights. This feature doesn't show
blown highlights that were already present in the image before you started ColorStyler. So it only indicates problems that
were created by a too strong ColorStyler effect.
ColorStyler Manual
36
When moving the mouse over the preview, the color below the cursor is shown in the color box of the Info tab sheet.
Additionally the color is shown as RGB and HSL values. The x and y values represent the image coordinates of the pixel
whose color is shown. For images with 16-bit/channel the color values are shown as 8-bit values like in Photoshop.
The first line at the bottom of the Info tab sheet show the image size in pixels and the channel bit depth. The second line
displays the camera model and the ISO value with which the photo was taken. If no EXIF data is available, this line is
empty.
2.4.4 Prefs
The Prefs tab sheet contains some options for defining the behavior of ColorStyler.
On Start Up
The On Start Up combo box defines which settings are used when ColorStyler is started. The "Default Settings" option
sets all controls back to their default values. "Previous Settings" loads the settings that were previously applied to an
image. "Own Defaults" loads a self-defined preset file. If no preset file was previously chosen, a file dialog appears.
Otherwise use the "Define Own Defaults" item of the Reset arrow menu to choose a new preset file.
"Logged Settings" automatically opens the settings that were previously applied to the same image. It only works in
Photoshop, Photoshop Elements, Paint Shop Pro and Photoline. Additionally it only works if you previously had the Log
Settings check box activated and if you already processed the same image file. This works in the same way as the Reset
option. Please see the Tools & Reset page for more information.
Language
The Language combo box allows you to set your preferred language for the ColorStyler dialog. At this time you can only
choose between English and German. When running ColorStyler for the first time, it is automatically set to the language of
your operating system.
Skin
The Skin combo box features various skin options. Skinning means that the user interface receive a new look. There are
different options for imitating the user interface of Lightroom, Photoshop, Photoshop Elements and PaintShop Pro. There
is also a dark version of Aero (the default UI style of Windows Vista/7), a special PhotoWiz skin style as well as an option
to only skin the sliders.
Each skin sets its own preview background color, but you can change it again with the Preview color box that is discussed
next. You can use a different skin and preview background color for the plugin, standalone and Lightroom versions of
ColorStyler. The None option of the Skin combo box recreates the standard controls and deactivates skinning, which
requires restarting ColorStyler.
ColorStyler Manual
37
Preview
The Preview color box shows the current color of the preview background. By default this is the color of the window
background. Click on the color box to display a menu with different options: Reset Color restores the default color and
Choose Color displays a color dialog for selecting a certain color. The other menu items apply various gray tones from
black to white. The same context menu appears if you right click on the preview background.
Multi-CPU Off
If you encounter any problems, you can deactivate the support for multiple processor cores and hyperthreading pipes with
this check box. If your computer only uses a non-hyperthreading, single-core processor, this check box is disabled by
default.
Host Color Dialog
This check box is only available in the plugin version of ColorStyler as the Lightroom/Standalone version has no access to
a host color dialog.
When clicking on a color box a color dialog shows up for selecting a color. If the Host Color Dialog check box is activated,
the color dialog of the host application, e.g. Photoshop's color dialog, is displayed. We recommend to keep the Host Color
Dialog check box deactivated unless you need a specific feature of the host color dialog.
When the Host Color Dialog check box is deactivated, ColorStyler uses an advanced version of the color dialog of the
operating system. It shows the effect of a chosen color in the preview while the color dialog is still displayed. You just
need to make sure that the Preview check box on the color dialog is activated. The host color dialog always has to be
closed in order to see the effect of the chosen color and you need to reopen it to choose another color, which is less
convenient.
ColorStyler Manual
38
Anti-Aliased Curve
With the Anti-Aliased Curve check box activated the curve on the Main tab sheet looks thicker and smoother. Otherwise it
is drawn as a sharper but jagged 1-pixel line.
Instant Preview
If the Instant Preview check box is activated, the preview is updated while you drag a slider. Instant Preview may work too
slowly on computers with an older processor. You can also get the same effect if you hold down the Shift key while
dragging a slider.
Log Settings
When the Log Settings check box is activated ColorStyler automatically saves preset files at
Windows 2000/XP: c:\Documents and Settings\<user>\Application Data\ThePluginSite\ColorStyler\logfiles\
Windows Vista/7: c:\Users\<user>\AppData\Roaming\ThePluginSite\ColorStyler\logfiles\
MacOS X: /Library/Application Support/PhotoWiz/ColorStyler/logfiles/
after you press the OK button. In Photoshop, Photoshop Elements, Paint Shop Pro and Photoline the file name of the
image is used as the preset file name. In other applications a random number is used, because these applications do not
supply the file name of the image to ColorStyler. If you apply ColorStyler a second time to the same image and have Log
Settings activated, the previous preset file in the logfiles folder will be overwritten.
At least with Photoshop, Photoshop Elements, Paint Shop Pro and Photoline this feature allows you to easily find the
settings that you applied to a certain image by looking into the logfiles sub folder. For other applications you can only look
at the file date and guess which preset file was used for which image.
In connection with the Logged Settings option of the On Start Up combo box (see above), you can use the Log Settings
check box to automatically make ColorStyler start up with the settings that were applied the last time to the same image.
So if you need to correct the same image again, you will automatically be presented with the same settings that you used
the last time. In case you don't want to start up ColorStyler with the logged settings or forgot to activate this option, you
can also open the logged settings by clicking the arrow button next to the Reset button and choosing "Logged Settings"
from the button menu.
ColorStyler Manual
39
2.5 Histo Tab Sheet
ColorStyler offers various types of histograms. Basically histograms don't show anything you can't see in the image itself if
you know where to look and look really closely. But histograms have the advantage that they are more structured than the
image itself, so they let you recognize image problems easier.
A histogram is a statistical display of an image parameter, e.g. brightness, hues or saturation. It shows the distribution of
certain pixel values in an image. These values usually range from 0 to 255 in a 8bit image. The range of these values is
displayed from left to right in the histogram, so the value 0 is displayed at the outer left and the value 255 is displayed on
the outer right side. The amount of each value is displayed from bottom to top, so the height of the curve represents the
number of pixels that have a certain value. If more pixels have a certain value, the histogram curve will be higher at that
point.
In ColorStyler the histogram curve is separated into three areas: the shadows on the left side (with values from 0 to 85),
the midtones in the middle (with values from 86 to 170) and the highlights on the right side (with values from 171 to 255).
ColorStyler displays all three areas equally wide, although some people may argue that the midtones are twice as wide as
the shadows and the highlights. But usually it is more useful to define the three areas equally wide.
Controls
The left combo box lets you choose the histogram type. The different types are discussed below.
The Zoom check box scales the histogram vertically. This can make the peaks higher and reveal valleys that were not
there before. This is especially useful if there is one extremely high peak, which makes all other values appear very small.
The No Gaps check box makes gaps in the histogram curve dissappear. It does not change the image itself, but simply
improves the histogram view. These gaps can appear when the tonal values are stretched by an image processing
operation, but they usually do not indicate image damage.
ColorStyler lets you display the histograms in four different styles with the combo box located on the right side. "Filled"
creates the standard histogram type that is known from many graphics applications. The "Gradient" option draws a color
gradient from left to right. The colors of this gradient are different from histogram to histogram. The "Line" option draws a
line and leaves the area underneath empty. "Dot" plots the histogram values as dots, which may make some histogram
values less readable, but helps you to recognize a general trend more easily.
ColorStyler Manual
40
RGB Histogram
You can use the RGB histogram to see if there are blown highlights or cutoff shadows in an image. Blown highlights can
be identified by a high spike on the right side whereas cutoff shadows are represented by a high spike on the left side.
The higher and wider the spike is, the more information was cut off.
If there is a large slope on the left or right side and not just a thin spike, then tonal values of the photo are already cut off.
If the cut off is on the left side in the shadows, then it is often not really visible in the image itself. Another bad sign might
be that the middle part of the curve is quite flat or extremely low. If such histograms are produced by an adjustment in
ColorStyler, you may correct the setting, unless you want that look.
The RGB histogram also shows an image's darkest value (the end point of the curve at the left) and brightest value (the
end point of the curve at the right) in an image. Both are also called black point and white point. The range between both
points is called dynamic or tonal range and determines the contrast of the image. The optimal contrast is achieved if the
curve starts at the outer left and ends at the outer right. If this isn't the case, the image may not have a good contrast. If
the curve starts more towards the middle, it also means that the image is too bright. If it ends more in the middle, then the
image is too dark.
Nevertheless there are always exceptions to the rule. For example, a photo of a snow landscape and an overexposed
photo have a similar histogram, but the snow photo is fine while the overexposed photo needs to be fixed. On the other
hand a photo with a black sky and stars or the moon looks on the histogram as if it is underexposed, although this isn't the
case. Another example is a photo taken on a foggy day. If you increase the contrast too much, the result will look terrible
and won't give the viewer the impression of fog anymore. A good rule is to always investigate the contents of the image
and to not trust the histogram completely.
Small gaps tend do show up in the RGB Histogram more often than in other histogram types. They are only a sign that an
image was processed and are usually nothing to worry about.
ColorStyler Manual
41
Intensity, Luminosity and Lightness Histograms
The Intensity, Luminosity and Lightness histograms are very similar for many images. They often let you better judge the
brightness distribution in an image, but they are not suitable to judge blown highlights or cutoff shadows. If the image
contains more shadows, the hill is more on the left side. If it contains more highlights, the hill is located on the right side. If
it is well balanced, the hill or hills are usually in the middle of the histogram.
If there are two peaks, one on the outer left side in the shadows and one on the outer right side in the highlights, it may
mean that the photo was taken under difficult light conditions and may exhibit unusually high image contrast. If there are
peaks on both the outer left and right side, the image contrast is usually too extreme.
Red, Green, Blue, Cyan, Magenta and Yellow Histograms
These histograms can be used to recognize color casts or other color problems. For example if the Blue Histogram
contains a curve that is only located in the shadows, it means that there are as good as no light blue areas in the image.
This can mean that the color blue was suppressed in the image and that the image has a yellow color cast.
Hue Histogram
The Hue histogram lets you see if some hues are missing. If some hues are dominant in the image, it can mean - but not
necessarily - that there is a color cast. A close-up photo for example is usually missing some hues even if it doesn't have
a color cast.
Saturation Histogram
The Saturation histogram lets you see if there is a problem with the saturation in the image. For example if there is
nothing in the left part, the image may be oversaturated or if there is nothing on the right side, the image is probably
undersaturated. However, images with a lot of white and dark areas may appear undersaturated according to the
ColorStyler Manual
42
histogram, but as pure white and black have no saturation, the image saturation may still be fine.
Colors Histogram
The Colors histogram is similar to the RGB histogram, so it also lets you see if there are blown or cutoff areas.
Additionally it shows which hues are dominant in the shadows, midtones and highlights.
Black and White Histograms
The left part of Black histogram and the right part of the White histogram are similar to the RGB histogram. Both
histograms should fill the whole value range from left to right. The above Black histogram indicates that the image is too
"black" and too much "white" at the right end of the histogram is missing. The above White histogram also has a small gap
at the right end, which means that the white values aren't fully used.
If there is a large gap at the right or left end of the histogram, it means that the contrast of the image is bad. Spikes at the
outer left or right indicate cutoff shadows and blown highlights.
ColorStyler Manual
43
2.6 Smart Filtering
Smart filtering means that you can readjust the settings of a filter without undoing previous operations, reopening the
original image or creating a new layer. It currently only works in Photoshop CS3 and higher.
Before you can apply ColorStyler as a smart filter, you have to turn the current background image or layer into a smart
object. You do that by choosing from the menu Filter > Convert for Smart Filters or Layer > Smart Objects > Convert
to Smart Object.
After you applied ColorStyler by clicking OK on its dialog, you see a ColorStyler item on the Layers panel.
To readjust the applied ColorStyler settings, double click the ColorStyler item in the Layers panel. You can also deactivate
the ColorStyler effect by clicking on the eye icon left of it. To adjust the opacity and blend mode of the effect click on the
icon with the two sliders on the right hand side of the ColorStyler item.
ColorStyler Manual
44
2.7 Batch Processing
2.7.1 Batch Processing in Photoshop
Photoshop offers a Batch feature on its File > Automate menu. This feature lets you batch process a series of images with
the help of a Photoshop action. So if you want to batch process images in Photoshop you only need to record an action
that contains ColorStyler.
Recording an action with ColorStyler:
1. Open an image in Photoshop.
2. Switch to the Actions panel at the right and create a new action by using the New Action button or the pop-up panel
menu.
3. Choose ColorStyler from the Filter menu.
4. Now adjust the effect settings in ColorStyler as you want them recorded in the action.
5. Press OK on the ColorStyler dialog.
6. Press the Stop button on the Action panel. Now you have your ColorStyler action that you can use with File > Automate
> Batch.
ColorStyler Manual
45
Batch processing a series of images with ColorStyler:
1. Open one of the images from the image series.
2. Select File > Automate > Batch.
3. In the Batch dialog make sure that your ColorStyler action is selected.
4. Set the other batch options and click OK to run it.
You can record a new action for each task that requires a different ColorStyler effect. On the other hand if you do not want
to create a collection of different actions, you can also change the ColorStyler settings of the action. To do that click on
the ColorStyler item in the Actions panel, change the settings in the ColorStyler dialog and press OK. If you want to apply
individual ColorStyler settings to each image during batch processing, please activate the small icon left of the ColorStyler
entry in the Action panel. This makes the ColorStyler dialog appear for each image, so that you can adjust the settings for
each image.
ColorStyler Manual
46
2.7.2 Batch Processing in Paint Shop Pro
Paint Shop Pro (Version 8 and higher) offers a Process feature on the File > Batch menu for batch processing a series of
images with the help of a PSP script. Recording such a script is quite easy.
Recording a PSP script with ColorStyler:
1. Open an image in PSP.
2. Select File > Script > Start Recording.
3. Choose ColorStyler from the Effects > Plugins menu.
4. Now adjust the effect settings in ColorStyler as you want them recorded in the script.
5. Press OK on the ColorStyler dialog.
6. Select File > Script > Stop Recording and save the script. Now you have a ColorStyler script that you can use with File
> Batch > Process.
Batch processing a series of images with ColorStyler:
1. Open one of the images from the image series.
2. Select File > Batch > Process or File > Batch Process.
3. In the Batch Process dialog choose your ColorStyler script from the Script frame.
ColorStyler Manual
47
4. Set the other batch options and click on the Start button to run it.
You need to record a new script for every ColorStyler effect that you want to apply during batch processing. You can
create a collection of scripts with various ColorStyler effects and use these scripts as you need. If you want to apply
individual ColorStyler settings to each image during batch processing, please deactivate the "Silent mode" check box on
the Batch Process dialog. This makes the ColorStyler dialog appear for each image.
2.7.3 Batch Processing in Other Applications
There are some other applications that support batch processing with the help of plugins, e.g. Fireworks, Debabelizer and
Photo-Paint. Basically batch processing in other applications works the same as in Photoshop and Paint Shop Pro.
ColorStyler Manual
48
2.8 Key Shortcuts
ColorStyler lets you use a few key shortcuts for performing certain tasks. Advanced users prefer using key shortcuts as
they help to achieve some tasks much faster.
Please note: If the input focus is in the preset list you can use the A to Z keys to choose the next preset that starts with
that letter. Pressing the N key slways selects the "None" item tough. If you additionally hold down the Alt key, you can
trigger the key shortcuts mentioned below even if the input focus is on the preset list.
Here is a list of all shortcuts that can be used:
CTRL and +
Increases the preview zoom ratio
CTRL and -
Decreases the preview zoom ratio
CTRL and Z
Undo the last step
CTRL and Y
Redo the last step
R
Resets some controls to their default values
P
Activates or deactivates the Preview check box
Del or Backspace
Deletes the selected curve control point. (Only if the mouse cursor
is located over the curve or if you previously clicked on the curve)
H
Activates the hand tool
Space
Activates the hand tool (Only if the mouse cursor is located over
the preview)
I
Activates the eyedropper tool
V
Activates the cross tool
E
Activates the brush tool with the Eraser option
B
Activates the brush tool with the Brush option
X
Switch between the Eraser and Brush option of the brush tool
S
Activates the split view tool
M
Displays or hides the mask view by toggling the two M buttons on
the Mask tab sheet
If you are using a English keyboard layout:
[
Increase the brush size
]
Decrease the brush size
Shift and [
Increase the brush hardness
Shift and ]
Decrease the brush hardness
ColorStyler Manual
49
If you are using a German keyboard layout:
Ö
Increase the brush size
#
Decrease the brush size
Shift and Ö
Increase the brush hardness
Shift and #
Decrease the brush hardness
3 Effect Controls
3.1 Modes
ColorStyler features four modes: Easy Mode, Quick Edit Mode, Photography Mode and Advanced Mode. Easy Mode
offers a list of presets and displays one or more controls for further adjusting the effect of the preset. Quick Edit Mode
provides several controls for adjusting the brightness, contrast and color of the whole image as well as parts of it.
Photography Mode simulates the photographic workflow from shooting an image to processing it in the lab, printing and
framing it. It does this with the help of hundreds of presets from a dozen combo boxes. Finally, Advanced Mode contains
all available effect controls on six tab sheets and offers the most possibilities.
3.1.1 Modes Workflow
All modes are connected, so switching between modes does not change the image effect. You can start in one mode and
adjust the effect further in another mode. If you need detailed control over an effect you should try Advanced Mode. If
Advanced Mode appears too complex, you can stay in Easy Mode, Quick Edit Mode or Photography Mode. Once you
know these modes well, you can explore what Advanced Mode offers and see if it provides even more useful options for
you.
For detailed workflow tips see the Step By Step Guide page.
3.1.2 Easy Mode
Easy Mode contains only the Preset tab sheet that is also available in Advanced Mode. But in contrast to Advanced Mode
some controls appear below the preset list when you click a preset or switch to a preset group with the combo box above
the preset list.
For presets that activate multiple effects you only see a Main Intensity slider for increasing or decreasing the intensity of
all effects. For presets with only one effect multiple sliders appear below the preset list. Sometimes these are all controls
of the effect, sometimes not. If the ColorStyler window is too small to fit all controls, only the Main Intensity slider is
shown. You can avoid that by enlarging the ColorStyler window.
ColorStyler Manual
51
If you right click on the preset list you will see a menu with the names of all effects of the preset. Clicking on one of these
items displays the effect controls in Advanced Mode.
For more information see the Preset tab sheet page.
3.1.3 Quick Edit Mode
Quick Mode offers sliders for general and selective adjustments. It provides the means for quickly adjusting the image.
This mode is especially useful if you are interested in photo processing without special effects. But you can also use it for
adjusting the image after applying special effects in another mode.
All of these controls are also available in Advanced Mode. The first three controls are also located on the Tone sub tab of
the Main tab sheet. They adjust the brightness, contrast and shadows/highlights of the whole image. The Cool/Warm and
Green/Mag. sliders originate from the Color sub tab of the FX1 tab sheet and can be used to colorize the image. The
Saturation and Balance sliders are also located on the Tone sub tab of the Main tab sheet and adjust the saturation of the
whole image. The other controls at the bottom are for selectively adjusting the brightness, contrast, hue and saturation of
certain color areas in the image. They are from the Select tab sheet in Advanced Mode.
For more information on these controls see the pages of the mentioned tab sheets.
3.1.4 Photography Mode
ColorStyler Manual
52
Photography mode consists only of presets that are sorted into a dozen combo boxes. Each combo box offers many items
for adding a predefined effect, a so-called preset, to the image. This way you can add up multiple effects at the same time
to an image. The presets of one combo box override each other, but if you choose presets from different combo boxes,
their effects are combined. It works similarly to the activated Combine check box in Easy and Advanced Mode.
These presets let you recreate the look of traditional photography effects. It is a selection of the presets that are also
available in Easy and Advanced Mode. Each effect of the Photography Mode can be edited in more detail after clicking
the "More..." label. This displays the appropriate controls in Advanced Mode.
3.1.5 Advanced Mode
Advanced Mode contains the combined effects of all other modes and even more. All adjustments that you make in the
other modes are visible in this mode. Advanced Mode lets you fine-tune them even further, because it offers the most
features.
In addition to the Preset tab sheet known from Easy Mode there are five further tab sheets in this mode. Each tab sheet
contains up to four sub tabs. Usually one sub tab contains one effect, but some sub tabs also contain up to three different
types of effects.
For more information about the different effect controls read the pages about these tab sheets.
ColorStyler Manual
53
3.2 Presets Tab Sheet
The Presets tab sheet lets you select among five hundred presets sorted into more than 20 groups. When the Combine
check box is activated, you can also combine presets for even more choices.
3.2.1 The Preset List
The preset list occupies the main part of the Preset tab sheet. It provides 600 preset items, which are displayed as
thumbnails, icons or text items. You can switch between these different views with the arrow-down menu as explained
below.
The presets are sorted into more than 20 preset groups. Each of these groups can be collapsed and expanded by clicking
the group header. To collapse or expand all groups click the -/+ button above the preview.
The first item of each group is called "None" and neutralizes the effect of the presets in the same group. The first preset
group is called "Own Presets" and contains only presets that were saved by you, the user. So when you run ColorStyler
for the first time you only see the "None" item in this group. The second and third groups contain general photo and
vintage presets that consist of multiple effects.
The next 12 groups (Color Film to Frame) also appear as combo boxes in Photography Mode. They contain presets that
only use one effect and the presets in each group activate a different effect. So you can nicely combine the presets of
each group with each other by activating the Combine check box. The remaining 6 preset groups are similar as they also
activate only one effect, but they contain mainly special effects and not classic photographic ones.
If you right click an item in the preset list, you see a menu with the names of the effects that the preset uses. Clicking
on one of these items opens up another tab sheet and displays the appropriate effect controls. The context menu of the
Color Grad presets contains seven additional menu items, which let you choose another gradient type.
ColorStyler Manual
54
3.2.2 Adjusting the Preset List
Clicking the arrow-down button above the preset list displays a menu with options for opening and saving presets and for
adjusting the look of the preset list.
The Thumbnail, Icons and List options let you choose between different list modes. The Thumbnails option applies the
effect of each preset to a miniature version of the image. The Icons option applies the presets to images with different
patterns (e.g. a blank gray image, gray tone scale, checkerboard or hue/saturation diagram). Depending on the preset
group a different test pattern is used. The List option only displays text items and no visual previews of the presets.
The next five menu items (Very Large to Very Small Thumbs) define the size of the preview images in the Thumbnails
and Icons modes. Very Large Thumbs only displays one thumbnail per row whereas Very Small Thumbs displays four per
row. The effect of some presets is better visible with the Very Large Thumbs option, but Medium Thumbs with two
thumbnails per row is usually a good compromise.
The preset thumbnails are rendered when ColorStyler starts up. With a fast CPU this takes less than a quarter second at
medium size and one second at very large size. With older computers it can take up to several seconds to render 500
thumbnails at very large size. So to avoid unnecessary delays, it is good to choose the thumb size wisely or to switch to
List mode, which avoid rendering thumbs.
The Standalone/Lightroom version of ColorStyler additionally renders the thumbnails again when you switch to another
image, which can get inconvenient with a slower CPU. To avoid that you can switch to Icons mode, which does not
rerender the thumbs when switching images.
Finally, the Labels option hides or reveals the text labels in Thumbnails and Icons view. This leaves more room for the
miniature previews.
ColorStyler Manual
55
3.2.3 Opening and Saving Presets
Apart from the preset list option on the arrow-down menu of the Preset tab sheet there are also options for opening and
saving presets.
ColorStyler supports two types of preset files. CSP files are native ColorStyler files that can contain all of ColorStyler's
effect settings. You can open as well as save these files. ACV files are also supported by ColorStyler. These files are
generated by Photoshop's Curve dialog and only contain curve points. When ColorStyler opens such a file, it only
changes the curve points in the Tone and RGB sub tabs of the Main tab sheet in Advanced Mode. Both preset files are
shown as thumbnails in the preset list, but ACV files can only be opened and not saved by ColorStyler.
Clicking Open Preset displays a file dialog for selecting and opening a preset file. This function is only necessary if you
want to open a preset that is not located in the default preset folder of ColorStyler. All presets of the default presets folder
are displayed in the Own Presets group of the preset list and can be opened by clicking them there. The folder of the last
opened preset is displayed by default in the file dialog.
You can save the current ColorStyler settings as a preset file with the help of the Save Preset or Save Preset As menu
item. The difference between the two is that the Save Preset option automatically saves the preset file into the default
preset folder of ColorStyler whereas Save Preset As additionally displays a file dialog and asks you where you want to
save the preset.
The default preset folder of ColorStyler is located here:
Windows 2000/XP: c:\Documents and Settings\<user>\Application Data\ThePluginSite\ColorStyler\Presets\
Windows Vista/7: c:\Users\<user>\AppData\Roaming\ThePluginSite\ColorStyler\Presets\
MacOS X: /Library/Application Support/PhotoWiz/ColorStyler/Presets/
Both Save Preset commands display a Save Preset window, which lets you enter a preset name and define which effect
settings will be saved in the preset.
The check boxes of the used effects are automatically activated. The check boxes of the currently unused effects are
deactivated. If you keep that and save your preset only with the used effects, you can later combine the saved preset with
an existing effect in ColorStyler. That is done by opening the preset after activating the Combine check box.
If you want your preset to deactivate all other effects in ColorStyler when the Combine check box is active, you can
activate all check boxes. You can do that by clicking the Check All button. The Check None button deactivates all
check boxes and lets you manually choose certain effects for inclusion in the saved preset. Finally click on the Save
button to save the preset file or click on Cancel to abort this action.
The Reset Preset Folder menu item sets the default preset folder as the starting folder for the file dialog of the Open
Preset and Save Preset As commands. This way you can avoid searching for the default preset folder after you saved or
opened a preset from a different location on the hard drive.
ColorStyler Manual
56
3.2.4 Displaying Only Certain Preset Groups
The combo box above the preset list offers various options for choosing which preset groups are displayed. "Show All"
displays all presets whereas the other options only display the presets of a certain preset group in the preset list.
Displaying only one preset group means less scrolling of the preset list.
3.2.5 Combining Presets
When you open a preset with a deactivated Combine check box, then all active effects are deactivated and only the
effects of the preset are applied. On the other hand if you want to combine the effects of different presets, you can
activate the Combine check box. Then opening a preset does not remove the active effects and additionally activates the
preset effects. As a result the existing effects and the preset effect are combined. Instead of activating the Combine check
box you can also hold down the Ctrl key when clicking on a preset to avoid that the active effects are removed.
However, there is an exception to this rule. If a preset contains settings for an effect that is already active, then the
settings of this active effect are overwritten. This does not remove the effect, but changes it. For example, lets say you
brightened up the image with the Brightness slider and added a diffusion effect. Now you activate the Combine check box
and open a preset. This preset uses the same Brightness slider for darkening the image and additionally applies a red
color. So you started with a brightened and diffused image and ended with an image that is darkened, diffused and
colored red. The original brightness effect was changed, the diffusion effect was kept and the red color was added. The
original brightening and new darkening did not compensate each other. The new darkening effect dominated.
On the other hand it is possible to save a preset that deactivate one or more effects. Opening such a preset existing
effects even if you have the Combine check box activated or hold down the Ctrl key.
ColorStyler Manual
57
3.2.6 Collapsing Preset Groups and Making the Preset List Larger
The -/+ button is only available if the combo box is set to "Show All". It lets you collapse and expand all preset groups.
After collapsing all groups you can expand individual groups by clicking the group header. If you only have one or two
preset groups expanded, you do not need to scroll the preset list so much.
The arrow-left icon on the right-hand side of the Preset tab sheet is only available for the Thumbnails and Icons mode of
the preset list. Clicking it expands the preset list to half of the window width and displays more thumbnails per row. At the
same time the preview also gets smaller to make room for the larger preset list. Now the same icon uses an arrow that
points to the right. Click again to collapse the preset list to its original width.
ColorStyler Manual
58
3.3 Main Tab Sheet
The Main tab sheet contains a curve tool and sliders for adjusting the brightness, contrast, color and saturation of the
whole image.
Click on the sub tab bar at the top of the tab sheet to switch between different control groups. The arrow-down button
displays a menu with various presets that activate the effects on the selected sub tab. So depending on the selected sub
tab a different menu is displayed.
3.3.1 The Curve Diagram
There are seven different curves plus five sliders for each curve. One curve is located on the Tone sub tab, two are on the
Color sub tab, three on the RGB sub tab and another one is on the Saturation sub tab. Each of them changes different
image values. The Tone curve affects all pixel values (thus producing brightness and contrast adjustments), the Color and
Bicolor curves colorize the image with one or two colors, the three RGB curves affect the three color channels individually
and the Saturation curve changes the saturation of all pixels.
The curve diagram offers an advanced way to change the brightness, contrast, color or saturation of the whole image.
The basic idea is to transform certain pixel values into other values. The horizontal axis of the curve diagram represents
the original input values from 0 to 255. The vertical axis represents the new output values. The label at the bottom left
corner of the curve shows which value is transformed into which other value if you move the mouse cursor over a point of
the curve.
As long as the curve lies on the base line, which runs diagonally from the bottom left to the top right corner, no pixel value
is changed. If the curve runs above the base line, then the pixel values are increased. If it runs below, the pixel values are
decreased, which affects the brightness. The bottom left part of the base line represents the shadows and the top right
part represents the highlights. If you use an S-shaped curve, then the shadow values are decreased and the highlight
values are increased, which raises the contrast. An inverted S-curve decreases the contrast.
To set a new curve point click at a location in the curve diagram, at which you want the curve to pass through. But you
can also click somewhere, hold down the mouse button and drag the mouse to move the new curve point and shape the
curve accordingly. To create a more complex curve you usually need to set two or more curve points. To select a curve
point simply click on it. To remove a selected curve point press the Del or Backspace key or simply drag it outside of the
diagram.
The curve that you shape with curve points is displayed as a black line. If you use the sliders below the curve diagram,
you will see a red curve line appear. This red line represents the combined output curve that is shaped by the black
curve as well as the slider values.
ColorStyler Manual
59
You can also adjust the curve by activating the eyedropper icon and dragging with the eyedropper tool on the preview.
Depending on the pixel that you click on a curve point will be created, which is then moved up or down while you drag
your mouse up or down. For more information see the Tools & Reset page.
3.3.2 Tone
The Tone sub tab allows you to adjust the image tone, meaning the brightness and contrast of the image.
With activated Sat Fix check box the curve and sliders are applied only to the luminance channel of the image. This
usually keeps the saturation constant, which can be an advantage or disadvantage depending on the image. When the
Sat Fix check box is deactivated, the curve and sliders are applied to all channels.
The Intensity slider increases or decreases amplitude of the curve and the intensity of the controls on the Tone sub tab.
It influences both the black curve as well as the other sliders below the curve. Slider values below zero make the red
output curve move towards the base line thus decreasing the Tone effect. Values above zero make the red curve move
further away from the base line thus increasing the Tone effect. At a value of zero the Intensity slider does not influence
the curve and the sliders.
The Brightness slider increases or decreases the brightness of the image in EV (Exposure Value) steps from -3.0 to
+3.0.
The Shadows and Highlights sliders increase or decrease the brightness in the dark and bright areas of the image.
Shadow values above zero make the shadows darker whereas values below zero brighten them up. Highlight values
above zero brighten the highlights whereas values below zero darken them. If both sliders have similar slider values, then
the contrast of the image is changed. To adjust the contrast without having to drag both sliders simultaneously, you can
also activate the check box at the left to turn both into a single Contrast slider. Contrast values below zero make some
details more visible, but may create a faded look. Values above zero increase the contrast and give the image more
punch, but may stretch shadow or highlight details too much.
The Exposure slider stretches the tonal range of the image. It performs a white point adjustment for positive slider values
and a black point adjustment for negative values. Please use with care, because it can easily blow highlights or suppress
shadows.
3.3.3 Color
The Color sub tab lets you colorize the image with one or two colors. With the Color option selected in the list box, you
have only one color box. Bending the curve above the base line brightens the image with this color. If you bend it below
the base line, the color is used to darken the image.
With the Bicolor option you have two color boxes. If the curve runs above the base line, the first color is applied. If it runs
below, the second color is applied to the image. To colorize the image with both colors, you need to make the curve run
below as well as above the base line. To choose another color click on one of the color boxes. The arrow-down button
also displays a menu with different preset items after you switched between the Color and Bicolor options.
ColorStyler Manual
60
The Intensity slider increases or decreases amplitude of the curve and the intensity of the controls on the Color sub tab.
It influences both the black curve as well as the other sliders below the curve. Slider values below zero make the red
output curve move towards the base line thus decreasing the color effect. Values above zero make the red curve move
further away from the base line thus increasing the color effect. At a value of zero the Intensity slider does not influence
the curve and the sliders.
The Color slider increases or decreases the brightness of the color in the image.
The Shadows and Highlights sliders increase or decrease the brightness of the color in the dark and bright areas of the
image. Shadow values above zero make the shadows darker whereas values below zero add a brighter color. Highlight
values above zero add a brighter color the highlights whereas values below zero make them darker. If both sliders have
similar slider values, then the color contrast of the image is changed. To adjust the contrast without having to drag both
sliders simultaneously, you can also activate the check box at the left to turn both into a single Contrast slider. Contrast
values below zero make some details more visible, but may create a faded look. Values above zero increase the color
contrast and give the image more punch, but may stretch shadow or highlight details too much.
The Amplify slider stretches the tonal range of the image according to the chosen color(s). Please use with care,
because it can easily blow highlights or suppress shadows.
3.3.4 RGB
The RGB sub tab also adjusts the color of the image. But it works quite differently from the Color sub tab. You have to
adjust three curves instead of one curve plus a color box. This requires an understanding of how the three red, green and
blue color channels are combined to create a certain color look, but it also offers more possibilities. The RGB sub tab lets
you switch between the Red, Green and Blue curves, which represent the three color channels of the RGB color model.
So you can independently adjust the red, green and blue color channels of the image. You can switch between the three
curves with the list box at the top left corner of the tab sheet.
The Intensity slider increases or decreases amplitude of the curves and the intensity of the controls on the RGB sub tab.
It influences both the black curve as well as the other sliders below the curve. Slider values below zero make the red
output curve move towards the base line thus decreasing the color effect. Values above zero make the red curve move
further away from the base line thus increasing the color effect. At a value of zero the Intensity slider does not influence
the curve and the sliders.
The Color slider increases or decreases the brightness of the selected color channel. Negative values add the
antagonistic color of the color channel (cyan for the red channel, magenta for the green channel and yellow for the blue
channel) to the image whereas positive values add the color of the color channel.
The Shadows and Highlights sliders increase or decrease the brightness of the color channel in the dark and bright
areas of the image. Shadow values above zero add the antagonistic color (cyan for the red channel, magenta for the
green channel and yellow for the blue channel) to the shadows. Values below zero add the color of the color channel to
the shadows. Highlight values above zero add the color of the color channel to the highlights. Values below zero add the
antagonistic color (cyan for the red channel, magenta for the green channel and yellow for the blue channel) to the
highlights. If both sliders have similar slider values, then a bicolor effect occurs, which consists of the color of the color
channel and its antagonistic color. To create this effect without having to drag both sliders simultaneously, you can also
activate the check box at the left to turn both into a single Contrast slider.
ColorStyler Manual
61
The Exposure slider works similarly to the Color slider, but creates a more extreme effect.
3.3.5 Saturation
The Saturation sub tab can be used to change the saturation of the image.
Normally a certain saturation value is transformed into another saturation value according to the curve. If you activate the
Tonal check box then the saturation value is increased or decreased at a certain brightness level, so that you can adjust
the saturation in the shadows, midtones and highlights differently. That means at a certain brightness level a certain
saturation increase or decrease takes place.
The combo box below the Tonal check box defines the method with which the image saturation is processed. The
Normal option uses classic saturation adjustment via the HSL color space whereas the Mild option stays in RGB space,
which avoids color artifacts at extreme settings. The remaining option protects a certain color from the saturation
adjustment. For example, the Red option keeps the saturation of the red image areas more or less constant, even if it is
increased in the rest of the image.
The Intensity slider increases or decreases amplitude of the curve and the intensity of the controls on the Saturation sub
tab. It influences both the black curve as well as the other sliders below the curve. Slider values below zero make the red
output curve move towards the base line thus decreasing the saturation effect. Values above zero make the red curve
move further away from the base line thus increasing the saturation effect. At a value of zero the Intensity slider does not
influence the curve and the sliders.
The Saturation slider increases or decreases the saturation of the image.
If the Tonal check box is deactivated, the Low Sat. and High Sat. sliders increase or decrease the saturation in the low
and highly saturated areas of the image. If the Tonal check box is active, the same sliders, now named Shadows and
Highlights, increase or decrease the saturation in the dark and bright areas of the image. To adjust both sliders
simultaneously activate the check box at the left to turn both into a single Balance slider. Positive Balance values
increase the saturation in highly saturated or bright areas (depending on the Tonal check box) and decrease it in low
saturation or dark areas. Negative Balance values do the opposite by decreasing the saturation in highly saturated or
bright areas and increasing it in low saturation or dark areas.
The Exposure slider works similarly to the Saturation slider, but creates a more extreme result.
ColorStyler Manual
62
3.4 Select Tab Sheet
The Select tab sheet of Advanced Mode offers two sets of controls for selectively adjusting the brightness, contrast, hue
and saturation of image areas that have a certain color in the original image. These controls can help to fine-tune the
result of the general adjustment on the Main Tab sheet or to adjust side-effects of the effects on the FX1 and FX2 tab
sheets. The arrow-down button in the top left corner of the Select tab sheet displays a menu with various film simulation
presets.
3.4.1 Tonal Controls
When you select "Tonal" in the Controls combo box at the bottom of the tab sheet you will see four sub tabs above the
middle separation line. Each sub tab contains seven or eight color sliders for adjusting the brightness, contrast, hue or
saturation of image areas with a certain color. Negative slider values decrease the brightness, contrast, hue or saturation
whereas positive values increase them. Double click the slider label to reset a slider to zero.
Click the eyedropper icon to activate the eyedropper tool. Then click on the preview, hold down the mousse button and
drag the tool to change a slider value. The color of the pixel that you clicked on the preview determines which slider will be
changed while you drag the mouse horizontally. For more information see the Tools & Reset page.
The Intensity slider below the separation line decreases or increases the total effect of all sliders on this tab sheet. The
Tolerance slider suppresses or amplifies the color masks of the eight available colors. As a result the total effect of all
sliders on this tab sheet is also decreased or increased, but you should be more careful with this slider as too high values
may produce artifacts.
ColorStyler Manual
63
3.4.2 Color Controls
With the Controls combo box set to "Color" you will see eight color boxes at the top of the tab sheet. Each of these color
boxes has six sliders assigned to them. Clicking on a color box displays the sliders that belong to it. So while the Tonal
controls apply a selected tonal operation on image areas of certain colors, the Color controls perform tonal operations on
an image area with a selected color. In some cases the Tonal controls will be more convenient and in others it may
require fewer clicks to use the Color controls.
Each color box contains sliders for adjusting the brightness, contrast, hue or saturation of the image areas with the
selected color. Negative slider values decrease the brightness, contrast, hue or saturation whereas positive values
increase it. Double click the slider label to reset a slider to zero.
There are also two additional sliders called Tolerance and Hue Range, which are not available when the Controls combo
box is set to "Tonal". The Tolerance slider controls the intensity of the mask of the selected color, which in turn
influences the effect intensity of the brightness, contrast, hue and saturation sliders. Slider values above 50 amplify the
mask whereas lower values suppress it. Values above 90 may produce artifacts, because the color mask might be
stretched too much.
The Hue Range control displays a color gradient which ranges from red to green to blue and finally to red again. It
represents a continuous color circle, because the red color on the left and right side are identical. Below the hue bar are
two arrows connected with a line. The arrows indicate which color range is currently targeted. If you switch to another
color in the color box row, you can see that the two arrows are repositioned to display the color range of the newly
selected color. You can change this color range by dragging one of the arrows in order to target a larger image area. If
you drag an arrow beyond the left or right side of the hue bar, it will reappear on the other side. By dragging the line that
connects the arrows or dragging directly on the hue bar between the arrows you can move both arrows simultaneously
and retain the size of the color range.
Please note that the adjustments of the Hue Range control may only be subtle, because the color mask is not only
determined by the selected hue range but is also based on other internal parameters. For example, if you currently have
the red color box at the top activated and drag the arrows towards the blue area of the hue bar, you won't be able to affect
blue or green areas in the image with the sliders of the red color box. You will only be able to exclude certain red tones
and maybe include magenta and orange tones which lie nearby on the hue bar.
The Intensity slider below the separation line decreases or increases the total effect of all sliders on this tab sheet. The
Tolerance slider below the separation line suppresses or amplifies the color masks of all eight colors. As a result the total
effect of all sliders on this tab sheet is also decreased or increased, but you should be more careful with this slider as too
high values may produce artifacts.
ColorStyler Manual
64
3.5 FX1 Tab Sheet
The Colorize tab sheet of Advanced Mode offers effects for colorizing the image, adjusting its contrast and for adding
color gradient and neutral gradient effects. It simulates traditional lens filters as well as supplies special color effects.
Click on the sub tab bar at the top of the tab sheet to switch between different control groups. The arrow-down button
displays a menu with various presets that activate the effects on the selected sub tab. So depending on the selected sub
tab a different menu is displayed.
3.5.1 Filter
Color Warmth
The Color Warmth group contains sliders for colorizing the image. Positive values of the Cool/Warm slider make the
image orange and negative values add a blue color. Positive values of the Green/Magenta slider colorize the image
magenta and negative values make it green. By using both sliders you can also apply other colors. Red is added with high
values of both sliders, cyan with low values of both sliders and yellow with high values of the Cool/Warm and low values
of the Green/Mag. slider.
Summer Color
The Summer Color effect changes the color and increases the saturation of the image. Set the Intensity slider to a value
above zero to activate the effect. At a value of 100 it has the greatest intensity. The Red-Yellow slider defines the color
mood of the image. At a value of zero the colors have an autumn-like reddish look and at a value of 100 the colors tend
towards yellow, which gives landscape photos a summer-like look.
Polarizer
The Polarizer effect simulates the brightness changes that a polarizer lens filter produces. Such a lens filter darkens the
sky and brightens the foliage in landscape photos. It normally has no influence on skin, but such an effect was
nevertheless added as a bonus.
Positive values of the Sky slider darken blue and cyan image areas whereas negative ones lighten them. On the other
hand, positive values of the Foliage slider brightens green and yellow image areas whereas negative ones darken them.
Positive values of the Skin slider brightens red and orange image areas whereas negative ones darken them. So positive
values of the sliders simulate a polarizer lens filter and negative ones produce the contrary effect. The Brightness slider
lets you darken or brighten the image. It brightens various image colors different and keeps gray areas mostly untouched.
So it works quite differently from the Brightness slider on the Tone sub tab of the Main tab sheet.
ColorStyler Manual
65
3.5.2 Colorshift
The Colorshift effect creates drastic color changes by remixing the color channels. The Type combo box offers different
effect types. The Classic option produces less saturated color shift effects and misses the three bottom sliders. The
Enhanced option allows more versatile effects with the help of all seven sliders. The TechniColor option simulates a
special film process, which only uses two instead of three color channels. The Infra Red option simulates the look of infra
red photos. These last two options are based on the Enhanced effect thus they offer all controls.
Set the Intensity slider to a value above zero to activate the effect. The higher its value, the stronger the effect will be.
The Red Hue, Green Hue and Blue Hue sliders separately change the hue for each of the three RGB color channels. If
you activate the check box at the left hand side of them, a combined Hue slider appears, which shifts the color for all
three channels at the same time. This is like having the same value for all three Hue sliders.
The Red Hue, Green Hue and Blue Sat sliders separately change the saturation for each of the three RGB color
channels. If you activate the check box at the left hand side of them, a combined Saturation slider appears, which shifts
the saturation for all three channels at the same time. This is like having the same value for all three Sat sliders.
ColorStyler Manual
66
3.5.3 Grad
The Grad effect applies a colored gradient to the image. You can choose the type of gradient that you want from the
Gradient combo box. You can choose between a linear and circular gradient and between one, two or three colors. Two
colors means that one color will start from the top of the gradient and one from the bottom, so that they are cross blended.
Three colors means that a third color will be applies in the middle of the gradient, so that it cross blends with the top and
bottom color. There is also a Linear Middle Color option in the Gradient combo box, which applies the color in the middle
of the gradient and fades it out to the top and the bottom. This option can be used to simulate, e.g. a gold reflector that is
used in portrait photography.
The Invert check box makes the gradient cover the parts of the image that it did not cover before. A linear gradient then
runs from bottom to top instead of top to bottom and a circular one covers the center of the image instead of the corners.
The Intensity slider activates and adjusts the strength of the color gradient. The higher its value, the stronger the color of
the gradient.
The Brightness and Contrast sliders reduce or increase the brightness and contrast of the color gradient. The
Shadows and Highlights sliders remove the gradient from shadow and highlight areas of the image. For example, if you
have a photo with a bright sky and dark building, you can increase the value of the Shadows slider to weaken the effect of
the color gradient on the dark buildings.
The Offset slider shrinks or expands the linear gradient effect and moves it towards the top or bottom of the image thus
making the gradient effect cover more of the image. If you apply a circular gradient the same slider will be called Size and
move the circular gradient towards the corners of the image. The Density slider controls the softness of the gradient
edge. A low slider value will produce a hard edge between the unmodified image areas and the gradient and a high value
will result in a soft transition. For the circular gradient you have an additional Elliptical slider, which transforms the
gradient from a circular to an elliptical one. Finally, the Rotation slider rotates the gradient. It has no effect on circular
gradients, only on linear and elliptical ones.
Depending on how many colors you chose in the Gradient combo box you will see one, two or three color boxes at the
bottom. Click on them to select a different color for the gradient. In the appearing color dialog you can select a new color
or change the current color. By adjusting the saturation of the color you can also change its effect intensity. You can
change the saturation of the color either by entering another value in the Sat text box or by vertically moving the cross in
the color diagram.
Activate the cross icon and click with it on the preview to relocate the center of the gradient. For more information see
the Tools & Reset page.
ColorStyler Manual
67
3.5.4 ND-Grad
The ND-Grad effect applies a gradient-shaped brightness and contrast adjustment to the image, which simulates a
graduated neutral density lens filter. You can choose between a linear, linear middle and circular gradient from the
Gradient combo box. The Linear Middle option applies the brightness and contrast adjustment in the middle of the image
and fades it out to the top and the bottom. This option can be used to simulate a white or silver reflector that is often used
in portrait photography.
The Invert check box makes the gradient cover the parts of the image that it did not cover before. A linear gradient then
runs from bottom to top instead of top to bottom and a circular gradient covers the center of the image instead of the
corners.
The Intensity slider activates and adjusts the strength of the color gradient. The higher its value, the stronger the color of
the gradient.
The Brightness and Contrast sliders define the brightness and contrast adjustment that is applied with the gradient.
The Shadows and Highlights sliders remove the gradient from shadows and highlights areas of the image. For
example, if you have a photo with a bright sky and dark building, you can increase the value of the Shadows slider to
weaken the effect of the brightness and contrast adjustment on the dark buildings.
The Offset slider shrinks or expands the linear gradient effect and moves it towards the top or bottom of the image thus
making the gradient effect cover more of the image. If you apply a circular gradient the same slider will be called Size and
move the circular gradient towards the corners of the image. The Density slider controls the softness of the gradient
edge. A low slider value will produce a hard edge between the unmodified image areas and the gradient and a high value
will result in a soft transition. For the circular gradient you have an additional Elliptical slider, which transforms the
gradient from a circular to an elliptical one. Finally, the Rotation slider rotates the gradient. It has no effect on circular
gradients, only on linear and elliptical ones.
Activate the cross icon and click with it on the preview to relocate the center of the gradient. For more information see
the Tools & Reset page.
ColorStyler Manual
68
3.6 FX2 Tab Sheet
The FX2 tab sheet offers even more effects for enhancing the look of the image. There are diffusion, glow, vignette,
paper, grain and frame effects.
Click on the sub tab bar at the top of the tab sheet to switch between different control groups. The arrow-down button
displays a menu with various presets that activate the effects on the selected sub tab. So depending on the selected sub
tab a different menu is displayed.
3.6.1 Diffusion
The Diffusion sub tab produces diffusion and blur effects that are either applied to the whole image or as a gradient.
The Intensity slider activates and adjusts the strength of the diffusion effect. The higher its value, the stronger the image
diffusion will be. The Radius slider controls the width of the diffusion effect. Higher values produce a softer effect. The
Opacity slider determines how much of the original image is visible. Lower values let more of the image shine through
and improve the contrast whereas higher values hide the image behind the diffusion and fade the image details. The
Brightness and Contrast sliders adjust the brightness and contrast of the diffusion effect.
If you want to apply the diffusion to the whole image you should select "None" in the Gradient combo box. Otherwise
you can choose between a linear, linear middle and circular gradient. The Linear Middle option applies the diffusion to the
middle of the image and fades it out to the top and the bottom. With the Invert check box activated this option can be used
to simulate a shift lens. The Invert check box makes the gradient cover the parts of the image that it did not cover before.
A linear gradient then runs from bottom to top instead of top to bottom and a circular gradient covers the center of the
image instead of the corners.
The Offset slider shrinks or expands the linear diffusion gradient and moves it towards the top or bottom of the image
thus making it cover more of the image. If you apply a circular gradient the same slider will be called Size and move the
circular gradient towards the corners of the image. The Density slider controls the softness of the gradient edge. A low
slider value will produce a hard edge between the unmodified image areas and the gradient and a high value will result in
a soft transition. For the circular gradient you have an additional Elliptical slider, which transforms the gradient from a
circle to an ellipse. Finally, the Rotation slider rotates the gradient. It has no effect on circular gradients, only on linear
and elliptical ones.
Activate the cross icon and then click with it on the preview to relocate the center of the diffusion gradient. For more
information see the Tools & Reset page.
ColorStyler Manual
69
3.6.2 Halo
The Halo sub tab offers two effects that cover some parts of the image with a color layer with soft borders.
Glow
The Glow effect makes certain image areas glow with a certain color. This color is white by default, but you can also
change it by clicking in the color box. The Intensity slider activates and adjusts the strength of the glow effect. The
Radius slider influences the border softness of the glow area. The Exposure slider decreases or increases the
brightness of the glow effect. Too high values may blow out highlight details.
The Limit slider determines how large the glow effect is and how much of the image it covers. Larger slider values
increase the size of the glow effect. The Tone slider defines the brightness of the image pixels that will be covered by the
glow effect. If you want to apply the glow effect to bright image areas, use a high slider value. For covering dark image
areas, choose a low slider value. Basically the Limit slider defines the brightness range that the effect covers whereas the
Tone slider defines the center of that range.
Activate the eyedropper icon and click on the preview to select a value for the Tone slider. Hold down the mouse button
and drag the mouse to change the value of the Limit slider interactively. For more information see the Tools & Reset
page.
Vignette
The Vignette effect covers the corner areas of the image with a color. If the Invert check box is activated, the center of
the image is covered instead. The Intensity slider activates and adjusts the opacity of the vignette effect. The Size slider
moves the vignette more towards the corners of the image. The Density slider controls the softness of the vignette edge.
A low slider value will produce a hard edge between the unmodified image areas and the vignette and a high value will
result in a soft transition. The Shape slider gradually chanages the shape of the vignette. At a value of -100 it is circular,
at zero it is elliptical and at 100 it is a rounded rectangle. Finally, the Rotation slider rotates the vignette, which only
works if the vignette is elliptical.
Activate the cross icon and click with it on the preview to relocate the center of the vignette. For more information see the
Tools & Reset page.
ColorStyler Manual
70
3.6.3 Detail
Paper
The Paper effect increases the local contrast of the image pixels, which simulates printing on more glossy paper. The
Intensity slider activates the effect and amplifies it. The Gloss slider controls how wide the spreading of the effect is.
Lower slider values reveal more details in the image. The Highlights slider removes the effect from the highlight areas of
the image. This avoids blown out details in the highlights.
Grain
The grain controls add gray or colored grain particles to the image in order to simulate the grain of a photographic film.
The Intensity slider controls the intensity of the grain. Low values let the grain vanish and higher values make it more
visible. The Size slider defines the size of the grain particles. The value represents the radius of the grain particle. A
radius value of 1.0 means that the particle is 2 pixel in diameter. A value of 4.0 creates grain particles that are quite big
and obtrusive. The Color slider colorizes the grain particle. At a value of zero you will only see gray grain particles and at
a value of 100 you get multicolored grain particles.
Clicking the Rand button changes the internal random values that are used to render the grain. This changes the grain
distribution slightly.
The Shadow, Midtone and Highlight sliders let you increase or decrease the intensity of the grain effect in the shadow,
midtone and highlight areas of the image independently. Setting them all to -100 totally removes the grain.
ColorStyler Manual
71
3.6.4 Frame
The Frame effect adds rectangular or square frames around the image. The frame is placed inside the image, so it hides
a part of it.
The Frame consists of three elements: outside, middle border and inside. The Outside slider sets the size of the outer
frame part, the Border slider adjusts the size of the second frame element and the Inside slider increases or decreases
the size of the inner frame part. If you set one of these sliders to zero, the corresponding frame element disappears.
The Intensity slider makes the frame transparent and lets the image underneath shine through. At a slider value of zero
the frame vanishes. The top color box shows the color of the outside and inside elements. The bottom color box
indicates the color of the border element. Click on them to choose another color. The Border Only check box makes the
inside and outside of the frame disappear while the border element is still visible.
The remaining controls influence the edge curve of each border element. If you want a perfectly straight and rectangular
frame you should choose the None option for the Edge combo box. The other options offer various patterns for adding a
curve to the frame elements. The Outer Edge slider increases the curvature of the line between the outside and border
frame element. The Middle Edge slider increases the curvature of the line between the border and inside frame element.
Finally, the The Inner Edge slider increases the curvature between the inside frame element and the image.
The Size slider controls the amplitude of the edge curves. Low values produce smaller curve details whereas large
values result in large details. The Roundness slider smoothes the curve details. At higher values the details get larger
and smaller ones are suppressed. This slider can also be used to make the corners of the frame elements round. The
Softness slider defines the softness of the edge curve. A slider value of -100 pixelates the edge and values between -99
and zero make it sharper. Values above zero make the edge softer.
If you selected the Random option in the Edge combo box, you also find a Rand button and an edit box at the bottom of
the tab sheet. The edit box contains the value that is used for the randomness of the edge curve. Other values produce a
different edge curve. You can manually enter values between -999,999 and 999,999. This makes almost two million
different curve variations possible. Clicking the Rand button produces a new random value and places it in the edit box.
The Frame Width label at the bottom estimates the size of the frame in pixels. You can use this value to enlarge the
image canvas to avoid that the frame hides a part of the image. For example, if the frame width is 150 pixels you need to
enlarge the width and height of the image canvas by 300 pixels before you apply ColorStyler.
ColorStyler Manual
72
3.7 Mask Tab Sheet
The Mask tab sheet of Advanced Mode offers control for the brush tool, various tonal and gradient-based masking options
as well as options for adjusting the overall ColorStyler effect.
Click on the sub tab bar at the top of the tab sheet to switch between different control groups. The arrow-down button
displays a menu with various presets that activate the effects on the selected sub tab. So depending on the selected sub
tab a different menu is displayed.
3.7.1 Brush
The Brush controls are used in connection with the brush tool. Please read the Tools & Reset page.
3.7.2 Mask
The Method Combo Box
The Method combo box contains four options. "Off" deactivates masking whereas the other three display different
masking options as discussed below.
The M Button
If you activate the M button you will see the grayscaled mask image that is created with the help of the masking options
described below. This gives you visible feedback about which image areas are masked and which not. The white areas of
the mask have the effect applied whereas the black ones show the original pixels. Gray mask areas have the effect
applied with reduced intensity.
ColorStyler Manual
73
Tonal Masking
The Tonal method contains three options for creating masks based on brightness, color and saturation values of the
image. You can use all three groups at the same time or only one. Each group contains an Invert slider, which makes
masked areas unmasked and vice versa.
The Brightness group offers Range and Tones options. The Range option applies all ColorStyler effects to image areas
of a defined brightness range. The Tone slider lets you select the brightness value. If you set it to 255, only the brightest
image areas will be affected. If you set it to zero, only the dark image areas will be included in the mask. The Limit slider
controls the brightness range around the selected brightness value. A higher slider value will add larger image areas to
the mask whereas a value of zero means that no image area is affected at all. To pick a brightness value from the preview
activate the eyedropper icon of this group and click on the preview. Drag the eyedropper over the preview to adjust the
Limit slider and immediately see the effect of the brightness mask.
The Tones options of the Brightness group offers Highlights, Midtones and Shadows sliders. If you increase the value
of the Highlights sliders, the ColorStyler effect will be removed from the bright image areas. If you additionally activate the
Invert check box, the Highlights slider adds the ColorStyler effect to the bright image areas. The other two sliders work
accordingly, but affect mid bright and dark image areas. Alternatively you can activate the eyedropper icon of this group,
click on the preview, hold down the mouse button and drag the mouse over the preview. One of the three sliders is then
automatically chosen (depending on the clicked pixel in the preview) and its value is changed during dragging.
The Color group applies all ColorStyler effects to image areas that have a certain color in the original image. The color
displayed in the color box is used for creating the mask. To choose another color click on the color box to display a color
dialog. Alternatively click on the eyedropper icon next to the color box and then click on the preview to pick another color.
Drag the eyedropper over the preview to adjust the Limit slider and immediately see the effect of the color mask. The
Limit slider adjusts the size of the affected image areas by expanding or shrinking the mask. A low slider value only
includes pixels with similar colors in the mask whereas a high slider value also includes pixels with slightly different colors.
The Saturation group applies all ColorStyler effects to image areas of a defined saturation range. The Tone slider
selects the saturation value. For example, if you set it to 255, only the highly saturated image areas will be affected. If you
set it to zero, only the low saturated image areas will be included. The Limit slider controls the saturation range around
the selected saturation value. A higher slider value will include larger image areas in the mask whereas a value of zero
means that no image area is affected at all. To pick a saturation value from the preview activate the eyedropper icon of
this group and click on the preview. Drag the eyedropper over the preview to adjust the Limit slider and immediately see
the effect of the saturation mask.
ColorStyler Manual
74
Linear Masking
The Linear Mask method creates a linear gradient that is used as a mask. The Offset slider positions the gradient, the
Density slider expands or shrinks the gradient and the Rotation slider rotates the gradient by 360 degrees. The Invert
check box inverts the mask and lets you quickly swap the masked areas.
To set the center of the linear mask click on the cross icon on the left side of the Method combo box. This activates the
cross tool, with which you can click on the preview to set the center.
Circular Masking
The Circular Mask method creates a circular gradient that is used as a mask. The Size slider determines the size of the
circular gradient and the Density slider makes its borders harder or smoother. The Elliptical slider makes the circular
gradient elliptical and the Rotation slider rotates it. If the Elliptical slider has a value of zero, the gradient is circular, so
using the Rotation slider has no effect. The Invert check box inverts the mask and lets you quickly swap the masked
areas.
To set the center of the circular mask click on the cross icon on the left side of the Method combo box, then click on the
preview.
ColorStyler Manual
75
3.7.3 Fade
The controls on the Fade sub tab have an influence on all other effects in ColorStyler. It is the final processing step that is
performed after all other effects. Unlike the Fade command in Photoshop, these controls also allow you to amplify the
effect and not only fade it.
The Main Intensity slider decreases or increases the intensity of all ColorStyler effects. A slider value of zero leaves the
effects untouched. If you set it to -100, no effect is applied by ColorStyler. At 100 all ColorStyler effects are applied at
twice the strength. This slider is also displayed in Easy Mode below the preset list for presets that contain multiple effects.
The other four sliders adjust the luminance, color, lightness and saturation of all ColorStyler effects. Values above zero
increase the intensity, values below zero reduce it and a zero value does not produce any changes.
If you set the Luminance slider to -100, the original luminance of the image is retained and the ColorStyler effects only
affect the color of the image but not its luminance. If you set the Color slider to -100, the original color of the image is
retained and the ColorStyler effects only affect the luminance of the image but not its color. If you set both Luminance and
Color sliders to -100, ColorStyler does not apply any effect.
If you set the Lightness slider to -100, the original lightness of the image is retained and ColorStyler only changes the
color (hue and saturation) of the image. If you set the Saturation slider to -100, the original saturation of the image is
retained and ColorStyler only changes the hue and lightness of the image. If you set the Lightness and Saturation sliders
to -100, ColorStyler only changes the hue of the image. If you set the Lightness, Saturation and Color sliders to -100,
ColorStyler does not apply any effect.
There is no Hue slider available, because such a slider would shift the colors. If you want to do that, please use the Shift
Hue slider on the Color sub tab of the FX1 tab sheet. Otherwise use the Color slider instead.
If you set the Luminance slider to 100 and the ColorStyler effects increase the luminance of the image, then the
luminance will be increased further. If ColorStyler decreases the luminance of the image and you set the Luminance slider
to 100, then the luminance will be decreased further. The other sliders work according to the same principle.
ColorStyler Manual
76
Copyright © 2012-2013 by Harald Heim & The Plugin Site