1
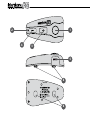
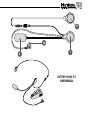
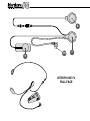
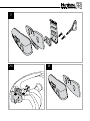
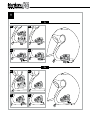
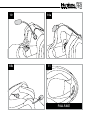
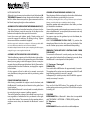
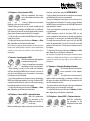
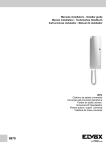
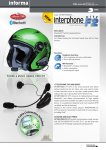
INSTRUCTION MANUAL
2
1
4
3
5
6
6
8
10
9
7
INTERPHONE F4
UNIVERSAL
8
9
10
7
INTERPHONE F4
FULL FACE
7
7.1
8
9
9a
9a1
9a2
9a3
9a4
9b1
9b2
9b3
9b4
9b
10
10a
10b
11
FULL FACE
INTERPHONE F4 stereo is a Bluetooth® system for helmets, allowing you access to information and entertainment whilst riding your motorcycle.
INTERPHONE F4 stereo works and communicates with all
mobile telephones, GPS navigators, and musical readers
equipped with Bluetooth® technology.
The control unit is covered by a special weather protection
skin membrane making it fully waterproof. Its aerodynamics
has been designed to avoid any disturbances generated by
air turbulence, and to allow water, if raining, to slide away.
Its controls and shape have been designed to allow for quick
and easy identification and access whilst riding wearing gloves.
INSTALLATION
INTERPHONE F4 stereo can be installed on any helmet,
without effecting structure or finish. Once installed, it can
be removed at any time. INTERPHONE F4 stereo does not
affect helmet homologation.
WHILST RIDING
Always prioritise your riding, not telephone calls.
During a telephone conversation, or whilst using the interphone, reduce your speed and concentrate on your riding.
In bad weather and/or heavy traffic, we recommend pulling
over and stopping, before answering.
Always ride carefully and in accordance with the current highway code.
WHEN STOPPED
To avoid theft, if leaving the helmet on the motorcycle, INTERPHONE F4 stereo is fitted with a quick release button
to allow you to remove the external Bluetooth® control unit
and take it with you.
FUNCTIONS
Telephone functions
• hands-free Dualphone
(connection with two 2 telephones at
the same time)
• voice response
telecom
• voice call
• call refuse
Intercom functions
• motorcycle-motorcycle or pilot-passenger
interphone connection with other
Interphone or INTERPHONE F4 devices
• interphone connection with enable button
•telephone ring warning
intercom
GPS functions
• audio information from Bluetooth® GPS
navigator
• telephone ring warning
gps
Stereo functions
• wireless hi-fi stereo connection with
Bluetooth® A2DP music players
• remote controls music commands
• telephone ring warning
music
CHARACTERISTICS
• Full duplex communication
• DSP filter
(digital cancellation of wind and background noise)
• Communication up to 500 m (in open field)
• Automatic volume adjustment
(adjusts automatically to suit speed and environmental noise)
• Fully waterproof
• Installation in just 5 minutes
• Removable control panel
• Lithium battery
• Active use autonomy: up to 10 hours
(indicative time of use alternating the various functions)
• Stand-by time: up to 700 hours
• Recharge time: 3 hours
• Dimensions: 90x46x20 (mm)
• Weight: 83g including ear phones and microphone
NOTES ON AUTONOMY
Active use autonomy is indicative. It has been calculated by
alternating the use of all the INTERPHONE F4 stereo functions and, given the varied use of these; it can vary significantly from one use to another.
During Intercom communication, one of the two Interphone
or INTERPHONE F4 devices has a greater battery consumption: this is due to the wireless recharge procedure that one
of the control panels carries out in order to remain connected to the other. It can even lead to a difference in autonomy
of 60/90 minutes.
On long journeys, to optimise battery duration, we advise
enabling Intercom mode only when you wish to communicate, remaining in stand-by or an alternative mode when not
actually communicating.
Product description
Bluetooth® control panel
1. Multipurpose button
2. Multipurpose LED
3. Volume adjustment button +
4. Volume adjustment button 5. Recharge / Multipurpose socket and accessories
6. Bluetooth® control panel connection guide
Speaker and speaker stereo with anti-wind microphone
7. Speaker
8. Speaker stereo
9. Microphone with anti-wind sock
10. Speaker/microphone connector
Package contents*
• Bluetooth® control panel
• Speaker with anti-wind microphone
• Speaker for stereo profile
• Removable control panel support with clip and screws
(2 screws)
• Adhesive control panel support
• Clip adaptor
• Mains battery charger
• Adhesive Velcro
• Screwdriver
*Universal INTERPHONE F4 or Full Face in the Twin Pack versions: the
package contains 2 complete kits for two helmets with one battery
charger (dual wire) to recharge 2 control panels.
1 First use
1.1 Charging
Before using INTERPHONE F4 you will need to charge it up.
Connect the battery charger to a mains socket (110-220 V)
and the recharger connector to the INTERPHONE F4 charging socket.
When charging, the LED indicator is red.
Once charging is complete, the LED turns green, to show
that the battery has been fully charged.
1.2 Installation
The kit includes two types of slide support, one adhesive
(fixed) and the other with clamp clips (removable). Use the
support that best adapts to your use and helmet type.
NOTES ON POSITION
Although it can be mounted on either side of the helmet, INTERPHONE F4 stereo has been designed to be fixed on the
left: this allows the motorcyclist to give commands with his
left hand, keeping the right on the accelerator.
ASSEMBLY OF THE SLIDE SUPPORT WITH REMOVABLE CLIP (7)
Take the support and note the best place to fasten it to the
side of the helmet. Insert the rear part of the clip into the
helmet and couple the other part on the outside.
Insert the screws and tighten gently. Check position and
move the support if necessary, by sliding it along. Tighten
the screws with the screwdriver supplied.
N.B.: the support also includes an adaptor to offset any possible differences in thicknesses that there can be between helmets.
Mount the adaptor between the two parts comprising the slide support,
using the longer screws supplied with the kit.
ASSEMBLY OF THE ADHESIVE SLIDE SUPPORT (8)
Take the adhesive support and look for the best side and place to position it. Clean and de-grease the part of the helmet
where you are going to stick the support (do not use any detergents that could damage the helmet’s finish). Remove the
protective film from the bi-adhesive, and apply the support
to the helmet.
As the support will not be able to be moved once stuck
onto the helmet, take great care with its positioning, when
applying.
FIXING THE CONTROL PANEL (9)
After having assembled the support onto the helmet, take
the Bluetooth® control panel, and insert into the guide, from
top to bottom.
Check that the Bluetooth® control panel is correctly locked in
its casing by trying to remove it, pulling upwards.
The control panel must always be inserted from top to bottom, regardless of whether the kit is positioned to the right
or left of the helmet. The connector for the speaker with microphone must always be beneath the Bluetooth® control
panel.
SPEAKER WITH MICROPHONE ASSEMBLY (10)
Take the piece of Velcro and apply to the inside of the helmet
with the bi-adhesive, positioning it at your ear.
N.B.: before positioning the Velcro, it is a good idea to try it out. Put the
helmet on and check the most suitable position for fixing.
Apply the speaker with microphone to the Velcro you have
just installed in the helmet.
Connect the speaker with microphone connector to the socket on the Bluetooth® control panel (the connector can only
be inserted in one position).
Any excess wire must be gathered up into the helmet, beneath the padding.
ONLY FOR INTERPHONE F4 FULL FACE (11): position the
microphone Velcro into the chin guard, at the level of the
mouth. Gather up any excess wire beneath the padding.
REMOVING THE BLUETOOTH® CONTROL PANEL FROM
THE HELMET
To remove the Bluetooth® control panel, press the locking
lever against the helmet shell and, keeping it pressed, allow
the Bluetooth® control panel to slide upwards.
1.3 Turning on / Turning off
TURNING ON
Press and hold the MFB button for approximately 3 seconds.
The speaker will sound an acoustic warning and the LEDs will
begin flashing quickly for around 3 seconds.
Subsequently, in stand-by mode, the LED will flash approximately once every 5 seconds.
TURNING OFF
Press and hold the MFB button. The speaker will sound a
prolonged acoustic warning and the LED will flash red prior
to turning off.
2 Pairing
INTERPHONE F4 is a Bluetooth® device that is compatible
with TELEPHONE – INTERCOM – STEREO (A2DP) profiles.
2.1 Telephone
Pairing
INTERPHONE F4 can be used with a mobile telephone.
After having turned INTERPHONE F4 off, press and hold the
MFB button until the warning light alternates red and blue
flashes. This will take about 8 seconds.
When the light is flashing red/blue alternately your INTERPHONE F4 is in pairing mode, go to the Bluetooth menu in
your telephone and select search for devices (please refer to
the telephone or navigator manual).
The telephone or navigator will detect INTERPHONE F4.
Simply select it, and enter the numerical code 0000.
To use with a mobile telephone and GPS navigator at the
same time, see point 2.4.
2.2 Intercom
Pairing
With two INTERPHONE F4 devices, you can use the Intercom function.
After having turned the two INTERPHONE F4s off, press and
hold the MFB buttons on both until the warning light alternates red and blue flashes. This will take about 8 seconds.
When both LEDs flash red/blue alternately, press and release
the MFB button on one of the two INTERPHONE F4s.
The two INTERPHONE F4s are connected when both LEDs
show a fixed blue light.
NOTE ON COMPATIBILITY WITH OTHER INTERPHONE MODELS
The INTERPHONE F4 intercom connection is also compatible with previous INTERPHONE Cellular Line® devices.
Pairing: press and hold the MFB buttons on both until the
warning light alternates red and blue flashes. For INTERPHONE F4 this will take about 8 seconds, for INTERPHONE,
about 5 seconds.
When both devices flash red/blue alternately, press and release the INTERPHONE F4 multipurpose button (the red and
blue LED will flash more quickly).
Wait a few seconds, and when the devices are connected,
the INTERPHONE F4 LED will remain fixed blue, whilst that
of INTERPHONE will flash blue quickly.
2.3 Stereo (A2DP)
Pairing
To use the Stereo (A2DP) function, you will need INTERPHONE F4 in configuration mode: After having turned IN-
TERPHONE F4 off, press and hold the MFB button until the
warning light alternates red and blue flashes. This will take
about 8 seconds.
When the light is flashing red/blue alternately, ask the musical player you intend to use, to search for devices (please
refer to the instructions given in the device manual). If the
musical player so requires, enter the numerical code 0000.
Once connected, the INTERPHONE F4 LED will flash blue.
2.4 Audio GPS
Pairing
GPS NAVIGATORS use the TELEPHONE (headset) profile for
audio connection: to use a telephone whilst using a navigator, you will need to use the specific function of the GPS
device. For further information and settings, please consult
the navigator manual.
3 Use
3.1 Telephone function
To answer a call: as a call comes in, the speaker
produces a warning sound or the telephone’s
ring: to answer, simply press and release the MFB
button.
telecom
To end a call: to end a call, simply press and release the MFB
button.
Vocal call: some telephones allow you to make a vocal call
simply by pressing and releasing the MFB button.
To refuse a call: to refuse the call, press and hold the MFB
button for approximately 4 seconds.
To refuse a call in VOX mode, follow the instructions given in
the VOX FUNCTION section.
Volume adjustment: to adjust the volume, press the buttons Volume + or Volume -, depending on the desired volume level.
3.2 Intercom function
To enable intercom function: to enable the
conversation in an intercom profile, press the
MFB button on one of the two INTERPHONE
F4s, and hold for about 3 seconds. An audible
intercom
warning will advise you when connection has occurred.
Conversation in intercom mode is full-duplex.
To disable intercom function: to disable intercom function,
simply press and release the MFB button.
Volume adjustment: to adjust the volume, press the buttons Volume + or Volume -, depending on the desired volume level.
3.3 Stereo function (A2DP)
Use of stereo A2DP profile of the
telephone with INTERPHONE F4:
if the telephone has a Stereo A2DP
profile, it can be used as musical plamusic
telecom
yer, connecting it up to INTERPHONE F4. To enable musical
playing, please consult the telephone instruction manual.
To adjust the volume, press the buttons Volume + or Volume -, depending on the desired volume level.
Use of a musical player with INTERPHONE F4:
a musical player other than the telephone, with Bluetooth®
technology, can be used: to connect it up, follow the instructions for the pairing of INTERPHONE F4 and refer to the musical player manual.
3.4 Music remote control
• Play/Pause: press and release the MFB button
twice.
• Rew: press and hold the Volume - button for
music
3 seconds.
• FF: press and hold the Volume + button for 3 seconds.
• Volume: To adjust the volume, press the buttons Volume +
or Volume -, depending on the desired volume level.
APPLE® IPOD®, IPHONE® OR IPHONE® 3G
Music can also be played on INTERPHONE F4 stereo by IPHONE or IPOD devices, if equipped with the specific Bluetooth®
CELLULAR LINE® ILINK STEREO adaptor (not included).
3.5 Telephone + Intercom function
With this combination, the connection to the telephone function takes
priority.
• During a telephone conversation,
intercom
telecom
interphone communication is not permitted.
• To enable the intercom function, there cannot be a telephone call underway: press and hold the MFB button for around
3 seconds. An acoustic sound will advise you of connection.
Conversation in intercom mode is full-duplex.
• To end a conversation in intercom mode, simply press and
release the MFB button.
• During an interphone conversation, you can answer or refuse a telephone call received. Intercom communication will
be interrupted and re-activated automatically at the end of
the call.
• To answer a telephone call, press and release the MFB button.
• To end a telephone call, press and release the MFB button.
• To refuse the call, press and hold the MFB button for approximately 4 seconds.
• To adjust the volume, press the buttons Volume + or Volume -, depending on the desired volume level.
3.6 Telephone + Stereo function (A2DP)
With this combination, the connection to the telephone function takes
priority.
telecom
music
• During a telephone conversation,
the playing of music is not permitted.
• When listening to music, you can answer a telephone call
received. Press and release the MFB button to enable the
call. At the end of the call, music will automatically continue
playing from the exact point at which it had stopped.
• To refuse a call, press and hold the MFB button for approximately four seconds.
• To adjust the volume, press the buttons Volume + or Volume -, depending on the desired volume level.
N.B.: In telephones equipped with musical players, and therefore which
include a Stereo (A2DP) profile, the Telephone + Stereo (A2DP) function
coincides. As such, it may not be possible to connect a further Stereo
(A2DP) player.
3.7 Intercom + Stereo function (A2DP):
With this combination, the interphone
conversation takes priority.
• During an interphone conversation,
intercom
music
the playing of music is not permitted.
• When listening to music, you can make and interphone
call. Press and hold the MFB button for around 3 seconds. An
acoustic sound will advise you of connection. Conversation
in intercom mode is full-duplex.
• To end the interphone conversation, press and release the
MFB button. After approximately 2 seconds, the Stereo A2DP
connection will be restored and music will continue playing
from the exact point at which it had stopped.
• To adjust the volume, press the buttons Volume + or Volume -, depending on the desired volume level.
3.8 Telephone + Stereo (A2DP) + Intercom function
With this combination,
the connection to the
telephone function takes priority.
telecom
intercom
music
Before connecting the devices, please ensure that all three
have been used at least once with INTERPHONE F4.
• During a telephone conversation, interphone conversation
and the playing of music are not permitted.
• During an interphone conversation, you can answer or refuse a telephone call received. To answer, press and release
the MFB button, to refuse press and hold the MFB button for
approximately 4 seconds.
• During an interphone conversation, the playing of music
is not permitted.
• Whilst listening to music on the Stereo A2DP, you can
answer a telephone call received, or enable an interphone
conversation. To answer, press and release the MFB button.
To enable the intercom function, press and hold the MFB
button for approximately 3 seconds. An acoustic sound will
advise you of connection. Conversation in intercom mode is
full-duplex.
• To adjust the volume, press the buttons Volume + or Volume -, depending on the desired volume level.
N.B.: In telephones equipped with musical players, and therefore which
include a Stereo (A2DP) profile, the Telephone + Stereo (A2DP) function
coincides. As such, it may not be possible to connect a further Stereo
(A2DP) player.
3.9 Telephone + Telephone (Dualphone) function
This function allows for the simultaneous connection of two telephones.
telecom
telecom
• As a call comes in on the second telephone, whilst a conversation is underway on the first, you
can press and release the MFB button to interrupt the first
call and activate the second.
• You cannot refuse a call coming in on the second telephone
whilst carrying out a conversation on the first.
• To adjust the volume, press the buttons Volume + or Volume -, depending on the desired volume level.
3.10 Telephone + Stereo (A2DP) + Telephone function
With this combination,
the connection to the
telephone function takes
priority.
telecom
music
telecom
• During a telephone conversation, the playing of music is
not permitted.
• As a call comes in on the second telephone, whilst a conversation is underway on the first, you can press and release
the MFB button to interrupt the first call and activate the
second.
• You cannot refuse a call coming in on the second telephone
whilst carrying out a conversation on the first.
• When listening to music, you can answer a telephone call
received. Press and release the MFB button to enable the
call. At the end of the call, music will automatically continue
playing from the exact point at which it had stopped.
• To adjust the volume, press the buttons Volume + or Volume -, depending on the desired volume level.
N.B.: In telephones equipped with musical players, and therefore which
include a Stereo (A2DP) profile, the Telephone + Stereo (A2DP) function
coincides. As such, it may not be possible to connect a further Stereo
(A2DP) player.
3.11 Voice response (VOX )
The voice response function allows you to answer a call without having to press any buttons.
Enabling voice response: Press and hold the
telecom
Volume + button for approximately 5 seconds.
An acoustic sound will advise you that this has been done.
Disabling voice response: Press and hold the Volume button for approximately 5 seconds. An acoustic sound will
advise you that this has been done.
To answer a call: When receiving a call, simply say a word
(e.g. ‘HELLO’) within ten seconds, to enable the line.
To refuse a call: When receiving a call, simply allow ten seconds to pass and it will be refused.
3.12 Voice call
The voice call function allows you to make a call
without using the telephone keys. INTERPHONE
telecom
F4 stereo is compatible with the voice call function of various different mobile Bluetooth® telephones: to
enable it and access the controls, please refer to your telephone instruction manual.
Please refer to the section Use - Telephone section.
4 Bluetooth® specifications
Bluetooth®:
v2.1 EDR
Supported profiles:
Headset – Handsfree – A2DP / AVRCP / SBC
Pairing:
up to 8 devices
Multipoint connection:
up to three devices
(e.g. 1 telephone + 1 intercom + 1 stereo (A2DP)
5 Care and maintenance
If not using the kit for long periods of time, the battery must
be charged every two/three months, to avoid damage.
Do not use solvents or de-greasers to clean the kit as these
can damage it. Clean with a damp sponge and neutral soap
if required.
N.B.: When cleaning, to avoid water filtering through the connector and
damaging the control panel, please ensure that you have placed the
battery charger plug into the socket. If mounted on the helmet, leave
the speaker connector connected. Kit waterproofing is only guaranteed
when the connector is connected.
(Applicable in those countries of the European Union with
recycling systems)
The symbol shown on this product or on its documents indicates that the product must not be disposed of with other
domestic refuse at the end of its life cycle. To avoid damage
to the environment or to health caused by the inappropriate
disposal of refuse, the user is requested to separate this product from other refuse and to recycle it responsibly to favour
the sustainable re-use of material resources.
Domestic users are invited to contact the sales point where
the product was purchased or the local office with information regarding recycling of this type of product.
Business users are invited to contact their suppliers and to
check terms and conditions of purchase. This product must
not be disposed of together with other commercial refuse.
This product bears the CE mark in conformity with the regulations of the R & TTE Directive (99/5/EC). Cellular Italia S.p.A.
hereby declares that this product conforms to essential standards and other norms under Directive 1999/5/EC. The user
is forbidden from making variations or modifications of any
kind to the device. Any variations or modifications not expressly approved by Cellular Italia S.p.A. will cancel the user’s
authorisation for the use of the device. The Bluetooth® trademark is the property of Bluetooth SIG, Inc.