1
IYl
MITSUBISHI
,
f
TV
Owner's
Guide
RISK OF ELECTRIC SHOCK
DO NOT OPEN
\
CAUTION: TO REDUCE THE RISK OF ELECTRIC SHOCK,
DO NOT REMOVE COVER (OR BACK).
NO USER-SERVICEABLE
PARTS INSIDE.
REFER SERVICING TO QUALIFIED SERVICE PERSONNEL.
The lightning flash with arrowhead
symbol within an equilateral
triangle is intended to alert the user to the presence of uninsulated
"dangerous
voltage" within the product's enclos_re that may be of
sufficient magnitude
to constitute
a risk of electric shock.
The exclamation
point within an equilateral
triangle
alert the user to the presence of important
operating
maintenance
(servicing) instructions
in the literal;ure
ing the appliance.
_Warning:
is intended to
and
accompany-
Don't leave stationary
images, such as stock market reports, video
I
games, station logos, or the TV's displays, on-screen for more than 10 |
minutes. Still patterns
such as these can scar the picture tube, causin_
permanent:
damage
to the TV.
J
WARNING:
TO REDUCE THE RISK OF FIRE OR ELECTRIC
ANCE TO RAIN OR MOISTURE.
SHOCK,
DO NOT EXPOSE
THIS APPLI.-
CAUTION:
TO PREVENT ELECTRIC
SHOCK HAZARD, DO NOT USE THIS UNIT'S (POLARIZED)
PLUG
WITH AN EXTENSION
CORD, RECEPTACLE
OR OTHER OUTLET UNLESS THE BLADES
CAN BE FULLY INSERTED
TO PREVENT
BLADE EXPOSURE.
NOTE
TO CATV
SYSTEM
INSTALLER:
THIS REMINDER
IS PROVIDED
TO CALL THE CATV SYSTEM INSTALLEI_:'S ATTENTION
TO ARTICLE 820-40 OF THE NEC THAT PROVIDES GUIDELINES
FOR PROPER
GROUNDING
AND, IN PARTICULAR,
SPECIFIES
THAT THE CABLE GROLIND SHALL BE
CONNECTED
TO THE GROUNDING.
SYSTEM OF THE BUILDING, AS CLO_E TO THE
POINT OF CABLE ENTRY AS PRACTICAL.
_
MITSUBISHI
Table
OWNER'S
GUIDE
of Contents
Important
Safeguards
Preface:
Welcome
Summary
of Special
Unpacking
What's
.........................................................
to Mitsubishi
Features
.......................................
5
.............................................................
6
Your TV .............................................................................
in Each Chapter
Some Conventions
.......................................................................
Used in this Guide ................................................
Chapter
1: Getting
Overview
of the Control
Panel
Overview
of the Remote
Control
Getting
Remote
to Know
Your
TV ............................
2: Connecting
Overview
of Back Panel
Basic Connections
Getting
Started
11
14
Your
TV .....................................
.....................................................................
Your
9
.......................................................
..............................................................................
3: Operating
8
12
TV + antenna or cable without a cable box ...........................
TV + cable with a cable box ....................................................
TV + separate
UHF and VHF antennas
................................
TV + VCR + antenna or cable without a cable box ...............
TV + VCR or Cable with a cable box ......................................
TV + stereo audio system .......................................................
TV + Mitsubishi products that have A/V Network
Terminals .................................................................................
Chapter
7
..........................................................
ready to use the remote control ...............................
control buttons and functions ...................................
Chapter
3
TV .......................................
..................................................................................
Adjusting the color purity .......................................................
Using the remote control to operate VCRs, cable koxes
and other equipment ...............................................................
Turning the TV on/off .............................................................
Selecting the input source to watch your VCR oc other
equipment
................................................................................
Changing channels
.................................................................
Understanding
the ViewPoint * on-screen menus .................
Setting the clock ......................................................................
Memorizing
channels ..............................................................
Adding and deleting channels ................................................
Setting the A/V Network ........................................................
Selecting the menu type .........................................................
Naming the input .....................................................................
Naming the channels ...............................................................
Using video mute .....................................................................
Selecting the menu language .................................................
14
16
19
20
22
23
24
26
27
30
36
37
39
40
41
42
48
49
50
54
55
58
59
60
61
63
64
6€i
67
Chapter
3: Operating
Your TV (cont.)
Selecting the A/V memory categories
....................................
Customizing
the A/V memory settings ...................................
Using the Advanced
............................................................
78
Setting the timer .....................................................................
Using the parental !ock ..........................................................
Using SuperQuickView
TM .................................................
79
80
84
Chapter
4: Using
Features
68
70
the Special
Features
..........................
Understanding
the On-Screen Displays ...........................................
Using the Sleep Timer .......................................................................
changing or cancelling the sleep timer ..................................
Using the Picture-in-Picture
(PIP) Modes ........................................
activating
the PIP image ........................................................
selecting the source of the :PIP image ....................................
changing channels while using the PIP mcdes ......................
exchanging
the picture of the PIP image and the main
image .......................................................................................
freezing the PIP image ...........................................................
Using the Active A/V Network Feature ............................................
Chapter
5: Troubleshooting
87
88
89
90
91
92
93
94
95
96
97
............................................
99
caution and care ....................................................................
cleaning .................................................................................
calling for service .................................................................
103
103
104
Appendix
1: Procedure
for Bypassing
the Parental
Lock .................................................................................
105
Index
107
...............................................................................
IMPORTANT
SAFEGUARDS
PLEASE READ ALL THESE INSTRUCTIONS
REGARDING
YOUR TELEVISIOI_
SET AND
RETAIN FOR FUTURE REFERENCE.
FOLLOW ALL WARNINGS
AND INSTRUCTIONS
MARKED ON THE TV RECEIVER.
1.
2.
3.
4.
Read Instructions
Read all safety and operating
operating the appliance.
Retain Instructions
Retain the safety and operating
future reference.
Heed Warnings
Adhere to all warnings
operating instructions.
Follow Instructions
Follow all operating
9.
instructions
before
instructions
on the appliance
for
and in the
Ventilation
Slots and openings in the cabinet are
provided for ventilation
and to ensure reliable
operation of the TV receiver and to protect it
from overheating.
Do not block these openings
or allow them to be blocked by placing the TV
receiver on a bed, sofa, rug, or other similar
surface.
Nor should it be placed over a radiator
or heat register.
If the TV receive: is to be
placed in a rack or bookcase, en,_u::e that
there is adequate
ventilation
and _;hat the
manufacturer's
instructions
have been
adhered to.
and use instructions.
10. Power
Warning:
5. Cleaning
Unplug this TV receiver from the wall outlet before
cleaning.
Do not use liquid or aerosol cleaners.
Cleaners
can permanently
damage the cabinet or
screen. Use a damp cloth for cleaning.
6.
7.
8,
Attachments
and Equipment
Never add any attachments
and/or equipment
without approval of the manufacturer
as such
additions may result in the risk of fire, electric
or other personal injury.
Water and
Do not use
immersion
tubs, wash
swimming
shock
Moisture
this TV receiver where contact with or
in water is possible.
Do not use near bath
bowls, kitchen sinks, laundry tubs,
pools, etc.
Accessories
Do not plac, e this TV receiver on an unstable
cart,
stand, tripod, bracket, or table. The TV receiver may
fall, causing serious injury to a child or adult, and
serious damage to the appliance.
Use only with a
cart, stand, tripod, bracket, or table recommended
by
the manufitcturer,
or sold with the TV receiver.
Any
mounting
of the appliance
should follow the manufacturer's
instructions,
and should use a mounting
accessory recommended
by the manufacturer.
An appliance
and cart
combination
should be
moved with care. Quick
stops, excessive force,
and uneven surfaces may
cause the appliance and
cart combination
to
overturn.
Sources
This TV receiver should be operated only from
the type of power source indicated on the
marking label. If you are not sure of the type of
power supplied to your home, con,_ult your
appliance dealer or local power company.
11. Grounding
or Polarization
This TV receiver :is equipped with a polarized
alternating
current line plug having one blade
wider than the other. This plug will fit into the
power outlet only one way. If you are unable to
insert the plug fully into the outlet, try
reversing
the plug. If the plug should still fail
to fit, contact your electrician
to replace your
obsolete outlet. Do not, defeat the safety
purpose of the polarized plug.
12. Power-Cord
Protection
Power-supply
cords should be rot.ted so that
they are not likely to be walked on or pinched
by items placed upon or against them, paying
particular
attention
to cords at plugs, convenience receptacles,
and the point where they
exit from the appliance.
13. Lightning
For added protection
for this TV receiver during
a lightning
storm, or when it i,; left unattended
and unused for long periods of time, unplug it
from the wall outlet and disconnect the antenna
or cable system. This will prevent damage to
the TV receiver due to lightning
and power-line
surges.
Important
Safeguards
(cont.)
14. Power Lines
An outside antenna system should not be located
in the vicinity of overhead power lines or other
electric light or power circuits, or where it carl fall
into such power lines or circuits.
When installing
an outside antenna
system, extreme care should
be taken to keep from touching such power lines
or circuits as contact with them might be fatal.
15. Overloading
Do not overload wall outlets and extension
cords
as this can result in a risk of fire or electric shock.
16. Object and Liquid Entry
Never push objects of any kind into this TV
receiver through openings as they may touch
dangerous
voltage points or short-out parts that
could result in a fire or electric shock. Never spill
liquid of any kind on the TV receiver.
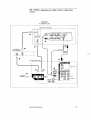
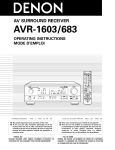
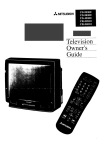
17. Outdoor
Antenna
Grounding
If an outside antenna or cable system is connected
to the TV receiver, be sure the antenna
or cable
system is grounded so as to provide some protection against voltage surges and built-up static
charges.
Section 810 of the National Electrical
Code, ANSI/
NFPA No. 70-1984, provides information
with
respect to proper grounding of the mast and
supporting
structure,
grounding
of the lead in
wire to an antenna discharge unit, size of
grounding
conductors, location of antenna
discharge unit, connection to grounding
electrodes,
and requirements
for the grounding
electrode.
EXAMPLE OF ANTENNA GROUNDING
LEAD IN WIRE
DISCHARGE UNIT
(NEC SECTION 810-20)
GROUNDING
CONDUCTORS
-(NECSECTION810-21)
-GROUND
"-_'_
POWER
SERVICE
ELECTRODE
NEC -- NATIONAL ELECTRICAL
CODE
CLAMPS
GROUNDING
SYSTEM
(NEC ART 250, PART H)
18. Servicing
Do not attempt
to selwice this TV receiver
yourself as opening or removing covers may
expose you to dangerous
voltage or other
hazards.
Refer all servicing to £ualified service
personnel.
19. Damage
Requiring
Service
Unplug this TV receiver from the wall outlet
and refer servicing to qualified service
personnel under the following conditions:
(a) When the power-supply
cord or plug is
damaged
(b) If liquid has been spilled, or objects have
fallen into the TV receiver
(c) If the TV receiver' has been exposed to rain
or water
(d) If the TV receiver does not operate normally
by tbllowin_: the operating instructions,
adjust only those controls that are covered
by the operating instructions
as an improper
adjustment
of other controls may result in
damage and will often require extensive
work by a qualified technician
to restore the
TV receiver to its normal operation.
(e) If the TV receiver has been dropped or the
cabinet has been damaged
(D When the TV receiver exhibits a distinct
change in pertbrmance
-- this indicates a
need for service
20. Replacement
Parts
When replacement
parts are required,
be sure
the service technician
has used replacement
parts specified by the manufacturer
or have the
same characteristics
as the orig:inal part.
Unauthorized
substitutions
may result in fire,
electric shock or other hazards.
21. Safety Check
Upon completion of any service _r repairs to this
TV receiver, ask the service technician
to
perform safety checks to determine
that the TV
receiver is in safe operating condition.
_Warning:
Do not leave stationary
images, such
markel; reports, video games, station
the TV's displays, on-screen for more
minutes.
Still ,_atterns such as these
the picture tube, causing permanent
the TV.
as stock
logos, or
than 10
can scar
damage to
PREFACE
Welcome
to Mitsubishi
Congratulations
on your purchase of this Mitsubishi TV. Your TV
is designed for superb viewing pleasure as weP_ as continued
reliability.
To familiarize you with your TV and owner'_ guide, we suggest that
you read through the preface, which provides the following important information:
Summary
of Special
Unpacking
What's
Some
Your
in Each
Features
TV
Chapter
Conventions
Used
in this
Guide
Mitsubishi
has designed your TV to bring you years of vievdng
enjoyment.
Similarly, your owner's guide i_,_designed to be user
friendly, providing guidance to help you take advantage
of all of
your equipment
features.
Thank you for selecting
Mitsubishi!
our product
and once again,
welcome
to
Summary
of Special
Features
Your top-rated
tures:
Mitsubishi
TV delivers
the following
special
fea-
TV GUIDE Plus+ --- a subscription-free,
interactive,
on-screen
program guide. It is integrated
directly into the signal of the
TV channel and updated automatically
several times a day
181.Channel
Capacity
--- programs up to 181 channels
68 antenna channels or 125 cable channels)
(either
Illuminated
Multibrand
Remote
Control with TV/VCR/
DVD/AUDIO
Control --- uses a single remote con_;rol transmitter to operate the TV, selected Mitsubishi VCRs, DVD player
and audio components,
as well as certain VCRs, cable boxes,
and satellite receivers fcom other manufacturers
ViewPoint
®On-Screen
Operating
System
TV's features with easy-to-follow
in_;tructions
--- simplifies
the
Digital
Dynamic
Comb Filter .... creates a smooth, continuous picture texture, by comparing the individual scanning lines
with those directly above and below
Color Temperature
Control
--- Provides 3 choices, including
a precise 6500°K setting for optimum color tones
Closed Caption Decoder
included with TV programs
--- decodes hidden text information
and displays the text on-screen
Extended
Data Services
....
(also known as "XDS") allows
broadcasters
to supply you with channel information,
program
information,
and the time of day
2-Tuner Advanced
to view two different
a VCR tuner
Picture-in-Picture
Mode .... allows you
broadcasts
at the same time without using
Expanded
Sound Capability
--- sll()ws you to connect
the TV to an external audio system fo__ enhanced listening
pleasure.
Also, includes Level Sound to equalize difSering
program and channel volume levels
• Active A/V Network
--- allows you to perform many of the
commonly used features of your TV and selected Mitsubishi
VCRs by pressing a single button
E>Important:
6
The entire range of these special features is integrated
into your
Mitsubishi
TV and fully operational
- wh ether or not you connect
your IR emitter.
Preface:
Welcome
to Mitsubishi
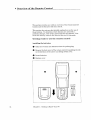
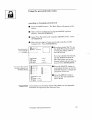
Unpacking
Your
TV
What you will find
As you unpack your new TV, please
items are included:
• an owner's
guide containing
• a registration
• a remote
check to be sure the following
a warranty
card
control
transmitter
• a set of two AAA size batteries
• an Active A/V Network
for the remote
control
cable
• IR emitter
A few suggestions
Before you hook up your new TV, please
take a few minutes
to:
In} Complete the registration
card. The registration
card asks for
the serial number of the TV. You will find this on the back of
the unit.
Keep the box and packing
File your sales receipt
warranty
service.
O
Your TV
for future
use.
in a safe plac, e. It may be required
Place the TV on a stable
the hook-up.
Unpacking
materials
surface
with sufficient
for
li_:hting to do
7
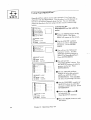
What's
in Each
Chapter
Here's
what you will find in this owner's
Chapter
1, Getting
to Know
Introduction
to the locations
controls of your TV
Chapter
2, Connecting
Instructions
equipment
Chapter
TV
and functions
Your
for connecting
to your TV
3, Opernting
Your
guide,:
of l_he buttons
TV
a VCR, antenna,
Your
and
cable box and other
TV
Guidance for using your Mitsubishi
TV to ach:[eve maximum
viewing satisfaction.
Procedures
that are uniqu,_ to the operation
of TV Guide Plus+ are highlighted
Chapter
Operating
Mitsubishi
Chapter
4, Using" the Special
instructions
TV
for using the exception
The appendix
lock.
explains
you might
Welcome
encounter
the procedure
You will also find a detailed
Preface:
al functions
of your
5, Troubleshooting
Summary of problems
resolving them
8
Features
and suggestions
for bypassing
the parer.Ltal
index at the back of the book.
to Mitsubishi
!,%r
Some
Conventions
Used
in this
Guide
Mitsubishi
has gone to great
effort to provide
you with an easy-tofollow, useful owner's
guide.
You will find that different
types of
information
are treated
in different
ways.
You should pay particular
attention
to topics bulleted by a red
arrow and either an Important
or a Warning
label. These terms
are used sparingly in the owner's guide. They are intended to
highlight information
which should be carefully read.
If you will be activating
TV GUIDE Plus+, take careful note of all
information
with the TV GUIDE Plus+ signal cues. These directions are exclusively for your use. They should not be ibllowed or
used if you will not be using this feature.
I list of related
/
topics or tasks
I t related
topics or tasks
I
_'_i
I
IE>Important:
This cue indicates information
critical to th.e operation of your
new TV.
_l
This cue alerts you to
information
describing
dangerous
situations that could
damage your equipment
or
cause electrical shock.
exclusively
V GUIDE for
PlusTV
+ signal
GUIDE cue.
Plus Information
+ users.
Some Conventions
Used in this Guide
_,
_,
etc.
1
The step-by-step
instructions
on how to accor._plish a
particular
tm,_k are signaled
by white numbers on a black
background.
is
9
_
Getting
CHAPTER
E
ToO NKnow
Your TV
Now that you have unpacked your TV, read through the safety
information
and glanced at the overview of how this owner's guide
is organized, it's time to become familiar with the buttons and
controls you will be using when you operate the TV. This chapter
will introduce the range of options available when u,,_ing the buttons on the remote control or on the TV's control panel. It also
offers some general guidelines for using the remote control.
Most functions can be controlled by using either the control panel
or the remote control, but certain specialized functions require the
use of one or the other. This chapter, which will familiarize you
with the full range of button functions, contains the following
sections:
0
Overview
of the
Control
Panel
0
Overview
of the
Remote
Control
11
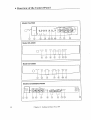
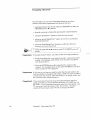
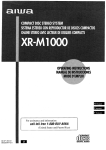
Overview
of the Control
Panel
Model CS-27609
@@@@
PROG_IMER
TvOL •
• c_ •
Model CS-32509
O
....................
o
O
o
(_°C)
O°"O
...........
O O
Model CS-36509
o
Models
12
0
O0
0
0
CS-36609/CS-40509
[I_
t
0
s.woEo
_ic_o
I
$TRE_GTH
_o_L DO'R
'°_'
Chapter
1: Getting
to Know Your TV
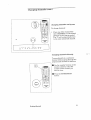
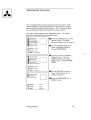
Overview
@
of the
Control
Panel
(cont.)
program
timer indicator
(PROGRAM
TIMER)
This indicator lights up in green when you turn the TV on. It
blinks in green when the TVis powered off and the timer has
been set.
(_) power
button
(POWER)
Use to turn the TV on or off.
(_) volume
controls
(VOLUME
•, V)
Press the up (•) button to turn up the volume.
button turns down the volume.
The down (V)
(_) channel
controls
(CH. • V)
Use the up (•) button to switch to a channel with a higher
number and the down (V) button to switch to a channel with a
lower number.
_)
audio/video
reset (AV RESET)
Press to reset audio and video functions to their original factory
adjustments
or setting except for volume, the "Listen to"
function (stereo/SAP/mono),
speaker (off/on), background
(black/gray),
Instant Info and closed captioning.
@
input button
(INPUT)
Use to select the input source you wish to view:
• TV channels on Antenna A (ANT-A) or Antenna
B (ANT-B)
and/or
• other equipment
connected to Input 1, 2, or 3 (for some
models)
(Z) S-video input terminal
(CS-27609,
CS-36609, and CS40509 only)
Use to connect the S-video output of a camcorder or other
component to the TV. If you connect the S-video ('.able to this
terminal, the adjacent video input terminal cannot be used.
@
video input terminal
(CS-27609, CS-36609,
and CS-40509
only)
Use to connect the video output from a standard
camcorder or
other component to the TV.
@
audio input terminals
(CS-27609,
CS-36609, and CS-40509
only)
Use to connect the audio output from a camcorder or other
component.
@
degauss
button
(DEGAUSS)
Use this button to correct color impurity.
@
color purity
adjustment
switches
(CS-36609 and CS40509 only)
Set these switches according to the placement and position
your TV. See "adjusting the color purity" in Chapter 3.
Overview
of the Control
Panel
of
13
t Overview
of the Remote
Control
This section provides you with an overview
buttons and the features that they control.
of t:he remote
control's
This section does not provide detailed explanations
on the use of
these buttons.
To determine
which buttons are used with a
particular
feature, refer to the instructions
for that feature.
Features are listed by name in the Index at. the end of this guide.
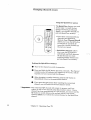
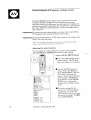
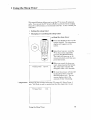
Getting
ready
to use
installing
the batteries
the
remote
control
O
Take the two AAA size batteries
O
Remove the back cover of the remote control by pushing
in the direction of the arrow and lifting off the cover.
Insert
from the packing
bag.
batteries.
Replace
cover.
0
O
size AAA
batteries
14
Chapter
the tab
1: Getting
to Know Your TV
Getting
some
Ready
to Use
the
Remote
Control
(cont.)
do's and don'ts
To ensure that your remote
follow these guidelines:
control
will cont:mue
working
properly,
• Don't press two or more buttons at the same time, unless
are specifically instructed
to do so in this owner's guide.
• Don't allow the remote
• Avoid dropping
control
the remote
to get wet or become
you
heated.
control on a hard surface.
• When cleaning the remote control, don't use any harsh
chemicals.
Use only a soft, slightly moisterLed cloth.
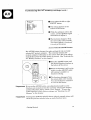
general
instructions
When using the remote control to operate the TV, VCR, DVD, C_6_BLE
BOX, or AUDIO equipment:
O
Be within
O
Point the tip of the remote
Press
guidelines
12 feet of the equipment.
the appropriate
for using
control toward
button
or sequence
the equipment.
of buttons.
batteries
• Don't use a new battery
with an old one.
• Don't heat, take apart,
or throw batteries
into a fire.
• Load the batteries
as indicated in the illustration,
making
that they are positioned correctly (+ to +, and - to - ).
• Replace
the back cover of the remote
For best results,
use Duracell*
*Duracell
• Overview
of the Remote
control.
AAA (MN2400)
® fs a registered
Control
sure
batteries.
trademark
of Durace.11, Inc.
15
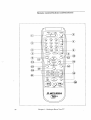
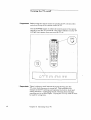
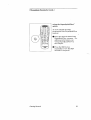
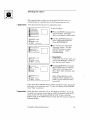
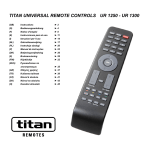
Remote
control
buttons
VCR-A
DVD
TV -
and
fUELCtions
POWER
AUDIO
CHANt
®
Q ® v0,u
®
INPUT
MUTE
J _/
INF(
TV GUIDE+
®
@
@
@
@
_\
@
EXCH
MENU
0
REC
STOP
PAUSE
VCR PLUS+
REWIREV
PLAY
FF/FhND
_,= MITSUBISHI
16
@
ADJUST
Chapter
I: Getting
to Know Your TV
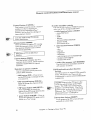
Remote
control
buttons
and
functions
(cont.)
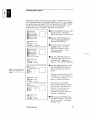
@ select switch
Your remote control has four layers: the
TV layer, the VCR-A layer, the DVD
layer, and the AUDIO layer. You can set
up each of these layers to operate a
different piece of equipment.
Use this
switch to select the layer you want to set
up or use.
@TV GUIDE Plus4- ('IV GUIDE+)
Use this button to dJ splay TV GUIDE
Plus+ program listings.
@power
Press
@ mute control
(MUTE)
Use to turn the sound off complel:ely
to restore it to its original volume.
Important:
TV GUIDE
to enter
setup.
or to
zip codes for TV GUIDE
to
operate this button.
See the TV GUIDE
Plus+. Operating
Guide.
button
(POWER)
this switch to turn the TV on or off.
@ number
buttons
(0-9)
Use to select a channel number
enter a parental lock code, OR
Plus+ must. be activated
or
@ enter/exchange
button (ENTER/
EXCH)
Use this button after selecting a channel
number, after selecting an item t_om the
onscreen menu system, or with the
picture-in-picture
mode.
Plus+
@ channel
control
(CHANNEL)
Press the top part of the button to change
to a channel with a higher number; press
the bottom part to change to a channel
with a lower number.
@ information
button (INFO)
Use to view an onscreen summary
of the
current settings fi)r the TV or AUDIO
functions and the display related[ to
Extended Data Services (XDS).
@ SuperQuickView
button (SQV)
Press to view channels you have
programmed
into SuperQuickView
_"
memory.
TM
This button is also used extensively
in
the GUIDE Plus+ menu system.
See
the TV GUIDE Plus+ Operating
Guide.
@volume
control
(VOLUME)
Press the top part of the button to increase the volume. Press the bottom part
of the button to decrease the volume.
@light
button
Use to light up the :remote (for four
seconds).
Q input
button (INPUT)
Use to select the input source you wish to
watch:
• TV channels on Antenna A or
Antenna B
• Other equipment
connected
2 or 3 (on some models).
to Input
1,
ADJUST buttons may be used to scroll
through the channds
in GUIDE Plus+
menus.
@QuickView
button
(QV)
Press this button to instantly switch to
the channel that you designated
as the
Quick View channel.
Press again to
return to the last channel viewed.
Overview
@adjust
buttons
( J,, •, _ , _)
After selecting ar_ audio or video function, use these buttons to adjust the
sound or picture.
Also use these with
the picture-in-picture
mode to move the
PIP location on the screen and to select
i_ems in the menus.
of the Remote
Control
17
Remote
control
@,cancel
button (CANCEL)
This button is used to cancel a channel
number, to clear a channel programmed into SuperQuickView
memory, and to clear the settings of
some onscreen menus.
@ home button (HOME)
Press to return to regular TV viewing
from the onscreen menus to turn off
the onscreen displays and to cancel
the closed captioning.
• video function
tint
- color
contrast
Plus+
button
(VIDEO)
- brightness
sharpness
- color tempe:ca'cure low/middle/high
background
bJack/gray
- Instant Info on/off
@ menu button (MENU)
Use this button to display the TV's
onscreen menu system, which contains
additional
instructions
for special
functions.
• audio video memory
(AN MF,MORY)
Use this button for immediate
access to
A!V memory
sellections
controls
Use to control the special
picture (PIP) function.
@)VCR and audio
buttons
picture-in-
PIP channel
button
(PIP
Press to change the channel
PIP image
CH) -of the
funLction
The REC button in the TV layer is the
VCR+ key which brings up the VCR+
menu. The VCR+ key can be used to
register a recording event.
The PLAY
button is also used with the Active A/V
Network.
See "Using the Active A/V
Network Feature"
in Chapter 4.
PIP input button
(PIP INPUT) -Press repeatedly
to switch the
source of the PIP image between the
TV and the external inputs.
pause button
(PAUSE)
-- Press to
freeze the reduced PIP image and to
return to a "live" image.
Chapter
product
Use these buttons to control VCRs, cassette
decks, CD players, etc. These '.are preprogrammed
to operate selected Mitsubishi
components.
• PIP button
(PIP) -- Press to turn
on the PIP image, to change its size,
or to cancel it.
18
to
speaker on/off
level sound off!on
displays.
@ picture-in-picture
(cont.)
• audio function
button
(AUDIO)
- stereo/SAP/mono
'bass
treble
balance
surround offfsimulate/hall
It is also used to stop TV GUIDE
Plus+ installation.
offTV GUIDE
and func, tions
@ audio and video controls
Use the AUDIO button or VIDEO button
select one of the settings listed below.
TM
Also turns
buttons
@sleep
timer button
(SLEEP)
Use to program the TV to turn off automatically at a l_ter time.
1: Getting
to Know Your TV
Connecting
CHAPTER.
TWO
Your TV
This chapter offers step-by-step
instructions
for completing
most common hook-ups.
It contains the following sections:
€
Overview
}
Basic
of the Back
Connections
Panel
tile
Overview
Model
of the Back
Panel
CS-27609
1S-ViDEO
--
L _,_Q
.oh
<%
m
Models
CS-32509/CS-36609/CS-40509
mli_BBN_N
1_
IS-VIDEO
2;
--
--
@
2
_VHFIUHF
(75 _}
Model
IR;G LINK
FIXED
VARIABLE
ACTIVAA,,
N EETWOR K
CS-36509
w_wre_m
_
20
VHFAJHF
Chapter
2: Connecting
Your TV
._
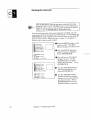
Overview
@
of the
back
panel
(cont.)
antenna
terminals
(ANT-A, CABLE LOOP-OUT,
ANT-B)
Two independent
cables or antennas
can be connected to these
terminals.
Use ANT-A and ANT-B terminals
to receive a
signal from VHF/UHF antennas
or your cable sys':em. Use the
CABLE LOOP OUT terminal to send the signal being received
by the ANT-A terminal out to another component (such as a
VCR).
The TV GUIDE
Plus+
signal
source MUST be connected
to the
ANT-A terminal.
@
_>Important:
S-VIDEO input terminal
Use these terminals
to connect an S-video signal from a Super
VHS (S-VHS) VCR or disc player to the TV.
If you connect to the S-Video jack, you cannot
jack for the same input.
@
@
use tlhe regular
video
video input terminals
Use these terminals
to connect the video output
dard VCR or other component
to the TV.
from a stan-
audio input terminals
Use these terminals
to connect
other component to the TV.
ti'om a VCR or
the audio output
®
IR/G link
Use this terminal to connect an Infrared (IR) Emitter for TV
GUIDE Plus+ cable box and VCR control features. NOTE: TV
GUIDE Plus+ system can only operate the type of VCRs and
cable boxes that can select channels using a remote control
with a number keypad.
®
active A/V Network
terminal
Use this terminal
to connect a Mitsubishi
network terminal.
VCR that
has an A/V
®
video output terminal
Use this terminal to send the TV video signal to a VCR, AN
receiver or other component.
®
audio output
terminals
Use these terminals
to send the TV's audio signal
A/V receiver, or other component.
®
to a VCR,
color purity adjustment
switches
(C8-36509
only)
Set these switches according to the placement and position
your TV. See "Adjusting the Color Purity" in Chapter 3.
Overview
of the Back Panel
of
21
Basic
Connections
This section explains the basic connections you will need
between your TV, antenna
and VCR. You will see there
ent connections
shown depending
on the type of antenna
using, whether or not you have a cable box, or if you will
TV GUIDE Plus+.
Choose the type of connectic,n for the
equipment
you have.
to make
are differ-.
you are
be using
type c_f
If you have difficulty making any of the connections
to your TV, you
may want to contact your Mitsubishi
dealer or yo_r local cable
company.
This section
explains
• TV + antenna
• TV + cable
the following
or cable
with
• TV + separate
or cable
with
• TV + stereo
system
audio
IYou should unplug
Chapter
box
box
• TV + VCR + cable
connecting
a cable
UHF and VHF antennas
• TV + Mitsubishi
22
without
a cable
• TV + VCR + antenna
_Warning:
connections:
a cable
products
with
without
a cable
box
A/V Network
your TV and any other components
terminals
before
]
J
them.
2: Connecting
box
Your TV
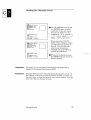
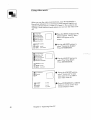
TV + antenna
equipment
or cable
without
a cable
box
you will need
If you have a standard
75-ohm coaxial cable, you will not need
additional
equipment.
If your antenna has two leads (called twin
lead or 300 ohm antenna lead), you will need:
• One 300-75 ohm matching
transformer
300 ohm - in
75 ohm .-out
connecting
a cable
•
the incoming
on the TV.
Connect
terminal
cable or antenna
to the tCST-A input
;;-._:
75 Ohm
Coaxial Cable
TV rear terminals
300 Ohm Fiat
Twin Lead
--4
_l__W
@:t_° 2]
.....
0
0
0
0;@ @ '
__
k_ _ _
_'_
/
Optional 300 Ohm to 75 Ohm
Matching Transformer
connecting
O
an antenna
Use a screwdriver
transformer.
with twin
to connect
leads
the 300 ohm twin leads to the
Push the 75 ohm side of the transformer
terminal on the TV.
Basic Connections
onto the ANT-A
23
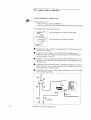
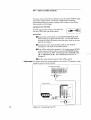
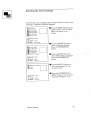
TV + cable
with
If 'IV GUIDE
a cable
box
Plus+ will be used
Use this hook-up if:
• you will be using TV GUIDE Plus+
•you use a cable box only to descramble
To complete
the hook-up,
fs
lengths
• one IR emitter
O
Emitter
r
Connection
of 75 ohm coaxial
(provided
cable
with TV)
rises
Transmitters
__.IR
IR
mi,
cable channels
you'll need:
• three
ran
premium
!
/
J
Connect the cable system's
the two-way splitter.
incoming
cable to the IN terminal
on
Connect a coaxial cable to one of the OUT terminals
on the
splitter; connect the other end of this cable to the ANT-B terminal on the back of the TV.
O
Connect a second coaxial cable to the other ()UT terminal on the
splitter; connect the other end of this cable to the IN terminal on
the cable box.
O
Connect the third coaxial cable to the OUT terminal on tlhe back
of the cable box; connect the other end of this cable to the ANT-A
terminal on the back of the TV.
O
Connect the IR emitter.
Plus+ Operating Guide.
Cable
Incoming
Follow the procedu:res
in the _m¢"GUIDE
!
@
TVRear Term nal
f
iiii
_
Cable
J
Box
Rear Terminal
:xn
24
Chapter
2: Connecting
Your TV
_
[_l_
Emitter
TV + cable
with
a cable
box
(cont.)
If TV GUIDE
Plus+
will not be used
Use this hook-up if:
• you will not be using TV GUIDE Plus+
• you need a cable box only to descramble
premium
cable channels
This hook-up will allow you to use the advanced features of your TV,
such as 2-tuner PIP and SuperQuickView
and watdh basic cable
channels on Antenna-A.
You will be able to view the premium cable
channels that are descrambled
by your cable box on Antenna-B.
To complete
the hook-up,
• two lengths
you'll need:
of 75 ohm coaxial
cable
procedure
O
Connect the cable system's
nal on the back of the TV.
incoming
cable to the .MNT-A termi, _-_fi
O
Connect a coaxial cable between the CABLE LOCP-OUT termihal on the back of the TV and the IN terminal on the back of the
cable box.
Connect the second coaxial cable between the OUT terminal of
the cable box and the ANT-B terminal on the back of the set.
TV rear terminals
I@-
,sVIDEO
I //2-_',,
Incoming 0
Cable
0
0
_
Cable Box
rear terminali
OUT
Basic Connections
:25
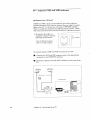
TV + separate
equipment
UHF
and VHF
antennas
you will need
If UHF and VHF signals are brought into your home with two
separate antennas
you'll need to combine them in order to connect
them to the TV. To do this you w:ill need a UHFNHF
combiner.
(There are different combiners for different kinds of wires. Check
with your local electronics store fi)r the kind o:_combiner you need.)
Pictured to the right is a
standard
combiner with the
following specifications:
_[_
75 OHM Out
Two (2) 300 ohm inputs
One (1) 75 ohm output
To connect
O
separate
UHF and VHF antennas
Connect the UHF and VHF antenna leads to the appropriate
terminals
on the UHF/VHF combiner.
Press
TV.
VHF
the combiner
(Channels
2-13)
Flat Twin
--
onto the ANT-A terminal
UHF Antenna
Anlenna
(Channels
Flat Twin
14-69)
Lead --
Lead
External
Antenna
or Cabls
TV Rear Terminal
_
75 Ohm
Combiner
300
Ohm to
Back
26
to your TV:
Chapter
2: Connecting
Side
Your TV
on the rear of the
TV + VCR
+ antenna
or cable
without
a cable
box
You may want to connect a VCR along with your antenna or cable.
If so, based on whether or not you will be using TV GUIDE Plus+,
follow the directions which apply.
To complete
the hook-up,
you'll need:
• Three lengths of
75 ohm coaxial cable
One set of RCA pin-type
audio cables
• One RCA pin-type video cable
(if connecting a standard
VCR), Or
• One S-Video cable
(if connecting an S-VHS VCR)
One IR emitter assembly
(if TV GUIDE Plus+ will be used)
Important:
If your VCR and/or
cable box can only be tuned
with a channel
channel down control, TV GUIDE Plus+ will not function.
VCRs and cable boxes which can be tuned with a numeric
are compatible.
up/
Only
keypad
procedure
O
Connect the incoming
the TV.
O
Connect
terminal
one end of a coaxial cable to the CABI,E LOOP-OUT
on the back of the TV.
Connect
terminal
the other end of the coaxial
on the VCR.
Basic Connections
cable to the ANT-A terminal
on back of
cable to tb_e .ANTENNA
IN
27
TV + VCR
(cont.)
>Important:
+ antenna
or cable
without
a cable
box
O
Connect the second coaxial
TV ANT-B.
cable from the VCI_ ANT-OUT
to
O
Connect an RCA pin-type video cable to the VIDEO OUT
terminal on the back of the VCR. Connect the other end of this
cable to one of the VIDEO INPUT terminals
oil the back of the
television..
If you are connecting a Super VHS (S-VItS) VCR, ase an S-Video
cable instead of an RCA pin-type video cable. Connect this S-Video
cable to the S-VIDEO OUT terminal on the VCR. Connect the
other end of this cable to the S-VIDEO INPUT terminal on the
back of the TV.
O
Connect
terminals
a set of RCA pin-type
audio cables
on the back of the VCR. Use the
the right (R) channel
(L) channel.
and the
white
cable
to the AUDIO
OUT
red cable to connect
for connecting
Connect the other ends of this cable to the AUDIO
terminals
on the back of the TV.
the
left
INPUT
If you plan to use TV GUIDE Plus+, connect _;he IR emitter
cable to the IR/G LINK. Place one of the emitter ends in front
of the VCR. For more detail concerning the placement
of the
emitter lenses, see the TV GUIDE Plus+ OpE.rating Guide.
28
Chapter
2: Connecting
Your TV
TV + VCR + antenna
(cont.)
or cable
without
a cable
box
VCR Rear Terminals
i
VlOE3
OUr
IN
L
QL
I
Antenna
)\,
:
_d0
Yellow Lead
_Atta(:l"
on{ (Jr
cable _j
-iV Rear Terminals
IS-V_DEO
k _o_:_
@
0
R
0
1
White Lead
2
Incoming Cable
¢HF/UHF
(75
O
FIXED
_)
Red
IPJG LINK
Lead
'@@i
ACTIVE
A!V NETWORK
VARIABLE
,®L
TV Guide
Plus+
only
_Important:
If your VCR is monaural (non-stereo),
you only need to connect a
single RCA pin-type audio cable. Connect the cable to the audio
out terminal of the VCR, then connect the other end to the L (leit)
audio input on the back of the TV.
DImportant:
If your VCR has a video channel switch,
your VCR owner's guide for details.
Basic Connections
set it to "C,FF/AV".
See
29
TV + VCR
+ antenna
If TV GUIDE
Plus+
Use this hook-up
or cable
box
if:
Plus+
• you use a cable box to descramble
the hook-up,
• Four lengths
a cable
will be used
• you will be using TV GUIDE
To complete
with
premium
cable channels
you'll need:
of
75 ohm coaxial
One two-way
cable
splitter
One set of RCA pin-type
audio cables
One RCA pin-type video cable
(if connecting a standard VCR), Or
• One S-Video cable
(if connecting
One IR emitter
_>Important:
an S-VHS VCR)
assembly
If your VCR and/or cable box can only be tuned with a channel up./
channel down control, TV GUIDE Plus+ will not function.
Only
VCRs and cable boxes which can be tuned with. a numeric keypad
are compatible.
30
Chapter
2: Connecting
Your TV
TV + VCR
(cont.)
_
+ antenna
or cable
with
a cable
box
procedure
0
Connect the cable system's
on the two-way splitter.
O
Connect
splitter;
terminal
incoming
cable to the IN terminal
a coaxial cable to one of the OUT terminals
on the
connect the other end of this cable to the _3qT-B
on the back of the TV.
Connect a second cable to the other OUT terminal on the
splitter; connect the other end of this cable to the IN terminal
on the cable box.
Connect the third coaxial cable to the OUT terminal on the
back of the cable box; connect the other end of this cable to the
ANT-A terminal on the back of the TV.
Connect the fourth coaxial cable from the CABLE LOOP-OUT
terminal on the back of the TV to the ANTENNA IN terminal
on the back of the VCR.
O
[:>Important:
Connect an RCA pin-type video cable from the VII)EO OUT
terminal on the back of the VCR to the \rIDEO INPUT terminal on the back of the TV.
If you are connecting a Super VHS (S-_%IS) VCR, use an S-Video
cable instead of an RCA pin-type video cable. Connec; this S-Video
cable to the S-VIDEO OUT terminal on the VCR. Connect the
other end of this cable to the S-VIDEO INPUT terminal on the
back of the TV.
O
Connect a set of RCA pin-type audio cables to the AUDIO OUT
terminals
on the back of the VCR. Use the red cable to connect
the right (R) channel and the white cable to connect the left (L)
channel.
O
Connect the other ends of this cable to the AUDIO
terminals
on the back of the TV.
Basic Connections
INPUT
31
TV + VCR
(cont.)
+ antenna
or cable
with
a cable
box
Connect the IR emitter cable to the IR/G LINK. Place one of
the emitter ends in front of the cable box. Place the other
emitter end in front of the VCR. For more detail concerning
the placement of the emitter lenses, see the TV GUIDE Plus+
Opera ring Guide.
[}>Important:
Important:
If your VCR is monaural (non-stereo),
you only need to connect a
single RCA pin-type audio cable. Connect the cable to the audio
out terminal of the VCR, then connect the other end so the L (left_
audio input on the back of the TV.
If your VCR has a video channel switch,
your VCR owner's guide for details
set it to "OFF/AV'.
VCR Rear Terminals
TV RearTerminals
O [11
White
o!
o
Cable Box
Rear Terminals
0
32
Chapter
2: Connecting
Your TV
Lead
mL.._;_
I
_
" _
I
See
TV + VCR + antenna
(cont.)
If TV GUIDE
Plus+
Use this hook-up
or cable
with a cable
box
will not be used
if:
• you will not be using TV GUIDE
Plus+
• you use a cable box only to descramble
premium
cable channels
This hook-up will allow you to use advanced features of your TV,
such as 2-tuner PIP and SuperQuickView
plus w_,tch basic cable
channels on Antenna-A.
You will be able to view tile premium
cable channels that are descrambled
by your cable box on AntennaB.
TM
To complete
the hook-up,
you'll need:
• Three lengths of
75 ohm coaxial cable
• One set of RCA pin-type
audio cables
One RCA pin-type video cable
(if connecting a standard
VCR), or
One S-Video cable
(if connecting
Basic Connections
an S-VHS VCR)
33
TV + VCR + antenna
(cont.)
or cable
with a cable
box
procedure
O
Connect the incoming
of the TV.
cable to the ANT-A terminal
on the back
O
Connect a coaxial cable from the CABLE LOOP-OUT
on the back of the TV to the cable box IN terminal.
O
Connect a second cable from the OUT terminal on the cable box
to the ANTENNA IN terminal on the back of the VCR.
0
Connect a third coaxial cable from the ANTENNA
nal on the back of the VCR to the ANT-B terrainal
of the TV.
terminal[
OUT termion the back
Connect an RCA pin-type video cable from the VIDEO OUT
terminal
on the back of the VCR to the VIDEO INPUT terminal on the back of the TV.
_>Important:
If you are connecting a Super VHS (S-VHS) VCR, use an S-Video
cable instead of an RCA pin-type _rideo cable. Connect this S-Video
cable to the S-VIDEO OUT terminal on the VCR. Connect the
other end of this cable to the S-VIDEO INPUT terminal on the
back of the TV.
O
Connect a set of RCA pin-type audio cable_,; to the AUDIO OUT
terminals
on the back of the VCR. Use the red cable to connect
the right (R) channel and the white cable to ,mnnect the left (L)
channel.
Connect the other ends of this cable to the AUDIO
terminals
on the back of the TV.
Important:
_' Important:
34
INPUT
If your VCR is monaural
(non-stereo),
you only need to connect a
single RCA pin-type audio cable. Connect the cable to the audio
out terminal of the VCR, then connect the other end to the left (L)
audio input on the back of the TV.
If your VCR has a video channel switch,
your VCR owner's guide for details.
Chapter
2: Connecting
Your TV
set it to "OFF/AV".
See
TV + VCR + antenna
(cont.)
or cable
with
a cable
box
WITHOUT
TV GUIDE PLUS+
VCR Rear Terminals
-9@
While Lead
IN
Antenna
Lead
0
@
Cable Box
Yellow Lead __Attoath_I
Rear Terminals
c°?#e%%J
OUT
l°
TV Rear Terminals
IS-VIDEO
@
t°
_:_
1
0 w.,te_o%
0
Incoming
_._Jl L_,,:_-_ R
2
Cable
VHF/LJHF
(75 _._)
FIXED
Red Lead
ACTIVE
IR/G LINK A/M NETWOF:K
®@
VARIABLE
®®[
Basic Connections
35
TV + stereo
audio
system
You may want to hear the sound from your TV and/or VCR tkcough
your home audio system. To do this, complete the necessary
connections
shown on previous pages of this chapter, then follow
the procedure on this page.
equipment
you will need
one hook
set ofupRCA
pin type
audio you
cables.
To
an audio
system,
will need
[__)]
procedure
o
O Connect the audio cables to the AUDIO VARIABLE OUTPUT terminals
on the back of the TV. Use the red cable to
connect the right (R) channel and the white cable to connect
the left (L) channel.
O Connect the other ends of these cables to the AUX IN
terminals
on the back of the audio system.
O Turn off the television's speakers.
To do this, press AUDIO
on the remote control until you see the SFEAKER display.
Set the speakers to "Off" by pressing either ADJUST r_ght
(_) or ADJUST left (,).
See "Adjusting the Sound" in
Chapter 3.
0 Set the audio system's
DImImrta_t:
input
For proper tone and volume balance,
using an external audio system.
to the AUX position.
turn offtlhe TV speakers
Audio system rear terminals
Red Lead t
WlniteL_ad
TV Rear Terminals
mm
@,
i]......
L _,oc_ R
® @@,
....
0
36
Chapter
2: Connecting
Your TV
when
.._:.,_;: _,
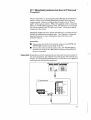
TV + Mitsubishi
Terminals
products
that
have/_€
Network
The A/V Network is a special system tlhat Mitsubishi developed to
make it easier to use several Mitsubishi products with only one
remote control. Only one of the products needs to be in "line of
sight" of the remote control. When the supplied cable is connected
between two Mistubishi products with A/V network, you can point
the remote control at the TV and it will "pass" the remote control
command to the others.
Mitsubishi VCRs that have Active A/V Network
can also have the
benefits of additional
automated
tasks.. See Chapter 4, Using the
Special Features, for more information
about the Active A/V
Network features.
procedure
_>Important-
O
Connect one end of the A/V network cable to the ACTIVE
NETWORK terminal on the back of the TV.
O
Connect
terminal
network
A/V
the other end of the cable to the A/V NETWORK IN
on the back of a Mitsubishi
component that has A/V
terminals.
Depending on which components
you have and the way you plan to
use your equipment,
the method of connecting the A/V network can
change. For more detailed information,
review the owner's guide of
each particular
Mitsubishi component.
MitsubishiComponentrear terminals
TV rear terminals
mm
@
@
,
,]....
®®@,
@®®,
ACTIVE
IP,/G
UNK
A/V
NETWORK
I®
m._J
37
CHAPTER
Operating
THREE
Your
TV
Now that your TV is connected to a cable system a_d/or an antenna
and possibly some external components,
it's time to enjoy your
equipment.
This chapter will explain how to operate the TV, first
focusing on functions that are basic and easy and then explaining
some advanced features.
This chapter
Getting
0
Using
explains:
Started
the Advanced
Features
.
i Getting
Started
This section is designed to get you started enjoying your new TV.
If you follow these procedures
one by one, you w:ill soon begin
discovering everything
your television can do.
You'll find information
on:
• Adjusting
the color purity
(Models CS-36509, CS-36609
• Using the remote
control
and other equipment
• Turning
the
the input
• Changing
channels
• Understanding
the
and
deleting
• Setting
the A/V network
the
40
channels
menu
type
• Naming
the
input
• Naming
the
channels
video
mute
• Selecting
the menu
• Selecting
the/_rv
Chapter
VCRs,
language
memory
categories
the A/V memory
3: Operating
Your TV
your
® on-screen
clock
• Adding
• Customizing
to watch
the ViewPoint
channels
• Using
to operate
source
• Memorizing
• Selecting
CS-40509
ONLY)
cable
boxes,
TV on/off
• Selecting
equipment
• Setting
and
settings
VCR or other
:menus
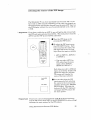
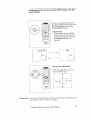
Adjusting
CS-36609
the color purity
- Models
and CS-40509
ONLY
CS-36509,
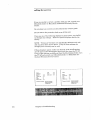
Because your Mitsubishi
color television has a large-screen
picture
tube, the earth's magnetic field can produce discolored patches on
the edges of your screen. The controls you will be using to adjust
the color purity are two switches, one labeled DIRECTION
and the
other STRENGTH.
These switches are found on the I_ont control
panel of models CS-36609 and CS-40509
tion panel of model CS-36509. To correct
instructions:
OTurn
and on the back conneccolor purity, follow these
off the TV set.
ODetermine
the compass direction where the set is facing.
The direction is determined
from the front of the screen
facing forward.
OSelect the position
the chart below.
TV
SET
DIRECTION
for the DIRECTION
DIRECTION
SWITCH
S
NEUTRAiL
N
East
X
North
West
X
South
•
Important:
East
X
South
West
X
East
X
West
X
the TV on, and check the color performance.
If color impurity is still present, change the STRENGTtt
switch to position "1". If there is still impurity, wait a
few minutes, then press the DEGAUSS button on the
control panel.
switches; each time you
If there is still color impurity after adjusting the
switches, please contact your Mitsubishi
Authorized
Warranty
Center.
Color impurity can also be caused by unshielded
speakers
strong magnets.
Move these items away from your _.
Getting
SWITCH
X
South
• You must adjust the color purity
move the set to a new location.
•
STRENGTH
to
X
North
North
OTurn
switc, h according
Started
and
41
Using
boxes
about
the remote
and other
your
remote
control
to operate
components
VCRs,
cab]Le
control
This TV's remote control has four "layers": the 1_7 layer, the VCR-.
A layer, the DVD layer, and the AUDIO layer. Each layer can be
used to operate a different component in your A/V system.
You
choose the layer you want to use by setting the "select" switch
across the top of the remote control.
When you first receive your remote control, the TV layer is set up
to operate your Mitsubishi TV and VCR-A is set up to operate your
Mitsubishi VCR. The DVD layer is programmed
to operate your
Mitsubishi DVD player and the AUDIO layer is programmed
tbr
your Mitsubishi A/V receiver.
You can use the following
_Important:
•
•
•
•
•
•
power button
pause button
mute control
SuperQuickView
button
QuickView '_'button
volume control
•
•
•
•
•
input button
channel control
enter button
TV Guide+ button
audio and video controls
to operate
TM
•
•
•
•
•
•
•
your TV:
menu button
cancel button
information
button
home buttor_
sleep timer button
number buttons
PIP controls
• play button
• AV memory button
• arrow buttons
The TV GUIDE Plus + button is functional
only' after you activate
as described in the TV GUIDE Plus+ Operatini_, Guide.
If you have a cable box (including some digital satellite boxes), a
non-Mitsubishi
VCR, or if you have a Mitsubishi
laserdisc player,
A/V receiver, or compact disc player, you can set up the layers in
the remote control to operate these components.
The VCR-A layer can be set up to operate a non-Mitsubishi
VCR.
The DVD layer can be set to operate a VCR, cable box, digital
satellite box, or a Mitsubishi laserdisc player. The AUDIO layer
can be set up to operate a cable box, digital satellite box, laserdisc
player, or an A/V receiver.
The TV layer can be set up to operate
the volume control of a Mitsubishi A/V receiver.
42
Chapter
3: Operating
Your TV
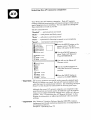
it
If your VCR
is this brand...
Mitsubishi (A)
Mitsubishi (B)
Canon
Emerson
Funai
General Electric
Goldstar
Hitachi
JVC
Using
boxes
the
and
setting
up the remote
control
components
control
to operate
(cont.)
to operate
VCRs,
your
cable
V,CR
0
Turn offyour
0
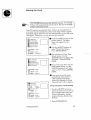
Set the select switch on the remote
want to set up: VCR-A or DVD.
O
While holding in the POWER button on the remol;e control,
enter the code number listed in the chart below for your brand
of VCR. Be sure to enter both digits of the code number.
If
more than one number is listed, begin with the first one.
O
Release
...enterthis
code
VCR.
the POWER
03, 10, 11
06
12
O3
03, 10
03, 10, 11
03
08, 13, 20
14
Magnavox
Murtitech
NEC
Panasonic
Philco
Philips
Quasar
RCA
Sanyo
O
to choose the layer you
button.
...enterthis
code
If your VCR
is this brand...
01
02
03
04, 05
06
03
07
08
09
remote
other
I1:your VCR
is [hisbrand...
Scot
Sharp
Sony
Sylvania
Symphonic
Teknika
Toshiba
Totevision
Zenith
15
16
77, 18
03, 10, 11
06
_o4,
06
15
O7
19
Press the POWER button again. Your VCR should turn on. If
the VCR turns on, your remote control is ready to operate your'
VCR. If your VCR does not turn on, repeat the instructions
trying each code number from 01 to 30.
using
remote
control
to operate
your
After you have set up your remote control
of VCR, you can use the remote to operate
O
...enterthis
code
VCR
for your particular
your VCR.
brand
Set the select switch on the remote control to the layer that you
set up to operate your VCR: VCR-A or DVD.
Point the remote
buttons.
control at the VCR and press the desired
If you are using a Mitsubishi VCR, you will be able to use all of the
buttons on the remote control to operate your VCR except for
MUTE, VOLUME and the PIP function buttons, which will always
operate the TV itself.
If you are using another brand of VCR, you can use the POWER,
CHANNEL, REC, STOP, Pause, REW, PLAY, and FF buttons to
operate your VCR.
Getting
Started
43
If your cable
...enter this
box isthis brand...
code
ABC
57, 59, 62, 67, 89
Color Voice
73, 74, 98
Comtronics
93
Gemini
55
General Electric
66
General Instruments
55, 56, 57
Hamlin
___52, 53, 69
Hitachi
57
Jerrold
54, 55, 56, 57, 58
59, 60, 85, 87
Macom
71
94
Magnavox
Memore)"
51
Using
boxes
the remote
and other
setting
digital
up the remote
satellite
box
_l
44
control
to operate
VCRs,
your
cable
cable
box or
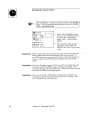
O
Turn on your cable box or digital satellite
O
Set the select switch on the top of the remote
layer you want to set up: AUDIO or DVD.
O
While holding in the POWER button on the reraote control,
enter the code number listed in the chart below for your brand
of cable box. Be sure to enter both digits of tlhe code number.
If
more than one code is listed, begin with the first one.
0
Release
the POWER
If your cable box]satellite
is this brand...
Oak
Panasonic
Paragon
Philips
...enterthis
code
61,62, 82
63, 70
51
73, 74, 75, 76, 77
___
64, 65, 84
48
51
63
49
53
79
65, 84
Regal
Regency
Samsung
box.
to choose the
button.
94, 98, 99
Pioneer
Prime Star
Pulsar
RCA
RCA DSS
0
%Important:
control
to operate
components
(cont.)
If yourcablelsatell
boxis this brand
Scientific Atlanti .__nature
Sony_ DSS
_ SSPrucar
Starcom
Starqate
Tocom
Toshiba
United Artists
United Cable
Viewstar
Zenith
...enterthis
code
66, 88, 89, 91, 92
57
47
63
__ 54, 55, 56, 87
_
55
_
67, 68, 72 ___
51
62
54
93, 94
51
__J
Press the POWER button again. Your cable or satellite box
should turn off. If it does, your remote control is now set up to
operate it. If your cable or satellite box does not turn off,
repeat the instructions
above, trying each code number lisl;ed
for your brand of cable or satellite box. If norse of these numbers work, try each code number from 51-99.
After setting up your remote control, if you cannot turn on the
cable box by pressing POWER, try using the CH_qNEL
buttc,n or
number buttons. Some cable boxes will turn on _hen a channel is
requested.
f you areleave
usingtheTV
GUIDE
Plus+,
Always
cable
box on.
Chapter
3: Operating
Your TV
do not turn the cable box off.
Using
boxes
using
the remote
and other
your
remote
control
to operate
components
(cont.)
control
to operate
VC, Rs, cable
your
cable
box
After you have set up your remote control for your particular
brand
of cable box, you can use the remote to operate your cable box.
O
Use the select switch on the remote control to choose the layer
that you set up to operate your cable box: AUD:[O or DVD.
O
Point the remote
buttons.
control at the cable box and press the desired
You can use the POWER, CHANNEL, numbers (0-9), and ENTER
buttons to operate your cable box. If you are using .an RCA DSS or
PRIMESTAR ®* receiver, you may be able to use additional buttons.
Refer to the instructions
for these devices.
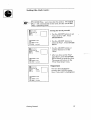
setting up the remote control
disc player or A/V receiver
to operate
your
Mitsubishi
Turn off your audio component.
Set the select switch on the top of the remote to choose the
layer you want to set up. For a laser disc player, choose AUDIO or DVD. For an A/V receiver, choose TV or AUDIO.
While holding in the POWER button
enter one of these code numbers:
• For
31,
• For
• For
• For
on the reraote
a Mitsubishi A/V receiver and a compact disc player: 30,
35 or 38
a Mitsubishi
and some Pioneer Laserdisc players:
32 or 33
a Yamaha A/V receiver and a compact disc plLayer: 36 or 37
a Mitsubishi DVD player: 34
Be sure to enter both digits of the code number.
one number is listed, try the first one.
Release
O
control,
the POWER
If more than
button.
Press the POWER button again. Your disc player
component should turn on. If it does, your remote
now set up to operate your audio component.
:[fi.t
on, repeat the instructions
above, trying the other
listed for your component.
or audio
control is
does not turn
code number
See "Using Your Remote Control to Operate Your Mitsubishi
Laserdisc Player" and "Using Your Remote Control to Operate
Your Mitsubishi A/V Receiver" in this chapter for information
on using the remote to operate your A/V components.
*PRIMESTAI_
Getting
Started
is a registered
servlcemark
of PRIMESTAR
Pnrtner,_
LP.
45
Using
boxes
notes
Important:
_>Important:
the remote
and other
about
your
control
to operate
components
(cont.)
remote
VCRs,
cable
control
Sometimes manufacturers
will change their proctucts, or they may
use more than one code. If this is the case, your remote may not be
able to operate your VCR or cable box.
When you replace the batteries
will usually return to its initial
your remote again.
using your
disc player
remote control
or DVD player
in your remote control, the remote
setting.
You may need to set up
to operate
your
Mitsubishi
After you have set up your remote control for your ]aserdisc
DVD player, you can use the remote to operate it.
la,;er-
player
or
O
Use the select switch on the remote control 1;ochoose the layer
that you set up to operate your |aserdisc player, AUDIO or
DVD.
O
Point the remote
desired buttons.
control
at the laserdisc
player
•
and press the
You can use the POWER, CHANNEL, numbers (0-9), INFO,
MENU, CANCEL, STOP, PAUSE, REW, PLAY,, carsor ( • • ),
and FF buttons to operate your disc player.
using your
receiver
remote
control
to operate
After you have set up your remote
can use the remote to operate it.
O
_Important:
Mitsubishi
A/V
control for your AiV receiver,
you
Use the select switch on the remote control to choose the layer
that you set up to operate your receiver: TV cr AUDIO.
It is recommended
that you set up :your A/V receiver in the AUDIO
layer as well as the TV layer. If you set up your remote control for
your A/V receiver in the TV layer, you will only be able to control
the VOLUME and MUTE functions.
Point the remote
desired buttons.
46
your
Chapter
3: Operating
control
at the A/V receiver
Your TV
and press the
Using
boxes
the remote
and other
control
to operate
components
(cont.)
VCRs,
cable
If you are using a Mitsubishi HTS-100 surround sound amplifier
enter code 30 to use the POWER, VOLUME, and MUTE buttons.
If you are using a Mitsubishi
HTS-300 receiver enter code 31 to use
the POWER, CHANNEL, INPUT, VOLUME, ENTER, number (0-9), INFO, MENU, CANCEL, AUDIO, VIDEO, ADJUST, and
MUTE buttons.
If you are using a Mitsubishi
M-VR400 (code 35), M-VR600 (code
35), M-VR800 (code 38), or M-VR1000 (code 38), you can use the
POWER, VOLUME, number (0-9), and MUTE buttons to operate
the receiver.
The ADJUST buttons will access the M-VRS00 and
M-VR1000 menus.
If you are using a Mitsubishi
M-CD500 CD changer, you can use
the PLAY, PAUSE, STOP, FF, and REW buttons to operate the
changer.
Resetting
setting
the layer
of your
remote
Set the select switch on the remote
set the component to.
While holding in the POWER
enter the code 00.
Release
Getting
the POWER
Started
button
to the original
factory
to choose the layer you have
on the remote
control,
button.
47
Turning
[_Important:
the TV on/off
Before using the remote control to operate the TV, set the select
switch on the top of the remote control to TV.
Use
the
POWER
button
on either
the
control
panel
control to turn the TV on and off. The power indicator
will light up in green when you turn the TV on.
Important:
,18
c,r the
remote
on your
TV
There is always a small amount of current flowing into the
TV, even when the power is turned off. This maintains
any
changes to the TV's settings and operates the built-in clock and
timing functions.
Unplugging
the set will erase these settings,
requiring you to set them again. Unplug the TV only when it won't
be used for a long time.
Chapter
3: Operating
Your TV
Selecting
the input
other equipment
source
to watch
your
VCR
or
If you connected components
such as VCRs, camcorders,
or laserdisc players to your TV, you will need to change the input source to
view the signals from these components.
To select an input source, press the input
control panel or on the remote control.
button
(INPUT)
on the
OR
You can choose between
the following input
sources:
• ANT-A or ANT-B (antennas
or cable systems connected to the
antenna terminals)
• Input 1 or Input 2 (components
connected to the terminals
on the
back of your TV) for models CS-32509 and CS-36509
• Input 1, 2, or 3 (a component connected to the terminals
on the
front panel of your TV) for Models CS-27609, CS-36609, and
CS-40509
When selected, the name of the input you have
briefly in the upper right corner of the screen.
Getting
Started
selected
will display
49
Changing
channels
Your TV offers you six ways of changing channels once their
numbers have been programmed
into channel memory:
• selecting channels one-by-one
CHANNEL down (V) controls
• directly
accessing
a channel
• using the QuickView
TM
by pressing
option to recall
• using the special QuickView
memorized channel
• using the SuperQuickView
channels on a user-chosen
• using the ADJUST
screen
_Important:
To change
channels
with the CHANNEL
TM
the number
buttons
the last channel
option to switch to a particular
function
list
TM
(A V) buttons
faster,
up (A) and
use either
to alternate
between
with TV GUIDE Plus+
sarf
]
of the foil.owing procedures:
• Enter three digits for every channel number, _asing zeros where
needed. For example, enter 004 to view channel 4 and 028 to
view channel 28, or
• Press the ENTER button after selecting the, number of the
channel.
For example, press 4, then press ENTER (in less than
three seconds) to view channel 4.
50
_Important:
If only one or two keys are used to select the channel number, the
onscreen display will appear and remain visible for three seconds if
no more keys are entered.
Once the display is no longer visib:[e, t:he
TV will tune to the selected channel.
_Important:
If you memorized channels using the Indoor/Outdoor
Antenna
option, your TV can receive antenna channels 2-13 (VHF) and[ 1469 (UHF). If you memorized
channels using the Cable option, your
TV can receive cable channels 1-125. If you select a channel
outside of these ranges, your TV will not change channels.
Chapter
3: Operating
Your TV
Changing
channels
(cont.)
changing
channels
To change
channels:
one-by-one
Press one of the channel buttons (CHANNEL) o1_the control
panel or on the remote control.
The _I_ will automatically
tune
to the next memorized channel.
OR
(_
o
0
0
0
0
0
0
0
0
changing
channels
directly
To move directly to a particular
channel without going through the
programmed
channels in-between
O Use the number buttons on the
remote control to select the
number of the channel you
wan:t to view.
ij
,._._L 5
Getting
Started
0 Press the ENTER/EXCH
button.
51
Changing
channels
(cont.)
using
the QuickView
option
The QuickView
feature can work
in two ways: to recall the last
channel viewed (Last Channel
Recall), or to recall a channel you
put into QuickView memory.
If you have not memorized any
channels into QuickView
Memory, Laser Channel Recall
allows you to use the QV button
to switch back and forth b_tween the curcent channel and
the last one viewed.
QuickView
Memory
allows
you to use the QV button to
switch back and forth between
the last channel you were
watching and the channel you
put into QuickView memory.
Setting
0
the QuickView
Tune to the channel
memory
you wish to memorize.
Press and hold the QV button for about 2 seconds. The channel
numbers and a QV indicator will appear on the screen, indicating that you have memorized that channel.
After changing to another channel, press the, QV button
immediately
return to the memorized
channel.
to
If you press the QV button while watching the memorized
channel, you will return to the last channel _4ewed.
_Important:
52
The memorized
QV channel will remain
replace it with a new channel using the
channel has been programmed
as a QV
QV button to switch between the current
channel an/ess you re-select the current
channel.
Chapter
3: Operating
Your TV
in memors' until you
procedure above. Once a
channel, you cannot use the
and the, last viewed
channel as the QuickView
Changing
channels
(cont.)
using the SuperQuickView
option
To view selected
®®®
programmed
memory:
TM
channels
into SuperQuickView
O Enter the desired channel into
SuperQuickView
memory.
For
additional
information,
see
"Using SuperQuickView"
in
this chapter.
0 Press the SQV bul;ton
repeatedly
to view the SQV
channels in sequence.
Getting
Started
53
Understanding
the ViewPoint
One of the distinctive
features
on-screen
menus
of this TV is Mitsubishi's
exclusive
l ViewPoint ®
ON-SCREEN
OPERATING
SYSTEM
Unlike other television menu systems, ViewPoint includes a spe,cial
Picture-in-Picture
screen to let you view the TV picture while you
are using the menu.
ViewPoint also provides step-by-step
the TV's special capabilities.
When using the ViewPoint
mind:
• The selected
menu
• The on-screen
minutes.
tbr using some of
please keep the following in
item is indicated
menus
• Some on-screen
system,
instructions
in yellow.
will turn off if no item is selected
menu items
5
must be set before other items are
available.
For example, "Set the Timer"
"Set the Clock" has been set.
• You can exit the on-screen
MENU button repeatedly.
viewing.
within
wil]Lonly be available
if
menus any time by pressing the
You will then retu:m to regular TV
• You can also exit the on-screen menus by pre_;sing the HOME
button on the remote control. You only need to press tho HOME
button once to completely exit :from all menus.
54
Chapter
3: Operating
Your TV
Setting
the
clock
I
Plus+ will automatically
set the clock. See the TV GUIDE
V GUIDE Plus+ users may skip this section. TV GUIDE
Plus+ Operating Guide.
_I
I
Your TV contains an internal clock. If there is a broadcaster
in
your area that is sending the current time along with its regular
broadcast
signal, then your TV can automatically
set its clock with
this signal. Otherwise,
you can set the clock yourself.
[_TV
[]
O Press the MENU button on the
remote ,control. The Main
Main Menu
First Time Setup
[]
Customize Display
[]
Advanced Features
[]
Select AN Memory
[_Guide
_
Menu will appear
screen.
on. the
Plus+ Menu
O Use the ADJUST buttons to
select "First Time Setup."
Press ENTEPJEXCH.
ADJUST
to select
ENTER
to enter
MENU
to exit menus
[]
First Time
_]
Set the Clock
[]
Memorize
[]
Add/delete
[]
Set AN
Setup
[
Channels
Channels
Network
-] ADJUST
[EZS] ENTER
MENU
You will see the "First Time
Setup" screen. Use the
ADJUST buttons to select "Set
the Clock." Press ENTER/
EXCH.
to select
to enter
I
O
If you want your TV
clock automatically,
ADJUST buttons to
clock" to "On". Press
EXCH.
to set the
use the
set "Auto
ENTER/
to go back
OIfyou
want to set the clock
yourself, set "Auto clock" to
"Off' and follow the steps
outlined in Setting I_he Clock
Yourself" later in this chapter.
[]
Set the Clock
[]
Auto clock:
[]
Day
: Sunday
El
Time
: 12:00 pm
[]
Time zone:
[]
Oa_(light
sawngs
j_---J ADJUST
On
Central
:Off
to select
ENTER
to enter
MENU
to go back
using
automatic
Started
setting
Use the ADJUST buttons to
select the time zone you live in.
The awailable time :,_ones are:
Central, Mountain,
Pacific,
Alaska, Hawaii, Atlantic and
Eastern.
• Press
Getting
clock
ENTER/EXCH.
55
-_ i.::::
:'-:-:
:!:.
Setting
the clock
(cont.)
TV GUIDE Plus+ users may skip this section° TV GUIDE
Plus+ will automatically
set the clock. See the TV GUIDE
P/us+ Operating Guide.
[]
Set the Clock
[]
Auto clock:
[]
Day
: Sunday
[]
Time
: 12:00
[]
Time zone:
[]
Daylight
savings
-]
I_
56
On
pm
Central
J
: Off
DJUST
If you follow daylight savings o
time, use the t_J)JUST buttons
to select "On". Otherwise,
select "Off'. :Press ENTEIU
EXCH.
to select
ENTER
to enter
MENU
to go back
The automatic: clock set up is
completed.
The screen will
return to the "First Time Setup"
menu.
_Important:
The TV's clock will not be set until you tune your 'YV to a channel
that broadcasts
the time via Extended Data Sei-cices (XDS). If
your TV loses power, you will need to tune to that channel again to
reset your clock. Most PBS stations broadcast
the time setting
signal.
[_Important:
If you set "Daylight savings" to "On", your TV wil:[ adjust the c:Lock
by one hour when daylight savings time begins and ends. This
automatic
feature only works when your TV has selected a channel
that sends the XDS time setting signal.
DImportant:
If you are receiving a VCR signal on channel 3 or channel 4 (on
Antenna A), the automatic
setting may not work correctly.
Turn
your VCR offifit is not being used.
Chapter
3: Operating
Your TV
Setting
the
clock
(cont.)
TV GUIDE
Plus+ users may
skipclock.
this section.
2_ GUIDE
GUIDE
[Plus+
will automatically
set the
See the 737
[Plus+ Operatin_ Guide.
[]
setting
Set the Clock
[]
Day
r_
[]
Auto clock: : Off
Time
°. : ....
[_----] ADJUST
: - -
to enter
MENU
to go back
[]
Set the Clock
[]
Auto clock: Off
[]
Day
]Time
: Sunday
: • - : ....
]ADJUST
• Use the ADJUST
select the "Day".
EXCH.
to enter
MENU
to go back
buttons to
Press ENTER/
• Use the ADJUST buttons or
number buttons to set the
"Time".
[
I
After you have set the "Day"
and "Time", press the ENTER/
EXCH button to start the clock.
The screen will return to the
"First Time Setup" menu.
to select
ENTER
yourself
• Use thE,, ADJUST buttons to set
"Auto clock" to "Offf. Press
ENTER/EXCH.
I_]
to select
ENTER
the clock
Important:
[]
Set the Clock
[]
Auto clock: Off
[]
Day
: Sunday
[]
Time
: 12:00 pm
[_---'] ADJUST
Getting
I
You can clear the tilae by
pressing the CANCEL button
when "Auto clock" is highlighted.
to select
ENTER
to enter
MENU
togoback
Started
57
Memorizing
channels
TV GUIDE
Plus+
users
do not need to memorize
channels
ANT-A. TV GUIDE Plus+ will do this automatically.
See
TV GUIDE Plus+ Operating Guide. However, you should
memorize channels for ANT-B if that input will be used. If
not be memorizing
channels for ANT-B, proceed to ':Setting
Network" later in this section.
for
the
still
you will
the ,_dY
You can use the menus to automatically
memorize the channels
your TV can receive and skip the unused channels.
Once channels
are memorized, you can scan through them using tl_Lechannel up/
down controls on the remote control and control panel.
O
[_]
TV Main
_
[]
Customize
irst Time
Advanced
Display
Setup
Features
[]
Select
Memory
[]Guide
_-1
F_3
[]
Menu
A]V
Plus+
Menu
to select
ENTER
to enter
MENU
to exit menus
Memorize
B (Ant-B)
_r_--] Antenna
A (Ant'A)
On which input
to memorize?
1 ADJUST
tO select
ENTER
to enter
MENU
to go back
[]Memorize
_]
you
_]
At the "First Time Setup"
screen, use ADJUST buttons
select "Memorize Channels".
Press ENTER/EXCH.
O
Use the ADJUST buttons to
select the terminal
(ANT-A or
ANT-B) to which the antenna or
cable system is attached.
Press
ENTER!EXCtt.
(If using botlh
terminals,
memorize channels
for one of the _:erminals now)
O
Use the ADJUST
['-----'--'_
ADJUST
to select
ENTER
to enter
MENU
to go back
Memorize
I_Ch
Not in memory
....
I
003
Now memorizing
you can receive
all the stations
on Ant-A.
Channels
[_-_
//
sland
CANCEL
_>Important:
58
by.
to stop
buttons
to
choose the type of antenna you
connected:
Cable antenna or
Indoor/outdoor
_,ntenna. Press
ENTERJEXCIt.
O
[]
Please
memorization
You will see a message that
channel memorization
is in
progress.
A channel being
added to memory will be labeled
"In memory".
Channels not
being added will be labeled "Not
in memory". Yoa can stop
channel memorization
at any
time by pressing; CANCEL.
CHANNEL up/down controls will work differently after channels
have been memorized.
After memorizing,
use the channel controls
(CHANNEL) to advance sequentially
to the next memorized
channel.
Use the number buttons to select individual channels.
Chapter
to
like
What is connected to your TV
on AnI-A?
_
O
Channels
Indoor/outdoor
antenna
Cable antenna
on the screen.
Use the ADJUST buttons to
select "First Time Setup".
Press ENTER/EXCH.
_-_
would
will appear
O
Channels
Antenna
r_
Menu
_--_]
ADJUST
Press the MENU button on the,
remote control. The Main
3: Operating
Your TV
Adding
and
deleting
channels
IB
TV GUIDE Plus+ offers a singular :method to addJdelete
channels.
See the TV GUIDE Plus+ Operating Gllide.
However, you can still follow the instructions
below for
ANT-B channels.
After all available channels have been memorized
with tl:.e
"Memorize Channels" feature, channels with weaker signals
added or deleted with the following procedure.
_]TV
Main Menu
[]
First Time Setup
[]
Customize
[_] Advanced
O Press t:he MENU button on the
remote control. The Main
Display
Menu will appear
screen.
Features
_]Select
AN
[]Guide
Plus+
Memory
O Use the ADJUST buttons to
select "First Time Setup".
Press ENTER/EXCH.
ADJUST
to select
_1
ENTER
to enter
MENU
to exit menus
[]
First Time Setup
[]
Set the Clock
[]
Memorize
[]
Add/delete
[]
Set A/V Network
Use the ADJUST buttons to
select "Add/delete Channels".
Press ENTER/EXCH.
Channels
O The "Add/delete Channels"
screen will appear.
Use the
ADJUST buttons tc select the
channel you would i[ike to add
or delete.
Channels
_
ADJUST
to select
_-]
ENTER
to enter
MENU
to go back
(You can also use the
CHANNEL controls to select
channels
Add/delete
Channels
Antenna A
Indoor/putdoor)
Channbl
: 003ABCD
O
I
7 ADJUST
EE_
to select
ENTER
to add
MENU
to go back
already
If a channel
in memory.)
is labeled
"In
memory", use the CANCEL
button to remove it from
memory.
If a channel is labeled
"Not in memory", use the
ENTEIUEXCH
button to add it
Not in memory
Either "In memory" or
"Not in memory" will appear.
o_a the
Menu
_
[]
can be
to memory.
O
When you are finished adding
and deleting channels;, press
the HOME button to :eturn to
normal
TV viewing
Adding a channel to memory allows you to tune to the channel
with the CHANNEL up/down controls.
If' a channel is :aot in
memory, you can only tune to it with the aumber buttons.
Getting
Started
59
Setting
AV
the A/V Network
The A/V Network is a system that Mitsubishi developed to make, it
easier to operate many products with one remote control. When
the A/V Network is connected between two Mitsubishi products,
you can point the remote control at t:he television and it will "pa,_s"
the remote control command to the other. In addition to passinG;
the remote control signal, Active A/V Network will .automate the,
TV's input selection and the playback of Mitsubishi VCRs into a
single command. To set up the A/V Network, follow the steps below.
[_]TV
First _me
Customize
[]
the MENU button on the
remote control. The Main
Menu will appear on the screen.
Advanced
Setup
Display
Features
_]Select
AiV Memory
[]Guide
Plus+ Menu
-------1
ADJUST
[]
O Press
Main Menu
O
Use the ADJUST
buttons
to
select "First Tirae Setup".
Press ENTE_b%XCH.
to select
ENTER
to enter
MENU
to exit menus
Use ADJUST to select "Set t_V
Network", then press ENTER]
EXCH.
Set AIM Network
[] o.
[]
Basic
[]
Active
'--"_ ADJUST
to select
!E551 ENTER
to enter
I_
to go back
MENU
If your VCR has a rear
terminal
that reads:
O Use the ADJUST buttons to
select "Active" ,"Basic", or "()iT'.
Check the rear terminals
of
your VCR, the_. use the cha_t
below to deternfine how you
should set your TV.
...and you have set your
VCR to:
set your TV to:
Basic
A/V Network
Active A/V Network
Active
...then
AJV Network
Does not have an A/V
Network rear terminal
Off
Basic
Active
Active
--
Off
OPress
the ENTER/EXCH
or MENU button to return to the
"First Time Setup" menu. Press HOME to exit all menus.If
you are not sure how to set your VCR's A/V Network setting,
refer to your VCR's owner's guide.
60
_>Important:
The A/V Network can still be used to pass remote control signals
even when the TV's "A/V Network" setting is "Off'.
[}>Important:
If you do not use the A/V Network system, set "A!V Network"
"Off'. If you don't, channel selection may not work correctly.
E>Important:
If you select Active or Basic A/V settings, make sure your Mitsubishi VCR with an A/V Network or Active A/V Network connection
connected to Input-1 and the AiV network cable is in place.
Chapter
3: Operating
Your TV
to
is
:'::7:'--:,::
:.:: :-.Tz:'.
Selecting
the
menu
type
You can display the on-screen menus in one of two ways. The
"Standard
Menu", which is illustrated
in this manual, p:ro'Ades
step-by-step
instructions
for all features.
The "Advanced Menu"
lets you select each feature directly by its name and icon.
Your TV's normal setting is the "Standard
menu".
between the Standard
and Advanced menu,_:
[]
TV Main
[]
First Time Setup
Menu
[]
Customize Display
[]
Advanced Features
[]
Select AN Memory
[]Guide
]
to select
ENTER
to enter
MENU
to exit menus
[]
Customize
[]
Select
Menu
[]
Name
the Input
Display
[]
Name
the Channels
[]
Use Video
[]
Select
Mute
Menu
--I ADJUST
Type
O Press the MENU bu_ton on the
remote control. The Main
Menu will appear on the screen.
O Use the ADJUST buttons to
select "Customize Display".
Press ENTEtUEXCH.
Plus+ Menu
_-']AD,JUST
[]
I
To switch
I
I
O You will see the "Cul_tomize
Display" menu.
Use the
ADJUST buttons to "Select
"Menu Type".
Press ENTER/
EXCH.
Language
to select
ENTER
to enter
MENU
to go back
OUse the ADJUST bul:tc,ns to
select "Standard
menu" or
"Advanced menu".
Select Menu Type
[] Standard menu
r_ Advanced menu
OPress
the ENTER/EXCH
MENU button.
I-_
ADJUST
to select
ENTER
to enter
MENU
to go back
Getting
Started
or
61
Selecting
the menu
type
(cont.)
If you select the "Standard menu", the screen will n_turn to the
"Customize
Display" menu. If you selected the "Advanced menu",
the screen will show the menu illustrated
below.
To operate the Advanced menu, use the ADJUST buttons to highlight the icon of the feature you want to use, then press ENTEI_'
EXCH. The name of the highlighted
icon appears at the bottom of
the screen. This menu will disappear
in about five minutes if you
do not select an item.
"
If you wish to return to the standard
menu, use the ADJUST
buttons.
Choose the "Select Menu Type" icon and press ENTER/
EXCH. This gives you the option of re-selecting
the standard
menu.
The Advanced
Main Menu
- Select Menu
Use Video Mute
Set the Timer
Name the Channels
Use Parental
Name the Input
Select .._rV Memory
Menu Type
Guide+
Select Menu Type
/
The feature name of the highlighted
icon appears here.
62
Lock
Use SuperQuickView
First Time Setup
Select
Language
Chapter
3: Operating
Your TV
Menu
Naming
the
input
This feature allows you to name the inputs so that you can keep
track of components
you have connected to your TV. For example,
you might name one input '%CR", and another one "DISC"_ After
naming, the new name will appear on the screen display
The
original names are: "Input-l", "Input-2" and[ "Input-3".
_--']TV
[]
Main
[]
Customize
[_
Advanced
[]
Select
I_
Setup
Display
Memory
Plus+
Menu
ADJUST to select
ENTER
to enter
MENU
to exit menus
[]
Customize
[]
Select
Menu Type
[]
Name
the Input
[]
Name
the Channels
[]
Use Video
[]
Select
_
Display
ADJUST
to select
ENTER
to enter
MENU
to go back
Name the Input
Input-3 is not available
on
Models CS-32509 and CS-
[]
Input label New name
Input-1
.....
36509
_
Input-2
Input-3
[]
ADJUST to select
ENTER
to enter
MENU
to go back
Name
the Input
Input label
[]
Input-1
[]
Input-2
[]
Input-3
Menu will appear
O Use the ADJUST buttoas to
select "Customize Display".
Press ENTEWEXCH.
You will see the "Customize
Display" screen. Use the
ADJUST buttons to select
"Name the Input".
ENTER!EXCH.
New name
ABCDE
Use the ADJUST buttons and
the ENTEWEXCH
button to
select each letter in t:he new
name.
You can use the letters (A - Z),
numbers (0 - 9), or symbols (:/.
, ( ) ! "# $ % &'blank:+
;<= > ?
blank - ) for the new name.
If you press the CANCEL
button while setting the name,
you will :move one position to
the left. You can clear 1;he
entire name by pressing
CANCEL when the left-most
ADJUST
to select
ENTER
to enter
MENU
to go back
Started
:is underlined.
O When you are finished, press
the MENU button. The screen
will return to the "Customize
Display"
Getting
F'ress
0 Use the ADJUST buttons to
select the input you want to
name (Input-I,
Input-2 or
Input 3). Press ENTEWEXCH.
position
[_]
on the screen.
Mute
Menu Language
[]
r_
0 Press the MENU button on the
remote control. The Main
Features
AN
[]Guide
_-7
Menu
First Time
menu.
63
Naming
the
channels
TV GUIDE Plus+ users do not need to perfi)rm the steps
below for ANT-A ifTV GUIDE Plus+ is used. However, if
ANT-B will be used you can name the channels on ANT-B.
Refer to the TV GUIDE PIus+ Operating Guide.
To help you keep track of the many channels available, you can.
name up to 30 of the channels your TV receives.
In this menu, the
ENTER/EXCH
button performs the same function as the ADJUST
keys in other menus. After you enter a name, it. will appear on
screen, next to the channel number.
O Press the MENU button on the
remote cont:ro]. The Main
_----"]TVMain Menu
[] Customize Display
r_FirstTimeSetup
[]Advanced
Features
_]Setect
AN Memory
[]Guide
Plus+ Menu
]ADJUST
_-I
to enter
MENU
to exit menus
[]
Customize
[]
Select
[]
Name the Input
[]
Name the Channels
[]
Use Video
[]
Select
r_
Menu will aplcear on the screen.
I
Use the ADJUST buttons to
select "Customize Display".
Press ENTER/EXCH.
to select
ENTER
]ADJUST
l
You will see the "Customize
Display" screen. Use the
ADJUST buttons to select
"Name the Channels".
Press
ENTERYEXCH.
Display
Menu Type
Mute
I
I
Use the ADJUST buttons '_o
select an antenna (A or B).
Press ENTE_ffEXCH.
Menu Language
to select
ENTER
to enter
MENU
to go back
0
Use the ADJUST buttons
channel controls or number
buttons to select the channel
you want to name. Press
ENTER/EXCH
to store the
channel number in memol=y.
64
Chapter
3: Operating
Your TV
Naming
the channels
[]
Name the Channels
Antenna
:A
(Indoor/outdoor)
Channel
:---
[]
New name
_
DJUST
I_
[]
: ....
to select
ENTER
to enter
MENU
to go back
Name the Channels
(Indoor/outdoor)
_r_ Antenna
:A
Channel
:003
]New
-_
name : ....
ADJUST
to select
ENTER
to enter
MENU
to go back
(cont.)
O Use the ADJUST bul;tons and
the ENTER button to select
each letter in the new name.
You can use letters (A - Z),
numbers (0 - 9), or s:_lbols (:/.
, ( ) ! "#$ % &'blank+
;< = > ?
blank - ) for the new name.
If you press the CANCEL
button while setting the name,
you will move one position to
the left. You can clear the
entire name by pressing
CANCEL when the left-most
position is underlined.
When you are finished, press
the HOME button to return to
normal _dewing.
I>Important:
The name you set will appear instead of the call letters
supplied by Extended Data Services (XDS).
[>Important:
Message "Memory over!" will indicate that the memory i,_fall. If
the memory is full and you want to name a channel, you must use
the above steps to clear the name for an existing channel
You can
then select the new channel to name.
Getting
Started
b.eiag
65
Using
video
mute
When you use the video mute functions, your TV will display a
blue screen whenever it is receiving a weak external signal or no
signal at all from Input-l, Input-2, or Input-3. If you want to try
viewing a weak external input signal, you can turn the video mute
off.
_]TV
Main Menu
[]
First Time Setup
[]
Customize Display
E
_] Advanced Features
[]
Select AN Memory
[]Guide
_
I_
Plus+ Menu
DJUST
to select
ENTER
to enter
MENU
to exit menus
[]
Customize
[]
Select
O Use the ADJUST buttons to
select "Customize
display".
Press ENTEI%EXCH.
Display
Menu Type
[]
Name
the Input
[]
Name
the Channels
[]
Use Video
[]
Select
_
@) Use the ADJUST buttons
select "Use Video Mute".
Press ENTER/EXCH.
Mute
Menu
Language
ADJUST
to select
ENTER
to enter
MENU
to go back
[]
Use Video Mute
[]
Automatic
[] o.
l
66
,
] ADJUST
to select
ENTER
to enter
MENU
to go back
Chapter
O Press the MENU button on the
remote control
The TV Main
Menu will appear on the
screen.
I
3: Operating
to
E
Your TV
O Using the ,_J)JUST buttons,
select "Autor_atic" to turn
video mute on or to "Off' to
turn video mute off.
O Press ENTEWEXCH
or MENU
button to r et_lrn to the "C,_stomize Display"
menu.
Selecting
the
menu
language
This TV allows you to display the on-screen
languages:
English or Spanish (Espafiol).
_-']TV
First Time Setup
[]
Customize
I
Display
[] Advanced Features
_----1SelectAN Memory
[]Guide
Plus+
_
ADJUST
to select
ENTER
to enter
F_
MENU
to exit menus
[]
Customize
[]
Select
Menu Type
[]
Name
the Input
[]
Name
the Channets
[]
Use Video
[]
Select
I_
O Use the ADJUST buttons to
select "Customize Display _.
Press the ENTER/EX€:H
button.
Display
Mute
Menu
Language
Use the ADJUST buttons to
select "Select Menu ]Language".
Press the ENTER/EXCH
button.
to select
ENTER
to enter
MENU
to go back
[]
Select Menu Language
[]
English
[]
EspaSol
I
O Use the ADJUST buttons to
select tile language ibr the
on-screen menu.
Press the ENTER]EXCH
MENU button to return
_"_
ADJUST
_--1 ENTER
MENU
Getting
of two
Menu
_--_
]ADJUST
in either
O Press the MENU buttoa on the
remote control. The 'I_T Main
Menu will appear on the
screen.
Main Menu
[]
menus
to select
to enter
"Customize
Display"
or
to the
menu.
to go back
Started
67
Selecting
the A/V memory
categories
AV
Your TV has five A/V memory categories.
Each A_ memory
category contains preset picture and sound settings to best suit the
type of program you are watching.
You can adjust the settings for
these memories as much as you like,.
The five memories
"Standard"
"Music"
are:
- - - normal
picture
- - - vivid picture
"Movie" - - - soft picture
"News" - - - optimized
[]
Main Menu
First Time Setup
[]
Customize Display
[]
Advanced Features
_]Select
AN Memory
[]Guide
Plus+ Menu
[-"-_ ADJIJST
and lively sound
and strong
for listening
"Sports"- - - vivid picture
_]TV
and sound
to speech in news programs
and strong
I
O
to enter
MENU
to exit menus
sound
Press the MENU button on the
remote control. The Main
Menu will appear on the screen.
O Use
the ADJU ST buttons to
select "Select A/V Memory".
Press ENTERrEXCH.
to select
ENTER
sound
O You
[]
Select AN Memory
[]
[]
[]
Standard
Music
Movie
,.._--1ADJUSF
ENTER
[_
Important:
screen.
Use the ADJUST
select the desired
position.
buttons t,o
A/V memory
to select
to enter
CANCEL to reset
MENU
Memory
O
_o News
Sports
will see the Select A/V
to go back
O Press the MENU button tc,
return to the MAIN MENU.
A/V memory positions are specific to the currently selected input.
When you change your input, the last A/V memory position used
with that input is automatically
selected.
See "Selecting the :Input
Source" in this chapter for information
on choosing your input.
Although the preset A/V memory categories are designed to optimize the picture and sound quality for different types of program-.
ruing, you can adjust individual settings (tint, _;reble, etc.) for any
position.
See " Customizing
the A/V Memory Settings"
in this
chapter for information
on adjusting individual _ideo and audio
settings.
% Important:
68
The "Listen to:" function, Balance, Speaker ON/OFF, (volume),
background
and closed captioning adjustments
are independent
A/V memory positions.
Chapter 3: Operating
Your TV
of
Selecting
_ Important:
the AN
memory
categories
(cont.)
The "Select A/V Memory" menu is not available
until the channel has been unlocked.
using
the A/V MEMORY
button
to select
You can use the AV MEMORY button
new A/V Memory to use or adjust.
button
for locked channels
an AN
on the remote
on the remote
Memory:
to select a
O
Press the AV MEMORY
of AV Memories.
O
Use the ADJUST up or down buttons to select a new memory,
or if you wish to change the setting in the selected memory,
proceed with step 3.
O
If you wish to change an individual setting in the selected AV
Memory press the ENTER/EXCH
button once to display the
video settings or press the ENTER/EXCH
button twice to
display the audio setting.
0
Use the ADJUST up or down buttons to select the setting you
would like to adjust, Do Not Press ENTER/EXCH,
instead use
the ADJUST left or right buttons to change the setting.
Press the HOME button to use the selected
remove the display from the screen.
resetting
to display
memory
a list
and
an A/V memory
If you have changed the adjustments
of an AV memory and would
like to return these settings to the original £actory adjustments:
O
Press the MENU
Menu will appear
button on the remote
on the screen.
Use the ADJUST
ENTEPdEXCH.
buttons
Use the ADJUST
position.
buttons
The Main
to select "Select A/V Memory".
You will see the Select A/V Memory
0
control.
Press
screen.
to select the desired
A/V meraory
You can press the CANCEL button to reset many of the audio
and video settings for the selected A!V memory position to their
factory settings.
Pressing CANCEL will not affect changes made to wflume,
"Listen to:" function (Stereo/SAP/Mono),
speaker (off/on),
background
(black/gray),
and closed captioning.
Getting
Started
the
69
Customizing
the A/V memory
settings
You can adjust the individual video and audio settings for each of
the five preset A/V memory positions to select your' desired picture
and sound qualities.
This section provides descriptions
of each
video and audio setting, and explains how to adjust them for the
AN memory positions.
See "Selecting the A/V memory position"
in this chapter for more information.
_Important:
You can cancel any adjustments
made to an A/V memory position
and return it to the factory settings.
See "Selecting the A/V
,
memory position" in this chapter for more information.
Adjusting
the picture
This section contains descriptions
for each video setting and
explains how to adjust them for the. A/V memory positions.
descriptions
of video
settings
Tint provides a scale that adjusts the proportion
of red to green in
the picture.
This determines
the delicate tones of color.
Color
provides
a scale that determines
the intensity
of the color.
Contrast
provides a scale that controls the level of white-to-black
in the picture.
When the contrast is low, you will be able to see the
variety of shades in the darker images on the screen. When the
contrast is high, the screen's dark images will appear more uniformly black, but this will also make the colors on the screen seem
more vibrant.
Brightness
the picture.
provides
a scale that
controls
Sharpness
the picture.
provides
a scale that
adjusts
the overall
brightness
the detail and clarity
of
of
The Color temp (Color temperature)
allows you to set how the
TV will display white images. Your choices are "Low," "High,"' or
"Middle".
• With the "Low" setting, white images on-screen will have a
warm cast to them. This setting represents
the 6500°K
industry standard.
• With the "High" setting, white images on-screen will haw., a
cool cast to them. This setting may provide the most realistic
picture under bright lighting.
• With the "Middle"
setting, white images oa-screen will be
balanced between the above warm and coo:[ setting.
70
Chapter
3: Operating
Your TV
Customizing
the A/V memory
settings
(cont.)
Background
allows you to select the background
color from choices
of Black or Gray for the closed caption display and the audic,/video
functions display.
The _C function is used to control the closed caption decodc,r.
details, see "Using the closed caption decoder" in this chapter.
For
Instant Info allows special information
broadcast from TV GUIDE
Plus+ and host channels to be viewed on-screen.
It can be tamed
"on" or "off' in any memory setting.
For details, see the 7_/GUIDE
Plus+ Operating Guide.
Adjusting
the video
settings
You can adjust the video settings
for any A/V memory position using
either the MENU or VIDEO
buttons on the remote control.
access
with
the MENU button
• :,
OPress
the MENU butto_ on the
remote control. The TV Main
Menu
_TV
Main
Menu
[]
First
[]
Customize
Time
Display
_
Advanced
Features
_]
Select
_Guide
_
[_
Setup
AN
Memory
Ptus+
DJUST
Menu
to select
ENTER
to enter
MENU
to exit menus
_
Video Function
Standard
[]
Tint
[]
[]
Color
Contrast
[_
Brightness
Sharpness
[]
Color temp : Middle
Instant Info:
On
Background
: When
Getting
: Black
muting
Started
appears
on the screen.
_Use
the ADJUST buttons to
choose "Select A/V Memory".
Press ENTER/EXCH.
OThe five A/V memory positions
appear.
Select the ._V position
to adjust; by pressing t_e
ADJUST up/down buttons.
When the desired po,,dtion is
selected, press ENTEl_EXCH.
OThe video settings for the
selected A/V memory position
display. Use the ADJUST up/
down buttons to select the
setting to change. Do not press
ENTEY_rEXCH.
71
.
.:
.
Customizing
the A/V memory
setting,,_
(cont.)
AV
O
Press
either
O
The setting
the left or right ADJUST
appears
at the bottom
of the screen.
While the setting is still on the screen,
left buttons to adjust it.
access
with the video
button.
use the ADJUST
right/
button
The VIDEO button selects the video settings for the cm_rently
selected A/V memory category. The currently selected AN memory
category displays on the screen above the video a,ijustment
display
when you press the Video button.
See "Selecting the A/V Memory
Categories"
in this chapter.
0
Q ® ® l-_
©®®-_
c"25 _
2%_cD
W.
I
Important:
72
While the setl_ing is still on the
screen, use the ADJUST right!
left buttons to change the
function's setting.
0
The setting will disappear
from
the screen :after a few seconds.
You cannot adjust a setting if it
is not on the screen.
If you use the VIDEO button, any adjustments
made to video
settings are memorized into the currently
selected A/V memory
position (Standard,
Movie, Music, News, Sports). To reset the
video settings to their factory settings, see "Selecting the A/V
Memory Categories" in this chapter
Chapter
3: Operating
Your TV
of
0
®
@
Press the VIDEO button
repeatedly
until the desired
setting displays at the bottom
the screen.
Customizing
Using
the AN
closed
caption
memory
settings
(cont.)
decoder
Many broadcasters
now supply closed captioning information
along
with their regular broadcasts.
Your TV can decode that information and display it on the TV screen.
Closed captioning was initially designed so that those with hearing
difficulties could more fully enjoy viewing television.
However,
closed captioning can also be used in other ways, such as:
• helping children learn to read
• learning a foreign language
• using the television without disturbing
There are two types of captioning
standard
and text.
others
that broadcasters
can send:
Standard
captioning
is related to the program that is being
shown. Standard captioning usually follows the dialogue of the
characters
on-screen and only displays when the broadcast,_r is
sending the closed captioning.
Text captioning
often contains information
such as weather or
news. Text captioning blocks out your view of the program you are
watching.
Your TV can decode four different standard
,captioning signals and
four different text captioning signals from each TV s.tation. However, each station may be broadcasting
only one or two capl;ioning
signals, or none at all.
When
setting
the decoder you can choose to ,display:
• one of four standard
_-_ :4)
captioning
• one of four text captioning
[] : Text 3, _C] : Text 4)
• captions
when muting
or to turn the captions
If you select"
[]
( U_ :1) will appear
(_
off ( _
signals
(IC--_:1, [ffC]:2, _
:3,
( _C7 : Text 1, _-d : Text 2,
: When Muting)
: Off)
: When Muting,"
whenever
signals
the standard
captioning
signal
you use the MUTE button.
_Important:
If you set the decoder to a "standard" caption setting or "when
muting" and tune to a broadcaster
that is not sending a caption
signal, no captions will appear.
_Important:
The content of captions are determined
by the broadcaster.
If your
captions show strange characters,
misspellings,
or odd grammar, it
is not a malfunction
of the TV.
Getting
Started
73
Customizing
the A/V memory
setti:ngs
(cont.)
AV
adjusting
the closed
caption
decoder
You can access the closed caption decoder screen using the MENU
or A/V Memory button.
When adjusting the closed caption decoder,
you can use the buttons on the remote control.
access
[]
TV Main
[]
First
[]
Customize
Menu
Display
[]
Advanced
Fealures
Time
Select
Setup
I
I
AJV Memory
[_Guide
Plus+
_
ADJUST
to select
ENTER
to enter
[_
MENU
to exit menus
[]
Select
AN
[]
Standard
[]
[]
Music
Movie
I
Menu
[_
[_
Use the ADJUST up/down
buttons to choose "Select ,_FV
Memory". Press ENTER/EXCH.
Memory
ADJUST
to sDlect
ENTER
to enter
CANCEL
to reset
MENU
to go back
[]
Video Function
Stanaard
[]
[]
Tint
Color
[]
[]
[]
Contrast
Brightness
Sharpness
Use the ADJUST up/down
buttons to select the A/V
Memory you want to modify.
Press ENTER/EXCH.
[]
B
Color temp
: Middle
Instanl
Info:
On
Background
: Black
[]
[]_]
0 Select the closed caption display
by pressing the ADJUST up/
down buttons.
Press the adjust
right or left button to select tlhe
desired closed caption sig:aal.
Wait until the display appears.
That option !s now selected.
_
: When
_
_
access
button
muting
O
® ® M'!I
i"_
button
O Press the MENU button on tile
remote control. The TV Main
Menu will appear on the screen.
.
_]
with the MENU
]
_
5) I'/,"
with the AV memory
Press the AV MEMORY. Press
ENTER/EXCH.
Next press
ADJUST up/down until the
closed cap'don menu option
displays, button repeatedly
until the closed caption option
displays.
Press the ,_)JUST
right/[Left
buttons to select the desired
closed caption signal.
(See previous page for explanation of caption settings.)
74
_>Important:
If you cannot display any captions on the screen, please keep in
mind that not all broadcasters,
video tapes, or laserdiscs supply
closed caption signals. Additionally,
captions might not appear if
you are playing a video tape that is worn or deteriorated,
or starLing to play a laserdisc or video tape from still or search mode.
1>Important:
The closed caption
Memory settings.
Chapter
3: Operating
setting
you choose will apply to all five AV
Your TV
Customizing
Adjusting
the AN
memory
settings
(cont.)
the sound
This section contains descriptions
for each audio setting arLd
explains how to adjust them for the A/V memory positions.
descriptions
of audio
settings
The Listen to: function allows you to determine how your TV will
receive an audio signal and play back the sound that you hear. You
can set this function to "Stereo," "S.A.P." or "Mono."
• For almost all situations,
you should choose Stereo.
With this
setting, the TV will play stereo broadcasts
in stereo and mono
broadcasts
in mono. If a channel is broadcasting
in stereo, the
word "Stereo" will display when you tune to that channel.
• Some TV stations will broadcast
second audio program, or
S.A.P. signal. This signal is an additional soundtrack
that you
can't hear during normal TV viewing. An S.A.P. signal might
be related to the program you are watching, such as a
soundtrack
in a foreign language, or it might be unrelated;
for
example, a weather report. If a channel is broadcasting
an
S.A.P. signal, the letters "SAP" will appear on-screen when you
tune to that channel. Choose "Listen to: SAP" to hear ;he S.A.P.
signal.
• Use the Mono setting if you are receiving a weak audio signal.
This setting will reduce background
noise. However the TV will
only play in mono, even if the program you are watching is in
stereo.
The Bass setting
The Treble
setting
enhances
enhances
or reduces
or reduces
low frequency
sound.
high frequency
sound.
The Balance setting adjusts the level of seund between the left
and right speakers.
Adjust the scale until the sound seems to come
equally from both speakers.
The Surround
setting creates simulated
stereo and surround
effects. You can set this setting to "Off," "Simulate" or "Hall".
• Select Off if you do not want to use any surround effects.
• Select Simulate
if you are watching a non-stereo program.
Your TV will create a simulated stereo effect.
• Select Hall if you are watching a stereo program.
Your TV will
create a simulated
surround effect, making the sound seem to
extend around and behind you using the TV's internal speakers.
The Speaker
function allows you to turn the TV's internal speakers on or off.
• Choose On if you want to play the TV's sound through the TV's
built-in speakers.
• Choose Off if you connected your audio system to your TV and
you want to play the sound of your TV through the audio
system.
Getting
Started
75
Customizing
the AN
memory
settings
(cont.)
AV
The Level Sound selection allows you to enable the TV to automatically equalize the volume level of programs that contain
significant sound level differences from one segment to another; for
example, from regular programming
to commercials.
To receive the
best audio fidelity for music programs, it may be desirable to turn
this setting off.
Important:
Important:
For proper tone and volume balance, you may w_slh to turn
TV's speakers when using an external audio system,
off the
Set the surround setting to "OFF" when using an A/V receiver
Dolby _ Pro Logic Surround.
*DOLBY
, AC-3,
Corporation.
PRO
LOGIC
Copyright
Adjusting
and the double-D
1992 Dolby
the audio
Laboratories,
symbol
Inc.
are trademarks
All rights
of Dolly
Laboratomes
o
with
Licensing
reserved.
functions
You can adjust the audio settings for any A/V memory position
using the MENU or AUDIO buttons on the remote control.
access
with
the MENU button
Press the MENU button on the
remote control. The TV Main
Menu will appear on the screen.
O
[_TV
_
Main Menu
First Time Setup
Customize
Display
[_]Guide
_
[_
}_
EXCH twice to display the
settings for the selected audio
mode.
Plus+ Menu
DJUST
tO select
ENTER
to enter
MENU
to exit menus
Selecl
O The
audio settings for the
selected Afv r memory position
are displayed.
Use the ADJUST up/down buttons to select
the setting to change. Do NOT
press ENTEWEXCH.
PJ3] Memory
[_] Standard
[] Music
[]
Movie
[_ADJUST
[_
76
to select
ENTER
to enter
CANCEL
to reset
MENU
to go back
Chapter
3: Operating
Use the ADJUST buttons to
choose "Select AiV Memory".
Press ENTEI_]EXCH.
The fiw_
A/V memory positions will
appear. Select the A/V position
by pressing the ADJUST up/
down buttons.
Press ENTER/
Your TV
Customizing
[]
Audio Function
Standard
[]
[]
Listen to : Stereo
Bass
_
[]
reNe
Balance
Surround
[]
[]
Speaker : Off
Level Sound
: Simulate
the A/V memory
settings
(cont.)
O Press either the left or right
ADJUST button.
O The setting appears at the
bottom of' the screen.
While the setting is still on the
screen, use the ADJUST right]
left buttons to adjust it.
O The functions disappear from
the screen after a few seconds.
You cannot adjust a _anction if
it is not on the screen.
access
with
the AUDIO
button
The AUDIO button changes the audio settings for the currently
seIected A/V memory category.
The currently
selected A/V
memory category will display on the screen above the audio adjustment display when the Audio button is pressed.
(See "Selecting the
A!V Memory Position" in this chapter.)
{]} Press the AUDIO button until
the desired function displays on
the bottom of the screen.
While the function is still on the
screen, use the ADJUST right/
left buttons to modify ffae
function"s setting.
The
the
You
it is
functions disappear from
screen after a few seconds.
cannot adjust a function if
not on the screen.
_Important:
If you use the AUDIO button, any adjustments
made to audio
functions are memorized
into the currently
selected A/V memory
position (Standard,
Movie, Music, News, Sports).
To re,_et the
audio functions to their factory settings, see "Selecting the AiV
Memory" in this chapter.
DImportant:
Pressing the ADJUST right/left button alone in normal picture
select the previous selected video or audio 5anction menu.
Getting
Started
will
77
Using
the Advanced
Features
This section explains
features. You'll learn
• Setting
78
how to use some of the more advanced
about:
the timer
• Using
the
• Using
SuperQuickView
Chapter
parental
3: Operating
lock
TM
Your TV
Setting
the timer
This special
automatically
[>Important:
The
feature allows you to program the TV to turn on
at a specific time to the channel that you ;_et.
clock must
[]
TV Main Menu
[]
[]
First Time Setup
Customize Display
be set
prior
Plus+ Menu
O Use tile ADJUST buttons to
select "Advanced Features".
Press ENTER/EXCE.
r--_ ADJUST to select
_--q ENTER
MENU
to enter
to exit menus
O
[]
Advanced Features
[]
Set the Timer
[]
Use Parental Lock
[]
Use SuperQuickView TM
timer.
0 Press the MENU bu_;ton on the
remote control. The Main
Menu will appear on the screen.
Select AN Memory
[]Guide
the
To set the timer:
[_-'] Advanced Features
[]
to setting
I
You will see the "Advanced
Features"
screen. Use the
ADJUST buttons to _elect
"Set the Timer".
Press
ENTER!EXCH.
L> Important:
[_]
ADJUST to select
ENTER
to enter
MENU
to go back
[]
Set the Timer
[]
Day
[]
Start time :--
O
: Sunday
[_]Antenna
:- -
[]
: --
Channel
If you have not set the time, you
will be automatically
routed to
the "Set the clock" menu.
: ....
_-]
ADJUST
to select
_-]
ENTER
to enter
MENU
to go back
Use the ADJUST bu'otons and
the ENTER button to set Day
(Mon-to-Fri, Everyday,
Sun Sat), ;Start time, Antenna, and
Channel.
After ,_etting the timer, the
Program Timer indicator will
blink in green while Lhe TV is
turned off.
If you press the CANCEL button while setting the timer, the arrow
will move to the previous item. To clear the timer, press CANCEL
when "Day" is selected.
_Important:
When the timer turns the TV on, the display
not press any remote control button within 5
turns on, the TV will automatically
turn off.
button (such as the INFO button) to keep the
flashing display.
Using the Advanced
Features
will flash. [f you do
minutes after the TV
Press a flmction
TV on and to stop the
79
Using
the
parental
lock
This special feature allows you to lock the entire TV during a
certain time period or lock up to ten individual channels.
You
cannot lock the TV and lock individual channels at the same time.
When you turn on the lock, you enter
allow you to turn off the lock later.
a 4-digit secret
code that will
If you try to turn on a locked TV, view a locked channel or the
locking "time period" begins, you will[ see a message asking you 1;o
enter the secret code. If you don't enter the code within five
minutes, the TV will turn off or change to an unlocked channel.
If you enter your secret code, the message will disappear
and the
lock will be turned off"temporarily.
However, the TV or channels
will be locked again after you turn off the TV. This will continue
until you turn the lock off permanently.
To turn the lock off
permanently,
follow the procedure "Canceling or Changing Parental Lock" in this section.
using
_]TV
Main Menu
[]
First Time
Setup
[]
Customize
Display
[_
Advanced
Features
_]Select
A/V Memory
_Guide
Plus+
[_
]
to select
ENTER
to enter
MENU
to exit menus
[]
Advanced Features
[]
Set the Timer
lock
0 Press the MENU button.
Main Menu will appear.
The
Use the ADJUST buttons to
select "Advanced Features".
Press ENTER/EXCH.
Menu
ADJUST
parental
You will see 1;he "Advanced
Features"
screen.
Use the
ADJUST buttons to select "Use
]Parental Lock". Press ENTEtUEXCH.
[] Use Parental Lock
[_Use SuperQuickView TM
O You
[-_]
ADJUST
to enter
MENU
to go back
[]
Use Parental
[_
Lock the TV
[]
Lock the Channel
['_
80
to select
ENTER
'_
DJUST
If you selected "Lock the TV",
see Locking _he TV in this
chapter.
If you selected "Lock
the Channel", see Locking the
Channel in this chapter.
Lock
Dlmportant:
If you turn the parental TV
lock on, you cannot use the
timer.
to select
ENTER
to enter
MENU
to go back
Chapter
will see the "Use Parental
:Lock" screen. Use the ADJUST
buttons to select "Lock the _['V"
or "Lock the Channel".
Press
ENTER/EXCH.
3: Operating
Your TV
Using
the
parental
lock
(cont.)
locking
[]
Lock the "iV
[]
Secret
the TV
O The message
will appear.
code
O Enter a four-digi': secret code
using the number buttons (0-9);
then, press the ENTER/EXCH
button.
ENTER
to enter
MENU
to go back
You can cancel tile code if you
press CANCEl, before you press
ENTER/EXCH.
O
[]
Lock the TV
[]
Setting
: Off
Use the ADJUST up/down
buttons to select a setting: Off,
Always On, or By Time. Press
ENTER/EXCH.
If you select
": By Time"
_-]
ADJUST
to select
ENTER
to enter
MENU
to go back
[]
Lock the TV
[]
Setting
[]
to set the time at which you
want to lock the TV. Press
ENTER/EXCH.
O
:12:00pm
Unlock
at :
the setting
The cursor will move to "Lock
at." Use the ADJUST buttons
: By Time
[]Lockat
the TV
: ....
The lock is now off.
Enter your personal
code
using NUMBER
buttons.
Then press ENTER
to set the lock.
[_
for locking
:
Use the ADJUST buttons to set
the time at which you want to
unlock the TV. Press ENTER/
EXCH. The screen will return
to the ".Advanced Features"
rrlenu.
------]ADJUST
r_7
ENTER
to enter
CANCEL
to reset
MENU
to go back
[]
Lock the TV
[]
Setting
[]
[-_
If :you want the lock to be in
effect all the time, set the same
"Lock at" time as you set for t:he
"Unlock at" time, or select
"Always On".
: By Time
[]Lockat
_Important:
to select
:12:00pm
Unlock
at : 12:00
ADJUST
pm
to select
ENTER
to enter
CANCEL
to reset
MENU
to go back
O
Press
O
When you turn on a locked TV
or if the lock's "time period"
begins, you will be asked to
enter your four-digit secret
code. Enter the (:ode to temporarily disable the lock. The lock
will be enabled again when you
turn the TV off.
The TV will be locked at all times ii'you
not set the TV's clock.
Using
the Advanced
Features
HOME
to exit the menus.
set the lock by time but do
81
Using
the
parental
lock
(cont.)
locking
[]
Lock the Channel
[]
Secret
code
O The message "Lock the Channel" will appear.
: ....
0
The lock is now off.
Enter your personal code
using NUMBER
buttons.
Then press ENTER
to select the channels.
[]
MENU
Lock
to go back
the Channel
[] ........
[]
[] ........
[]
[] ........
r_]
F_
to select
ENTER
to enter
MENU
to go back
[]
Lock the Channel
[]
.....
[]
[]
[]
[]
[-_]
82
[]
[] ........
[]
[] ........
[]
ADJUST
003
Enter a four-digit secret code
using the number buttons (0-9);
press ENTE',RrEXCH.
You can caned the code if you
press CANCEL before you
press ENTEp_rEXCH.
ENTER to enter
r_q
the channel
]
........
]
........
]
........
O Use the ADJUST buttons to
select the antenna (ANT-A or
ANT-B) that has the channel
you want to lock. Press ENTER/EXCH.
Use the CHANNEL or
ADJUST buttons to select the
channel you want to lock.
Press ENTEt_?EXCH.
[]
]
O You will see the channel lock
set up screen. Use the foul:
ADJUST buttons to select a
position.
Press ENTER/EXCI%
O
Repeat the steps above to lock
additional
channels.
When you
are finished., press the HOME
button to turn off the menus.
O
When you try to view a locked
channel, you will be asked to
enter your tbur-digit secrel:
code. Enter tlhe code to
temporarily
disable the lock.
The lock will be enabled again
when you turn the TV off.
........
ADJUST to select
ENTER
to enter
MENU
to go back
Chapter
3: Operating
Your TV
. .'
Using
the parental
canceling
lock
or changing
button.
O
Select "Advanced Features"
using the ADJUST
buttons.
Press ENTER/EXCH.
[]
Lock the TV
[]
Setting
_Important:
Lock" using the ADJUST
on the
up/down
button.
Press
O If you have locked the TV, use
the ADJUST up/down buttons
to select the setting "Off' to
turn off the lock.
:Always On
----] ADJUST
if
The Main Menu will appear
Enter the four digits of your secret code using the number
buttons (0-9). Press ENTER/EXCH.
_--_
you lock a channel, e.g.,
channel 3 (shown).
lock
Press the MENU
screen.
0
You will see this screen
parental
O
Select "Use Parental
ENTERiEXCH.
You will see this
screen if the TV
is locked.
(cont.)
[]
to select
ENTER
to enter
MENU
to go back
Lock
the TV
...... 0o34-
........
_ ........
_r_] Ant-A
[]
[] ........
[] ........
[] ........
[] ........
[] ........
[] ........
] ADJIJST
to select
ENTER
to enter
MENU
to go back
If you have locked 1:he channel,
use "the ADJUST buttons to
place the cursor next to the
channel whose loc_- you want to
cancel. Press ENTERiEXCH.
O Press the CANCEL button to
unlock that channel, or use the
ADJUST button,_ t_ change the
channel to a new one.
Press the MENU button to
retu_rn to the "Advanced Features" menu.
If you forget your four-digit secret code, please
Procedure for Bypassing
the Parental Lock.
Using
the Advanced
Features
see the Appendix
83
Using
SuperQuickView
TM
SuperQuickView
allows you to cycle through a list of up to ten
channels with the SQV button.
Use the menu to add channels to
the list or to remove channels from _he list. You can also add
channels directly to the list using only the remote control's SQV
button.
[]
TV Main
[]
Firsl Time Setup
[]
Customize Display
[_
Advanced
Features
[]
Select
Memory
[]Guide
[_]
_]
AN
[
[
ADJUST
to select
ENTER
to enter
MENU
to exit menus
Advanced Features
[]
Set the Timer
[]
Use Parental Lock
SuperQuickView
_--']ADJUST
O Press the MENU button on the
remote contro!. The Main
Menu will appear on the screen.
Use the ADJUST
up/down
buttons to select "Advanced
Features".
Press ENTER/
EXCH.
TM
/
O You will see, the "Advanced
Features"
screen.
Use the
ADJUST up/down buttons to
select "Use SuperQuickView".
Press ENTEI_]EXCH.
to select
to enter
MENU
to go back
[]
Use SuperQuickView
TM
[]
Ant-A
[]
........
[]
[]
[]
[]
........
........
........
........
[]
[]
[]
[]
........
........
........
........
[]
---
to select
ENTER
to enter
MENU
to go back
Use SuperQuickView
TM
[] ........
[] ........
[] ........
[] ........
_ ........
E ........
[] ........
[] ........
[] ........
[] ........
_]ADJUST
ENTER
MENU
_) You will see the
"SuperQuickView"
screen. Use
the ADJUST buttons to select a
position in the list. Press
ENTER/EXCH.
Use the ADJUST up/dOWrL
buttons to sei[ect the antenna
(ANT-A or ANT-B). Press
ENTERAgXCH.
You can clear
the entry by pressing CANCEL.
O Use the Ct_2qNEL,
number or
ADJUST buttons to select the
channel to add to the list. Press
ENTER/EXCH.
Repeat steps Othrough
O
to customize the
SuperQuickView
memory.
to select
to enter
to go back
Press the MENU
this menu.
84
Chapter
the
[
ENTER
]ADJUST
list with
menu
Plus+ Menu
_]
[]Use
customizing
the
SuperQuickView
Menu
3: Operating
Your TV
button
Lo exit
Using
SuperQuickView
TM
(cont.)
SQV
adding channels
directly
control's
SQV button
to the list with
the remc,te
O
Use the CHANNEL buttons or number buttons
to the channel you want to add to the list.
O
Press
and hold the SQV button
for about
to tune the TV
2 seconds.
"SQV" will appear under the channel number,
the channel has been added to SuperQuickView
The letters
indicating that
memory.
_>Important:
Once you've added a channel to the SQV memory, the letters "SQV"
appear under the channel number any time the channel number is
displayed, even if you tune to the channel using another method.
E>Important:
If the "SQV" indicator begins to flash when you try to add a
channel to the list using the SQV button, then the SuperQuickView
memory is full. In this case, you will have to remove an existing
channel to add a new channel.
removing
channels
from the SQV list: using
the menu
Use steps 0 - _ from "customizing
the SuperQuickView
list with
the menus" on the preceding page to select and cancel the channel
from the SuperQuickView
list.
removing
control's
the channels
from
CANCEL button
the
SQV list with
the remote
O
Press the SQV button repeatedly
removed from the list.
O
While the channel number and SQV indicators
are still
displayed on the screen, press the CANCEL button.
When the
SQV indicator disappears,
the channel has been canceled from
the SuperQuickView
list. If you wait until the channel and
SQV indicators
disappear
automatically,
then the CANCEL
button will not remove the channel f_om the list.
Using the Advanced
Features
to select the channel
to be
85
L_ll
CHAPTER
Using
the FOUR
Special
In addition
Features
to the basic and advanced
features
explained
in the
previous chapter, your TV offers some special features that you can
use when operating your TV. This chapter contains tlhe following
topics:
0
Understanding
the
0
Using
the Sleep
Timer
Using
the Picture-in-Picture
Using
the Active
0
AN
On-Screen
Network
Displays
(PIP)
Modes
Feature
87
Understanding
the
On-Screen
Displays
Your TV provides an on-screen summalbr of the current settings for
the TV or cable channels, as well as the information
related tc
Extended Data Services (XDS) or channel and program information
provided by TV GUIDE Plus+. XDS allows broadcasters
to supply
you with the current time, channel information
(such as call letters
and the network name), and program information
(such as the
program name and program description).
To view this information,
the remote control.
press the information
button
(INFO)
on
1
Some of the screen information
on ANT-A ifTV GUIDE Plus+
network name
If the source of the main
picture is an antenna:
shown be:iow will not appear]
has been installed.
The first setting shows:
" antenna (A) and channel
number (23)
. the channel'_ call letters or
name
• stereo and SAP are available
A023 ESPN
Stereo & SAP
SQV QV
A023
program name
]
program description
Thursday 10:23 am
TM
• current
• current
If the source of the main
picture is an input:
Input-1
S-VIDEO
A023
l
":,1_ "t 2'b
• channel programmed
into
SuperQuickView
memory
• channel is the QuickView (QV)
channel
• PIP input source is Antenna
Channel 23.
A,
day of the week
time
This second setting shows:
• the input name (Input-l)
• S-video cab:ie is connected
• PIP input s3urce is Antenna
Channel :23
• current day of the week
• current t!,_me
A,
Thursday 10:23 am
Important:
XDS program information
supplying the information.
The on-screen
seconds.
88
Chapter
displays
will only be present, if the broadcaster
will automatically
4: Using the Special
Features
disappear
after about
1
is
10
Using
the Sleep
Timer
This special feature allows you to set the TV to turn off automatically. You can set the TV to turn off after a period of time ranging
from 10 to 120 minutes, in ten minute intervals.
In thi s section you
will learn:
• Setting
• Changing
the sleep
timer
or canceling
the sleep
setting'
_T
__._ _
_
timer
the sleep
timer
O Press the SLEEP button on the
remote control. The sleep timer
display will appear on the
screen.
Select how long you want the
TV to stay on by repeatedly
pressing the SLEEP button.
The time will decrease in 10
minute intervals each time you
pres,_ the button.
TV Sleep Timer
120 min.
When you
want, stop
The sleep
disappear
reach the time you
pressing the button.
timer display will
after a few seconds.
To v_ew the amoun-L of time left
in the sleep timer press the
SLEEP button once. The onscreen display shows the
amount of time remaining.
[> Important:
During the last minute before the TV turns off, "Sleep 'Timer 1
min." will flash in red to remind you that the sleep timer is set.
TV Sleep Timer
Using the Sleep Timer
1 min.
89
changing
or canceling
the
sleep
time:r
O Press the SLE;EP button on the
remote control
An on-screen
TV Sleep Timer
10 min.
display will indicate the
amount of time remaining
the TV turns off.
until
O Repeatedly
press the SLEEP
button to change the remaining
time or to cancel the sleep
"
timer. The sleep timer is
canceled whe:_ "- - -" appears
instead of the remaining
time.
::- ,: ::
90
Chapter
4: Using the Special Features
Using
the Picture-in-Picture
(PIP)
Modes
One of the special features of the TV is the picture-in-picture
(PIP)
mode, which allows you to view two different sources aL the same
time. In this section you'll learn:
• Activating
the PIP image
• Selecting
the
• Changing
channels
• Exchanging
image
• Moving
• Freezing
source
the
the
the
of the PIP image
while
picture
using
of the
the PIP modes
PIP image
and
the
main
PIP image
PIP image
Using the Picture-in-Picture
(PIP) Modes
91
activating
the
PIP image
O Press
the PIP button.
A PIP image will appear in
the corner of the screen. Use
the PIP CH up (A) down (V)
control to select the channel to
be viewed.
Press PIP again within 10
seconds; the PIP image will
reduce to a smaller size.
Ant-A 023 ESPN
Stereo & SAP
A 023
(If you wait longer than 10
seconds the PIP image will
disappear when you press the
PIP button.)
O Press the PIP button once
again to cancel the PIP image.
Ant-A 023 ESPN
Stereo & SAP
A 023
92
b, Important:
When the main image is black and white,
appear in black and white.
[> Important:
If you move the PIP image and then turn it off, ilt will appear
last position when you turn it on again.
Chapter
4: Using the Special
Features
the PIP image
will also
in its
selecting
the
source
of the PIP
image
The Mitsubishi TV you have purchased
has two-tuner PIP. If you
have only an ANT-A input connected, you can view one program on
the main picture and another channel from the same ANT input on
the PIP display without the use of a second external tuaer, such as
a VCR.
_Important:
If you have a cable box on ANT-A, you will not be able to have both
the PIP and main pictures from ANT-A. The main picture must be
ANT-B and the PIP picture ANT-A (cable box).
O Turn the PIP image on by
pressing the PIP btttton.
O To select the PIP i_put,
the PIP INPUT button.
G
G _
i _L_
Ej
_i!
press
Each
time you press the button, the
PIP input will seLe(:t the next
input from the inputs available:
• ANT-A, INPUT
or INPUT 3,
1, INPUT
2
You can select ikNT-B in
PIP, only when the main
input is from INPUT 1,
INPUT 2 or INPUT 3.
Each time you select a different
input, an on-screer: display will
appear for about five seconds.
The screen will display the
name of the input selected.
Ant A 023
ESPI',I
PIP A023
l
DImportant:
O You can also select the PIP
input source by first selecting
the source in the rrLain picture
and then pressing the ENTER/
EXCH button,
l?rcssing this
button with the PIP displayed
exchanges the PIP picture for
the main picture.
If you have a picture displayed from ANT-B on the main picture,
and the PIP source from ANT-A, the ENTER/EXCH
b atton will no_
exchange the main picture for the PIP picture.
Using the Picture-in-Picture
(PIP) Modes
93
changing
channels
while:
using
the ]PIP modes
0 Press the PIP channel button
(PIP CH) up (A) or down (V)
on the remote control to change
the channel of the PIP image.
2 i?:j
_>Important:
The PIP CH Buttons change
under two conditions:
• When that
0 Press the C]_A_iNEL up (A)
or down (V) button on the
remote cont]:ol to change the
channel of the main image.
the channel
image is a channel
• When the main picture
INPUT-2, or INPUT-3)
ANT-B
for the small PIP image
:from AN_-A
is from an external input (INPUT-l,
and the PIP is frDm ANT-A or
When the PIP image comes from another piece of equipment
your satellite receiver, cable box or VCR) the PI;P CH buttons
not change the picture.
94
Chapter
4: Using the Special Features
(e.g.,
do
exchanging
main image
the picture
of the PIP
image
and
the
You may exchange the picture of
the main (background)
image and
the PIP image by pressing the
ENTEI_EXCH
button.
[:>Important:
If one picture is from ANT-A
and the other is from ANT-B,
nothing will happen when the
ENTER/EXCH
button is
pressed.
Ant-A 023 ESPN
Stereo & SAP
Input -1
S-VIDEO
Input-1
A O23
Moving
the PIP image
Press the ADJUST buttons
move the PIP ima_:e.
DImportant:
If you move the PIP image and then turn it off, it will appear
last position when you turn it on again.
Using
the Picture-in-Picture
(PIP) Modes
to
in its
95
freezing
the
PIP
image
O Press the PAUSE button to
freeze the I?IP image on the
screen.
O Press PAUSE
a live picture.
L>Important:
again to return
If you press the pause button while viewing a picture without a PIP
image, a PIP image will appear and be frozen, Le., you will see a
still image.
To remove
the
frozen picture,
press the, PIP
button.
96
to
Chapter
4: Using the Special
Features
t Using
the Active
A/V Network
Feature
This A/V Network is a special feature that makes it earlier to use
your television and other Mitsubishi A/V components
together.
When you connect the A/V Network, you. can point the cemote
control at the television, and it will pass the remote control command to other components.
You will gain even more benefits if you have a Mitsubishi VCR
equipped for the Active A/V Network.
The Active A/V Network
allows you to perform many of the commonly used features of your
system at the press of just one button.
This section explains the
various features of the Active A/V Network.
L
L
before
_
you begin
1
If you have installed TV GUIDE Plus+ on your TV, you can use the
IVCR Plus+ feature to control your VCR for recording,
j
• You must have connected an A/V Network cable frc.m the Active
A/V Network terminal of your TV to the "AN Network IN"
terminal of your VCR. See "TV+Mitsubishi
Products that Have
A/V Network Terminals"
in Chapter 2.
• You must have connected
your VCR to INPUT-1
of your TV.
• You must have set your TV A/V Network setting to Active or
Basic.
See "Setting the A/V Network." in Chapter 3.
• Your VCRs remote
control
• Your VCR video mute
what
the Active
setting
AN Network
The Active A/V Network
Play command.
settings
makes
should be set tc VCR-A.
should be turned
ON.
does
it easier
and faster
to use the VCR
_Important:
When using the Active A/V Network,
remote control at your television.
_>Important:
If the TV is not receiving a signal on INPUT-l,
it will automatically turn offin about one to two minutes.
If you use a TV menu
during this time, the TV will turn offin about five minutes after
you stop using the menus.
using
the
you should always
point your
PLAY button
When you press PLAY on the remote:
• Active A/V Network
the tape (if any).
will turn your VCR on and be_n
playing
• Active A/V Network
INPUT-1.
will turn your TV on and switch it to
• when you turn your TV off, your VCR will turn off, _m!ess it is
playing or recording.
Using
the Active A/V Network
Feature
97
•_
CHAPTER
FIVE
Troubleshooting
Even though you're now familiar with the basic and advanced
operations
of the TV, you may occasionally encounter
a problem.
This chapter offers common answers to some of the most frequently
asked questions of TV owners. We suggest that you consult this
chart before contacting
a Mitsubishi
service represeatative.
(.)9
Troubleshooting
Problem
The remote
Possible
control
doesn't
(cont.)
Solution
Check that the batteries
installed correctly.
work.
For More
are
Information
See Getti_ff Ready to Use
theRemote Control in
Chapter 1 for an explanation
of how to install batte,_ies in
the remote control.
The TV takes
several
seconds to respond
commands.
See Remote Control Buttons
and Functions in Chapter
1,
which explains where the
select switch is located.
Be sure that you are
pointing the tip of the
remote control toward the
TV from a distance of no
more than 20 feet.
See GettJng Ready to :Use
the Remote Control in
•
Use the ENTER!EXCH
button to avoid delays.
See Changfng Channels in
Chapter 3, which explains
the function of the ENTER/
EXCH button.
•
Be sure that the channel you
want to view is programmed
into memory.
See Memorizing
Channels
Chapter 3, which explains
how to p::ogram channels
into the 'iW's memory.
•
Check that the TV is tuned
to the correct input source
(antenna) for that channel.
See Selecting the Input
Source in Chapter 3, which
explains how to change the
input source.
to button
You can't access a channel.
On-screen displays appear
each time you adjust a
function.
100
Check that the select switch
is set to "TV".
• This is part of the normal
operation of the TV.
Chapter
5: Troubleshooting
Chapter
pointers
control.
1, which contains
J_orusing the remote
See Screen Displays in
Chapter 4 for a full explanation of' the on-screen displays.
in
Troubleshooting
Problem
Possible
•
There's no sound even
when the volume is turned
(cont.)
Solutions
For More
Information
Check that the MUTE
button isn't on.
See Remote Control Buttons
and Functions in Chapter 1,
which explains the location
and function of the MUTE
button.
The TV's "Listen to:" setting
may be set to "second audio
program" (S.A.P.).
See Customizing
AV
Memory in Chapter 3, which
explains how tc adjust the
"Listen to:" setting.
Check that "Speaker"
function is set to "On."
See Customizinff A V
Memory in Chapter 3, which
explains how to adjust the
"Speaker" setting.
up.
You forget the code you used
to set the parental lock.
• Use the alternate
procedure
that doesn't require the use
of the code.
•
You can't program the TV to
turn on automatically.
•
The TV may be locked.
•
The sound doesn't
•
The TV's "Listen to:" setting
may be set to "second audio
program" (S.A.P.).
,See Customizing
AV
Memory in Chapter 3,
which explains how to
adjust the "LisLen to:"
setting.
There is a large black or
gray rectangle on the screen.
The TV has been set to
"text" mode, but there is no
text information
being
broadcast.
See Using the Closed
Caption Decgder in the
Getting Started section of
Chapter 3, or press the
HOME button to make the
rectangle disappear.
You cannot see a picture
when you play a tape in the
VCR.
If you connected your VCR
with A/V cables, use the
INPUT button to select the
input source (Input 1, 2, or
3) that the VCR is connected
image
match
the
on screen.
•
See the Appendix,
.Procedure for Bypassing
Paten taI Lock.
the
:See Using the Parental
Lock
"within Using" the Advanced
Features
in Chapter
3.
See Selecting
l:he Input
Source for an explanation
about changing
the input.
to.
Troubleshooting
101
Troubleshooting
Problem
Antenna-B
does not appear
as a PIP source.
102
Possible
•
(cont.)
Solution
Antenna B cannot appear as
a PIP source when antenna
A is the main picture.
Chapter
5: Troubleshooting
For
•
More
Information
See Usi;_g the Picture-inPicture (PIP) Modes in
Chapter 4.
Caution
• Warning:
and care
Don't leave stationary
images
on-screen
for more than
10 minutes.
These images can scar the picture tube, causing permanent
age to the TV. Some examples of stationary
images are:
•
•
•
•
•
_>Important:
dam-
stock-market
reports
station logos (especially bright ones)
video game displays
shopping channel displays
the television's
own on-screen displays
If you plan to place speakers next to the TV, make sure they are
magnetically
shielded.
Ordinary speakers will cause distortion in
the picture due to their strong magnets.
This distortion, however,
will not harm the picture tubes.
For maximum enjoyment and safe operation of your Mitsubishi TV,
please read IMPORTANT
SAFEGUARDS,
pages 3 and. 4 of your
Owners Guide, very carefully and apply them properly.
Cleaning
Normally, light dusting
your TV clean.
with a non-scratching
duster
will keep
If you want to wipe down your TV, turn it off and unplug it. Then,
wipe it gently with a soft cloth slightly moistened with water. You
can add a few drops of mild liquid detergent to the wa_er for oily
dirt.
DO NOT allow liquid to enter
DO NOT use strong
or abrasive
DO NOT use spray liquids
the TV through
and Care
slots.
cleaners.
or cleaners
DO NOT scrub or rub the TV harshly.
Caution
the wmtilation
directly
on the YV's surface.
Wipe gently.
103
calling
for service
If you are unable to correct a problem with you:r TV, consult your
Mitsubishi
dealer or Mitsubishi .Authorized Warranty
Service
Center.
Do not adjust
Do not remove
an)' controls
not described
the protective
in this owner's
guide.
back cover of this unit.
If you see one of the following displays on your screen, you should
not change any settings.
These are special displays used by the
factory.
NOTE:
"Firmware Versions" are included fi)r reference only and
will vary from those shown below. If any of these settings are
changed your warranty
may be void.
If these displays appear, make sure that all of the on/off settings
are the same as the illustrations
above and then turn the TV off.
If any of the settings are different from the illustrations
below, turn
the TV off and consult your Mitsubishi dealer or MitsubishJ Authorized Warranty
Service Center.
Initial
3dia
: On
E2RESET
CCD
: On
Auto clock
: On
Hotel
Power
Res
Hotel
: Off
Ant
:2
Power
Ant
Input
When mute
:3
:On
Input
When mute
Firmware
104
: Off
: Off
Initial
Chapter
Version:
FirmwareVersion:
M37270-XXXSP...
M38123-XXXSP
...
LC86P4164
...
5: Troubleshooting
Res
: Off
: 2
: 3
:On
M37270-XXXSP...
M38123-XXXSP._
LC86P4164
.,.
APPENDIX
Procedure
for Bypassing
Cut along dotted
the Parental
Lock
line and file after reading.
After you set the lock, you will need the secret
code :in order to:
• view a locked channel,
• view the locked TV, or
• cancel the lock.
If you forget the code, you can view the locked TV without entering
the code. To do this, simply press the buttons on your remote
labeled "QV" and "9" at the same time whenever your secret code is
requested.
_Important:
Unlocking with this procedure is only temporary.
lock completely, follow the procedure below:
To cancel the
O
Turn on your TV. If the TV requests your secret code, press the
"QV" button and the "9" button on the remote control at the
same time.
O
Press the MENU button to view the main menu. Use the
ADJUST button to select "Advanced Features".
Press ENTER/'
EXCH.
O
Use the ADJUST
ENTER/EXCH.
O
Press the "QV" button and the "9" button on the, remote
at the same time, instead of entering the code.
O
If you were using "Lock the TV", the lock must be turned off.
Using the ADJUST up/down buttons, select the "Off' setting.
button
to select "Use Parental
Lock".
Press
control
If you were using "Lock the Channel," use the _._D.YUSTup/
down buttons to place the cursor next to the channel whose lock
you want to turn off. Press ENTEtUEXCH.
Press the CANCEL button to unlock
ADJUST up/down buttons to change
Press the MENU button
menu.
_Important:
to return
that channel or use the
the channel to a new one.
to the "Advanced
Features"
You must use the remote control included with this TV. You
cannot use a remote control from another Mitsubishi component
and you cannot use "Universal" remotes from other n_anufacturers.
105
* Index
A
C
E
AFV Components
Using the remote with ........... 45
A/V Memory Settings
Adjusting
the picture ............. 70
Customizing
...........................
70
Selecting the categories ......... 68
Using external audio
components ..................... 36, 37
Using the memory button ..... 69
A_ Network
Description
.............................
60
Setting ....................................
60
Active A/V Network Terminal...
21
Active AV Network
Using the play button with ... 97
Adjust Buttons ...........................
17
Advanced Features
Using ......................................
78
__dqT-A Terminal ........................
21
/_dqT-B Terminal ........................
21
Antennas
Antenna terminals
................. 21
Using separate
UHF & VHF 26
Audio Controls ...........................
18
Audio Settings
Adjusting .................................
75
Balance ...................................
75
Bass ........................................
75
Descriptions
...........................
75
Level Sound ............................
76
Listen to .................................
75
Speaker ..................................
75
Surround
................................
75
Treble .....................................
75
Audio Input Terminals
Front panel .............................
13
Back panel ..............................
21
Audio Output Terminals
........... 21
Audio Products
Using remote control with ..... 18
Audio/video reset (AV RESET)
Front panel .........................
13
Cable TV
Using remote with ................. 44
Using with a cable box .......... 42
Using without a cable box...23,27
Calling For Service ....................
104
Cancel Button ............................
18
Enter/Exchange
Button ............. 17
Extended Data Ser¢ices .......... 65,88
Channel Controls
Front panel .............................
13
Remote button ........................
17
Channels
Adding/Deleting
.....................
59
Changing ................................
50
Locking ...................................
82
Memorizing
............................
58
Naming ...................................
64
Using QuickView ...................
52
Using SuperQuickView
......... 53
Using the SQV button ........... 85
Cleaning your TV .......................
103
Clock
Setting ....................................
55
Closed Captioning
Adjusting
the closed caption
decoder ...............................
74
Standard
captioning
............... 73
Text captioning
......................
73
Color Purity
Adjusting
................................
41
Back panel switches ............... 21
Color Temperature
....................
70
Connections
TV+antenna
or cable without a
cable box .............................
23
TV+cable with a cable box ..... 24
TV+Mitsubishi
products that
have A!V network terminal..37
TV+separate
UHF and VHF
antennas
.............................
26
I
TV+stereo audio system ........ 36
TV+VCR+antenna
or cable
without a cable box ............ 27
TV+VCR+cable
with a cable box
............................................
Control Panel
Overview
B
Back Panel, Overview
...............
Balance .......................................
Basic Connections
Overview ................................
Bass ............................................
20
75
30
.............................
12
D
Degauss
Button
.........................
13
H
Home Button
..............................
Important
Safeguards
...............
Information
Button ....................
Input Button
Front Panel ............................
Remote ...................................
Inputs
Naming ...................................
Selecting the inpu; source .....
IR/G link ......................................
18
3
17
13
17
63
49
21
L
Language,
Selecting.
.................
Light Button ..............................
Listen-To Function ....................
Locking Channels ......................
[::sing the parentnl lock .........
Locking Your TV
Bypassing the parental
lock
67
17"
75:
82
80
105
M
Memorizing
Channels
...............
Menu
Selecting the menu language
English ...............................
Espahol ...............................
Selecting the menu type ........
Menu Button ..............................
Mute control butWn ...................
58
67
67
61
18
17
N
Number
Buttons
((_,-9)................
17
o
On-Screen Displays
Understanding
........................
On-Screen Menus
Understanding
.......................
Operating
Your TV .....................
88
54
_9
22
75
Index
107
°
U
P
Parental
Lock
Bypassing ..............................
105
CanceLing/Changing
.............. 83
Locking the Channel ............. 82
Locking the TV .......................
81
Using ......................................
80
Picture-in-Picture
(PIP)
Modes. See PIP
Picture-:In-Picture
Controls ....... 18
PIP
Activating
the PIP image ...... 92
Using. .....................................
91
PIP Button .................................
18
PIP CH Button ...........................
18
PIP Input Button .......................
18
PIP Pause Button ......................
18
Power Button
Front Panel ............................
13
Remote ....................................
17
Power Button (TV on/ofD ........... 48
Q
QuickView
Using ......................................
Setting QuickView memory
QV Button ..................................
52
.. 52
17
R
Remote Control
Buttons ...................................
16
Functions ................................
17
General instructions
.............. 42
Installing
batteries ................ 14
Using with a cable box .......... 42
Using with Mitsubishi
audio
components
........................
45
Using with VCRs ................... 43
Using with Mitsubishi
AiV
receivers
.............................
45
Using with Mitsubishi
laser-disc
or DVD player ....................
46
VCR buttons ...........................
18
108
UHF antenna
terminal ..............
Unpacking your TV ...................
Understanding
the on-screen
display.,; .......................... 88,
Video ...........................................
Volume .......................................
VCR
Using renmte with .................
Using without a cable box .....
VCR Buttons
Remote Control .......................
VHF antenna
terminal ..............
Video controls
Back panel ...............................
Customizing
...........................
Using the remote ...................
Video input terminals
.................................................
Terminals
...................................
21
Active A/V Network ............... 21
Antenna ..................................
21
Audio input ............................
21
Audio output ..........................
21
Video input .............................
21
Video output ...........................
21
Timer
Setting the timer'. ..................
79
Treble .........................................
75
Troubleshooting
.........................
99
TV GUIDE Plus+
Adding/Deleting
ANT-B Channels .....................................
59
Changing
Channels ............... 50
Connections
..................
21, 30
IR!G link ..................................
2i
Remote control buttons and
functions
..................
17, 18
Signal cue ...............................
9
Special feature .......................
6
TV GUIDE Plus+ button ....... 17
13
21
75
17
104
Index
Plus+ Operating
21
7
97
I8
J!7
V
T
See TV GUIDE
Guide
S
S-Video input terminal
Front panel .............................
Back panel ..............................
S.A.P ...........................................
Select switch ..............................
Service ......................................
Sleep Button ..............................
18
Sleep Timer
Canceling/Changing
.............. 90
Using ......................................
89
Sound
Adjusting ................................
75
Spanish language
.............. 67,68
Speaker function ........................
75
Special features
.........................
6
SQV button ................................
85
Stereo Audio
Using external audio components ...................................
36
SuperQuickView
Changing Channels
with ....... 53
Customizing
...........................
84
Using the SQV option ............ 53
Using the SQV button ........... 17
Surround
....................................
75
45
27
18
21
21
70
18
2/
Video outpost terminals ............... 21
Video mute .................................
66
ViewPoint on screen menus
Using .......................................
54
Volume controls
Front pane] ..............................
13
Using the remote .................
17
X
XDS.
See
Ex_:ended
Data
Services
MITSUBISHICOLORTELEVISION
LIMITED
MITS dBISHI
CONSUMER
an author!zed MITSUBISHI
ELECTRONICS
Audio/Video
AMERICA, INC. ("MCEA")
OR COLOR MONITOR
WARRANTY
warrants to the original purchaser of this television or monitor if purchased from
Dealer that, should it prove defective by reason of improper workmanship and/or material:
a. Picture Tube. For two years from the date of purchase at retail, we will repair or replace, at our option, any defective picture tube wJthout charge for the tube.
b.Other Parts. For one year from the date of original purchase at retail, we will repair or replace, at our option, any defective part without charge for the part.
c. All parts used for replacement are warranted for the remainder of the original warranty period.
d. Labor. For one year from the date of original purchase at retail, we will provide the labor for a warranty repair by an authorized MrFSUBISHI service center
without charge.
e. Notice. To obtain warranty service, you must notify an authorized MITSUBISHI
1. TO OBTAIN WARRANTY
service center of any defect within the applicable warranty time period.
SERVICE DURING THE FIRST YEAR:
a. Contact your nearest authorized MITSUBISH1 service center, whose name and address can be obtained from your MITSUBISHI dealer or by writing orcalling
MCEA a: the address and telephone number provided below.
b. Warranty service will be provided in your home or, if required, at an authorized service shop, provided that your television is located within the geographic
territory customarily covered by an authorized MITSUBISHI service center. If not, you must either deliver your television to an authorized se_,ice location at your
own expense, or pay for any travel and!or transportation
costs the service center may charge to and from your home. Actual service }_.tbo:will be provided without
charge.
c. Proof of purchase date from an authorized MITSUBISH[ Dealer is required when requesting warranty ser_ ice. Present your sales receipt or other document
which establishes
COVERAGE.
proof and date of purchase. THE RETURN
OF THE OWNER
REGISTRATION
CAR]) IS NOT A CONDtl'ION
OF WARRANTY
However, please return the Owner Registration Card so that we can contact you should a question of safety arise which could affect you.
2. AFTER THE FIRST YEAR_ t_ _btain warranty service f_r a defective picture_mbe_ y_u :tre resp_nsib_e f_r de_ivering the televisi_n c r m_nit_r t_ an auth_rized
MITSUBISHI
service center at your own expense.
3. THIS WARRANTY
DOES NOT COVER damage caused by: modification, alteration, repair or service of this product by anyone other than an authorized
MITSUI:IISH1 service center; physical abuse to, or misuse of, the product; operation in a manner contrary to the instructions which accompany the product; freight
damage; or any damage caused by acts of God such as lighming or fluctuation in electrical power. This warranty also excludes all cost_ arising from installation,
adjustment of user controls, external antenna systems, service of products purchased or serviced outside the U.S,4.., initial technical adjustments (set-up) and userrequired maintenance. Consult the operating instructions furnished with the product for information regarding user controls.
4. ANY EXPRESS
WARRANTY
NOT PROVIDED
HEREIN,
AND ANY REMEDY
WHICH,
BUT FOR THIS PROVISION,
IM PLICATION OR OPERATION OF LAW, IS HEREB Y EXCLU DED A ND DISCLA IMED. THE IMPL lED WARRANTIES
OF FITNESS FOR ANY PARTICULAR PURPOSE ARE EXPRESSLY LIMITED TO A TERM OF ONE YEAR.
5. UNDER NO CIRCUMSTANCES
CONSEQUENTIAL
DAMAGES,
SHALL MCEA BE LIABLE TO PURCHASER
MIGHT
OR ANY OTHER PEP, SON FOR ANY INCIDENTAL.
WHETHER ARISING OUT OF BREACH OF WARRANTY,
BREACH
ARISE BY
OF M FiRCHANTAB ILIT Y AN D
OF' CONTRACT,
SPECIAL OR
OR OTHERWISE.
6. Som_ states do not allow limitations on how long an implied warranty lasts, or the exclusion or limitation of incidental, special, or :onsequential
damages, so
the abo;e limitations or exclusions may not apply to you.
7. This warranty gives you specific legal rights and you may also have other rights which vary from state to state.
8. BEFORE REQUESTING
SERVICE, please review the instruction booklet to insure proper installation and correct customer control adjustment. If the problem
persists, contact your nearest MITSUBISH1 Dealer for name(s) of authorized MITSUBISHI Service Center(s). If you are unable to obtain this information, please
call 1-800-332-2l
19, or write us at the address below.
Norcross,P'o'MITSUBISHI
INC.Box
50256A30091-5025
CONSUNER
RETAIN
THIS PORTION
CUSTOMER
STREET
FOR YOUR
A MITSUBISHI
AMI_,RICA,
RECORDS
SERIAL
NO.
NAME
ADDRESS
CITY
PHONE (
ELECTRONICS
STATE
)
ZIP
PURCHASE
DATE
/
MO
PLACE OF PURCHASE
/
DAY
YR
o.;
:j-
MITSUBISHI
MITSUBISHI
,$100 Atlantic
Norcross,
CONSUMER
Blvd.
ELECTRONICS
AMERICA,
INC.
GA 30071-1305
© 1997 Mitsubishi Consumer
872C170A10
Electronics America, Inc.
Printed in U.S.A