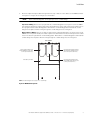
1
Eaton® BladeUPS® Maintenance Bypass Module (MBM) User's Guide Class A EMC Statements FCC Part 15 NOTE This equipment has been tested and found to comply with the limits for a Class A digital device, pursuant to part 15 of the FCC Rules. These limits are designed to provide reasonable protection against harmful interference when the equipment is operated in a commercial environment. This equipment generates, uses, and can radiate radio frequency energy and, if not installed and used in accordance with the instruction manual, may cause harmful interference to radio communications. Operation of this equipment in a residential area is likely to cause harmful interference in which case the user will be required to correct the interference at his own expense. ICES-003 This Class A Interference Causing Equipment meets all requirements of the Canadian Interference Causing Equipment Regulations ICES-003. Cet appareil numérique de la classe A respecte toutes les exigences du Reglement sur le matériel brouilleur du Canada. EN 62040-2 Some configurations are classified under EN 62040-2 as “Class-A UPS for Unrestricted Sales Distribution.” For these configurations, the following applies: WARNING This is a Class A-UPS Product. In a domestic environment, this product may cause radio interference, in which case, the user may be required to take additional measures. Eaton and BladeUPS are registered trademarks Eaton Corporation or its subsidiaries and affiliates. Phillips and Pozidriv are a registered trademarks of Phillips Screw Company. National Electrical Code and NEC are registered trademarks of National Fire Protection Association, Inc. All other trademarks are properties of their respective companies. ©Copyright 2009–2011 Eaton Corporation, Raleigh NC, USA. All rights reserved. No part of this document may be reproduced in any way without the express written approval of Eaton Corporation. Requesting a Declaration of Conformity Units that are labeled with a CE mark comply with the following harmonized standards and EU directives: l Harmonized Standards: IEC 61000-3-12 l EU Directives: 73/23/EEC, Council Directive on equipment designed for use within certain voltage limits 93/68/EEC, Amending Directive 73/23/EEC 89/336/EEC, Council Directive relating to electromagnetic compatibility 92/31/EEC, Amending Directive 89/336/EEC relating to EMC The EC Declaration of Conformity is available upon request for products with a CE mark. For copies of the EC Declaration of Conformity, contact: Eaton Power Quality Oy Koskelontie 13 FIN-02920 Espoo Finland Phone: +358-9-452 661 Fax: +358-9-452 665 68 Special Symbols The following are examples of symbols used on the UPS or accessories to alert you to important information: RISK OF ELECTRIC SHOCK - Observe the warning associated with the risk of electric shock symbol. CAUTION: REFER TO OPERATOR'S MANUAL - Refer to your operator's manual for additional information, such as important operating and maintenance instructions. This symbol indicates that you should not discard the UPS or the UPS batteries in the trash. This product contains sealed, lead-acid batteries and must be disposed of properly. For more information, contact your local recycling/reuse or hazardous waste center. This symbol indicates that you should not discard waste electrical or electronic equipment (WEEE) in the trash. For proper disposal, contact your local recycling/reuse or hazardous waste center. Table of Contents 1 INTRODUCTION . . . . . . . . . . . . . . . . . . . . . . . . . . . . . . . . . . . . . . . . . . . . . . . . . . . . . . . . 1 2 SAFETY WARNINGS . . . . . . . . . . . . . . . . . . . . . . . . . . . . . . . . . . . . . . . . . . . . . . . . . . . . 3 3 INSTALLATION . . . . . . . . . . . . . . . . . . . . . . . . . . . . . . . . . . . . . . . . . . . . . . . . . . . . . . . . . 11 Inspecting the Equipment . . . . . . . . . . . . . . . . . . . . . . . . . . . . . . . . . . . . . . . . . Checking the MBM Installation Accessories . . . . . . . . . . . . . . . . . . . . . . . . . . . Tools Required . . . . . . . . . . . . . . . . . . . . . . . . . . . . . . . . . . . . . . . . . . . . . . . . . . Unpacking the Cabinet . . . . . . . . . . . . . . . . . . . . . . . . . . . . . . . . . . . . . . . . . . . . Mechanical Installation . . . . . . . . . . . . . . . . . . . . . . . . . . . . . . . . . . . . . . . . . . . . Rack Setup for the MBM . . . . . . . . . . . . . . . . . . . . . . . . . . . . . . . . . . . . . . Electrical Installation . . . . . . . . . . . . . . . . . . . . . . . . . . . . . . . . . . . . . . . . . . . . . . MBM Power Wiring Preparation . . . . . . . . . . . . . . . . . . . . . . . . . . . . . . . . . Power Wiring Installation . . . . . . . . . . . . . . . . . . . . . . . . . . . . . . . . . . . . . . Interface Wiring Installation. . . . . . . . . . . . . . . . . . . . . . . . . . . . . . . . . . . . . Parallel System with MBM Initial Startup . . . . . . . . . . . . . . . . . . . . . . . . . . . . . . 11 11 12 12 13 13 17 17 18 22 22 4 5 6 COMMUNICATION. . . . . . . . . . . . . . . . . . . . . . . . . . . . . . . . . . . . . . . . . . . . . . . . . . . . . . 23 Installing Signal Cable . . . . . . . . . . . . . . . . . . . . . . . . . . . . . . . . . . . . . . . . . . . . . Configuring UPS Signals for Bypass Mode . . . . . . . . . . . . . . . . . . . . . . . . . . . . Breaker Aux and REPO Terminals . . . . . . . . . . . . . . . . . . . . . . . . . . . . . . . . . . . Installing Breaker Aux Terminal Wiring . . . . . . . . . . . . . . . . . . . . . . . . . . . . Installing a Remote Emergency Power-off . . . . . . . . . . . . . . . . . . . . . . . . . 25 26 27 27 29 OPERATION. . . . . . . . . . . . . . . . . . . . . . . . . . . . . . . . . . . . . . . . . . . . . . . . . . . . . . . . . . . . 31 Controls and Indicators . . . . . . . . . . . . . . . . . . . . . . . . . . . . . . . . . . . . . . . . . . . . Operating Modes . . . . . . . . . . . . . . . . . . . . . . . . . . . . . . . . . . . . . . . . . . . . . . . . Normal Mode Current Flow. . . . . . . . . . . . . . . . . . . . . . . . . . . . . . . . . . . . . Bypass Mode Current Flow. . . . . . . . . . . . . . . . . . . . . . . . . . . . . . . . . . . . . Using the UPS when an MBM is Installed . . . . . . . . . . . . . . . . . . . . . . . . . . . . . Transferring the MBM to Bypass . . . . . . . . . . . . . . . . . . . . . . . . . . . . . . . . . . . . Transferring the MBM to Normal Mode . . . . . . . . . . . . . . . . . . . . . . . . . . . . . . . 31 32 33 33 34 35 37 MBM MAINTENANCE. . . . . . . . . . . . . . . . . . . . . . . . . . . . . . . . . . . . . . . . . . . . . . . . . . . 39 Important Safety Instructions . . . . . . . . . . . . . . . . . . . . . . . . . . . . . . . . . . . . . . . Performing Preventive Maintenance . . . . . . . . . . . . . . . . . . . . . . . . . . . . . . . . . Daily Maintenance . . . . . . . . . . . . . . . . . . . . . . . . . . . . . . . . . . . . . . . . . . . . Periodic Maintenance . . . . . . . . . . . . . . . . . . . . . . . . . . . . . . . . . . . . . . . . . Recycling the Used MBM . . . . . . . . . . . . . . . . . . . . . . . . . . . . . . . . . . . . . . . . . 39 39 39 39 39 7 SPECIFICATIONS . . . . . . . . . . . . . . . . . . . . . . . . . . . . . . . . . . . . . . . . . . . . . . . . . . . . . . . 41 8 MBM SCHEMATICS. . . . . . . . . . . . . . . . . . . . . . . . . . . . . . . . . . . . . . . . . . . . . . . . . . . . . 43 9 TROUBLESHOOTING . . . . . . . . . . . . . . . . . . . . . . . . . . . . . . . . . . . . . . . . . . . . . . . . . . . . 45 Trouble Conditions . . . . . . . . . . . . . . . . . . . . . . . . . . . . . . . . . . . . . . . . . . . . . . . Service and Support . . . . . . . . . . . . . . . . . . . . . . . . . . . . . . . . . . . . . . . . . . . . . . 45 46 WARRANTY. . . . . . . . . . . . . . . . . . . . . . . . . . . . . . . . . . . . . . . . . . . . . . . . . . . . . . . . . . . . 47 10 Eaton BladeUPS Maintenance Bypass Module (MBM) User’s Guide 164201785—Rev 2 www.eaton.com/powerquality i Table of Contents ii Eaton BladeUPS Maintenance Bypass Module (MBM) User’s Guide 164201785—Rev 2 www.eaton.com/powerquality Chapter 1 Introduction The Eaton® BladeUPS® Maintenance Bypass Module (MBM) is a three-breaker maintenance bypass. The MBM is designed to operate with the BladeUPS 12 kVA three-phase uninterruptible power supply (UPS) in a fully populated 60 kW N+1 system. The MBM enables power to completely bypass and isolate the UPS so that the UPS can be safely serviced, upgraded, or replaced without interrupting power to critical systems. Figure 1 shows the BladeUPS MBM and Figure 2 shows a typical installation. Providing outstanding performance and reliability, the BladeUPS MBM's unique benefits include the following: l Front panel breakers located behind the front cover: - UPS Input breaker provides a single point of input power control to the UPS and easily removes power from the UPS for servicing. - Bypass breaker transfers the load from the UPS output to the mains input. - UPS Output breaker isolates the UPS from the mains input and the load. l Breaker lock-out tabs. l BladeUPS transfer to bypass control conveniently located on the MBM front panel. l Operating instructions and power flow diagram with indicator lights for status located behind the front cover. l l l Breaker auxiliary contacts available to connect to facility equipment (such as an indicator light) to show the state of each breaker. Interlock bar for UPS Output and Bypass breakers to prevent turning both breakers off at the same time and dropping the load. Mounts in any rack with 6U of available space, including the BladeUPS module rack. (Installing the MBM in the same module rack can limit the number of UPSs.) l 6U height that fits any standard 48 cm (19") rack. l Mounts on rails for easy installation. l Can be mounted at the top or bottom of the rack. l Top or bottom entry conduit landing plates. l Easy rear panel access wiring to pressure termination lugs. l Single cable control interface with the BladeUPS module. l Emergency shutdown control through the remote emergency power-off (REPO) terminals. l Backed by worldwide agency approvals. Eaton BladeUPS Maintenance Bypass Module (MBM) User’s Guide 164201785—Rev 2 www.eaton.com/powerquality 1 Introduction Figure 1. The BladeUPS MBM Alternate Top Mounting Location for the BladeUPS MBM BladeUPS Bar BladeUPS Module BladeUPS Module BladeUPS Module BladeUPS MBM Bottom Entry Wireway BladeUPS BladeUPS MBM Figure 2. Typical BladeUPS MBM Installation with BladeUPS Modules 2 Eaton BladeUPS Maintenance Bypass Module (MBM) User’s Guide 164201785—Rev 2 www.eaton.com/powerquality Chapter 2 Safety Warnings IMPORTANT SAFETY INSTRUCTIONS SAVE THESE INSTRUCTIONS This manual contains important instructions that you should follow during installation and maintenance of the Maintenance Bypass Module (MBM). Please read all instructions before operating the equipment and save this manual for future reference. DANGER This MBM contains LETHAL VOLTAGES. All repairs and service should be performed by AUTHORIZED SERVICE PERSONNEL ONLY. There are NO USER SERVICEABLE PARTS inside the MBM. WARNING l l l l The UPS connected to this MBM contains its own energy source (batteries). The MBM output may carry live voltage even when the UPS is not connected to an AC supply. To reduce the risk of fire or electric shock, install this MBM in a temperature and humidity controlled, indoor environment, free of conductive contaminants. Ambient temperature must not exceed 40C (104F). Do not operate near water or excessive humidity (95% maximum). To reduce the risk of fire, connect only to a circuit provided with branch circuit overcurrent protection in accordance with the National Electrical Code® (NEC®), ANSI/NFPA 70. To comply with international standards and wiring regulations, the sum of the leakage current of the MBM and the total equipment connected to the output of this MBM must not have an earth leakage current greater than 3.5 milliamperes. Sikkerhedsanvisninger VIGTIGE SIKKERHEDSANVISNINGER GEM DISSE ANVISNINGER Denne manual indeholder vigtige instruktioner, som bør følges under installeringen og vedligeholdelsen af vedligeholdelsesshuntboksen (VSB). Læs venligst alle instruktionerne, inden udstyret tages i brug, og gem denne manual til senere brug. FARE Denne VSB indeholder LIVSFARLIG SPÆNDING. Alle reparationer og serviceeftersyn bør UDELUKKENDE udføres af AUTORISERET SERVICEPERSONEL. Der findes INGEN BRUGERANVENDELIGE DELE i VSB'en. Eaton BladeUPS Maintenance Bypass Module (MBM) User’s Guide 164201785—Rev 2 www.eaton.com/powerquality 3 Safety Warnings ADVARSEL! l l l l UPS'en, der er tilsluttet denne VSB, indeholder sin egen energikilde (batterier). VSB-outputtet kan rumme spænding, selv når UPS'en ikke er tilsluttet en vekselstrømforsyning. For at nedsætte risikoen for brand eller elektrisk stød bør VSB'en monteres i et indendørs miljø med kontrolleret temperatur og fugtighed fri for strømførende fremmedlegemer. Omgivelsestemperaturen må ikke overstige 40C (104F). Må ikke anvendes i nærheden af vand eller overdreven fugtighed (95 % maksimum). For at nedsætte risikoen for brand må enheden kun tilsluttes et kredsløb med strømbeskyttelse i overensstemmelse med det nationale elektriske kodeks, ANSI/NFPA 70. For at overholde internationale standarder og vedtægter om ledningsføring må summen af lækstrømmen fra VSB'en og det samlede udstyr, der er tilsluttet VSB'ens output, ikke have en lækstrøm på mere end 3,5 milliampere. Belangrijke Veiligheidsinstructies BELANGRIJKE VEILIGHEIDSINSTRUCTIES BEWAAR DEZE INSTRUCTIES Deze handleiding bevat belangrijke instructies die u dient na te leven tijdens de installatie en het onderhoud van de Maintenance Bypass Module (MBM). Lees alle instructies alvorens het apparaat te gebruiken en bewaar deze handleiding voor het geval u ze later nog nodig hebt. GEVAAR Deze MBM bevat DODELIJKE VOLTAGES. Alle reparaties en onderhoud mogen UITSLUITEND DOOR BEVOEGD ONDERHOUDSPERSONEEL worden uitgevoerd. In deze MBM bevinden zich geen ONDERDELEN DIE DE GEBRUIKER ZELF KAN ONDERHOUDEN. WAARSCHUWING l l l l 4 De UPS die aangesloten is op deze MBM bevat zijn eigen energiebron (batterijen). Het uitgangsvermogen van de MBM kan onder spanning staan, zelfs als de UPS niet aangesloten is op een AC-stroombron. Om het risico op brand of een elektrische schok te beperken, dient u deze MBM in een temperatuurgestuurde en binnenomgeving met geregelde vochtigheidsgraad te installeren, vrij van geleidende verontreinigende stoffen. De kamertemperatuur mag 40C of 104F niet overschrijden. Niet gebruiken in de buurt van water of overmatige vochtigheid (95 % maximum). Om het risico op brand te beperken, dient u het apparaat enkel aan te sluiten op een stroomkring voorzien van beveiliging tegen overbelasting in overeenstemming met de Nationale Elektrische Code, ANSI/NFPA 70. Om te voldoen aan de internationale normen en bedradingsvoorschriften, mag de som van de lekstroom van de MBM en de totale uitrusting die is aangesloten op de uitgang van deze MBM geen grotere lekstroom hebben dan 3,5 milliampère. Eaton BladeUPS Maintenance Bypass Module (MBM) User’s Guide 164201785—Rev 2 www.eaton.com/powerquality Safety Warnings Tarkeita Turvaohjeita TÄRKEITÄ TURVAOHJEITA - SUOMI SÄILYTÄ NÄMÄ OHJEET Tämä käyttöohje sisältää tärkeitä ohjeita, joita käyttäjän tulee noudattaa huolto-ohitusmoduulia MBM) asennettaessa ja huollettaessa. Lue kaikki ohjeet huolellisesti ennen laitteen käyttöä ja säilytä tämä käyttöohje myöhempää tarvetta varten. VAARA Huolto-ohitusmoduulissa on HENGENVAARALLISEN KORKEA JÄNNITE. Korjaus- ja huoltotoimenpiteitä saa suorittaa VAIN VALTUUTETTU HUOLTOHENKILÖ. Moduulin SISÄLLÄ OLEVIA OSIA EI VOI HUOLTAA ITSE. VAROITUS l l l l Tähän MBM-moduuliin kytketyssä UPS-laitteessa on oma virtalähteensä (akut). MBM-moduuli saattaa olla jännitteellinen, vaikka UPS ei olisikaan kytkettynä verkkovirtalähteeseen. MBM-moduuli tulee asentaa tulipalon ja sähköiskujen välttämiseksi sisätilaan, jonka lämpötilaa ja kosteutta voidaan säädellä ja jossa ei ole virtaa johtavia epäpuhtauksia. Ympäristön lämpötila ei saa olla yli 40C (104F). Älä käytä laitetta lähellä vettä tai erittäin kosteassa tilassa (kosteusprosentti korkeintaan 95 %). Laite tulee ain kytkeä tulipalon vaaran välttämiseksi kaikkien voimassa olevien sähköturvallisuusmääräysten ja -asetusten mukaisesti ylivirtasuojalla varustettuun sähköverkkoon. Kansainvälisten standardien ja kytkentämääräysten mukaisesti MBM-moduulin ja siihen kytkettyjen laitteiden yhteenlaskettu maavuotovirta ei saa ylittää 3,5 milliampeeria. Consignes de sécurité CONSIGNES DE SÉCURITÉ IMPORTANTES CONSERVER CES INSTRUCTIONS Ce manuel comporte des instructions importantes que vous devez suivre lors de l'installation et de l'entretien du Module de Dérivation de Maintenance (MBM). Veuillez lire toutes les instructions avant d'utiliser l'équipement et conserver ce manuel pour une consultation ultérieure. DANGER! Ce MBM contient des TENSIONS MORTELLES. Toutes les réparations et tous les entretiens devront être effectués UNIQUEMENT PAR UN PERSONNEL D–ENTRETIEN AGRÉÉ. Aucune pièce à l–intérieur de ce MBM NE PEUT ÊTRE ENTRETENUE PAR L–UTILISATEUR. Eaton BladeUPS Maintenance Bypass Module (MBM) User’s Guide 164201785—Rev 2 www.eaton.com/powerquality 5 Safety Warnings AVERTISSEMENT! l l l l L'onduleur connecté à ce MBM possède sa propre source d'alimentation (batteries). Il est possible que la sortie du MBM soit sous tension même lorsque l'onduleur n'est pas connecté à une alimentation CA. Afin de réduire le risque d'incendie ou de choc électrique, installez ce MBM dans un environnement intérieur à température et humidité contrôlées, exempt de contaminants conducteurs. La température ambiante ne doit pas dépasser 40 C (104 F). Ne pas utilisez près d'eau ou avec une humidité excessive (95 % maximum). Afin de réduire les risques d'incendie, n'effectuez le raccordement qu'avec un circuit muni d'une protection de surintensité de circuit de dérivation maximum de 100 ampères conformément au Code Electrique National (National Electrical Code) des Etats-Unis ANSI/ NFPA 70. Pour répondre aux normes internationales et réglementations de câblage, la somme du courant de fuite du MBM et l'équipement total connecté à la sortie de ce MBM ne doit pas dépasser un courant de fuite à la terre de 3,5 milliampères. Sicherheitswarnungen WICHTIGE SICHERHEITSANWEISUNGEN AUFBEWAREN Dieses Handbuch enthält wichtige Hinweise, die Sie bei der Installation und Wartung des Maintenance Bypass Module (MBM) beachten sollten. Bitte lesen Sie alle Hinweise vor dem Betrieb des Gerätes genau durch, und heben Sie dieses Handbuch bei Ihren Unterlagen auf. WARNUNG Dieses MBM führt LEBENSGEFÄHRLICHE–SPANNUNG. Sämtliche Reparatur- und Wartungsarbeiten dürfen NUR VON BEFUGTEM–WARTUNGSPERSONAL durchgeführt werden. Im Inneren des MBM sind KEINE–VOM–BENUTZER–WARTBAREN–TEILE vorhanden. ACHTUNG l l l l 6 Die an dieses MBM angeschlossene USV enthält eine eigene Energiequelle (Batterien). Der MBM-Ausgang kann lebensgefährliche Spannung führen, selbst wenn die USV nicht an die Netzstromversorgung angeschlossen ist. Zur Vermeidung der Gefahr eines Brandes oder eines elektrischen–Schlages sollte dieses MBM nur in geschlossenen Räumen mit kontrollierter Temperatur und Luftfeuchtigkeit installiert werden, in denen keine leitfähigen Schadstoffe vorhanden sind. Die–Umgebungstemperatur darf 40C (104F) nicht überschreiten. Das Gerät darf nicht in der Nähe von–Wasser oder übermäßiger Feuchtigkeit betrieben werden (maximale Luftfeuchtigkeit 95 %). Zur Vermeidung von Brandgefahr sollte das Gerät nur an einen Stromkreis angeschlossen werden, der mit einem Überstromschutz mit einem Nennstrom gemäß dem National Electrical Code, ANSI/NFPA 70 ausgestattet ist. Zur Einhaltung der internationalen–Normen und Verdrahtungsvorschriften darf die Summe des Kriechstroms des MBM und der an die Ausgänge dieses 97 %-igen MBM angeschlossenen Geräte nicht mehr als 3,5 Milliampere betragen. Eaton BladeUPS Maintenance Bypass Module (MBM) User’s Guide 164201785—Rev 2 www.eaton.com/powerquality Safety Warnings Avvisi di sicurezza IMPORTANTI ISTRUZIONI DI SICUREZZA CONSERVARE QUESTE ISTRUZIONI Questo manuale contiene istruzioni importanti da seguire durante le operazioni di installazione e manutenzione del modulo di bypass manutenzione (Maintenance Bypass Module - MBM). Leggere completamente le istruzioni prima di azionare l'apparecchiatura e conservare questo manuale per uso futuro. PERICOLO All'interno del modulo MBM sono presenti TENSIONI LETALI. Tutte le operazioni di riparazione e manutenzione devono essere eseguite esclusivamente da PERSONALE AUTORIZZATO ALL'ASSISTENZA. All'interno del modulo MBM non sono presenti COMPONENTI RIPARABILI DALL'UTENTE. AVVERTENZA l l l l L'UPS collegato a questo modulo MBM contiene una propria fonte di energia (batterie). Sull'output del modulo MBM potrebbero essere presenti tensioni attive anche quando l'UPS non è collegato a una fonte di energia CA. Per limitare il rischio di incendio o scariche elettriche, installare il modulo MBM in un ambiente chiuso a temperatura e umidità controllate, privo di elementi contaminanti conduttivi. La temperatura ambiente non deve superare i 40 C (104 F). Non azionare in prossimità di acqua o umidità eccessiva (massimo 95%). Per limitare il rischio di incendio, collegare esclusivamente a un circuito dotato di protezione da sovracorrente, in conformità con le indicazioni del National Electrical Code, ANSI/NFPA 70. Nel rispetto degli standard internazionali e delle normative sui cablaggi, la somma della corrente di dispersione del modulo MBM e di tutte le apparecchiature collegate all'uscita del modulo non deve presentare un valore di corrente di dispersione di terra superiore a 3,5 milliampere. Viktig Sikkerhetsinformasion VIKTIGE SIKKERHETSINSTRUKSJONER GJEM DISSE INSTRUKSJONENE Denne bruksanvisningen inneholder viktige instruksjoner som du bør følge under installasjon og vedlikehold av Maintenance Bypass Module (MBM). Vennligst les alle instruksjonene før utstyret tas i bruk og ta vare på denne bruksanvisningen til senere oppslag. FARLIG Denne MBM inneholder LIVSFARLIG SPENNING. Reparasjoner og service skal kun utføres av AUTORISERT SERVICE PERSONELL. Det er INGEN BRUKERADGANG TIL DELER inni MBM. Eaton BladeUPS Maintenance Bypass Module (MBM) User’s Guide 164201785—Rev 2 www.eaton.com/powerquality 7 Safety Warnings FARLIG l l l l UPS koblet til denne MBM inneholder sin egen strømforsyning (batteri). MBM uttaket kan være strømførende selv når UPS ikke er koblet til vekselstrøm. Denne MBM må installeres i et temperatur og luftfuktighets-kontrollert innendørs klima, fri for forsøplende ledere, for å redusere risikoen for brann eller elektrisk sjokk. Omgivelsestemperatur må ikke overskride 40C (104F). Må ikke brukes nær vann eller ved for høy luftfuktighet (95% maksimum). For å redusere brannfare, må denne kun kobles til en krets som er utstyrt med forgrenerkrets overstrømbeskyttelse i henhold til National Electrical Code, ANSI/NFPA 70. For å være i henhold til internasjonale standarder og koblingsreguleringer, må summen av strømlekkasjen til MBM og det samlede utstyret koblet til uttaket fra denne MBM ikke ha jordlekkasje som overskrider 3,5 milliampére. Advertências de Segurança INSTRUÇÕES DE SEGURANÇA IMPORTANTES GUARDE ESTAS INSTRUÇÕES Este manual contém instruções importantes que devem ser seguidas durante a instalação e manutenção do Módulo de Bypass de Manutenção (MBM). Por favor, leia todas as instruções antes de operar o equipamento e guarde este manual para referência futura. PERIGO Este MBM contém VOLTAGENS LETAIS. Todos os reparos e manutenções devem ser feitos APENAS POR FUNCIONÁRIOS DE MANUTENÇÃO AUTORIZADOS. Não existem PEÇAS QUE PODEM SER CONSERTADAS PELO USUÁRIO dentro do MBM. ADVERTÊNCIA l l l l 8 O UPS conectado a este MBM contém sua própria fonte de energia (baterias). A saída do MBM pode transportar voltagem real mesmo quando o UPS não está conectado a uma fonte de CA. Para reduzir o risco de incêndio ou choque elétrico, instale este MBM em ambiente interno, com controle de temperatura e umidade, livre de contaminantes condutores. A temperatura ambiente não pode exceder 40C (104F). Não opere perto de água ou de umidade excessiva (95% máximo). Para reduzir os risco de incêndio, conecte somente em um circuito com de circuito ramal para proteção contra sobrecarga de corrente, de acordo com o Código Elétrico Nacional, ANSI/ NPFA 70. Para se adequar aos padrões internacionais e regulamentos de fiação, a soma do vazamento de corrente do MBM e o equipamento total conectado na saída deste MBM não pode ter um vazamento de corrente de aterramento maior do que 3,5 miliamperes. Eaton BladeUPS Maintenance Bypass Module (MBM) User’s Guide 164201785—Rev 2 www.eaton.com/powerquality Safety Warnings Предупреждения по мерам безопасности ВАЖНЫЕ УКАЗАНИЯ ПО МЕРАМ БЕЗОПАСНОСТИ СОХРАНИТЕ ЭТИ УКАЗАНИЯ Данное руководство содержит важные инструкции, которые необходимо соблюдать при установке и обслуживании модуля переключения на байпас для технического обслуживания (МПБТО). Перед работой с оборудованием прочтите все указания и сохраните данное руководство для дальнейшего использования. ОПАСНО В МПБТО некоторые узлы находятся под СМЕРТЕЛЬНО ОПАСНЫМНАПРЯЖЕНИЕМ. ТОЛЬКО УПОЛНОМОЧЕННЫМОБСЛУЖИВАЮЩИМПЕРСОНАЛОМ. В МПБТО НЕТ УЗЛОВ, ОБСЛУЖИВАЕМЫХ ПОЛЬЗОВАТЕЛЕМ. ПРЕДУПРЕЖДЕНИЕ l l l l ИБП, присоединенный к МПБТО, имеет собственный источник питания (батареи). На выходе МПБТО может присутствовать напряжение, даже когда ИБП не присоединен к источнику переменного тока. Чтобы снизить опасность пожара или поражения электрическим током, устанавливайте данный МПБТО в чистом помещении с контролируемыми температурой и влажностью, в котором отсутствуют токопроводящие загрязнения. Температура окружающего воздуха не должна превышать 40„aC (104„aF). Не эксплуатируйте устройство около воды или в местах с повышенной влажностью (максимум 95%). Чтобы снизить опасность пожара, присоединяйте модуль только к контуру, имеющему устройство защиты от избыточного тока с шунтом согласно нормам проектирования, установки и эксплуатации электрического оборудования (National Electrical Code) ANSI/ NFPA 70. В соответствии с международными стандартами и нормами электропроводки, общий ток утечки на землю для МПБТО и подключенного к выходу МПБТО оборудования не должен превышать 3,5 миллиампер. Advertencias de Seguridad INSTRUCCIONES DE SEGURIDAD IMPORTANTES GUARDE ESTAS INSTRUCCIONES Este manual contiene instrucciones importantes que el usuario debe seguir durante la instalación y el mantenimiento del Módulo de Desviación de Mantenimiento (MBM, por sus siglas en inglés). Lea todas las instrucciones antes de poner en funcionamiento el equipo y guarde este manual. Puede necesitarlo en el futuro. PELIGRO Este MBM contiene VOLTAJES LETALES. SOLO EL PERSONAL DE SERVICIO AUTORIZADO debe realizar reparaciones y servicios. NO HAY PIEZAS QUE PUEDAN RECIBIR SERVICIO DEL USUARIO dentro del MBM. Eaton BladeUPS Maintenance Bypass Module (MBM) User’s Guide 164201785—Rev 2 www.eaton.com/powerquality 9 Safety Warnings ADVERTENCIA l l l l El UPS conectado a este MBM contiene su propia fuente de energía (baterías). La salida del MBM puede llevar voltaje activo, inclusive cuando el UPS no está conectado a un suministro de CA. Para disminuir el riesgo de incendio o cortocircuito, instale este MBM en un ambiente interno con temperatura y humedad controladas, y sin contaminantes conductores. La temperatura ambiente no debe exceder los 40C (104F). No ponga el equipo en funcionamiento cerca de agua o humedad excesiva (95% máximo). Para disminuir el riesgo de incendio, conecte sólo a un circuito proporcionado con protección de sobrecarga de corriente del circuito derivado de acuerdo con el Código Eléctrico Nacional, ANSI/ NFPA 70. Para cumplir con los estándares internacionales y las reglamentaciones de cableado, la suma de la corriente de fuga del MBM y el equipo total conectado a la salida de este MBM no deben tener una corriente de fuga a tierra superior a 3,5 miliamperes. Säkerhetsföreskrifter VIKTIGA SÄKERHETSFÖRESKRIFTER SPARA DESSA FÖRESKRIFTER Denna manual innehåller viktiga instruktioner som ni bör följa under installation och underhåll av Maintenance Bypass Module (MBM). Läs alla instruktioner före användning av utrustningen och spara denna handbok för framtida referens. FARA Denna MBM innhåller LIVSFARLIG SPÄNNING. All reparation och service får endast utföras av AUKTORISERAD SERVICEPERSONAL. Det finns INGA DELAR SOM KAN SERVAS AV ANVÄNDAREN inuti MBM. VARNING l l l l 10 Den UPS som är ansluten till denna MBM har en egen energikälla (batterier). MBM-utmatning kan föra med sig direktspänning även när UPS-enheten inte är ansluten till ett vägguttag. För att minska risken för brand eller elchock, skall denna MBM installeras inomhus i en miljö med kontrollerad temperatur och fuktighet, som är fri från ledande föroreningar. Omgivande temperatur får inte överskrida 40C (104F). Arbeta inte i närheten av vatten eller i hög luftfuktighet (max 95 %). För att minska risken för brand får enheten endast anslutas till en krets försedd med överspänningskydd i enlighet med National Electrical Code (nationella elföreskrifter), ANSI/ NFPA 70. För att uppfylla kraven i internationella standarder och föreskrifter beträffande kabelledning, får inte summan av läckströmmen från MBM och från den sammanlagda utrustning som är ansluten till MBM överskrida en jordläckström på 3,5 milliampere. Eaton BladeUPS Maintenance Bypass Module (MBM) User’s Guide 164201785—Rev 2 www.eaton.com/powerquality Chapter 3 Installation This chapter describes: l Equipment inspection l Installation accessories l Required tools l Unpacking the cabinet l Mechanical installation l Electrical installation l Initial startup Inspecting the Equipment If any equipment has been damaged during shipment, keep the shipping cartons and packing materials for the carrier or place of purchase and file a claim for shipping damage. If you discover damage after acceptance, file a claim for concealed damage. To file a claim for shipping damage or concealed damage: 1) File with the carrier within 15 days of receipt of the equipment; 2) Send a copy of the damage claim within 15 days to your service representative. Checking the MBM Installation Accessories The Maintenance Bypass Module (MBM) is designed to be mounted in a separate rack from the BladeUPS modules. However, the MBM can be mounted in the same rack as the BladeUPS modules. Racks with the BladeUPS Parallel Bus Bar 6-High installed are limited to five UPSs to allow 6U rack space for the MBM. Racks with the BladeUPS Parallel Bus Bar 4-High installed can be configured to leave 6U rack space for the MBM above or below the bar. The MBM comes with all hardware required for installation in a standard EIA or JIS seismic rack-mount configuration with square and round mounting holes. The rail assemblies adjust to mount in 48-cm (19-inch) racks with front to rear rail distances from 61 to 76 cm (24 to 30 inches) deep. Verify that the following items are included with the MBM: l MBM front covers l Mounting brackets and fasteners: - (2) mounting brackets - (4) 6-32 x 5/16" flat-head screws l Rails and fasteners: - (2) sliding rail assemblies (left and right) - (12) 10-32 x 1/2" hex-head screws - (4) U-shaped 10-32 clip nuts l MBM to UPS signal cable l This user's guide Eaton BladeUPS Maintenance Bypass Module (MBM) User’s Guide 164201785—Rev 2 www.eaton.com/powerquality 11 Installation Tools Required To assemble the components, the following tools may be needed: l Torque wrench able to measure 5.65-31.1 Nm or 50-275 lb in (power and ground wiring lugs) l 5/16" hex key for torque wrench (power wiring lugs) l Large flat-blade bit for torque wrench (ground wiring lugs) l 5/16" hex socket (rails) l #1 Phillips® screwdriver (chassis brackets) l #2 Pozidriv® or Phillips screwdriver (rear panel) l 7 mm hex socket (conduit plates) l Small flat-blade screwdriver (signal wiring terminal blocks) l Pliers for installing clip nuts l Cutter/stripper (wiring and conduit) Unpacking the Cabinet CAUTION l l Unpacking the cabinet in a low-temperature environment may cause condensation to occur in and on the cabinet. Do not install the cabinet until the inside and outside of the cabinet are absolutely dry (hazard of electric shock). The cabinet is heavy (see Table 8 on page 41). Removing the cabinet from the carton requires two people. NOTE To protect the product, do not unpack until ready to install. To unpack the cabinet: NOTE 1. Use care when moving and opening the cartons. Cut the tape sealing the outside box. Open the flaps of the box and remove the inside box containing the accessories. The MBM cabinet is located underneath the inside box. 12 2. Have two people lift the cabinet from the box for ease of removal. 3. Discard or recycle the packaging in a responsible manner, or store it for future use. Eaton BladeUPS Maintenance Bypass Module (MBM) User’s Guide 164201785—Rev 2 www.eaton.com/powerquality Installation Mechanical Installation The MBM accepts either top or bottom wire entry depending on the cabinet mounting location. Because of the cabinet depth, the recommended mounting location is at either the very top or very bottom of a rack adjacent to the parallel UPS system. If installing the MBM in the same rack as the UPSs, mount the MBM as close as possible to the wireway to aid in power wire installation. Rack Setup for the MBM To install the MBM rail kit: 1. Loosen the assembly wing nuts on both rail assemblies and adjust the rail size for the depth of your rack (see Figure 3). Assembly Wing Nuts Front Rail Assembly Rear Figure 3. Adjusting the Rail Depth NOTE 2. Verify that the hole patterns on the rails and mounting brackets align with the hole pattern on the rack. Select the proper holes in the rail for bottom or top positioning of the MBM cabinet in the rack. Bottom Mounting. Place the rail for the MBM at the bottom, using positions 1 and 6 from the bottom of the rack for the front hex-head screws (see Figure 4). Top Mounting. Place the rail for the MBM at the top, using positions 13 and 18 from the top of the rack for the front hex-head screws (see Figure 4). Eaton BladeUPS Maintenance Bypass Module (MBM) User’s Guide 164201785—Rev 2 www.eaton.com/powerquality 13 Installation Top of Rack Position 13 Position 6 Position 18 Position 1 Bottom of Rack Bottom Mounting Top Mounting Figure 4. Front Rail Screw Positions for the MBM 3. Secure the rail to the front of the rack with two hex-head screws (see Figure 5). Front Rail Hex-Head Screws Figure 5. Securing the Front Rail 4. Using two clip nuts and two hex-head screws, attach the rail to the rear of the rack (see Figure 6 and Figure 7). Bottom Mounting. The bottom rail uses positions 2 and 4 from the bottom of the rack for the rear hex-head screws. Top Mounting. The top rail uses positions 15 and 17 from the top of the rack for the rear hex-head screws. 14 Eaton BladeUPS Maintenance Bypass Module (MBM) User’s Guide 164201785—Rev 2 www.eaton.com/powerquality Installation Top of Rack Position 15 Position 4 Position 17 Position 2 Bottom of Rack Bottom Mounting Top Mounting Figure 6. Rear Rail Screw Positions for the MBM Clip Nuts Figure 7. Securing the Rear Rail 5. Repeat Steps 2 through 4 for the other rail. 6. Tighten the assembly wing nuts on both rail assemblies. CAUTION The MBM is heavy [34.5 kg (76 lb)]. Two people are required to move the MBM. 7. Place the MBM on a flat, stable surface with the front of the MBM facing toward you. 8. If the mounting brackets are not already installed, align the two mounting brackets with the screw holes on the side of the MBM and secure with the supplied 6-32 x 5/16" flat-head screws (see Figure 8). Eaton BladeUPS Maintenance Bypass Module (MBM) User’s Guide 164201785—Rev 2 www.eaton.com/powerquality 15 Installation Top Front Cover Cover Pin and Cabinet Opening Bottom Front Cover 6-32 x 5/16" Flat-Head Screws Mounting Bracket Figure 8. Installing the MBM Mounting Brackets and Front Covers 9. If installing the MBM in the same rack as the UPS, remove the three screws on the right and the bottom right screw securing the MBM rear panel (see Figure 9). The BladeUPS Bar blocks access to these screws when the MBM is installed in the rack. Remove these four screws if installing the MBM in the same rack as the UPS. Figure 9. MBM Rear Panel 10. Slide the MBM into the rack on the rails. 16 Eaton BladeUPS Maintenance Bypass Module (MBM) User’s Guide 164201785—Rev 2 www.eaton.com/powerquality Installation 11. Secure the front of the MBM to the rack using two 10-32 x 1/2" hex-head screws in the top and bottom holes of each mounting bracket, as shown in Figure 10. 6-32 x 5/16" Flat-Head Screws Figure 10. Securing the MBM Mounting Brackets 12. Attach the MBM top and bottom front covers: Align the pins on the rear of each cover with the openings in the MBM cabinet. Push the cover firmly into place. See Figure 8. 13. Continue to the following section, “Electrical Installation”. Electrical Installation MBM Power Wiring Preparation Read and understand the following notes while planning and performing the installation: l Refer to national and local electrical codes for acceptable external wiring practices. l For external wiring, use 90°C copper wire. l Choose wire ampacities from Table 310-16 of the National Electrical Code (NEC). Wire is rated 90°C. l Material and labor for external wiring requirements are to be provided for by the customer. l Input wiring must be three-phase, 4-wire plus ground. l See Table 1 for MBM wiring specifications and refer to the BladeUPS user's guide for BladeUPS Bar wiring requirements and terminal locations. Eaton BladeUPS Maintenance Bypass Module (MBM) User’s Guide 164201785—Rev 2 www.eaton.com/powerquality 17 Installation Table 1. MBM Wiring Specifications Terminal Function Size of Pressure Termination Metric (English) Tightening Torque Nm (lb in) Terminal Size and Type Phase A 1 13.3 mm2-177 mm2 (1 #6-350 kcmil) 31.1 (275) 5/16" Hex Phase B 1 13.3 mm2-177 mm2 (1 #6-350 kcmil) 31.1 (275) 5/16" Hex Phase C 1 13.3 mm2-177 mm2 (1 #6-350 kcmil) 31.1 (275) 5/16" Hex Phase A 1 13.3 mm2-177 mm2 (1 #6-350 kcmil) 31.1 (275) 5/16" Hex Phase B 1 13.3 mm2-177 mm2 (1 #6-350 kcmil) 31.1 (275) 5/16" Hex Phase C 1 13.3 mm2-177 mm2 (1 #6-350 kcmil) 31.1 (275) 5/16" Hex Phase A 1 13.3 mm2-177 mm2 (1 #6-350 kcmil) 31.1 (275) 5/16" Hex Phase B 1 13.3 mm2-177 mm2 (1 #6-350 kcmil) 31.1 (275) 5/16" Hex Phase C 1 13.3 mm2-177 mm2 (1 #6-350 kcmil) 31.1 (275) 5/16" Hex Phase A 1 13.3 mm2-177 mm2 (1 #6-350 kcmil) 31.1 (275) 5/16" Hex Phase B 1 13.3 mm2-177 mm2 (1 #6-350 kcmil) 31.1 (275) 5/16" Hex Phase C 1 13.3 mm2-177 mm2 (1 #6-350 kcmil) 31.1 (275) 5/16" Hex Common Neutral Neutral 6 13.3 mm2-177 mm2 (6 #6-350 kcmil) 31.1 (275) 5/16" Hex Ground Ground 4 52 mm2-2 mm2 (4 #14-1/0) 5.65 (50) Large Flat Blade Mains Input UPS Input UPS Output Critical Load Output NOTE Terminal Wire Size Rating See Note Wiring should be sized in accordance with the power cable termination sizes listed in this table, the BladeUPS parallel current rating and overcurrent protection rating required (refer to the BladeUPS user's guide), and national and local electrical codes. Use 13.3 mm2 (6 AWG) 90C copper wire minimum. Power Wiring Installation To install wiring: 1. Verify that the UPS is turned off and all power sources are removed. Refer to the operation chapter of the BladeUPS user's guide for shutdown instructions. 2. Verify that the MBM is properly installed and secured. 3. Remove the screws securing the MBM rear panel (see Figure 9 on page 16) and remove the panel to gain access to the terminals. Retain the hardware for later use. 4. If necessary, remove the MBM top rear panel (see Figure 11). Slide the panel back to remove. The rear panel must be removed first. 18 Eaton BladeUPS Maintenance Bypass Module (MBM) User’s Guide 164201785—Rev 2 www.eaton.com/powerquality Installation 5. Route the input and output cables through either the top or bottom of the cabinet to the MBM terminals. See Figure 11 or Figure 12 for wiring access information. NOTE Each conduit landing plate can accept up to two 3" conduit fittings. Top Access Wiring. Remove the top right and left conduit landing plates (see Figure 11) from the MBM top rear panel. Identify all conduit requirements and mark their location. Drill or punch all conduit holes in the top right and left conduit landing plates. Reinstall the conduit landing plates and install all conduit fittings into the plates. Pull the wiring through the conduit fittings into the wiring area. Bottom Access Wiring. Remove the bottom right and left conduit landing plates (see Figure 12) from the MBM bottom rear panel. Identify all conduit requirements and mark their location. Drill or punch all conduit holes in the bottom right and left conduit landing plates. Reinstall the conduit landing plates and install all conduit fittings into the plates. Pull the wiring through the conduit fittings into the wiring area. Rear of Cabinet Top Entry Conduit Landing for UPS AC Input and Output. (Remove panel to drill or punch conduit holes.) Removable Top Rear Panel Top Entry Conduit Landing for AC Mains Input and Critical Load Output. (Remove panel to drill or punch conduit holes.) Top Entry Conduit Landing for Breaker Aux and REPO terminals. (Remove panel to drill or punch conduit holes.) NOTE Each conduit landing plate can accept up to two 3" conduit fittings. Figure 11. MBM Cabinet Top View Eaton BladeUPS Maintenance Bypass Module (MBM) User’s Guide 164201785—Rev 2 www.eaton.com/powerquality 19 Installation Rear of Cabinet Bottom Entry Conduit Landing for AC Mains Input and Critical Load Output. (Remove panel to drill or punch conduit holes.) Bottom Entry Conduit Landing for UPS AC Input and Output. (Remove panel to drill or punch conduit holes.) Bottom Entry Conduit Landing for Breaker Aux and REPO terminals. (Remove panel to drill or punch conduit holes.) NOTE Each conduit landing plate can accept up to two 3" conduit fittings. Figure 12. MBM Cabinet Bottom View 6. Route the mains input, neutral, and ground wiring from the utility source to the MBM mains input, neutral, and ground terminals. See Figure 13 for terminal locations. 7. Connect the ground wiring to the MBM ground terminal and utility source terminals. See Table 1 on page 18 for wiring and termination requirements. Verify all ground connections are installed according to local and national electrical wiring codes. 8. Connect the Neutral to the utility source and MBM neutral terminals. See Table 1 on page 18 for wiring and termination requirements. 9. Connect phase A, B, and C power wiring to the MBM mains input and utility source terminals. See Table 1 on page 18 for wiring and termination requirements. 10. Route the UPS input, neutral, and ground wiring from the MBM to the UPS input, neutral, and ground terminals on the BladeUPS Bar terminal block. See Figure 13 for terminal locations. 11. Connect the ground wiring to the MBM ground terminals and the BladeUPS Bar ground terminal. See Table 1 on page 18 for wiring and termination requirements. Verify all ground connections are installed according to local and national electrical wiring codes. 12. Connect the Neutral to the MBM and BladeUPS Bar neutral terminals. See Table 1 on page 18 for wiring and termination requirements. 20 Eaton BladeUPS Maintenance Bypass Module (MBM) User’s Guide 164201785—Rev 2 www.eaton.com/powerquality Installation 13. Connect phase A, B, and C power wiring to the MBM UPS input and BladeUPS Bar UPS input terminals. See Table 1 on page 18 for wiring and termination requirements. Critical Load Phase A Mains Input Phase A Common Neutral Critical Load Phase B Ground Mains Input Phase B Critical Load Phase C UPS Input Phase C Mains Input Phase C UPS Output Phase C UPS Input Phase B Ground UPS Output Phase B Common Neutral UPS Input Phase A UPS Output Phase A Figure 13. Power Terminal Locations 14. Route the UPS output wiring from the MBM to the UPS output terminals on the BladeUPS Bar terminal block. See Figure 13 for terminal locations. 15. Connect phase A, B, and C power wiring to the MBM UPS output and BladeUPS Bar UPS output terminals. See Table 1 on page 18 for wiring and termination requirements. 16. Route the critical load output, neutral, and ground wiring from the MBM critical load terminals to the critical load. See Figure 13 for terminal locations. 17. Connect the ground wiring to the MBM ground terminal and critical load terminals. See Table 1 on page 18 for wiring and termination requirements. Verify all ground connections are installed according to local and national electrical wiring codes. 18. Connect the Neutral to the MBM and critical load neutral terminals. See Table 1 on page 18 for wiring and termination requirements. 19. Connect phase A, B, and C power wiring to the MBM critical load terminals and the critical load. See Table 1 on page 18 for wiring and termination requirements. 20. If installing interface wiring, proceed to “Interface Wiring Installation” otherwise, proceed to Step 21. 21. When all wiring is complete, reinstall the top rear panel if removed in Step 4. 22. Reinstall the rear panel removed in Step 3 and secure with retained hardware. NOTE The screws removed in Step 9 on page 16 cannot be reinstalled because the BladeUPS Bar blocks access. Eaton BladeUPS Maintenance Bypass Module (MBM) User’s Guide 164201785—Rev 2 www.eaton.com/powerquality 21 Installation Interface Wiring Installation NOTE The 6-conductor signal cable must be installed between the MBM and the UPS and the UPS connected to the MBM must be configured correctly for the Activate UPS Bypass Mode Pushbutton and the UPS Bypass Mode Active Indicator to operate properly. See “Communication” on page 23 for: l Required signal cable installation between the MBM and the BladeUPS l Optional Breaker Aux contact wiring l Optional remote emergency power-off (REPO) wiring After interface wiring is complete, proceed to the following section, “Parallel System with MBM Initial Startup.” Parallel System with MBM Initial Startup To start up a parallel system with an MBM installed, see “Operation” on page 31 and the BladeUPS user's guide. 22 Eaton BladeUPS Maintenance Bypass Module (MBM) User’s Guide 164201785—Rev 2 www.eaton.com/powerquality Chapter 4 Communication This chapter describes: l Signal inputs and outputs l Breaker Aux contacts l Remote emergency power-off (REPO) Figure 14 shows the location of the signal input and output terminals. Figure 15 shows the Breaker Aux and REPO terminals on the Maintenance Bypass Module (MBM). MBM Rear Panel Signal Connector (see Figure 16 for detail) Figure 14. Signal Input and Output Connector Breaker Aux and REPO Terminals (see Figure 17 for detail) Figure 15. Breaker Aux and REPO Terminals (Rear Panel Removed) Eaton BladeUPS Maintenance Bypass Module (MBM) User’s Guide 164201785—Rev 2 www.eaton.com/powerquality 23 Communication Bypass Status Com Bypass Status NO Force to Bypass Force to Bypass + Activate Bypass Activate Bypass + Figure 16. Signal Connector Detail REPO + REPO - UPS Input Aux – NO UPS Input Aux – NC UPS Input Aux – Com Bypass Aux – NO Bypass Aux – NC Bypass Aux – Com UPS Output Aux – NO UPS Output Aux – NC UPS Output Aux – Com Figure 17. Breaker Aux and REPO Terminals Detail 24 Eaton BladeUPS Maintenance Bypass Module (MBM) User’s Guide 164201785—Rev 2 www.eaton.com/powerquality Communication Installing Signal Cable NOTE If a longer cable is required, use 0.8 mm2 (18 AWG) wire and connect to MBM and UPS connectors. NOTE The 6-conductor signal cable must be installed between the MBM and the UPS, and the UPS connected to the MBM must be configured correctly for the Activate UPS Bypass Mode Pushbutton and the UPS Bypass Mode Active Indicator to operate properly. To install the signal cable: 1. Plug the signal cable into the signal connector (see Figure 18). Figure 18. Installing Signal Cable 2. Route the signal cable to the closest or most convenient UPS in the parallel system and tie the cable out of the way. It does not matter which UPS is connected to the MBM. Only one UPS needs to be connected using the signal cable. The other UPSs in the parallel system will receive signals through the external CAN communication bus. Eaton BladeUPS Maintenance Bypass Module (MBM) User’s Guide 164201785—Rev 2 www.eaton.com/powerquality 25 Communication 3. Connect MBM cable wires to the UPS signal input and relay connectors using Table 2. The cable wires should be connected to the control terminals using the mating connectors supplied with the UPS. Refer to the communication chapter of the BladeUPS user's guide for UPS terminal locations. Table 2. MBM to UPS Terminals From MBM To UPS Conductor Color Bypass Status (Com) Relay Output Contacts (Com) Black Bypass Status (NO) Relay Output Contacts (NO) Red Force to Bypass (-) Signal Input 1 (-) White Force to Bypass (+) Signal Input 1 (+) Green Activate Bypass (-) Signal Input 2 (-) Orange Activate Bypass (+) Signal Input 2 (+) Blue Configure UPS For UPS Connector Tightening Torque On Bypass Force Bypass 0.5 Nm (4.5 lb in) Request Bypass Configuring UPS Signals for Bypass Mode Only one UPS (the UPS connected to the MBM) needs to be configured for the MBM Activate UPS Bypass Mode Pushbutton and the UPS Bypass Mode Active Indicator to operate properly. The other UPSs in the parallel system will receive signals through the external CAN. NOTE Refer to the operation chapter of the BladeUPS user’s guide for instructions on control panel operation. To configure UPS signal input 1, signal input 2, and relay output: 1. 2. Verify that the UPS firmware is updated to v2.x: a. On the control panel of the UPS connected to the MBM, press any button to activate the menu options, and then press the button until the IDENTIFICATION menu displays. b. Press the c. If the firmware version is not v2.x, install the firmware from the BladeUPS: Documents, Firmware, and Installation Video CD or visit www.eaton.com/powerquality to download the latest version and the instructions for installing it. button to display the identification data, including the firmware version. Configure signal input 1: a. Press the button until the Start screen appears. b. Select SETTINGS, USER SETTINGS, SIGNAL INPUTS, and Signal. c. Select INPUT 1 and press the d. Select force bypass and press the e. Logic 1 is the default. The following screen text displays: button to enter the setting mode. button to save the setting. Signal: INPUT 1 <force bypass> Logic: 1 f. 26 Press the button to save the setting. Eaton BladeUPS Maintenance Bypass Module (MBM) User’s Guide 164201785—Rev 2 www.eaton.com/powerquality Communication 3. Configure signal input 2: a. Select INPUT 2 and press the button to enter the setting mode. b. Select request bypass and press the c. Logic 1 is the default. The following screen text displays: button to save the setting. Signal: INPUT 2 <request bypass> Logic: 1 d. 4. Press the button to save the setting. Configure the relay: a. Press the button until USER SETTINGS appears. b. Select RELAY CONFIG and Relay. c. Select ALARM-1 and press the button to enter the setting mode. d. Select on bypass and press the button to save the setting. The following text displays: Relay: ALARM-1 Setup: on bypass 5. Press the button until the Start screen appears. 6. Press the Activate UPS Bypass Mode pushbutton on the front panel of the MBM (see Figure 20 on page 32) to transfer the UPS to bypass. The UPS transfers to Bypass mode and the critical load is immediately supplied by the bypass source. 7. Verify that the UPS Bypass Mode Active status indicator (see Figure 20) is illuminated, indicating the UPS is operating in Bypass mode. 8. Verify that UPS status UPS on Bypass displays on the UPS control panel. 9. Return to normal mode: Press any button to activate the menu options, then select CONTROL and GO TO NORMAL MODE. Alternatively (standalone UPS only): Press any button to activate the menu options, then select TURN UPS ON/OFF, TURN UPS ON, and OK to confirm. Breaker Aux and REPO Terminals The REPO input allows the Bypass breaker to be opened with a remotely connected EPO switch. The auxiliary contacts of each breaker can be connected to facility equipment (such as an indicator light) to show the state of each breaker. Installing Breaker Aux Terminal Wiring To install breaker aux terminals: 1. Verify the UPS is turned off and all power sources are removed. Refer to the operation chapter of the BladeUPS user's guide for shutdown instructions. 2. Verify all power sources are removed from the MBM. 3. Remove the screws securing the MBM rear panel (see Figure 9 on page 16) and remove the panel to gain access to the terminals. Retain the hardware for later use. 4. If necessary, remove the MBM top rear panel (see Figure 11 on page 19). Slide the panel back to remove. The rear panel must be removed first. Eaton BladeUPS Maintenance Bypass Module (MBM) User’s Guide 164201785—Rev 2 www.eaton.com/powerquality 27 Communication 5. Route the aux wiring through either the top or bottom of the cabinet to the MBM aux terminals. Use conduit between the facility equipment and the MBM. See Figure 15 on page 23 for terminal block location. NOTE Each conduit landing plate can accept two 3" conduit fittings. Top Access Wiring. Remove the top middle conduit landing plate (see Figure 11 on page 19) from the MBM top rear panel. Identify all conduit requirements and mark their location. Drill or punch all conduit holes in the top middle conduit landing plate. Reinstall the conduit landing plate and install all conduit fittings into the plate. Pull the wiring through the conduit fittings into the wiring area. Bottom Access Wiring. Remove the bottom middle conduit landing plate (see Figure 12 on page 20) from the MBM bottom rear panel. Identify all conduit requirements and mark their location. Drill or punch all conduit holes in the bottom middle conduit landing plate. Reinstall the conduit landing plate and install all conduit fittings into the plate. Pull the wiring through the conduit fittings into the wiring area. 6. Connect the facility equipment to the aux terminals. See Figure 17 on page 24 for terminal locations, and Table 3 and Table 4 for aux wiring. 7. If installing REPO wiring, proceed to “Remote Emergency Power-off,” otherwise, proceed to Step 8. 8. When all wiring is complete, reinstall the top rear panel if removed in Step 4. 9. Reinstall the rear panel removed in Step 3 and secure with retained hardware. Table 3. TB1 Connections Terminal TB1 Name 1 REPO (+) 2 REPO (-) 3 UPS Input Aux (NO) 4 UPS Input Aux (NC) 5 UPS Input Aux (Com) 6 Bypass Aux (NO) 7 Bypass Aux (NC) 8 Bypass Aux (Com) 9 UPS Output Aux (NO) 10 UPS Output Aux (NC) 11 UPS Output Aux (Com) Description Input: Normallyopen dry contact used to activate MBM EPO from a remote switch. Output: Normallyopen contact closes when Input breaker closes. Output: Normallyclosed contact opens when Input breaker closes. Output: Normallyopen contact closes when Bypass breaker closes. Output: Normallyclosed contact opens when Bypass breaker closes. Output: Normallyopen contact closes when Output breaker closes. Output: Normallyclosed contact opens when Output breaker closes. Table 4. Breaker Aux Contact and Terminal Ratings 28 Aux Contact Rating Terminal Wire Size Rating Suggested Wire Size Tightening Torque 5A, 125/250 Vac, 50/60 Hz 1A, 125 Vdc 3.30.52 mm2 (1220 AWG) 0.8 mm2 (18 AWG) 4.7 Nm (42 lb in) Eaton BladeUPS Maintenance Bypass Module (MBM) User’s Guide 164201785—Rev 2 www.eaton.com/powerquality Communication Installing a Remote Emergency Power-off The REPO is used to shut down the MBM bypass from a distance. When the REPO is activated, the MBM opens the Bypass breaker and removes power from the critical load if the MBM is in Bypass mode. If the MBM is in Normal mode, the load will continue to be powered by the UPS. To remove power from the load, the REPO connected to the UPS must be activated. CAUTION l l l l The REPO switch must have a minimum rating of 250 Vac at 20 mA and be a normally-open latching-type switch not tied into the BladeUPS REPO or any other circuit. 120 Vac is present on the LV model REPO connections and 230 Vac is present on the HV model REPO connections. The REPO switch wiring must be in accordance with National Electrical Code (NEC) Article 725 Class 2 requirements. The wire should be rated at 600V, 1A minimum and 12 AWG maximum. To ensure the UPS stops supplying power to the load during an emergency and when the MBM is in Normal mode of operation, the emergency power-off function on the UPS must be activated. NOTE 1 The REPO for the UPS must not be combined in the same circuit as the circuit for the MBM REPO or damage to the UPS will result. If connecting to a single EPO button, use fully isolated contact hubs on the EPO switch. NOTE 2 For Europe, the emergency switch requirements are detailed in Harmonized document HD-384-48 S1, “Electrical Installation of the Buildings, Part 4: Protection for Safety, Chapter 46: Isolation and Switching.” To install a REPO switch for an MBM: 1. Verify the UPS is turned off and all power sources are removed. Refer to the operation chapter of the BladeUPS user's guide for shutdown instructions. 2. Verify all power sources are removed from the MBM. 3. Securely mount the REPO switch. Recommended locations include near operator's consoles or near exit doors. Refer to the REPO switch manufacturer's installation instructions for enclosure dimensions and wiring knockouts. 4. Remove the screws securing the MBM rear panel (see Figure 9 on page 16) and remove the panel to gain access to the terminals. Retain the hardware for later use. 5. If necessary, remove the MBM top rear panel (see Figure 11 on page 19). Slide the panel back to remove. The rear panel must be removed first. 6. Route the REPO wiring through either the top or bottom of the cabinet to the MBM REPO terminals. Use conduit between the REPO switch and the MBM. See Figure 15 on page 23 for terminal block location. NOTE Each conduit landing plate can accept two 3" conduit fittings. Eaton BladeUPS Maintenance Bypass Module (MBM) User’s Guide 164201785—Rev 2 www.eaton.com/powerquality 29 Communication Top Access Wiring. Remove the top middle conduit landing plate (see Figure 11 on page 19) from the MBM top rear panel. Identify all conduit requirements and mark their location. Drill or punch all conduit holes in the top middle conduit landing plate. Reinstall the conduit landing plate and install all conduit fittings into the plate. Pull the wiring through the conduit fittings into the wiring area. Bottom Access Wiring. Remove the bottom middle conduit landing plate (see Figure 12 on page 20) from the MBM bottom rear panel. Identify all conduit requirements and mark their location. Drill or punch all conduit holes in the bottom middle conduit landing plate. Reinstall the conduit landing plate and install all conduit fittings into the plate. Pull the wiring through the conduit fittings into the wiring area. 7. Connect the appropriate external switch to the REPO terminals. See Figure 17 on page 24 for terminal locations, and Figure 19, Table 3, and Table 5 for REPO wiring. 8. When all wiring is complete, reinstall the top rear panel if removed in Step 5. 9. Reinstall the rear panel removed in Step 4 and secure with retained hardware. Table 5. REPO Connections Wire Function Terminal TB1 1 REPO 2 Suggested Wire Size Tightening Torque 3.30.52 mm2 (1220 AWG) 0.8 mm2 (18 AWG) 4.7 Nm (42 lb in) REPO Switch (Normally-Open) MBM REPO Terminals Bypass Breaker ST Shunt Trip Terminal Wire Size Rating 1 + Polarity 2 – Polarity Figure 19. REPO Switch Wiring 30 Eaton BladeUPS Maintenance Bypass Module (MBM) User’s Guide 164201785—Rev 2 www.eaton.com/powerquality Chapter 5 Operation This chapter contains information on how to use the BladeUPS Maintenance Bypass Module (MBM), including front panel controls and indicators, operating modes, and transferring the MBM between modes. Controls and Indicators The controls and indicators identified and described in Table 6 and shown in Figure 20 are used to control and monitor MBM operation. Table 6. Controls and Indicators Controls and Indicators Status Description Activate UPS Bypass Mode Pushbutton Pressed Requests transfer of UPS to internal bypass. Transfer will not occur if internal bypass is not available. On UPS is on internal bypass. Off UPS is in Normal mode. On (|) AC utility power is supplied to the UPS. Off (O) AC utility power is removed from the UPS. On UPS input breaker is closed and power is supplied to the UPS. Off UPS input breaker is open and AC input power is removed from the UPS. On (|) Power is supplied from the UPS to the critical load. Off (O) Power is supplied directly from utility power to the critical load. On Power is supplied from the UPS. Off No power is supplied from the UPS. On (|) Power is supplied directly from utility power to the critical load. Off (O) Power is supplied from the UPS to the critical load. On Power is supplied to the critical load from the UPS or directly from utility power. Off No power is supplied to the critical load. UPS Bypass Mode Active Indicator UPS Input Breaker UPS Input Indicator UPS Output Breaker UPS Output Indicator Bypass Breaker Critical Load Indicator Eaton BladeUPS Maintenance Bypass Module (MBM) User’s Guide 164201785—Rev 2 www.eaton.com/powerquality 31 Operation UPS Bypass Mode Active Indicator Activate UPS Bypass Mode Pushbutton UPS Input Breaker Bypass Breaker Breaker Lock-out Tab UPS Input Indicator Critical Load Indicator UPS Output Indicator UPS Output Breaker Figure 20. BladeUPS MBM Controls and Indicators Operating Modes WARNING Power is present inside the UPS cabinet until the UPS battery breakers are turned off. The MBM enables power to completely bypass and isolate the UPS so that the UPS can be safely serviced or replaced without interrupting power to critical systems. The MBM consists of a UPS Input breaker, a UPS Output breaker, and a Bypass breaker. The Bypass breaker transfers the load from the UPS output to the mains input, and the UPS Output breakers isolates the UPS from load and from being backfed from the mains input. The UPS Input breaker provides a single point of AC input power control to the UPS and removes AC power from the UPS for servicing. An interlock bar for the UPS Output and Bypass breakers is provided to prevent turning both breakers off at the same time and dropping the load. The MBM supports a critical load in two different modes of operation: l l 32 In Normal mode, the critical load is supplied by the BladeUPS, which derives its power from rectified utility AC power. In this mode, the battery charger also provides charging current for the battery, if needed. In Bypass mode, the critical load is directly supplied by utility power. Eaton BladeUPS Maintenance Bypass Module (MBM) User’s Guide 164201785—Rev 2 www.eaton.com/powerquality Operation Normal Mode Current Flow When the Bypass breaker is open and the UPS Output breaker is closed, conditioned and protected power from the UPS is routed through the UPS Output breaker to the critical load. The UPS is supplied mains power through the UPS Input breaker. Figure 21 shows the path of electrical power through the MBM when operating in UPS mode. Mains Input to MBM from Utility UPS Input Breaker To UPS Input UPS Output Breaker Bypass Breaker From UPS Output Output To Critical Load MBM Main Power Flow in UPS Mode Figure 21. Path of Current Through the MBM in UPS Mode Bypass Mode Current Flow A bypass circuit with a Bypass breaker is used to safely supply utility power directly to the critical load during periods of UPS maintenance or repairs. WARNING Power is present inside the UPS cabinet until the UPS battery breakers are turned off. When the Bypass breaker is closed, the load is wrapped around the UPS while power is still supplied to the load by the UPS through the UPS Output breaker. The UPS Output breaker is then opened, isolating the UPS from the bypass power source. The UPS can be safely shut down and AC input power removed from the UPS using the UPS Input breaker without interrupting power to the critical load. The UPS now can be serviced or replaced safely. Eaton BladeUPS Maintenance Bypass Module (MBM) User’s Guide 164201785—Rev 2 www.eaton.com/powerquality 33 Operation In Bypass mode, the critical load is not protected from commercial power interruptions and abnormalities. Figure 22 shows the path of electrical power through the MBM when operating in Bypass mode. Mains Input to MBM from Utility UPS Input Breaker To UPS Input UPS Output Breaker Bypass Breaker From UPS Output Output To Critical Load MBM Main Power Flow in Bypass Mode Figure 22. Path of Current Through the MBM in Bypass Mode Using the UPS when an MBM is Installed NOTE 1. Before starting the UPS with the MBM, verify all of the UPS and MBM installation tasks are complete. Remove the MBM top and bottom front covers: Grasp the sides of each cover and pull forward. See Figure 23. 2. 3. 34 Verify that the MBM circuit breakers are set as follows: Bypass Breaker Open UPS Output Breaker Closed UPS Input Breaker Closed Start the UPS in Normal mode. Refer to the instructions in the operation chapter of the BladeUPS user's guide. Eaton BladeUPS Maintenance Bypass Module (MBM) User’s Guide 164201785—Rev 2 www.eaton.com/powerquality Operation 4. Attach the MBM top and bottom front covers: Align the pins on the rear of each cover with the openings in the MBM cabinet. Push the cover firmly into place. See Figure 23. Top Front Cover Cover Pin and Cabinet Opening Bottom Front Cover Figure 23. Removing and Attaching the MBM Front Covers Transferring the MBM to Bypass CAUTION l l 1. Only trained personnel familiar with the operation of this equipment should transfer loads. Failure to follow this transfer sequence may cause loss of power to loads or overload protection devices to activate. In Bypass mode, the critical load is not protected from commercial power interruptions and abnormalities. Remove the MBM top and bottom front covers: Grasp the sides of each cover and pull forward. See Figure 23. NOTE 2. If the UPS does not transfer to bypass, a utility power outage may have occurred and the UPS is running in battery mode. Press the Activate UPS Bypass Mode pushbutton on the front panel of the MBM (see Figure 20 on page 32) to transfer the UPS to bypass. The UPS transfers to Bypass mode and the critical load is immediately supplied by the bypass source. 3. Verify that the UPS Bypass Mode Active status indicator (see Figure 20) is illuminated, indicating the UPS is operating in Bypass mode. Eaton BladeUPS Maintenance Bypass Module (MBM) User’s Guide 164201785—Rev 2 www.eaton.com/powerquality 35 Operation WARNING Power is present inside the cabinets. 4. Close the Bypass breaker (see Figure 20). 5. Slide the interlock bar to the right (see Figure 24). 6. Open the UPS Output breaker (see Figure 20 and Figure 24). The critical load is directly supplied by utility power. 7. Shut down the UPS. Refer to the instructions in the operation chapter of the BladeUPS user's guide. CAUTION The UPS Input breaker must be opened to electrically isolate the UPS. 8. Open the UPS Input breaker (see Figure 20). 9. Verify the UPS Input and Output indicators are not illuminated. The UPS can now be serviced or replaced safely. 10. Verify the Critical Load indicator is illuminated. 11. Attach the MBM top and bottom front covers: Align the pins on the rear of each cover with the openings in the MBM cabinet. Push the cover firmly into place. See Figure 23. Interlock Bar Figure 24. BladeUPS MBM Breaker Interlock Operation – Bypass Mode 36 Eaton BladeUPS Maintenance Bypass Module (MBM) User’s Guide 164201785—Rev 2 www.eaton.com/powerquality Operation Transferring the MBM to Normal Mode CAUTION l l 1. Only trained personnel familiar with the operation of this equipment should transfer loads. Failure to follow this transfer sequence may cause loss of loss of power to loads or overload protection devices to activate. In Bypass mode, the critical load is not protected from commercial power interruptions and abnormalities. Remove the MBM top and bottom front covers: Grasp the sides of each cover and pull forward. See Figure 23 on page 35. 2. Close the UPS Input breaker (see Figure 20 on page 32). 3. Verify the UPS Input indicator is illuminated. 4. Verify the UPS is operating and is in Bypass mode. Refer to the instructions in the operation chapter of the BladeUPS user's guide. 5. Verify the UPS Output indicator is illuminated. 6. Close the UPS Output breaker (see Figure 20 on page 32). 7. Slide the interlock bar to the left (see Figure 25). 8. Open the Bypass breaker (see Figure 20 on page 32 and Figure 25). 9. Transfer the UPS to Normal mode. Refer to the instructions in the operation chapter of the BladeUPS user's guide. 10. Verify the Critical Load indicator is illuminated. 11. Attach the MBM top and bottom front covers: Align the pins on the rear of each cover with the openings in the MBM cabinet. Push the cover firmly into place. See Figure 23 on page 35. Eaton BladeUPS Maintenance Bypass Module (MBM) User’s Guide 164201785—Rev 2 www.eaton.com/powerquality 37 Operation Interlock Bar Figure 25. BladeUPS MBM Breaker Interlock Operation – Normal Mode 38 Eaton BladeUPS Maintenance Bypass Module (MBM) User’s Guide 164201785—Rev 2 www.eaton.com/powerquality Chapter 6 MBM Maintenance Schedule regular routine checks of the BladeUPS Maintenance Bypass Module (MBM) to verify correct operation. This chapter explains how to perform preventative maintenance and recycle a used MBM. Important Safety Instructions Remember that the BladeUPS MBM system is designed to supply power EVEN WHEN DISCONNECTED FROM THE UTILITY POWER. The MBM interior is unsafe until the UPS is shut down and utility power to the MBM is disconnected. WARNING l l Servicing and maintenance should be performed by qualified service personnel only. LETHAL VOLTAGE PRESENT. This unit should not be operated with the protective panels removed. Do not make any assumptions about the electrical state of any cabinet in the UPS system. Performing Preventive Maintenance The MBM requires very little preventive maintenance. However, the system should be inspected periodically to verify that the units are operating normally. Daily Maintenance Perform the following steps daily: 1. Check the area surrounding the BladeUPS MBM. Ensure the area is not cluttered, allowing free access to the unit. 2. Ensure the ventilation openings (on rear and sides of the MBM cabinet) are not blocked. 3. Ensure the operating environment is within the parameters specified in “Specifications” on page 41. 4. Ensure the MBM breakers are in normal operating mode. Periodic Maintenance Make periodic inspections of the MBM to determine if components, wiring, and connections exhibit evidence of overheating. Give particular attention to pressure termination connections. Maintenance procedures should specify that the pressure termination connections be retorqued to values listed in the manual. Recycling the Used MBM Contact your local recycling or hazardous waste center for information on proper disposal of the used MBM. CAUTION Do not discard waste electrical or electronic equipment (WEEE) in the trash. For proper disposal, contact your local recycling/reuse or hazardous waste center. Eaton BladeUPS Maintenance Bypass Module (MBM) User’s Guide 164201785—Rev 2 www.eaton.com/powerquality 39 MBM Maintenance 40 Eaton BladeUPS Maintenance Bypass Module (MBM) User’s Guide 164201785—Rev 2 www.eaton.com/powerquality Chapter 7 Specifications This chapter provides the following specifications: l Model list l Weights and dimensions l Electrical input and output l Environmental and safety Table 7. Model List UPS Model Number Power Levels (Rated at Nominal Inputs) BladeUPS MBM LV 60 kVA or 60 kW at 208V BladeUPS MBM HV 60 kVA or 60 kW at 400V Table 8. BladeUPS MBM Weights and Dimensions 441 x 754 x 261 mm 17.3 x 29.6 x 10.5 Dimensions (WxDxH) BladeUPS MBM LV shipped: 45.4 kg (100 lb) BladeUPS MBM HV shipped: 45.4 kg (100 lb) BladeUPS MBM LV installed: 34.5 kg (76 lb) BladeUPS MBM HV installed: 34.5 kg (76 lb) Weights Table 9. BladeUPS MBM Rack Requirements Dimensions 610 x 1067 x 2032 mm (24 x 42 x 80) Clearances Allow 1m (3 ft) floor space in the front and rear of the rack for safety and access for maintenance. Table 10. Electrical Input BladeUPS MBM LV BladeUPS MBM HV 120/208V three-phase 230/400V three-phase Nominal Frequency 50/60 Hz 50/60 Hz Rated Input Current 180A 115A Nominal Voltage Connections Hardwired using pressure terminations Input Mode Three-phase, 4-wire plus ground Table 11. Electrical Output BladeUPS MBM LV BladeUPS MBM HV 120/208 Vac three-phase 230/400 Vac three-phase Nominal Frequency 50/60 Hz 50/60 Hz Rated Output Current 166.5A Nominal Output Voltage Connections Full Output 87A Hardwired using pressure terminations Three-phase Eaton BladeUPS Maintenance Bypass Module (MBM) User’s Guide 164201785—Rev 2 www.eaton.com/powerquality 41 Specifications Table 12. Environmental and Safety BladeUPS MBM LV BladeUPS MBM HV Surge Suppression ANSI C62.41 Category B3 EN 61000-4-6 Safety Conformance UL 1778 4th edition; CSA C22.2, No. 107.3 EN and IEC 62040-1-1 cULus, ICES cULus, CE Agency Markings EMC (Class A) N/A N/A Operating Temperature 0C to 40C (32F to 104F) Storage Temperature 0C to 25C (32F to 77F) Transit Temperature -25C to 55C (-13F to 131F) Operating: 595% noncondensing Relative Humidity Non-operating: 595% relative humidity, 38.7C (101.7F) maximum wet bulb temperature with no cosmetic damage Up to 1,000 meters (3,300 ft) above sea level Operating Altitude Transit Altitude MBM Heat Dissipation 42 Up to 2,000 meters (6,600 ft) with 1% derating per +100 meters (330 ft) Up to 15,000 meters (49,000 ft) above sea level ~200W Audible Noise N/A RoHS Compliant Yes Eaton BladeUPS Maintenance Bypass Module (MBM) User’s Guide 164201785—Rev 2 www.eaton.com/powerquality MBM Schematics This chapter shows the schematics of each Maintenance Bypass Module (MBM) model. Figure 26 shows the low voltage (208V) model and Figure 27 shows the high voltage (400V) model. Closest or most convenient UPS in Parallel System Chapter 8 Figure 26. BladeUPS MBM LV Schematic Eaton BladeUPS Maintenance Bypass Module (MBM) User’s Guide 164201785—Rev 2 www.eaton.com/powerquality 43 Closest or most convenient UPS in Parallel System MBM Schematics Figure 27. BladeUPS MBM HV Schematic 44 Eaton BladeUPS Maintenance Bypass Module (MBM) User’s Guide 164201785—Rev 2 www.eaton.com/powerquality Chapter 9 Troubleshooting The BladeUPS Maintenance Bypass Module (MBM) is designed for durable, trouble-free operation. Use the following section to determine the cause of minor problems. Trouble Conditions The following table describes possible trouble conditions. See Figure 28 for fuse and indicator locations. Condition Possible Cause Action The UPS Input indicator does not illuminate, but the MBM operates normally. Fuse F5 is open. Check the fuse and replace with same type and rating (1A, 250 Vac). LED DS5 is defective. Contact your service representative. The UPS Output indicator does not illuminate, but the MBM operates normally. Fuse F4 is open. Check the fuse and replace with same type and rating (1A, 250 Vac). LED DS4 is defective. Contact your service representative. The Critical Load indicator does not illuminate, but the MBM operates normally. Fuse F3 is open. Check the fuse and replace with same type and rating (1A, 250 Vac). LED DS3 is defective. Contact your service representative. The UPS Bypass Mode Active indicator does not illuminate, but the MBM operates normally. Fuse F2 is open. Check the fuse and replace with same type and rating (1A, 250 Vac). If the condition persists, contact your service representative. If the condition persists, contact your service representative. If the condition persists, contact your service representative. If the condition persists, contact your service representative. LED DS2 is defective. Contact your service representative. The bypass status signal wiring from the BladeUPS to the MBM is disconnected or defective. Verify the bypass status signal wiring is connected and has continuity (see “Communication” on page 23). The UPS relay output is not configured properly. Configure the UPS relay output to On Bypass (refer to the BladeUPS user's guide). If the condition persists, contact your service representative. If the condition persists, contact your service representative. REPO does not activate. Fuse F1 is open. Check the fuse and replace with same type and rating (1A, 250 Vac). If the condition persists, contact your service representative. The UPS does not transfer to Bypass mode when the MBM Activate UPS Bypass Mode pushbutton switch is pressed. The REPO signal wiring from the MBM to the REPO switch is disconnected or defective. Verify the REPO signal wiring is connected and has continuity (see “Communication” on page 23). The bypass utility does not qualify. Check the bypass utility. The UPS is receiving bypass utility power that may be unstable or in brownout conditions. Bypass mode is disabled. Verify the Usage of Bypass user setting on the BladeUPS is Enabled (refer to the BladeUPS user's guide). The activate bypass signal wiring from the BladeUPS to the MBM is disconnected or defective. Verify the activate bypass signal wiring is connected and has continuity (see “Communication” on page 23). The UPS signal inputs are not configured properly. Configure the UPS signal input 2 to Request Bypass (refer to the BladeUPS user's guide). If the condition persists, contact your service representative. If the condition persists, contact your service representative. If the condition persists, contact your service representative. Power is not available at the MBM output The MBM UPS Input and Bypass breakers terminals. are open. The REPO switch is active. Close the breakers. Reset the REPO switch and close the Bypass breaker. Eaton BladeUPS Maintenance Bypass Module (MBM) User’s Guide 164201785—Rev 2 www.eaton.com/powerquality 45 Troubleshooting UPS Bypass Mode Active Indicator Fuse (F2) UPS Bypass Mode Active Indicator (DS2) REPO Fuse (F1) Critical Load Indicator (DS5) Critical Load Indicator (DS3) UPS Critical Load Indicator Fuse (F3) UPS Input Indicator Fuse (F5) UPS Output Indicator Fuse (DS4) UPS Output Indicator Fuse (F4) Figure 28. BladeUPS MBM Fuse and Indicator Locations Service and Support If you have any questions or problems with the UPS, call your Local Distributor or the Help Desk at one of the following telephone numbers and ask for a UPS technical representative. United States: Canada: All other countries: 1-800-356-5737 1-800-461-9166 ext 260 Call your local service representative Please have the following information ready when you call for service: l Model number l Serial number l Date of failure or problem l Symptoms of failure or problem l Customer return address and contact information If repair is required, you will be given a Returned Material Authorization (RMA) Number. This number must appear on the outside of the package and on the Bill Of Lading (if applicable). Use the original packaging or request packaging from the Help Desk or distributor. Units damaged in shipment as a result of improper packaging are not covered under warranty. A replacement or repair unit will be shipped, freight prepaid for all warrantied units. NOTE 46 For critical applications, immediate replacement may be available. Call the Help Desk for the dealer or distributor nearest you. Eaton BladeUPS Maintenance Bypass Module (MBM) User’s Guide 164201785—Rev 2 www.eaton.com/powerquality Chapter 10 Warranty Limited Warranty Eaton® UPS Model: BladeUPS® (Global) WARRANTOR: The warrantor for the limited warranties set forth herein is Eaton Corporation, an Ohio Corporation (“Eaton”). LIMITED WARRANTY: This limited warranty (this “Warranty”) applies only to the original Purchaser (the “End-User”) of any Eaton BladeUPS Products (individually and collectively, the “Product”) purchased and registered with Eaton and cannot be transferred. This restriction applies even in the event that the Product is initially sold by Eaton for resale to an End-User. This Warranty gives you specific legal rights, and you may also have other rights which vary from State to State (or jurisdiction to jurisdiction). LIMITED WARRANTY PERIOD: The period covered by this Warranty for the Product is eighteen (18) months from the date of Product shipment. WHAT THIS LIMITED WARRANTY COVERS: Eaton warrants that the Product and battery (individually and collectively, the “Warranted Items”) are free of defects in material and workmanship. If, in the opinion of Eaton, a Warranted Item is defective and the defect is within the terms of this Warranty, Eaton’s sole obligation will be to repair or replace such defective Warranted Item (including providing service, parts and labor, as applicable), at the option of Eaton. PROCEDURES FOR REPAIR OR REPLACEMENT OF WARRANTED ITEMS: The Warranted Item will be repaired or replaced at an Eaton site or such other location as determined by Eaton. If the Warranted Item is to be replaced by Eaton, and the End-User supplies a credit card number or purchase order for the value of the replacement product, Eaton will use commercially reasonable business efforts to ship (via standard ground shipment and at no cost to the End-User) the replacement Warranted Item to the End-User within one (1) business day after Eaton receives notice of the warranty claim. In such case, the End-User must return (at Eaton’s expense) the defective Warranted Item to Eaton in the same packaging as the replacement Warranted Item received by the End-User or as otherwise instructed by Eaton. If Eaton does not receive the defective Warranted Item, Eaton will either charge the End-User’s credit card, or send the End-User an invoice (which the End-User agrees to pay), for the value of the replacement product. If the Warranted Item is to be replaced by Eaton, but the End-User is unwilling or unable to supply a credit card number or purchase order for the value of the replacement product, Eaton will use commercially reasonable business efforts to ship (via standard ground shipment and at no cost to the End-User) the replacement Warranted Item to the End-User within one (1) business day after Eaton receives the defective product from the End-User. In any case, Eaton will provide shipping instructions and will pay its designated carrier for all shipping charges for return of defective equipment and replacement of Warranted Items. Any returned Warranted Item or parts that are replaced may be new or re-conditioned. All Warranted Items returned to Eaton and, in any replacement endeavor, all parts removed by Eaton shall become the property of Eaton. WHAT THIS LIMITED WARRANTY DOES NOT COVER: This Warranty does not cover any defects or damages caused by: (a) failure to properly store the Product before installation, including the charge of batteries no later than the date indicated on the packaging; (b) shipping and delivery of the Product if shipping is FOB Factory; (c) damage caused by fire, flood, lightning, vandalism, acts of God, End-User's neglect, misuse, misapplication, incorrect connection, or external damage, or that has been subject to repair or alteration by End-User (or a third party) not authorized by Eaton in writing; (d) repair or alteration not performed by an authorized Eaton Customer Service Engineer or Agent; (e) improper testing, operation, maintenance, adjustment, or modification of any kind not authorized in writing by Eaton personnel or performed by an authorized Eaton Customer Service Engineer or Agent; or (f) use of the Product under other than normal operating conditions or in a manner inconsistent with the Product’s labels or instructions. Eaton BladeUPS Maintenance Bypass Module (MBM) User’s Guide 164201785—Rev 2 www.eaton.com/powerquality 47 This Warranty is not valid if the Product’s serial numbers have been removed or are illegible. Any Warranted Items repaired or replaced pursuant to this Warranty will be warranted for the remaining portion of the original Warranty subject to all the terms thereof. Eaton shall not be responsible for any charges for testing, checking, removal, or installation of Warranted Items. EATON DOES NOT WARRANT EQUIPMENT NOT MANUFACTURED BY EATON. IF PERMITTED BY THE APPLICABLE MANUFACTURER, EATON SHALL PASS THROUGH SUCH MANUFACTURER’S WARRANTIES TO END-USER. EATON DOES NOT WARRANT SOFTWARE, INCLUDING SOFTWARE EMBEDDED IN PRODUCTS, THAT IS NOT CREATED BY EATON. WITHOUT LIMITING THE FOREGOING, EATON SPECIFICALLY DOES NOT WARRANT SOFTWARE (SUCH AS LINUX) THAT WAS CREATED USING AN “OPEN SOURCE” MODEL OR IS DISTRIBUTED PURSUANT TO AN OPEN SOURCE LICENSE. THIS WARRANTY IS THE SOLE AND EXCLUSIVE WARRANTY OFFERED BY EATON WITH RESPECT TO THE PRODUCTS AND SERVICES AND, EXCEPT FOR SUCH FOREGOING WARRANTY, EATON DISCLAIMS ALL OTHER WARRANTIES INCLUDING, BUT NOT LIMITED TO, ANY IMPLIED WARRANTIES OF MERCHANTABILITY, TITLE, NON-INFRINGEMENT, AND FITNESS FOR A PARTICULAR PURPOSE. CORRECTION OF NON-CONFORMITIES IN THE MANNER AND FOR THE PERIOD OF TIME PROVIDED ABOVE SHALL CONSTITUTE EATON’S SOLE LIABILITY AND END-USER’S EXCLUSIVE REMEDY FOR FAILURE OF EATON TO MEET ITS WARRANTY OBLIGATIONS, WHETHER CLAIMS OF THE END-USER ARE BASED IN CONTRACT, IN TORT (INCLUDING NEGLIGENCE OR STRICT LIABILITY), OR OTHERWISE. SOME STATES OR JURISDICTIONS DO NOT ALLOW THE EXCLUSION OF EXPRESS OR IMPLIED WARRANTIES, SO THE ABOVE EXCLUSION MAY NOT APPLY TO YOU. IN THAT EVENT, SUCH WARRANTIES ARE LIMITED IN DURATION TO THE LIMITED WARRANTY PERIOD. SOME STATES OR JURISDICTIONS DO NOT ALLOW LIMITATIONS ON HOW LONG AN IMPLIED WARRANTY LASTS OR THE EXCLUSION OR LIMITATION OF INCIDENTAL OR CONSEQUENTIAL DAMAGES, SO THE ABOVE LIMITATIONS AND/OR EXCLUSIONS MAY NOT APPLY TO YOU. LIMITATION OF LIABILITY: The remedies of the End-User set forth herein are exclusive and are the sole remedies for any failure of Eaton to comply with its obligations hereunder. In no event shall Eaton be liable for any indirect, incidental, special, or consequential damages of any kind or type whatsoever, resulting from, or in connection with, any claim or cause of action, whether brought in contract or in tort (including negligence or strict liability). Some States or jurisdictions do not allow the exclusion of limitation of incidental or consequential damages, so the above limitation or exclusion may not apply to you. Eaton shall not be responsible for failure to provide service or parts due to causes beyond Eaton’s reasonable control. In no case will Eaton’s liability under this Warranty exceed the replacement value of the Warranted Items. END-USER'S OBLIGATIONS: In order to receive the benefits of this Warranty, the End-User must register the product warranty (via mail or online at www.eaton.com/powerquality “Register a Product”); use the Product in a normal way; follow the Product’s operation and maintenance manual; and protect against further damage to the Product if there is a covered defect. OTHER LIMITATIONS: Eaton’s obligations under this Warranty are expressly conditioned upon receipt by Eaton of all payments due from End-User (including interest charges, if any). During such time as Eaton has not received payment of any amount due to it for the Product, in accordance with the contract terms under which the Product is sold, Eaton shall have no obligation under this Warranty. Also during such time, the period of this Warranty shall continue to run and the expiration of this Warranty shall not be extended upon payment of any overdue or unpaid amounts. COSTS NOT RELATED TO WARRANTY: The End-User shall be invoiced for, and shall pay for, all services not expressly provided for by the terms of this Warranty, including without limitation, site calls involving an inspection that determines no corrective maintenance is required. Any costs for replacement equipment, installation, materials, freight charges, travel expenses, or labor of Eaton representatives outside the terms of this Warranty will be borne by the End-User. 48 Eaton BladeUPS Maintenance Bypass Module (MBM) User’s Guide 164201785—Rev 2 www.eaton.com/powerquality OBTAINING WARRANTY SERVICE: In the United States, call the Customer Reliability Center 7x24 at 800-356-5737. Outside of the United States, contact your local Eaton product sales or service representative. For comments or questions about this Warranty, write to the Customer Quality Representative, 3301 Spring Forest Road, Raleigh, North Carolina 27616 USA. Eaton BladeUPS Maintenance Bypass Module (MBM) User’s Guide 164201785—Rev 2 www.eaton.com/powerquality 49 50 Eaton BladeUPS Maintenance Bypass Module (MBM) User’s Guide 164201785—Rev 2 www.eaton.com/powerquality *164201785 2* 164201785 2