1
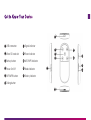
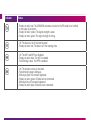
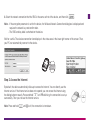
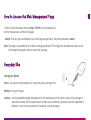
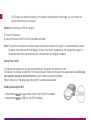
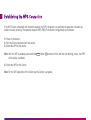
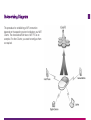
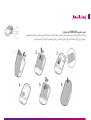
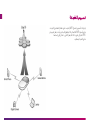
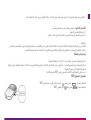
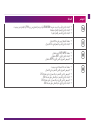
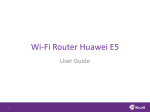
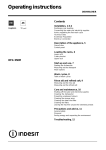
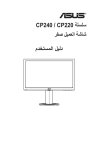
User Guide Welcome to VIVA E5830 Wireless Modem Thank you for choosing the Wireless Modem Note: This guide briefly describes the function of the device. For the operation of configuring the management parameters, see Help on the management program or web management page. The device can be used in a reasonable closed environment such as a pocket, handbag or laptop bag, however, if there is a risk that the ambient temperature will increase when the device is processing data services for a long period, due to the device not being able to dissipate the heat effectively. If this happens and as a safety precaution, the device will switch off automatically or disconnect. In the event of this happening please restart your device as usual to restart the connection. Get to Know Your Device 1 1 USB connector 7 Signal indicator 2 Micro SD card slot 8 Roam indicator 3 Battery button 9 WiFi/WPS indicator 4 Power On/Off 10 Mode indicator 5 WiFi/WPS button 11 Battery indicator 7 8 9 11 10 6 5 4 2 6 Dialing button 3 Indicator Status - Steady on and in red: The USIM/SIM card does not exist or the PIN code is not verified or the signal is inexistent. - Steady on and in yellow: The signal strength is weak. - Steady on and in green: The signal strength is strong. - Off: The device is not in the roaming state. - Steady on and in red: The device is in the roaming state. - Off: The WiFi and WPS are disabled. - Steady on and in blue: The WiFi is enabled. - Fast Blinking in blue: The WPS is enabled. - Off: The network service is inexistent. - Fast blinking in green: dialing up. - Blinking in green: 2G network registered. - Steady on and in green: 2G data service connected. - Blinking in blue: 3G network registered. - Steady on and in blue: 3G data service connected. Indicator Status - Fast blinking in red: The battery power level is very low and must be charged immediately; otherwise the device will be powered off. - Steady on and in red: The battery power level is weak. - Steady on and in green: The battery power level is enough. - Blinking: The battery is being charged. If the indicator is in red, the battery level is too low to power on the device. When the indicator turns green, you can power on the device. How to Access the Internet with WiFi Step1. Establish the WiFi Connection (Take PC for Example) 1. Select Start > Control Panel > Network Connections > Wireless Network Connection. Note: To set up a WiFi connection, the PC must be configured with the wireless network adapter. If the wireless network connection is displayed, the wireless network adapter is available. Otherwise, you should check your wireless network adapter. 2. Click View available wireless networks to display the wireless network connection list. 3. Select the network connection that the SSID is the same as that of the device, and then click . Note: - If the encryption parameter is set for the device, the Wireless Network Connection dialog box is displayed and requires the network key and confirmation. - The SSID and key label is attached on the device. Wait for a while. The wireless connection icon displays in the status area in the lower right corner of the screen. Then, your PC can automatically connect to the device. Step 2. Access the Internet By default, the device automatically dials up to access the Internet. You can directly use the Internet service. If the Internet service does not respond, you can access the Internet using the dialing button manually. Press and hold until is blinking, the connection is set up successfully. Then you can use the Internet service. Note: Press and hold until is off, the connection is torn down. How to Install the Management Program The procedure for installing the management program depends on the operating system installed on your PC. The following section takes Windows XP as an example. 1. Power on the device. 2. Connect the device and PC with the compatible data cable. 3. The OS (Operating System) automatically detects and recognizes new hardware and starts the installation wizard. Note: If the auto-run program does not respond, find the installing file in the driver path. Then double-click the installing file to run the program. 4. Follow the prompts of the installation wizard. 5. After the program is installed, the shortcut icon of the program is displayed on the desktop. 6. After the device is installed, the program is launched automatically. Then every time the device is connected to the PC with the compatible data cable, the program is launched automatically. Note: You can also double-click the shortcut icon on the desktop to launch the program. How to Access the Web Management Page 1. Start the Internet browser and enter http://192.168.1.1 in the address bar. 2. Enter the password, and then click Login. - Admin: This user type is authorized to view and change configurations. The default password is admin. Note: If the page is unavailable while the device is being connected to PC through the compatible data cable, launch the management program and then access the web page. Everyday Use Charging the Battery Note: If you have not used the battery for a long time, please recharge it first. Method 1: Using the charger Caution: - Use the compatible charger delivered only by the manufacturer with this device model. Using a charger of other device models, other manufacturers or vendors may invalidate any approval or warranty applicable to the device, result in the non-operation of the device, and cause danger. - The Charger is an optional accessory. If the charger is not provided in the package, you can contact your service provider to buy one yourself. Method 2: Connecting to a PC for charging 1. Power off the device. 2. Connect the device and PC with the compatible data cable. Note: To ensure that the battery has sufficient power to provide the data service longer, it is recommended that you do not power on the device until the charging is finished. If the device is powered on, the management program is launched automatically and the data service is started. Now, the charging is stopped. Saving Power mode If the device has not been carrying out any operations for 15 seconds, the indicators are off. If the device has not been accessed for 10 minutes by default, the device changes to the deep sleep state. In this state, you can press any key to activate the device. Now the indicators become lightened. When the device is in the deep sleep state, the WiFi is automatically disabled. Enabling/Disabling the WiFi - Press and hold - Press and hold WiFi/WPS WiFi/WPS until until is steady on and in blue, the WiFi is enabled. is off, the WiFi is disabled. Mode of Accessing the Internet After you establish the WiFi Connection successfully, you can access the Internet using the following modes. Mode Operations Manual 1. Access the Internet using the dialing button manually. For details, see the chapter of “Step2. Access the Internet”. 2. Wait for a while. If you are notified that the connection is successful, you can use the Internet service. Note: You can also launch the management program or web page to connect to or disconnect from the network following the prompts. On Demand After the device is powered on, it can automatically connect to the Internet when data transmission is required. If data transmission is not performed over a period of time, the device automatically tears down the Internet connection. Auto After the device is powered on, it can automatically connect to the Internet no matter whether data transmission is required. Note: - The dialing button dose not work in the Auto or On Demand mode. - You can launch the web management page to select the mode of accessing the Internet. Establishing the WPS Connection If the WiFi Clients, connected with the device support the WPS, the device can automatically generate a network key without manually entering. The operation steps of WPS-PBC (Push Button Configuration) are as follows. 1. Power on the device. 2. Start the Clients connected with the device. 3. Enable the WPS of the device. Note: After the WiFi is enabled, press and hold of the device is enabled. WiFi/WPS . When becomes off first and then fast blinking in blue, the WPS 4. Enable the WPS of the Clients. Note: For the WiFi operations of the Clients see the Clients’ user guide. Networking Diagram The procedure for establishing a WiFi connection depends on the operating system installed on your WiFi Clients. The aforesaid section takes a WiFi PC as an example. For other Clients, you need to configure them as required. Micro SD Card If the WiFi Clients connected with the device support the WPS, the device can automatically generate a network key without manually entering. The operation steps of WPS-PBC (Push Button Configuration) are as follows. 1. Remove the rubber cap from the Micro SD card slot. Then insert the Micro SD card into the slot. 2. After inserting the Micro SD card completely, replace the rubber cap. Note: - Micro SD card is an optional accessory. If the Micro SD card is not provided in the package, you can buy one yourself. - To remove the Micro SD card, open the rubber cap and press the Micro SD card gently. Now the Micro SD card will pop up automatically. Then take it out. - Do not remove the card when it is being used. Removing the card during an operation may damage the card as well as the device, and data stored on the card may be corrupted. Restoring to Factory Defaults If you need to reconstruct the network or you forget the changes of some parameters, you can choose to restore factory defaults and reconfigure the device. Press and hold WiFi/WPS and at the same time until all the indicators are off, you restore the factory defaults successfully. Note: After this operation, all personal configuration settings are deleted and all web-based management settings and parameters will be restored to their default values. Friendly Tips If you cannot ensure that the device is normal, you can try these following ways to solve: - See Help on the management program or web page. - Restart the device. - Restore the factory defaults. - Contact your service provider. Prepare the Device Install the USIM/SIM Card and Battery Position the card at the card slot entrance, making sure it is facing the same way as shown in the diagram, with the notched corner at the top left. Then slide in. إعداد الجهاز تثبيت شريحة USIM/SIMوالبطارية ضع الشريحة في المكان المخصص لها ،وتأكد من أنها تواجه نفس االتجاه الذي يظهر في الرسم التخطيطي، وتحقق من أن الزاوية المائلة في أعلى الزاوية اليسرى .ثم أزلق الشريحة بالمكان المخصص لها. اضغط باستمرار و WiFi/WPS في الوقت نفسه إلى أن تطفأ جميع المؤشرات ،تمكنت من استعادة ضبط المصنع بنجاح. مالحظة: بعد هذه العملية ،يتم حذف جميع إعدادات التهيئة الشخصية و جميع إعدادات ومعلمات صفحة اإلدارة سوف تعاد إلى قيمها االفتراضية. نصائح ودية: 1 .1إذا كنت ال تستطيع التأكد من أن الجهاز طبيعي ،يمكنك أن تجرب هذه السبل التالية كحل: راجع التعليمات حول برنامج اإلدارة أو صفحة اإلدارة. 2.2قم بإعادة تشغيل الجهاز. 3.3قم باستعادة ضبط المصنع. 4.4قم باالتصال بمزود الخدمة. بطاقة ذاكرة Micro SD إذا كانت أجهزة WiFiالمتصلة بالجهاز تدعم ، WPSيمكن للجهاز تلقائيا توليد مفتاح الشبكة دون تدخل يدوى .خطوات العملية WPS-PBC هي على النحو التالي.. 1 .1إزالة الغطاء المطاطي من فتحة بطاقة ذاكرة . Micro SDثم أدخل بطاقة ذاكرة Micro SDفي الفتحة. 2.2بعد إدخال بطاقة ذاكرة Micro SDبالكامل ،أعد الغطاء المطاطي. مالحظة: بطاقة ذاكرة Micro SDهى ملحق اختياري .إذا لم تتوفر بطاقة ذاكرة Micro SDفي الحزمة ،يمكنك شراء واحدة بنفسك. إلزالة بطاقة ذاكرة ، Micro SDإفتح الغطاء المطاطي و إضغط على بطاقة ذاكرة Micro SDبلطف .اآلن بطاقة ذاكرة Micro SDسوف تظهر تلقائيا .قم بإخراجها. ال تقم بإزالة بطاقة ذاكرة Micro SDعندما يتم استخدامها .إزالة البطاقة خالل االستخدام قد يؤدي إلى تلف البطاقة فضال عن تلف الجهاز ، والبيانات المخزنة على بطاقة الذاكرة قد تتعرض للتلف. استعادة ضبط المصنع إذا كنت في حاجة إلعادة بناء الشبكة أو إذا كنت نسيت التغييرات الخاصة ببعض المعلومات ،يمكنك اختيار استعادة ضبط المصنع وإعادة تكوين الجهاز. تصميم الشبكة إجراءات تأسيس اتصال WiFiيعتمد على نظام التشغيل المثبت على أجهزة WiFiالخاصة بك .المقطع المذكور يأخذ جهاز كمبيوتر WiFiكمثال على ذلك .لألجهزة األخرى ،تحتاج إلى إعدادها على النحو المطلوب. إنشاء اتصال WPS إذا كانت أجهزة WiFiالمتصلة بالجهاز تدعم ، WPSيمكن للجهاز تلقائيا توليد مفتاح الشبكة دون تدخل يدوى .خطوات العملية WPS-PBC هي على النحو التالي.. 1 .1تشغيل الجهاز. 2.2تشغيل األجهزة المتصلة بالجهاز. 3.3تشغيل WPSبالجهاز. مالحظة: بعد أن يتم تشغيل ، WiFiاضغط باستمرار WiFi/WPS .عندما تطفأ 4.4تشغيل WPSباألجهزة. مالحظة: لعمليات WiFiلألجهزة ،يرجى االطالع على دليل المستخدم لألجهزة. أوال ثم تومض سريعًا باللون األزرق ،تم تشغيل WPS طريقة الوصول إلى شبكة اإلنترنت بعد تأسيس اتصال WiFiبنجاح ،يمكنك الوصول إلى اإلنترنت باستخدام األوضاع التالية. الوضع العمليات يدوي 1 .1الوصول إلى اإلنترنت باستخدام زر االتصال يدويا .لمزيد من التفاصيل ،انظر الفصل “ الخطوة الثانية :الوصول إلى اإلنترنت “. 2.2انتظر لبعض الوقت .إذا تم إعالمك أن االتصال كان ناجحًا ،يمكنك استخدام خدمة اإلنترنت. مالحظة: يمكنك أيضا اطالق برنامج اإلدارة أو صفحة اإلدارة لالتصال أو قطع االتصال من الشبكة بإتباع الرسائل. عند الطلب بعد تشغيل الجهاز ،فإنه يمكن تلقائيا االتصال بشبكة اإلنترنت عند طلب نقل بيانات .إذا لم يتم تنفيذ نقل بيانات على مدى فترة من الزمن ،فإن الجهاز يقطع االتصال بشبكة اإلنترنت تلقائيًا. آلي بعد تشغيل الجهاز ،فإنه يمكن تلقائيا االتصال بشبكة اإلنترنت ،ال يهم ما إذا كان مطلوب آليًا أم ال. مالحظة - :زر االتصال ال يعمل في وضع آلي أو في وضع عند الطلب. -يمكنك إطالق صفحة اإلدارة لتحديد طريقة الوصول إلى شبكة اإلنترنت. الشاحن هو ملحق اختياري .إذا لم يتم توفير شاحن في الحزمة ،يمكنك االتصال بمزود الخدمة لشرائه واحد.األسلوب الثانى :التوصيل بجهاز كمبيوتر شخصي للشحن 1 .1قم بإيقاف تشغيل الجهاز. 2.2قم بربط الجهاز مع جهاز الكمبيوتر باستخدام كابل بيانات متوائم. مالحظة: للتأكد من أن البطارية لديها قوة كافية لتوفير خدمة البيانات لفترة أطول ،فمن األفضل عدم تشغيل الجهاز حتى يتم االنتهاء من الشحن. إذا قمت بتشغيل الجهاز ،يبدأ تشغيل برنامج اإلدارة تلقائيا ويتم إطالق خدمة البيانات .عندها سيتوقف الشحن. وضع توفير الطاقة إذا كان الجهاز لم ينفذ أي عمليات لمدة 15ثانية ،يتم إطفأ المؤشرات. إذا كان الجهاز لم يتم الوصول إلية لمدة 10دقائق ،يتحول الجهاز إلى حالة النوم العميق تلقائيا .في هذه الحالة ،يمكنك الضغط على أي مفتاح لتنشيط الجهاز .اآلن تومض المؤشرات عندما يكون الجهاز في حالة النوم العميق ،يكون WiFiمعطل تلقائي ُا. تشغيل /تعطيل WiFi اضغط باستمرار اضغط باستمرار WiFi/WPS WiFi/WPS بثبات و باللون األزرق ،تم تشغيل WiFi حتى يومض ،تم تعطيل .WiFi حتى يطفأ الوصول إلى صفحة اإلدارة 1 .1إبدأ بتشغيل مستعرض اإلنترنت وأدخل http://192.168.1.1في شريط العنوان. 2.2أدخل كلمة المرور ،ثم انقر فوق .Login : Adminهذا المستخدم يتمتع بحقوق عرض وتغيير اإلعدادات .كلمة المرور االفتراضي هى .admin مالحظة: إذا كانت الصفحة غير متوفرة في حين أن الجهاز متصال بجهاز الكمبيوتر عن طريق كابل بيانات متوائم ،قم بإطالق برنامج اإلدارة ومن ثم الوصول إلى صفحة اإلدارة. اإلستخدام اليومى شحن البطارية مالحظة : إذا كنت لم تستخدم البطارية لفترة طويلة ،يرجى إعادة الشحن أوالً. األسلوب األول :استخدام الشاحن تحذير: استخدم الشاحن المتوافق المسلم من قبل الشركة المصنعة مع هذا الجهاز .باستخدام شاحن من أي جهاز آخر ،أو من غيرها من المصنعين أوالبائعين قد يبطل أي موافقة أو ضمان مطبق على الجهاز ،ويؤدي إلى عدم تشغيل الجهاز ،ويسبب خطرًاَ. تثبيت برنامج اإلدارة المثبت على جهاز الكمبيوتر الخاص بك .في القسم التالي نستخدم Windows يعتمد اإلجراء الخاص بتثبيت برنامج اإلدارة على نظام التشغيل ُ XPكمثال. 1 .1تشغيل الجهاز. 2.2ربط الجهاز مع جهاز الكمبيوتر باستخدام كابل بيانات متوائم. 3.3يقوم نظام التشغيل باكتشاف الجهاز الجديد والتعرف عليه تلقائ ًيا ويبدأ ُمعالج التثبيت. مالحظة: إذا لم يستجب برنامج التشغيل التلقائي ،إبحث عن ملف التثبيت في مسار برنامج التشغيل .ثم انقر نقرا مزدوجا فوق ملف التثبيت لتشغيل البرنامج. 4.4اتبع رسائل تنشيط معالج التثبيت. 5.5بعد تثبيت البرنامج ،يتم عرض رمز االختصار لبرنامج اإلدارة على سطح المكتب. 6.6بعد أن يتم تثبيت الجهاز ،يبدأ تشغيل برنامج اإلدارة تلقائيا .ثم في كل مرة يكون الجهاز متصال بجهاز الكمبيوتر باستخدام كابل بيانات متوائم ، يبدأ تشغيل برنامج اإلدارة تلقائيا. مالحظة: كما يمكنك أن تقوم بالنقر المزدوج على رمز االختصار الموجود على سطح المكتب لبدء تشغيل برنامج اإلدارة.. . .3حدد اتصال الشبكة الذي يتوافق مع SSIDكما فى الجهاز ،ثم انقر فوق مالحظة: إذا كانت مبرمجة التشفير قد تم تعيينها للجهاز فسيتم عرض مربع واجهة اتصال الشبكة الالسلكية وسيطلب منك إدخال مفتاح الشبكة وتأكيده. ملصق SSIDو مفتاح الشبكة موجود على الجهاز. انتظر لبعض الوقت ،يتم عرض رمز االتصال الالسلكي في منطقة الحالة بأسفل الركن األيمن من الشاشة .بعد ذلك سيتم ربط جهاز الكمبيوتر الخاص بك تلقائيا إلى الجهاز. الخطوة الثانية :الوصول إلى اإلنترنت افتراضيا ،يقوم الجهاز تلقائيا بطلب االتصال إلى اإلنترنت .يمكنك مباشرة استخدام خدمة االنترنت. إذا كانت خدمة اإلنترنت ال تستجيب ،يمكنك االتصال إلى اإلنترنت باستخدام زر االتصال يدويا. حتى يومض ،ويتم إعداد االتصال بنجاح .يمكنك استخدام خدمة اإلنترنت. اضغط باستمرار مالحظة: حتى يطفأ ،ليتم إيقاف االتصال. اضغط باستمرار كيفية االتصال لإلنترنت مع WiFi الخطوة األولى :إنشاء اتصال ( WiFiخذ على سبيل المثال الكمبيوتر) 1 .1حدد ابدأ > لوحة التحكم > اتصاالت الشبكة > اتصال الشبكة الالسلكية. مالحظة :إلنشاء اتصال ، WiFiيجب أن يتم إعداد جهاز كمبيوتر مع محول الشبكة الالسلكية .إذا كان اتصال الشبكة الالسلكية معروض ،فذلك يعني أن محول الشبكة الالسلكية متوفر .على خالف ذلك ،يجب عليك التحقق من محول الشبكة الالسلكية. 2.2انقر فوق عرض الشبكات الالسلكية المتاحة لعرض قائمة اتصاالت الشبكات الالسلكية. المؤشر الحالة •الوميض السريع باللون األحمر :مستوى طاقة البطارية ضعيف للغاية ويجب إعادة الشحن على الفور ،أو سيغلق الجهاز تلقائياٍ. •الثبات باللون األحمر :مستوى طاقة البطارية ضعيف. •الثبات باللون األخضر :مستوى طاقة البطارية قوى. •الوميض :يتم إعادة شحن البطارية .إذا كان المؤشر باللون األحمر ،مستوى طاقة البطارية ضعيف للغاية لتشغيل الجهاز .عندما يتحول المؤشر إلى اللون األخضر ،يمكنك تشغيل الجهاز. المؤشر الحالة •الثبات باللون األحمر :ال توجد شريحة USIM/SIMأو لم يتم التحقق من رمز PINأو اإلشارة غير موجودة. •الثبات باللون األصفر :اإلشارة ضعيفة. •الثبات باللون األخضر :اإلشارة قوية. •مطفأ :الجهاز ليس في حالة التجوال. •الثبات باللون األحمر :الجهاز في حالة التجوال. •مطفأ WiFi/WPS :غير مشغل. •الثبات باللون األزرق WiFi :مشغل. •الوميض السريع باللون األزرق WPS :مشغل. •مطفأ :خدمة الشبكة غير موجودة. •الوميض السريع باللون األخضر :جارى االتصال. •الوميض باللون األخضر :تم التسجيل على شبكة .2G •الثبات باللون األخضر :تم االتصال على شبكة .2G •الوميض باللون األزرق :تم التسجيل على شبكة .3G •الثبات باللون األزرق :تم االتصال على شبكة .3G التعرف على جهازك 1 1 موصل USB 7 مؤشر اإلشارة 2 فتحة بطاقة ذاكرة Micro SD 8 مؤشر التجوال 3 زر البطارية 9 مؤشر WiFi/WPS 4 زر التشغيل و اإليقاف 10 مؤشر الحالة 5 زر WiFi/WPS 11 مؤشر البطارية 6 زر اإلتصال 11 6 10 7 8 9 5 4 2 3 شكرا على اختيارك لهذة الوحدة الطرفية الالسلكية (المشار إليها فيما بعد بالجهاز). مالحظة : •وظائف الدعم والمظهر الفعلي تخضع للمنتج المشترى .الصور التالية هي عرض لغرض التوضيح فقط .لالطالع على التفاصيل الخاصة بالمنتج المشترى ،راجع مزود الخدمة. •يقدم هذا الدليل وصفا موجزا لوظائف الجهاز .لتشغيل و إدارة وظائف الجهاز ،راجع التعليمات على برنامج اإلدارة أوصفحة اإلدارة. •يمكن أن يستخدم الجهاز في بيئة مغلقة معقولة مثل الجيب ،حقيبة اليد أو حقيبة كمبيوتر محمول ،ولكن إذا كان هناك خطر فهويتمثل في أن درجة الحرارة المحيطة ستزيد عندما يكون الجهازمتصل بخدمة البيانات لفترة طويلة ،ويرجع إلى عدم قدرة الجهاز على تبديد الحرارة على نحو فعال .وإذا حدث ذلك ،وكإجراء احترازي سوف يغلق الجهاز تلقائيا أو يتم قطع االتصال .في حال حدوث ذلك الرجاء إعادة تشغيل الجهاز كما هو معتاد . دليل المستخدم مرحبا بك في الوحدة الطرفية الالسلكية E5830من VIVA