1
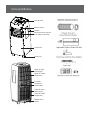
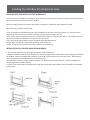
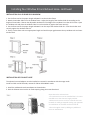
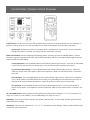
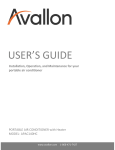
Service questions? Call Avallon at 1-866-471-7427.
For sales inquiries, contact Sylvane at 1-800-934-9194
USERS GUIDE
Installa on, Opera on, and Maintenance for your
portable air condi oner
PORTABLE AIR CONDITIONER
Model- APAC100W
www.avallon.com 1-866-471-7427
Important Safety Informa on
Improper handling of your Avallon portable air condi oner can cause serious damage to the appliance and/or to the
user. Please read the following safety informa on. This portable air condi oner is designed for domes c indoor use
only. Do not use the unit for industrial or commercial use. Any other use may invalidate the warranty. Please review
the ra ng label located on the rear panel of the unit for electrical and other technical data related to this unit. The
unit must be used in a properly grounded wall outlet. Please read and follow the safety informaƟon listed below to
reduce the risk of fire, electric shock or injury.
ELECTRICAL SAFETY
•
•
•
•
•
•
•
•
•
•
This unit is designed for indoor use only.
Do not use the unit in extremely humid or wet environments.
Do not spray water and wet the housing or control panel.
Do not pull the unit by the cord.
Always turn the unit off and unplug it from the outlet when cleaning.
Unplug the unit if it is not going to be used for a long period of me.
Do not operate the unit with a damaged plug or a loose socket.
Use only the correct power supply with appropriate amperage.
If the power cord is damaged, it must be replaced by the manufacturer, a service agent, or qualified technician.
Do not remove any part of the casing unless instructed by an authorized technician.
GENERAL SAFETY
•
•
•
•
•
•
•
This portable air condi oner is not intended to be used by children.
Children should be supervised to ensure that they do not play with this product.
Do not allow children to play with the controls or drop any objects into the air outlets or vents.
Do not place objects or let any person sit on top of the unit.
Only use in the upright posi on on a flat, level surface and provide at least 20” of clearance from any walls or objects.
Route the power cord carefully to avoid a tripping hazard.
This unit is intended for domes c use only. Do not use the portable air condi oner for industrial or commercial use. Any
other use may invalidate the warranty.
Your portable air condi oner is supplied with a Leakage-Current Detec on and Interrup on (LCDI) safety plug. This device provides protec on to reduce the risk of fire due to arcing faults in the power supply cord. Before using your portable air condi oner, follow the instruc ons below to ensure that the LCDI plug is working properly:
1. Plug the power cord to a grounded outlet.
2. Press the TEST bu on on the LCDI plug. This should trip the plug and cut the power to the air condi oner. If the plug does not
trip and you are able to turn on the unit, please contact support.
DO NOT USE YOUR PORTABLE AIR CONDITIONER IF THE TEST FAILS.
Press the RESET bu on to start using your air condi oner.
Do not use the TEST and RESET bu ons as an ON/OFF switch.
Note: Electrical products should not be disposed of with household waste. Please contact your local
recycling center for more informa on on how to recycle electronic waste.
Table of Contents
Important Safety Informa on
Table of Contents
Introduc on
Parts Iden fica on
Installing Your Window Kit and Exhuast Hose
Draining Your Unit
Control Panel / Remote Control Overview
Energy Guide
Cleaning and Maintenance
Trouble Shoo ng
Specifica ons
Warranty
2
3
4
5
6,7
8
9,10
11
12
13,14
15
16
First Time Opera ng Instruc ons:
Before use, make sure all packaging labels and materials are all removed from the unit. Be sure to keep track of all in
cluded parts and pieces before discarding packaging materials. It is advised that you keep the original box and packaging
materials in case you are ever to move or ship the appliance in the future.
This owner’s manual is provided for reference use only. Specifica ons may change without prior no ce. Refer to the product
label on the back of your portable air condi oner for the latest technical informa on.
Introduc on
Thank you for purchasing your Avallon portable air condi oner. Avallon is dedicated to developing products that will
enhance your lifestyle with superior quality and dis nc ve features. Please visit www.avallon.com for more informaon on your product and other Avallon products.
This manual contains important informa on regarding the proper installa on, use and maintenance of your portable
air condi oner. Following this manual will ensure that your product will work at its peak performance and efficiency.
Please save the original product packaging in case you need to safely transport your portable air condi oner. For Your
Records:
Please write down the model number and serial number below for future reference. Both numbers are located on
the ra ngs label on the back of your unit and are needed to obtain warranty service. You may also want to staple your
receipt to this manual as it is the proof of your purchase, and is also needed for service under your warranty.
Model Number:
Serial Number:
Date of Purchase:
To be er serve you, please do the following before contac ng customer service:
• If you received a damaged product, immediately contact the retailer or dealer that sold you the product.
• Read and follow this instruc on manual carefully to help you install, use and maintain your unit.
• Read the troubleshoo ng sec on of this manual as it will help you diagnose and solve common issues.
• Visit us on the web at h p://www.avallon.com to download product guides, addi onal troubleshoo ng resources
and up-to-date informa on.
• If you need warranty service, our friendly customer service representa ves are available via email at
[email protected] or by telephone at 1 (866) 471-7427.
Parts Iden fica on
Control Panel
Remote Sensor
Handle
Horizontal Louver Control
Lever (adjust manually)
Front Panel
Castors (4)
Upper Air Filter
(behind grill)
Upper Air Intake
(Evaporator)
Air Outlet
Con nuous
Drain Outlet
Lower Air Filter
(behind grill)
Lower Air Intake
(Evaporator)
Bo om Drain
Outlet
Installing Your Window Kit and Exhaust Hose
PREPARATIONS FOR INSTALLING THE WINDOW KIT
You must vent your portable air condi oner when running in it cooling mode. Your unit includes a window exhaust kit
that can be used to vent the unit out of a window.
Before you begin, make sure you have all the parts necessary for installa on and a loca on is picked.
When choosing a loca on keep in mind:
• The air condi oner should be placed on a firm founda on to minimize noise and vibra on. For safe and secure
posi oning, place the unit on a smooth, level floor strong enough to support the unit.
• The unit has casters to aid placement, but it should only be rolled on a smooth, flat surface. Use cau on when rolling on carpet and do not a empt to roll the unit over any objects.
• The unit must be placed within reach of a properly rated grounded socket.
• Never place any obstacles around the air inlet or outlet of the unit.
• Allow at least 20” of space from the wall for efficient air-condi oning.
INSTALLATION IN A DOUBLEͳHUNG SASH WINDOW
1. Cut the foam seal to the proper length and a ach it to the window sill.
2. A ach the window slider kit to the window sill. Adjust the length of the window slider kit according to the width of
the window. Shorten the adjustable window kit if the width of the window is less than 26.5 inches. Open the window sash and place the window slider kit on the window sill.
3.Cut the foam seal to the proper length and a ach it on the top of the window slider kit. Close the window sash
securely against the window slider kit.
4. Finally, cut the foam seal to an appropriate length and seal the open gap between the top window sash and outer
window sash.
Installing Your Window Kit and Exhaust Hose- con nued
INSTALLATION IN A SLIDING SASH WINDOW
1. Cut the foam seal to the proper length and a ach it to the window frame.
2. A ach the window slider kit to the window frame. Adjust the length of the window slider kit according to the
height of the window. Shorten the adjustable window kit if the height of the window is less than 26.5 inches. Open
the window sash and place the window slider kit on the window sill against the frame securely.
3. Cut the foam seal to the proper length and a ach it on the top of the window slider kit. Close the window sash
securely against the window slider kit.
4. Finally, cut the foam seal to an appropriate length and seal the open gap between the top window sash and outer
window sash.
INSTALLATION OF EXHAUST HOSE
The exhaust hose and adaptor must be installed or removed in accordance with the usage mode.
Install for COOL and AUTO mode, remove for FAN or DEHUMIDIFY mode.
1. Install the window exhaust hose adapter as shown below.
2. Push the Exhaust Hose into the air outlet opening along the arrow direc onal.
Notes about the exhaust hose:
• The exhaust hose can be extended but it is recommended to use the shortest length possible.
• Make sure there are no kinks or bends where exhausted air could get trapped causing your portable
air condi oner to overheat and shut itself off.
• Do not lengthen hose by adding any addi onal
hoses or a achments.
Draining Your Unit
When the portable air condi oner is in cooling mode, or dehumidify
mode, it will remove moisture from the air. The condensed water from the air will be collected in an internal reservoir
and will be evaporated and exhausted out of the exhaust hose. However, in very humid condi ons, the internal reservoir may fill completely. This causes the air condi oner to turn off to avoid overflowing the internal reservoir, the fan
will con nue to operate.
During dehumidifying mode, remove the upper drain plug from the back of the unit. A ach a ¾” hose that can be
locally purchased to the con nuous drain outlet. Connect the drain hose adapter to end of hose and place the open
end of the adapter directly over the drain area.
During cooling mode the once the water level of the bo om tray reaches capacity the unit will beep several mes
and the digital display on the control panel will read “P1” to indicate the water must be manually drained. Carefully
move the unit to a drain loca on and remove the bo om drain plug and connect the drain hose to the drain outlet.
The portable air condi oner will now drain through the drain hose. Please note that this unit has no drain pump; all
water will drain with gravity only, i.e., only “downhill.”
Once unit is fully drained reinstall the bo om drain plug and restart the machine un l the “P1” symbol disappears. If
the error repeats call for service.
Control Panel / Remote Control Overview
POWER buƩon: Powers the unit on and off. By default when you first use the power bu on, the unit will begin to
operate in cooling mode. The unit will remember the last used mode/se ngs if you shut down and restart.
Auto-Restart: If power to the unit is interrupted, the air condi oner will restart itself in its last used mode/
se ngs once power is restored. The compressor will restart a er 3 minutes.
MODE select buƩon: Selects the appropriate opera ng mode. Each me you press the MODE bu on, a mode is
selected in sequence that goes from AUTO, COOL, DRY (Dehumidify), and FAN. The mode indicator light illuminates
under the different mode se ng.
Cooling OperaƟon: Press the MODE bu on un l the COOL indicator light comes on. Press the UP and DOWN
arrows to select your desired room temperature. Press the FAN bu on to choose the fan speed.
Dry OperaƟon (Dehumidify): Press the MODE bu on un l the DRY indicator light comes on. Under this
mode you cannot select a fan speed or adjust the temperature. Make sure the exhaust hose is removed in
this mode.
Auto OperaƟon: Press the MODE bu on un l the AUTO indicator light comes on. When the air condi oner
is set in AUTO mode it will automa cally select cooling or fan depending on what temperature you have se
lected and the current ambient temperature. Under this mode you cannot select the fan speed.
Fan OperaƟon: Press the MODE bu on un l the FAN indicator light comes on. Press the FAN bu on to
choose the fan speed. The temperature cannot be adjusted. Make sure the exhaust hose is removed in this
mode.
UP and DOWN buƩons: Used to adjust (increasing/decreasing) temperature se ngs (1 º C / 2 º F increments) in a
range of 17 º C(62 º F) to 30 º C(88 º F) or the TIMER se ng in a range of 1-24 hrs.
FAN buƩon: Press to select the fan speed in two speeds- LOW and HIGH. The fan speed indicator light illuminates
under different fan se ngs.
LED Display: Shows the set temperature in “º C” or “º F” and the Auto- mer se ngs. While on DRY and FAN modes
it shows the room temperature.
Control Panel / Remote Control Overview- con nued
TIMER buƩon: Used to ini ate the AUTO ON start me and AUTO OFF stop me program, in conjunc on with the UP
and DOWN bu ons. When the unit is on, press the mer bu on to ini ate the Auto-off stop program, the TIMER OFF
indicator light will illuminate. Press the UP or DOWN bu on to select the desired me. Press the TIMER bu on again
within five seconds, the Auto-on start program is ini ated and the TIMER ON indicator light will illuminate. Press the
UP or DOWN bu on to select the desired Auto-on start me.
When the unit is off, press the TIMER bu on to ini ate the Auto-on start program, press it again within five seconds
and the Auto-off stop program will ini ate.
Press or hold the UP or DOWN bu on to change the Auto me by 0.5 hour increments, up to 10 hours, then at 1 hour
increments up to 24 hours. The control will count down the me remaining un l the unit starts. The system will automa cally revert back to display the previous temperature se ng if there is no opera on in a five second period.
SLEEP buƩon: Select to ini tate the SLEEP opera on. On the remote this func on is labeled as “ECONOMY”. Press
this bu on, the set temperature will increase by 1 º C / 2 º F in 30 minutes. The set temperature will then increase
by another 1 º C / 2 º F a er an addi onal 30 minutes. This new temperature will be maintained for 7 hours before
it returns to the originally selected temperature. This ends the SLEEP mode and the unit will con nue to operate as
originally programmed. This feature is only available in COOLING and AUTO mode.
LOCK buƩon (remote control only): Press this recessed bu on to lock all current se ngs, the controller will not
accept any new opera ons un l the LOCK bu on is pressed again to release. A lock symbol will display on the LED
display to indicate this func on is ac ve.
RESET buƩon (remote control only): Press this recessed bu on to cancel all current se ngs, the unit will return to
ini al se ngs.
ERROR CODES on LED display:
E1- Room temperature sensor error.
E2- Evaporator temperature sensor error.
E3- Display panel communica on error.
For all error codes, unplug the unit and plug it back in, if error repeats call for service.
PROTECTION CODES on LED display:
P1- Room temperature sensor error. Connect the drain hose and drain the collected water away. If error repeats call
for service.
Note: The control panel is capable of displaying temperature in Fahrenheit or Celsius. To convert from one to the
other, press and hold the UP and DOWN bu ons at the same me for 3 seconds.
Energy Saving Guide
Read and follow the guide below to get the best performance and efficiency from your portable air condi oner:
• Do not cover the air outlet (exhaust) while in use.
• Do not place the unit in front of curtains or drapes- to ensure they do not obstruct the air intake.
• Minimize the length of the exhaust hose.
• Make sure the exhaust hose is as straight as possible and avoid kinks or bends.
• Keep curtains, blinds or drapes closed during the sunniest part of the day.
• Use the mer to operate the unit before it is needed. For example, set the mer to turn on the unit in cooling mode
for 3 or more hours to cool the room before you arrive. You may want to operate the unit all day if you live in a warmer climate.
• Minimize the heat sources (direct sunlight, computers, servers, people, etc.) in the room.
• Close all windows and doors.
• Use the unit in a contained room. For example, a room with four walls and a ceiling, instead of a par oned studio,
or warehouse.
• Make sure the unit is on a level surface.
• Minimize the amount of humidity in the room. For example, run the unit as a dehumidifier.
• To prolong the compressor’s life, please wait at least 3 minutes before turning the unit back on a er shu ng it off.
• Inspect and keep the pre-filters clean by cleaning regularly.
• Perform rou ne maintenance.
Cleaning and Maintenance
Periodic cleaning and proper maintenance will ensure efficiency, top performance, and long life.
EXTERIOR CLEANING
Use a so dry cloth to wipe the body clean. If necessary, use lukewarm water to dampen a cloth to clean the unit.
Use a so bristle brush to clean between the vents.
Carefully use a vacuum cleaner to clean the condenser coils.
Never use abrasive chemicals, vola le substances, gasoline, detergents, chemically treated cloths, or other cleaning
solvents that may damage the cabinet exterior.
Never spray water directly on the unit.
CLEANING THE PREͳFILTER
To clean the pre-filter, follow the steps below:
1) Power off the unit and remove the pre-filter.
2) Use a vacuum cleaner or tap the filter lightly to remove loose dust and dirt, then rinse thoroughly under lukewarm
running water (below 104°F). You may use a mild soap and water solu on if needed. Allow the pre-filter to air dry in a
cool and shaded place. Dry thoroughly before reinstalling.
Clean the pre-filter periodically. If the unit is used in a dusty environment you may need to clean it on a weekly basis.
Never operate the unit without the pre-filter.
PREPARATION FOR STORAGE
If you are not going to be using the unit for an extended period of me, follow the instruc ons below before storing
your unit:
1) Drain all the water from the unit’s reservoir. Operate the unit in fan mode for a few hours to thoroughly dry any
moisture le on the coils inside the unit.
2) Power off the unit, and clean or change the filters.
3) Unplug and carefully wind the power cord.
4) Remove the exhaust hose and adapters and keep them in a safe place.
Trouble Shoo ng
ISSUE
My air condi oner is
not func oning at all.
POSSIBLE CAUSE
• Unit is not receiving power.
• LCDI power cord is tripped.
• Insufficient power.
• Water reservoir is full.
• Control panel is disconnected.
My remote control
does not work and
the indicator light on
remote does not turn
on.
My air condi oner is
making a loud noise.
My air condi oner is
making a con nuous
metallic knocking or
pinging sound.
My air condi oner is
leaking.
My air condi oner
runs for a li le while
and then it trips the
power cord or the
circuit breaker.
The control panel lights
blink randomly.
• Ba eries not installed.
• Bad ba eries.
• Ba eries installed incorrectly.
• A defec ve remote control.
SOLUTION
• Make sure the unit is plugged in to a grounded
outlet.
• Press the Reset bu on on the LCDI cord.
• Move the unit to another outlet. Check your
circuit breaker. (Refer to the ra ng label on the
back of the unit to determine the Amperage
draw).
• Make sure the door gasket is properly sealed.
• If no indicator lights turn on, contact customer
service.
• Install new ba eries.
• Replace the ba eries.
• Reinstall the ba eries correctly.
• Contact customer service.
• The unit is not level.
• A foreign object has jammed the
fan.
• The floor below the unit is uneven.
• Make sure the unit is on a level surface.
• Remove the object from the fan.
• Unit may have been shipped on its
side.
• Damaged compressor.
• Shut off the unit. Let the unit sit on a level
surface for at least 24 hours and restart.
• Contact customer service.
• Drain plug is removed.
• Cracked base pan.
• A ach the drain plug.
• Contact customer service.
• Move the unit to a level surface.
• The air condi oner may be plugged • Contact an electrician if the unit works in a
into an outlet that can not supply the different room or circuit.
correct amount of current.
• Unit may have a faulty control
panel.
• This is normal opera on.
Trouble Shoo ng- con nued
ISSUE
My air condi oner is
not cooling at all.
POSSIBLE CAUSE
• Unit is not opera ng in cooling
mode.
• The compressor is not on.
• The ambient temperature is too
high.
• The filter may be dusty or blocked.
• Blocked exhaust port.
My air condi oner
blows cold air, but
does not lower the
room temperature.
• The unit is not vented.
• The area of the room is too large.
• Open windows and doors.
• Too many heat sources.
• The room/garage may be
inadequately insulated.
• The ambient temperature is too
high.
• Direct sunlight is hea ng the room.
• The filter may be dusty or blocked.
• Dirty condenser coils.
• Obstructed air intake or exhaust
ports.
SOLUTION
• Set the unit to be in cooling mode, and lower the
set temperature.
• The compressor may take up to 3 minutes to
turn on, or longer if it is too warm.
• Lower the room temperature to be below 90°F
degrees.
• Clean the filters (see maintenance)
• Remove any obstruc ons in the exhaust hose
and port.
• The unit must be vented.
• Minimize the size of the area to be cooled, i.e.
adding a drop ceiling. Use more than one unit to
cool the area, or use a larger unit.
• Close any open doors and windows.
• Remove or shut off addi onal heat sources such
as radio equipment, servers, etc.
• Properly insulate the room to be cooled, i.e.
using fiberglass.
• The unit may not work if the room temperature
is above 90°F.
• Close curtains or pull down blinds, and minimize
the direct sunlight into the room.
• Clean the filter and replace it if needed.
• Carefully vacuum the coils clean.
• Remove anything blocking the ports.
Specifica ons
DESCRIPTION OF PRODUCT
Portable Air Condi oner
MODEL
APAC100W
VOLTAGE / FREQUENCY
AC 115 / 60 Hz
BTU
10,000
AMPERAGE
9.8A
INPUT POWER
1125W
COLOR
White
REFRIGERANT
R134a, 10.2oz.
DIMENSIONS
(HEIGHT X WIDTH X DEPTH)
29 1/2” x 13 11/16” x 15”
WEIGHT
50.7 pounds
NOTE: Technical data and performance informa on is provided for reference only.
Specifica ons are subject to change. Check the ra ng label on the portable air condi oner for the most
accurate informa on.
Product Warranty
Warranty Period
Avallon will be responsible for:
Consumer will be responsible for:
1st year
All costs for repairing or replacing parts and/or unit which proves to
be defective. All transportation costs in the first 90 days.
All transportation costs after 90 days.
Limited 2nd-5th year
(compressor only)
Repairing or replacing any compressor which proves to be
defective. (Labor not included)
Labor and all transportation costs.
This product is warranted by Avallon and is subject to any conditions set forth as follows:
WHAT IS COVERED:
One Year Parts and Labor: For one year from the date of original
retail purchase, Avallon will repair or replace any part free of charge
including labor that fails due to a defect in materials or workmanship.
Avallon will be responsible for all transportation costs for the first 90
days from original purchase date, after 90 days the consumer will be
responsible. Labor will be performed free of charge at an authorized
Avallon repair facility and will supply new, rebuilt, or refurbished parts
free of charge. Avallon may request a defective part be returned in
exchange for the replacement part. After the 12 month period,
Avallon will no longer be responsible for labor charges incurred or
replacement parts. All defective products and parts covered by this
warranty will be repaired or replaced on a mail-in basis to an Avallon
authorized repair facility.
Five Year Limited Warranty (Compressor– Labor Not Included): In the
second through fifth year from the date of original retail purchase,
Avallon will replace the compressor free of charge. The consumer will
be responsible for all transportation and labor costs. Avallon will supply a new, rebuilt, or refurbished compressor and may request for the
defective compressor to be returned in exchange. This limited 5-Year
warranty is for the compressor only and does not include labor.
All warranties apply to the original purchaser only, and only covers
defects in workmanship experienced during operation of the product
under normal service, maintenance, and usage conditions. This warranty applies to the purchase and use of this product in residential
settings within the United States of America. All products and parts
replaced by Avallon under warranty service become the property of
Avallon. All defective products and parts covered by this warranty
will be repaired or replaced on a mail-in basis to an Avallon authorized repair facility.
Exceptions: Commercial or Rental Use Warranty: 90 days labor and
parts from date of original purchase. No other warranty applies.
WHAT IS NOT COVERED- The following limitations apply to the
coverage of this warranty. This warranty does not cover:
Labor charges for installation, setup or training to use the
product. Shipping damage, and any damage caused by
improper packaging for shipment to an authorized service
center, and any damaged caused by improper voltage or
any other misuse, including abnormal service, handling, or
usage. Cosmetic damage such as scratches and dents. Normal wear and tear on parts or replacement of parts designed
to be replaced, e.g. filters, cartridges, batteries. Service trips
to deliver, pick-up, or repair, install the product, or to instruct
in proper usage of the product. Damages or operating problems resulting from misuse, abuse, operation outside environmental specifications, uses contrary to instructions provided in
the owner’s manual, accidents, acts of God, vermin, fire,
flood, improper installation, unauthorized service, maintenance negligence, unauthorized installation or modification,
or commercial use. Labor, service transportation, and shipping charges for the removal and replacement of defective
parts, beyond the initial 12 month period. Products that have
been modified to perform outside of specifications without
the prior written permission of Avallon. Products lost in shipment, or theft. Products sold AS IS or from an unauthorized
reseller. Products that have had their serial numbers removed,
defaced, or with serial numbers that have been invalidated.
Damage from other than normal household use. Replacement or repair of household fuses, circuit breakers, wiring or
plumbing. Damage to personal property from use of product.
Damage from service other than from an authorized Avallonrepair facility. Hoses, knobs, lint trays and all attachments,
accessories and disposable parts. Any service charges not
specifically identified as normal such as normal service area
or hours. Any special or consequential damages arising out of
the use of the product.
OBTAINING WARRANTY SERVICE: If you believe your product is defective, contact Avallon Customer Support for troubleshooting assistance and warranty service at www.avallon.com or call 1-866-471-7427. Before contacting Customer Support you are required to have
your model number, serial number and proof of purchase available upon request. Once an Avallon authorized representative has confirmed that your product is defective and eligible for warranty service, the product must be returned to an Avallon authorized repair
facility. Avallon is not responsible for damage resulting from shipper mishandling or improper packaging. Do not return a defective product to the place of purchase. Products received without a return authorization number will be refused.
THIS WARRANTY IS IN LIEU OF ANY OTHER WARRANTY, EXPRESS OR IMPLIED, INCLUDING WITHOUT LIMITATION, ANY WARRANTY OF MERCHANTABILITY OR
FITNESS FOR A PARTICULAR PURPOSE. TO THE EXTENT ANY IMPLIED WARRANTY IS REQUIRED BY LAW, IT IS LIMITED IN DURATION TO THE EXPRESS WARRANTY
PERIOD ABOVE. NEITHER THE MANUFACTURER NOR ITS DISTRIBUTORS SHALL BE LIABLE FOR ANY INCIDENTAL, CONSEQUENTIAL, INDIRECT, SPECIAL, OR PUNITIVE DAMAGES OF ANY NATURE, INCLUDING WITHOUT LIMITATION, LOST REVENUES OR PROFITS, OR ANY OTHER DAMAGE WHETHER BASED IN CONTRACT,
TORT, OR OTHERWISE. SOME STATES DO NOT ALLOW THE EXCLUSION OF INCIDENTAL OR CONSEQUENTIAL DAMAGES, SO THE ABOVE EXCLUSION MAY NOT
APPLY TO YOU. THIS WARRANTY GIVES YOU SPECIFIC LEGAL RIGHTS. YOU MAY HAVE OTHER RIGHTS THAT VARY FROM STATE TO STATE.
Service questions? Call Avallon at 1-866-471-7427.
For sales inquiries, contact Sylvane at 1-800-934-9194
AVALLON GLOBAL, LLC
3736 Bee Cave Rd.
STE 1 #188
West Lake Hills, TX 78746
Toll Free: 1-866-471-7427
Web: http://www.avallon.com
E-mail: [email protected]
Product contents and specifications may change without notice.
Copyright © 2013 Avallon Gobal, LLC