1
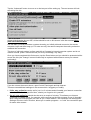
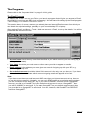
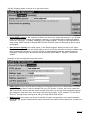
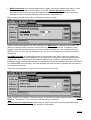
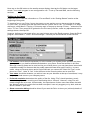
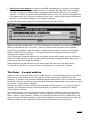
Mobile Data Connectivity
using the Psion Series 5, 5mx, 7 (and Revo)
A Beginner’s Guide to setting up the Psion
for use with a mobile phone
(Document v1.00 – August 2001)
The registered owners of any Trademarks, product names and/or other commercially-identifiable words contained within
this document are acknowledged.
Whilst this document is © K. Snelling 2001, it contains extracts from material produced by:
M. McConnell, R. Brunsting, J. McAleely and from accumulations of Usenet postings by numerous other persons.
Any programs mentioned in this document are the copyright of their respective authors and may not necessarily be
“freeware”.
Contents
Introduction
3
Getting started
4
Configuring your modem
5
Setting up your Internet connection(s)
9
The Programs:
Email
14
Faxing
17
SMS (Text Messaging)
19
Useful Add-ons:
The Dialer
20
Appendices:
Mobile phones that work with Psion computers
22
Modem set-up initialization codes for various mobile phones
24
24
25
26
28
Ericsson 888, 320 phones and DI27/DI28 modems
Siemens S25, C35, M35, S35
Nokia 6210, 7110, 8210, 8810, 8850
Motorola L7089, P7389, T250
If your Psion “resets” itself when using Infrared port
28
Page 2
Introduction
In recent months, I have noticed a fairly large increase in the number of people looking for help with
setting up a Psion handheld computer to access Internet and Email with their mobile phone. With
the “slow-but-sure” progress the mobile networks seem to be making with regard to “mobile
connectivity”, considerably more people are looking at using their handheld computer while on the
road.
My reasons for compiling this guide are two-fold. Firstly, Psion themselves do not seem to provide
the detailed information a lot of users are looking for and, from the experiences of existing mobile
data users, it seems the data Psion provides is not always accurate. In addition, from what I have
seen, Psion is not keeping up terribly well with the new models of mobile phone that are appearing.
Secondly, the mobile phone manufacturer’s own data for setting up your Psion to use one of their
mobile phones can often be quite difficult to find, and doesn’t always have the latest details.
This guide concentrates on setting up the Psion with Modems, Internet access, Email, Fax and
SMS. In a future update, I hope to include setting up the Psion WAP Browser. I am not a great fan
of the Opera Web Browser (for EPOC), simply because I do so little “mobile web browsing”, the
Psion Web Browser currently suits my purpose. I may, however, add Opera at a later date (I do
have it installed!).
In compiling this guide, I have, obviously, drawn on my own experiences and troubleshooting, and
also the information placed on the Internet by current users; mostly through answers to questions
asked in the Psion Usenet newsgroups.
Throughout this guide, there will be reference to various menu options. I will indicate these by
means of a chevron – “>” – pointing to the next option, e.g. “Menu > Tools > Options”
I will specifically mention two people who have provided a wealth of information to myself, and in
answer to newsgroup questions: Mike McConnell and Rolf Brunsting. Some information contained
within this guide has been extracted from their web sites and also the “GSM Data Companion”
produced by Rolf.
IMPORTANT NOTE:
The Series 5mx and Series 7 are pre-loaded with Email v2.0 installed in their ROM and
Web v2.0 is included on the PsiWin CD. Psion also have Message Suite v1.52 available on
their web site (http://www.psion.com/downloads/) as a free download. This version 1.52 is
for the original Series 5 only.
In some cases, it has been known for some people to download and install v1.52 on their
5mx/7 thinking it is an upgrade – it is not required, do not install it, as it will cause serious
conflicts with the later machines, with the likely result that you will lose all of your data by
having to “hard reset” your Psion to get rid of it.
Also available for free download from the Psion web site is the “Mobile Connectivity Update”. This
update is only for the Psion 5mx and Ericsson MC218 and is required in conjunction with certain
mobile phones and the Psion 56k Infrared Travel Modem. Older Ericsson phones don’t require this
update, but more recent models do. Mobile phones from Nokia and Siemens do generally require
installation of the update.
Feedback on this guide would be appreciated.
Kevin Snelling ([email protected])
Page 3
Getting Started
First, some important things to remember.
If you wish to set up your Psion to use a mobile phone and access the Internet and/or email, using a
mobile phone is both slow and can be expensive. Typically, the speed at which you connect using a
mobile phone is only 9600 bits per second* (bps), whereas the modem attached to your
desktop/laptop computer and plugged into your home phone line, may connect at between
33600bps and 56000bps – a considerable difference!
To be able to make “data” calls – Internet and/or fax – you will need to have your phone set up for
“fax and data”. This should be free, and involves making a call to Customer Services for your phone
Network Provider and asking them to activate fax and data. In most, if not all, cases the Network
Provider will send a special text message to your phone which you should read – it’ll probably just
say “SIM update” – then delete it, switch off your phone for a few seconds then turn it back on.
Most phones these days – especially those with WAP and/or built-in modems will probably have a
SIM card that is already “data enabled” though it may not be “fax enabled”. If in doubt, ring
Customer Services and check.
When you request fax and data, you may also be given two new numbers – Virgin Mobile “pay-asyou-go” SIM cards are “fax & data” enabled by default, allowing faxes to be received on the normal
number. These do not replace your existing number, but allow the mobile network to identify which
type of call is being made to you. Unless you are going to be have other modems call you, then
there is little point in giving people your “data” number.
With fax there are two possibilities; you can divert incoming faxes to a “fax mailbox” – this may be
dependant on your mobile network and your phone’s divert facilities – or receive them direct on your
Psion via the mobile phone. In either case, if you wish to receive faxes, you need to give your fax
number out.
In my case, with faxing, I have my fax number permanently “diverted” to a fax mailbox (I can
“undivert” it if I want to). Once a fax is received the system sends me a text message giving details
of the fax. I then dial the fax mailbox and tell it to send the fax to the most convenient machine
where I then collect it. If you know that the “next call” will be a fax, you can set up your phone and
Psion to receive it straight away.
Disclaimer: The details given in this guide include screenshots taken from a Series 7 which are also what will be
seen when setting up a Series 5mx. The Psion Revo has a built-in program – eSetup (?) – which I have not seen,
to assist you in getting things set-up. As a result, the information given here should be taken as a rough guide for
what to enter for the various options.
Please note that this Guide has been produced to help you set up your Psion for using a mobile
phone. It is not designed to replace your Psion’s user manual for details on how to use the
programs. However, this guide does offer additional information as answers to “frequently asked
questions” seen on the Internet Newsgroups.
* At the moment, the typical speed is 9600bps, although the Orange network provides “High Speed Data”
offering connection speeds up to 28000bps at extra cost, provided you either have a Nokia 6210 phone, or the
Nokia Data Card (which does not appear to work in the Series 7 PCMCIA slot). If you have a Nokia 7110 WAP
phone, the built-in modem on that is capable of connecting at speeds of up to 14400bps provided your Network
Provider supports it.
Page 4
Configuring your modem
Before you consider trying to set up the Email program, you should first set up a modem and, of
course, your Internet access details. Both of these are dealt with under Control Panel options.
At any time during the series of set-up steps in this and following sections, if you make an
error, either go back to the previous screen or tap the Cancel button and start over.
From the System screen, tap Control Panel > Modems. If you already happen to have a modem set
up, you will probably see a screen something like this:
The “Current modem” displayed in this screen, will be whatever was last used – in my case, it is my
Nokia 6210 mobile phone. The option buttons should be fairly obvious:
• New is for creating a new modem definition and, when tapped, will given you a screen as shown
below
• Edit is for editing the definition of the currently selected modem
• Delete is for permanently deleting the current definition from your Psion
• Cancel will return you to Control Panel ignoring any changes you might have just made
• OK will return you to Control Panel acting on any changes you might have just made.
If you don’t already have a modem set up, and for the purposes of this guide, I will take you through
setting up a new modem, so tap the “New” button if necessary, and you should be presented with
the following screen:
On this screen, you set up the modem basics.
• Name can be anything you like that identifies to you which modem it is
• Speed is the setting for how fast your Psion/phone exchange data. In my experience, a setting of
57600 is fine for communicating with a mobile phone’s modem.
Page 5
• Connect via is used to determine how your Psion will link to your mobile phone. In this example,
the Nokia 6210 has an infrared “eye” or a serial cable (Nokia part number - “DLR-3P”). I have
chosen the infrared connection.
• Fax class determines the internal technicalities when sending faxes. It does NOT relate to the
fax “Group”; fax machines these days are classed as “Group 3”, with a newer “Group 4” standard
for digital-only lines. From personal experience, I have chosen to manually select the class
required – in this case, “2” – rather than setting it to “Auto”. If you set up this screen on your
Psion using “Auto”, and subsequently have difficulties sending some faxes, check whether your
mobile phone modem supports classes 1, 2 or 2.0 and use one of these settings instead.
Note that “Class 1” is the usual standard for faxing over traditional “BT landlines”, but is rarely suited to use
with mobile phones due to data-timing issues.
When completed, tap on the “Options” tab, and you will now have a screen like this:
On the top line of this screen, you will see the name you have given your modem. When using a
mobile phone for data connections, the options on this screen are theoretically “redundant”.
However, with other types of modem, they perform the following functions:
• Loudspeaker in use determines whether you hear the various modem tones that are generated
during a connection. The options, all self-explanatory, are: “Never”, “Until call answered”,
“Always” or “After dial, until answer”.
• Volume determines setting for listening to the tones if you have them set in the above option.
Select from “Quiet”, “Medium” or “Loud”. Note that if using a different modem, and that modem has
been directly commanded NOT to produce the modem-tones, then the setting of this option will have no
effect.
• Pause time for “,” is a setting mostly used when your modem has to dial through an office
exchange for example. Often using an office-based telephone, you need to dial a specific
number first – e.g. “9” or “91” – to get an “outside line”. If you needed to do that then, later on,
when you enter the number to be dialled, you might set “9,0123456789”, so that your modem
dials “9” for the outside line, waits for the number of seconds set by the comma, then continues
with the rest of the number.
Page 6
When you have set up the options here, tap the “Initialisation” tab, and you will be presented with
this screen:
The settings on this screen can make your connection work very efficiently or, if you get the settings
wrong, you may not be able to connect successfully at all! Refer to the appendices at the end of this
document for a selection of popular phones and their set up details. The details in this appendix
have been compiled from personal experiences of users of those phones.
• Init. (reset) string is a command sent to your phone modem every time you start a connection,
whether it is for data (Internet) or faxing. In some cases, a command entered here is sufficient,
and no further commands need to be set.
• Data init. string is an additional command (if required) that is sent after the “Init (reset) string”
and you are starting a data connection.
• Fax init. string is an additional command (if required) that is sent after the “Init (reset) string” and
you are starting a fax connection.
There is one last screen to deal with, so tap the “Advanced” tab to get:
This screen sets up how your Psion will control your phone’s modem.
• Flow control sets how your Psion “talks to” and “controls” your modem during the connection
session. The three options here are “None”, “Software” or “Hardware”.
When you are using a mobile phone that has a built-in modem and an infrared “eye”, then there are
obviously no cables involved in connecting the two together. As a result, the Psion needs to control
the “flow of data” between it and the phone by sending special commands – “XON” to start dataflow, and “XOFF” to stop/pause the data-flow. This is called “software flow control”.
Page 7
If you connect your phone with a cable, then the Psion can control the data-flow by setting or
measuring voltages on certain pins on the cable plug to determine whether the modem is “ready” or
the data-flow needs to be stopped/paused. This is called “hardware flow control”.
The third flow control option – None – tells the Psion not to use any form of data-flow control at all.
This might be fine for slow speed connections, but you run the risk of the modem sending more data
than the Psion can handle, and losing data as a result, or the Psion sending data to the modem and
the modem losing data as a result.
For best results, check your phone modem’s specifications and use “software” or “hardware” flow
control whenever possible.
Note – although I have described the two forms of flow control, you may be surprised to read that
some infrared-connected modems still require hardware flow control, even though there is no cable!
Be sure to check which your phone modem requires!
• Terminal Detect & Carrier Detect are settings used with a cable connection. Under normal
circumstances when using a mobile phone, these two settings should be left unchecked as they
are in the above picture.
• Modem type tells the Psion what modem it is/will be connected to. This setting determines what
additional commands the Psion will send to the modem – commands internal to the software over
which you have no control. The choices are “Mobile” or “Fixed Line”; though it should be noted
that some of the “AT” commands used to set up the modem, when sent in “Mobile” mode may
cause some phones to report an error, after which the dial-up action fails. Such phones must use
a “Fixed line” setting.
Once you have finished setting the options on this screen, tap the “OK” button and you will be
returned to the “Modem settings” screen, with your new modem listed as the default modem. If all is
correct, tap “OK” again to return to Control Panel, then the “Esc” button to return to the System
screen. Your modem is now set up and will be used as the default for connections.
If you wish to change the modem, or set up another, simply tap Control Panel > Modems, press the
left/right arrows to select a different modem, or New, Edit, Delete as appropriate.
Page 8
Internet connection details
Having set up your mobile modem to be able to make connections “on the road”, we will now move
on to configuring your Psion for Internet access. This section does, of course, assume that you
already have an account with an Internet Service Provider (ISP) – BT Internet, Virgin, Lineone, etc.
Please note that, at present, if you have an account with AOL, MSN, CIX or “Compuserve 2000*”,
your Psion cannot access these systems due to the proprietary interfaces these services use.
*A CompuServe “Classic” account will work.
You should be able to access the required details from the program(s) already installed on your
desktop/laptop computer, by looking in the “account options” (or similar) settings in your email
program. If there are any settings you do not have access to, or simply cannot find, a call to your
ISP Customer Service Department should furnish you with those details. A brief overview of the
details you will need is as follows:
The number(s) your modem should dial to access your ISP’s computers*;
Your ISP account username;
Your ISP account password;
Your email address;
The server IP address (often not needed);
The Primary DNS address (often not needed);
The Secondary DNS address (often not needed);
Address of the outgoing (SMTP) mail server;
Address of the incoming (POP3) mail server;
Your email account username (may be same as ISP above);
You email account password (may be same as ISP above).
* it may be that your ISP has a special number that allows you to connect to a modem that is capable of
connecting at slower speeds. In the case of “ClaraNET” – the ISP I use – they have a number to use that will
connect to a modem capable of connecting at speeds as low as 9600bps, which is ideal for mobile phone
connections.
Page 9
Setting up Internet
From the Psion System screen, tap Control Panel > Internet, and you will be presented with a
screen something like this:
If you already happen to have an Internet Service account set up, you may see a screen similar to the next one
below. If so, just tap the “New” button and continue from the next section.
On this screen, make sure that “Based upon” shows “Standard settings” and tap OK.
You will now see a screen something like this:
• In the Name box, enter a name that identifies which Internet service you are using; e.g.
“BTInternet”, “VirginNET” etc.
• Your connection will be via a modem – your mobile phone – so for Connection type, tap Dial-up
and ensure the white circle next to it has a black dot in it.
• Use “smart” dialling determines whether you enter the ISP number in “international format” or
as you would dial from within the UK. If you tap the white box to place a tick in it, then the
Standard dial-up number box will show: “+[Country] [Area] [Number]” and you would need to
enter the number as (example) “+44 845 7123456”. Note, however, that whilst the leading zero in
the area code is omitted here, it is not the case with PC Dial Up Networking!
If you untick smart dialling, you can enter the number in “UK” format, e.g. “08457123456”
Using smart dialling enables your Psion to automatically add and dial International extensions as
appropriate when you travel abroad, provided you set the “Home City” on the Psion, to where you
are staying.
For the moment, ignore the Other dial-up numbers option.
Page 10
Once you have finished with this screen, tap the “Account” tab to move on to this screen:
• Manual login determines whether the details you enter below, are sent automatically when you
connect. If you select this option, you will be presented with an extra screen during the
connection where you will have to enter your username/password manually. Unless you have any
reason to do otherwise, leave this box unticked.
• Username is where you enter your Internet account username, which you selected when you
signed up with your ISP.
• Password is where you enter the password you chose when you signed up with your ISP*
• Confirm password is where you enter the same password again for confirmation purposes*
* as you type in the password, each character is represented by an asterisk. Be sure to type in the
details carefully and remember that both username and password are case-sensitive – e.g.
“GthYEdRT” is NOT THE SAME as “GTHYEDRT” or “gthyedrt” when the other computer receives it!
When you have completed this screen of options, tap the “Addresses” tab to be presented with a
screen like this:
With most ISP’s these days, your “computer address” – how you are identified by other Internet
computers – are allocated dynamically, i.e. your address is different each time you make a
connection. However, there are some ISP’s who do allocate specific addresses to your computer.
If you do not have specific addresses, then tick the boxes as shown in the picture above.
Page 11
If your ISP does provide you with specific addresses, untick the boxes and you will then be given a
box alongside “IP address” with “0.0.0.0” in it. Just overtype these numbers with whatever your ISP
gives you. Two similar boxes will also appear alongside the “DNS address” entries, which you
should similarly fill in with details from your ISP.
Some ISP’s who provide specific addresses may only give you a “Primary DNS address” entry. If
this is the case ask them if there is a Secondary address, or leave Secondary as “0.0.0.0”.
To move on to the next set up screen, tap the “Login” tab to get this screen:
In most cases, as with the previous screen, there should be nothing to change here. However, for
completeness, these are the options provided.
• Use login script should be ticked if your ISP states you need to use a specific series of
commands to make the connection.
• Port settings allows you to enter specific modem set-up details relating to data bits, parity and
stop bits. (Only applies if using a login script)
• Display window determines whether or not to display a text entry window for additional
command you send during login. (This setting is a tick-box which will only apply if using a login
script)
• Type in the login script below is a small text-editor box that will appear when you have to use a
login script. With this mini-editor, you type in the series of commands – the “script” – that your
ISP’s system requires. These details will be provided by your ISP if they are needed.
In all cases I have encountered so far, there has been no need to do anything on this set-up screen.
However, you may happen to have an account which does require a login script, so please follow
carefully, all details given by your ISP.
Page 12
Tap the “Advanced” button to move on to the last part of the setting up. The next screen will look
something like this:
Unless told otherwise by your ISP, all that should be set on this screen is the box marked Allow
plain text authentication.
Use call back (if ticked) activates a system whereby you initially dial and connect to the remote
computer, login and then hang up. For extra security, the remote computer then calls you back to
establish the connection.
This type of call-back system is often used with a Company’s internal computer system and is not
used for normal “public” Internet access (not to my knowledge, any way!).
Once you have completed this final screen, tap the Done button and you should be presented with a
screen like this (the “Orange” name will obviously be replaced with whatever name you entered
previously!):
If you do not see the screen above, open Control Panel again and tap Internet.
There are two additional settings on this screen which I suggest you modify.
• If idle, stay on line for can be set for just 1 or 2 minutes and will enable your Internet connection
to be “cut off” after the specified time, should you forget to do it yourself!
• On exit, stay online for should also be set to a couple of minutes. This allows your Internet
connection to remain active, for example, while you start up the Web program to use it. Normally,
when using the Email program, as soon as you “Close mailbox”, the connection will be dropped.
Setting a minute or two in this box, allows you to switch programs – or “hold” the connection open
for some other reason.
Page 13
The Programs
Please refer to the “Important Note” on page 3 of this guide.
The Email Program
By tapping the “Email” icon on your Psion, you launch a program that will give you access to Email,
fax sending & receiving and SMS (text) messaging*. We will start with setting up the Email program.
* SMS messaging is not available on the Series 5 Classic.
This section does, of course, assume you already have an Internet/Email account from which you
can obtain the required settings, possibly on your home desktop PC or laptop.
After starting Email, use Menu > Tools > Add new account > Email, to set up the details. You will be
presented with a screen like this:
• Account name should be any name that identifies to you which account your are setting up (or
editing at a later date).
• Your name should be your real name or other name you wish to appear on emails.
• Email address is the address you were given as a result of signing up with your ISP; e.g.
[email protected]
• Set as default account should be ticked if this account is the only one you have or, if you have
others, tick this box to indicate which account outgoing emails will appear to be from.
Note:
if you have more than one email account AND more than one Internet account set up, be sure
to use this tick-box carefully. Normally, you can only SEND mail from a particular account when
you are connected to the same ISP; e.g. if you have a ClaraNET account and an OrangeNET
account, you dial in to ClaraNET but your default email account is set as “OrangeNET”, then
you will be UNABLE to send mail. If you want OrangeNET as your default email account then
you must dial in to OrangeNET to send mail. You can, however, dial ClaraNET but RECEIVE
mail from OrangeNET.
Page 14
Tap the Outgoing button to move on to the next screen:
• Email (SMTP) server is the computer to which you send your outbound email(s). If you already
have an email account using your desktop computer, you should be able to find these details
under the “Accounts”, or similar, heading in your email program. Though of little significance in
most cases, SMTP stands for Simple Mail Transfer Protocol, and is a standard by which mail is
exchanged.
• Auto send on opening is a useful option. In the Email program, when you tap on the “Open
Mailbox” button, if you have any email ready to send, your Psion will send it once the mailbox has
been successfully accessed. If you do not wish to automatically send any waiting outbound
messages, untick this box, and use the Email program option Menu > Transfer > Send from
outbox.
Now tap on the Incoming tab to see this screen:
• POP3 server is the computer which holds your incoming mail until you collect/delete it. As with
the SMTP server above, copy the details from your PC system. In some, but not all, cases the
SMTP and POP3 servers are the same, though quite often you will see them designated as per
the examples: “pop.xxxxx.xxx” and “smtp.xxxxx.xxx” By the way, “POP” stands for “Post Office
Protocol”, though it has nothing to do with your High Street Post Office!
• Mailbox login is the name you chose to identify yourself, and appears in your emails address
before the “@” symbol. Note that this name may not be the same as that used when you dial in to
your ISP.
Page 15
• Mailbox password is the access password you chose. As with the mailbox login above, it may
not be the same password used to dial in to the ISP. Confirm password should be selfexplanatory! Note that as you type the password characters, they are replaced on screen by
asterisks so that no-one else watching, can see what your password is.
Before tapping the OK button, tap on Advanced to see this screen:
Under normal circumstances, the value entered in the SMTP Port box should be as shown – 25.
When you access another computer via the Internet, you actually “connect” on different “ports”
based on what you are/will be doing. In all cases I have encountered, if the outbound mail port
(SMTP) is not “25”, then the ISP will advise you. As “25” is the standard, you should not need to
change this.
Use MIME encoding is a setting which may or may not be of use. When used (box ticked), the
email program will send each paragraph of your email as one single line, and the recipients email
program will “wrap” these lines to the width of his/her screen. However, a problem arises if your
paragraph length exceeds 256 characters; anything over this will be truncated and text will be lost! If
you disable MIME (box unticked), the email program will insert its own line-breaks and there will be
no truncation of the text.
Tap on the Incoming tab, and you will be presented with this screen:
Again, as with the “Outgoing” screen previously, you should not need to alter the value in the POP3
Port box – it should be “110”, unless your ISP advises you otherwise.
Secure password authentication should only be ticked if your ISP uses encrypted passwords.
Leave this box unticked unless the ISP advises you otherwise.
Page 16
Now, tap on the OK button on the smaller screen display, then tap the OK button on the larger
screen. Your email program is now configured for use. To set up Fax and SMS, see the following
sections.
Setting up for Faxes
Please be sure to read the information on “Fax and Data” in the “Getting Started” section at the
beginning of this guide.
To create a fax on your Psion, from a document you are working on or a document that is already
on your Psion, you simply print the document with the “printer” set to “fax”. For example, in a Word
document, select Menu > Printing > Print setup and, in the pop-up box tap “Printer...” and select Fax
in the “To” box. Then press OK to go back to the Print set-up screen, make any adjustments to the
settings shown, then tap OK.
However, before you can create a fax, you need to have set-up the Email program. Open the Email
program, select Menu > Tools > Account settings > Fax and you should have a screen like this:
• Fax number should be self-explanatory! It is the number your mobile phone operator may have
given you when you had fax and data activated on your phone. Enter that number in this box.
Although incoming faxes can be received via your mobile phone, you may have been issued with
a separate number for faxes so that the mobile network knows what type of call it is. In some
cases, using an Ericsson phone and a Virgin SIM card, you can set the “Next Call Type” on the
phone as “voice”, “data” or “fax”. A fax then sent to the normal number can be received.
• Your name should be whatever you wish to have as your identifier at the top of sent faxes; it may
be your personal name or your company name.
• Preferred resolution determines the quality of the fax. Using “Fine” should produce a much
better looking fax at the receiving end, than setting this to “Normal”. However, using Fine will
create a larger file to be sent. Unfortunately, the experiences of other users has shown that with
the “Normal” setting, the whole fax has been corrupted. I can only suggest you try both, and see
which is better in your case.
• Show connection dialog should be ticked if you want the Psion to show you (minimal) details of
progress.
Page 17
Next, tap the “Modem” tab to move to the next screen:
• Max. fax speed is the setting to determine how fast your modem can send the fax under ideal
conditions. Most fax machines can use a maximum of 9600bps, though there are some newer
machines available that can receive at 14400bps. Select 9600 in this box, and you should have
few problems.
• Min. fax speed is the slowest speed you want to use when sending a fax. If there are problems
in establishing a connection with a remote fax machine, the modems will lower the speed until a
satisfactory link can be established. Obviously, the slower the speed, the longer it takes to send
the fax. With a mobile phone, a slow speed can mean an expensive call! So, to avoid the
modems setting a speed so low that it takes quite a time to send the fax, this box can be used to
set the lower limit at which you would like the modems to work. If the modem can’t make a
connection at the “max” speed and start trying lower speeds, if it still can’t connect at the “min”
speed you have selected here, it will drop the connection (to save you money!), and you should
try again.
• The Faxback delay is unlikely to be needed with mobile phones. There are a number of
information services available whereby you can use your fax machine to obtain information by
dialling another fax machine, entering a number to identify a document you want, for example,
then the remote machine sends you that document directly to your fax machine, after telling you
to “press the start button”.
You cannot use this type of “information recovery” system with a mobile phone because you would
need to call the remote system with a voice call, but then have no means of receiving the incoming
fax on that voice number – the returned fax would need to come on your fax number! As I
understand it, this faxback system could only work if you were using an external modem on your
Psion, plugged into the same “landline” socket as your telephone.
Page 18
Setting up SMS (not applicable to Series 5 “Classic”)
Using a mobile phone to send SMS (text) messages seems to be the main reason why people have
mobiles. A phenomenal number of text messages are sent every month and it is much easier to use
a decent-size keyboard to type in your message, than trying to use the phone keypad.
Before starting the SMS set-up procedure, I would strongly suggest you contact your mobile network
and ask them what the “SMS Centre” number is. It will be something like “+44 xxxx xxxxxx” – i.e. a
number in international format. Make a note of this number now, in case it is needed during set-up.
Start the Email program and tap Menu > Tools > Account settings > SMS and you will see a screen
like this:
At first, this looks like a very simple set-up procedure! However, if you have not set up your mobile
phone modem as “Mobile” (see the “Configuring your modem” section at the beginning of this
guide), then you may find you cannot select a modem at all in the Mobile phone box on this screen.
After selecting your phone, tap the Advanced tab to move to this screen:
• Character set determines how your phone and network SMS Centre can handle text messages.
The more modern mobiles, which have “picture messaging” facilities, can obviously send more
than just “plain text”. To be able to do this, the system needs to be able to use “special
characters” other than the usual letters and numbers. To avoid boring you with the technicalities,
if you simply send plain text messages, then you need to use a 7-bit character set. Anything else,
then use 8-bit. However, note the warning shown in the screenshot above.
• Messages remain valid for is a setting used by your network SMS Centre. It adds a special code
at the beginning of your SMS to indicate how long the message should stay “alive” if the SMS
Centre is having difficulty getting it to the recipient. In the screenshot example, if a message was
sent and could not be delivered after one week of trying, then the SMS Centre will “kill” the
message, and you would have to send it again.
Page 19
• Edit service centre address. In order to send SMS messages from your phone, the message
needs to be “processed” by the SMS Centre for your network. So, although you are sending a
message to a particular mobile number, it goes through the SMSC and on to your intended
recipient. Your Psion needs to be told what SMSC number to use. So, before proceeding further,
it is important that you now have it connected to the Psion – either with the infrared activated on
the phone, or the cables plugged in if it is a cable connection.
Tap the Edit button and be patient! You should then have a screen like this:
When you first tap the Edit button, your Psion will attempt to “connect” to your phone and get the
SMSC number directly from your phone – hence the delay before the above screen appears.
If your Psion successfully reads the number, it will be shown in the box. It will be in International
format, but WITHOUT the leading “+”. (The number shown in the above screenshot is for the
Orange phone network in the UK.)
If your Psion fails to read the number from your phone, the box will be blank, and you will have to
enter the number yourself (you did ring your network provider as suggested earlier, didn’t you?!). If
entering it yourself, do not add the leading “+”.
When completed, tap the OK button in the small screen, then tap OK on the larger screen.
You should now be all set to use your Psion and mobile phone, “on the road”. However .....
The Dialer – A useful addition
When you come to use your Psion for the “mobile internet”, you will probably have just your mobile
phone set up as the modem to use. But, what if you have also set-up a modem for use with
“landlines”, or perhaps even a second modem-equipped mobile phone? Once you have entered all
the details for these, you need to ensure you have selected the right modem to use, before you start
your surfing. (Control Panel > Modems)
Similarly, you may have set up a second (or even third) Internet Account – e.g. Virgin Net and BT
Internet). You would also need to select which account you wanted to use before you started.
(Control Panel > Internet)
In my particular case, I have two Internet Accounts, and three modems set-up on my Series 5mx
and 7. To make selection of these easier, I use a very simple, but very useful program called “The
Dialer”, written by John McAleely. It allows you to change the Internet Account, the Modem to use
and your location; all without having to “stop & think” and go to Control Panel before you start. The
Dialer also offers an extra, single line of information which shows you what is going on.
Page 20
When you run The Dialer, it presents you with a screen like this:
Connection shows you which Internet Account is in use. Simply change this as appropriate if you
have more than one account set up.
Phone number displays the number you have set up as the access number for the Internet Account
in use.
Use number as entered simply determines how the number is presented to your mobile phone for
dialling.
Modem shows the currently selected modem to use. If you have set up more than one, use this to
change to a different modem.
Location allows you to select where you are dialling from.
Number to dial simply shows you what number will be sent to the phone to start dialling.
Connection status is a simple, but very useful, single line display indicating how your internet
connection is progressing.
The way I use The Dialer is to start my Internet programs – Email, Web, WAP – then start The
Dialer. Select which ISP to use, which modem I want and the location. Then simply tap the Dial
button and wait for the Connection status to show “connected”. Once connected, switch to
whichever program I want to use; it really couldn’t be easier.
When I have finished, I switch back to The Dialer, tap the “Hang-up” button, and wait for Connection
status to show “Disconnected”.
When using The Dialer for the first time, you may encounter an error-box that says “Not found”. If
this happens, you should manually select ISP and modem, and connect without using The Dialer.
For the next and future connections, use The Dialer.
Page 21
Appendix A
Mobile phones known to work with your Psion
The following is a list of GSM mobile phones which can be connected to a Psion computer via a
cable or infrared connection.
(List compiled by Rolf Brunsting – 31 January 2001)
Infrared Connection:
• Ericsson
CF888, I888, R320s, R320sc, R380s, SH888
• Motorola
L7089, P7389, Talkabout 180, Talkabout T2288, Timeport 250, Timeport 260, V2288, V3690,
V50
• Nokia
6210, 6250, 7110, 8210, 8290, 8810, 8850, 8890, 9000, 9000I, 9000il, 9110, 9110i
• Orange L7089e
• Pocketline Spectrum
• Samsung
SGH-A100, SGH-A110, SGH-Q100
• Sendo D800
• Siemens
S25, S35I, S40, SL45
Using the Ericsson click-on DI27 Infrared Adapter:
• Ericsson
A1018s, CA638, CF688, CF768, CF868, GA628, GF768, GF768c, GF788, GF788c,
GF788e, GH688, I868, PF768, R250Pro, S868, T10s, T10sc, T18s, T18sc, T18z
Using the Ericsson click-on DI28 Infrared Adapter:
• Ericsson
A2618s, R310s, T28s, T28sc, T28World,
Cable Connection:
• Alcatel
One Touch 500, One Touch 502, One Touch 700, One Touch 702, One Touch Pocket
• Ascom Axento
• Benefon
ESC!, Q, Track, Twin - Dual SIM, Twin - Single SIM
• Bosch
GSM 909 Dual S, GSM-Com 908, GSM-Com 909
• Ericsson GS18
• Mondial ML808
• Nokia 7110
Page 22
• Pocketline
Mercurius, Spectrum
• Sagem
959 R Diamond, CS755, MC850, MC959, MW939, RD750D, RD750ET, RD750EX,
RD750S, RD750T
• Siemens
C35, M35, S25, S35I, S40, SL45
• Sony
CMD-J5, CMD-Z5
The phones indicated here should not be taken as a definitive list as new phones seem to be
appearing at very regular intervals. There may well be phones on the market, not listed here, that
may successfully be connected to your Psion.
Page 23
Appendix B
Modem Set-up and Initialization Codes for various mobile phones
General Note:
Fluorescent lights can interfere with infrared communication between the Psion and a mobile phone.
Some users have found that their Psion and phone work OK at home but won't work in the office;
this may be the reason.
Disclaimer: The settings provided here should be taken as a guide only. This listing has been compiled using
the settings provided by many users, which have been found to work satisfactorily on their phone(s). There is
no reason to believe that, if you have a phone specifically listed here, these settings should not also work for
you. However, no responsibility is taken by the author of this Guidebook, nor its contributors, for any damage
caused to your phone, or other failure subsequently requiring suppliers/manufacturers assistance to rectify.
For further information regarding any aspect of setting up your phone to access the Internet etc., please
contact your phone network provider, or the phone manufacturer.
ERICSSON 888, 320 phones
ERICSSON DI27, DI28 Infrared modems
Name:
Speed:
Connect:
Fax Class:
Ericsson
57600
Infrared
Auto
Init (reset):
Data:
Fax:
ATZ
(blank)
(blank)
FlowControl:
Hardware (RTS/CTS)
Terminal (DSR/DTR): [ ] not checked
Carrier (DCD):
[ ] not checked
Type:
Mobile
Note 1: With the 5mx *only* & R320 phone,
the "Mobile Connectivity Update" should be installed. This can be downloaded from the Series 5(mx) page on the web-site
– http://www.mikemcc.net
Note 2: With the T20 phone and DI28 modem, some users have found it necessary to use a "Fixed line" setting instead of
"Mobile" to be able to connect.
Page 24
SIEMENS S25 (but see alternative settings below)
SIEMENS C35 M35 S35
Name:
Speed:
Connect:
Fax Class:
Siemens
115200 with Infrared; 19200 with Serial cable
Infrared (S25/S35) Serial (C35/M35)
Auto
Init (reset):
Data:
Fax:
AT&F
AT\Q1
(blank)
Flow Control:
Software (Xon/Xoff)
Terminal (DSR/DTR): [ ] not checked
Carrier (DCD):
[ ] not checked
Type:
Mobile
Note: It is important when connecting by Serial Cable to use a Port speed of 19200. This also applies when using the
phone with a PC.
SIEMENS S25 (alternative settings)
Name:
Speed:
Connect:
Fax Class:
S25
115200
Infrared
1
Init (reset):
Data:
Fax:
AT&F0X3\Q0
(blank)
(blank)
Flow Control:
Hardware (RTS/CTS)
Terminal (DSR/DTR): [X] checked
Carrier (DCD):
[ ] not checked
Type:
Fixed line (yes, despite being a mobile phone)
Note: With Modem type set as "Fixed line" sending and receiving SMS messages with the Psion will not be possible.
Change the setting to "Mobile" temporarily to use SMS.
Page 25
NOKIA "Generic Settings", including 7110, 8210, 8810, 8850, 6210
(see also settings below for 7110e at 14.4kbps on Orange and for 6210e at up to 28.8kbps on Orange)
Name:
Speed:
Connect:
Fax Class:
Nokia
57600
Infrared
Auto
Init (reset):
Data:
Fax:
AT&F&K4
(blank)
(blank)
Flow Control:
Software (Xon/Xoff)
Terminal (DSR/DTR): [ ] not checked
Carrier (DCD):
[ ] not checked
Type:
Mobile
NOKIA 7110e running at 14.4kbps on Orange Network
Name:
Speed:
Connect:
Fax Class:
Nokia 7110e
57600
Infrared
Auto
Init (reset):
Data:
Fax:
AT&F&K4
AT+CBST=14
(blank)
Flow Control:
Software (Xon/Xoff)
Terminal (DSR/DTR): [ ] not checked
Carrier (DCD):
[ ] not checked
Type:
Mobile
Note: If the 7110e starts giving problems after a seemingly trouble-free period of data access by Infrared, use Psion
"Comms" program to connect to the 7110e, and type "ATZ <enter>" twice, followed by "AT&F" <enter>" once.
NOKIA 6210e running at up to 28.8kbps on Orange Network
(these settings will attempt to establish the fastest connection speed possible)
Name:
Speed:
Connect:
Fax Class:
Nokia 6210e
57600
Infrared
Auto
Init (reset):
Data:
Fax:
AT&F&K4
AT+CBST=0,0,1
(blank)
Flow Control:
Software (Xon/Xoff)
Terminal (DSR/DTR): [ ] not checked
Carrier (DCD):
[ ] not checked
Type:
Mobile
Page 26
NOKIA 6210e running at 28.8kbps on Orange Network
(these settings will "force" a 28.8 connection and, if this speed cannot be achieved, will drop the line)
Name:
Speed:
Connect:
Fax Class:
Nokia 6210e
115200
Infrared
Auto
Init (reset):
Data:
Fax:
AT&F&K4
ATS35=7+CBST=48,0,1
AT&S&K4
Flow Control:
Software (Xon/Xoff)
Terminal (DSR/DTR): [ ] not checked
Carrier (DCD):
[ ] not checked
Type:
Mobile
NOKIA 6210 - HSCSD Settings
General HSCSD settings using a V110 ISDN connection.
Note: The High Speed Circuit Switched Data technology implemented in the Nokia 6210 can only be used when your
operator has equipped its network with HSCSD equipment. Check with your network operator first before trying the
modem settings below.
Modem settings for 28.8 kbps ISDN V.110:
Name:
Speed:
Connect:
Fax class:
Nokia 6210
57600 bps
Infrared
Auto
Init (reset):
Data:
Fax:
AT&F&K4+CBST=80
(blank)
(blank)
Flow Control:
Software (Xon/Xoff)
Terminal (DSR/DTR): [X] checked
Carrier (DCD):
[X] checked
Type:
Mobile
Page 27
Motorola L7089, P7389, T250
Name:
Speed:
Connect:
Fax Class:
Motorola
115200
Infrared
Auto
Loudspeaker:
Volume:
Pause time for ",":
Init (reset):
Data:
Fax:
Until call answered
Quiet
4 secs
AT&F&K5
(blank)
(blank)
Flow Control:
Software (Xon/Xoff)
Terminal (DSR/DTR): [ ] not checked
Carrier (DCD):
[ ] not checked
Type:
Mobile
Note 1: On the L7089 phone, make sure that keypad tones are set to "On" and the "Normal" setting. The settings in the
"Options" tab also seem to be important.
Note 2: Fax is not possible with a Psion and the Motorola phone.
If anyone reading this guidebook is able to supply additional settings, these would be greatly
appreciated to keep the information up to date.
Psion performs a "Soft Reset" when Infrared port is used
If your Psion is spontaneously resetting when you try to use the infrared port, check that you don't
have "Auto Switch Off" (Control Panel > Switch on/off) set to more than 31 minutes. There appears
to be a bug which can crash the infrared port with too long a time set for Auto Switch Off.
Information courtesy of Mike McConnell, August 2000
This Guidebook © Kevin Snelling, August 2001.
Page 28