1
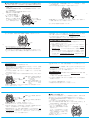
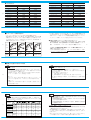
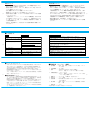
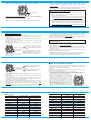
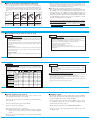
取扱説明書
INSTRUCTION
目次
このたびはグランドセイコーをお買い上げいただきありがとうご
ざいました。SEIKOでは、時計づくり100有余年の伝統と世界に
誇る先進技術のすべてを注ぎ、製造・検査を実施しております。
グランドセイコーの優れた性能を保つ為に、この取扱説明書をよ
くお読みのうえ、末長くご愛用下さいますようお願い申し上げま
す。
この取扱説明書はお手もとに保存いただき、必要に応じてご覧く
ださい。
■各部の名称 ・・・・・・・・・・・・・・・・・・・・・・・・・・・・・・・・・・・・・・・・・・・・・4
■製品の特長 ・・・・・・・・・・・・・・・・・・・・・・・・・・・・・・・・・・・・・・・・・・・・・5
■ご使用方法 ・・・・・・・・・・・・・・・・・・・・・・・・・・・・・・・・・・・・・・・・・・・・・6
ゼンマイの巻きかた ・・・・・・・・・・・・・・・・・・・・・・・・・・・・・・・・・・・・・6
時刻の合わせかた ・・・・・・・・・・・・・・・・・・・・・・・・・・・・・・・・・・・・・・10
日付の合わせかた ・・・・・・・・・・・・・・・・・・・・・・・・・・・・・・・・・・・・・・20
時針単独修正の方法 ・・・・・・・・・・・・・・・・・・・・・・・・・・・・・・・・・・・・21
■回転ベゼルの使いかた ・・・・・・・・・・・・・・・・・・・・・・・・・・・・・・・・・・23
■パワーリザーブ表示の見かた ・・・・・・・・・・・・・・・・・・・・・・・・・・・・26
■使用上の注意とお手入れの方法 ・・・・・・・・・・・・・・・・・・・・・・・・・・28
■こんな時には ・・・・・・・・・・・・・・・・・・・・・・・・・・・・・・・・・・・・・・・・・・34
■アフターサービスについて ・・・・・・・・・・・・・・・・・・・・・・・・・・・・・・36
■補修用性能部品について ・・・・・・・・・・・・・・・・・・・・・・・・・・・・・・・・36
■製品仕様 ・・・・・・・・・・・・・・・・・・・・・・・・・・・・・・・・・・・・・・・・・・・・・・37
■各部の名称
■製品の特長
時針
1
21
19
18
6
4
17
GMT
6
15
13
リュウズ
8
16
6
10
秒針
11
1段目:時針単独修正
(日付連動)
スプリングドライブはゼンマイの力で動きます。パワーリザーブ表示の残量
が無くなる前に充分に巻き上げてご使用ください。
特に低温下(0℃以下)では、パワーリザーブ表示が「1/6」以下になる
と止まる可能性がありますのでご注意ください。
14
12
ねじロック解除位置:
ゼンマイ巻き上げ(手巻き)
ねじロック位置
日付
パワーリザーブ
表示針
24時針
■ご使用方法 ゼンマイの巻かた
ねじロックが解除されました
ら、リュウズを押し付けない
ように注意しながら右(12時
方向)にゆっくり回して、ゼ
ンマイを巻いてください。
2
この時計は自動巻き式(手巻き付き)です。
・ゼンマイは、腕につけてご使用いただく際には、通常の腕の動きで
自然に巻き上がります。
・止まっている時計をお使いになる場合には、リュウズを回してゼン
マイを巻き上げることをお勧めします。
21
20
19
4
6
8
10
12
14
16
21
20
19
18
16
6
18
6
GMT
13
11
8
6
11
4
5
15
13
6
4
3
17
6
GMT
5
1
23
リュウズは、ねじロック仕様
になっております。リュウズ
を左(6時方向)に回してね
じロックを解除してくださ
い。(ねじロックが完全に解
除されると、リュウズは締め
こんだときの位置よりも少し
外側に出ます。
)
4
2
15
22
2
1
23
17
1
22
3
●リュウズでのゼンマイの巻きかた
6
5
注意
2段目:時分針の修正
14
5
分針
12
3
4
10
23
4
20
回転ベゼル(24時間表示付)
文字板外周リング(24時間表示付)
2
22
スプリングドライブとはセイコー独自の機構で、ゼンマイが巻き解ける力を唯一の動力源と
しながらも、クオーツ時計と同等の高精度を実現した機構です。(機構の詳細は別冊の「スプ
リングドライブ・ハンドブック」をお読みください。
)
ゼンマイを充分に巻き上げた状態から、約72時間(約3日間)動き続けます。ゼンマイの巻
き上げ状態がわかるパワーリザーブ表示付きです。秒針は完全に滑らかなスイープ運針で動き
ます。
巻き上げ方式は自動巻きですが、手巻き機構も併せて備えていますので、始動時の巻き上げ
に便利です。
グランドセイコースプリングドライブGMTは、24時針付きのキャリバー9R66を搭載し、24
時間表示を施した回転ベゼルと文字板外周リングを備えています。時針は単独で修正できます
ので、たとえば海外旅行中に時針を現地の時刻(ローカルタイム)に合わせておきながら24時
針で日本時間(ホームタイム)を表示する方法や、回転ベゼルと24時針の組み合わせによって
2∼3つの別地域の時刻を表示する使用方法が可能です。
*リュウズを5回転させると約
10時間分のパワーリザーブが
得られます。巻き上げ操作時
の目安にしてください。
*なお、リュウズを左(6時方
向)に回してもゼンマイは巻
き上がらず、空回りする構造
になっています。
7
22
1
21
23
6
18
5
19
4
6
14
20
19
18
16
21
19
18
6
11
8
6
10
2リュウズを左に回し、まず24時針と分針を現在時刻に合わせます。
24時針は現在時刻の午前午後に注意して合わせます。
22
2
1
6
14
12
18
5
19
3
21
23
4
20
16
14
4
15
11
●24時針を24時間表示用として合わせる方法〈タイプ1を選択した場合〉
・回転ベゼルの▽印を必ず12時位置に合わせてください。
1リュウズを左(6時方向)に回してねじロックを解除し、秒針がち
ょうど0秒に来た時に、2段目まで引き出してください。秒針が止
まります。
16
21
20
14
19
18
6
ねじロック解除位置
4
8
2段目
10
16
12
5
6
15
11
10
4
3
17
GMT
11
2段目
13
ねじロック位置
1
13
6
1
23
1
GMT
13
8
2
15
22
4
17
12
8
6
15
5
13
12
20
4
17
4
3
17
GMT
11
6
GMT
6
13
1
23
6
1
23
2
22
5
2
22
〈タイプ2〉24時針に他の地域の時刻を表示させて使用する場合
・時針を住む地域の時刻(ホームタイム)に、24時針を住む場所とは異なる
地域の時刻(時差のある時刻)に合わせ、デュアルタイム表示として使用
する場合にこのタイプを選びます。
例)時分針は日本時間で午前10時08分42秒、24時針は世界標準時(GMT)で午前1時
4
10
⇒続いて時刻・日付表示を合
わせる場合は、ねじロックは
締めずにP.10「時刻の合わせ
かた」
、P.20「日付の合わせか
た」の操作方法に従ってくだ
さい。
3
〈タイプ1〉24時間表示用として使用する場合(午前・午後の読み取り用)
例)午前10時08分42秒を表示
12
時刻の合わせかた
・必ずゼンマイが巻き上げられた状態で、時刻合わせをしてください。
・この時計の24時針の使いかたには、2つのタイプがあります。それに
よって時刻の合わせかたが異なりますので、どちらの使いかたにす
るのか選択してから時刻合わせをしてください。
11
10
13
9
8
15
16
4
17
6
GMT
21
8
※リュウズをねじ込んでいる時
に若干のクリック感がありま
すが、これはゼンマイが巻き
上げられる感触が伝わってい
るものですので問題はありま
せん。
2
3
※ゼンマイの巻き上がり量についてはP.26「■パワーリザーブ表示の見かた」を
ご参照ください。
※フル巻き上げの状態からさらにリュウズを回しても、リュウズは止まらずに回
転させることができます。リュウズを回し続けても時計が壊れることはありま
せんが、ゼンマイはそれ以上巻き上がりませんので過剰な操作はお控えくださ
い。
リュウズを押し付けながら右
(12時方向)に回し、止まると
ころまでねじ込んでくださ
い。
4
20
パワーリザーブ表示針がフル巻き上げ表示になるまで、ゼンマイを巻いて
ください。秒針が動きはじめます。
10
3
〈例1〉午前10時00分に合わせる場合は・・・
24時針をベゼルの「10」
(5時方向)に、分針を0分に合わせます。
〈例2〉午後6時00分に合わせる場合は・・・・
24時針をベゼルの「18」(9時方向)に、分針を0分に合わせます。
12
※時針、日付が合わせたい時刻、日付と異なる表示をしている場合がありますが、
それらは後で合わせられます。(⇒P.20参照)
※合わせたい時刻の手前から分針をゆっくり進めて合わせてください。
14
3時報と同時にリュウズを押し込んでください。24時針、分針、秒針
は現在時刻に合った状態になりました。
※時刻合わせは、電話の時報サービスTEL.117が便利です。
4時針を現在時刻に合わせます。リュウズを1段目まで引き出してくだ
さい。
※この時、秒針は動き続けています。
1
※リュウズをねじ込んでいる時に若干のクリック感がありますが、これはゼンマイが
巻き上げられる感触が伝わっているものですので問題はありません。
6
18
5
19
3
21
23
4
20
2
4
17
1
6
11
10
13
8
GMT
15
12
14
16
※日付を合わせる場合は、ここで一緒に合わせてください。
(詳しくは→P.20「日付の合わせかた」を参照)
※日付が変わるところが午前0時ですので、午前・午後を間違いなく合わせてくださ
い。
※リュウズを回す際は、時針の1時間単位の動きを確認しながら静かに回してくださ
い。
6合わせ終わったらリュウズを押し込み、さらに押し付けながら右
(12時方向)に回して止まるところまでねじ込んでください。
14
22
5リュウズを回し、時針のみを現在時刻に合わせてください。
ねじロック解除位置
1段目
15
21
20
19
18
10
16
14
12
1段目
21
20
19
18
10
16
21
20
19
18
16
14
12
14
21
6
8
20
4
19
6
6
8
6
18
5
4
5
4
6
8
ねじロック位置
ねじロック解除位置
1段目
10
15
16
4
6
8
6
4
3
17
1
3
4
5
15
1
11
15
6
4
3
17
11
2
GMT
6合わせ終わったらリュウズを押し込み、さらに押し付けながら右(12時方
向)に回して止まるところまでねじ込んでください。
より正確に時刻合わせをするために!
1
GMT
日付の合わせかた
13
3時報と同時にリュウズを押し込んでください。24時針、分針、秒針はパリ
の時刻(午前2時)に合った状態になりました。
※リュウズをねじ込んでいる時に若干のクリック感がありますが、これはゼンマイが
巻き上げられる感触が伝わっているものですので問題はありません。
2
・この時計は、時針のみを回して日付修正を行います。
・時針を時計回りに2周させて午前0時を過ぎると「日を送る」こととなり、逆回転
させると「日を戻す」ことができます。
・時刻合わせの後の日付合わせや、前月が小の月(2,4,6,9,11月)の場合、修正を行っ
てください。
1リュウズを左(6時方向)に回してねじロックを解除してから、リュウズを1段目
まで引き出してください。
2リュウズを回して時針を2周させ、午前0時を過ぎる毎に日付を「1日分」修正で
きます。
23
17
2段目
4リュウズを1段目まで引き出してください。
※日付を合わせる場合は、ここで一緒に合わせてください。
(詳しくは→P.20「日付の合わせかた」を参照)
※日付が変わるところが午前0時ですので、午前・午後を間違いなく合わせてください。
※リュウズの回転の際、時針の1時間単位の動きを確認しながら静かに回してくださ
い。
22
11
2段目
1
13
20
1
GMT
5
15
11
5リュウズを回し、時針のみを日本時間(午前10時)に合わせてください。
18
2
1
23
13
4
3
17
GMT
13
23
22
1
23
22
※合わせたい時刻の手前から分針をゆっくり進めて合わせてください。
17
16
・例として24時針でパリの時刻を表示し、時針で日本時間を表示させる方法
で説明します。
日本時間で午前10時00分の場合、パリは午前2時00分になります。(サマー
タイム適用時期以外)
・回転ベゼルの▽印を必ず12時位置に合わせてください。
・時刻合わせは、電話の時報サ
ービスTEL.117が便利です。
2
1リュウズを左(6時方向)に
22
回してねじロックを解除し、
秒針がちょうど0秒に来た時
ねじロック位置
に、2段目まで引き出してく
ねじロック解除位置
1
ださい。秒針が止まります。
2リュウズを左に回し、24時針を回転ベゼルの「2」(1時方向)に、分針を
0分に合わせます。
12
※他の地域として選択できるのは、日本時間からの時差が1時間単位の地域に限られます。
10
●24時針を他地域の時刻の表示として合わせる方法
〈タイプ2を選択した場合〉
・スプリングドライブ機構の構造上、より正確な時刻合わせをしていただ
くには、下記の点にご注意ください。
1.時刻合わせをする場合は、ゼンマイを充分(パワーリザーブ表示がフ
ル巻上げの状態)巻き上げてください。
2.止まっている時計を動かした場合は、ゼンマイを充分巻いて30秒程度
秒針が動いてから、リュウズを2段目に引き出し、時刻合わせをして
ください。
3.リュウズを2段目まで引き出して秒針を止めている時間は、「30分以
内」にしてください。これ以上の時間引き出していた場合は一旦リュ
ウズを押し込み、30秒程度は秒針が動いてから、時刻合わせをし直し
てください。
19
3日付合わせが終わったら、時針の位置を再度確認してリュウズを押し込んでくださ
い。
さらに押し付けながら右(12時方向)に回して止まるところまでねじ込んでくださ
い。
※リュウズをねじ込んでいる時に若干のクリック感がありますが、これはゼンマイが巻き上げ
られる感触が伝わっているものですので問題はありません。
時差単独修正の方法
・ 海外旅行等で時差のある地域へ移動した場合、時計を止めることなく現地の時刻
に合わせられます。
・ この修正により、日付も連動して変更できます。
右回転:時針は、時計回りと逆方向に回
転し、時針を2周させると日付
が1日戻ります。
1リュウズを左(6時方向)に回してねじロックを解除してから、リュウズを1段目ま
で引き出してください。
左回転:時針は、時計回りに回転し、時
針を2周させると日付が1日進
みます。
※1時間単位で時針の動きを確認しながらリュウズを回してください。
21
2リュウズを回して時針単独修正を行ってください。
14
12
※日付はどちらの方法で修正してもかまいません。日付修正が少ない方向を選択してください。
※リュウズの回転は、静かに行ってください。
21
6
18
5
19
3
4
20
■回転ベゼルの使いかた
2
1
23
6
10
12
14
1段目
左回転:プラス時差修正(時針が進みま
す)
※P.24「●主要都市時差表」の日本時間との時差を参照してください。
※時針単独修正をするときは、午前・午後および日付表示にご注意ください。
※時針を時計と逆回りに動かして午前0時を通過し、午後9時00分∼午前0時00分付近に合わせ
る場合は、一旦午後8時00分まで戻してから時針を合わせ直してください。
回転ベゼル上および文字板外周リング上の「24時間表示」を利用して、時針で示す時
刻とは違う2つめ、または3つめの他地域の時刻を表示させることができます。
例)時針で日本時間午前10時08分を表示し、24時針でパリとバンコクの時刻を表示さ
せたい場合
1まず、回転ベゼルの▽印を12時位置に合わせてください。
2次に、P.11「24時針を他の地域の時刻の表示として合わせる方法」を参照の上、時
分針を午前10時08分に、24時針を回転ベゼルの「2」に合わせます。
3パ リ と バ ン コ ク の 時 差 は 「 + 6 時 間 」
(サマータイム適用時期以外)ですので、
6
8
4
回転ベゼルの▽印を24時間表示で6時間
分左に回します。
この時、パリは文字板外周リングの24時
間表示で「午前2時」、バンコクは回転
6
ベゼルの24時間表示で「午前8時」と読
み取ることができます。
1
5
2
19
3
10
12
20
22
6
13
11
14
GMT
15
(日本時間との時差の値については→P.24「●主
要都市時差表」を参照ください。
)
4
17
※リュウズをねじ込んでいる時に若干のクリック感がありますが、これはゼンマイが巻き上げ
られる感触が伝わっているものですので問題はありません。
21
23
3時針単独修正が終わったら、時針の位置を再度確認してリュウズを押し込み、さら
に押し付けながら右(12時方向)に回して止まるところまでねじ込んでください。
18
22
11
8
15
16
4
17
1
GMT
13
ねじロック位置
ねじロック解除位置
右回転:マイナス時差修正(時針が戻り
ます)
16
22
23
●主要都市時差表
都市名
24
世界標準時
日本標準時
ローマ
+1:00
−08:00
パリ
+1:00
−08:00
+1:00
−08:00
東京
+9:00
00:00
マドリッド
ソウル
+9:00
00:00
ロンドン
00:00
−09:00
ベルリン
+8:00
−01:00
ダッカ
00:00
−09:00
香港
+8:00
−01:00
リオデジャネイロ
−3:00
−12:00
バンコク
+7:00
−02:00
ラパズ
−4:00
−13:00
タシケント
+6:00
−03:00
サンティアゴ
−5:00
−14:00
カラチ
+5:00
−04:00
ニューヨーク
−5:00
−14:00
モスクワ
+3:00
−06:00
メキシコシティー
−6:00
−15:00
ナイロビ
+3:00
−06:00
ロサンゼルス
−8:00
−17:00
カイロ
+2:00
−07:00
アンカレッジ
−9:00
−18:00
イスタンブール
+2:00
−07:00
アンカラ
+12:00
+03:00
ヨハネスブルグ
+2:00
−07:00
シドニー
+10:00
+01:00
25
+
■パワーリザーブ表示の見かた
・パワーリザーブ表示で、ゼンマイの巻き上げ具合が確認できます。
・時計を腕から外して置いておく際には、次にご使用(携帯)されるまで動
き続けるかどうかをパワーリザーブ表示でご確認の上、必要に応じてゼン
マイを巻き上げてください。(時計を止めないためには、必ず余裕を持った
時間分を巻き上げるようにしてください。)
26
パワー
リザーブ
の指示
●自動巻き機構によるゼンマイ巻き上げの目安について
・ご使用時間と巻き上げ具合の目安は下記の通りです。実際にはお客
様のご使用状況(時計を携帯使用される時間や運動量等)によって
異なってきますので、パワーリザーブ表示でご確認ください。
27
1日当たり12時間の携帯で連続して3∼5日間ご使用されると、フ
ル巻き上げになるでしょう。
ゼンマイの
2/3程度巻き上がった 1/3程度巻き上がった
フル巻き上げの状態
巻き上げ無しの状態
状態
状態
状態
持続時間
※フル巻き上げ状態でリュウズをそれ以上回しても、あるいは自動巻き機構による巻
き上げが行なわれても、ゼンマイが損傷を受けることはありませんのでご安心して
お使いください。この時計のゼンマイは自動巻き機構特有の構造(スリッピングア
タッチメント)の働きで、ゼンマイが巻き止まらないようになっております。
約72時間(約3日間)
動きます。
約48時間(約2日間)
動きます。
約24時間(約1日)
動きます。
※1日のご使用時間が短い場合などは、パワーリザーブ表示をご確認の上、必要に
応じてゼンマイを巻き上げてください。
時計は止まっているか、
止まる直前の状態です。
■使用上の注意とお手入れの方法
注意
28
注意
日常のお手入れ
かぶれやアレルギーについて
・ケースやバンドは肌着類と同様に直接肌に接しています。汚れたままにし
ておくとサビて衣類の袖口を汚したり、かぶれの原因になることがありま
すので常に清潔にしてご使用ください。
・時計を外したときは、柔らかい布などで汗や水分をふき取るだけで汚れや、
ケース・バンド及びパッキンの寿命が違ってきます。
・バンドは多少余裕を持たせ、通気性をよくしてご使用ください。
・かぶれやすい体質の人や、体調によっては、皮膚にかゆみやかぶれをきた
すことがあります。
・かぶれの原因として考えられるのは、
1.金属・皮革に対するアレルギー
2.時計本体及びバンドに発生した錆、汚れ、付着した汗などです。
・万一肌などに異常を生じた場合は、ただちに使用を中止し、医師にご相談
ください。
〈革バンド〉
・革バンドは、柔らかい布などで吸い取るように軽くふいてください。こす
るようにふくと色が落ちたり、ツヤがなくなったりする場合があります。
29
〈金属バンド〉
・金属バンドは、ときどき柔らかい歯ブラシなどを使い、部分洗いなどのお
手入れをお願いします。
注意
警告
防水性能
・時計の文字板または裏ぶたにある防水性能表示をご確認の上、ご使用ください。
・水分のついたままリュウズを回したり、引き出したりしないでください。時計
内部に水分が入ることがあります。
使用例
時計の防水表示
上段:文字板
下段:裏ぶた
30
表示なし
表示なし
表示なし
WATER RESIST
表示なし
防水の
基準
雨や洗顔など日常生活 水に関係の深い仕事(農水産・園 空気ボンベを使用しない 空気ボンベを使用する ヘリウムガスを使用す
で予想される「水がか 芸・食堂など)やスポーツ(水泳 潜水(スキンダイビング)潜水
(スキューバ潜水)る潜水方式
(飽和潜水)
やヨット)で使用できる程度 で使用できる程度
に使用できる
に使用できる
かる」程度
日常生活用防水
(3気圧防水)
×
⃝
×
×
×
×
×
×
×
×
日常生活用強化防水
(5気圧防水)
⃝
⃝
×
×
×
日常生活用強化防水
(10気圧防水)
⃝
⃝
⃝
×
×
表示なし
WATER RESIST 20 BAR 日常生活用強化防水
(20気圧防水)
のいずれか
⃝
⃝
⃝
×
×
WATER RESIST
WATER RESIST 5 BAR
のいずれか
表示なし
WATER RESIST 10 BAR
のいずれか
WATER RESIST 10 BAR
WATER RESIST 20 BAR
非防水
・日常生活用防水(3気圧)の時計は水の中に入れてしまうような環
境での使用はできません。
・日常生活用強化防水(5気圧)の時計は、スキンダイビングを含め
て全ての潜水に使用できません。
・日常生活用強化防水(10、20気圧)の時計は、飽和潜水/空気潜水
には使用できません。
その他、携帯上ご注意いただきたいこと
・転倒時や他人との接触などにおいて、時計の装着が原因で思わぬケガを負
う場合がありますのでご注意ください。
・特に乳幼児を抱いたりする場合は、時計に触れることでケガを負ったり、
アレルギーによるかぶれをおこしたりする場合もありますので、十分にご
注意ください。
・落としたりぶつけたりはもちろんのこと、激しいスポーツなどによるショ
ックもお避けください。時計が一時的に遅れたり進んだりします。
31
32
保管について
定期点検について
・「−10℃∼+60℃からはずれた温度」下では機能が劣化したり、
停止したりする場合があります。
・磁気の影響(テレビ、スピーカ、磁気ネックレス等)があると
ころに放置しないでください。
・強い振動のあるところに放置しないでください。
・極端にホコリの多いところに放置しないでください。
・薬品の蒸気が発散しているところや薬品にふれるところに放置
しないでください。
(薬品の例:ベンジン、シンナーなどの有機溶剤、およびそれ
らを含有するもの=ガソリン、マニキュア、化粧品などのスプ
レー液、クリーナー剤、トイレ用洗剤、接着剤など=水銀、ヨ
ウ素系消毒液など)
・温泉や、防虫剤の入った引き出しなど特殊な環境に放置しない
でください。
・機種9R66の点検及び分解掃除はメーカーにて行ないますので、
販売店にはメーカーへ依頼するようお申しつけください。
・ながくご愛用いただくために、3∼4年に一度程度の分解掃除
による点検調整(オーバーホール)をおすすめします。
ご使用状況によっては、機械の保油状態が損なわれたり、油の
汚れなどによって部品が磨耗し、時計の進み、遅れが大きくな
ることがあります。また、パッキン等の部品の劣化が進み、汗
や水分の侵入などをで防水性能が損なわれる場合があります。
分解掃除による点検調整を、お買い上げ店にご依頼ください。
・部品交換の時は、「純正部品」とご指定ください。
・定期点検の際には、パッキンやバネ棒の交換もあわせてご依頼
ください。
33
■こんな時には
現象
時計が止まっている。
考えられる原因
ゼンマイのエネルギーが無くなった。
このようにしてください
「ゼンマイの巻きかた」に従ってゼンマイを巻き上げ、時刻を合わせ直してご使用ください。
携帯中や時計を外す際は、パワーリザーブ表示の針を確認し、必要に応じてゼンマイを巻いてください。
毎日使用しているが、パワーリザーブ表示が
携帯時間が少ないか、
あるいは腕の動きが少ない。
上がらない。
携帯使用する時間を長くしていただくか、時計を外す際のパワーリザーブ表示の残量が次にご使用さ
れるまでの時間分に足りない場合は、
リュウズを回してゼンマイを巻き上げてください。
時計が一時的に進む/遅れる。
暑いところ、
または、寒いところへ放置した。
常温に戻れば元の精度に戻ります。時刻を合わせ直してください。この時計は気温5℃∼35℃で腕に
つけたときに安定した時間精度が得られるように調整してあります。
磁気を発生するもののそばに置いた。
磁気を遠ざけると、元の精度に戻ります。時刻を合わせ直してください。
元に戻らない場合には、
お買い上げ店にご相談ください。
落としたり強くぶつけたりまたは激しいスポーツをした。
強い振動が加えられた。
時刻を合わせ直してください。
元に戻らない場合には、
お買い上げ店にご相談ください。
パッキンの劣化などにより時計内部に水分が入った。
お買い上げ店にご相談ください。
34
ガラスのくもりが消えない。
パワーリザーブ表示の残量があるのに時計
低温下(0℃以下)
に放置した。
が止まった。
低温下(0℃以下)では、パワーリザーブ表示が「1/6」以下のときは時計が止まる場合があります。
リュウズを回してゼンマイを巻いてください。
止まっている時計を動かした直後、時刻合わ 動き出す際、調速機構が働くまではやや時間がかかりま
せをしたら、秒針の運針が早く見えた。
す。
(故障ではありません)
調速機構が働くまでに数秒間かかります。より正確に時刻を合わせるには、
30秒程度秒針が動いてか
ら時刻合わせをしてください。
日付が、
日中に変わる
時刻合わせが12時間ずれている
35
12時間、針を進めて時刻および日付を合わせ直してください。
※その他の現象は、
お買い上げ店にご相談ください。
■アフターサービスについて
・お買い求めいただきましたグランドセイコーは厳重な検査、調整を行った後、お手元にお
届けしております。しかし、取扱説明書にそった正常なご使用状態で保証期間内に万一、
不具合が生じた場合には保証書をそえて、お買い上げ店へお持ちください。メーカにて
無料で修理、調整させていただきます。保証内容は、保証書に記載してあります。
・保証期間経過後の修理およびグランドセイコーについてのご相談は、お買い上げ
店でうけたまわっております。
なお、ご不明な点はP.75の「セイコーウオッチ株式会社お客様相談室・お客様相
談係」へお問い合わせください。
36
■補修用性能部品について
・グランドセイコーの補修用性能部品の保有期間は通常10年間を基準としていま
す。正常なご使用であれば、この期間中は原則として修理可能です。(補修用性
能部品とは、時計の機能を維持するのに不可欠な修理用部品です。)
・修理可能な期間はご使用条件によりいちじるしく異なり、精度が元通りにならな
い場合もありますので、修理ご依頼の際にお買い上げ店とよくご相談ください。
・修理のとき、ケース・文字板・針・ガラス・バンドなどは一部代替部品を使用さ
せていただくことがありますのでご了承ください。
・その他、わからない点がありましたら、「セイコーウオッチ株式会社お客様相談
室・お客様相談係」にお問い合わせください。
■製品仕様(ムーブメント関係)
1.基本機能 ・・・・・・時針、分針、秒針、24時針、カレンダー表示、パワーリ
ザーブ表示
2.水晶振動数・・・・・・・・32,768Hz
3.精度 ・・・・・・・・・・平均月差±15秒以内(日差±1秒相当)
※ただし、気温5℃∼35℃において腕につけた場合
4.作動温度範囲・・・−10℃∼+60℃
※ただし、低温下(0℃以下)ではパワーリザーブ表示
が1/6以上で使用のこと
5.駆動方式・・・・・・・ゼンマイ巻 <自動巻き(手巻き付き)>
6.運針方式 ・・・・・・・スイープ運針
7.持続時間 ・・・・・・約72時間(約3日間)※パワーリザーブ表示がフル巻き
上げの状態から
8.電子回路 ・・・・・・発振・分周・スプリングドライブ制御回路(C-MOSIC):1個
9.使用石数・・・・・・・・・・・30石
※仕様は改良のため予告なく変更することがあります。
37
You are now the proud owner of a GRAND SEIKO watch.
GRAND SEIKO watches are designed and manufactured to
operate with extremely high accuracy by taking advantage of
SEIKO's more than 100 years of experience in watchmaking
and the advanced technology that SEIKO can boast to the
world.
CONTENTS
To preserve the highest quality of your GRAND SEIKO watch,
please read the instructions in this booklet carefully for its
proper use and care, and keep this booklet for ready reference.
■NAMES OF THE PARTS ・・・・・・・・・・・・・・・・・・・・・・・・・・・・・・・・40
■FEATURES・・・・・・・・・・・・・・・・・・・・・・・・・・・・・・・・・・・・・・・・・・・・41
■HOW TO USE
HOW TO WIND THE MAINSPRING ・・・・・・・・・・・・・・・・・・・・・・42
HOW TO SET THE TIME ・・・・・・・・・・・・・・・・・・・・・・・・・・・・・・・46
HOW TO SET THE DATE ・・・・・・・・・・・・・・・・・・・・・・・・・・・・・・・56
HOW TO USE THE INDEPENDENT HOUR HAND
ADJUSTMENT FUNCTION ・・・・・・・・・・・・・・・・・・・・・・・・・・・・・57
■HOW TO USE THE ROTATING BEZEL ・・・・・・・・・・・・・・・・・・・59
■HOW TO READ THE POWER RESERVE INDICATOR ・・・・・・62
■TO PRESERVE THE QUALITY OF YOUR WATCH・・・・・・・・・・64
■TROUBLESHOOTING ・・・・・・・・・・・・・・・・・・・・・・・・・・・・・・・・・・70
■REMARKS ON AFTER-SALES SERVICING ・・・・・・・・・・・・・・・・72
■REMARKS ON THE REPLACEMENT PARTS ・・・・・・・・・・・・・・73
■SPECIFICATIONS ・・・・・・・・・・・・・・・・・・・・・・・・・・・・・・・・・・・・・74
■NAMES OF THE PARTS
■FEATURES
21
18
6
40
4
17
GMT
6
10
13
Crown
8
16
6
15
Second
hand
Rotating bezel
(with 24-hour indicators)
Outer frame of the dial
(with 24-hour indicators)
Minute hand
5
19
3
4
20
2
1
23
11
Spring Drive works by the power provided by the mainspring. Rewind the mainspring
before the power reserve indicator shows "0".
If the watch is left under low temperatures (especially below 0℃), it may stop if the power
reserve indicator is showing less than one-sixth.
Unlocked:Winding up the mainspring
(manual oparation)
14
12
Locked
■HOW TO USE HOW TO WIND THE MAINSPRING
21
19
6
8
10
16
21
19
18
16
13
14
20
6
18
6
GMT
11
*As for manual winding, if you
give the crown five 360 degrees
rotations, it provides the power
to run the watch for approximately ten hours.
*If the crown is turned counterclockwise (the six o'clock direction), the mainspring of the
watch will not be wound.
43
Gently turn the crown clockwise
(the twelve o'clock direction)
while pressing it, until it is
screwed all the way in and
locked.
4
12
14
※To check the winding state of the mainspring, refer to "■HOW TO READ THE
POWER RESERVE INDICATOR " on page 62.
※There is no need to turn the crown further when the mainspring is fully wound. The
crown can be turned without damaging the watch mechanism; it only winds the
mainspring free.
2
1
21
23
6
18
5
19
4
20
22
3
6
13
11
※While screwing the crown in, the
watch clicks as the mainspring is
wound. This should not cause
any concern since movement of
the mainspring causes this.
8
15
12
14
16
4
17
6
GMT
10
44
8
4
Wind the mainspring until the power reserve indicator shows a full-wound
state. The second hand starts moving.
4
6
3
11
6
5
15
13
5
4
3
17
6
GMT
The crown is a screw-lock
type crown. Turn the crown
counterclockwise (the six
o'clock direction) to unlock
the screw. (When the screw is
completely unlocked, it will be
projected outward a little from
its original position.)
15
1
23
3
2
17
22
2
1
23
4
20
22
●How to manually wind the mainspring by turning the crown
1
After unlocking the screw,
slowly turn the crown clockwise (the twelve o'clock direction) to wind the mainspring.
Take care not to press down
the crown.
2
This watch is a self-winding watch equipped with a manual winding mechanism.
・When the watch is worn on the wrist, the motion of the wearer's arm winds
the mainspring of the watch.
・When first using a stopped watch, it is recommended that you manually wind
the mainspring by turning the crown.
42
41
CAUTION
Second click:Time setting
Date
24-hour hand
Power reserve
indicator
First click:Independent
adjustment of the hour hand
(interrelated with date setting)
12
22
Spring Drive, the unique mechanism made available only by SEIKO technology, ensures quartz
accuracy while using the mainspring as its sole power source. (For details of the Spring Drive
mechanism, refer to the separate manual "Spring Drive Handbook.")
The watch will work continuously for approximately 72 hours (three days) when the mainspring is
fully wound.
The watch features a power reserve indicator to show the winding state of the mainspring. The
sweep second hand works in a perfectly smooth movement.
This is a self-winding watch equipped with a manual winding mechanism. When first using the
watch, manual winding is convenient.
Grand Seiko SPRING DRIVE GMT, equipped with the caliber 9R66 movement with the 24-hour
hand, features the rotating bezel and outer frame of the dial on which 24-hour indicators are
imprinted. The hour hand can be independently adjusted, offering some types of usage of the
hour display, for instance, by setting the 24-hour hand to Japan time, and even if you set the hour
hand to display the time of the place you are staying (local time) while traveling abroad, you can
easily check the time in Japan (home time), or by setting the 24-hour hand in combination with
the rotating bezel, the watch can display the times of two or three different places.
10
Hour hand
⇒If you wish to continue to set
the date and time, do not screw
the crown in but follow the
instructions of "How to set the
date " on page 56, and "How to
set the time" on page 46.
45
HOW TO SET THE TIME
・When setting the time, ensure that the watch is working: the mainspring is
sufficiently wound.
・This watch has two different types of 24-hour hand usage. Since the time
setting method differs according to the type of usage, please choose the type
before setting the time.
〈Type 1〉Simply using the 24-hour hand to show the 24-hour time as an AM/PM indicator.
Example: Display of the time of 10:08'42"
〈Type 2〉Using the 24-hour hand to indicate the time in a different time zone.
・By setting the hour hand to the time of the place where you live (home time),
and the 24-hour hand to the time of a place different from where you live
(somewhere with time difference), this type uses the 24-hour hand for dual
time display.
Example: Display of the 24-hour hand set to GMT while the hour and minute
hands set to indicate 10:08'42" (AM) Japan time
46
21
21
20
19
16
6
8
14
12
14
21
4
12
20
19
18
16
21
20
19
18
6
11
Second click position
10
18
10
16
14
12
5
1
GMT
15
20
10
4
3
17
Screw lock type crown locked
6
18
5
19
8
2
1
23
49
4
3
Screw lock type crown unlocked
4
17
6
8
GMT
Second click position
10
15
16
6
6
22
13
1
11
11
2Turn the crown counterclockwise to set the 24-hour and minute hands
to the current time. When setting the 24-hour hand, be sure that
AM/PM is set correctly.
2
13
15
6
8
11
1
23
4
17
6
4
22
6
GMT
13
●How to set the 24-hour hand as a 24-hour indicator〈When the
type 1 usage is selected〉
・Set the " ▽ " mark on the rotating bezel to the 12 o'clock position.
1Unscrew the crown by turning it counterclockwise (the 6 o'clock
direction), and then pull it out to the second click when the second
hand is at the " 0 " second position. The second hand will stop on the
spot.
48
5
5
15
13
4
4
3
17
6
GMT
47
1
23
3
1
23
2
22
2
22
Example 1 : To set to 10:00 AM, adjust the 24-hour hand to indicate " 10 " on the
bezel (the 5 o'clock position), and the minute hand to the " 0 "
minute position.
Example 2 : To set to 6:00 PM, adjust the 24-hour hand to indicate " 18 " on the bezel (the
9 o'clock position), and the minute hand to the " 0 " minute position.
14
12
※The hour hand and date are to be set later so it is not necessary to adjust them
yet, even if it is indicating the wrong time and date. (Refer to page 56)
※Set the minute hand behind the time and then slowly advance it to the desired time.
3Push the crown back in simultaneously with the time signal. The
setting of the 24-hour, minute and second hands to the current time is
now completed.
※The telephone time signal service (117) is helpful in setting the exact time.
4Set the hour hand to the current time. Pull the crown out to the first
click.
※The second hand continues moving.
50
2
21
6Push the crown back in upon completion of time setting. Screw the
crown in completely until it stops by turning it clockwise (the 12
o'clock direction) while pressing it.
51
6
18
5
19
3
Screw lock type crown unlocked
First click position
8
6
15
10
16
4
17
1
GMT
13
11
12
14
●How to set the 24-hour hand as a dual time indicator for a different
time zone area〈When the type 2 usage is selected〉
2Turn the crown counterclockwise to set the 24-hour hand to " 2 " on the
rotating bezel (the 1 o'clock direction) and the minute hand to " 0 " minute.
※The time difference adjustment function serves only for a time in a different time zone area
where the time difference from Japan time is represented in one-hour increments.
※Set the minute hand behind the time you want to set and then slowly advance it to the
desired time.
21
20
19
18
6
10
11
53
8
16
4
12
14
21
6
1
GMT
13
Second click position
6
18
5
19
5
20
4
4
3
4
17
6
11
10
13
8
GMT
15
12
14
16
2
1
23
3
1
23
22
15
・This will be explained by using an example of a case in which the 24-hour hand
indicates the time in Paris while the hour and minute hands show Japan time. When
the time in Japan is 10:00 AM, it is 2:00 AM in Paris (when daylight saving time is not
in effect).
・Set the " ▽ " mark on the rotating
bezel to the 12 o'clock position.
・The telephone time signal service
2
22
(117) is helpful in setting the
exact time.
1Unscrew the crown by turning it
Screw lock type
crown locked
counterclockwise (the 6 o'clock
Screw lock type crown
1
direction), and then pull it out to
unlocked
the second click when the second
Second click position
hand is at the " 0 " second
position. The second hand will
stop on the spot.
17
52
※Adjust the date also at this point if necessary. (Refer to "HOW TO SET THE DATE"
on page 56.)
※When setting the hour hand, be sure that AM/PM is set correctly.
※Turn the crown slowly, checking that the hour hand moves in one-hour increments.
※While screwing the crown in, the watch clicks as the mainspring is wound. This
should not cause any concern since movement of the mainspring causes this.
1
23
4
20
22
5Turn the crown to set the hour hand only to the current time.
3Push the crown back in simultaneously with the time signal. The setting of
the 24-hour, minute and second hands to the time in Paris (2:00 AM) is now
completed.
4Pull out the crown to the first click.
5Turn the crown to set the hour hand only to the Japan time (10:00 AM).
2
1
※While screwing the crown in, the watch clicks as the mainspring is wound. This
should not cause any concern since movement of the mainspring causes this.
6
18
5
19
3
21
23
4
20
22
6
First click position
10
11
8
15
16
4
17
14
12
54
Tips for more accurate time setting
1
GMT
13
※Adjust the date also at this point if necessary. (Refer to "HOW TO SET THE DATE"
on page 56.)
※When setting the time, be sure that AM/PM is set correctly.
※Turn the crown slowly, checking that the hour hand moves in one-hour increments.
HOW TO SET THE DATE
・Date setting is performed by turning the hour hand only.
・The date advances one day by turning the hour hand two full rotations clockwise, passing
midnight, while the date is set back one day by turning the hour hand two full rotations
counterclockwise.
・Manual date adjustment is required at the end of a month that has less than 31 days: February,
April, June, September and November.
1Unlock the screw lock type crown by turning it counterclockwise (the 6 o'clock direction), and
then pull it out to the first click.
2Each time the hour hand makes two full rotations by turning the crown, passing midnight, the
date changes one day.
21
6
18
5
19
3
4
4
17
6
8
15
11
First click position
10
13
Screw lock type crown locked
Screw lock type crown unlocked
Counterclockwise: The hour hand turns
clockwise. The date advances one day when
the hour hand makes two full rotations.
12
4
6
13
11
Roma
+01:00
−08:00
Paris
+01:00
−08:00
10
12
14
Tokyo
+09:00
0:00
Madrid
+01:00
−08:00
Seoul
+09:00
0:00
London
0:00
−09:00
Beijing
+08:00
−01:00
Dakar
0:00
−09:00
Hong Kong
+08:00
−01:00
Rio De Janeiro
−03:00
−12:00
Bangkok
+07:00
−02:00
La Paz
−04:00
−13:00
Tashkent
+06:00
−03:00
Santiago
−05:00
−14:00
Karachi
+05:00
−04:00
New York
−05:00
−14:00
Moscow
+03:00
−06:00
Mexico City
−06:00
−15:00
Nairobi
+03:00
−06:00
Los Angeles
−08:00
−17:00
Cairo
+02:00
−07:00
Anchorage
−09:00
−18:00
Istanbul
+02:00
−07:00
Auckland
+12:00
+03:00
Johannesburg
+02:00
−07:00
Sydney
+10:00
+01:00
+
14
Japan Standard Time
5
Greenwich Mean Time
3
City Name
GMT
15
●Time Differences
23
17
※While screwing the crown in, the watch clicks as the mainspring is wound. This should not
cause any concern since this is caused by movement of the mainspring.
59
1
10
※Refer to "●TIME DIFFERENCE TABLE IN THE WORLD" on page 60 for time differences
from Japan time.
※When using the independent hour hand adjustment function, make sure that AM/PM and the
date are correctly set.
※When turning the hour hand counterclockwise, advancing past midnight, in order to set the
hour hand to indicate any time near 9:00 PM and midnight, temporarily set the hour hand back
to 8:00 PM first, and then advance it to the desired time.
By utilizing the 24-hour hand and the 24-hour indicators on the rotating bezel and outer frame of
the dial, the watch can independently display times of one or two different places other than the
home time which is shown by the hour and minute hands.
<Example>
To set the 24-hour hand to indicate the time in Paris and Bangkok while setting the hour and
minute hands to display 10:08 AM Japan time.
1First, set the " ▽ " mark on the rotating bezel to the 12 o'clock position.
2Then, set the hour and minute hands to 10:08 AM, and adjust the 24-hour hand to indicate " 2 "
on the rotating bezel. Refer to "How to set the 24-hour hand as a dual time indicator for a
different time zone area" on page 47 for more details.
3There is a 6-hour time difference between Paris and
6
Bangkok; the time in Bangkok is 6 hours ahead of the time
8
4
in Paris (when daylight saving time is not in effect). Turn
the rotating bezel counterclockwise to move the " ▽ " mark
back for 6 hours on the 24 hour indicators. The hour time
in Paris is shown by the 24-hour hand pointing to " 2 " (2:00
AM) of the 24 hour indicators on the outer frame of the
6
dial, while the hour time in Bangkok is shown by the 24hour hand pointing to " 8 " (8:00 AM) of the 24 hour
indicators on the rotating bezel.
(Refer to "● TIME DIFFERENCE TABLE IN THE
WORLD" on page 60 for time differences from Japan
time.))
21
6
11
8
15
16
4
17
1
GMT
Screw lock type crown locked
Screw lock type crown unlocked
Counterclockwise: Advancing the time
First click position
(The hour hand turns clockwise.)
2
21
6
18
5
19
3
Clockwise: Setting the time back (The
hour hand turns counterclockwise.)
3After completing the independent hour hand adjustment, check the position of the
hour hand once again and push the crown back in. Then, screw the crown in
completely until it stops by turning it clockwise (the 12 o'clock direction) while
pressing it.
60
※Turn the crown slowly, checking that the hour hand moves in one-hour increments.
■HOW TO USE THE ROTATING BEZEL
2
13
58
57
1
23
4
20
22
・ For example, while traveling abroad and staying in a place with a different time from
where you live, you can conveniently set the watch to indicate the local time in the
different time zone area without stopping the watch.
・ The independent hour hand adjustment function is interrelated with the date display.
If the hour hand is correctly adjusted, the watch displays the correct date of the place
where you are staying.
1Unlock the screw lock type crown by turning it counterclockwise (the 6 o'clock
direction), and then pull it out to the first click.
2Turn the crown to set the hour hand to indicate the time of the place where you are
staying. The hour hand is independently set to the time in a different time zone.
19
14
12
※The date can be adjusted either by advancing it or by setting it back. Turn the hour hand clockwise or
counterclockwise by whichever is convenient.
※Turn the crown gently.
HOW TO USE THE INDEPENDENT HOUR HAND ADJUSTMENT FUNCTION
22
16
1
GMT
Clockwise: The hour hand turns
counterclockwise. The date is set back
one day when the hour hand makes two full
rotations.
※While screwing the crown in, the watch clicks as the mainspring is wound. This should not
cause any concern since movement of the mainspring causes this.
20
20
2
1
23
55
3After completing the date setting, check the position of the hour hand once again and
push the crown back in. Then, screw the crown in completely until it stops by turning
it clockwise (the 12 o'clock direction) while pressing it.
18
22
・ Take notice of the following points in order to set the time more accurately.
1.Before setting the time, wind the mainspring until the power reserve
indicator shows a full-wound state.
2.When using a watch after it has stopped, wind the mainspring sufficiently
and wait approximately 30 seconds after the second hand starts moving, and
then pull the crown out to the second click and set the time.
3.Do not stop the second hand with the crown being at the second click
position for thirty minutes or longer. If the second hand has been stopped
exceeds 30 minutes, push the crown back in to its original position, and let
the second hand move for 30 seconds or longer, then restart the time setting.
16
56
6Push the crown back in upon completion of time setting. Screw the crown in
completely until it stops by turning it clockwise (the 12 o'clock direction)
while pressing it.
61
■HOW TO READ THE POWER RESERVE INDICATOR
・The power reserve indicator lets you know the winding state of the mainspring.
・Before removing the watch from your wrist, observe the power reserve indicator to
check if the watch has stored enough power to keep running until the next time you
wear it. If necessary, wind the mainspring. (To prevent the watch from stopping, wind
the mainspring to store the excess power that will allow the watch to run for extra
time.)
62
The Power Reserve
Indicator
The winding state of
the mainspring
●Remarks on the self-winding mechanism of the mainspring
・The correlation between the number of hours the watch is worn and
the winding state of the mainspring is provided below for your
reference. However, the winding state of the mainspring may vary
depending on actual use conditions, such as the number of hours you
wear the watch or the extent of your movement while wearing it. It is
recommended that you observe the power reserve indicator to check
the level of remaining power of your watch.
2/3 wound
1/3 wound
Unwound
The mainspring of the watch becomes fully wound when it is worn for
twelve hours for three to five days.
Approximately 48
hours (2 days)
Approximately
24 hours (1 day)
The watch either stops
or is running down.
※In a case where you wear the watch for a short period of time each day, observe the
power reserve indicator to check the level of the remaining power. If necessary,
manually wind the mainspring.
Fully wound
The number of hours Approximately 72
the watch can run
hours (3 days)
※When the mainspring is fully wound, the crown can be turned further, or the
mainspring may wind without damaging the mainspring itself. The mainspring of the
watch employs a slipping attachment structure, a self-winding watch specific
mechanism, to prevent the mainspring from over winding.
63
■TO PRESERVE THE QUALITY OF YOUR WATCH
CAUTION
64
CAUTION
●CARE OF YOUR WATCH
●RASH AND ALLERGY
・The case and bracelet touch the skin directly just as underwear. If they are left
dirty, the edge of a sleeve may be stained with rust of those who have a
delicate skin may have a rash.
・After removing the watch from your wrist, wipe perspiration or moisture with a
soft cloth. This will prevent the watch from being soiled, adding to the life of
the gasket.
・Adjust the bracelet and band so that there will be a little clearance between the
bracelet or band and your wrist to avoid accumulation of perspiration.
・If you are constitutionally predisposed to rash, the band may cause you to
develop a rash or an itch depending on your physical condition.
・The possible cause of the rash are as follows:
1. Allergy to metals or leathers
2. Rust, dust or perspiration on the watch or band
・If you develop any skin reactions, take off the watch and consult a doctor
immediately.
<LEATHER BAND>
・When removing moisture from a leather band, do not rub the band with the
cloth as this may discolor it or reduce its gloss. Be sure to blot up the moisture
using a soft dry cloth.
65
<METAL BRACELET>
・Clean the watch bracelet with a soft toothbrush dipped in water or soapy
water.
CAUTION
●WATER RESISTANCE
WARNING
・Check the dial or case back of your watch for the water resistant quality, and then
see the table below.
・Do not turn or pull out the crown when the watch is wet, as water may get inside
the watch.
Condition
Indication for water
of use
resistance
a: Indication on the dial
Degree
b: Indication on the
of water
case back
resistance
66
a
b
a
b
a
No indication
No indication
No indication
WATER RESIST
No indication
b
WATER RESIST or
WATER RESIST 5 BAR
a
b
a
b
Designed and
manufactured to withstand
accidental contact with
water such as splashes
and rain.
Suitable for swimming, yachting Suitable for shallow
and other aquatic sports as wellas
for works closely associated with diving without a heavy
breathingapparatus.
water such as kitchen work,
watening and fishing.
Genuine
Genuine diving
diving using using heliumgas.
scuba.
Water resistance
(3 bar)
×
⃝
×
×
×
×
×
×
×
×
Water resistance
(5 bar)
⃝
⃝
×
×
×
No indication, or
WATER RESIST 10 BAR Water resistance
(10 bar)
WATER RESIST 10 BAR
⃝
⃝
⃝
×
×
⃝
⃝
⃝
×
×
No water resistance
No indication, or
WATER RESIST 20 BAR Water resistance
(20 bar)
WATER RESIST 20 BAR
■PLACES TO KEEP YOUR WATCH
・If the watch is left in a temperature below −10℃ or above +60℃ for a
time it may function improperly or stop operating.
・If your watch is 3 bar water resistant, do not use it in water.
・If your watch is 5 bar water resistant, do not use it in any type of diving
including skin diving.
・If your watch is 10 or 20 bar water resistant, do not use it in saturation diving
or scuba diving.
●PRECAUTIONS ON WEARING YOUR WATCH
・In case you tumble and fall or bump into others with the watch worn on your wrist,
you may be injured by the reason of the fact that you wear the watch.
・When you make contact with children, especially with infants, they may get injured or
develop a rush caused by allergy.
・Do not drop the watch or hit it against a hard surface and not wear the watch while
playing active sports. The watch may gains/loses time.
67
■PERIODIC CHECK
long
・Do not leave the watch in a place where it is subjected to strong magnetism or
static electricity.
・Checking and overhaul of the watch (cal. 9R66) will be performed by SEIKO.
When you take the watch to the retailer from whom it was purchased, request
that the watch will be checked and overhauled by SEIKO.
・Do not leave the watch where there is strong vibration.
・We suggest that you have your watch checked by SEIKO every 3 or 4 years
for oil condition or damage due to water or sweat. After checking the watch,
adjustment and repair may be required.
・Do not leave the watch in a dusty place.
・When replacing the parts, please specify "SEIKO GENUINE PARTS."
・Do not expose the watch to gases or chemicals.
(Ex.: Organic solvents such as benzine and thinner, gasoline, nail polish,
cosmetic spray, detergent, adhesives, mercury, and iodine antiseptic
solution.)
・Be sure to have the gasket and push-pin replaced with new ones when
checking the watch.
68
69
・Do not leave the watch in a hot spring, or do not keep it in a drawer having
insecticides inside.
■TROUBLE SHOOTING
Trouble
Possible cause
Solution
The power supplied by the mainspring has been
consumed.
Refer to "How to wind the mainspring" to wind the mainspring and reset the time. While you are wearing the watch or when
you take it off, check the remaining power shown by the power reserve indicator and wind the mainspring if necessary.
Even though you wear the watch every day, The watch is worn on your wrist only for a short period
the power reserve indicator does not move up. of time, or the amount of arm movement is small.
Wear the watch for an extended period of time, or when taking off the watch, turn the crown to wind the
mainspring if the remaining power shown by the power reserve indicator is not sufficient for the next use.
The watch has been left or worn in extremely high
or low temperatures.
Return the watch to a normal temperature so that it works accurately as usual, and then reset the time. The watch has been
adjusted so that it works accurately when it is worn on your wrist under a normal temperature range between 5℃ and 35℃.
The watch is left close to an object with a strong
magnetic field.
Prevent the watch from making close contact with magnetic objects so that the watch works accurately as usual, and then reset the time.
If the watch does not work accurately again after the above procedure, contact the retailer from whom the watch was purchased.
You drop the watch, hit it against a hard surface, or wear it while
playing active sports. The watch is exposed to strong vibrations.
Reset the time. If the watch does not work accurately as usual after resetting the time, contact
the retailer from whom the watch was purchased.
The watch stops operating.
The watch temporarily gains or loses
time
70
The inner surface of the glass is clouded.
Moisture has entered the watch because the gasket has deteriorated.
71
Contact the retailer from whom the watch was purchased.
The watch stops even though the power The watch has been left under a temperature
reserve indicator is not showing "0".
below 0℃.
If the watch is left under a temperature below 0℃, it may stop if the power reserve indicator is
showing less than one-sixth. In such a case, turn the crown to wind the mainspring.
Right after starting the watch, it seems that the second When starting the watch, it takes a little time before the
hand moves quicker than usual when setting the time.
adjustment function starts working (this is not a malfunction).
It takes several seconds before the adjustment function starts working. Set the time after the
second hand moves for approximately 30 seconds to set the time correctly.
※Contact the retailer from whom the watch was purchased for any other troubles.
72
■REMARKS ON AFTER-SALES SERVICING
■REMARKS ON REPLACEMENT PARTS
・Your GRAND SEIKO watch was strictly checked and completely
adjusted at the factory to ensure its high accuracy. However, if your
watch gets out of order with the correct way of use as described in this
instruction booklet within the guarantee period, take your watch to the
dealer from whom your watch was purchased together with the
certificate of guarantee. Repair and adjustment will be made without
charge.
・For repair after the guarantee period or for any other information
regarding the watch, contact the retailer from whom your watch was
purchased or the "CUSTOMER SERVICE DEPARTMENT" of SEIKO
WATCH CORPORATION.
・SEIKO makes it policy to usually keep a stock of spare parts for
GRAND SEIKO watches for 10 years. In principle, your watch can be
reconditioned within this period if used normally. (Replacement parts
are those which are essential to maintaining the functional integrity of
the watch.)
・The number of years that a watch is considered repairable may vary
greatly depending on the conditions under which it was used, and
normal accuracy may not be achieved in some cases. We recommend,
therefore, that you consult the retailer from whom the watch was
purchased when having them repair your watch.
・The case, dial, hands, glass and bracelet, or parts thereof may be
replaced with substitutes if the originals are not available.
73
■SPECIFICATIONS
74
1.Features:…Hour, Minute and Second hands, Power Reserve Indicator and Date
2.Frequency of crystal oscillator:…32,768 Hz
3.Loss/gain (monthly average):…Within± 15 seconds (equivalent to± 1 second per
day) (worn on your wrist at a normal temperature
range between 5℃ and 35℃)
4.Operational temperature range: …−10℃∼+60℃
Under a low-temperature condition (below 0℃),
always keep at least one-sixth of the watch power
shown by the power reserve indicator.
5.Driving System:…Spring Drive (Self-winding type with manual winding function)
6.Hand movement:…Sweep second hand
7.Duration:…Approx. 72 hours (Approx. 3 days) *If the power reserve indicator shows the
power supplied by the mainspring is full before starting the watch.
8.IC (Integrated Circuit):…Oscillator, frequency divider, and spring drive control circuit (CMOS-IC): 1 piece
9.Jewels:…30 jewels
※The specifications are subject to change without prior notice due to product
全国共通フリーダイヤル
0120-612-911(下記の最寄地に着信いたします)
お客様相談室
〒 101-0044 東京都千代田区鍛冶町 2-1-10
〒 550-0013 大阪市西区新町 1-4-24(大阪四ツ橋新町ビルディング8階)
お客様相談係
〒 060-0061 札幌市中央区南一条西 7-20-1
(札幌スカイビル4階 セイコーサービスセンター内)
〒 810-0801 福岡市博多区中洲 5-1-22
(松月堂ビル6階 セイコーサービスセンター内)
75