1
I
I
owners
manual
J
J
: _i
l
MODEL NO.
358.350842
358.350870
358.350880
[
F
: i
CRRFTSM R'N
2.1 2,1PS 2.3PS/VL
CHAIN SAWS
'CAUTION:
Read Rules for
Safe Operation
and Instructions
Carefully
• Assembly
•Operation
• ' Maintenance
Parts
• Repair
[
Sears,
Roebuck
and
Simpsons-Sears
Co.,
Chicago,
Ltd.,
Ill.
60684
Toronto,
U.S&
Canad£
Congratulations on your purchase of our new Craftsman gas chain saw. It is the finest gas
chain saw available on the market today for the price you have paid. We ask that you take a
few minutes to read the following instructions so you can enjoy the use of this new chain
saw for many years to come.
TABLE OF CONTENTS
1
2
3
4-8
Bar and Chain Installation
........................
Fuel and:Oil
.....................................................
Starting and Stopping
.....
Maintenance
......................................................
Air Filter & Carburetor
.......
Fan Housing
Clutch
Exhaust Ports
Spark Plug
Bar and Chain
Stone Replacement and Chain Sharpening (Models 358-350870
and 358-350880)
Chain Sharpening (Model 358-350842)
. .....................
7-10
11-12
12-14
15-30
Cutting With Your Saw
.............................................
Parts List and Illustrations
...........................................
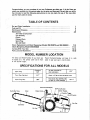
MODEL NUMBER LOCATION
The Serial and Model Number of your chain saw
Record the Serial Number
is located on a fiat surface under
of the thr0ttle trigger.
place in case your saw is lost or stolen.
and in front
and keep it in a safe
SPECIFICATIONS FOR ALL MODELS
SPark Plug:
i
Champion
"
CJ8
!
Air Gap, Flywheel to
Coil Lamination
|
J
.010"
Point Gap: (Ignition)
.017"
Chain: 14" Bar _ Pitch-76 Drive Links
Spark =Plug Gap:
.025""
Fuel: (½ pt.-8oz.-SAE No. 30 I
Oil (SD) to 1 GaL Gasoline)
t
16 to 1
Serial and Model No.
Oil Pump Button
Guide Bar Nose
Chain
Choke
Starter Handle
Trigger
On-Off Switch
Gas Cap
Guide Bar
GUARANTEE
During the first ninety days, we will repair the Chain Saw, free of charge, if
defective in material or workmanship..
If the Saw is used for commercial or rental purposes, the guaratttee applies
for thirty days.
This guarantee service is available by simply returning the Saw to any Sears
store.
SEARS ROEBUCK
AND CO. USA
SIMPSONS SEARS,
LTD. CANADA
I MPORTANT
rules for safe operation
1.
Never operate a chain saw when you are
fatigued.
2.
Use safety footwear, snug-fitting clothing, and
eye, hearing and head protection devices.
Always use caution when handling fue!. Move
the chain sawat least 10 feet (3 m)from the
fueling point before Starting the engine.
Do not allow other persons to be near the
chain saw when starting or cutting with the
chain saw. Keep bystanders and animals out of
the work area.
3.
4.
5.
6.
7.
8.
9.
10.
11.
12.
Neverstart cutting until you have a clear work
area,:, secure footing, and a planned _retreat
path from the.failing tree,
Always hold the chain saw firmly with both
hands when the engine is running. Use a firm
grip with thumbs and fingers encircling the
chain saw handles.
Keepall partsofyour body away from the saw
chain when the engine is running.
Before you start the engine, make sure the
saw chain is not contacting anything.
Always carry the chain saw with the engine
stopped, the guide bar and saw chain to the
rear, and the muffler away from your body.
Never operate a chain saw that is damaged,
improperly adjusted, or is not completely and
and securely assembled. Be sure that the saw
chain stops moving when the throttle control
trigger is released.
Always shut off the engine before setting it
down.
Use extreme caution when cutting small size
brush and saplings because slender material
13.
may catch the saw chain and be whipped toward you or pull you off balance.
When cutting a limb that is under tension be
alert for spring back so that you will not be
struck when the tension in the wood fibers
is released.
14.
Keep the handles dry, clean and free of oil or
fuel mixture.
15.
Operate the chain saw only in well ventilated
areas.
16.
Do not operate a chain saw in a tree unless
specifically trained to do so.
All chain saw service, other than the items
listed in the Owner's Manual maintenance instructions, should be performed by competent
chain saw service personnel. (e.g., if improper
tools are used to remove the flywheel, or if an
improper tool is used to hold the flywheel in
order to remove the clutch, structural damage
to the flywheel could occur which could subsequently cause the flywheel to burst.)
Guard against kickback. Kickback is the upward motion of the guide bar which occurs
when the saw chain at the nose of the guide bar
contacts an object. Kickback
can lead to
dangerous loss of control of the chain saw.
17.
18.
TO AVOID KICKBACK:
Hold the chain saw firmly with both hands.
Don't over reach. Don't let the nose of the
guide bar contact a log, branch, ground or
any other obstruction, Cut at high engine
speeds. Don't cut above shoulder height.
Follow
manufacturer's sharpening and
maintenance instructions for the saw chain.
BAR AND CHAIN INSTALLATION
Model 358-350842
Model,358-350870
Model 358-350880
(Craftsman 2.1)
(Craftsman 2.1 PS)
(Craftsman 2.3 PS!VL)
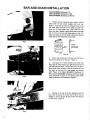
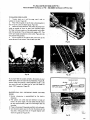
1.
Remove the bar mounting screw, washer, and bar
clamp with the bar wrench supplied with your saw.
Figure 1. After the bar clamp is removed there wit| be
two guide plates mounted on the guide bar studs. Re*
move one of these plates only. After guide bar and
chain have been installed, replace guide plate with bevel
side to front of unit and with flange sides out (fig. tA).
Install bar clamp but do not tighten clamp screw beyond
finger tight so chain adjustment can be made.
Fig. 1
Fla_je
out
or
_ay
from
clzzide
bar On both
sid_
Fig. 1A
2.
Mount the slotted end of the bar over the mount-
ing pins and slide bar to the rear.
3.
•
Fig. 2
Figure 2.
Hold about 8" of chain between your hands, with
sharp edge of cutters facing your right hand. Form an arc
with the chain and place it (cutters first) over the top of
clutch drum. Once the chain is over the clutch drum, turn
the chain so the drive link tangs engage the sprocket
teeth. Figure 2. On Model 358-350870 (Craftsman 2.1
PS) and model 358-350880 (Craftsman 2.3 PS/VL) engage
chain drive links in groove of rim sprocket teeth. Chain
travels in direction arrow indicates in Figure 2.
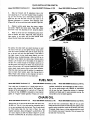
4.
Starting at the top of the .bar, gradually work the
chain into the groove of the bar until all drive links are
engaged in the bar groove. Be sure cutters face forward
on top of bar. Figure 3.
Fig. 3
CHAIN
Model358-350842
(Craftsman
2.1)
5.
Slide bar forward and:fit
INSTALLATION
(CONT'D.)
Model 358-350870(Craftsman
2.1 PS)
Model 35.8-350880 (Craftsman 2.3 PSFVL)
adjustment hole in bar
over adjusting pim if you have trouble fitting the adjust- ....
ing pin into the hole, use a small ended screwdriver to :
guide the pin into the hole. The pin may have to be ......
adjusted backwards or forwards with adjusting screw
(Figure 4B) to line up with the hole in the bar. Figure 4A.
6.
Replace outside guide piate, bar clamp, washer,
and screw. Tighten bar clamp screw finger tight. Make
sure hole in bar and adjusting pin are properly aligned.
7.
Raise tip of bar and turn the adjusting screw clockwise to tension the chain. Figure 4B. There should be
light tension in the chain, but the chain should move
around the bar freely when pulled by hand,
Adjusting
Pin
_,
Fig. 4A
Be careful, the chain teeth are sharp] Continue to hold
the nose of the bar up and tighten the bar clamp screw
with the wrench provided. Now pull the chain along the
bar to be sure you have the right tension. If the chain is
too tight, toosen the bar clamp screw slightly, turn the
adjusting screw counterclockwise a little and lift up on
the chain. Then tighten bar clamp screw. Recheck chain
tension. Lift the chain off of the middle of the length of
the bar. if it is loose enough for the tangs to come out of
the bar groove, the chain is too loose. You should only be
able to lift the chain 1/8"" from bar. Whenever using a new
chain, check chain tension often, as new chain stretches.
After the chain has been used for awhile, it is a good practice to check chain tension every time the gas tank is
filled. Proper chain tension is very important to help insure maximum performance from your chain saw.
Fig. 4B
FUEL MIX
Model 358-350842
(Craftsmen 2.1)
Model 358-350870
(Craftsman 2.1 PS)
Model 358-350880
(Craftsman 2.3 PS/VL)
Your chain saw is powered by a 2 cycle engine and re-
available, use SAE No. 30 nondetergent oil (MS or better).
quires a fuel mixture of gasoline and oil. The proper fuel
mixture i116 parts gasoline to 1 part oil, or 1/2 pint (8
oz.) Sears oil Cat. 32-36555 to one gallon or one imperial
gallon of "regular"
leaded gasoline. If Sears oil is not
oils in your fuel mix. Prepare the mixture in a separate
container and shake well to assurecomplete mixing. Do
not use dirty oil or old (stale) gasoline.
Do not use multi-viscosity oils (10W-30) or reprocessed
CHAIN OIL
Model 358-350842
(Craftsman 2.1)
Model 358-350870
Remove the oil flit cap and fill the oil tank with S.A.E. No..
30 (SD) oil. This oil is for chainand bar lubrication and is
in no way connected with the fuel mix. The oil tank should
be filled every time the fuel tank is filled. For cold
weather operation. Above 40 degree F use SAE 30 oil: 40
to 0 (zero) degree use SAE 10: Below 0 degree F use 10%
kerosene and 90% SAE 30. Be careful to keep the fuel mix
(Craftsman 2.1 PS)
Model 358-350880
(Craftsman 2.3 PS/VL)
and oil free from contamination. Wipe off the saw after
filling the fuel and oil tanks if either has been spilled. Under
normal cutting conditions, push the oil button once every
10 seconds. Under heavy, or dirty cutting conditions, push
the oil button once every 5 seconds. This will prevent the
bar and chain from burning.
IMPORTANT
MODEL
MODEL
Sears Models 358-350870
358.350870
358-350880
(Craftsman 2.1 PS)
(Craftsnmn 2.3 PS/VL)
(Craftsman 2.1 PS) and 358-350880
(Craftsman 2.3 PS/VL)
are
equipped with both automatic and manual oiler for lubd,eation of the guide bar and chain. The
.!,
, automatic oiler operates when the saw is running and may be assistedby pushing the manual oiler
button if additional oil is required for extreme cutting cond'xtions,
H
•
1. Fill the oil tank, (see paragraph under CHAIN OIL) Fill oil tank each time fuel tank
is filled.
2. Prime the oiler system before starting engim by pushing manual oiler button until
oil is visible at top Of bar,
_i_!
::_i:_i:,
_
•
3. Start' engine. Check automatic oiling by pokxting guide bar towards a clean surface
H
with engine running at cutting speed. Oil dhouid be seen on clean surface as it is
thrown off end of guide bar. WARNING:
"• •••_••L:;I;
ii¸
T'q=of guide bar should be several inches
away from clean surface - but do not let moving chain touch any kind of surface
•;
becausesaw could kick back and cause injury,
.
Sears model 358-350842
has a manual oiiw only. Push the oiler button every ten
secondsduring cutting to provide proper lubrication of bar and chain.
STARTING
AND STOPPING
Model 358-350842
Model 358-350870
Model 358-350880
(Craftsman 2.1)
(Craftsman 2-1 PS)
(Craftsman2-3 PS/VL)
NOTE: For your convenience, starting instructions
are
also printed on the saw below the handle, beside the
"on'L'_off '' switch.
1. Fill oil and fuel tanks. Check chain tension.
Pump oil button until oil appears on bar.
2. Push ignition switch forward to "on".
3. Push choke lever "on" (to right).
4. STARTING
(This is the recommended starting
position) See Figure 5.
Hold saw away from body with right hand and
elbow slightly bent, see Fig, 5. Squeeze trigger,
Push saw straight away from body and at same
time pull starter handle. Repeat action until
engine fires. Push choke off (to left) and repeat
starting procedure until engine runs. Hold on to
starter handle while allowing the rope to rewind.
DO NOT PULL STARTER HANDLE
OVER
12'" TO 14" FROM ENGINE.
5_
Fig. 5
Release trigger to idle engine.
6. If engine does not fire after 5 to 6 pulls, it may
be flooded. Push choke off(clockwise) and pull
starter several times while holding trigger at wide
open throttle. If saw has run out of fuel, 8 to 10
pulls with choke on may be required to restart
engine. When restarting a hot engine, or one
which has just been refueled, you may. have to
3
]
•
use the choke in order to clear the vapors out of
the carburetor,.
....
7. To stop engine, pull switch back to "off"
position. The engine may also be stopped by
pushing •the ,choke lever to, the right (counterclockwise).
CARE AND MAINTENANCE
Model. 358-350842
Follow these helpful
get the best possible
major breakdown and
of your saw is one of
(Craftsman 2.1)
Model 358.350870
(Craftsman 2.1 PS) Model 358.350880(Craftsman
hints on care and maintenance to
service from your saw, to prevent
costly repair bills. Careful servicing
the most important steps in preven-
2.3 PS/VL)
"live maintenance. Shoutct your saw develop trouble that
_, you are not prepared to handle, take it to a Sears Store
for service.
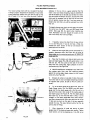
AIR Fi LTER AND CARBURETOR
To clean the air filter or adjust the carburetor, loosen the
filter cover screw (ahead of choke knob) and remove it
and the air filter cover. The air filter element should be
removed after evew 10 hours use and rinsed out in gasoline or fue! and oil mix. Squeeze it out well and be sure
the filter element fits into the cavity neatly without folds,
and flush with the top surface. See figure 6. Allow filter
element to dry before restarting engine or mixture will be
too rich;
CARBURETOR
ADJUSTMENTS
General:
Carburetor adjustments are made at our factory and wil|
be correct for most app ications. Further adjustments may
be required due to altitudes above 4000 ft., brands!age of
fuel used, and atmospheric conditions.
Caution:
The needles and associated parts will be damaged if Overtightened.
Adjustments:
Step 1. (Refer to Figure 7) -- Remove carburetor cover,
Turn high speed and low speed needles clockwise until
they stop, Remember! Don't Over-Tighten.
Fig. 6
Step 2. Turn high and low speed needles counterclockwise one full turn.
Step 3. Start engine in the same manner as described on
page 3 under "Starting and Stopping". The chain saw
engine should be run four or five minutes to bring it to
operating temperature.
Step 4. (Low Speed Needle Adjustmeht) " Squeeze the
throttle trigger and hold it in for five or six seconds. This
should clear the combustion chamber of built up fuels.
StepS. Squeeze throttle trigger .quickly. The engine
should accelerate smoothly. If it does not, turn low speed
needle counterclockwise 1/16 of a turn and squeeze
throttle quickly again. Continue turning tow speed screw
1/16 of a turn at a time until smooth acceleration is accomplished.
Step6. (High Speed Needle Adjustment) -Squeeze
throttle trigger all the way in. Test cut a piece of wood.
Step 7. If engine speed begins to fade, turn high speed
needle counterclockwise 1/16 of aturn and make anoth'er
test cut. Continue this until fading is corrected.
Needle
Idle Speed
Screw
Low Speed
Needle
Fig. 7
Step 8. If there is an excessive amount of smoke in the
exhaust, turn high speed needle 1/16 of a turn clockwise
until excessive smoke is reduced. .........
Step 9. (Idle Speed Adjustment) -- Turn the idle speed
screw (Figure 7) clockwise until the chain beginsto move.
Now slowly turn idle speed screw counterclockwise until
chain stops moving.
PLEASE NOTE: Observe "Rules For Safe Operation"
when adjusting carburetor.
TO adiust the high speed needle, first make a test cut with
the saw; If the engine power seems to fade in the cut, the
mixture is set too lean. Remove the saw from the cut. The"
high needle should be tu rned counterclockwise slightly. If
there seems to !_e an excessive amount of smoke in the
exhaust,
the mixture is set too rich. Remove the saw from
the cut. The high speed needle should be turned clockwise
slightly. After each adjustment make a testcut to check
performance.
:....
Fig. 8
4
AIR FILTER
AND CARBURETOR
(CONT'D}
When finally adjusted, the high speed needle will usually
be 7/8 to 1-1/8 turns open (counterclockwise). Try to
keep sawdust away from the carburetor when the filter
cover is removed. Be sure to hold the saw firmly with
both hands while cutting. Before replacing the air filter
cover, be sure to clean off the mating surfaces of cover
and carburetor box. See figure 8.
Turn choke knob to the right (counterclockwise) and
close choke lever over carburetor so that the finger on
the choke lever (cover underside) lines up with the slot
in the choke lever over the carburetor. Replace the filter
cover and tighten cover screw Figure 9.
Fig. 9
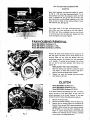
FAN HOUSING REMOVAL
Model 358-350842
Model 358-350870
Model 358.350880
(Craftsman 2.1)
(Craftsman 2.1 PS)
(Craftsman 2.3 PS/VL)
Remove the three screws holding the fan housing] to the
saw. See Figure 10. Clean out any loose sawdust in fan
housing. Clean out any chips and sawdust that have
accumulated between the cylinder fins. Use compressed
air if available. If cooling fins are blocked, the cylinder
will run too hot and could adversely effect power and
engine life.
REPLACING
THE
FAN HOUSING!
I.
._o.
Fan Housing
2.
Move the housing into position, pulling the starter
rope slightly to make sure the starter dogs are in
position around the starter pulley notches.
Replace the three fan housing mounting screws,
short screw to the front.
Fig. 10
CLUTCH
Model 358-350842
Model 358-350870
Model 358-350880
(Craftsman 2.1)
(Craftsman 2.1 PS)
(Craftsman 2.3 PSiVL)
If the clutch must be removed from your saw, it is best to
return the saw to your Sears Store, as they have the
proper equipment to do the job. However, if you must
remove the clutch, follow these instructions carefu!ly.
1.
2.
3.
F!g. 11
t=
Remove the bar and chain.
Remove the rubber connector from the spark plug.
Remove the fan housing, figure 10, and secure the
flywheel from turning. This is best accomplished by
wedging a socket wrench or an end wrench between
the flywheel nut and the front handlebar. See
Figure 11. Clutch removal should not be attempted
without first removing the fan housing, as damage
to the starter or flywheel could occur.
CLUTCH
4_
Use a soft,
blunt
ended
the clutch
spider
off
the two
the
notches
clutch
hand
on
the
it.
Use
does
provided
spider
threads.
of'the
only
your
spider.
After
Sears Store
the
spider
clutch
drum
and
sprocket
should
sprocket,
is the
and
be
in the clutch
bearing
clutch
counterclockwise.
punch
when
you
start
the
be removed.
All _
especially
the same time.
apply
the
it
_
i
taps with
wood
to
Fig. 12
the spider,
Follow
the hammer
as the spiderwiil
cutting
When
a coat of oil
Reinstall
a few
are sufficient,
the
have it replaced,
drum.
Just
remove
long run if the chain
at
drum,
spider
removed,
wear,
worn,
are replaced
the
itself
for
the
them
been
in the
the
If
strokes, take the
may
inspected
reinstalling
and
has
economical
sprocket
a few
and let
tf it is severely
most
directly
shoes, to turn
provided.
after
saw to
parts
are left-
Do not pound
or clutch
notches
loose
to turn
Use one of
as the threads
t2.
spideri
the
come
and hammer
for *,,hispurpose and turn
clockwise,
See Figure
ends
not
punch
of the crankshaft.
(CONT'D)
for
tighten
with
the
saw.
'
the
instructions
reinstalling
the
housing and reconnect
in "Bar
bar
and
and Chain
chain.
Installation"
Replace
the
fan
the spark plug lead.
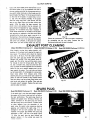
EXHAUST PORT CLEANING
Model 358-350842
After
lengthy
build-up
lose
running
The
every
25
30
from
the
to
Remove
the
posed,
pull
plug
the
enough
Use a wooden
may
out
to
the rubber
the
exhaust
rope until the
loose
cleaning
the
piston.
to
carbon
clear
may
have fallen
wire
brush
spark
the
plug
and the rubber
(Craftsman
2,3 PS/VL)
plug.
ports
ex-
piston moves
port_. See Figure
ice cream bar stick
from
scraping
Turn
from
unit
the exhaust
tool,
over
as you
and
shake
air is convenient,
exhaust
ports.
After
the starter rope to allow
cylinder
of any material
into the cylinder.
and replace
spark
about
If compressed
ports, pull
358-350880
engine to
exhaust
stick,
all loose carbon.
Model
connector
the
use a metallic
the
(Craftsman 2.1 PS)
be cleaned
remove
With
close the
not
scratch
blow
the
should
scrape the carbon deposits
Do
piston
'Pull
starter
!3,
causing the
ports
and
muffler.
far
size, to
ports
exhaust
hours.
spark
Model 358-350870
time, carbon deposits will
in the exhaust
power.
ports.
(Craftsman 2.1)
the
if necessary.
the
which
Clean screen with
muffler.
Clean and gap.
Replace
the spark
Fig. 13
plug
con hector.
SPARK PLUG
Modei_358-350842
(Craftsman 2.1)
Model 358-350870
(Craftsman 2-1 PS)
Model 358-350880
If the spark plug is not clean and properly gapped,
the engine will be hard to start and will not deliver
the best performance. The spark plug should be
cleaned and gapped every 25 hours. Remove the
rubber connector on the spark plug and remove
the spark plug. Use a wire brush or a pocket knife
to clean deposits from the electrodes of the
spark plug..Be careful when removing, cleaning,
:gapping,
and replacing the spark plug. If it is
damaged it will not work properly and must be
replaced. The proper gap between the spark plug
electrodes is .025 _'. (use wire or flat gauge} Figure
14. After the spark plug has been cleaned and
gapped, replace it in the cylinder and attach the
r_ ihh_=r
r'_nr_=P1"_r
Fig. 14
(Craftsman 2.3 PS/VL)
Model 358-350880
(Craftsman 2.3 PS/VL)
The rubber,vibration" mounts are designed so that a failure
of one of the mounts will not affect the safety of the saw.
Operation of the saw With a broken rubber mount may
Craftsman 2.1 PS and Craftsman
2.3 PS/VL are equipped
with a sprocket nose bar. The sprocket nose does not require grease. Bearings have been greased and sealed at the
factor/, Remember, keep the saw chain well oited. A well
oiled saw chain witl greatly increase the life of saw chain,
bar and saw chain drive sprocket.
cause excessive wear to other components, resulting in a
hazardous situation. Should a rubber mount break, take it
to a Sears Store immediately and have it replaced.
Check a|l vibration mount screws and nuts for tightness
every two to three hours of operating time.
Two Vibration
Mounts
Sprocket Nose Bar
Vibration
Mount
O
Vibration
Mount
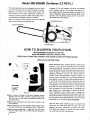
HOW TO SHARPEN YOUR CHAIN
Model
Model
OPERATING-STONE
358-350870
358-350880
REPLACEMENT
(Craftsman
(Craftsman
AND
2.1 PS) Only
2.3 PS!VL)
CHAIN
Only
FILING
WITH
POWER
SHARP
OP E RATI NG I NSTRUCT! ONS
Before sharpening chain, tension (tighten) to where alt tie
straps (no. 1, fig. 19) rest on guide bar. Pull chain upward
.
.
from top of guide bar. The bottom of the drive links should
be evenwith guide bar rails for proper tension (see arrow in
Figure 19 page 9). Clean loose wood chips from around
sharpening mechanism (see fig. lB). Rotate depth adjustment knob counterclockwise (opposite direction of
arrow on knob) until tight (no. 3, fig. 15). Start engine and
open throttle to about 1/2 open. Push oscillating knob (no.
2, fig. 15) to the extreme left outof locking slot and pull
back on knob. If no sparks are visible coming from the top
of the guide bar in front of the bar clamp, release oscillating
_SI"RUCI30NS
½ ;o_.. _
per
aL _lt, oline.
anua! camfu_l,/.
Fig. 15
• Never advance the depth knob before checking contact
: between stone and Chain. If stone is contacting:the chain,
the chain can. inmost cases, be sharpened without adVancing the knob.:
_::
• Never advance the depth knob more than one. click at any
• one sharpening.
: ,
• After sharpening, push the oscillating knob forward and to
the right and snap into the locking slot :(No. 2, Figure 15).
• Do not loosen screws (No. 1, Figure 15). The two screws
hoJd the aligning plate that has been properly adjusted at
the factory,_
_
:, _
i i i "
7
knob and turn depth adjusting knob (no. 3, fi_]. 15) one
click in direction of arrow. Pull back on osci!lating knob
again. Repeat until a small shower of sparks can be seen.
When sharpening stone contacts chain (indicated
by
sparks), move the oscillating knob rapidly side to side. This
side to side movement sharpensthe chain and will also dress
the stone with an even wear. Sharpening a dull chain should
require about 5 to 10 seconds. Do not oversharpen.
When
the chain
should
not
advances
This
be
the
allows
needs sharpening
turned
stone
the
fear of grinding
more
sufficiently
operator
too
again_ the
than
one
to
sharpen
to sharpen
much from
the chain.
depth
click.
the
One
the
chain
knob
click
chain.
without
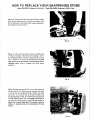
HOW TO REPLACE YOUR SHARPENING
Model_358-350870 (Craftsman 2.1 PS) Only
Model 358-350880
(Craftsman.2.3 PS/VL) Only
Figure 16, Remove guide'bar screw and bar clamp; Loosen
chain tension adjusting screw to relieve chain tension. Slip
bar off adjusting pin and slide bar back towards sprocket as
far as possible and remove chain.
Fig. 16
Figure 17, After guide bar clamp is removed, CLEAN inside
of clamp thoroughly.
Slide stone carrier assembly left to
the sharpening position, Remove oscillating knob and stud
(No, 1, Figure 17) by turning counterclockwise. Use a 5/16
open end wrench on flats located at extreme bottom end of
oscillating
assembly.)
knob,
(Stud
is threaded
STONE
into stone carrier
Fig. 17
Figure 18,_Slide stone carrier (No. 1) out of bar clamp and
off pivot pin (No. 2). Clean pivot pin and place two drops
of oit on shaft and spread with finger. Replace new stone
carrier (No. 1) on pivot pin (No. 2) and slide in position, Be
sure that adjusting arm (No. 3) is placed under adjusting arm
of depth adjusting block, (No. 4). Replace oscillating knob
,and stud and tighten securely. (Use 5/16 end wrench to
tighten 1/4 turn after finger tight.) Flats located at extreme
bottom of oscillating knob will accommodate 5116 end
wrench ................
Fig. 18
SHARPENING
STONE REPLACEMENT
INSTRUCTIONS
(CONT'D.)
Model 358-350870
Model 358-350880
Before
guide
installing
bar,
side
(Craftsman 2.1 PSI Only
(Craftsman 2.3 PS/VL) Only
guide bar and
of
guide
bar mounting
studs
of
thoroughly.
bar clamp
guide
bar
and
be sharpened
wise.
A
stone
bar mounting
are located)
on
and
A wood
mounting
long
new chain,
improperly
and
aligned
pad
inside
cause
chain
will
sides of
(where
guide
mounting
chip or debris
pads could
one side
clean
chain
would
cause
pad
between
teeth
cut
the
to
side
same
problem.
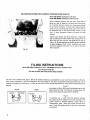
Tighten chain tension until all tie straps (No. I, Figure I9)
rest on guide bar and when pulled at top, the bottom of the
drive links will pull up even with guide bar rail (No. 2,
Figure 19). Be sure chain has this tension anytime the chain
is being sharpened. Under normal conditions your chain
should be sharpened once after 2 or 3 tanks of fuel have
been consumed.
1
Fig. 19
FILING INSTRUCTIONS
Model 358-350870 (Craftsman 2.1 PSI - 358-350880
(Craftsman 2.3 PS/VL) Only
1/4" PITCH TYPE 89
(For use on chain saws with power sharp systems)
This chain was so designed that approx. 80% of the needed sharpening is accomplished by your saw's built-in-sharpener. While the
chain is being sharpened by the built-in-sharpener, the cutting edges of the cutters are gradually being altered. 89 series chain is
designed and engineered to efficiently cut wood. If rocks, nails, or other foreign materials are cut, more frequent sharpenings will be
required.
Fig. 20
Fig.20
Top
Plate
:
Depth
Fig. 21
Gauge
Side Plate
Just before the 5th or 6th Power Sharp sharpening, the side
plates should be filed. This task can be done easily and
quickly with a Sears file and guide No. 32-36516.
:
• Fig. 2!
In abnormal use, in sand, rocks and abrasive materials,
side plates should be checked more often. Damage to the
cutters caused by abrasive materials usually results in
"discoloration
Spots" where the chrome has been worn
away. Cutter side plates should be filed until these spots
are removed.
I_ILING
Model 358-350870
TO SHARPEN
SIDE
1,
chain
Tension
wobble
2,
so it will=be
Determine
inside
24.: Keep
and depth
filing
to outside
of
reference
and chain guide
snug, won't
from
rock
or
guide
to
should
be from
yourself.
Figure
on file guide paraflel
bar. This will
filing
2.3 PS/VL)
Only
23.
File stroke
or away
marks
allowing
gauge. Figure
direction.
cutter
is the same angle contained
long smooth
(Craftsman
22.
and guide on top of chain,
rest on top of cutter
3.
(CONT'D.)
2.1 PS) - 358-350880
PLATES
on the bar. Figure
Place file
INSTRUCTIONS
(Craftsman
keep cutter
with
chain
angle at 22 o. This
on a new cutter.
Figure
24. Use
strokes.
4.
File all
other
side and fiie
cutters
on one side of chain,
all cutters.
then move to the
This will save you time.
Fig. 22
Fig. 23
the cutters
Fig. 24
If you
have filed
Power
Sharp chain wil! look like top illustration.
correctly,
the cutters
on your
Figure 25.
=
Correct
the
filing
notch
check
witl produce
and
1/32"
mark
a small projection
on either
projection.
(1/32").
end of your
to
Figure 25.
:
SUGGESTIONS
Use
file holder
FOR
!
OBTAINING
SHARP
CUTTING
EDGES
1. Normal_
sharpening
is accomplished
by
the
built-in
sharpener.
2. File
cutters
cutters
the
be kept
when
dull
and
same [ength.
only
The
side plates
approximately
1/32
attempt
of an inch
to keep
should
longer
all
always
than
the.
top piate.
3. Preserve the original filing angles carefully
4. Care should
top
plate.
be taken
Keep
and uniformly.
never to file into the bottom
guide
chain and guide bar(Figure
lines
on file
24).
guide
....
aligned
of the
with
=
Fig. 25
in
FILING
INSTRUCTIONS
Model 3581350842 (Craftsman 2.1)
Your wood cutting chores will be a lot easier if the chain
is always properly sharpened and tensioned. If you notice
cutting becoming difficult and you have to push on the
.saw to make'it cut and you notice the chain "walking"
sideways in the cut, this is a good indication that the
chain is dull and needs sharpening. Keep in mind that if
you let the chain cut in the dirt you will dull it at once,
Stop the engine and sharpen the chain. Cutting with a dull
chain puts an excessive load on both the bar and chain
and witl greatly shorten their life. if you have never pur.chased a bar and chain, you wilt be surprised how costly
they are.
To properly sharpen your chain,you will need a file holder,
the correct size file (5/32" dia.), and .025 ,Depth Gauge
jointer. (See page 29). Be careful when handling saw
chain. Remember that even though the cutters are too
dull to cut wood, they'!! still cut fingers.
1.
If possible, remove the chain from the saw and put
it in a saw filing vise. If you do not have a filing vise,
....i-increase the chain tension on the bar and sharpen the
::,:chain while it is on the bar.
Fig. 26
2.
There are three angles that must be maintained for a
properly sharpened chain. See Figure 26. All three of
these angles can be maintained accurately by Using.a file
iholder and file,
• :-_-3.
Place the file holder soit rides on both cutter top
i plate and: depth gauge {Fig, 26)with guide marks in fine
with the bar. File the cutters on the side of the chain
jointer
away from the Cutting edge. Apply Pressure:on the forward stroke on!y. See Figure 26.
....
4. _ Hold file:hepdte down 10degrees as you :make a few
firm strokes away from your self, appty_ing pressure
against the cutting edge. Apply pressure on the forward
stroke only. See Figure 26.
5.
Sharpen all cutterson one side of chain, then work
from other side of chain and repeat sharpening procedure
for opposite side cutters. Be sure to file all cutters uniformly.
Fig. 27
6.
To set all depth gauges at the same level, place the
Depd_ Gauge jointer, Part No. 55005, over each depth
gauge and file the depth gauge with a fiat file until it is
level with the jointer, then round off the leading edge of
each depth gauge. See Figure 27. File the depth gauges
after each four to five times the chain is filed, it is not
necessary to file depth gaugesafter every chain sharpening. When sharpening the chain, also check the bar to see
2
if there are any burrs on the rails of the bar, especially
around the nose. File away the burrs with a flat file. Be
sure to clean off filings.
7.
After sharpening all teeth and setting all depth
gauges,clean off the chain and re-set chain tension. Tighten
chain tension until all tie straps(see no. 1, fig. 28) rest on
11
Fig. 28
FILING
INSTRUCTIONS
Model 358-350842
bar and,
when
links
guide
will pull
up
While
pulling
button
to
flush
the chain
out
at top,
bar rail
of the drive
and at
the same time,
in the bar.
If the oil
bar is plugged.
(See Figure 3). This hole will
become
with
open.
filled
dirt
(each time
If it becomes
the oil
chain thoroughly in S.A.E. No. 30 oil before installing it.
This will relubricate itand prevent rust from forming.
help
pump
If at any time your bar or chain shows signs of wear, or
burning, take the saw to your Sears Store for attention.
hard to push, check to see if the oil hole in
ally
and sawdust,
remove
passage. To equalize
wear,
oCcasion-
Never use the bar as a pry bar or to force wood apart.
If the bar becomes lodged in a cut and cannot be moved,
use wedges, or an axe to free the saw. If the bar becomes
bent, replace it.
so check the oil
chain is sharpened)
plugged,
to see that
it is
the bar and clean out
the bar should
2.1 )
over when reinstalled. If the chain becomes very dirty,
remove it and wash it in kerosene, or solvent.Soak the
(no. 2, fig. 28).
the
hole regularly
(Craftsman
the bar, pump the oil pump
the chain
of the groove
becomes
the bottom
guide
around
re-lubricate
fittings
button
pulled
even with
(CONT'D.)
be turned
STORING YOUR CHAIN SAW
Model 358-350842
(Craftsman 2.1)
Model 358-350870
(Craftsman 2.1 PS} Model 358-350880
(Craftsman 2.3 PS/VL)
Once you have finished using the saw and it is to be idle for several months, follow
these steps before _oring the saw.
1. Drain fuel from the tank.
3. Drain oil from oil tank.
2. Start Engine andallow to run at idle speed until all fuel is used.
4. Store in a dry area and cover to protect from dust.
CUTTING TIPS
Model 358-350842
(Craftsman 2.1)
Before
tackiing
limbs,
or a small log just
big trees it is best if you
and
to
become
way
to
hold
with
your
right
the
hand
throttle
should
not
Model 358-350870
familiar
the
left
on
the
with
trigger
stand
the
with
directly
chain catches in a, cut and
controls.
stand
on-the
rear
cut a few branches,
Start
to get the feel of the chain saw,
saw is to
hand
(Craftsman 2.1 PS) Model 358-350880
to
front
handle
your
so
you
backward.
and
saw
your
You
in case the
cutting will actually be more difficuffi (continued page 13)
finger.
saw
properly, and
i chain is properly sharpened, the Cutting should be relatively
effortless. It is not necessary to press:down hard to make the
saw cut. Pushing the saw too hard will slow the engine and
can operate
index
the
of the
it is running
pump the oit button a few times to be sure it is delivering
oil to the bar and chain correctly. Squeeze the trigger
to open the throttle wide open and start the cut. If the
The accepted
left
handlebar
right
behind
bucks
the
the engine, see that
(Craftsman 2.3 PS/VL)
See Figure
•
29.
12
CUTTING
TIPS (CONT'D)
,Just as the chain completes the cut, Jet off of the throttle
and let the engine idle. Cutting should always be done
at futl throttle.
Do not, however, run the engine at full
throttle out of the cut. Remember to push the oil button
every 5 to t0 seconds white cutting with model 358350840. Listed below are brief instructions on how to make
the most common cuts with your chain saw.
Fig. 29
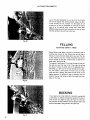
FELLING
(CUTTING
Before
felling
DOWN A TREE)
a tree, select a safe path of retreat
wor_king
area around
the tree.
leaning,
if at all, and
then
to fall.
Trees
be cut
through
Jarger
trees.
of up
notch
about
want
the
cut about
2"
above
the felling
cut,
cut. This
leaves a small
while
tree
length
of the
sides of
the
is
the tree
can usually
is required
1/3 the way through
tree
the
don't
If the
to
fall.
notch
cut all
is falling,
direction.
the tree
you want
on
30.
the
desired
where
pass. Under-cutting
To undercut,
the
decide
and clear a
the way
to 6 or 7 inches in diameter
in one
See Figure
side you
Observe
Then
the felling
and on the opposite
the way through
section
and
of wood
allows
side
to act as a hinge
in diameter
cut should
of
to the under-
the tree to fall
tree is larger
bar, the felling
the tree, on
make
in the
than
be made from
the
both
tree.
Fig. 30
H
BUCKING
If you have to cut in the middle
at both
until
ends, cut halfway
the saw
cut
the guide bar out
using the top
Fig. 31
!3
begins
of a log which
through
the topside of the
to close, see Figure
and undercut
is supported
from
3t,
the bottom
edge of the guide bar. See Figure
log, or
then
puEI
side of log
32.
BUCKING _(CONT'D)
This
witl
keep
Be careful
the
when
log from
pinching
undercutting
that
into
the ground.
Make sure that
you
can get
of the
when
out
finishing
the
way
cut.
side of the log so the
finishing
the cut.
you
the
possible
iog_will
roll
bar and
chain
does
have good
should
When
the
the
chain.
not
log begin
stand
away
cut
footing
so
to
roll
on the uphitl
from
you
when
Fig. 32
Whenever
possible;
and supported
will
help
allowed
the iog should
by other
excess filing
to
the ground
etc. See Figure
out
of the
dirt.
the ground,
it will
keep the chain
to touch
be placed off
logs, limbs,
keep
chain
sharp
dull
When
rapidly,
and excess
33. This
the chain
is
requiring
wear
to bar.
Fig. 33
I-I
"'" UNII
""'" lU
(CUTTING
Small
limbs
under cut
limb
cut
LIMBS FROM
STANDING
can be cut in onecut.
Larger
first
hasbeen
closer to
the
higher
on a ladder,
the
....
and
then
removed,
tree,
limbs
finish-cut
another
if desired;
either
by
it is advisable
tree
to
saw handle
you
should
type
of cutting'operation.
drop
it.
from
finishing
the
to tie a length
so the
Extreme
limbs should
above.
saw cannot
care should
be
After
the
cut may be made
for appearance.
climbing
TREE)
If you
tree,
must
or standing
of rope from
fall
be
very
far
the
if
used in this
Fig. 34
It
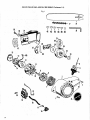
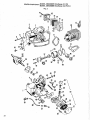
SEARS CHAIN SAW--MODEL
358-350842
(Craftsman 2.1)
Fig. 1
t
_-
_"
32
f
31
t
37
t
t
t
t
41 42 43 44 45 46
29
26
47
25
15
/
30
13
12
I!
'14
9
2
20
-19
24
35
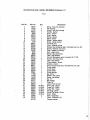
SEARS CHAIN SAW--MODEL
358-350842"(Craftsman
2.1)
Fig. 1
Key No.
Part No.
Qty,
1
2
3
4
5
6
7
8
9
10
11
12
13
14
15
16
17
18
19
20
22
24
25
26
27
28
29
30
31
32
33
35
36
37
40
41
42
43
44
45
46
47
48
15074
11243
15122
42024
4268
42034
42023
11214
15123
1724
39027
23346
39023
15129
23345
3933
3934
39026
39022
15128
23587
23378
32022
48011
23379
23382
22079
23381
11198
15149
15183
44029
31017
51015
39024
52003
52006
52007
52002
52004
52005
23455
23474
63135
1
1
2
1
1
As
As
As
As
As
As
1
1
t
1
1
1
1
2
1
:1
1
1
1
2
1
1
1
1
2
1
1
2
1
1
1
1
1
I
1
Req.
Req,
Req.
Req.
Req.
Req.
2
1
Description
Screw - front fan housing
Fan housing
Screws. rear fan housing
Handle - starter
Rope - anchor
Rope - starter
Spring -starter
Starter pulley
Washer - starter pulley
Screw - starter pulley
Flywheel ass'y
Cover - breaker points
Breaker and condenser ass'y (includes Key No. 40)
Screws - breaker mounting
Plate - breaker mounting
Boot - spark plug
Spring - plug connector
Lead - high tension
Coil and lamination ass'y (includes 16,17,18)
Screws - coil mounting
Lead - stop switch
Thrust washer - clutch
Bushing - clutch
Drum and sprocket ass'y (includes Key No. 25)
Clutch shoes
Clutch plate
Clutch spider
Clutch springs
Bar clamp
Washer - bar clamp
Screw - bar clamp
Bar 14"
Bar wrench
Chain 14",
Lead - Point to Coil
Drive Link - Chain
Cutter LH - Chain
Cutter RH - Chain
Tie Strap - Chain
Pre-set Tie Strap - Chain
Rivet- Chain
Plate - Guide Bar
Decal - Craftsman 2.1
Owners manual
16
SEARSCHAINSAW"MODEL358-350870(Craftsman
2.1 PS)
MODEL358-350880(Craftsman
2.3 PS/VL)
: •
:i_ '
Fig. 1
....
t
35
33
!
57 58
63
32
59
60
36
61
31
56
26
15
25
24!
13
12
11
14
2O
62
64
17
SEARS CHAIN
SAW -MODEL
358-350870
MODEL 358-350880
(Craftsman 2.1 PS)
(Craftsman 2.3 PS/VL)
Fig. 1
Key No.
1
2
3
4
5
6
7
8
9
10
tl
12
13
14
15
16
17
18
19
20
22
24
25
26
27
28
29
30
31
32
33
35
36
37
39
41
44
45
46
47
48
49
50
51
52
53
54
55
56
57
58
59
6O
61
62
63
64.
Part No.
15074
11243
15122
42024
4268
42034
42023
11214
15123
1724
39027
23346
39023
15129
23345
3933
3934
39O26
39022
15128
23587
23461
32O23 _
48013
23379
23382
22079
23381
11186
15149
15183
44047
31017
51023
23445
39024
10144
23438
23443
15004
23444
23442
15157
23458
23439
23441
15064
48015
23455
52024
52028
52027
52025
52026
123632
11252
23633
63135
Qty.
1
1
Description
Screw - front fan housing
Fan housing
2
Screws - rear fan housing
I
Handle - starter
1
Rope- anchor
1
Rope - starter
1
Spring - starter
1
Starter pulley
1
Washer - starter pulley
1
Screw - starter pulley
1
Flywheel assemb ly
1
Cover-breaker points
1
Breaker and condenser assembly (includes Key No. 41)
2
Screws- breaker mounting
1
Plate- breaker mounting
1
Boot- spark plug
1
Spring - plug connector
1
Lead - high tension
1
Coi! and lamination assembly (includes 16, 17, 18)
2
Screws - coil mounting
1
Lead - stop switch
1
Thrust Washer (silver)
1
Bearing - Clutch Drum
1
Drum
2
Clutch shoes
1
Clutch plate
1
Clutch spider
2
Clutch springs
1
Bar damp (model 358-350870 - Craftsman 2.1 PS)
1
Washer - bar clamp
1
Screw- bar clamp
1
Bar t4" - sprocket nose
1
Bar wrench
1
Chai_ 14"
1
Thrust washer (black)
1
Lead - points to coil
1
Stone & Arm
1
Spring - arm retaining
1
Plate - adj.
2
Screw- adj. plate
1
:Knob- oscillating
1
Knob- depth adj.
1
Pin - i_dexing
1
Spring- indexing pin
1
Spring -depth adj.
1
Followerdepth adj.
1
Nut - depth adj.
1
Sprocket - 9 tooth - 1/4 pitch
Plate - Guide Bar
Rivet
As Req.
Tie Strap
As Req.
Pre-set Tie Strap
As Req. •
Drive link
As Req.
Drive l_nk - bumper
As Req.
1
Decal |model358-350870
- Craftsman 2.1 PS)
1
Bar ctxnp (model 358-350880Craftsman 2.3 PS!VL)
1
:iiDecai [model 358-350880 - Craftsman 2.3 PS/V L)
Owners manual
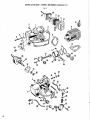
SEARS CH.AIN SAW -- MODEL 358-350842
(Craftsman 2.1 )
Fig. 2
11 49
47
3
9
2
5O
13
54
17
_,,,,24
t
22
19
55
•
21
43
44 i,
42 \@_
31
19
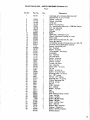
SEARSCHAIN SAW
--MODEL
358-350842
(Craftsman 2.1)
Fig. 2
Key No.
Part No.
Qty.
1
10151
1
2
3
4
5
6
7
8
9
11
12
13
14
15
16
17
18
t9
20
21
22
23
24
25
26
27
28
29
30
31
32
33
34
35
36
37
38
39
40
4t
42
43
44
45
46
47
48
49
50
51
52
53
54
55
56
19044
15136
15108
15134
23492
15135
19043
11244
23591
30005
19049
23352
23389
32018
22077
32019
1723
626605
15127
23354
22076
15126
11141
15137
23358
1952
23357
23356
23148
21012
2589
19046
23359
1629
2464
21013
2615
1949
2592
1674
1660
1677
19051
32021
23604
23589
23592
1709
15187
15189
23387
15036
15131
23456
63135
1
7
1
t
1
!
1
1
2
1
1
2
t
1
1
1
2
1
t
2
1
1
1
2
1
1
1
1
1
1
1
1
1
1
2
1
1
-1
1
2
2
2
2
2
1
1
1
2
2
1
1
2
2
1
Description
Crankcase ass'y (includes Matching Half
and Key Nos. 4, 5, 6, 7 & 42)
Gasket - crankcase
Screws- crankcase
Cotter pin
Screw _ bar adjusting
Pin - bar adjusting (use with 11198 Bar Clamp)
Nut - bar adjusting
Gaskel =cylinder
Cylinder
Baffle
Spark plug - Champion CJ-8
Gasket- carburetor housing to c'case
Piston rings
Piston ass'y(inc!udes Key No. 55)
Piston pin bearing
Connecting rod ass'y(includes Key No. 16 & 19)
Crankpinrollers (28 'Rollers in Strip)
Screws - connecting rod
Nut - flywheel
Washer- flywheel
Thrust washer - crankcase
Crankshaft
Key - flywheel
Oil pump body
Screws - oil pump
Spring - oil pump
O-Ring - plunger
Pk, nger - oil pump
Cap - oil pump
Intake valve - oil pump
Oil line
Weight - oil pick up
Gasket oil pump body
Discharge valve - oil pump
Nut- 1/8" tubing
Ferrule- 1/8" tubing
Discharge line- oil pump
Fitting - discharge line
O-Ring - oil cap
Oil cap
Studs - cylinder
Nut - cylinder
Washer- cylinder
Seal
Bearing
Body Spark arresting muffler
Cover - muffler
Screen - muffler
Screws - Muffler Body
Spacer - Muffler
Screw - muffler cover
Spur - optional
Screws - spur, optional
Retainer- Piston Pin
Spring - oil line protector
Owners manual
2C
SEARS CHAIN SAW -MODEL
•
MODEL
358-350870
358-350880
(Craftsman 2.1 PS)
(Craftsman 2.3 PS/VL)
Fig. 2
52
51 49
47
61
3
1
2
5O
54
53
17
55
42
43
44
33
59
37
56
?
SEARS CHAIN SAW -MODEL358"350870
.
MODEL 358-350880
Key No.
1
Part No.
10153
Qty.
1
2
3
4
5
6
7
8
9
12
13
14
15
19044
15136
15108
T5134
23492
15135
19043
11245
30005
19049
23485
23484
1
7
1
1
1
1
1
1
1
1
2
1
16
17
18
19
20
21
22
23
24
25
26
27
28
29
3O
31
32
33
34
35
36
37
38
39
40
41
42
43
44
45
46
47
48
49
50
51
52
53
54
55
56
57
58
59
6O
61
62
63
32018
22077
32019
1723
626605
15127
23354
22076
15126
1O129
15137
23358
19029
23357
23356
23148
21012
2589
19054
23421
10131
2464
21013
26t5
1949
2592
1674
1677
1660
19051
32021
23604
23589
235921709
23591
15189
23387
15036
15131
19053
11163
15114
10143
23456
15187
22103
23389
1
1
1
2
1
1
2
1
1
1
2
1
1
1
1
1
1
1
1
1
t
2
1
2
1
1
2
2
2
2
2
1
1
1
2
2
1
1
2
2
1
1
1
1
1
1
1
1
64
65
23352
11244
63135
2
1
(Craftsman 2.1 PS)
(Craftsman 2.3 PS/VL)
Fig. 2
Description
Crankcase assembly (includes Matching Half and
Key Nos. 4, 5, 6, 7 & 42)
Gasket - crankcase
Screws- crankcase
Cotter pin
Screw - bar adjusting
Pin - bar adjusting
Nut - bar adjusting
Gasket - cylinder
Cylinder (model 358-350880 - Craftsman 2.3 PS!VL)
Spark plug - Champion CJ-8
Gasket. carburetor housing to c'case
Piston rings
Piston assembly (includes Key No. 55) (model 358-350880Craftsman 2.3 PS/VL)
Piston pin bearing
Connecting rod assembly (includes Key Nos. 16 & 19)
Crankpin rollers (strip of 28)
Screws - connecting rod
Nut - flywheel
Washer - flywheel
Thrust washer - crankcase
Crankshaft (model 358-350870 - Craftsman 2.1 PS)
Key flywheel
Oil pump body
Screws - oil pump
Spring -oil pump
Quad Ring - plunger
Plunger- oil pump
Cap - oil pump
Intake valve - oil pump
Oil line
Weight - oil pick up
Gasket - oil pump body
Spring - diaphragm
Diaphragm Assembly
Ferrule 1/8" Tubing
Discharge line- oil pump
Fitting - dischargeline
O-Ring - oil cap
Oil cap
Studs - cylinder
Washers- cylinder
Nuts - cylinder
Seal
Bearing
Body - Spark arrestingmuffler
Cover. muffler
Screen - muffler
Screws - muffler body
Baffle - muffler
Screw - muffler cover
Spur (optional)
Screws- spur (optional)
Retainer - PistonPin
Gasket - pump body cover
Cover - oil pump assembly
Screw - oil pump cover
Complete Pump Assembly
Spring - oil line
Spacer - muffler cover
Crankshaft (model 358-350880 - Craftsman 2.3 PSiV L)
Piston ass'y(includes ref. 55) (model 358-350870 Craftsman 2.1 PS)
Piston ring (model 358-350870- Craftsman 2.1 PS)
Cylinder (model 358-350870 - Craftsman 2.1 PS)
Owners manual
22
SEARS CHAIN
SAW -MODEL
358-350842
MODEL 358-350870
(Craftsman 2.1)
(Craftsman 2.1 PS)
Fig. 3
41
13
16
tL
/
41
35
23
17
SEARSCHAli_ISAW-MODEL
358:350842 (Craftsman 2.1 )
358-35087{} (Craftsman 2.1 PS)
MODEL
Fig. 3
r
Key No.
Part No.
Qty.
1
2
3
4
5
6
7
8
23376
11188
15165
15147
23377
625712
15143
23375
15146
23581
34034
19045
23369
23373
1636
11191
23493
23362
15145
23366
23367
15139
23388
23452
23372
23361
11247
23384
10123
. 19048
_119047
11143
15138
11147
15152
• 1709
23363
23364
21014
22091
1
1
1
1
1
1
2
1
1
1
1
1
1
1
3
1
1
1
1
1
9
10
11
12
13
14
15
16
17
18
19
20
21
22
23
24
25
26
27
28
29
3O
31
32
33
34
35
36
37
38
39
4O
41
42
43
_44
45
46
47
48
....
15151
1648
15037
15141
15129
19058
22081
2582
63135
1'
1
1
1
1
1
1
1
1
1
1
1
5
1
_2
2
1
1
1
1
1
1
2
1•
2
1
1
1
• k
Choke knob
Carburetor cover
Screw- Carburetor cover
Wave washer - choke lever
Choke lever
Screw - Choke lever
Screws- Carburetor
Spacer - Choke
Wave washer - Shutter
Choke - Shutter
Carburetor
Gasket - Carburetor.
Air Filter
Boot - Throttle wire
Screws - Carburetor housing to C'case
Handle and Carburetor housing
Grip - handle
Button - Oil pump
Pin - Trigger
Reed
Reed Stop
Screw- Reed
Dust seal
Trigger
Throttle rod
Push rod- Oil pump
Gas tank top
Decal - tnstruction
Gas cap assembly (includes Key No. 30)
Gasket - Gas cap
Gasket - Gas tank
Gas tank bottom
Screws - Gas tank
Cylinder shroud
Screws - Cylinder Shroud - Rear
Screws- Cylinder shroud - Front
Weight- Fuel pick up
Felt - Fuel pick up
Line - Fuel pick up
Front handle bar (model 358-350870 - Craftsman
2.1 PS, only)
Washer - Handle bar
Screw- Front Handle Bar _Top
Screws- Front Handle Bar - Bottom
Screw - Handle to gas tank - Rear
Screws - Handle to gas tank - Front
Gasket- Carburetor cover
Front handle bar (model 358-350842 - Craftsman 2.1)
Switch - on-off
Owners manual
SEARS CHAIN'SAW--MODEL
358.350880
(Craftsman 2.3 PS/VL)
2
16
18
14
27
15
56
24
13
211
25
\
SEARS CHAIN'SAW-MODEL
Key No.
1
2
3
4
5
6
7
8
9
10
11
12
13
14
15
16
17
18
19
20
21
22
23
24
25
26
27
28
29
30
31
32
33
34
35
36
37
38
39
40
41
42
43
45
47
48
49
50
51
52
53
54
55
56
57
58
59
60
61
Pax No.
23376
11238
15144
15147
23377
625712
15143
23375
15146
23581
34034
19045
23369
23373
1636
11237
23599
23595
15193
23366
23367
15139
23388
23601
23372
23594
11235
23384
-10123
19048
19047
11143
15138
11147
15152
1709
23363 _
23364
21014
221O4
15194
15196
15037
15129
2582
23597
15036
23598
23611
15192
11236
23596
15036
23612
23602
23603
1642
15197
19074
63135
358-350880
Qty.
1
1
1
1
1:
1
2
1
1
1
1
1
1
1
3
1
1
1
1
1
1
1
1
1
1
1
1
1
1
1
1
5
,1
2
2
1
1
1
1
1
2
2
1
2
2
1
1
2
: 1
I
2
1
1
1
1
1
1
(Craftsman 2.3 PS/VL)
Description
Choke knob
Carburetor cover
Screw - carburetor cover
• Wave washer - choke lever
Choke lever
Screw - choke lever
Screws- carburetor
Spacer - choke
Wave washer - shutter
Choke - shutter
Carburetor
Gasket-carburetor
Air filter
Boot throttle wire
Screws - carburetor housing to C'case
Handle
Grip * handle
•Button - oil pump •
Pin - trigger
Reed
Reed stop
Screw reed
Dust seal
Trigger
Throttle Rod
Push rod - oilpump
Gas tank top
Decal, instruction
Gas cap ass'y includes ref. 30
Gasket - gascap
•Gasket - gas tank
Gas tank bottom
Screws - gas tank
Cylinder shroud
Screws - cylinder shroud - rear
Screws - cylinder shroud - front
i Weight - fuel pick up
Felt - fuel pickup
Line - fuel pick up (bulk no, 8133)
Front handle bar
Screw - top front handle
Screw - front handle bar - top
Screws - front handle bar - bottom
Screws - handle to gas tank, front
Switch - on-off
Isolator mounting - handle to gas tank
Screw - connection
Bracket - isolator - gas tank
Spacer - rear mounting
Screw - rear mounting spacer
Carburetor housing
Isolator mounting -handle to carb,
Screws - bracket to carb. housing
Isolator - pad
Isolator - front handle
Bracket - front handle
Lockwasher - front handle bracket
Nut - front handle bracket
Gasket - carb. cover
::Owners manual
2_
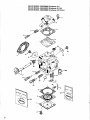
SEARS MODEL 358-350842
SEARS MOD EL 358-350870
SEARS MODEL 358-350880
(Craftsman 2.1)
(Craftsman 2.1 PS)
(Craftsman 2.3 PS/VL)
I0
I7
29
--,-34-
_H
_ 27
SEARS MODEL 358-350842
SEARS MODEL 358-350870
SEARS MODEL 358-350880
Key No.
4
5
6
7
8
9
10
11
12
!3
14
t5
16
17
18
19
:20
21
22
23
24
25
26
27
28
29
30
31
32
33
34
Part No.
34042
34043
34044
34045
3717
19045
34047
34048
34049
34051
34052
3429
34053
34054
34055
34056
3778
3779
3780
34058
34059
3429
34066
34061
3783
3784
34062
34063
3784
34064
34065
(Craftsman 2.1)
(Craftsman 2.1 PS)
(Craftsman 2.3 PS/VL)
Description
*Body Channel Welch Plug
Diaphragm Gasket
*Diaphragm
Diaphragm Cover
Diaphragm Ret. Screw & Lockwasher
Flange Gasket
Fuel Pump Gasket
*Fuel Pump Diaphragm
Fuel Pump Body
Fuel Pump Body Ret. Screw & Lockwasher
Idle Mixture Screw
*Idle Mixture Screw Spring
*Idle Speed Screw "
*Idle Speed Screw Spring
*Inlet Control Lever
*inlet Fulcrum Pin
*Inlet FutcrumPin
Ret. Screw
!nlet Needle
* Inlet Screen
* Inlet Tension Spring
High Speed Mixture Screw
*High Speed Mixture Screw Spring
Nozzle Check Valve Assembly
Throttle Shaft & Lever
Throttle Shaft Clip
Throttle Shaft Clip Ret. Screw & Lockwasher
*Throttle Return Spring
Throttle Shutter
*Throttle Shutter Screw & Lockwasher
*Gasket Set
Repair Parts Kit
(*)
Indicates contents of Repair Parts Kit
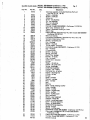
28
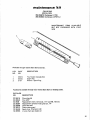
maintenance
CHAIN
SAW
MODEL
NO.
358-350842
Craftsman 2.1
•
MAINTENANCE
ITEMS
BUT NOT FURNISHED
SAW
Available through nearest Sears Service Center.
KEY
NO.
PART
NO.
DESCRIPTION
1
2
3
4
55003
55004
55005
3157
File Holder (includes file)
5/32"' File
Jointer Depth Guage
Wrench - Spark Plug
Accessories available through your nearest Sears Store or Catalog outlet.
29
CATALOG
NO.
DESCRIPTION
32-36516
32-36545
32-3605
32-36393
32-36608
32-36513
32-36403
32-36555
File and guide
File, 5/32'"
Replacement chain 1/4" pitch micro-chise!,
Replacement guide bar, 14""
Chain saw case
Plastic chain guard
Spark plug - Champion CJ8
2 cycle chain saw engine oil
type 25, 76 links
AVAILABLE
WITH YOUR
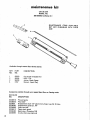
maintenance
kit
CHAIN SAW
MODEL NOS.
358-350870 (Craftsman 2.1 PS)
358-350880 (Craftsman 2.3 PS/VL)
MAINTENANCE
ITEMS
BUT NOT FURNISHED
SAW
AVAILABLE
WITH YOUR
2
3
\
Available through nearest Sears Service Center.
KEY
NO.
PART
NO.
DESCRIPTION
1
2
3
55015
55004
3157
File Holder (includes file)
5/32" File
Wrench - Spark Plug
Accessories available through your nearest Sears Store or Catalog outlet.
CATALOG
NO.
DESCRIPTION
32-36516
32-36545
32-3606
32-36394
32-36608
32-36513
32-36403
32-36555
File and guide
File, 5/32"
Replacement chain, barracuda, 1/4" type 89, 76 links
Replacement sprocket nose guide bar, 14"
Chain saw case
Plastic chain guard
Spark plug - Champion CJ8
2 cycle chain saw engine oil
3O