Transcript
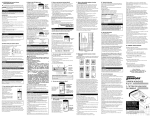
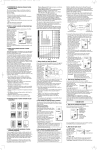
WARNING:
This device may not alarm at low carbon monoxide levels. This detector
has not been investigated for carbon monoxide detection below 30 ppm.
Warning: This carbon monoxide alarm is designed to detect
carbon monoxide gas from ANY source of combustion. Not
suitable as a smoke alarm or for detecting other gases. This
device is not suitable for installation in a hazardous location,
as defined in the National Electrical Code.
WARNING:
This product is intended for use in ordinary indoor locations of family
living units. It is not designed to measure compliance with Occupational
Safety and Health Administration (OSHA) commercial and industrial
standards. Individuals with medical problems may consider using warning
devices which provide audible and visual signals for carbon monoxide
concentrations under 30 ppm.
CAUTION:
Your unit is constantly monitoring the air and will go into full
alarm if ongoing, hazardous levels of CO are detected. Follow
the instructions in section K if the full alarm sounds.
WARNING: This device will only alarm if carbon monoxide
is detected. If not responded to, the presence of carbon
monoxide can be fatal. For list of sources of carbon monoxide,
see Sections C and D.
CAUTION: This alarm will only indicate the presence of
carbon monoxide at the sensor. Carbon monoxide may be
present in other areas.
LCD (WHERE EQUIPPED): The LCD display displays 4 pieces of
information, pressing the “Display” button allows you to toggle
between screens.
NOTE: The LCD display may be damaged by exposure to high
humidity and temperature.
PPM: This is the default display value. It shows the CO
concentration that the unit is sensing. The lowest value that the
unit will show is 30 ppm.
PEAK: This is the highest CO concentration (in ppm) that the unit
has sensed in the last 12 hours.
WARNING
Installation of this CO alarm should not be used as a substitute
for proper installation, use, and maintenance of fuel burning
appliances, including appropriate ventilation and exhaust systems.
Getting Started
Step 1
Determine the best location for your CO alarm(s). Usually this is
in or near bedrooms. Your alarm can be used as a plug-in or a
wallmount (using the mounting plate screws and anchors
provided) configuration. Refer to Section F and Section G.
Step 2
Connect the battery (where the alarm has back-up battery) of
your CO alarm and install the alarm. Refer to Section G and
Section J.
Step 3
When power is connected the CO alarm will go through a test
sequence (the horn will beep quickly 4 times, followed by 5
seconds of silence, followed by 4 quick beeps - this is the alarm
pattern that you will hear in the event of an emergency).
Additionally the red LED will flash synchronized with each beep
and it will be followed by one flash of both green and amber
LEDs at the end of the second series of beeps. Finally the LCD
display (where equipped) will turn on. If you press the test
button this sequence will repeat itself. Refer to Section H.
Step 4
While testing the CO alarm, have someone else check that the
alarm can be heard easily from the sleeping areas, Refer to
Section H.
LCD Display
(only on CO8LBD, CO8LBDI)
A. Indicators
Your carbon monoxide alarm
displays information from
four sources:
1. The 3 LED indicator
lights.
2. The loud 85dB horn.
3. The LCD display (where
equipped).
4. No Battery, yellow
indicator (where equipped).
every minute.
• In multiple station configuration, the 4 beep
alarm signal without red LED flashing will
indicate that the alarm was initiated by one of
the interconnected CO alarms.
3 beeps: Indicates alarm/hazardous smoke level at one of the
interconnected smoke alarms.
2 beeps: Indicates the battery is low. Refer to Section J.
• It will beep quickly 2 times, repeating every
minute.
1 beep: Indicates malfunction or “End of Product Life”.
Refer to Section H.
• It will produce a single beep, repeating every
minute.
NOTE: During the horn alarm, signals only to the unit that
initiates the alarm will have the red LED flashing. See Section K
for more details regarding the alarm signals for multiple station
configuration.
Test/Reset
Button
Battery Out
Indicator
Display
Button
toggles the
LCD display
between
ppm, peak &
COHB
Yellow,
Green &
Red LED’s
85dB Horn
LIGHTS: The indicator lights are three different colours:
Green: Indicates that the unit is receiving power.
• When the alarm is operated on AC power
supply, this LED will be steady-on.
• If the alarm is operating on a battery supply,
then this LED will flash once per minute.
• If the Green LED is steady off, then it is not
receiving power.
• If the product has more than six years from
installation, as part of the “End of Product Life
Signal”, this LED will flash 2 times every
minute. Refer to Section H.
Red:
Indicates an alarm condition, and that there is a
dangerous level of carbon monoxide present.
Refer to Section K.
• It will flash quickly 4 times (synchronized with
the horn), repeating every 5 seconds, for the
first 4 minutes.
• After 4 minutes it will flash quickly 4 times
(synchronized with the horn), repeating every
minute.
Yellow: Indicates malfunction or “End of Product Life”.
Refer to Section H.
• It will be steady-on when the unit is AC
powered or it will flash every minute
synchronized with the horn when unit is
powered only by the back-up battery.
• At “End of Product Life”, synchronized with
the above, the green LED will flash quickly
2 times per minute.
HORN: The horn generates 4 different patterns.
4 beeps: Indicates an alarm condition, and that there is a
dangerous level of carbon monoxide present.
Refer to Section E.
• It will beep quickly 4 times (synchronized with
the Red LED), repeating every 5 seconds, for
the first 4 minutes.
• After 4 minutes it will beep quickly 4 times
(synchronized with the Red LED), repeating
COHB: This approximates your exposure to carbon monoxide (see
Section E).
LOW BATTERY: If your alarm has a low battery, the low battery icon
will be displayed.
NO BATTERY INDICATOR (ONLY ON MODELS WITH REPLACEABLE
BACK-UP BATTERY):
The battery out indicator is located on the front of the alarm. It
displays “NO BATTERY” when the battery has been removed.
B. What is carbon monoxide and why
should you be concerned?
Carbon monoxide is a dangerous, poisonous gas. It is often referred
to as the Silent Killer because it has no odor or taste and it can’t be
seen. The presence of carbon monoxide inhibits the blood’s
capacity to transport oxygen throughout the body, which can
eventually lead to brain damage.
In any enclosed space (home, office, recreational vehicle or boat)
even a small accumulation of carbon monoxide can be dangerous.
C. What are the potential sources of carbon
monoxide?
Although many products of combustion can cause discomfort and
adverse health effects, it is carbon monoxide (CO) that presents the
greatest threat to life.
CO is produced by the incomplete combustion of fuels such as natural
gas, propane, heating oil, kerosene, coal, charcoal, gasoline or wood.
The incomplete combustion of fuel can occur in any device that
depends on burning for energy or heat such as furnaces, boilers, room
heaters, hot water heaters, stoves or grills and in any gasoline-powered
vehicle or engine (e.g., generator set or lawnmower). Tobacco smoke
also adds CO to the air you breathe.
When properly installed and maintained, your natural gas furnace and
hot water heater do not pollute your air space with carbon monoxide.
Natural gas is known as a “clean burning” fuel because under correct
operating conditions the combustion products are water vapor and
carbon dioxide, which are not toxic. (Carbon dioxide (CO2) is also
present in the air we exhale and is necessary for plant life.) The
products of combustion are vented from furnaces and water heaters to
the outside by means of a flue duct or chimney.
Correct operation of fuel-burning equipment requires two key
conditions. There must be:
• An adequate supply of air for complete combustion
• Proper venting of the products of combustion from the furnace
through the chimney, vent or duct to the outside
Typical Carbon Monoxide Problems
1. Equipment problems, due to defects, poor maintenance, damaged or
cracked heat exchangers
2. Collapsed or blocked chimneys or flues, dislodged, disconnected or
damaged vents
3. Downdraft in chimneys or flues; this can also be caused by very long
or circuitous flue runs, improper location of flue exhaust or wind
conditions
4. Improper installation or operation of equipment, chimneys or vents
5. Air tightness of house envelope results in a lack of air for the
combustion process
6. Inadequate exhaust of space heaters or appliances
7. Exhaust ventilation/fireplace competing for air supply
D. Potential sources of carbon monoxide in
your home:
Clogged Chimney
Automobile and Garage
Gas or Kerosene Heater
Wood Stove
Gas Water Heater
Gas or Oil Furnace
Wood or Gas Fireplace
Gas Appliances
Cigarette Smoke
E. What are the possible symptoms of carbon
monoxide poisoning?
Carbon monoxide (CO) is odorless, colorless, tasteless and very
toxic. When inhaled, it produces an effect known as chemical
asphyxiation. Injury is due to the combining of CO with the
available hemoglobin in the blood, which lowers the oxygencarrying capacity of the blood. In the presence of carbon
monoxide, the body is quickly affected by oxygen starvation.
The following symptoms are related to carbon monoxide
poisoning and should be discussed with all members of the
household so that you know what to look for:
Extreme Exposure (more than 40% COHb):
Unconsciousness, convulsions, cardio-respiratory failure,
death
Medium Exposure (15% to 40% COHb): Severe throbbing
headache, drowsiness, confusion, vomiting, fast heart rate
Mild Exposure (less than 15% COHb): Slight headache,
nausea, fatigue (often described as “flu-like” symptoms)
Many cases of reported carbon monoxide poisoning indicate that
while victims are aware they are not well, they become so
disoriented then are unable to save themselves by either exiting
the building or calling for assistance.
Young children and household pets may be the first affected.
Exposure during sleep is particularly dangerous because the victim
usually does not awaken.
For most people, mild symptoms generally will be felt after several
hours of exposure to 100 ppm of carbon monoxide. Higher levels
will lead to more severe symptoms or death.
F. Where should you install the alarm?
Since carbon monoxide
moves freely in the air,
the suggested location is
in or as near as possible
to sleeping areas of the
home. The human body
is most vulnerable to the
effects of carbon
monoxide during
sleeping hours. For
maximum protection, a
carbon monoxide alarm should be located outside primary sleeping
areas or on each level of your home. The diagram suggests ideal
locations for alarms in the home. The electronic sensor detects
carbon monoxide, measures the concentration and sounds a loud
alarm before a potentially harmful level is reached.
To reduce the likelihood of nuisance tripping of the device’s alarm
circuit and to prevent damaging the sensor:
• Do not install or place the alarm
- In locations where the normal ambient temperature is
below 40°F (4.4°C) or exceeds 100°F (37.8°C)
- Within 5 ft. (1.5 m) of any cooking appliance
- In damp or very humid areas or next to bathrooms with
showers. Install detectors at least 5 ft. (1.5m) away from
bathrooms.
- In close proximity to an automobile exhaust pipe; this will
damage the alarm.
• Accommodation spaces should be well ventilated when
household cleaning supplies or similar contaminant's are used.
G. How should you install the alarm?
Your American Sensors Carbon Monoxide Alarm is easy to install
to protect you and your family in your home, cottage, cabin and
office.
To work properly, the alarm unit must not be blocked by furniture
or draperies.
To provide maximum protection please allow up to 8 hours for
your CO alarm to fully initialize. It will, however, immediately
warn you of dangerous CO levels if they are present in your home.
G1. Installation of plug-in models
(CO8L,CO8LBD):
1. Select a proper location for the alarm(refer to Section F).
2. For battery back-up model CO8LBD, connect the battery(refer
to Section J).
3. Plug the alarm into a standard 120 Volt AC wall outlet.
• Do not use the alarm in an outlet that is controlled by a wall
switch.
• If you have a double outlet, plug the unit into the bottom outlet
so that the top outlet is available for other use.
• To work properly, the unit must not be blocked by furniture or
draperies.
G2. Installation of hardwire models
(CO8LBI,CO8LBDI) - for Service
Personnel ONLY:
WARNING: Your Carbon Monoxide alarm is to be
mounted onto a junction box on the wall or ceiling. These
units are for permanent connection only and should be
installed by Qualified Service Personnel only. DO NOT
connect wires to an AC outlet, extension cord, or power
cord and attachment plug. DO NOT connect to an AC
outlet that is controlled by a wall switch. To work
properly, the unit must not be blocked by furniture or
draperies. These units operate on 120 Volt AC. The
location and wiring methods must be in accordance with
the National Electrical Code or Canadian Electrical Code.
IMPORTANT: THE CO8LBI AND CO8LBDI ALARMS ARE
INTERCONNECTABLE ONLY WITH THE FOLLOWING AMERICAN
SENSORS SMOKE ALARMS 470, 670, 770, SA360, SA379, ESA5011
AND THE CO/SMOKE COMBINATION ALARM COS2010.
Connect your alarm to any standard 120 Volt AC wiring
system utilizing the quick connect wiring harness and the
mounting plate. Follow local or federal electrical and building
code standards at all times.
1. Make sure the AC UP Indicator
power to the
Screw Covers
junction box is
turned off at the fuse
box or service panel
before installation. Wiring Harness
2. Remove the two
Locking Clips
screw covers from
the mounting plate
and retain them for
later use.
3. Install the quick connect wiring harness into the mounting
plate, This can only be installed in one direction and will clip
into place when fully inserted.
4. Using twist-on wire connectors (supplied), connect the
white wire of the wiring harness to the neutral (white wire)
from the junction box and the black wire of the harness to the
live (black wire) from the junction box. If you are
interconnecting the alarm to other alarms (see wiring
diagram) then connect the orange wire of the wiring harness
to the interconnect line. If you are not interconnecting the
alarm, then cap off the orange wire.
5. Check all connections and carefully push the wires back
and install the mounting plate onto the junction box. Be sure
that the arrow at the top of the mounting plate is pointing
“UP” as this is where the top of the alarm will be.
6. Install the two screw covers (retained from Step 2) to hide
the locations for the octagon box mounting screws.
7. Install the back-up battery into the alarm (refer to Section J
of the User’s Manual).
8. Plug the alarm into the mounting plate. Be sure that the
top of the alarm is at the top of the mounting plate - the
connector pins in the back of the alarm should slide easily
into the quick connect wiring harness and the alarm should be
securely clipped into place by the 4 locking clips on the
mounting plate.
9. Turn the power back on at the fuse box or service panel.
10. Your alarm should be serviced by Qualified Service
Personnel only. AC power should always be turned off before
servicing the unit. To remove the alarm from its mounting
plate, the locking clips must be gently pried open using a
small screwdriver as you pull the unit out.
H. How can you Test/Reset the alarm?
A green power light indicates that power is supplied. For the
display models
CO8LBD and
CO8LBDI, the display
Test/Reset
will show “000”. The
button
green LED must be
steady-on if unit is AC
powered or it will flash
every 60 seconds if the
unit is powered only by
the back-up battery.
To test the alarm (wait at least ten minutes after installing it),
press and release the Test/Reset button. The alarm will sound
two series of 4 short beeps and the red LED will flash.
To reset after an alarm, press the Test/Reset button to silence
or reset the unit. Follow the instructions in Section K, which
tell you what to do after an alarm. This Carbon Monoxide
Alarm is designed to do a continuous self-diagnostic check of
its micro processing circuitry when in use.
A malfunctioning unit is indicated by a steady-on yellow LED
and one single beep every 60 seconds. If this occurs, reset the
unit. If the unit again beeps intermittently, do not use this
unit.
The “End of Product Life” signal is similar to the malfunction
signal. The only difference is the addition of 2 quick flashes of
the green LED synchronized with the beep.
For questions abuot your CO alarm, please contact:
1-800-387-4219
I. How can you maintain your alarm?
An alarm is useful only if
it works. The following
illustration explains
proper maintenance:
Your alarm should be
tested at least once per
week by pushing the
Test/Reset button as
outlined in Section H.
Test/Reset button
Test the alarm
by pressing the
Test/Reset button
once a week.
Air vent on bottom
of unit
Vacuum the air
vent occasionally
to keep free of dust
J. Back-up Battery Installation &
Replacement
Under normal conditions your battery should last at least one
year. When powered only by the back-up battery the green light
on the unit will briefly blink about every 60 seconds if the
battery is adequately powering the unit.
This CO alarm has a low battery warning to warn you that the
battery is running low or if the battery is missing. This is a
double beep approximately every minute. This low battery
warning will continue for at least 7 days if the unit is powered
by battery only and indefinitely if it is AC powered. Replace
your battery immediately if this occurs to ensure ongoing
protection.
Battery Replacement
WARNING
• Use recommended batteries only.
• Use of different battery may have a detrimental effect on the
alarms operation
• Constant exposures to high or low temperatures or high
humidity may reduce the battery life.
• This carbon monoxide alarm will not operate with a dead or
missing battery or if the battery door is open or not closed
completely.
• Do not remove the battery to use in any toys, remote controls
or other household devices.
• Do not try to open the alarm except for the battery door.
Opening the main housing of the alarm may damage the unit
and will void the warranty:
Recommended Battery: Use only 9V batteries Duracell
MN/MX1604, Gold Peak GP1604A/P/S, Energizer X22,
Eveready 522/1222 or Ultralife U9VL-J (available at most
general retail stores).
L. Technical Information
Battery Installation Instructions
Exposure Times
The carbon monoxide concentrations and time standards for
the alarms are as follows:
1a. If the alarm is a
plug-in model,
remove it from the
wall by pulling it out
of the outlet.
Slide battery
door out.
1b. If the alarm is a
hardwire model,
then use a small
screwdriver to gently
pry open the locking
tabs and pull the
alarm out of the
mounting plate.
2. Slide the battery door out.
3. Connect fresh battery to battery snap. Replace the battery
compartment door.
4. Test the unit by pressing the Test/Reset button as per
Section H to confirm the unit is powered.
5. Return the alarm to its original location.
K. What should you do if the ALARM sounds?
If potentially harmful levels of carbon monoxide are
detected, your unit will go into full alarm. The alarm signal
consists of 4 rapid beeps repeating every 5 seconds, with the
red LED light flashing every time the alarm horn beeps.
If the full alarm sounds respond as follows:
WARNING
Actuation of your CO alarm indicates the presence of
carbon monoxide (CO) which can KILL YOU. If alarm
signal sounds:
1. Operate reset/silence button;
2. Call your emergency services
(
), [fire department or
911];
3. Immediately move to fresh
air–outdoors or by an open
door/window. Do a head count to
check that all persons are
accounted for. Do not reenter the
premises nor move away from the
open door/window until the
emergency services responders
have arrived, the premises have
been aired out, and your alarm
remains in its normal condition;
4. After following steps 1–3, if your
alarm reactivates within a 24 hour
period, repeat steps 1–3 and
call a qualified appliance
technician (
) to
investigate for sources of CO from
fuel burning equipment and
appliances, and inspect for proper
operation of this equipment. If
problems are identified during this
inspection have the equipment
serviced immediately. Note any
combustion equipment not
inspected by the technician and
consult the manufacturer’s
instructions, or contact the
manufacturer directly, for more
information about CO safety and
this equipment. Make sure that
motor vehicles are not, and have
not been, operating in an attached
garage or adjacent to the
residence.
What to do after resetting the alarm following an alarm?
A full continuous alarm within six minutes after reset
confirms ongoing presence of harmful levels of carbon
monoxide. If this occurs follow instructions 1 - 3 above.
What to do after a carbon monoxide problem has been
corrected?
After a carbon monoxide problem has been corrected reset
your alarm by pushing the Test/Reset button as per the
instructions on Section H.
IMPORTANT: For the multiple stations of CO and smoke
alarm configuration, when there are hazardous smoke or CO
conditions at one of the interconnected units, only the unit
that initiates the alarm will have the red LED flashing
synchronized with the sound alarm pattern (4 or 3 beeps).
The rest of the interconnected units will generate only the
sound without the red LED flashing.
In a CO alarm situation (4 beeps), localize the CO alarm that
has initiated the alarm signal and act immediately per
instructions 1 to 4 above.
In a smoke alarm situation (3 beeps), localize the unit that has
initiated the alarm and act immediately according to the
owner’s manual instructions of the smoke alarm.
Your alarm utilizes a proprietary Electronic Sensing
Technology that permits the unit to vary the exposure time
before the alarm sounds based on carbon monoxide
concentrations.
The Full Alarm Activates
• Within 60-240 minutes at exposures of 70 ppm
• Within 10-50 minutes at exposures of 150 ppm
• Within 4-15 minutes at exposures of 400 ppm
Specifications
AC Power Supply
Battery Back-up
12V, 60HZ, 7 W”
Use only 9V batteries Duracell
MN/MX1604, Gold Peak
GP1604A/P/S, Energizer X22,
Eveready 522/1222 or Ultralife
U9VL-J (available at most general retail
stores).
Dimensions
(5.25” x 2.80” x 2.00”)
Normal Operating Conditions:
Operating Temperature 4.4°C to 37.8°C (40°F to 100°F)
Relative Humidity
30% to 70%
Alarm
85 dB at 10 ft
M. Limited Warranty
Your American Sensors carbon monoxide is warranted for six
(6) years from the date of purchase against defect in material
and workmanship. Units returned to Dicon Global Inc. with
proof of purchase date during this period as a result of such
defects will be repaired, or replaced at Dicon Global Inc.’s
option. This warranty only covers defects in material or
workmanship in normal residential use. This warranty does
not cover damage resulting from negligent handling, misuse,
or lack of reasonable care. This warranty is in lieu of any other
warranty either expressed or implied.
DICON GLOBAL INC. SHALL HAVE NO LIABILITY
FOR ANY PERSONAL INJURY OR PROPERTY
DAMAGE, OR ANY SPECIAL INCIDENTAL,
CONTINGENT OR CONSEQUENTIAL DAMAGE OF
ANY KIND RESULTING FROM CARBON MONOXIDE.
THE EXCLUSIVE REMEDY FOR BREACH OF THE
LIMITED WARRANTY CONTAINED HEREIN IS THE
REPAIR OR REPLACEMENT OF THE DEFECTIVE
PRODUCT AT DICON GLOBAL INC.’S OPTION. IN NO
CASE SHALL DICON GLOBAL INC.’S LIABILITY
UNDER ANY OTHER REMEDY PRESCRIBED BY LAW
EXCEED THE PURCHASE PRICE. YOUR CARBON
MONOXIDE ALARM IS NOT A SUBSTITUTE FOR
PROPERTY, DISABILITY, LIFE OR OTHER INSURANCE
OF ANY KIND. APPROPRIATE COVERAGE IS YOUR
RESPONSIBILITY. CONSULT YOUR INSURANCE
AGENT.
This warranty gives you specific legal rights and you may have
other rights which may vary from province to province.
Return to point of purchase for servicing. For repair or
replacement within the warranty period, return this product
(or send it postage prepaid) along with proof of purchase date
to Dicon Global Inc. Please enclose a note stating the nature
of the difficulty. Prior to sending, please call 1-800-387-4219
to establish a Returned Goods Authorization (“RGA”)
number and the latest instructions to serve you promptly.
Please mark this number on the exterior of your package and
send to:
Dicon Global Inc.
20 Steelcase Road West, Unit #3
Markham, Ontario, Canada L3R 1B2
www.diconglobal.com
window and close off warm air registers in the room or install
a fresh air duct directly to the fireplace or stove so that it
won’t steal air from your furnace.
Confining or enclosing gas-fired equipment
If you have partitioned off your furnace and water heater, you
may need additional ventilation.
Danger Signs
Stuffy, stale or smelly air, back drafts and soot from a fireplace
or furnace chimney usually means your home needs more air
for proper combustion and healthy living. For gas-fired
equipment, mostly yellow (rather than clear blue) burner
flames, a pilot light that keeps going out, or a smell of gas
indicate trouble. Turn off the equipment and contact your gas
company emergency service.
Additional Safety Tips
Have your fuel-burning equipment checked periodically for
safety and efficiency by a qualified service technician.
If you are adding a wood or coal burning stove to a home,
make sure that the stove is properly installed and vented.
Check with the Building and Inspections Department of your
local municipality or consult a heating contractor before
installation. If you have already installed a wood or coal stove
without a building permit or inspection, consult your local
municipal building authority. Some “do-it-your-selfers” have
unknowingly created dangerous conditions. Once you file for a
permit, a qualified inspector will check your installation and
explain how to rectify any mistakes.
Do not expose yourself to carbon monoxide through
carelessness. Never operate a gasoline-powered engine in a
confined or enclosed space such as a garage or tool shed.
Never use a kerosene stove or charcoal grill in a confined
space such as a closed garage or recreational van.
On masonry chimneys inspect the clean-out regularly to
ensure that the chimney is free and clear of debris.
Regardless of the fuel your furnace, fireplace or stove uses,
your chimney should be inspected from time to time by a
competent chimney contractor.
Never try to add a “heat reclaimer” or “automatic flue
damper” to your gas furnace or water heater. Gas installation
safety codes prohibit use of these devices as an add-on to an
existing furnace because of the risks of incorrect installation
and mechanical failure.
When using paints, household cleaning supplies or similar
materials, be sure that you’re using them in a well ventilated
area.
Following sensible maintenance and safety procedures in the
home will give you fuel savings without endangering your
health.
O. COMMONLY ASKED QUESTIONS
Q.
A.
Q.
A.
Q.
A.
Q.
A.
What does the alarm sound like?
A series of 4 short beeps (loud 85 db sound) with
synchronized red LED flashing.
Should I position the unit in a high or low location?
Carbon monoxide is virtually the same weight as air and
therefore, the alarm protects you in a high or low
location.
Will this unit detect smoke and fire?
No, a carbon monoxide alarm only detects carbon
monoxide. Smoke alarms are still necessary.
How do I test the unit?
Push the Test/Reset button. Refer to Section H. Do not
test with car or vehicle exhaust. This method is
dangerous to you and the pollutants from car or vehicle
exhaust may damage the alarm.
N. Tips for the homeowner
Energy Conservation and Indoor Air Quality
Two steps that homeowners take to conserve energy may
adversely affect indoor air quality.
Since air leakage can account for as much as 40% of heat loss,
houses are being made more air tight. Reduced air leakage will
contribute to higher concentrations of air contaminant's from
indoor sources and can cause draft reversal in the furnace or
fireplace chimney when the demand for air by fireplaces,
furnaces and exhaust fans exceeds the air supplied by leakage
area and supply ducts.
Converting from oil to gas, without taking steps to prevent
chimney deterioration, will increase the risk of chimney
blockage, draft failure and the associated release of
combustion products into the house. Qualified contractors and
inspection by the gas company are recommended.
Dirt and Blockage
Never insulate or try to seal up a draft hood, wind cap or
exhaust vent on any gas appliance (furnace, hot water heater,
range, dryer or space heater). Keep your equipment area clean.
Don’t store anything that could restrict air circulation close to
equipment.
It is absolutely essential to your safety that panels and grills on
the furnace are kept in place and that the fan compartment
door is closed when the furnace is operating.
If you have a gas water heater, make sure that combustion air
openings at the bottom of the tank and the opening below the
draft diverter (on top of the tank next to the flue duct)
remain unblocked.
If you have a gas dryer, the exhaust duct must be vented to the
outside and have a hood at the end. Check that the exhaust
system is not blocked by lint or debris and that the flapper in
the hood moves freely.
For all fuel-burning equipment, make sure that vent hoods
and pipes are not blocked by insulation, leaves or bird nests.
Using other equipment that consumes or exhausts household
air
If you use exhaust fans, a fireplace or other fuel burning
heaters or stoves:
Run exhaust fans for just a minute or two at a time. Prolonged
use could remove too much air, and it wastes heat.
Do not run power attic vents during the winter or when your
furnace is on.
When your fireplace, coal or wood stove is operating, open a
CARBON MONOXIDE
ALARM
Owner’s Manual
Model CO8L, CO8LBD
z Plug-in Models
Model CO8LBI, CO8LBDI
Hardwire Models
z
IMPORTANT: This manual must be read,
followed and kept for future reference.