1
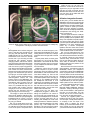
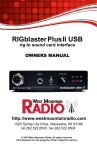
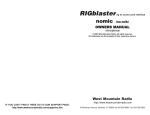
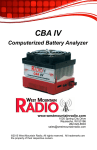
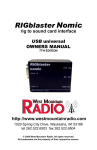
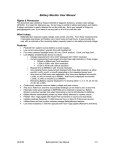
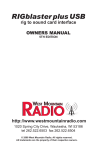
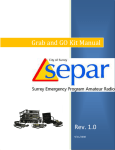
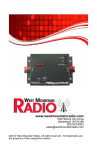
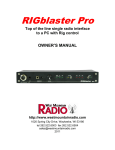
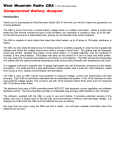
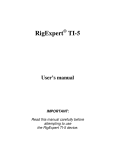
The new RIGblaster duo, says WB6NOA, is much more than a
sound-card interface for multiple radios, but rather a complete multi-rig
control center.
CQ Reviews:
West Mountain Radio RIGblaster duo
Station Controller
BY GORDON WEST,* WB6NOA
he West Mountain Radio accessory product line may not be huge
in selection, but it is large in ham
radio operating performance. For 12
volts DC, its line of Anderson Powerpole
voltage distribution panels, PWRgate
battery backup system, and new CBAIII Computerized Battery Analyzer are
favorites of hams involved in emergency communications. Its DSP speaker systems enhance both mobile and
base-station listening.
RIGtalks exchange band and frequency information with your computer
logging program, and of course, four
models of RIGblasters work with any
computer and over 2,000 different
radios as supplied. There is even a special RIGblaster Plug & Play designed for
use only with radios that have compatible data jacks.
However, hams wanted one piece of
intelligent hardware to operate two
transceivers, minimizing speaker, microphone, and keyer clutter for instant
radio changing and effortless digitalmode connections between two running rigs. Oh, and one more thing: Many
of us seasoned (I won’t say older) hams
who grew up with ancient digital signaling such as ROBOT SSTV and a
MicroLog keyboard (before computers), needed plug-and-play capabilities
for some of our shack equipment that
still glows in the dark with a 4-pin microphone connection. (Okay, 4-pin mic
jacks are still found in new gear, such
as the Ten-Tec Jupiter!)
West Mountain Radio’s answer is the
RIGblaster duo, packaged with every
T
*CQ Contributing Editor, 2414 College Dr.,
Costa Mesa, CA 92626
e-mail: <[email protected]>
Photo A– The RIGblaster duo set up on top of WB6NOA’s FT-450, one of more
than a half-dozen two-radio combos he would test out through the duo from West
Mountain Radio. (Photos by the author unless otherwise noted)
conceivable cable one needs to get it
on the air right out of the box. We would
be running the “duo” into multiple tworadio transceiver configurations (see
photo A):
Kenwood TS 950 Classic
ICOM IC-7000
Yaesu 450 and 950
Kenwood 2000 and a Kenwood TS
790A Multimode V/U rig
Yaesu FT-726R satellite system
I have just as many microphones, but
I wanted to work with my favorite Heil
Goldline mic and retain my Heil footswitch capability, too. Once you get
hooked on foot-switch phone TX/RX
operation, you will never want to push
the PTT again! No problem. The duo
has a foot-switch PTT jack on the back
so you don’t need the clutter of an extra
wire around to the front.
With over 25,000 single-radio
RIGblasters sold by the company, I was
confident the instruction manual would
ease into multi-rig hookups and then
explore going digital with programs likely already on your laptop or home com-
Reprinted with permission from CQ Communications, Inc. CQ Magazine, November 2009.
Photo B– Front-panel view of the RIGblaster duo. (Photo courtesy West Mountain Radio)
puter. The manual did just that, after
printing out the 30 pages from the
included CD. Multiple warnings caution
you not to just plug in things and start
experimenting: “…if you are impatient,
or do not continue completely through
the multiple screens…” You get the
idea. You need to pop the cover of
RIGblaster duo and follow the instruction manual precisely to match the
wiring for the rigs and whatever mic you
are matching with it.
Most small rigs use the plastic RJ-45.
The larger radios use an 8-pin screwon jack for the microphone connection,
and these universal mic cables are
included with the RIGblaster duo. If your
radios are far apart, and the supplied 3foot mic cables don’t reach, there are
optional 6-foot cables available. Also
included is the USB A-to-B interface
cable, along with eight 3.5-mm patch
cords, plug adapters, a Powerpole DC
power cord, and eleven wire jumpers
that go inside the aircraft-looking hardware. For the computer, West Mountain
Radio gives you a collection of thirdparty software and encourages you to
support those hard-working developers
of the software that has allowed our digital world of ham radio to grow, thanks
to their unselfish efforts. You might also
Google® FLDIGI.
What? No included 4-pin mic connector? Don’t panic, as West Mountain
Radio has optional 4-pin cables available, along with radio-specific FSK (frequency shift keying) cables. I know, I
know . . . Why haven’t radio manufacturers worked for common connections
on our newest radio transceivers? Still,
even the power plugs are different!
Now look at the front panel (photo B)
and marvel at the logical layout: A simple toggle switch gives you radio A or B,
and a single microphone input connector allows your one favorite microphone
to work with two rigs. There is a headphone jack, of course. Transmit level is
set so you don’t have to fumble with your
computer mouse to set computer audio
drive levels. A yellow LED (labeled CS
for computer sound) shows if computer
audio is active to the radio selected. This
automatically cuts off mic audio, and
thank goodness for this: There’s nothing
worse than the sound of PSK with folks
talking in the background! The positive
switching of sound-card software PTT
control (another LED indicator) stops
“you have mail” or Windows® melodies
and beeps from going over the air.
Additional indicators are detailed in the
manual and in photo B.
The rear panel (photo C) gives you
dual CW and FSK keying outputs,
speaker or line level computer and
receive audio inputs, twin microphone
outputs to your selected rigs, and the
USB interface for dual serial-port operation using the supplied USB cable to
your computer.
“The RIGblaster duo should not really be called a RIGblaster, as it was primarily designed to make a station with
two radios neater, simpler, and easier
to operate, totally integrating the audio
and switching. It even includes provision to switch station power and select
amplifiers and antennas between two
radios,” comments Del Schier, K1UHF,
at West Mountain Radio.
“Leave enough cabling so you can
turn the RIGblaster around to check
back-panel plug-in connections, and
use the color-coded cable labels,” adds
West Mountain Radio.
In my haste to get my two rigs on the
air for a net, I accidentally plugged my
audio output cable into the jack that outputs voltage for the LED system to show
which rigs are ready to go. Uh oh . . .
“Was I close to blowing the AF output
stage on my new Yaesu FT-450 by letting DC flow into the audio out cable?”
I asked Del, who replied:
The LED output jacks have 680-ohm
resistors in series to limit the current on the
LEDs. You can short them out or plug in
backwards a single-ended, not bridged,
radio speaker output and it will not hurt anything. However, there are jumpers to jump
out the LED resistors so that those outputs
may be used to control antenna, linear amp,
or CW key automatic selector boxes. If the
jumpers are shorting those resistors you
might burn something up. I think this is covered in the manual. What you should mention is the color-coded cable labels; we put
them in there for a reason.
Thanks, Del … and, um, remember
to use those color-coded cable labels.
They’re there for a reason (oops!).
Moving on…
Don’t put the RIGblaster—or for that
matter, any radio—on top of your 20amp or 35-amp transformer or switcher
power supply! This invites trouble. Keep
the power supply far away from your
running ham station.
Inside RIGblaster duo are jumper
blocks (photo D) where you will use the
supplied white mini-jumpers to tailor
your specific microphone to any brand
of radio. Well, almost . . . A mobile microphone with backlight capability, need-
Photo C– Rear-panel view of the RIGblaster duo. (Photo courtesy West Mountain Radio)
Inside the duo you can even customize the receive audio channel assignment to put your right radio on the
right and your left on the left, but the
default is both radios on both ears. You
can even set it up for radios with dual
receive, right and left.
A Station Integration Console
Photo D– White jumper cables let you customize the connections for virtually any
microphone to virtually any modern ham transceiver.
ing power from the radio, will not work
with Rigblaster duo. However, the good
news is that the Heil microphone will
now play well with Kenwood, Yaesu,
ICOM, Elecraft, Ten-Tec, and Alinco HF
transceivers! Your mic’s PTT will still
function, but if you are using a mobile
microphone with up/down channelchanging buttons, this function will not
play. Remember, West Mountain Radio
did all the homework for you, coming up
with the correct jumper suggestions,
even though there is little commonality,
even within the same manufacturer,
between mics that have the same exact
plug pin out! Just because you have an
8-pin plug or an RJ-45 square connector, it does not mean microphones are
interchangeable without the neat
jumpers found in the RIGblaster duo.
(The duo will not correct for impedance
mismatches, and if you have a very old
mic or rig with a different sort of connector, it’s possible that they will not
work properly with modern rigs/mics
using 8-pin or RJ-45 connectors, even
through the duo. However, Del says
they just might, so it’s worth a try!)
I am happy to report that Elecraft’s
factory-built standard matching Kenwood is included in the jumper diagram
illustrations! But of course, if you built
your Elecraft, you could have wired it
any way you wished.
OK, you are good with the twin rigs’
mic connections, right? It’s time to add
12 volts (about one amp) and get ready
to turn on the power. The power cord is
terminated with the Anderson Powerpole, which, as most emergency communicators should already know, when
looking at them from the rear, is always
wired with red on the right, with contacts
down.
Flip the power switch, and the green
light comes on. Turn on your rig, and try
both Radio A and Radio B. Got audio
from both receivers and your computer
in your headphones and stereo speakers? Good work.
Setting the volume from two radios
and the computer to a pair of headphones is a marvel of simplicity. Simply
select Radio A and set the radio’s volume about halfway up. Then set the
master volume control on the duo to a
comfortable speaker level. Next plug in
and put on your headphones and set
the headphone sub-volume to a bit
louder than your speakers. Next set the
other radio and the computer to match
the first radio and never touch those
adjustments again; just use the duo’s
master audio volume knob.
Good news! You can leave your
headphones plugged in without disabling the speakers! This means if
you’re trying to copy a weak signal, you
can put your headphones on, make the
contact, and then take them off—no
fumbling with headphone cords. Each
audio input selector—Radio A, Radio B,
and PC—has three positions: off, headphones only, and headphones and
speakers. This control layout is exactly
the same as an aircraft audio panel!
At this point, you will realize that the
RIGblaster duo was not conceived to be
primarily a sound-card software digitalmode interface. It is really a station integration console to make your station
easier and more efficient to operate,
and to eliminate multiple speakers and
microphones and moving your headphone cord around.
The duo sports two stereo 3-watt per
channel amplifiers, so it may be used
with any headphones or speakers. Stay
away from amplified computer speakers, as they tend to pick up RF, unless
you have a pair of West Mountain Radio
COMspkrs. The duo’s amplifiers will
power any 4–16-ohm unamplified
speakers loud and clean with full HiFi
stereo for computer music and filtered
communications audio for the radios.
OK, your two transceivers are now
tied to your best microphone, and you
can select transmit between transceiver A and B. There are cool external
“transmit ready” LEDs that stick on the
front of your radios to clearly show you
which radio is selected for transmit,
besides observing the position of the
“xmit select” switch.
Now it’s time for the sound-card software operation, remembering that the
RIGblaster leaves your computer’s
sound fully functional, as the RIGblaster
itself, on purpose, does not have builtin sound. Built-in sound-card interfaces
disable the normal sound-card audio of
a computer as soon as they are plugged
in, making it a can of worms to control
computer audio if you can even get both
audio systems to work without conflict.
From the supplied CD (photo E), click
the on-screen button for “West
Mountain Radio RIGblaster Software
Collection.” Start by selecting a simple
mode, such as PSK-31, with signals all
the time on 14.070 MHz. You can
remove the CD now, find the PSK-31
icon, and click to start that program.
Connect the supplied patch cord
between “RCV OUT” and your computer’s “line input,” usually a blue socket, or
on a laptop, to the “mic input.” Your
radio’s audio is already set about
halfway up, as described earlier in the
duo’s manual, and you can hear when
you have tuned in the whistle of PSK-31.
Photo E– The
included CD
includes the full
operating manual,
software drivers,
and a collection of
digital-mode software that you may
install on your
computer. CQ
joins with West
Mountain Radio in
urging you to
support the
authors of these
programs.
Now set your computer’s “Recording
Control” line or mic input virtual slider to
let the computer software, tied into
RIGblaster, read out your “catch.” Try
receiving various modes with different
software programs and get the feel for
decoding digital.
Now it’s time to set up the computer
for transmitting. The CD ROM has the
files you need to install driver software
(see photo F), if your computer is not
online. The drivers are Microsoft-certified and will automatically install from
Microsoft’s driver update service.
Thanks to this certification, the driver
installation is fool proof with no confusing messages from Windows® 98
trough Vista® 64. The manual tells you
how to check your computer to see what
COM port numbers were assigned to
the RIGblaster’s two virtual COM ports.
You will need these COM port numbers
to set all amateur radio software to do
PTT, CW keying, FSK keying, and CAT
or CI-V rig control.
Set up and configure your PSK31 program to key PTT on the COM port number to control PTT. Start with the duo’s
front-panel “xmit level” control at minimum, on a clear frequency, and hit transmit on the PSK program. You should see
the RIGblaster and your radio indicate
PTT activation. I started out with MFSK
16 and could hear the sounds coming
out of the speakers connected to the duo.
The sound-card Virtual Volume sliders
were already set in the earlier stages of
the duo manual, so you will have plenty
of transmit audio drive when you turn up
the RIGblaster’s “xmit level” knob.
Tip: You cannot overdrive your transceiver if you follow this simple procedure. Set the RF drive power control of
your radio to maximum—yes, maximum! Then with your PSK, or whatev-
er program, set to transmit, advance the
duo’s TX Level until you show less than
full power output. Never turn it up to full
power. You will be as clean as your
transmitter’s linear output is capable of,
as less than full power does not activate
ALC or overdrive. Never set your radio
to 30 watts and then set your audio to
35 watts! You will be wide as a barn! A
good article in QST on sound-card-level
settings can be viewed at <www.
WestMountainRadio.com/pdf/Ins&
Outs.pdf>.
Once you have made a PSK “am I
working?” contact, your station is fully
set up for over 30 modes of operation,
with over 100 sound-card programs,
and you will never have to touch the
installation again if all you want to use
is sound-card modes.
The RIGblaster duo also includes two
pairs of optically isolated CW and FSK
keying outputs. CW and FSK may be
done as MCW and AFSK with a sound
card, but these outputs enable direct
keying of those jacks on your radios with
appropriate software. Normally the
RIGblaster duo’s xmit select switch will
activate PTT on the radio you want, but
it is possible to use semi-break-in on
one radio and talk on the other, which
is great for VHF contesting with a VHF
SSB liaison while making a CW
microwave contact. There are also two
optically isolated frequency shift keying
outputs that may be used with MMTTY
and the EXTFSK extension.
West Mountain Radio has readymade cables for connection between
RIGblaster and the FSK accessory
input jacks on ICOM, Kenwood,
and Yaesu radios, but if you like,
AFSK works quite well without these
connections.
For computer logging, the instructions explain how to configure the
RIGblaster to use its two USB to
CAT/CI-V rig-control interfaces. Radios
that have DB9 rig control interfaces
directly connect to a computer.
Don’t forget menu items! I almost did
Photo F– Setup screen provides several options, including audio samples of
different digital modes, ham software, and USB drivers to make everything
work together.
until Del set me straight! For instance,
you must plug the RIGblaster CW keying outputs into jacks configured for the
straight-key mode, as the RIGblaster is
an external keyer for keyboard CW programs. Keep in mind that your radio is
part of this package, too, so don’t expect
the instructions for your radio’s paddle
or straight-key operation to be in the
RIGblaster manual.
Wow, what a package of third-party
programs included on the CD: PSK,
CW, RTTY, SSTV and MSTV, Rig
Control/Logging Programs, PACTOR
and AMTOR, Packet and APRS,
Hellschreiber (ALE), VHF EME and
Meteor-Scatter Modes, MT 63, Propagation Beacon Mapping, Spectrum
Analyzer, and a lot more. This thirdparty software package is included on
the one CD, and West Mountain Radio
aptly encourages you to support these
programs. If you have your own programs, you can also include them to
work with RIGblaster.
I was on the air in no time, working
my rigs between several digital programs. If I became long-winded and
one rig got warm, I could quickly switch
over and continue my digital conversation! If one rig on another antenna was
receiving better than the other, it was
nearly instant switching. There is even
an internal option on this RIGblaster to
monitor digital signals with both radios
at the same time on two different bands
or select between them!
As I switched out and in different rigs,
I found that each had its own “sweet
spot” of audio levels, and the frontpanel controls of RIGblaster duo gave
me instant adjustments. I really loved
being able to put on my headphones
and work the weak ones without touching a control or plug.
The technical support line at West
Mountain Radio was quick to get a live
person on the other end, and you can
tell they really knew their digital stuff!
For those of you who have your own
ways of interfacing radio to computer,
check out RIGblaster capabilities at the
West Mountain Radio website.
The hookup was literally plug and
play, and front-panel controls and
switches are totally intuitive, making
transmit selection and setting RX and
TX levels a snap. Good ground isolation gave our TX signal crystal-clear
reports, and it was fun to try out some
of the new digital programs during last
weekend’s 30-meter multi-mode ARRL
digital operating event. With two rigs
and the West Mountain Radio
RIGblaster duo I had a blast!