1
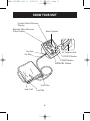
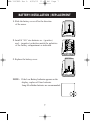
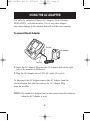
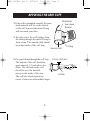
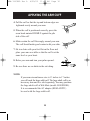
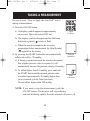
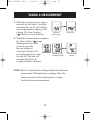
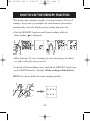
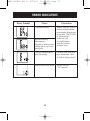
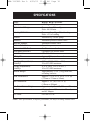
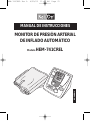
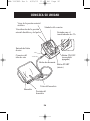
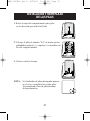
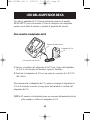
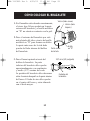
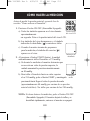
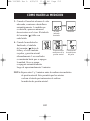
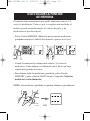
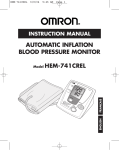
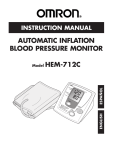
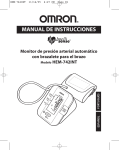
HEM-741CREL Rev A
4/20/05
11:43 AM
Page 1
INSTRUCTION MANUAL
AUTOMATIC INFLATION
BLOOD PRESSURE MONITOR
ESPAÑOL
HEM-741CREL
ENGLISH
Model
HEM-741CREL Rev A
4/20/05
11:43 AM
Page 2
TABLE OF CONTENTS
Before Using the Monitor
Introduction . . . . . . . . . . . . . . . . . . . . . . . . . . . . . . . . . . . . . . . . . .3
Important Safety Notes . . . . . . . . . . . . . . . . . . . . . . . . . . . . . . . . . .4
Before Taking a Measurement . . . . . . . . . . . . . . . . . . . . . . . . . . . .5
Operating Instructions
Know Your Unit . . . . . . . . . . . . . . . . . . . . . . . . . . . . . . . . . . . . . . .6
Battery Installation / Replacement . . . . . . . . . . . . . . . . . . . . . . . . .7
Using the AC Adaptor . . . . . . . . . . . . . . . . . . . . . . . . . . . . . . . . . .8
Applying the Arm Cuff . . . . . . . . . . . . . . . . . . . . . . . . . . . . . . . . .9
Taking a Measurement . . . . . . . . . . . . . . . . . . . . . . . . . . . . . . . . .11
Using the Memory Function . . . . . . . . . . . . . . . . . . . . . . . . . . . .13
Care and Maintenance
Care and Maintenance . . . . . . . . . . . . . . . . . . . . . . . . . . . . . . . . .14
Error Indicators . . . . . . . . . . . . . . . . . . . . . . . . . . . . . . . . . . . . . .15
FCC Statement . . . . . . . . . . . . . . . . . . . . . . . . . . . . . . . . . . . . . . .16
Warranty Information . . . . . . . . . . . . . . . . . . . . . . . . . . . . . . . . . .17
Specifications . . . . . . . . . . . . . . . . . . . . . . . . . . . . . . . . . . . . . . . .18
Notes . . . . . . . . . . . . . . . . . . . . . . . . . . . . . . . . . . . . . . . . . . . . . . 19
2
HEM-741CREL Rev A
4/20/05
11:43 AM
Page 3
INTRODUCTION
Thank you for purchasing the ReliOn® HEM-741CREL Automatic
Inflation Blood Pressure Monitor.
Fill-in for future reference
DATE PURCHASED: ________________
SERIAL NUMBER: __________________
Staple your purchase receipt here.
This monitor features automatic inflation and deflation to measure your
blood pressure and pulse rate. The measurement reading is clearly
displayed on a large digital panel.
The ReliOn® HEM-741CREL digital blood pressure monitor uses the
oscillometric method of blood pressure measurement. This means the
monitor detects your blood’s movement through your brachial artery
and converts the movements into a digital reading. An oscillometric
monitor does not need a stethoscope so the monitor is simple to use.
The ReliOn® HEM-741CREL Automatic Inflation Blood Pressure
Monitor is intended for home use.
SAVE THESE INSTRUCTIONS
3
HEM-741CREL Rev A
4/20/05
11:43 AM
Page 4
IMPORTANT SAFETY NOTES
To assure the correct use of the product basic safety measures should
always be followed including the precautions listed below:
þ Read all information in the instruction book and any other literature
included in the box before using the unit.
þ Contact your physician for specific information about your blood
pressure. Follow the instructions of your healthcare provider.
þ Operate the unit only as intended. Do not use for any other purpose.
þ The unit is intended for use in measuring blood pressure and pulse
rate in adult patient population. Do not use on infants.
þ Do not use a cellular phone near the unit. It may result in
operational failure.
þ Changes or modifications not approved by the ReliOn Healthcare
will void the user warranty. Do not disassemble or attempt to repair
the unit or components.
4
HEM-741CREL Rev A
4/20/05
11:43 AM
Page 5
BEFORE TAKING A MEASUREMENT
1. Avoid eating, smoking, and exercising for 30 minutes before
taking a measurement. Rest for at least 15 minutes before
taking the measurement.
2. Stress raises blood pressure. Avoid taking measurements
during stressful times.
3. Remove tight-fitting clothing from your left arm.
4. Measurements should be taken in a quiet place.
5. Sit in a chair with your feet flat on the floor. Rest your left arm
on a table so that the cuff is at the same level as your heart.
6. Remain still and do not talk during the measurement.
7. Keep a record of your blood pressure and pulse readings for your
physician. A single measurement does not provide an accurate
indication of your true blood pressure. You need to take and record
several readings over a period of time. Try to measure your blood
pressure at the same time each day for consistency.
8. Wait 2-3 minutes between measurements. The wait time allows the
arteries to return to the condition prior to taking the blood pressure
measurement. You may need to increase the wait time depending on
your individual physical characteristics.
5
HEM-741CREL Rev A
4/20/05
11:43 AM
Page 6
KNOW YOUR UNIT
Systolic Blood Pressure
Display
Diastolic Blood Pressure
/Pulse Display
Heart Symbol
Air Jack
Air Plug
AC Adapter Jack
ON/OFF Button
START Button
MEMORY Button
Cuff Tube
Arm Cuff
Cuff Tab
6
HEM-741CREL Rev A
4/20/05
11:43 AM
Page 7
BATTERY INSTALLATION / REPLACEMENT
1. Slide the battery cover off in the direction
of the arrow.
2. Install 4 “AA” size batteries so + (positive)
and – (negative) polarities match the polarities
of the battery compartment as indicated.
3. Replace the battery cover.
NOTE: If the Low Battery Indicator appears on the
display, replace all four batteries.
Long-life alkaline batteries are recommended.
7
HEM-741CREL Rev A
4/20/05
11:43 AM
Page 8
USING THE AC ADAPTER
Use only the authorized Omron AC Adapter, Model Number
HEM-ADPT1, with this monitor. Use of any other adapter
may cause damage to the monitor and will void the user warranty.
To connect the AC Adapter
Air Jack
AC Adapter
Air Plug
① Insert the AC Adapter Plug into the AC Adapter Jack on the right
side of the monitor as illustrated.
② Plug the AC Adapter into a 120V AC outlet (60 cycles).
To disconnect the AC Adapter remove the AC Adapter from the
electrical outlet first and then remove the AC Adapter Plug
from the monitor.
NOTE: The monitor is designed not to draw power from the batteries
when the AC Adapter is used.
8
HEM-741CREL Rev A
4/20/05
11:43 AM
Page 9
APPLYING THE ARM CUFF
1. If the cuff is assembled correctly, the sewn
hook material will be on the outside
of the cuff loop and the metal D-ring
will not touch your skin.
Pile Material
Sewn Hook
Material
2. Pass the end of the cuff furthest from
the tubing through the metal D-ring to
form a loop. The smooth cloth should
be on the inside of the cuff loop.
D-Ring
Smooth Cloth
3. Put your left arm through the cuff loop. 1/2 inch (12.7 mm)
The bottom of the cuff should be
approximately 1/2 inch above the
elbow. The cuff tab on the cuff
should lie over the brachial
artery on the inside of the arm.
Cuff tab
The cuff tube should run down
center of arm even with middle finger.
9
HEM-741CREL Rev A
4/20/05
11:43 AM
Page 10
APPLYING THE ARM CUFF
4. Pull the cuff so that the top and bottom edges are
tightened evenly around your arm.
5. When the cuff is positioned correctly, press the
sewn hook material FIRMLY against the pile
side of the cuff.
6. Make certain the cuff fits snugly around your arm.
The cuff should make good contact with your skin.
7. Sit in a chair with your feet flat on the floor and
place your arm on a table so that the cuff is at the
same level as your heart.
8. Relax your arm and turn your palm upward.
9. Be sure there are no kinks in the air tubing.
NOTE:
If your arm circumference size is 13 inches to 17 inches
you will need the large adult cuff. The large adult cuff is an
accessory item and it is sold separately, You may purchase
the large adult cuff at Wal-Mart (model-H-003DREL).
It is recommended the AC adapter (HEM-ADPT1)
be used with the large adult cuff.
10
HEM-741CREL Rev A
4/20/05
11:43 AM
Page 11
TAKING A MEASUREMENT
Be sure to read “How to Apply the Arm Cuff” before
taking a measurement.
1. Press the ON/OFF button.
a) All display symbols appear for approximately
one second. This is the initial LCD test.
Initial
LCD Test
b) The display symbols disappear and the Deflation
Indication symbol (
) starts to flash.
c) When the monitor completes the necessary
preparations before measurement, the Heart Symbol
( ) appears in the screen.
2. By pressing the START button the unit automatically
inflates the cuff to 170 mmHg.
a) If during your measurement the monitor determines
that a higher pressure value is required, it will
automatically increase the pressure value by 40 mmHg.
b) To inflate higher than 210 mmHg, press and hold
the START button until the desired pressure value
is reached (approximately 40 mmHg higher than
your estimated systolic blood pressure).
Do not inflate higher than 280 mmHg.
Deflation
Indication
Ready
to Measure
NOTE: If you want to stop the measurement, push the
ON/OFF button. The monitor will stop inflating
and start deflating rapidly, then the monitor will power off.
11
HEM-741CREL Rev A
4/20/05
11:43 AM
Page 12
TAKING A MEASUREMENT
3. When the correct pressure value is
reached, the cuff starts to deflate
automatically. As the cuff deflates,
decreasing numbers appear on the
display. The Heart Symbol
( ) flashes at every heartbeat.
4. When the measurement is complete,
the Heart Symbol ( ) stops
flashing and your blood
pressure and pulse
rate are displayed
alternately. Results will
be displayed until you turn
the unit off. The unit will
automatically shut off
in approximately 5 minutes.
Indicated
Value Drops
Measuring
Blood Pressure
Reading Display
Pulse Reading
Display
NOTE: Wait 2-3 minutes before taking another blood pressure
measurement. Waiting between readings allows the
arteries to return to the condition prior to taking
the blood pressure measurement.
12
HEM-741CREL Rev A
4/20/05
11:43 AM
Page 13
HOW TO USE THE MEMORY FUNCTION
This monitor has a memory capable of storing fourteen (14) sets of
readings. Every time you complete the measurement, the monitor
automatically stores the blood pressure reading and pulse rate.
• Push the MEMORY button to recall stored readings while the
Heart Symbol ( ) is displayed.
• When fourteen (14) sets of readings are stored in memory, the oldest
set will be deleted to store a new set.
• To delete all stored readings, press and hold the MEMORY button, then
press START button for 2 seconds. All the readings will be deleted.
NOTE: You can not delete the stored readings partially.
13
HEM-741CREL Rev A
4/20/05
11:43 AM
Page 14
CARE AND MAINTENANCE
To keep your digital blood pressure monitor in the best condition and
protect the unit from damage follow the directions listed below:
Clean the monitor with a soft dry cloth. Do not use any abrasive or
volatile cleaners. Do not attempt to clean the cuff. Never immerse the
monitor or any components in water.
Store the monitor in a safe and dry location. Do not fold the cuff
and tubing tightly. Do not subject the monitor to extreme hot or cold
temperatures, humidity and direct sunlight.
Avoid subjecting the monitor to strong shocks, such as dropping the
unit on the floor.
Remove the batteries if the unit will not be used for three months or
longer. Always replace all the batteries with new ones at the same time.
Use the unit consistent with the instruction provided in this manual.
Use only authorized parts and accessories.
14
HEM-741CREL Rev A
4/20/05
11:43 AM
Page 15
ERROR INDICATORS
Error Symbol
Cause
Cuff under-inflated.
Movement during
Measurement
No pulse or blood pressure
reading due to very weak
artery pulse.
Correction
Remove arm cuff. Wait 2-3
minutes and take another
measurement. Repeat steps
listed under “How To Take
A Measurement”.
Inflate the cuff
40 mmHg higher
than the previous
inflation value.
Cuff over-inflated (more
than 300 mmHg).
Carefully read and repeat
steps listed under “How
To Take A Measurement.”
Batteries have run down.
Replace all four
“AA” batteries.
15
HEM-741CREL Rev A
4/20/05
11:43 AM
Page 16
FCC STATEMENT
Note:
POTENTIAL FOR RADIO/TELEVISION INTERFERENCE (for U.S.A. only)
This product has been tested and found to comply with the limits for a Class
B digital device, pursuant to part 15 of the FCC rules.
These limits are designed to provide reasonable protection against harmful
interference in a residential installation. The product generates, uses, and can
radiate radio frequency energy and, if not installed and used in accordance
with the instructions, may cause harmful interference to radio communications.
However, there is no guarantee that interference will not occur in a particular
installation. If the product does cause harmful interference to radio or television
reception, which can be determined by turning the product on and off, the
user is encouraged to try to correct the interference by one or more
of the following measures:
• Reorient or relocate the receiving antenna
• Increase the separation between the product and the receiver.
• Connect the product into an outlet on a circuit different from that to which
the receiver is connected.
• Consult the dealer or an experienced radio/TV technician for help.
POTENTIAL FOR RADIO/TELEVISION INTERFERENCE
(for Canada only)
This digital apparatus does not exceed the Class B limits for radio noise
emissions from digital apparatus as set out in the interference-causing
equipment standard entitled “ Digital Apparatus”, ICES-003 of the Canadian
Department of Communications.
Changes or modifications not expressly approved by the party responsible
for compliance could void the user’s authority to operate the equipment.
16
HEM-741CREL Rev A
4/20/05
11:43 AM
Page 17
WARRANTY INFORMATION
Limited Warranties
®
Your ReliOn HEM-741CREL Automatic Blood Pressure Monitor, excluding the monitor cuff,
is warranted to be free from defects in materials and workmanship appearing within 5 years,
when used in accordance with the instructions provided with the monitor. The monitor cuff
is warranted to be free from defects in materials and workmanship appearing within one
year, when the monitor is used in accordance with the instructions provided with the monitor.
The above warranties extend only to the original retail purchaser.
We will, at our option, repair or replace without charge any monitor or monitor cuff coveredby
the above warranties. Repair or replacement is our only responsibility and your only remedy
under the above warranties.
To obtain warranty service contact Omron Healthcare for the address of the repair location.
Shipping instructions and repair information is available by calling 1-800-634-4350 or visiting
our website at www.omronhealthcare.com.
Enclose the Proof of Purchase. Include $5.00 for the return shipping and handling. Include
a letter, with your name, address, phone number, and description of the specific problem.
Pack the product carefully to prevent damage in transit. Because of possible loss in transit,
we recommend insuring the product with return receipt requested.
ALL IMPLIED WARRANTIES, INCLUDING BUT NOT LIMITED TO THE
IMPLIED WARRANTIES OF MERCHANTABILITY AND FITNESS FOR
PARTICULAR PURPOSE, ARE LIMITED TO THE DURATION OF THE
APPLICABLE WRITTEN WARRANTY ABOVE. Some states do not allow limitations
on how long an implied warranty lasts, so the above limitation may not apply to you.
OMRON SHALL NOT BE LIABLE FOR LOSS OF USE OR ANY OTHER
INCIDENTAL, CONSEQUENTIAL OR INDIRECT COSTS, EXPENSES OR
DAMAGES. Some states do not allow the exclusion or limitation of incidental or
consequential damages, so the above exclusions may not apply to you.
This warranty gives you specific legal rights, and you may also have other rights which may
vary from state to state.
FOR CUSTOMER SERVICE (US & Canada)
Visitor web site at:
www.omronhealthcare.com
Call toll free:
1-800-634-4350
17
HEM-741CREL Rev A
4/20/05
11:43 AM
Page 18
SPECIFICATIONS
Model:
Display:
Measurement Range:
Accuracy/Calibration:
Inflation:
Deflation:
Rapid Air Release:
Pressure Detection:
Measurement Method:
Pulse Wave Detection:
Power Source:
Battery Life:
Operating Temperature/
Humidity:
Storage Temperature/
Humidity:
Console Weight:
Outer Dimensions:
Cuff Dimensions:
Arm Circumference Range:
Contents:
UPC Code:
ReliOn® HEM-741CREL
LCD Digital Display
Pressure: 0 to 280 mmHg
Pulse: 40-180/min.
Pressure: ±3mmHg or 2% of reading
Pulse: ±5% of reading
Automatic by electric pump
Automatic pressure release valve
Automatic exhaust valve
Capacitive pressure sensor
Oscillometric method
Capacitance type pressure sensor
4 "AA" batteries
Approx. 300 uses when used once
a day for 2 minutes
50°F to 104°F (10°C to 40°C)
30 to 85% RH maximum
-4°F to 140°F (-20°C to 60°C)
10 to 95% RH maximum
Approximately 13 oz. (350g) with cuff,
excluding batteries
Approx. 5" (l) x 4 3/4" (w) x 3 3/4" (h)
(125mm x 119mm x 94mm)
Approx. 5 1/2" (w) x 18 7/8" (l)
(140mm x 480mm)
Approximately 9'' to 13'' (220mm - 320mm)
Monitor, Arm cuff, Instruction Manual,
and AC Adapter
6 81306 611130
NOTE: These specifications, to improve performance, are subject to change without notice.
18
HEM-741CREL Rev A
4/20/05
11:43 AM
NOTES
19
Page 19
HEM-741CREL Rev A
4/20/05
11:43 AM
Manufactured for:
OMRON HEALTHCARE, INC.
1200 Lakeside Drive
Bannockburn, Illinois 60015
www.omronhealthcare.com
Made in China
Copyright © 2005 Omron Healthcare, Inc.
741CRELINST Rev A
Page 20
HEM-741CREL Rev A
4/20/05
11:43 AM
Page S1
MANUAL DE INSTRUCCIONES
MONITOR DE PRESIÓN ARTERIAL
DE INFLADO AUTOMÁTICO
HEM-741CREL
ESPAÑOL
Modelo
HEM-741CREL Rev A
4/20/05
11:43 AM
Page S2
TABLA DE CONTENIDO
Antes de usar el monitor
Introducción . . . . . . . . . . . . . . . . . . . . . . . . . . . . . . . . . . . . . . . .E3
Notas de seguridad importantes . . . . . . . . . . . . . . . . . . . . . . . .E4
Antes de medir la presión arterial . . . . . . . . . . . . . . . . . . . . . . .E5
Instrucciones de operación
Conozca su unidad . . . . . . . . . . . . . . . . . . . . . . . . . . . . . . . . . .E6
Instalación y reemplazo de las pilas . . . . . . . . . . . . . . . . . . . . .E7
Uso del adaptador de CA . . . . . . . . . . . . . . . . . . . . . . . . . . . . .E8
Cómo colocar el brazalete
. . . . . . . . . . . . . . . . . . . . . . . . . . .E9
Cómo hacer la medición . . . . . . . . . . . . . . . . . . . . . . . . . . . . .E11
Uso de la función de memoria . . . . . . . . . . . . . . . . . . . . . . . .E13
Cuidado y mantenimiento
Cuidado y mantenimiento . . . . . . . . . . . . . . . . . . . . . . . . . . . .E14
Indicadores de error . . . . . . . . . . . . . . . . . . . . . . . . . . . . . . . .E15
Declaración de la FCC . . . . . . . . . . . . . . . . . . . . . . . . . . . . . .E16
Información sobre la garantía . . . . . . . . . . . . . . . . . . . . . . . . .E17
Especificaciones . . . . . . . . . . . . . . . . . . . . . . . . . . . . . . . . . . .E18
Notas . . . . . . . . . . . . . . . . . . . . . . . . . . . . . . . . . . . . . . . . . . . E19
S2
HEM-741CREL Rev A
4/20/05
11:43 AM
Page S3
INTRODUCCIÓN
Gracias por adquirir el Monitor de presión arterial de inflado automático,
modelo ReliOn® HEM-741CREL.
Complete estos datos en caso de que necesite
consultarlos en el futuro.
FECHA DE COMPRA:________________
NÚMERO DE SERIE: ________________
Engrape aquí su factura de compra.
Este monitor cuenta con inflado y desinflado automático para medir la
presión arterial y el pulso. La medición aparece claramente
en un amplio panel digital.
Su monitor digital de presión arterial ReliOn® HEM-741CREL, utiliza
el método oscilométrico para medir la presión arterial. Esto significa
que el monitor detecta el flujo de la sangre a través de la arteria
braquial y lo convierte en lectura digital. Los monitores oscilométricos
no necesitan un estetoscopio, lo cual facilita su uso.
El Monitor de presión arterial de inflado automático ReliOn®
HEM-741CREL ha sido diseñado para uso residencial.
GUARDE ESTAS INSTRUCCIONES
S3
HEM-741CREL Rev A
4/20/05
11:43 AM
Page S4
NOTAS DE SEGURIDAD IMPORTANTES
Para asegurar el uso correcto del producto, siempre se deben tomar
medidas de seguridad básicas, entre ellas las que se detallan
a continuación:
þ Antes de utilizar la unidad, lea completamente la información del
manual de instrucciones y toda otra información que se incluya en
la caja.
þ Solicite a su médico la información específica relacionada con su
presión arterial. Siga las instrucciones de su proveedor de servicios
de salud.
þ Utilice la unidad solamente para el uso especificado. No la utilice
para otro propósito.
þ La unidad está diseñada para medir el pulso y la presión arterial
en pacientes adultos. No la utilice en bebés.
þ No utilice teléfonos celulares cerca del aparato, ya que podría
ocasionar fallas en el funcionamiento.
þ Todo cambio o modificación que no se encuentre aprobado por
ReliOn Healthcare provocará la anulación de la garantía del
usuario. No desarme ni intente reparar
la unidad o alguno de sus componentes.
S4
HEM-741CREL Rev A
4/20/05
11:43 AM
Page S5
ANTES DE MEDIR LA PRESIÓN ARTERIAL
1. Evite comer, fumar y hacer ejercicios físicos 30 minutos antes de
hacer la medición. Descanse al menos 15 minutos antes de
hacer la medición.
2. El estrés aumenta la presión arterial. Evite medir su presión arterial
cuando esté con estrés.
3. Retire todo tipo de ropa ajustada del brazo izquierdo.
4. Las mediciones deben realizarse en un lugar tranquilo.
5. Siéntese en una silla con los pies completamente apoyados en
el suelo. Apoye el brazo izquierdo sobre una mesa para que el
brazalete quede a la altura del corazón.
6. Durante la medición, mantenga silencio.
7. Lleve un registro de las mediciones del pulso y la presión arterial
para su médico. Una sola medición no brinda una indicación
precisa de su presión arterial real. Es necesario realizar y registrar
varias mediciones durante un determinado periodo. Trate de medir
su presión arterial a la misma hora todos los días para obtener un
registro más uniforme.
8. Espere de 2 a 3 minutos entre una medición y otra. Este tiempo de
espera permite que las arterias vuelvan al estado que tenían antes
de medir la presión arterial. Según sus características fisiológicas,
tal vez necesite más tiempo de descanso entre las mediciones.
S5
HEM-741CREL Rev A
4/20/05
11:43 AM
Page S6
CONOZCA SU UNIDAD
Visor de la presión arterial
sistólica
Símbolo del corazón
Visualización de la presión
arterial diastólica y del pulso
Entrada para el
transformador de CA
Entrada del tubo
de aire
Botón ON/OFF
(encendido/
apagado)
Conector del
tubo de aire
Botón de memoria
Botón START
(inicio)
Tubo del brazalete
Brazalete
Pestaña del
brazalete
S6
HEM-741CREL Rev A
4/20/05
11:43 AM
Page S7
INSTALACIÓN Y REEMPLAZO
DE LAS PILAS
1. Retire la tapa del compartimiento para pilas
en la dirección que indica la flecha.
2. Coloque 4 pilas de tamaño “AA” de modo que las
polaridades positiva (+) y negativa (–) coincidan con
las del compartimiento.
3. Vuelva a colocar la tapa.
NOTA: Si el indicador de pilas descargadas aparece
en el visor, reemplace las cuatro pilas.
Se recomienda el uso de pilas alcalinas
de larga duración.
S7
HEM-741CREL Rev A
4/20/05
11:43 AM
Page S8
USO DEL ADAPTADOR DE CA
Use sólo el adaptador de CA Omron autorizado, número de modelo
HEM-ADPT1, con este monitor. El uso de cualquier otro adaptador
puede causar daño al monitor y anulará la garantía del usuario.
Para conectar el adaptador de CA
Entrada del tubo de aire
Adaptador de CA
Conector del tubo de aire
① Inserte el enchufe del adaptador de la CA en el gato del adaptador
de la CA a la derecha del monitor, según lo ilustrado
② Enchufe el adaptador de CA en una toma de corriente de 120 VCA
(60 ciclos).
Para desconectar el adaptador de CA, primero extraiga el adaptador de
CA de la toma de corriente y luego quite del monitor el enchufe del
adaptador de CA.
NOTA: El monitor está diseñado para no consumir alimentación de las
pilas cuando se utiliza el adaptador de CA.
S8
HEM-741CREL Rev A
4/20/05
11:43 AM
Page S9
CÓMO COLOCAR EL BRAZALETE
1. Si el brazalete está colocado correctamente,
el cierre tipo Velcro quedará en la parte
externa del brazalete y el anillo metálico
en "D" no estará en contacto con la piel.
Velcro (lado suave)
Velcro (lado
áspero)
2. Pase el extremo del brazalete que esté
más alejado del tubo a través del anillo
metálico en “D” para formar un doblez.
La parte más suave de la tela debe
quedar del lado interno del doblez
Parte suave
de la tela
del brazalete.
3. Pase el brazo izquierdo a través del
doblez de brazalete. La parte
inferior del brazalete debe quedar
aproximadamente a un centímetro
y medio (1/2") encima del codo.
La pestaña del brazalete debe descansar
sobre la arteria braquial en la parte interior
del brazo. El tubo de aire debe quedar
en el centro del brazo y estar alineado
con el dedo mayor.
S9
Anillo
en “D”
12,7 mm (1/2 pulgada)
Pestaña del
brazalete
HEM-741CREL Rev A
4/20/05
11:43 AM
Page S10
CÓMO COLOCAR EL BRAZALETE
4. Jale del brazalete de manera que los extremos
superior e inferior queden ajustados en forma
pareja alrededor del brazo.
5. Cuando el brazalete se encuentre en la posición
correcta, presione el lado áspero del Velcro
FIRMEMENTE contra su lado suave.
6. Asegúrese de que el brazalete esté correctamente
ajustado al brazo. Todo el brazalete debe estar en
contacto con la piel.
7. Siéntese en una silla con los pies completamente
apoyados en el suelo y coloque el brazo sobre una
mesa, de manera que el brazalete quede al mismo
nivel que el corazón.
8. Relaje el brazo y coloque la palma de la mano
hacia arriba.
9. Asegúrese de que el tubo de aire no esté torcido.
NOTA: Si la circunferencia de su brazo es de 13 a 17 pulgadas
necesitará el brazalete grande del brazo para adulto.
El brazalete grande para adulto es un accesorio y está de
venta por separado. Puede comprar el brazalete grande an
Wal-Mart (modelo H-003DREL). Es recomendado que el
adaptador de la CA (HEM-ADPT1) sea usado con el
brazalete grande para adulto.
S10
HEM-741CREL Rev A
4/20/05
11:43 AM
Page S11
CÓMO HACER LA MEDICIÓN
Antes de medir la presión arterial, recuerde leer la
sección “Cómo colocar el brazalete”.
1. Presione el botón ON/OFF (Encendido/Apagado).
a) Todos los símbolos aparecen en el visor durante
aproximadamente
Prueba inicial
del visor LCD
un segundo. Ésta es la prueba inicial del visor LCD.
b) Los símbolos del visor desaparecen y el símbolo
indicador de desinflado ( ) comienza a titilar.
c) Cuando el monitor termina de prepararse
para la medición, el símbolo del corazón (
aparece en el visor.
)
Indicación de
desinflado
2. Al presionar el botón START (Inicio), la unidad
automáticamente infla el brazalete a 170 mmHg.
a) Si durante la medición el monitor determina que
se necesita un valor de presión superior, la
unidad aumentará la presión automáticamente
en 40 mmHg.
b) Para inflar el brazalete hasta un valor superior
Listo para
a los 210 mmHg, pulse el botón START y manténgalo medir
presionado hasta llegar al valor de presión deseado
(aproximadamente 40 mmHg por encima de su presión
arterial sistólica). No inflar por encima de los 280 mmHg.
NOTA: Si desea detener la medición, pulse el botón ON/OFF
(Encendido/Apagado). El monitor dejará de inflar y se
desinflará rápidamente, entonces el monitor se apagará.
S11
HEM-741CREL Rev A
4/20/05
11:43 AM
Page S12
CÓMO HACER LA MEDICIÓN
3. Cuando el brazalete alcanza el valor
adecuado, comienza a desinflarse
automáticamente. A medida que
se desinfla, aparecen números
decrecientes en el visor. El símbolo
del corazón ( ) titila con
cada latido.
4. Cuando la medición ha
finalizado, el símbolo
del corazón ( ) deja de
titilar y el visor muestra
su pulso y presión arterial
alternadamente. Los resultados
se mostrarán hasta que se apague
la unidad. Si no se apaga,
se apagará automáticamente
luego de aproximadamente 5 minutos.
El valor
indicado
desciende
Visualización de
mediciones de la
presión arterial
Medición
Visualización
de mediciones
del pulso
NOTA: Espere entre 2 y 3 minutos antes de realizar otra medición
de presión arterial. Esto permitirá que las arterias
vuelvan al estado que tenían antes de realizar
la medición de presión arterial.
S12
HEM-741CREL Rev A
4/20/05
11:43 AM
Page S13
USO UTILIZAR LA FUNCIÓN
DE MEMORIA
El monitor tiene una memoria que puede almacenar catorce (14)
series de mediciones. Cada vez que se completa una medición, el
monitor guarda automáticamente los valores de pulso y las
mediciones de presión arterial.
• Pulse el botón MEMORY (Memoria) para recuperar mediciones
guardadas mientras el símbolo del corazón () aparece en el visor.
• Cuando la memoria haya almacenado catorce (14) series de
mediciones, la más antigua será eliminada con el fin de que haya
espacio para guardar una nueva.
• Para eliminar todas las mediciones guardadas, pulse el botón
MEMORY y pulse el botón START durante 2 segundos. Todas las
mediciones serán eliminadas.
NOTA: Las mediciones guardadas no pueden eliminarse parcialmente.
S13
HEM-741CREL Rev A
4/20/05
11:43 AM
Page S14
CUIDADO Y MANTENIMIENTO
Para conservar su monitor digital de presión arterial en perfecto
estado y protegerlo contra daños, siga las instrucciones que se
detallan a continuación:
Limpie el monitor con un paño suave y seco. No utilice limpiadores
abrasivos ni volátiles. No intente limpiar el brazalete. Nunca sumerja
el monitor ni sus componentes en agua.
Guarde el monitor en un lugar seguro y seco. No doble el brazalete
ni el tubo de manera excesivamente ajustada. No exponga el monitor
a temperaturas extremas de frío o calor,
a humedad ni a la luz solar directa.
Evite que el monitor sufra golpes fuertes, como por ejemplo,
caídas al suelo.
Si no se utilizará el monitor durante un período de tres meses o más,
retírele las pilas. Siempre reemplace todas las pilas gastadas por
nuevas, no sólo algunas.
Utilice la unidad según lo indican las instrucciones detalladas
en este manual. Utilice sólo piezas y accesorios autorizados.
S14
HEM-741CREL Rev A
4/20/05
11:43 AM
Page S15
INDICADORES DE ERROR
Símbolo de error
Causa
Brazalete inflado
insuficientemente.
Movimiento durante
la medición
Ninguna lectura de presión
arterial ni de pulso debido
a que el pulso arterial es
muy débil.
Corrección
Retire el brazalete.
Espere entre 2 y 3
minutos y realice otra
medición. Repita los
pasos mencionados en
“Cómo hacer la
medición”. Infle el
brazalete 40 mmHg
más que el
valor anterior.
Brazalete inflado
excesivamente (supera
los 300 mmHg)
Lea detenidamente
y repita los pasos
mencionados en la
sección “Cómo hacer
Una medición”.
Pilas gastadas.
Reemplace las cuatro
pilas “AA”.
S15
HEM-741CREL Rev A
4/20/05
11:43 AM
Page S16
DECLARACIÓN DE LA FCC
NOTA:
POSIBILIDAD DE INTERFERENCIA EN RADIO / TELEVISIÓN (para los
EE.UU. únicamente) Las pruebas a las que se sometió este producto
comprobaron que cumple con las limitaciones establecidas para dispositivos
digitales Clase B, de conformidad con la sección 15 de las Normas FCC.
El propósito de estas limitaciones es brindar protección razonable contra
interferencias perjudiciales en el hogar. Este producto genera, usa y puede
irradiar energía de frecuencia radioeléctrica y si no se le instala y emplea
según las instrucciones correspondientes, puede provocar interferencias en las
comunicaciones por radio. No obstante, no existe garantía alguna de que no
vayan a producirse interferencias en alguna instalación en particular. En el
caso de que el producto produzca algún tipo de interferencia perjudicial para
la recepción de radio o televisión, lo cual puede determinarse apagando y
volviendo a encender el producto, se recomienda que el usuario realice
alguna de las siguientes operaciones para intentar corregir la interferencia:
• Cambie la orientación o ubicación de la antena de recepción.
• Aumente la distancia que separa el producto del receptor.
• Conecte el producto a un tomacorriente que integre un circuito diferente
de aquél donde está conectado el receptor.
• Solicite asistencia al vendedor o a un técnico de radio/TV experimentado.
POSIBILIDAD DE INTERFERENCIA EN RADIO / TELEVISIÓN
(para Canadá únicamente)
Este aparato digital no excede los límites de la Clase B para la emisión de
señales de radio de los aparatos digitales, según las normas de causa de
interferencia de equipos “Aparatos Digitales”, ICES-003 del Departamento
de Comunicaciones Canadiense.
Todo cambio o modificación que no se encuentre expresamente aprobado
por la parte responsable, puede causar la anulación de la autorización del
usuario para utilizar el equipo.
S16
HEM-741CREL Rev A
4/20/05
11:43 AM
Page S17
INFORMACIÓN ACERCA DE LA GARANTÍA
Garantías limitadas
Su Monitor automático de presión arterial, modelo HEM-741CREL ReliOn®, sin incluir el
brazalete, está garantizado contra defectos de material y mano de obra que surjan en un
periodo de 5 años, cuando se le emplee según las instrucciones suministradas junto con el
monitor. El brazalete está garantizado contra defectos de materiales y mano de obra que
puedan surgir en el periodo de un año, siempre y cuando el monitor sea utilizado según las
instrucciones suministradas. Las garantías anteriormente descritas sólo se extienden al
comprador minorista original.
Nos comprometemos a reparar o recambiar sin cargo y según nuestro criterio cualquier monitor
o brazalete cubierto por dichas garantías. La reparación o el reemplazo es nuestra única
responsabilidad y su único recurso bajo las garantías mencionadas.
Para obtener el servicio de garantía, comuníquese con Omron Healthcare y solicite la
dirección del correspondiente lugar de reparación. Para acceder a las instrucciones y la
información de reparación disponibles, llame al 1-800-634-4350 ó visite nuestro sitio Web
en www.omronhealthcare.com.
Adjunte la factura de compra. Incluya US$5 por concepto de gastos de manejo
y devolución. Incluya una carta con su nombre, dirección, número telefónico y descripción
del problema específico. Embale el producto cuidadosamente para evitar que sufra daños
durante el transporte. Debido a la posibilidad de extravío durante el transporte, le
recomendamos que asegure el producto solicitando la confirmación de entrega.
TODAS LAS GARANTÍAS IMPLÍCITAS, ENTRE LAS QUE FIGURAN
(DE MANERA ENUNCIATIVA PERO NO TAXATIVA) LAS GARANTÍAS
IMPLÍCITAS DE COMERCIABILIDAD Y APTITUD PARA PROPÓSITOS
PARTICULARES, SE LIMITAN A LA DURACIÓN DE LA GARANTÍA ESCRITA
CORRESPONDIENTE DESCRITA ANTERIORMENTE. Algunos estados no
permiten limitaciones respecto al plazo de las garantías implícitas; por lo tanto la
limitación precedente puede no aplicarse en su caso.
OMRON NO ES RESPONSABLE POR DAÑOS OCASIONADOS DEBIDO
A LA PÉRDIDA DE USO NI POR NINGÚN OTRO DAÑO, GASTO O COSTO
INCIDENTAL, INDIRECTO O RESULTANTE. Algunos estados no permiten la
exclusión o restricción de daños resultantes o incidentales; por lo tanto las exclusiones
precedentes pueden no aplicarse en su caso.
Esta garantía le otorga derechos legales específicos y además, usted puede gozar de otros
derechos que pueden variar según el estado de residencia.
PARA COMUNICARSE CON EL SERVICIO DE ATENCIÓN AL CLIENTE
Visite nuestro sitio Web en:
www.omronhealthcare.com
Llame al número gratuito si reside en los EE. UU.:
1-800-634-4350
S17
HEM-741CREL Rev A
4/20/05
11:43 AM
Page S18
ESPECIFICACIONES
Modelo:
Visor:
Espectro de medición:
ReliOn® HEM-741CREL
Visor digital LCD
Presión: de 0 a 280 mmHg
Pulso: de 40 a 180/min.
Precisión/Calibrado:
Presión: ±3mmHg ó 2% de la medición
Pulso: ±5% de la medición
Inflado:
Automático mediante bomba eléctrica
Desinflado:
Válvula de liberación automática de presión
Liberación rápida de aire:
Válvula de escape automática
Detección de presión:
Sensor capacitivo de presión
Método de medición:
Método oscilométrico
Detección de la onda de pulso:
Sensor de presión de tipo capacitivo
Alimentación:
4 pilas "AA"
Duración de las pilas:
Aprox. 300 usos cuando se utiliza una vez
por día durante 2 minutos
Temperatura de operación/
50°F a 104°F (10°C a 40°C)
Humedad:
30 a 85% como máximo de HR
Temperatura de almacenamiento/ -20°C a 60°C (-4°F a 140°F)
Humedad:
10 a 95% como máximo de HR
Peso de la consola:
350g (13 oz.) aproximadamente, incluy en
do el brazalete pero no las pilas
Dimensiones externas:
Aprox. 125 mm (largo) x 119 mm (ancho)
x 94 mm (alto) (5" x 4 3/4" x 3 3/4")
Dimensiones del brazalete:
Aprox. 140 mm (ancho) x 480 mm (largo)
(5 1/2" x 18 7/8")
Circunferencia del brazo:
Aproximadamente entre 220 mm y 320 mm
(9'' y 13'')
Contenido:
Monitor, Brazalete, Manual de
Instrucciones y Adaptador de CA
Código UPC:
6
81306 611130
NOTA: Estas especificaciones técnicas, destinadas a mejorar el funcionamiento,
están sujetas a cambios sin previo aviso.
S18
HEM-741CREL Rev A
4/20/05
11:43 AM
NOTAS
S19
Page S19
HEM-741CREL Rev A
4/20/05
11:43 AM
Fabricado para:
OMRON HEALTHCARE, INC.
1200 Lakeside Drive
Bannockburn, Illinois 60015
www.omronhealthcare.com
Hecho en China
Copyright © 2005 Omron Healthcare, Inc.
741CRELINST Rev A
Page S20