1
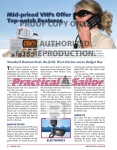
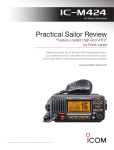
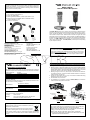
This device complies with part 15 of the FCC Rules. Operation is subject to the
following two conditions: (1) This device may not cause harmful interference,
and (2) this device must accept any interference including received, interference
that may cause undesired operation.
RAM3 (CMP30)
Remote Station Microphone
INCLUDED ACCESSORIES AND REPLACEMENT PART NUMBERS
1.
2.
3.
4.
23-Foot Routing Cable (S8101512)
Rubber Cap (RA052520A)
Mounting Bracket (RA052510) & Screws (U24312020 x 4 pcs)
Microphone Hanger (RA458800: Black or RA436000: White) &
Screws (U40412220 x 2 pcs)
5. Ferrite Core (L9190182)
1
2
3
4
VERTEX STANDARD CO., LTD.
4-8-8 Nakameguro, Meguro-Ku, Tokyo 153-8644, Japan
VERTEX STANDARD
US Headquarters
10900 Walker Street, Cypress, CA 90630, U.S.A.
YAESU UK LTD.
Unit 12, Sun Valley Business Park, Winnall Close
Winchester, Hampshire, SO23 0LB, U.K.
VERTEX STANDARD HK LTD.
Unit 5, 20/F., Seaview Centre, 139-141 Hoi Bun Road,
Kwun Tong, Kowloon, Hong Kong
5
The RAM3 (CMP30) allows you to remotely control all functions of Standard Horizon
fixed mount VHF radios which include the Quantum series, Matrix series, Quest-X,
Quest+, PS1000 and PS2000. The full dot matrix display and programmable keys
make operation simple and fast. Additional features include turning the radio on/off
and all DSC functions including Distress. When connected to the Matrix GX3000S, or
the Quantum series, this remote station microphone also controls the 30W PA/hailer
functions. The RAM3 (CMP30) can be extended up to 70 feet using the optional CT100 (23 Foot) extension cable. The RAM3 (CMP30) is backed by an industry leading
3-year waterproof warranty.
Copyright 2011
VERTEX STANDARD CO., LTD.
All rights reserved.
No portion of this manual
may be reproduced
without the permission of
VERTEX STANDARD CO., LTD.
VERTEX STANDARD (AUSTRALIA) PTY., LTD.
Normanby Business Park, Unit 14/45 Normanby Road
Notting Hill 3168, Victoria, Australia
Owner’s Manual
The details of the installation and operation of the RAM3 (CMP30) is included
in the owner’s manual of the compatible fixed mount radio, or it can be downloaded at www.standardhorizon.com. If you have any questions or comments,
please contact Standard Horizon Marine Product Support at 800/767-2450.
E A G 3 6 X 1 0 1
RAM3 (CMP30) INSTALLATION
Declaration of Conformity
We, YAESU UK LTD. declare under our sole responsibility that the following
equipment complies with the essential requirements of the Directive 1999/5/EC.
Type of Equipment:
Brand Name:
Model Number:
Manufacturer:
Address of Manufacturer:
Handset
STANDARD HORIZON
CMP30
Vertex Standard Co., Ltd.
4-8-8 Nakameguro Meguro-Ku, Tokyo 153-8644, Japan
Applicable Standards:
This equipment is tested and conforms to the essential requirements of directive, as included in following standards.
1. Connect the Extension Cable to the 8-pin connector on the transceivers rear panel,
then tighten the Cable Nut (Figure 1).
2. Referring to Figure 2, attach the supplied ferrite core as close as possible to the MIC
plug of the Routing Cable and External Speaker Connections, then snap its two
halves together. And then, wind some plastic tape around the ferrite core, to prevent
vibration from causing the two halves to split apart and fall off the wires.
3. Referring to Figure 3, make a 1.2” (30 mm) hole in the wall then insert the Extension Cable into this hole. Connect the Gasket and Mount Base to the Extension
Cable Connector using the Nut.
4. Drill the four Screw holes (approx. 2 mm) on the wall then install the Mounting
Bracket to the wall using four screws.
5. Put the Rubber Cap on to the Nut.
6. The installation is now complete. Connect the RAM3 (CMP30) to the Extension
Cable Connector and tighten the Cable Nut.
EN 301 843-1 (2004-06)
EMC Standard:
EN60950-1:2006
Safety Standard:
The technical documentation as required by the Conformity Assessment procedures is kept at the following address:
Company:
Address:
YAESU UK LTD.
Unit 12, Sun Valley Business Park, Winnall Close
Winchester, Hampshire, SO23 0LB, U.K.
External Speaker Connections
Ferrite Core
Gasket
FIGURE 1
External Speaker
Connections
Cap
Ferrite Core
Snap together
Routing Cable or
CT-100 Extension Cable
As close as possible
FIGURE 2
Wall
Routing Cable
Mounting Bracket
Nut
FIGURE 3
Disposal of your Electronic and Electric Equipment
Products with the symbol (crossed-out wheeled bin) cannot be
disposed as household waste.
Electronic and Electric Equipment should be recycled at a facility capable of handling these items and their waste byproducts.
In EU countries, please contact your local equipment supplier representative
or service center for information about the waste collection system in your
country.
NOTE
The routing cable can be cut and spliced, however care needs to be
taken when reconnecting the wires to ensure water integrity.
Before cutting the cable make sure it is not plugged into the radio. After
cutting you will notice there are the following wires:
Yellow, Green, Brown, Purple, Blue, Green, Red, and Shield
The Red and Shield wires are wrapped in foil. Remove the foil, and
separate the Red and Shield wires.
MODE SETTING & SETUP
The RAM3 (CMP30) is backward compatible Standard Horizon VHF radios that use the RAM+ (CMP25) and VH-310 (telephone style handset).
MODE SELECTION
KEY SETUP
The Mode selection allows the RAM3 (CMP30) to be setup to
operate with specific models, refer to the section below for
compatibility.
Mode 1: GX1256S, GX1280S, and GX2360S
Mode 2: PS1000, PS2000, CPV350, CPV550, GX1500S/E,
GX3000S/E, GX3500S, GX5000S, GX5500S,
and VM-3500E
To use Mode 2 on the GX3500S or VM-3500E the radio
software may have to be updated. Please contact Standard Horizon for details.
1.
2.
3.
4.
Turn the RAM3 (CMP30) off, press
and hold the [ENT] key then press
and hold the orange POWER ( )
key until the menu is shown.
Press the [ ] or [] key to select
“Operation Mode” item, then press
the [ENT] key.
Press the [ ] or [ ] key to select the Operation Mode
(“Mode 1” or “Mode 2”) and press the [ENT] key.
Press the [] key to select “Save &
Exit” and press the [ENT] key.
IMPORTANT NOTE
In the GX2000/GX2100 series, there is no need to
use “Mode Setting”, because the GX2000/GX2100
series can perform the mode selection automatically. Regarding the Key Setup, please refer to the
Owner’s Manual of the radio.
Mode 2 only allows the RAM3 (CMP30) to define
the [CLR/WX] key and assign / Change the number of selectable soft keys.
The following are used only when Mode 2 is selected
and the RAM3 (CMP30) is connected to a compatible
radio.
Define [Soft] Keys:
By default the soft keys are assigned as SCAN, DW and NAV,
however these keys can be changed. In addition the soft keys
can be increased / assigned, refer below:
1.
[CLR/WX] Function:
The operation of this key may be changed to select WX channels for North American market or CLR for Europe. By default
the when the key is pressed, the last selected WX channel
will be shown.
1.
2.
3.
4.
To change this key to operate the
CLR function, Turn the RAM3
(CMP30) off, press and hold the
[ENT] key then press and hold the
orange POWER ( ) key until the
menu is shown.
Press the [ ] key to select “[CLR/
WX] Function” and press the [ENT]
key.
Select “CLR” and press the [ENT]
key.
Press the [] key to select “Save &
Exit” and press the [ENT] key.
Number of Soft Keys:
3 soft keys are set as default. However the RAM3 (CMP30)
allows assigning of up to 10 soft keys with the instructions
below:
1.
2.
3.
4.
Turn the RAM3 (CMP30) off, press
and hold the [ENT] key then press
and hold the orange POWER ( )
key until the menu is shown.
Press the [ ] key to select “Number of Soft keys” and press the [ENT]
key.
Select the number of soft keys (3,
4, 6, 8 or 10) and press the [ENT]
key.
Press the [] key to select “Save &
Exit” and press the [ENT] key.
2.
3.
4.
5.
FUNCTION
Stops and starts scanning.
Stops and starts Dual Watch Scan.
Displays the GPS Navigation Data.
Enables the LCD backlight dimmer function.
When pressed memorizes a channel for scanning.
Activates the Intercom function.
Operates the PA function.
Operates the Fog Horn function.
Toggles the Voice Scrambler “on” and “off”.
Immediately recalls the previously selected US
WX
NOAA weather channel.
CLR
Cancels the menu selection.
: Some functions may not operate depending on the connected radio.
DISPLAY
SCAN
DW
NAV
DIM
MEM
IC
PA
FOG
SCRM
LCD SETTING
The RAM3 (CMP30) has the capability to change the LCD
contrast by following the instructions below.
1.
2.
3.
4.
RAM3 (CMP30) CONTROLS
DISPLAY
Channel display.
SOFT KEY
For details, refer to “Mode Setting and Setup” above.
Turn the RAM3 (CMP30) off, press
and hold the [ENT] key then press
and hold the orange POWER ( )
key until the menu is shown.
Press the [] key to select “Define
[Soft] keys” and press the [ENT] key.
Press the [] or [] key to select
the [Soft] key, and press the [ENT]
key. Then, press the [] or [] key
to select the new function to be
assigned, and press the [ENT] key.
Available functions are listed below.
Press the [CLR/WX] key to return
to the “Soft Key Setup” mode.
Press the [] key to select “Save &
Exit” and press the [ENT] key.
Press and hold down the [CALL/MENU] key until “RADIO
SETUP” menu appears.
Press the [CALL/MENU] key, then
press the [ ] key until the “CONTRAST” menu appears.
Press the [CALL/MENU] key again,
then press the [] or [] key to select the desired contrast level.
Press the [CALL/MENU ] key to
store the selected level, then press
the [16/9] key to exit “RADIO SETUP”
menu and return to radio operation
mode.
OPTIONAL ACCESSORIES
KEY PAD
[CALL/MENU] Key
Press this key to access the DSC OPERATION menu.
Press and hold this key to access the SETUP menu.
[16/9] Key
First press: channel 16 is immediately selected.
Second press: recalls the last selected channel.
Press and hold: selects channel 9.
CT-100 23FT EXTENSION CABLE
MLS-300 EXTERNAL LOUD SPEAKER
[](UP)/[](DOWN) Key
These keys are used to select channels, adjust the volume and squelch level, and to choose DSC calls, DSC
setup and Radio setup function.
[H/L] Key
Press this key to toggle the transmit power between high
and low. When the [H/L] key is pressed while the transceiver is on channel 13 or 67, the power will temporarily
switch from LOW to HI power until the PTT is released.
The [H/L] key does not function on transmit inhibited and
low power only channels.
PTT (Push-To-Talk) Key
Press this key to activate the transmission.
POWER ( ) Key
Press and hold down this key to turn to the transceiver
and RAM3 (CMP30) “on” and “off”.
Microphone
The internal microphone is located here.
When transmitting, position your mouth about 1/2 to 1 inch
(1.2 ~ 2.5 cm) away from the small mic hole. Speak slowly
and clearly into the microphone.
[VOL/SQ] Key (Volume Control / Squelch Control)
Press this key to toggle the function of the microphone’s
[ ] or [ ] key between the channel selections, volume
level adjustment, and squelch level adjustment.
[CLR/WX] Key
For details, refer to “Mode Setting and Setup” above.
[ENT] Key
This key functions as the enter key.
Speaker
The internal speaker is located here.
[DISTRESS] KEY
This key is used to send a DSC Distress Call.
Lift the red spring loaded DISTRESS cover, then press
and hold in the [DISTRESS] key.
MLS-310 10 WATT A MPLIFIED SPEAKER
SPECIFICATIONS
Supply voltage:
Current consumption:
13.8 VDC (Supplied from the transceiver)
700 mA @VOL Max.
200 mA @AF Mute
Operating Temperature: –4 °F to +140 °F (–20 °C to +60 °C)
MIC. Sensitivity (Typical): 60 mVrms
@ 1 kHz Tone with 3 kHz Deviation
MIC. Impedance:
2 kΩ
AF output:
300 mW @ 16 Ω for 10 % THD
(Internal Speaker)
2 W @ 4 Ω for 10 % THD
(External Speaker)
Display Size:
1.8” x 0.9” (45 x 23 mm)
Display Resolution:
132 x 64 dot
Case Size:
2.6” x 5.5” x 1.2” (67 x 140 x 30 mm)
Weight (Approx):
11.6 oz (330g)