1
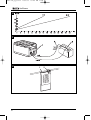
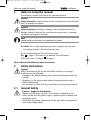
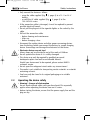
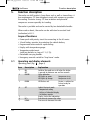
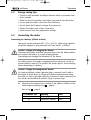
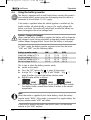
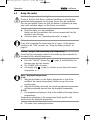
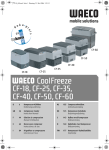
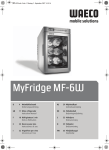
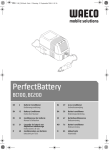
CF80-110_M_70501
23/5/07
10:49 AM
Page 1
CF-110 AC
CF-80 AC
CF-80, CF-110
AUS
Compressor Cooler Instruction Manual
M_70501
CF80-110_M_70501
23/5/07
10:49 AM
Page 3
CoolFreeze
Please read this operating manual carefully before starting the device.
Keep it in a safe place for future reference. If the device is handed over
to another person, this operating manual must be handed over along
with the device.
Contents
1.
2.
Notes on using the manual
Safety instructions
.......................................
7
.......................................
.......................................
.......................................
7
7
8
.......................................
9
.......................................
9
.......................................
.......................................
.......................................
10
10
11
Operation
.......................................
11
6.1
6.2
6.3
6.4
6.5
6.6
6.7
6.8
6.9
6.10
6.11
Before initial use
Energy saving tips
Connecting the cooler
Using the battery monitor
Using the cooler
Setting the temperature
Using the emergency switch
Switching off the cooler
Defrosting the cooler
Replacing the device fuse
Replacing the light bulb
.......................................
.......................................
.......................................
.......................................
.......................................
.......................................
.......................................
.......................................
......................................
.......................................
.......................................
11
12
12
14
15
16
16
16
16
17
17
Cleaning and maintenance
Guarantee
Troubleshooting
Disposal
Technical data
.......................................
17
.......................................
18
.......................................
18
.......................................
19
.......................................
19
2.1
2.2
3.
4.
5.
Scope of delivery
Intended use
Function description
5.1
5.2
6.
7.
8.
9.
10.
11.
General safety
Operating the device safely
Operating and display elements
Connections
3
CF80-110_M_70501
23/5/07
10:49 AM
Page 4
CoolFreeze
1
1
°
2
4
3
2
1
2
ON
OFF
3
3
4
5
POWER
6
°
SET
UP
+
ERROR
1
2
4
3
FUSE
100-240V~AC
4
12/24V DC
7
DOWN
–
CF80-110_M_70501
23/5/07
10:49 AM
Page 5
CoolFreeze
4
POWER
ON
OFF
TEMP
+
∞C
TEMP
ñ
TURBO
ERROR
5
2
POWER
ON
OFF
TEMP
+
∞C
TEMP
ñ
TURBO
ERROR
1
5
CF80-110_M_70501
23/5/07
10:49 AM
Page 6
CoolFreeze
6
7
TEMP
+
C
POWER
ON
OFF
8
6
TEMP
ñ
TURBO
ERROR
1
2
CF80-110_M_70501
23/5/07
10:49 AM
Page 7
Notes on using the manual
1.
CoolFreeze
Notes on using the manual
The following symbols are used in this operating manual:
Caution!
Safety instruction: Failure to observe this instruction can cause personal
injury or damage the device.
Caution!
Safety instruction: relating to a danger from an electrical current or
voltage. Failure to observe this instruction can cause injury or damage
the device and impair its function.
Note:
Supplementary information for operating the device.
➤ Action: This symbol indicates that action is required on your part.
The required action is described step-by-step
✔ This symbol indicates the result of an action
Fig. 2 1, page 4: This refers to an element in an illustration.
In this case, item 1 in figure 2 on page 4.
Please observe the following safety instructions.
2.
Safety instructions
Caution!
WAECO International will not be held liable for claims for damage
resulting from the following:
– Damage to the device resulting from mechanical influences and over
voltage.
– Alterations to the device made without the explicit permission of
WAECO International.
– Use for purposes other than those described in the operating manual.
2.1
General Safety
• Caution – Danger of electrocution
•
When using the device on boats: If the device is powered by the
mains, ensure that the power supply is protected with a ground fault
interrupter circuit.
Check that the voltage specification on the type plate corresponds to
that of the energy supply.
7
CF80-110_M_70501
23/5/07
10:49 AM
Page 8
CoolFreeze
Safety Instructions
• Only connect the device as follows:
•
•
•
•
•
•
•
•
•
•
2.2
Operating the device safely
• Warning! – Danger of electrocution
•
8
– using the cable supplied (Fig. 1 2, page 4) to a 12- V or 24- V
battery
– or with the AC cable supplied (Fig. 1 3, page 4) to the
100–240V AC mains.
If the connection cable is damaged, it must be replaced to prevent
possible electrical hazards.
Do not pull the plug out of the cigarette lighter or the socket by the
cable.
Pull out the connection cable:
– Before cleaning and maintenance
– After use
– Before changing a fuse.
Disconnect the cooling device and other power consuming devices
from the battery before you connect the battery to a quick charging
device. Overvoltage can damage the electronics of the device.
Electronic devices are not toys!
Always keep and use the device out of the reach of Children
Do not operate the device if it is visibly damaged.
This device may only be repaired by qualified personnel.
Inadequate repairs can lead to considerable hazards.
Should your device need to be repaired, please contact WAECO
customer service.
Do not open the refrigerant circuit under any circumstances!
The cooler is not suitable for transporting caustic materials or materials
containing solvents.
Food may only be stored in its original packaging or in suitable
containers.
Do not touch exposed cables with your bare hands.This especially
applies when operating the device from an AC mains.
Before starting the device, ensure that the power supply line and the
plug are dry.
CF80-110_M_70501
23/5/07
10:49 AM
Page 9
CoolFreeze
Intended use
• Warning!
• Do not place any electrical devices inside the cooler.
• Set up the device in a dry location where it is protected against
splashing water.
• Protect the device and the cable against rain and moisture.
• Do not place the device near naked flames or other heat sources
(heaters, direct sunlight, gas ovens etc.)
• Warning! Danger of overheating!
•
•
3.
Ensure at all times that there is sufficient ventilation so that the heat
generated during normal operation is able to dissipate.
Ensure that the ventilation slots are not covered. Make sure that the
device is sufficiently far away from walls and other objects so that the
air can circulate.
Never immerse the device in water.
Do not fill the inside with fluid.
Scope of delivery
Fig. 1 , page 4, shows the scope of delivery.
Item
1
2
3
4
Quantity
1
1
1
2
- (CF-80)
- (CF-80)
- (CF-110)
4.
1
2
2
1
Description
Cooler
Connection cable for 12/24 V DC connection
connection cable for 100-240V AC connection
Carrying handle, consisting of 2 holders,
1 handle, 4 screws
Operating manual
Internal basket
Internal compartment divider (plastic)
Internal basket with wire dividers (2 off)
Intended use
The cooler is suitable for cooling and freezing foods. The device is also
suitable for use on boats.
The appliance is designed for use with a 12 V DC or 24 V DC battery in a
car, boat or caravan, or on a 100-240 V AC mains supply.
Caution – When cooling perishable medicines!
If you wish to cool medicines, please check if the cooling capacity of the
device is adequate for this purpose.
9
CF80-110_M_70501
23/5/07
10:49 AM
Page 10
CoolFreeze
5.
Function description
Function description
The cooler can chill products, keep them cool as well as freeze them. A
low maintenance, CFC-free refrigerant circuit with compressor provides
the cooling. The extra strong CFC-free insulation and powerful
compressor ensure especially fast cooling.
The cooler is portable and can be carried by two detachable handles.
When used on boats, the cooler can be withstand a constant heel
(inclination) of 30°C .
Scope of functions:
• Power pack with priority circuit for connecting to the AC mains.
• 3-level battery monitor for protecting the vehicle battery.
• Programmed turbo mode for rapid cooling.
• Display with temperature gauge.
• Temperature adjustment.
•
•
5.1
(with two buttons in steps of 1°C (2°F)).
Detachable carrying handles.
Emergency override switch for ‘limp home’ mode.
Operating and display elements
Operating panel (Fig. 2 , page 4)
Item
1
10
2
Description
ON
OFF
POWER
3
ERROR
4
SET
5
6
7
–
UP +
DOWN –
Explanation
Switches the cooler on or off when the button
is pressed for between one and two seconds
Status indication
LED lights up green:
Compressor is on
LED lights up orange:
Compressor is off
LED flashes red:
Device is switched on
but not ready for
operation
Selects the input mode
- Temperature setting
- Celsius or Fahrenheit display
- Set battery monitor
Display, shows the information
Press once to increase the value
Press once to decrease the value
CF80-110_M_70501
23/5/07
10:49 AM
Page 11
CoolFreeze
Operation
5.2
Connections
Connection sockets (Fig. 3 , page 4)
Item
1
2
3
4
Description
Connection socket AC voltage supply
Fuse holder
Connection socket DC voltage supply
Emergency switch
6.
Operation
6.1
Before initial use
Note:
Before starting your new cooler for the first time, you should clean it
inside and outside with a damp cloth for hygienic reasons (please also
refer to “Cleaning and maintenance” on page 17)
The handles are enclosed unassembled. If you wish to attach the
handles, proceed as follows:
➤ Make a handle by putting two holders (Fig. 4 1, page 5) and a
handle (Fig. 4 2, page 5) together.
➤ Fasten the holders with the enclosed screws in the holes provided.
Selecting the temperature units – ºC or ºF
You can switch the temperature display between Celsius and Fahrenheit.
This is how to do it:
➤ Switch on the cooler.
➤ Press the “SET” button (Fig. 2 4, page 4) twice.
➤ Use the “UP +” (Fig. 2 6, page 4) and “DOWN -” (Fig. 2 7,
page 4) buttons to select Celsius or Fahrenheit.
✔ The selected temperature units then appear in the display for a few
seconds. The display flashes several times before it returns to the
current temperature.
Turning the lid around
You can turn the lid around if you want to open the lid from the other
side. To do this, proceed as follows:
➤ Undo the screws on the lock lugs (Fig. 5 1, page 5) and remove
them.
➤ Undo the screws on the hinges (fig. 5 2, page 5) and remove them.
➤ Lay the lid down.
➤ Fit the hinges on the side you want.
➤ Fit the lock lugs on the side you want.
11
CF80-110_M_70501
23/5/07
10:49 AM
Page 12
CoolFreeze
6.2
Energy saving tips
• Choose a well ventilated installation location which is protected from
•
•
•
•
•
6.3
Operation
direct sunlight.
Allow hot food to cool down first before you place it into the device.
Do not open the cooler more often than necessary.
Do not leave the lid open for longer than necessary.
Defrost the cooler once a layer of ice forms.
Avoid unnecessarily low temperature settings.
Connecting the cooler
Connecting to a battery (Vehicle or boat)
The cooler can be operated with 12 V or 24 V DC, either using cigarette
plug lead supplied, or plug removed and “hard wired” as follows:
Caution – Danger of damaging the device!
Disconnect the cooler and other consumer units from the battery before
you connect the battery to a quick charging device.
Overvoltage can damage the electronics of the device.
For safety reasons the cooler is equipped with an electronic system to
prevent polarity reversal. This protects the cooler against short-circuiting
when connecting to a battery.
Caution – Danger of damaging the device!
For fixed installations where cigarette plug is removed, and if cable is
extended, to avoid drops in voltage and therefore performance, keep
the cable as short as possible and only disconnect it when necessary. For
this reason avoid additional switches, plugs or power strips.
➤
Determine the required cross section of the cable in relation to the
cable length according to Fig. 6 , page 6.
Key for Fig. 6 , page 6
Co-ordinate axis
I
ø
12
Meaning
Cable length
Cable cross section
Unit
m
mm2
CF80-110_M_70501
23/5/07
10:49 AM
Page 13
CoolFreeze
Operation
Caution – Danger of damaging the device!
Make sure that the polarity is correct.
➤
➤
➤
➤
➤
Before starting up the device for the first time, check whether the
operating voltage and the battery voltage correspond (see type
plate).
Make sure that the cable at the positive battery terminal (Fig. 7 2,
page 6) is protected with a 15 A (12V) fuse (Fig. 7 3, page 6)
fitted as close to battery as possible.
Plug the 12/24-V connection cable (Fig. 1 2, page 4) into the DC
socket on the cooler (Fig. 7 1, page 6).
Connect the red cable (Fig. 7 red, page 6) to the positive terminal
of the battery (Fig. 7 2, page 6).
Connect the black cable (Fig. 7 black, page 6) to the negative
terminal of the battery (fig. 7 2, page 6).
Connecting to a 100-240V AC mains (E.g. in the home or office)
Caution – Danger of electrocution!
Never handle plugs and switches with wet hands or if you are standing
on a wet surface.
Caution – Danger of electrocution!
If you are operating your cooler on board a boat from a mains
connection of 100-240 V AC, you must install a residual current circuit
breaker between the 100-240 V AC mains and the cooler. Seek advice
from a trained technician.
The cooler has a built-in multi-voltage mains adapter with a priority
circuit for connecting to a 100-240V AC supply. The priority circuit
automatically switches to mains operation if the appliance is connected
to a 100–240 V AC supply, even if the 12/24 V cable is still connected.
When switching between the AC mains and the battery supply, the red
LED may light up briefly.
➤
Plug the 100–240 V connection cable (Fig. 1 3, page 4) into the AC
voltage socket and connect it to the 100–240 V AC voltage mains.
13
CF80-110_M_70501
23/5/07
10:49 AM
Page 14
CoolFreeze
6.4
Operation
Using the battery monitor.
The device is equipped with a multi-level battery monitor that protects
your vehicle battery against excessive discharging when the device is
connected to the on-board 12/24 V supply.
If the cooler is operated when the vehicle ignition is switched off, the
cooler switches off automatically as soon as the supply voltage falls
below a set level. The cooler will switch back on once the battery has
been recharged to the restart voltage level.
Caution – Danger of damage!
When switched off by the battery monitor, the battery will no longer be
fully charged. Avoid starting repeatedly or operating current consumers
without longer charging phases. Ensure that the battery is recharged.
In “HIGH” mode, the battery monitor responds faster than the levels
“LOW” and “MED” (see the following table).
Battery monitor mode
Switch-off voltage at 12 V
Restart voltage at 12 V
Switch-off voltage at 24 V
Restart voltage at 24 V
LOW
10.1 V
11.1 V
21.5 V
23.0 V
MED
11.4 V
12.2 V
24.1 V
25.3 V
HIGH
11.8 V
12.6 V
24.6 V
26.2 V
This
➤
➤
➤
is how to select the battery monitor mode:
Switch on the cooler.
Press the “SET” button (Fig. 2 4, page 4) three times.
Use the “UP +” (Fig. 2 6, page 4) and “DOWN -” (Fig. 2 7,
page 4) buttons to select the battery monitor mode.
➤ Digital Display will be as follows:
✔
(LOW)
(MED)
(HIGH)
The selected mode then appears in the display for a few seconds.
The display flashes several times before it returns to the current
temperature.
Note:
When the cooler is supplied by the starter battery, select the battery
monitor mode “HIGH”. If the cooler is connected to a supply battery, the
battery monitor mode “LOW” will suffice.
If you wish to operate the cooler from the AC mains, set the battery
monitor to the “LOW” position.
14
CF80-110_M_70501
23/5/07
10:49 AM
Page 15
CoolFreeze
Operation
6.5
Using the cooler
Caution – Danger of overheating!
Ensure at all times that there is sufficient ventilation so that the heat
generated during operation can dissipate. Ensure that the ventilation
slots are not covered. Make sure that the device is sufficiently far away
from walls and other objects so that the air can circulate.
➤
➤
Place the cooler on a firm foundation.
Make sure that the ventilation slots are not covered and that the
heated air can dissipate.
Close the cooler, see “Connecting the cooler” on page 12.
Note:
If you wish to operate the cooler from the AC mains, set the battery
monitor to the “LOW” position. See “Using the battery monitor” on
page 14.
Caution – Danger from excessively low temperature!
Ensure that the only objects placed in the cooler are those intended to
be cooled at the selected temperature.
➤
✔
✔
Press the “ON/OFF” button (Fig. 2 1, page 4) and hold down for
between one and two seconds.
The ‘POWER” LED is lit green.
The display (Fig. 2 6, page 4) switches on and shows the current
temperature in °C.
Note – Displayed temperatures
CF-80
i) With plastic dividers in: the display temperature is that of the
middle of the freezer compartment (furthest away from main
control panel).
ii) With plastic dividers removed: the actual compartment temperature
will be considerably warmer than the displayed temperature.
CF-110
i) The temperature displayed is that of the middle of the large interior
compartment.
Temperatures elsewhere in the compartment (both models) will
deviate from the displayed temperature.
✔
The cooler starts cooling the interior.
15
CF80-110_M_70501
23/5/07
10:49 AM
Page 16
CoolFreeze
6.6
Setting the temperature
➤
➤
✔
6.7
➤
6.9
Press the “SET” button (Fig. 2 4, page 4) once.
Use the “UP +” (Fig. 2 6, page 4) and “DOWN -” (Fig. 2 7,
page 4) buttons to select the cooling temperature.
The cooling temperature appears in the display for a few seconds.
The display flashes several times and then the current temperature
is displayed again.
Using The Emergency Switch
➤
➤
6.8
Operation
The emergency override switch (Fig. 3 4, page 4) is located in
the connection panel.
For normal operation the switch should be in the ‘NORMAL USE’
position.
In the unlikely event of an electronic control failure slide the Switch
to ‘EMERGENCY OVERRIDE’.
NOTE: in this position the appliance will run all the time and will
therefore perform as a freezer only.
Switching off the cooler
➤
➤
➤
Empty the cooler.
Switch the cooler off.
Pull out the connection cable.
➤
If you do not want to use the cooler for a longer period of time:
Leave the cover slightly open. This prevents odour build-up.
Defrosting the cooler
Humidity can form frost in the interior of the cooling device or on the
evaporator. This reduces the cooling capacity. Defrost the device in good
time to avoid this.
Warning! – Danger of damaging the device!
Never use hard or pointed tools to remove ice or to loosen objects
which have frozen in place.
To defrost the cooler, proceed as follows:
➤ Take out the contents of the cooling device.
➤ If necessary, place them in another cooling device to keep them
cool. Switch off the device.
➤ Leave the lid open.
➤ Wipe off the defrosted water.
16
CF80-110_M_70501
23/5/07
10:49 AM
Page 17
CoolFreeze
Operation
6.10
Replacing the device fuse
Caution – Danger of electrocution!
Disconnect the connection cable before you replace the device fuse.
➤
6.11
Replacing the light bulb
➤
➤
i)
ii)
➤
7.
Pull off the connection cable.
Press the switch pin (Fig. 8 2, page 6) downwards so that the
transparent part (Fig. 8 1, page 6) of the lamp can be removed at
the front.
Replace the light bulb ensuring that:
the LED’s inside the bulb face toward the transparent cover.
the polarity is correct. Test for operation and if the new bulb does
not work fit it the other way around.
Press the lamp back into the housing.
Cleaning and maintenance
Caution – danger of electrocution!
Always pull out the mains plug on the power supply before you clean
and service the device.
Caution – Danger of damaging the device!
Never clean the device under running water or in dish water.
Do not use abrasive cleaning agents or hard objects during cleaning as
these can damage the device.
Never use brushes, scouring pads or hard or pointed tools to remove ice
or to loosen objects which have frozen in place.
➤
Occasionally clean the inside of the device with a damp cloth.
17
CF80-110_M_70501
23/5/07
10:49 AM
Page 18
CoolFreeze
8.
Troubleshooting
Guarantee
Our general guarantee conditions apply. If the product is defective,
please take it to your nearest authorised WAECO repair agent.
For repair and guarantee processing, please include the following
documents when you send in the device:
• A copy of the receipt with purchase date.
• Reason for the claim or a description of the fault.
9.
Troubleshooting
Fault
Device does not
function, LED does
not glow.
Possible cause
Battery voltage is too low.
No voltage present in the AC
voltage socket.
The device fuse is defective.
The integrated mains adapter
is defective.
Suggested remedy
Test the battery and charge it as
needed.
Try using another plug socket.
Replace the device fuse, see
“Replacing the device fuse” on
page 17.
This can only be repaired by an
authorised repair centre.
Defective compressor.
The device does not
cool (plug is inserted,
“POWER” LED is lit).
This can only be repaired by an
authorised repair centre.
The device does not
Battery voltage is too low.
cool (plug is inserted,
“ERROR” LED flashes).
Test the battery and charge it as
needed.
The display shows an The appliance has switched
error message (e.g.
off due to an internal fault.
“Err1”) and the appliance does not cool.
This can only be repaired by an
authorised repair centre.
18
CF80-110_M_70501
23/5/07
10:49 AM
Page 19
Technical Data
10.
CoolFreeze
Disposal
➤
Place the packaging material in the appropriate recycling waste
bins wherever possible.
If you wish to finally dispose of the device, ask your local recycling
centre or specialist dealer for details about how to do this in accordance
with the applicable disposal regulations.
11.
Technical data
Overall capacity:
Connection voltage:
Rated current:
– 12 V DC
– 24 V DC
– 100-240 V AC
Cooling range:
Dimensions (WxHxD) in mm:
Weight:
CF-80
CF-110
80 litres
106 litres
12/24 V DC and 100-240V AC
7.5A
3.5A
1.3 to 0.7A
+10°C to - 18°C (+50°F to 0°F)
790x455x500
790x555x500
29kg
32kg
Note:
If the ambient temperature is above 32°C, (90ºF), the minimum
temperature cannot be attained.
Test/Certificates:
– 73/23/EEC –
Low Voltage Electrical Equipment
Directive
– 89/336/EEC – EMC Directive
– 95/54/EEC
Versions, and delivery options may vary due to technical modifications.
This device is CFC-free. The coolant circuit contains R134a.
19
CF80-110_M_70501
23/5/07
10:49 AM
Page 20
CoolFreeze
World Headquarters
D
WAECO International GmbH · Hollefeldstraße 63 · D-48282 Emsdetten
phone: +49 2572 879-195 fax: +49 2572 879-322 e-mail: [email protected]
o
Europe
AUS
WAECO Pacific Pty. Ltd.
1 John Duncan Court
Varsity Lakes QLD 4227
phone: +61 7 55076000
fax: +61 7 55076001
e-mail: [email protected]
N
WAECO Norge AS
Leif Weldingsvei 16
N-3208 Sandefjord
phone: +47 33428450
fax: +47 33428459
e-mail: fi[email protected]
HK
NL
WAECO Benelux B.V.
Ecustraat 3
NL-4879 NP Etten-Leur
phone: +31 76 5029000
fax: +31 76 5029090
e-mail: [email protected]
WAECO Impex Ltd.
Suites 3210-12 · 32/F · Tower 2
The Gateway · 25 Canton Road
Tsim Sha Tsui · Kowloon
Hong Kong
phone: +852 24632750
fax: +852 24639067
e-mail: [email protected]
ROC
WAECO Impex Ltd.
Taipei Office
2 FL-3 · No. 56 Tunhua South Rd, Sec 2
Taipei 106, Taiwan
phone: +886 2 27014090
fax: +886 2 27060119
e-mail: [email protected]
UAE
WAECO Middle East FZCO
R/A 8, SD 6
Jebel Ali, Dubai
phone: +971 4 8833858
fax: +971 4 8833868
e-mail: [email protected]
USA
WAECO USA, Inc.
8 Heritage Park Road
Clinton, CT 06413
phone: +1 860 6644911
fax: +1 860 6644912
e-mail: [email protected]
WAECO (Schweiz) AG
Riedackerstrasse 7a
CH-8153 Rümlang (Zürich)
phone: +41 44 8187171
fax: +41 44 8187191
e-mail: [email protected]
I
DK
WAECO Danmark A/S
Tvaervej 2
DK-6640 Lunderskov
phone: +45 75585966
fax: +45 75586307
e-mail: [email protected]
WAECO Ibérica S.A.
Camí del Mig, 106
Poligono Industrial Les Corts
E-08349 Cabrera de Mar
(Barcelona)
phone: +34 93 7502277
fax: +34 93 7500552
e-mail: [email protected]
F
FIN
WAECO Distribution SARL
ZAC 2 · Les Portes de L‘Oise
Rue Isaac Newton – BP 59
F-60230 Chambly (Paris)
phone: +33 1 30282020
fax: +33 1 30282010
e-mail: [email protected]
WAECO Finland OY
Mestarintie 4
FIN-01730 Vantaa
phone: +358 20 7413220
fax: +358 9 7593700
e-mail: waeco@waeco.fi
AUS
S
UK
WAECO Svenska AB
Gustaf Melins gata 7
S-42131 Västra Frölunda
(Göteborg)
phone: +46 31 7341100
fax: +46 31 7341101
e-mail: [email protected]
WAECO UK Ltd.
Dorset DT2 8LY · Unit G
Roman Hill Business Park
UK-Broadmayne
phone: +44 1305 854000
fax: +44 1305 854288
e-mail: [email protected]
WAECO Pacific Pty. Ltd.
1 John Duncan Court
Varsity Lakes, QLD, 4227
phone: 1800 21 21 21
fax: (07) 5507 6001
e-mail: [email protected]
WAECO Victoria
1/97 Lewis Road
Wantirna VIC 3152
phone: 1800 21 21 21
fax: (03) 9800 1533
NZ
Internet
20
Overseas + Middle East
WAECO Italcold SRL
Via dell’Industria 4/0
I-40012 Calderara di Reno (BO)
phone: +39 051 727094
fax: +39 051 727687
e-mail: [email protected]
CH
E
Internet: www.waeco.de
http://www.waeco.com.au
http://www.waeco.co.nz
WAECO Western Australia
9 Hod Way
Malaga WA 6090
phone: 1800 21 21 21
fax: (08) 9209 3577
WAECO New Zealand
Unit 15, 180 Montgomerie Road
Airport Oaks, Auckland 1701
phone: 0800 676 000
fax: (09) 256 0017
e-mail: [email protected]