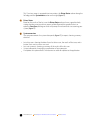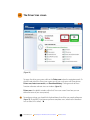
1
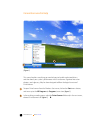
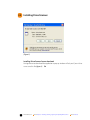
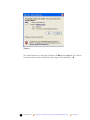
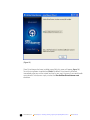
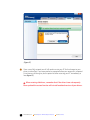
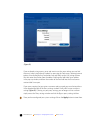
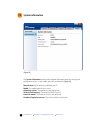
DriverScanner 2009 Scan, backup and update your PC’s drivers DriverScanner 2009 Manual 2ND EDITION What is DriverScanner? DriverScanner is the simple and reliable tool for updating your system’s drivers, boosting system performance, releasing improved functionality and increasing operability with networks and hardware. DriverScanner will scan your system to identify drivers to be updated, and deliver the tools you need to download and then install those drivers. At the same time, this application will also keep a full record of all DriverScanner activity and allow you to backup and restore your drivers. Combining a sophisticated system scanning engine with a characteristically elegant, clear and simple-to-use Uniblue styled interface, DriverScanner will dramatically improve your computing experience. 2 www.uniblue.com Back to Contents Conventions used in Help (Figure 1) This manual explains everything you need to know to be able understand drivers, and then boost your system’s performance with DriverScanner. Organized into seven chapters, and a glossary, Help has been designed to follow the logical structure of DriverScanner. To open DriverScanner from the Windows Start menu, click on the Start menu button, and move up to the All Programs (or Programs) menu item (figure 1). In the resulting cascading menu, select the DriverScanner folder and, in the next menu, choose DriverScanner itself (figure 1). 3 www.uniblue.com Back to Contents Also pay special attention to text, highlighted in blue or red, which is set apart from the rest of the text: Indicates warnings and items of extreme importance Indicates important information Where do I go from here? If you are unfamiliar with drivers and want to learn more you can read Chapter 2: Understanding drivers. If DriverScanner is not yet installed on your computer, you can go directly to Chapter 3: Installing, launching, registering and updating DriverScanner for more help. For a general overview about using DriverScanner read Chapter 4: The DriverScanner user interface. If you want to learn more about scanning and updating your drivers read Chapter 5: Driver scans and updates. For a brief guide to key Windows driver and DriverScanner concepts and definitions, you can read the Glossary of terms. 4 www.uniblue.com Back to Contents Contents Chapter 1 1.1 1.2 1.3 1.4 Chapter 2 2.1 2.2 2.3 2.4 Chapter 3 3.1 3.2 3.3 3.4 3.5 3.6 3.7 7 An introduction to DriverScanner 7 8 8 9 What does DriverScanner do? Feature overview Will DriverScanner make a difference? Do I need to be an expert to use DriverScanner? 10 Understanding drivers 10 11 12 12 What are drivers? When and why do driver problems occur? Do I need to update and backup drivers? How do I update and backup drivers? 13 Installing, launching, registering and updating DriverScanner 13 14 23 25 27 28 31 DriverScanner system requirements Installing DriverScanner Launching DriverScanner Online resources and support Purchasing DriverScanner Registering DriverScanner ActiveProtection Chapter 4 4.1 4.2 4.3 4.4 4.5 Chapter 5 5.1 5.2 5.3 Chapter 6 6.1 6.2 Chapter 7 7.1 7.2 32 The DriverScanner user interface 32 34 39 40 42 The Overview screen The Driver Scan screen The Backup screen The Restore screen The Settings screen 44 Driver scans and updates 44 49 50 Scanning outdated drivers Complete and partial driver scans Updating drivers 52 Driver backups and restores 52 54 Driver backups Driver restores 57 Configuring DriverScanner 57 60 System settings System information 61 Glossary of terms 1 An introduction to DriverScanner Congratulations on purchasing DriverScanner from Uniblue. This section gives an introduction into DriverScanner, explaining what it does and how it can help you. 1.1 What does DriverScanner do? Device drivers generally either come with our operating system, or we install them from a CD. But, like any software, drivers are upgraded and updated, by the manufacturers, to remove bugs, add extra functionality to the hardware or to improve the performance of the device. Unless you update your drivers regularly you may face problems ranging from the relatively minor such as having hardware that seems buggy and poorly performing, to the more major such as hardware failures, conflicts and complete system crashes. With so many drivers on your PC you can’t check them all yourself, which is why DriverScanner, the innovative new product from Uniblue, is the perfect solution to your driver update problems. This useful application will search your PC for all installed drivers and then cross reference these against Uniblue’s authoritative library of drivers. Where DriverScanner identifies outdated drivers it will then give you the tools to update your PC with the latest versions of those drivers, so improving the performance and stability of your computer and its peripherals. 7 www.uniblue.com Back to Chapter 1 - An introduction to DriverScanner Back to Contents 1.2 Feature overview DriverScanner is an automatic, powerful and comprehensive driver update management application for improving PC performance, stability and general health, which includes: System overview report with detailed scan results to keep you updated about outdated drivers found, backup and restore points created, and updates made. Automatic scans at start-up to give you regular access to the latest drivers so helping to enhance your computing experience and eliminate related system stalls and slow-downs. Automatic driver backup and restore giving you complete peace of mind knowing that any changes or updates can be quickly undone at the click of the button. An attractive and intuitive interface that makes the otherwise long and tedious task of driver updates management, quick, simple and easy. 1.3 Will DriverScanner make a difference? DriverScanner will search your PC for all installed drivers and then cross reference these against Uniblue’s substantial driver library. Where DriverScanner finds drivers that are out of date it will then help you to install the most recent ones, so making sure that you enjoy the highest levels of performance and stability from your PC and its peripherals. Key benefits of DriverScanner include: In depth analysis By thoroughly scanning your PC for outdated drivers DriverScanner identifies exactly how your system can be updated for improved performance. Driver update management Including sophisticated driver update management tools DriverScanner allows you to control the loading and installation of all your drivers, from one screen. Backup and restore DriverScanner’s backup and restore features help to ensure your PC is protected from the consequences of lost drivers. 8 www.uniblue.com Back to Chapter 1 - An introduction to DriverScanner Back to Contents Boost your PC and keep it optimized Dramatically improve your computing experience, and minimize network or hardware problems by using DriverScanner regularly to find and update outdated drivers. Log generation Displays a transcript of your driver download history and your most recent scan results for precise control of your system. Exceptionally simple to use Set in a highly attractive, logical and user-friendly graphical user interface DriverScanner delivers advanced functionality in a simple-to-use package. Safe and trusted Uniblue’s DriverScanner is trusted by PC users around the World to enhance PC performance and help protect against system failure. Windows Vista compatible DriverScanner is fully compatible with Windows XP and Vista (32-bit). The application automatically identifies your operating system so you don’t need to configure any settings manually. 1.4 Do I need to be an expert to use DriverScanner? At Uniblue, we are renowned for building easy-to-use yet powerful utility products and DriverScanner is no exception. Regardless of your level computer literacy, you will find DriverScanner simple and intuitive. 9 www.uniblue.com Back to Chapter 1 - An introduction to DriverScanner Back to Contents 2 Understanding drivers This comprehensive tutorial gives more information on the most important aspects of system drivers. 2.1 What are drivers? Drivers also called device drivers or software drivers enable high-level computer programs to operate hardware. Just about all the equipment that runs on or in you computer (from the motherboard, the hard-disk and the video card, through to the mouse, screen and printer) will be operated using their own particular software. Drivers are specific to the particular hardware device and the operating system used which means that you will need to ensure that the installed driver is right for that combination of equipment and operating system. The driver will take a generic high level command from the operating system and then translate this into a low-level form that the hardware understands. This makes programming simpler since the creator of a word processing application doesn’t need to program a different set of instructions for every single printer that it may be expected to print to. Drivers also give hardware developers more freedom to change, alter and expand the functionality of their equipment without having to worry about the high level applications being able to communicate with the hardware. 10 www.uniblue.com Back to Chapter 2 - Understanding drivers Back to Contents 2.2 When and why do driver problems occur? Updating drivers regularly offers two great advantages for your PC: • You update the functionality available to your system; and • You fix bugs, errors and conflicts that might be associated with certain drivers. Graphics cards can cause particular problems for your PC, causing video freezes and “blue screens.” The problem here may be that, due to their complexity and resource intensiveness, a 1st generation driver might be buggy and interact badly with other drivers on your system. You will need to ensure you have the latest “fixed” drivers to stop these problems. Alternatively if new features are added to the video card you will need to update drivers to keep pace with the improvements. Another situation is when Microsoft updates DirectX, in which case you will also need to update your drivers to take advantage of these improvements. Microsoft point out that drivers “…operate in a highly privileged environment and can cause disaster if they get things wrong…”. 11 www.uniblue.com Back to Chapter 2 - Understanding drivers Back to Contents 2.3 Do I need to update and backup drivers? Yes! Unless your computer is new, the likelihood is that the drivers, originally installed with your operating system, have since been updated to improve hardware functionality, resolve problems, or to remove conflicts. If you don’t update the drivers, on your system, you might be experiencing unnecessary system problems and limited functionality. It is also important to backup drivers to make sure that if you have a catastrophic system failure and need to reinstall Windows from scratch, or if you lose your computer and need to upload your data to a new machine, you can reinstall all your drivers quickly and easily. Save yourself the almost impossible task of installing your drivers individually by searching the Internet, or rooting through your cupboards for all of those old CDs that came with the hardware. DriverScanner lets you backup all your drivers to a CD or USB flash drive ready to be reinstalled easily and in one go. Running driver update software regularly ensures that you have the latest drivers installed, thereby eliminating related system seizures and crashes. 2.4 How do I update and back up drivers? It is possible to update drivers manually, however you will need to go to the website of each individual provider from whom you have hardware, search for the drivers section of their website, check the dates of the drivers there against the ones you have installed, and then install the drivers. Clearly this isn’t an easy or quick process. What’s more, how do you go about backing up your drivers? You will need to identify where they are saved and from there save them to a disk or USB flash drive. The simplest way of going about the updating and backing up of drivers is to use a driver update application such as DriverScanner, which will handle both tasks quickly, easily and efficiently. 12 www.uniblue.com Back to Chapter 2 - Understanding drivers Back to Contents 3 Installing, launching, registering and updating DriverScanner Learn how to install, launch and update DriverScanner. This chapter also includes system requirements, as well as procedures for purchasing and registering your product. 3.1 DriverScanner system requirements • • • • • • • • DriverScanner minimum requirements: Intel Pentium 3 500MHz or equivalent processor 256 MB RAM 200MB free hard disk space Additional space for driver backups and new drivers Graphics mode 1024x768 true color (highest 32-bit) Internet Explorer 5.5 Microsoft Windows XP / Vista (32-bit) Internet connection • • • • • • • • DriverScanner recommended requirements: Intel Pentium 4 1GHz or equivalent processor 512 MB RAM 500MB free hard disk space Additional space for driver backups and new drivers Graphics mode 1024x768 true color (highest 32-bit) Internet Explorer 6 Microsoft Windows XP / Vista (32-bit) Internet connection DriverScanner automatically identifies your operating system so you won’t need to configure any settings manually. 13 www.uniblue.com Back to Chapter 3 - Installing, launching, registering and updating DriverScanner Back to Contents 3.2 Installing DriverScanner (Figure 2) Installing DriverScanner from a download Having chosen to download the application a pop-up window will ask you if you wish to run or save this file (figure 2). 14 www.uniblue.com Back to Chapter 3 - Installing, launching, registering and updating DriverScanner Back to Contents (Figure 3) You should choose to run the file by clicking on the Run button (figure 3). You will then be shown another screen which displays the progress of the download. 15 www.uniblue.com Back to Chapter 3 - Installing, launching, registering and updating DriverScanner Back to Contents (Figure 4) Once the download is complete this window will appear, asking you if “you want to run this software?”. You should click on Run and DriverScanner will then install itself (figure 4). Installing DriverScanner from a CD Insert the DriverScanner CD into your CD-ROM or DVD-ROM drive and wait for the setup process to start automatically. If the setup process does not begin, automatically, when you insert the CD, then open the Windows Start menu, click on Run and browse for the CD/DVD drive. Alternatively, after clicking on Run, type: [drive]:\AUTOSTART.EXE Here [drive] denotes the drive letter of your CD/DVD drive into which you have inserted the software disk. You can also use Windows Explorer to view the contents of your CD-ROM or DVD-ROM drive. You can then double-click on the .EXE file to start the installation process. 16 www.uniblue.com Back to Chapter 3 - Installing, launching, registering and updating DriverScanner Back to Contents (Figure 5) Installing DriverScanner Whether installing from a download, or a CD, having completed the preceding steps you will then be shown the DriverScanner install wizard (figure 5). Make sure that all Windows programs are closed before clicking on the Next button. 17 www.uniblue.com Back to Chapter 3 - Installing, launching, registering and updating DriverScanner Back to Contents (Figure 6) You will need to confirm that you accept the DriverScanner end user license agreement before you progress further with the installation. Once you have read, and agreed to, the terms of the license select I accept the terms of the license agreement and then click Next (figure 6). 18 www.uniblue.com Back to Chapter 3 - Installing, launching, registering and updating DriverScanner Back to Contents (Figure 7) You will then be given the opportunity to select the folder into which the wizard will install Uniblue DriverScanner (figure 7). Unless you have a specific reason to do otherwise the default directory location will be fine. 19 www.uniblue.com Back to Chapter 3 - Installing, launching, registering and updating DriverScanner Back to Contents (Figure 8) Another window will appear letting you choose to have the setup process create a Desktop icon or a Quick Launch icon. Once you have chosen your options click on Next and DriverScanner will then start installing (figure 8). 20 www.uniblue.com Back to Chapter 3 - Installing, launching, registering and updating DriverScanner Back to Contents (Figure 9) When DriverScanner starts installing a screen showing an installation progress monitor will then appear (figure 9). Your operating system may also ask whether you wish to authorize DriverScanner on your computer. You should allow this otherwise DriverScanner will not be able to run properly. 21 www.uniblue.com Back to Chapter 3 - Installing, launching, registering and updating DriverScanner Back to Contents (Figure 10) Once DriverScanner has been installed successfully this screen will appear (figure 10). To exit the installation wizard click on Finish. By default DriverScanner will launch immediately after you exit the wizard (and start a new scan). However if you would prefer not to launch DriverScanner simply unselect the Run Uniblue DriverScanner now checkbox. 22 www.uniblue.com Back to Chapter 3 - Installing, launching, registering and updating DriverScanner Back to Contents 3.3 Launching DriverScanner (Figure 11) Initial launch of DriverScanner Unless you deselected the run now option in figure 10, as soon as you install DriverScanner it will launch automatically and start scanning your computer (figure 11). Subsequent launches of DriverScanner After the initial launch, and depending on the settings chosen during installation (see figure 10), DriverScanner can be started as follows: 23 www.uniblue.com Back to Chapter 3 - Installing, launching, registering and updating DriverScanner Back to Contents (Figure 12) Start menu The standard way to access DriverScanner is through the Start menu (figure 1). Desktop You can double-click on the desktop DriverScanner icon  (figure 12). to launch the application Notification area (aka System tray) The DriverScanner icon  is found at the bottom right of the screen, in the notification area, and can double-clicked to launch the application (figure 12). Quick launch icon The DriverScanner Quick launch icon  is found at the bottom left-hand corner of the screen and can be double-clicked to launch the application (figure 12). 24 www.uniblue.com Back to Chapter 3 - Installing, launching, registering and updating DriverScanner Back to Contents 3.4 Online resources and support In addition to this help manual the following support and services are also available: Downloads We update our products on an ongoing basis, making improvements and adding new features. Download all the latest updates from our download pages by visiting our download center: http://www.liutilities.com/support/downloads/. Premium support Our premium support service is provided by dedicated customer care and technical support professionals. For more information visit our support centre: http://www.liutilities.com/support/. Newsletter tutorials We publish articles, tips and advice in our regular newsletters. Register now to receive the best help and information on how to handle and protect your data using Uniblue products. For more details visit our website to subscribe to our free newsletter: http://www.uniblue.com. 25 www.uniblue.com Back to Chapter 3 - Installing, launching, registering and updating DriverScanner Back to Contents (Figure 13) LiveUpdate DriverScanner also includes LiveUpdate which, when selected, will automatically scan for updates to your DriverScanner software and components. To use this function simply click on Check for updates at the bottom right of the screen (figure 13). 26 www.uniblue.com Back to Chapter 3 - Installing, launching, registering and updating DriverScanner Back to Contents 3.5 Purchasing DriverScanner Visit the DriverScanner page on our website at http://www.liutilities.com/products/ driverscanner/ (click on this hyperlink to go to our website directly or paste the link into your browser). Next click on the Purchase Now button (it may also say Buy Now on other pages) on the right of the page to proceed to the DriverScanner purchase page. Or, if you already have the trial version of DriverScanner installed, click on the orange Register Now button at the bottom left of the DriverScanner home screen, which will prompt a web browser window to appear. On this page click Add to shopping cart. You will then be taken to the purchase page where can then complete your purchase details before clicking on Submit your order. Please note that our online store is tested daily to ensure the highest levels of security for your payment. 27 www.uniblue.com Back to Chapter 3 - Installing, launching, registering and updating DriverScanner Back to Contents 3.6 Registering DriverScanner (Figure 14) When you buy your copy of DriverScanner, you then need to register it in order to enjoy the following benefits including (figure 14): • Allowing you to update outdated drivers • Removing the online purchase reminder that appears on the bottom left corner of the opening screen • Removing the registration reminder window that DriverScanner displays on closing the product 28 www.uniblue.com Back to Chapter 3 - Installing, launching, registering and updating DriverScanner Back to Contents (Figure 15) In order to register DriverScanner you will first need to purchase the product (see section 3.5: Purchasing DriverScanner for more information). After purchase you will receive, by email, a serial number that needs to be entered into the product to register it. The serial number entry window (figure 15) can be accessed by clicking on the Register Now button to the bottom left of all screens (figure 14). Then insert the serial number in the Enter Serial Number field and click on Activate Now (figure 15). When entering the serial number please make sure that you are entering the number for the correct product. For DriverScanner the serial number should start with the letters DS and be in the following format (where X identifies a different letter or number in each case): DS-XXXXX-XXXXX-XXXXX-XXXXX-XXXXX-XXXXX. 29 www.uniblue.com Back to Chapter 3 - Installing, launching, registering and updating DriverScanner Back to Contents (Figure 16) To confirm that you are logged in click on the About button at the bottom right of the DriverScanner interface (figure 16) and a screen will appear which includes information confirming the registration status of DriverScanner. Before registering DriverScanner you will not be able to download or install any updated drivers. To update drivers you need to activate the full version of the application by purchasing DriverScanner and then entering the serial number. 30 www.uniblue.com Back to Chapter 3 - Installing, launching, registering and updating DriverScanner Back to Contents 3.7 ActiveProtection Uniblue’s ActiveProtection is a software support service which entitles you to enjoy a generous range of benefits including: • • • • • the latest software downloaded directly to your PC online expert support cost savings over time the ability to install software on three PCs and much more When you purchase any Uniblue product you also receive ActiveProtection, for one year, from the product purchase date. At the end of your one year term you will then need to renew your product (so extending your ActiveProtection coverage) if you wish ActiveProtection to continue automatically updating your software for another year. Unless renewed, your Uniblue software will not be updated and will be unable to solve the very latest PC problems and system issues. Product renewal, and the extension of ActiveProtection, can be completed either manually, or automatically, depending on when you purchased your product and what options you chose. 31 www.uniblue.com Back to Chapter 3 - Installing, launching, registering and updating DriverScanner Back to Contents 4 The DriverScanner user interface This chapter explains the five primary screens of the DriverScanner user interface. 4.1 The Overview screen (Figure 17) When DriverScanner starts, the system Overview screen is the default screen (figure 17). To navigate from one screen to the other, you need to click on the tabs in the navigation panel, along the top of the screen. 32 www.uniblue.com Back to Chapter 4 - The DriverScanner user interface Back to Contents This Overview screen is separated into two sections: the Driver Status column along the left edge, and the System data section on the right (figure 17). Driver Status Based on the results of the last scan the Driver Status column shows a graphic clearly stating whether or not your drivers are out of date. Beneath this graphic there is an option to Start Scan, clicking on which will prompt DriverScanner to start scanning your system (figure 17). System overview The main area contains the system data panels (figure 17), ie reports showing summary details of: • Last driver scan: showing the date of your last driver scan, the results of that scan, and a button (Start scan) to start a new scan • Last scan summary: showing a summary of the results of the last scan • System information: showing the specifications of your computer • LiveUpdate: this option allows DriverScanner to search for updates to the application 33 www.uniblue.com Back to Chapter 4 - The DriverScanner user interface Back to Contents 4.2 The Driver Scan screen (Figure 18) To access the driver scan screen, click on the Driver scan tab on the navigation panel. On the left-hand side of the Driver scan screen you will see a sub-menu with three entries: Driver scan, Latest scan results, and Download history. Clicking on each of these functions alternates relevant views or windows (figure 18). Driver scan is the default window within the Driver scan screen. From here you can define the terms of your scan precisely. To configure settings, you should tick the checkboxes that reflect you search preferences (figure 18). By default, DriverScanner performs complete scans (note that the checkbox next to Select All is ticked). 34 www.uniblue.com Back to Chapter 4 - The DriverScanner user interface Back to Contents (Figure 19) Latest scan results is where DriverScanner displays all the outdated drivers found on your system (figure 19). Note that once you have run your scan, the Latest scan results window pops up automatically to reveal the issues found by DriverScanner. The numbers of outdated drivers found are summarized in the Attention bar. Below this attention bar is a list of the outdated drivers found by DriverScanner and categorized by system device type and potential risk to your system. The drop-down menu, above the attention bar, allows you to filter the list of outdated drivers to show only those out-of-date or ignored. You may scroll this list and select which individual drivers to update and install, and which to leave unchanged. To update a particular driver click on the Download driver button to download the driver, and then click on the Install driver button to install it. 35 www.uniblue.com Back to Chapter 4 - The DriverScanner user interface Back to Contents The information bar explains the icons used in the scan results. In particular, the driver level icons identify the level of risk posed to your system by a particular driver update. You can download all drivers in one go, simply by clicking on the Download all button. All drivers can cause unexpected PC problems, or conflict with other drivers. Drivers marked as safe or moderate are unlikely to cause problems, but it is still advisable that you backup your drivers first. However DriverScanner will only download, but not install, drivers marked as risky because it is possible that the installation of these drivers could cause serious system problems. 36 www.uniblue.com Back to Chapter 4 - The DriverScanner user interface Back to Contents (Figure 20) Download history displays a history of drivers downloaded using DriverScanner (figure 20). 37 www.uniblue.com Back to Chapter 4 - The DriverScanner user interface Back to Contents 4.3 The Backup screen (Figure 21) To access the Backup screen, click on the Backup tab on the navigation panel (figure 21). This screen allows you to backup all or some of your drivers by selecting the individual driver, or clicking on the Perform a complete backup… checkbox at the top of the page, and then clicking on Backup selected at the bottom of the page. On the left-hand side of the Backup screen you will see a sub-menu with two entries: Driver backup and Backup settings. The Driver backup option directs you to the default screen which has just been described, while the Backup settings button takes you to the Backup settings screen. 38 www.uniblue.com Back to Chapter 4 - The DriverScanner user interface Back to Contents (Figure 22) The Backup settings screen allows you to change the location to which backed-up drivers will be saved by clicking Browse to choose the destination of the save (figure 22). 39 www.uniblue.com Back to Chapter 4 - The DriverScanner user interface Back to Contents 4.4 The Restore screen (Figure 23) Click the Restore tab to access the Driver restore screen (figure 23). From here you can restore old drivers by selecting from the list of driver backups. Choose the appropriate location, from which you want to restore the drivers, then choose whether you wish your PC to reboot with or without prompting. Then click on Next to see a list of the drivers available to be restored from that location. 40 www.uniblue.com Back to Chapter 4 - The DriverScanner user interface Back to Contents (Figure 24) Select a driver you want restored and click Restore selected (figure 24). 41 www.uniblue.com Back to Chapter 4 - The DriverScanner user interface Back to Contents 4.5 The Settings screen (Figure 25) The Settings screen can be accessed by clicking on the Settings tab (figure 25). The default System settings screen (from the menu to the left of the screen) allows you to modify a range of system settings including: how the application is closed and minimized, the default folder to which downloaded drivers are saved, and whether or not DriverScanner starts an automatic driver scan every time it is launched. 42 www.uniblue.com Back to Chapter 4 - The DriverScanner user interface Back to Contents (Figure 26) The other tab on the left-hand menu, accesses the System information page (figure 26). This page conveniently displays your system’s information including the manufacturer, model, and the total physical memory (RAM), among other things. 43 www.uniblue.com Back to Chapter 4 - The DriverScanner user interface Back to Contents 5 Driver scans and updates Learn about driver scans and how to run them. 5.1 Scanning outdated drivers (Figure 27) When DriverScanner starts it will automatically launch a scan for driver updates, in which case the first screen you will be shown is figure 27. If you haven’t changed the default settings (from the Settings page), so that DriverScanner doesn’t start with an automatic scan, the home screen will be figure 27. From here launch a scan manually by clicking on Start scan. 44 www.uniblue.com Back to Chapter 5 - Driver scans and updates Back to Contents (Figure 28) Alternatively, access the Driver scan screen by clicking on the Driver scan tab on the navigation panel, then Driver scan on the left-hand menu and then clicking on Start scan (figure 28). The Driver scan screen allows you to select which devices you wish to scan by ticking the checkbox. Initially, it is important to perform a complete scan. 45 www.uniblue.com Back to Chapter 5 - Driver scans and updates Back to Contents (Figure 29) Once DriverScanner has started scanning you will see the progress screen (figure 29). This progress screen will show you how many outdated drivers DriverScanner has found. Those categories with outdated drivers are marked with while areas without are marked . 46 www.uniblue.com Back to Chapter 5 - Driver scans and updates Back to Contents (Figure 30) By clicking the Cancel button (at the bottom right of the screen), you will be able to halt the scan (figure 29). A pop-up window will then appear confirming that the scan has been cancelled (figure 30). 47 www.uniblue.com Back to Chapter 5 - Driver scans and updates Back to Contents (Figure 31) Once you have run your scan, the Scan results window reveals the number and identity of outdated drivers found by DriverScanner (figure 31). Use the scroll bar on the right to review the items listed. We recommend that you create a backup of your drivers before updating any of them. As a precautionary measure, even though DriverScanner will allow you to download drivers, marked as risky, it will not install them for you since it is possible that these drivers may cause system problems. Instead you must install risky drivers manually. 48 www.uniblue.com Back to Chapter 5 - Driver scans and updates Back to Contents 5.2 Complete and partial driver scans (Figure 32) In the Driver scan screen, you will notice a list of the various groups of hardware devices whose drivers can be scanned for (figure 32). By default the Perform a complete scan… checkbox is ticked and so DriverScanner will perform a complete scan for all devices. However, if you want to scan only certain types of drivers unselect the Perform a complete scan… option and then select the individual sections you want to scan. Once you have chosen the scan settings these will then be saved so that the next time that you run a scan from this page (ie from the page accessed through the Driver scan tab on the navigation panel along the top of the screen) your search settings will be remembered. 49 www.uniblue.com Back to Chapter 5 - Driver scans and updates Back to Contents 5.3 Updating drivers (Figure 33) The Latest scan results window lists the outdated drivers found on your system (figure 33). You may scroll through this list and select individual entries to update. Although most driver updates are safe, or perhaps at most moderately risky, updating drivers that control hardware essential for the operation of your PC can put your system at substantial risk. For this reason DriverScanner marks certain driver updates as being risky. Although DriverScanner will download risky drivers, it will not install them for you. Instead you must install them manually. 50 www.uniblue.com Back to Chapter 5 - Driver scans and updates Back to Contents Updating a driver is a two stage process. First DriverScanner downloads the driver from the relevant source, and then, secondly, it installs the downloaded driver. To download each outdated driver click on the red Download driver button (figure 33). To then install each downloaded driver click on the Install driver button, which replaces the Download driver button (figure 33). When installing drivers marked as being of moderate risk, in the Level column, a second screen will appear asking you to confirm your decision to install the driver. However, if you try to install a risky driver a screen will appear explaining that DriverScanner will not install risky drivers, and will instead redirect you to where you can install the driver manually. If you identify a driver you aren’t interested in updating you can choose to ignore it simply by selecting the Ignore checkbox (figure 33). Before installing the updated drivers we recommend that you create a backup of your old drivers. To backup drivers see Chapter 6: Driver backups and restores. ll drivers can cause unexpected PC problems, or create conflicts with other drivers. It is possible, but unlikely, that installing drivers could cause problems with your system. Therefore we recommend that you backup your drivers using DriverScanner’s backup tools (access the Backup tab). You will then enjoy the reassurance of knowing that you can reinstall your old drivers should you ever have a problem. DriverScanner will NOT install for you drivers marked as risky because it is possible that the installation of these drivers could cause problems with your system. You may install these drivers manually, however we do not recommend it and Uniblue will not be held liable for any harm to your computer that may result. Should you choose to install this driver anyway, we recommend that you first backup your drivers using DriverScanner’s backup tools (access the Backup tab). 51 www.uniblue.com Back to Chapter 5 - Driver scans and updates Back to Contents 6 Driver backups and restores Regularly backing up your computer’s drivers is essential, whatever activity you are performing, however it is especially important before performing system administration and maintenance tasks. For this reason we recommend that you perform a backup before you download updated drivers. 6.1 Driver backups (Figure 34) DriverScanner allows you to take a backup of your drivers. First access the Backup screen (figure 34). 52 www.uniblue.com Back to Chapter 6 - Driver backups and restores Back to Contents Simply select the system section or sections you want backed up (by clicking on the blank checkbox). Alternatively, you can choose to backup all drivers by clicking on the blank checkbox next to Perform a complete backup of all your drivers at the top of the screen (figure 34). Having chosen those drivers you want backing up then click on Backup selected to initiate the backup procedure (figure 34). 53 www.uniblue.com Back to Chapter 6 - Driver backups and restores Back to Contents 6.2 Driver restores (Figure 35) At any point you can restore old, backed up, versions of your drivers (figure 35). First click on the Restore tab from the top navigation panel to access the Driver restore page. Then click on the Browse button to reveal a list of backup files available to be restored. Select the archive you want to restore, from the list, and then click on Next. Choose whether or not you want your PC to reboot automatically if required. 54 www.uniblue.com Back to Chapter 6 - Driver backups and restores Back to Contents (Figure 36) Having clicked Next DriverScanner will then display the list of backed up drivers included in the archive (figure 36). Choose the checkbox next to the driver you want to restore and then click on Restore selected (which will have become highlighted). DriverScanner will then show a progress bar as your chosen drivers are restored. 55 www.uniblue.com Back to Chapter 6 - Driver backups and restores Back to Contents (Figure 37) Once successfully restored you will still need to restart your PC for the changes to your drivers to take effect. If you requested to be prompted before your computer is rebooted DriverScanner will then give you the option of either restarting your PC immediately, or later (figure 37). When restoring old drivers, remember that if the drivers have subsequently been updated the restore function will reinstall outdated versions of your drivers. 56 www.uniblue.com Back to Chapter 6 - Driver backups and restores Back to Contents 7 Configuring DriverScanner Learn how to configure DriverScanner, change preferences, and set up automatic scans. 7.1 System settings (Figure 38) The System settings window is accessed by clicking on the Settings tab, and allows you to configure various DriverScanner options (figure 38). 57 www.uniblue.com Back to Chapter 7 - Configuring DriverScanner Back to Contents There are three areas that you can configure (figure 38): Navigation This option allows you to define how DriverScanner is minimized or closed when the buttons at the top right of the screen are pressed. Downloads This option allows you to set the default folder to which downloaded drivers are saved, and the number of simultaneous driver downloads permitted. Scan This option allows you to set DriverScanner so that it scans your drivers every time the application is launched. We recommend that this setting is left on so that the driver status is always updated automatically. This relieves you of the need to perform manual scans regularly, by completely automating the system scanning process. Proxy Settings If you access the Internet using a proxy, or if you just want DriverScanner itself to use a particular proxy, you can input the settings by clicking on the Proxy settings button. This will prompt a pop-up window to appear (figure 39). 58 www.uniblue.com Back to Chapter 7 - Configuring DriverScanner Back to Contents (Figure 39) If you are already using a proxy server and want to use the same settings you can find these out (when using Internet Explorer) by accessing the Tools menu, selecting Internet options, then clicking on the Connections tab, and finally on the LAN settings button. You then enter the number from the address field into the field titled Server address in the pop-up window, and then the number of the Port field into the DriverScanner section titled Server port. If your proxy requires that you enter a username and password, you can also store these in the appropriate fields of the Proxy settings window. Finally click Save to save these settings (figure 39). If, having set your proxy settings, you no longer wish to use them simply access the Proxy settings window and tick the Bypass proxy settings tick box. Once you have configured your system settings click on the Apply button to store them. 59 www.uniblue.com Back to Chapter 7 - Configuring DriverScanner Back to Contents 7.2 System information (Figure 39) The System information section makes detailed information about the settings and configuration of your system readily accessible, and identifies (figure 39): Manufacturer: Which company produced your PC Model: The model name of your system Operating system: The operating system being used Total physical memory: The amount of RAM in your PC Processor model: The processor used in your computer Number of logical processors: The number of cores on the chip 60 www.uniblue.com Back to Chapter 7 - Configuring DriverScanner Back to Contents Glossary of terms The following terms are defined: Application Applications are programs that are designed for end users, and include applications such as word processors, spreadsheets, media players and database software. Backup The procedure that allows you to store your data on a separate storage medium so that you can restore the data with 100% accuracy if and when data loss takes place. Disk drive The most popular mass data storage mechanism used in PCs is the hard drive. In simple terms the PC uses the hard drive to store software, and all other data, permanently (or until erased), while it uses physical memory (more commonly called RAM in the context of PCs) to store date needed when turned on and actively processing data. Display adapters These are also known as graphics processing units and are dedicated devices for processing and rendering images and graphics. They may be integral to the motherboard, or be an add-in, in which case they may also be called graphics cards. Driver A driver (also called a device driver) is a piece of software that permits other programs to work with hardware. See section 2.1: What are drivers? for more information. Dynamic link libraries A DLL, or dynamic link library, is a collection of small software programs, any of which are called up by a larger program (eg, Microsoft Word) that is running on your computer. Some DLLs are needed by Windows and other program graphical user interfaces, while others are used to connect to the Internet, or to send emails. One of the advantages of having DLL files is to save putting a burden on your computer’s memory since DLLs are not loaded into RAM until the file is needed. For example, the print driver will not be loaded until you request to print your Word document. Once you click on the print button, Word runs the printer DLL, among other things. 61 www.uniblue.com Back to Glossary of terms Back to Contents File system A system of organized directories and files. IDE ATA/ATAPI IDE stands for Integrated Driver Electronics, ATA refers to Advanced Technology Attachment and ATAPI is an acronym of Advanced Technology Attachment Packet Interface. These phrases all refer to technologies used to connect the data storage devices within a PC using the wide ribbon-like cables that can be seen inside a desktop PC. Note, however, that removing the cover isn’t recommended since it may cancel the warranty on your computer, and you may also run the risk of electrocution if your PC is switched on. Network adapters Also called a network card, or network interface card, the network adapter is a device included in your computer allowing your PC to connect to networks. The network adapter will include both the physical socket and the circuitry needed to communicate over the network. Restore The process of reinstating a set of data to its state before the data loss or related incident has occurred. Universal Serial Bus This is a very popular technology standard for connecting all manner of external devices, from printers and keyboards, to PDAs and flash drives, to your PC using a cable with the USB plug. User interface The menu and other general instruments available for the user to communicate with the program. In DriverScanner the user interface is designed to be highly intuitive and exceptionally simple to use. 62 www.uniblue.com Back to Glossary of terms Back to Contents Address: Uniblue Systems Ltd Level 2, Regional Business Center Achille Ferris Street Msida, MSD 1751 Malta, Europe Contact: http://www.liutilities.com/support/