1
Owner's
Manual
CRRFTSMRHo
INDUSTRIAL
SABRE SAW
Model No. 130.27719
Caution:
Before using this product,
read this manual and follow
all its Safety Rules and
Operating Instructions.
•
_,
•
,
•
Safety
Operatio n
Maintenance
Parts
Espa_ol
Sears, Roebuck and Co., Hoffman Estates, IL 60179
Table
of Contents
Page
Warranty .....................................................
Power Tool Safety Rules
Symbols
3-5
.....................................................
Functional Description and Specifications
Assembly
2
......................................
6
..........................
7
....................................................
Operating Instrdctions
.......................................
8
8-I0
Tool Tips ...................................................
Maintenance
................................................
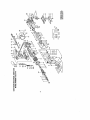
Service Parts ..............................................
I0
11
12-13
Sears Warranty
Full One Year Warranty on Craftsman Indusb'ial Sabre Saw
If this Craftsman Industrial Sabre Saw fails to give complete satisfaction within
one year from the date of purchase, Sears will replace it free of charge.
if this IndustrialSabre Saw is used for commercial or rental purposes, this
warranty applies for only one year from the date of purchase.
Warranty Service
Warranty service is available by returning this Craftsman Industrial Sabre Saw
to your nearest Sears Store in the United States,
This warranty applies only while this Industrial Sabre Saw is used in the United
States.
This warranty gives you specific legal rights, and you may also have other
rights which vary from state to state.
Sears, Roebuck and Co., DepL 817WA, Roffman Estates, IL 60179
.Oy
_Read
v
_
v
.|
and understand all instructions.
Failure to follow all instructions
listed below, may result in electric shock, fire and/or serious personal injury,
SAVE THESE
Work Area
Keep your work area clean and well lit.
Cluttered benches and dark areas invite
accidents.
Do not operate power tools in explosive
atmospheres,
such as in the presence of
flammable
liquids, gases, or dust. Power
tools create sparks which may ignite the
dust or fumes.
Keep by-standers, children, and visitors
away while operating a power tool.
Distractions can cause you to lose control.
Electrical Safety
Double Insulated tools are equipped with a
_olarized
plug [one blade is wider than the
_ther.) This plug will fit in a polarized
_utlet only one way. ff the plug does not fit
fully in the outlet, reverse the plug. If it still
:loes not Fit, contact a qualified electrician
lo install a polarized outlet. Do not change
_he plug in any way. Double Insulation []
.=liminatec the need for the three wire
_rounded power cord and grounded power
_upp]y system. Before plugging in the tool,
_e certain the outlet voltage supplied is
,vithin the voltage marked on the nameplate.
9o not use "AC only" rated tools with a DC
power supply.
Avoid body contact with grounded
sur[aces
such as pipes, radiators, ranges
and refrigerators.
There is an increased
risk of electric shock if your body is
grounded.
If operating the power tcol in
damp ]ocatlans is unavoidable, a Ground
Fault Circuit Interrupter must be used to
supply.the power to your tool. Electrician's
robber gloves and footwear w_ll further
enhance your personal safety.
Don't expose power tools to rain or wet
conditions.
Water entedng a power tool will
increase the risk of electric shock.
Do not abuse the cord. Never use the
cord to carry the tools or pull the plug
from an outlet. Keep cord away from
heat, oil, sharp edges or moving parts.
Replace damaged cords immediately.
Damaged cords increase the risk of electric
shock.
INSTRUCTIONS
when operating a power tool outside, use
an outdoor extension cord marked '_N-A"
or _N." These cords are rated for outdoor
use and reduce the dsk of electric shock.
Refer to "Recommended
sizes of Extension
Cords" in the Accessory section of this
manual.
Personal Safety
Stay alert, watch what you are doing and
use common sense when operating a
power tool. Do not use tool while tired or
under the influence of drugs, alcohol, or
medication.
A moment of inattention while
operating power tools may result in serious
personal injury.
Dress properly. Do not wear loose
clothing or jewelry. Contain long hair.
Keep your hair, clothing, and gloves away
from moving parts. Loose clathee, jewelry,
or long hair can be caught in moving parts.
Keep handles dry, clean and free from oil
and grease.
Avoid accidental starting. Be sure switch
is "OFF" before plugging in. Carrying tools
with your finger on the switch or plugging in
tools that have the switch "ON" invites
accidents.
Remove adjusting keys or wrenches
before turning the tool "ON". A wrench or
a key that is left attached toa rotating part of
the tool may result in personal injury.
Do not overreach. Keep proper footing
and balance at all times. Proper footing
and balance enables better control of the
tool in unexpected situations.
. Use safety equipmenL
Always wear eye
protection.
Dust mask, non-skid safety
shoes, hard hat, or hearing protection must
be used for appropriate conditions.
Tool Use and Care
Use clamps or other practical way to
secure and support the workpiece to a
stable platform. Holdingthe work by hand
or againstyour body is unstableand may
lead to loss of control
Do not force tool. Use the correct tool for
your application. The correct too! wiTIdo
the job better
it is designed,
and safer at the rate for which
Do not use toot if switch does not turn it
"ON" or "OFF". Any tooI that cannot be
controlled with the switch is dangerous and
must be repaired.
Disconnect the plug from the power
source before making any adjustments,
changing accessories,
or storing the tool.
Such preventive safety measures reduce the
risk of starting the tool accidentally, Store
idle tools out of reach of children and
other untrained persons. Tools are
dangerous in the hands of untrained users,
Maintain toots with care. Keep cutting
tools sharp and clean. Propedy maintained
tools, with sharp cutting edges are less likely
to bind and are easier to control, Any
alteration or modification
is a misuse and
may result in a dangerous
condition.
Check for misalignment
or binding of
moving parts, breakage of parts, and any
other condition that may affect the tools
operation. If damaged, have the tool
serviced before using. Many accidents are
caused by poorly maintained tools. Develop
a periodic maintenance scheduIe for your
tool.
Use only accessories that are
recommended
by the manufacturer
for
your model. Accessories that may be
suitable for one tool, may become
hazardous when used on another tool,
Service
Tool service must be performed only by
qualified repair personnel. Service or
maintenance performed by unqualified
personnel could result in a dsk of injury. For
example: internal wires may be misplaced or
pinched, safety guard return springs may be
improperly mounted,
When servicing a tool, use only identical
replacement parts. Follow instructions in
the Maintenance
section of this manual
Use of unauthorized parts or failure to follow
Maintenance Instructions may create a risk
of electric shock or injury, Certain cleaning
agents such as gasoline, carbon
tetrachloride, ammonia, etc, may damage
plastic parts.
Hold tool by insulated gripping surfaces
when performing an operation where the
cutting tool may contact hidden wiring or
its own cord. Contact with a "live" wire will
make exposed metal parts of the tool "live"
and shock the operator. Do not drill, fasten
or break into existing we!Is or other blind
areas where electrical wiring may exist, ff
this situation is unavoidable, disconnect all
fuses or circuit breakers feeding this
worksite.
Keep hands away from cutting area, Do
not reach under the material being cut.
The proximity of the blade to your hand is
hidden from your sight.
Never leave the trigger locked "ON".
Before plugging the tool in, check that the
trigger lock is "OFF =. Accidental start-ups
could cause injury.
Do not use dull or damaged blades. Bent
blade can break easilyor cause kickback.
Be aware of the location and setting of
the switch "Lock-ON" button. If the switch
is locked "ON" during the use, be ready for
emergency situations to switch it "OFF", by
first pulling the trigger then immediately
releasing it without pressing the "Lock-ON"
button,
Keep hands from between the gear
housing and saw blade holder. The
reciprocating
blade holder can pinch your
fingers.
Before starting to cut, turn tool "ON" and
allow the blade to come to full speed.
Tool can chatter or vibrateif blade speed is
too slow at beginning of cut and possibly
kickback.
Always wear safety goggles or eye
protection when using this tool. Use a
dust mask or respirator for applications
which generate dust.
disposal, materials in fine partJc+eform may be
explosive. Do not throw contents on an open
fire.
Secure material before cutting. Never
hold it in your hand or across legs. Small
or thin material may flex or vibrate with the
blade, causing loss of control
_Some
created
by
power dust
sanding,
sawing,
grinding, drilling, and other construction
activities contains chemicals known to
Cause cancer, birth defects or other
reproductive
harm, Some examples of
these chemicals are:
Make certain all adjusting screws and the
blade holder are Ught before making a
out. Loose adjusting screws and holdem
can cause the tool or blede to sTIpand loss
of control may result.
When removing the blade from the tool
avoid contact with skin and use proper
protective gloves when grasping the
blade or accessory.
Accessories may be
hot after prolonged use,
If your tool is equipped with a dust bag,
empty it frequently and after completion of
sawing. Spontaneous combestion, may in
time, result from mi._J m of oil or water with
dust parficles. Be exftemely careful of dust
• Lead from lead-based
paints,
- Crystalline silica from bricks and cement
and other masonry products, and
,, Arsenic and chromium
treated lumber.
from chemically-
Your risk from these exposures vades,
depending on how often you do this type of
work. To reduce your exposure to these
chemicals: work in a wetl ventilated area,
and work with approved safety equipment,
such as those dust masks that are specially
designed to filter out microscopic particles,
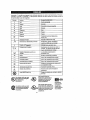
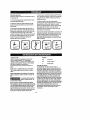
vT=e
IMPORTANT:
Some of the following symbols
and ]eam their meaning. Proper interpretation
tool better and safer.
may be used on your tool. Please study them
of these symboIs will allow you to operate the
Name
Desig nation/Explanat
V
Volts
Voltage (potential)
A
Amperes
Current
Hz
Hertz
Frequency
W
Watt
Power
Symbol
ion
(cycles per second)
kg
Kilograms
Weight
rain
Minutes
Time
s
Seconds
Time
I_I
Diameter
Size of ddll bits, grinding
no
No load speed
Rotational
Revolutions or reciprocationper minute Revolutions,
.../rain
wheels,
etc.
speecl, at no load
strokes, surface
speed,
orbits etc. per minute
0
1,2,3 ....
Off position
Zero speed, zero torque...
Selector
Speed, torque or position settings.
settings
I, II, III,
Higher number
Infinitely variable selector with off
means greater speed
Speed is increasing
from 0 setting
Arrow
Action in the direction of arrow
Alternating
Type or a characteristic
of current
current
Direct current
Type or a characteristic
of current
,'x.,
Alternating
Type or a characteristic
of current
[]
Class II construction
Designates Double Insulated
Construction tools.
@
Earthing terminal
Grounding
Warning symbol
Alerts user to warning messages
Ni-Cad RBRC seal
Designates
@
or direct current
This symbol designates
that this tool is listed by
Underwriters Laboratories.
Ni-Cad battery recycling
program
C@
that this tedl is listed to
This symbolStandards
Canadian
designatesby
Underwriters
This symbol designates
that this tool is listed by
the Canadian Standards
Association.
terminal
Laboratofles.
This symbol designates
that this tool is listed by
f|llm
_
Underwrlt ers Laboratories,
C I -_L J IJS and listed to Canadian
Standards by Underwriters
Laboratories.
=
_=_
This symbol
designates
that
this tool
complies
to NOM
Mexican
Standards.
_
Disconnect the plug from the power source before making any
assembly, adjustments
or changing accessories.
Such preventive safety
reduce the risk of starting the tool accidentally.
measures
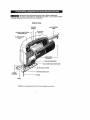
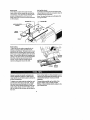
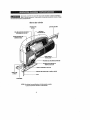
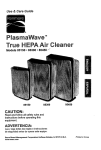
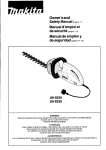
Sabre Saw
TRIGGER
SWITCH
ALLEN
WRENCH
5 MM
"LOCK-ON"
ADJUSTING
DIAL
BUTTON
BLADE (
KNOB
CHIP BLOWER
CUTTING
LEVER
GUIDE SLOTS
BLADE
PLUNGER
BLADE
BASE
NOTE: For tool specifications
refer to the nameplate on your tool.
Blade Installation
Set the blade orbit selector lever to pes_tion ill
1. Pull blade change knob upward as far as it will
go.
2. Turn blade change knob three turns counterclockwise (viewed from the top of the teol).
3, Insert the blade into blade plunger at a 90"
angle to the cutting direction. Wr_ha slight
upward pressure, turn the blade teeth forwerd
(direction of cut) and guide the beck of the
blade into the groove in the center of blade
roller guide, Pull gently down on the blade to
seat the blade tabs in the plunger.
4. With the blade in the proper position, turn knob
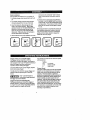
Trigger switch and "Lock-ON" button
Your jigsaw can be turned ON or OFF by
squeezing or releasing the trigger. Your jigsaw is
also equipped with "Lock-ON" button located just
above the trigger that allows contJnuoos
operation without holding the trfggar.
TO LOCK SVVFrCHON: squeeze trigger, depress
button and release tdgger.
TO UNLOCKTHE SWITCH: squeeze trigger and
release it without depressing the 'Lock-ON"
button.
_]
If the "Lock-ON" button is
continuously being depressed,
the trigger cannot be released,
Tdgger Preset Speed Adjusting Dial
This feature enbles you to preset the _gger at
desired speeds by rotating the dial on the trigger
to a higher or lower setting. Regardless of the the
pressure applied on trigger, the tool will
clockwise until a noticeable "Click" noise is
heard, indiceting that the blade is ]ocked in
place.
5. Depress knob to disengage and continue to
rum knob 1 until it is aligned with the curvature
of the handle, and can be pressed back into its
normal position, Press down on knob until it is
flush with the handle, and the jigsaw is ready
for use.
Removing the blade is essentially the reverse of
the installation procedure, however, take note
that once the blade change knob is loosened,
gently push the blade upward to release the
blade tabs from the piungan
not operate any faster that the maximum speed
setting selected.
Setting
A-B
C-D
E
Low stroke
Medium stroke
High stroke
Plunger Speed
The jigsaw cutting speed or stroke rate required
depends on the material being cut, thetype of
blade used, and the feed rate preferred bythe
operator. The best speed for a particuler
application is lerge_ determined by experience,
though as a general rule, slower speeds are for
denser materials and faster speeds far soft
materials. Note that when the jigsaw is used at
low speed settingsfor any length of time, the
motor temperature will rise due to the slower
speed of the internal cooling fan. In such cases,
It is necessary to Occasionally run the tool at full
speed for a few minutes to keep the motor
operating at high efficiency,
O"
"_
Blade Orbit
Maximum cutting efficiency can be obtained by
adjusting the blade orbit selector lever to suit the
material being cut. The following chart will help
you determine which setting to use for your
application. This chart is intended as a guideline
only, and test cuts in scrap materiaJ should be
performed first to determine the best setting.
Setting
O
"
0
•
Chip Blower
The jigsaw is equipped with a thrse-positlen chip
blower to help keep the cutting line clear of chips.
By adjusting the chip blower lever, the force of
the discharged air may be altered as follows;
_i_]
trongest blowing action for working
in woods and similar materials.
hard materials such es metal
or thin sheet met_s and
used with knife blades, grit
edge blades or rasp woW.
Setting
I
soft materialswherecleaner
cutting or deficatescrolling
workisperformed,
Setting
II
medium densitymaterials
such asharder woodsor
_
Mediumblowing action.
No blowing action
particle board.
Setting
II1
soft materialssuchas wood,
plastics, etc.
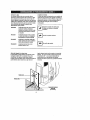
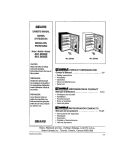
Base Angle Adjustment
The base may be tilted to allow angle cuts up to
45 ° in either direction. To adjust base, loosen
screw with allen wrench, slide the base towards
the front of the tool, and rotate to the desired
angle, es marked on the angle scale. Detent slot
wilt hold the base firmly at 90". Intermediate
angles may be set with a protractor. After
positioning the base, securely tighten screw.
BASE
PROTRACTOR
(Notin_uded)
Base
Inserts
Anti-splinter Insert
To minimize splinteringof the top surface of the
material being cut, piase the anti-splinter insert in
the blade opening of the base.
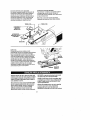
Model Sears number will accept two base
inserts which may be changed by removing the
six screws(A). The steeI insert is used for mea_
general cutting operations, and the smooth
plastic insert may be used to minimize scratches
on fine surfaces,
Note: This insert will only work with blades that
have ground sides,
SCREW
INSERT
BASE
INSERT
BASE
Rush Cutting
To allow the saw to make a perpendicular cut
close to a vertical surface, the base may be
repasitianed as follows. Remove screw B, move
base to the front mounting slot, and be sure the
deter_ notch is aligned with the detent slot in the
base. Re-insert screw (B) into the threaded hole
closest to the detent notch, and securely tighten.
Note that when the base is retracted in this
'
DETENT
manner, only 90" cuts are possible, and the
optional cutting guide may not be used.
SCREW
eO
ANGLE
SCALE
•
Always be certain that smsiler workpiecas are
securely fastened to a bench or other support.
Larger panels may be held in place by clamps on
a bench or sawhorses.
When cutting metal, it Jsoften advisable to use a
lubffcant to cool the blade and extend its life. An
To begin a cut, cleady mark the cutting line, and
rest the front of the base on the work. Engage
the switch, and move the blade into the work
using only enough forward pressure to keep the
blade cutting steadily. DO NOT FORCE, as this
will not make the saw cut faster;, let the blade do
the work.
Choose blades carefully, as the ability of the
optional blade lubricator may be pumhesed
separately.
jigsaw to follow curves, provide smoother
finishes, or faster cutting is directly related to the
type of blade used.
10
•
t
should be replaced at an Authorized Service
Center, Bearings which become noisy (due to
heavy lead or very abrasive material cutting)
should be replaced at once to avoid
overheating or motor failure.
Service
Preventive maintenance
performed by unauthorized
personnel may result tn misplacing of
internal wires and components which could
cause serious hazard. We recommend that
all tool service be performed
Service Facility.
Cleaning
by a Sears
To avoid accidents always disconnect the
tool from the power supply before cleaning
or performing any maintenance. The tool
may be cleaned most effectively with
compressed dry air, Always wear safety
goggles when cleaning tools with
compressed air.
Tool Lubrication
Your tool has been propedy }ubricated and
fs ready to use. It is recommended
that tools
with gears be regreased with a special gear
lubricant at every brush change,
Carbon Brushes
The brushes and commutator in your tool have
been e_Jineered for many hours of
dependable sen'ice. To maintain peak
efficier'_y of the motor, we _mend
avery
two to six months the bn._shasbe examined.
Ventilation openings and switch levers must be
kept dean and free of foreign matter. Do not
attempt to aieas by inserting pointed objects
through openings.
_
Certain cleaning agents and
solvents damage ptas_c
parts. Some of these are: gasoline, carbon
tetrachloride, chlorinated cleaning solvents,
ammonia and household detergents that
contain ammonia.
Only genuine Sears replacement brushes
specially designed for your tool should be
used.
Bearings
After ab<:_Jt300400 hours of operation, or at
every second brush change, the beaffngs
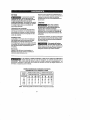
If
an extension
is necessary,
a cord
adequate
size for your
conductors
thatcord
is capable
of carrying
thewith
current
necessary
tool must be used. This wt]l prevent excessive voltage drop, tose of power or overheating.
Grounded tools must use 3-wire extension cords that have 3-prong pIugs and receptacles.
RECOMMENDED
SIZES OF EXTENSION CORDS
120 VOLT ALTERNATING CURRENT TOOLS
TOO|PS
Ampere
Rating
3-6
6-8
8-10
10-12
12-16
NOTE:
Cord Size in A,W.G.
Wire Sizes in mm2
Cord Length in Feet
Oord Lengthin Meters
25
50
100
150
15
30
60
120
18
18
18
16
14
16
16
16
16
12
16
14
14
14
14
12
12
12
.75
.75
L 75
1.0
.75
t.0
!.0
23
1.5
2.5
2.5
4.0
2.5
4,0
4.0
-
The smaller the gauge number, the heavier the cord.
11
12
_
_,_
_o_o
oo_
o-_
"_o=
o_o_oo_
ooooo_oo_
ooo_
o_oo
o_o_
0_00
Indice
Pdgina
Garantia ....................................................
14
Normas de seguridad para herramientas mec&nicae ...............
Sfmbolos ...................................................
Descripci6n funcional y especificaciones
Ensamblaje
Instrucciones
15-17
18
..........................
19
.................................................
de funcionamiento
..............................
20
20-22
Consejos para la herramienta ...................................
Mantenimiento ...............................................
Piezas de repuesto .........................................
22
23
12-13
Garant|a de Sears
Garantla completa de un aSo para la sierra de vaiv6n indusbial
Craftsman
Si no est& completamente satisfecho con esta sierra de vaiv6n industrial
Craftsman dentro del plazo de un aSo a parfir de la fecha de compra,
Sears la reemplazar&gratuitamente.
Siesta sierra de vaiv6n industrial se utilJza con fines comerciales o de
alquiler, esta garantia solamente fiene una aSo de aplicaci6n a partir de la
fecha de compra.
Servicio de garantfa
Et servicio de garantia se eneuentra disponible devolviendo esta sierra de
vaiv6n industrialCraftsman a ta tienda Sears mde pr6xima en los Estados
Unidos.
Esta garant[a tiene aplicaci6n eolamente mientras eeta sierra de vaiv6n
industrial se utilice en los Estados Unidos,
Esta garantfa le confiere a usted derechos legales especfficos yes poeible
que tambi6n tenga otros derechos que varian de un estado a otro.
Seers, Roebuck and Co., DepL 817WA, Hoffman Estates, IL 60179
14
Lea y entiendatodasiasinstreccienes.Elincumplimiento
de tedaslas instruceiooas
ifldisadas a continsaci6npuededar lugar a sacudidaseJ_ctricas,iocsndios y/o lesionss
person;desgraves.
CONSERVEESTASINSTRUCCIONES
Area de tmbajo
Mantengael _rea de trabajolimpiay bTenileminada.
Las mesas desordenadas
y las_reasoscurasInvitan a
qua se produzcanaccidentes.
aceite,los bordesafilsdos o las piezasm6viles. Gamble
los cerdonesdeSadosinmediatamente.Loscordones
dafiados eumentanel desgode que se produzcan
sacudidss ei_ctricas.
Noutilice herramientasmec;inisas en atm6steras
e:cplosivas,Isles come las existentesen presenciade
liquldes,oaseso pelvestntlamables. I.as
hsrramientasmec_nicasgeneraochJspasy _stas
peedendar lugarala ignici6n de] polvo o losvaporss.
AI etlllzar sea herramientamec=tnicaa la Intemperle,
utilice uncord6nde extensk_n
pare intemperie
mamado"W-A"o "W". Estoscerdonestienen
capacidad nominal pareuseala intemperiey reducen el
riesgode qua sep_odazcansacudidasnl_ctrisas.
Consults "Tamafiosrecomendadosde los cordenesde
sxtensi6n"en lasscci6o Ascesefiosde este manual.
Maatenga a las personasqua se enceentren
gresentes,a loscities y a losvisitantesalejadoeal
etilizar aria herramtentamec;inica. LasdJstracciones
puedenbaserque usted pierdael control.
Seguridad personal
Mant_ngasea]erla, ffjese en Is que esl_ hacienday
use el sentidecemz_n
suandootgice one barramienta
me,nice. Nouse Is berramienta cuandoest_
cansadoose encoentrebajola lnfleenctade drogae,
alcohol o medicamentos. Un memento de distraeci6n
a] utilizer herramieotas
msc,_nicaspuededar lugar a
lesienespsrsonaIesgraves,
Seguridad
el_cldca
Las herramientasconaislamientodobteest_n
equipadasconunenchafepolsrtzado(un terminal ee
m_s anchoqueel otto). Esteenchufeenlra_ en un
tomacorrientepeladzadosalamentede ariamanors.
Si el sachetsne antra percompleteen el
temacordente,d_le la vuelta. Si sloes sin entrar,
p_ngaseen contactsconun eleclricistaeompelente
pare Inslalaren temacorrientepaladzada. No haga
ning_n_o de eatable en el enchefa.Elaislamiento
dobleL_Je_iminala nscesidaddelsistema de cord6nde
energiade treshilosconsctadoa tierray latuentede
energiaconectadaa Uerra.Antes desnchefarla
herramienta,asegOresede quela tenai6ndel
tomaeorrientesuministrada seencosntredentrodel
maroon de la tensi6nespncificada
sn la pia_ del
fabrisante.No utiliceherramisntascon capacidad
nominal"ACsolameots"('AConly') conuna fuentede
energiaDC.
V[stase adecuadamenle. No se pongarepa holpadanl
joy'as. Suj_leseel polo. Mantengael pole, la ropay
los guantes alejades de las plazasm6vges. La rope
helgada,las joyaso elpelolargopuedenquedar
atrapados en las piezasm6vilss, Mantenga los manges
secos, limpiesy libresdeacsite y grass.
Evite el arranqueaceidenleL AsegQresede qae el
interrupteresl_ eela poalsidn"OFF"(apagado)antes
de enchaferla herramlenta.EiIIsvarlas herramientas
con el dedo en elinterruptero elenchufarherramientas
que tenganel interrupter en la pesici6n'ON"
(encendido) invitea quese produzcanaccidentes.
Quite las Ilavesde ajnsteo de tuercaantes de
seconder la herramlenta.Una liars de ajustao de
tuersaqua se deje puestaenunsplazagiratoria de la
herramien_ puedeocasionarIssionespersonales.
Eviteel tentacledel euerpoconlas seperltcles
conectadasa tierra tales cometaberias, radladores,
eslalasde cocinay refrigeradores.Haymayorriesgo
de quass produzsansacodidasei_ctri_ssi su cuerpo
esl_conectadoa tisrm. Si 13otilizaci_nde _a
herramientamec_nicaen lugarssb0medoses
inevitable,sedebeuserun interrupterde circoitopara
relies a tierra paresoministrar lasnerg_a
ala
herramlenta.Los gsantesde gems pareelsctricistay el
salzadoantidesflzanteaumsn_
m_s la segu_ad
personal.
No inlente alcsnzardemasiads lejoe. Mantengaen
apeyo de los piesyun equilibriaadecuadesen lode
momenta. El apoye delos piesy elequifibfio
adecuados permitenun major controlde la herramienta
eu sitoacienes inesperadas.
Utilice equipode segaddad. Usesiempre proteecil_n
de los ojoe. Sedebeutil_sarunam;lscaraantipotvo,
zapatosde seguddadantideslizantes,
caste o
protecci6nde los o_dosseg_nIorequieranbs
condioiones.
NOexpongalas herramientasmec,'inicasa fa Suvia nl
a sftuacionesh_medas. La entradade agueenuna
herramientamec._nicaaumsotan_el riesgo de que se
produzcansacudldsssl_ctdcas.
Utilizaci6n y cuidado de las herramientas
Uttlice abrazaderaeu otromode pr_stisode fijar y
sepodar la piezade trabajea unaplatalerma eatable.
No abusedel cord6n. Nonce use elcord6npare ]lever
las herramientasni pare sacar elenchufede un
tomacorfinnte.
Mantengael cordbnalejadodelsalor, el
15
herraraiontas.Si la herraratenta esl_ daJlada,hags
que reallcon onserviciode ajustesy reparaciocos a
la herrsmientaanionde usada. Mushesacoidentes
son causadosper herraraientanmantenidas
doticienteraonte.Establezcaun programsde
raantenimiento peribdicoparsla horrsraionta.
La oujsci6nde la piezade trabajocon la raanoo contla
el cuerporesultainestabley puodoocasionarp_rdidade
control.
No fuercela herraraienta.Usela herraraienta
correctspars la apltoacl6nqoe doses. La herrarainnta
corractahnr_eltrnbajoraejor y con m_s segurfdada la
capacidadeorainai para laque est_diseSada.
grilles _nicaraenle accosodosqoe est_n
tecoraendados per el labrlcontede se raode]o, Los
accesoriosqoe puedenser adecuadosparsone
herraraientapuedenvoivorsepeligrososcuandoso
utilizanen otra herraraieota.
He otilice la herraraientasi el intermmpter
nola
eeciendeo apaga. Todaher_raiontaquenose pueda
cootroJarconelinterroptores peIigrosay debeset
rapnrada.
Desconeoteel enchufede la lunate de enorg|aantes
de hacercualqoierajuste, corabiar accecortoso
guarderla hermraieota.Estasraedidasde segoridad
preventives
reducen el riesgode arrancarla horraraienta
accidentalrnente.
GuardeIns herraralentasqueno est_ esandoleers
del alcancede los nifiosy otras personasno
capacitadas. Lasherramiontasson peligrosasco Ins
manesde los usuariosnocapacitados.
MantengaIns herrsralentesconcoldado.Conserve
Ins herraralentasde code aliladasy lfraplas.Las
herramientasmantenidasadecuadaraonte,
conborden
de code alilados,tienen rashes probabilidades
de
atascaroey sonm;is f_cilosde controlar.Toda
altemci6no raod_icacibnconstituyeue use incorrectoy
puedotenorcome resu]tadounasituaoi6n pdigrosa.
Servicio
El serviciode ajustesy reparactonesde ena
herramienladebe serrcolizado_nicaraente per
personal de reparacfones corapetente.EI oervicioo
manteniraiento realizadoper personalnocompetente
podriaocasionarun peligrode que soprodazcan
lesiones. For ojerapto:Loscab]onInternespuodco
colocarsoreal o pel]izcarse,
los rosettesde retorno de
tooprotectoresde segoridad puedenmontarse
inadeccadaraeete.
AI realizerservi¢lode ajostesy reparacioncode one
herraraieota,oUlJcet]aicaraentepiezasde repuesto
id[nticas. Sign ]as instrsccienesqueaparecenonla
secci6n Mantenlraientode esle raanual. Eluse de
piezasno autorizadaso el incumplimiento de Ins
instroccionos de Maetentraiento
puodeocasionarun
pel[grode que seproduzcansacudidasel_ctrio_so
[esiones.Ciertosagoniesde Iirapie'za,
talescorse
gasolina, totracloruro
de carbono, ameniaco,etc,
puedendaSarInspiozasde p!_stico.
Coraprsebela desalineaci6ne el stancede Inspiezas
m6viles, la rupturade piezasy cualquierotra
siluaci6nque pandaafecter el tunclonaratentode tan
"Fijaci6n en ON"del interrupter. Si el interrupter
est_ fijo en la posici6n"ON"duranteel use, est_
preparadopars onsituaclones de eraergonciaponerlo
on "OFF'.tirando priraerodol gatillo y salt_ndoio
inraediatsmentedespots sin oprirair el bot6n de
"Fijaci6nco ON'.
Sojets la herramienta per Ins sopedicies de agarre
aisladas cuandorealice one operaoibnen la qee la
herraraienla de cede poeda entraren conlacto con
cables ocultoso conan propio cord6n. El contacto
conun cableqne tongacorriaete har_qoee!stapasoa
Innpattenraet_licas deocubiertasde la herramientay
que el operadorrecibaoacudidssal_etricas. NO
taladre, romps, ni hags trabsjo de sujeoidn enparedes
existentes ni en otras _reassiegesderidepueda haber
cables e!_ctricos.Siesta situacidn es inevitable,
desconectetodos los fusibles o cortecircoitos que
alimentan este sitio de trabajo.
Mantengelos raanos aleJadesdel _ireade code. Ne
pones la mane debajodel raaterial quese est_ codando. La proxJraidadde la hojaa la mane qeeda
ocuits a ta vista.
Mantenga las manes aleJadasdel espaei0entre ta
coja de engranaJesy el soporte de ]a hoJade sierra.
Elsoporte de la hojade vaJv_npondspellizcarteion
dodos.
Hence deJeel gatillo liJo en la posicl6n"OH"
(encondido). Antesde enchofarla herraralenta,
corapruebequeel clerre del getillo eat6 en la
poslci6n"OFF" (apagado). Un arranqoe accidental
podriacauser lesiones.
He elilice hojas desfiladas el dnfiadas. Una hoja
doblada puederoraperse f_cilmente o causar
rotraooso.
Sepala ubicaci6ny la posicibnde] bot6n de
16
Antesde cemenzarel code, enclendala
herramienta y deje que la hojacleanse teda sa
velocldad. La herrsrnientapeedechirfiaro vibrarsi
la veJocidadde la hoja es dernasiadolentest
comienzodel code y posiblementepuede
experimenterretrocaso.
Si su herramientaestaequipadaconunaboise pare
pelvo, vac[elaconlrecuensiay despu6sde termlnar
de aserrar. N cabodeitiemposepuedeproducir una
combusti6n espont_neade la mezcIade aceiteo ague
con las particu]as
de polvo.Seaextremadamente
cuidedoso
altirar el polvn,los matefialesenforms de
particelasfines puedenset explasivos.
No tire el
contenidea.un fuegosbierto.
Use slernpre galas de seguridad o grotecol6nde
los oJoacuandoutilice esla herramienta. Use nee
m=iscaraantipolve o on respiradorpare
splicacienes que generan polvo.
_
Clede polvogeneradopet el
ItJado, eserradn,ameladoy
taladradnmen,nines,y per otras acllvidadesde
construccl6n,eentieneagsatesqurmlcosquese
sage quecausancancer,defeclosde nacimienlou
otrosdefiessobrela reprndacciba.Algsnos
ejemplosde astos egentesqulmicesson:
File e] material antes de cedar. Nunna In tenga en
la mane nl cobre las pierncs. EJmeteri2,1peqeefio
o deigadopuedecuntarseo vibrarcon lahoja,
causandop{}rdidade control.
Asag_resede que lodes los tnrnillosde aJustey el
coporte de la baja est_n apretadosantes de hacer
on code. Si lostornil!osde ajestey los sopodes
estan flojos, puedenhacerque ia herramientao la
holerasbale, pudiendoproducirsep_rdidade
control.
* Rome de piflturasa base de piomo,
• S_icecfistalinade ladrfl]os
y cementoy otros
productosde mamposterfa,y
• Arsanicoy cremede readerstratadaqoirnicamente.
Su riesgoper causede estasexposicJones
varia.
dependiendode concu_ntafrecuenciareclineaste tipo
de trabajo.Parareducirsu exposicibn
a estosagentes
qu[micos: trabajeen an _res b[enventiisday trabaje
con equipode seouridadsprobado, come per ejemplo
mascarasantipo]voque estand[se_adas
aspasialmentepareimpedirmediaetefilbaci6nel paso
de padfculasrnicrosc6picas.
At quitar ta hoJade la herramlenta, evite el
contactoconla piel y use guanlesprotectores
adecuadosal agsrrar la bate e el accesorio. Los
accesoriospuedenester catientesdespu_sdel use
prolongado.
17
'
llll
I
Importante: Es posible que algonos de los simbolos siouientes se usen en su herrarnienta. Por favor,
est_dielos y aprenda su signffisado. Le interpretaci6nadecuada de estos simbctoe le permitir;i utiIizar la
herramientamejor y conm_s segur_ad,
Nombre
Designaci6n/explicacidn
V
Volt
Tensidn(potencial)
A
Ampere
Corriente
Hz
Hertz
Freeuencta(ciclospor segnndo)
W
Watt
Potencia
kg
Kilogramo
Peso
rain
Minuto
Tiempo
s
Segundo
Tiempo
Q
Di_metro
Tama_o de Ins brocas taladradoras,
Simbolo
muelas, etc.,
no
,.Jmin
0
1,2,3 ....
I, II, Iit,
VelocidadrotaeJonalsin _rga
Revoluciones
o _emacidnporminuto
Revolucionee,golpes, velocidadde
superficie,6rbitas, etc,, por minuto
Posici6n"ofF(apagado)
Velocidad nero, par motor cero...
Graduacionesdel selector
Graduacionesde velocidad,par motor o
posici6n. Un n_mero m_s altosignifica
mayor velocidadselector settings
SelectorInfin_mente variablecon
La velocidadaumenta desde la
apagado
graduaci6nde 0
-F
Flecha
Acci6n en la direceidn de la flecha
"X.,
Corriente alterna
Tipoo uoacaracteristica de corriente
Corrientecontinua
Tipo o una caracterietieade corriente
Cordente altema o continua
Tfpo o una caracter[stica
de corriente
Conslrneck_,n
de claseII
Designa las herramientas de construccidn
conelslamientodoble.
Terminal de toma de tierra
Terminal de conexi6n a tierra
Simbolode advertencia
Alerb al usoario sobre rnensajesIJe
advertencia
Selio RBRCTMde Ni-Cd=
Designael programa de reeiclajede batefias
de Ni-Cd
[]
@
@
(_
Velocidadsincarga
stesimboloindicaqueesta
herramieota
est_catalogada
(_
porUnderwriters
C
Laboratories,
, Esteslmbolo indite que esta
herramienta est_catalogada
pot la CanadianStandards
Association.
UnderwritersLaboratoriesha
catalogadoes|aherramienta
stesimboloIndica que
indicandoque cumpleIns
normas caoadisnsse.
E||!
_
C!k _I,,_US
18
Este simbolo indica que estn
herramientaest_ catalogadapor
Underwriters Laboratodesy que
Underwriters Laboratories la ha
cataiogadoseoOnlas normas
nanadienses.
i -e
Estesimbolo
indicaque esta
herramienta
cumple conla
nonnemexicana
oticial(NOM).
Desconecteel
enchufede
la fuente
de energiade
antes
de realizar
cualquierensambtaje
o
ajuste,o cambiar
accesorios.
Estasmedidas
seguridad
preventivas
reducen el riesgo
de arranc_r la herramientaaccidentalmente.
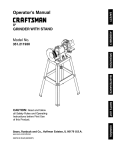
Sierra de vaiv_n
INTERRUPTOR
GATILLO
LLAVEALLEN5MM
DfALDEAJUSTEDE
PREFIJADA
DELGATILLO
CAM810DEHOJA
ABERTURAS
DE
VEHTILACION
PALAHCA
DELSOPLADOR
DEVIRUTAS
ORB_ADELAHOJA
RAHURASDEMOHTAJEDELAGUJADECORTE
EMSOLODE
LAHOJA
HOJA
PLACABASE
80TA: para obtener lasespecificaciones
de laherramienta,consulte
la placadei fabricantecolocadaen laherramient_
19
4. Con la hojaen la posiei6o adecuada,gire el bot6n 1
en el sentido de las agujas del reid] haste que se oiga
un sonido de "Clic" notable, indicando que le hoja
est&fija en su sitio,
Inslelact6n de la hoja
Coloque la palancaselectorade la 6rbita de la hoja 11
en la posiel6nIlL
1,Tiredelbot6ngiratoriodecambiode hoje1hacia
ardbahastedondesepueda.
5. Optima e! bot6n I pareque se desacople y
continuegirendodicho bot6n haste qae se encuentre
alineadoconla curvature del mangoy se pusda
oprimir de vueltasu posici6n normal. Ejerzepreel6n
haole abajo sobre el bot6n 1 basra que _ste se
encoentreal rascon el mangoy ta sierra de vaiv_n
queda lisle parela utilizaci6n.
2. Girelotree vaeltasen seetidocontraMo a] de lee
agujasdel reloj (vistodesdela parte superior de la
herramieota).
3. Introduzca la hojaen el 6mbolo de ]a hoja 5 a un
_ngulo de 90° respecto a! sentido de come.ConLena
ligerapresi6n haela arriba, gire los dientesde la hoja
haciaadelante (sentiMode come)y gale la parts
posteriorde la hojaal interiorde la ranuraque est_ en
el ceotrodel rodil]o guiador de la hoja12. Tirede la
hojahaole abajo suavemente para colocarlas
lenggetasde le hojaen el _mbolo.
•
I
Ouitar le hoja consistsesencialmenteen el proceedde
instalaci6n ala inversa.Sin embargo,ffJeseque una
vez qae se agoja el bot6n de cambiode hoja 1, se ha
de empujar suavsmente la hojahaciaarriba pare
soltardel _mbo!o las iengBetasde ]a hojaJnterraptor
gat]l]oy bot6n de
I
I
i
I
Poslci6n
"Fljacl6n en ON"
La sierra de vaiv_nse pusdeseconder(posici6n
"ON") o apagar (posici6n =OFF")apretando o
soltando el geti]!o.La sierra de vaiv_ntambi_n est_
equipada con on botchde "Fijaci6n en ON" ubicedo
justo sobre el gatiUo, el cael permite un
funelonamienlo continuosin tenor que apretar el
gatillo.
A_B
Golpelento
C-D
Gotpemediano
E
Golpe r_pido
Veloeided del 6mbolo
La veloeldadde corte de le sierra de vaiv_no
ve)ocidedde gnlpeo requeridadepends gel material
que se est_ cortando,del tipode hojautilizada y de la
velocidad de alimentacibn prefeddapor eloperador.
La mejor veloctdedpara unaaplicacibnespecificaest_
determlnada en gran padepor la experienela,aunque
cored regla general,lasvelocidadesm_s lentasson
paremateriales m_edensesy tasve!ocidadesm_s
r;_pidasparematerialesblandos,Tenga en cuentaque:
cuandola sierra de vaiv_nse utilicea baja velocidad
detentecaelquierperiodode tiempo,la temperature
del motor subir_ debido a one velocidadm_s Isnta del
ventiladorde refrigeraci6ninterno.En talescasos,de
vez en caandoes necesariohater functonar le
herramientaa todavelocidad durante unosminutos
paremantenerel motor funelonandoconalto
rendimiento.
PARA FIJARELINTERRUPTORENLA POSICION
"ON": apriete el gatillo, optimael bot6n y suelteel
gatillo.
PARADESBLOQUEAREL INTERRUPTOR:apriete el
gatlgoy su_ltelo sin oprimir el bot6nde "Fijael6n en
ON".
_Si
se opdmecontinoamenteel
bot6n de "Fijac_n en ON", no
ee puedesogarel gatigo.
Dial de eleste de aeloeided prelijada del gatillo
Este dispositivole permgea asted preajustarel gatlllo
a las velocidadesdeseadasgirando el dial 3 queest_
sobre el gatillo hasteunaposici6n re;is alta o m_s
baje. NoimpoMacaal sea la presi6nejercidasobre el
gatillo, [a herramientano funelonar_ m_isdeprisa que
la posici6nde veloeldadm_xima seleccionede.
2O
Orbila de la hoJa
La m_ximaeficienciade cartese puedeobtener
ajustando ta palancaseleetora de la 6rbita de ia hoja
pareadaptarseal materialque se est'. cortands.El
euadrosigulentele ayudar_ a determinerqu_ posiei0n
utilizerparesu aplicacibn.Estecuadrose destinapare
sentir de guia t_nicamente
y primem ee debenrealizer
codes de pruebaen material de des_chopare
determinaria mejor posici6n.
Peslcl_s 0
Posici6n I
Seplador de viretas
La sierrade vaiv_nest_equipadacon sn sopiador de
virutasde tree posieionespareayudar a manteneria
lines de code librede virutas,Medianteel ajuste de ia
paiancadel soplador de virutesse puedeaiterar la
tuerzadel aire descargadocome se indicaa
continueci6n:
"_
mstedales durostales come metales
o I_mines met_Hcasdelgadasy
utilJzadacon hojasde euchilIo,hojas
contile de grano abrasiveo trabajo
de respado.
materialesbiandos donde se realize
un eortem_s nitido o untrabajode
despiazamientocontinue delicado
Posiel6nII
maleriales de densidadmedia t,_les
come maderas m_ duraso tableros
hechosde part_ceiasde madera
Posici6nnl
materiales blandostales come
madera, pl_sticos,etc.
cci6nde soplado m_s fuertepa_'a
trabajaren maderas y materiales
simibres,
_
Aeci6ndesoplado
mediana.
Sin acci6ndesoplado.
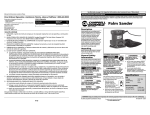
Ajustedel =ingulo de ta place base
La piecebasese puedeinclinerpare permitir codes
en _ngulo de hesla45° en cualquiarade ias dos
direcciones. Pare ajestar ia placebase, at!oje el
lornil]econ la liarsAHen,desliee ia piecebasshaciala
parte deianterade ia herramientay gire hestael
_ngulo deseado seg[in est_ mamado en ia escaiade
_ngulos, La ranura de ret6nsujetar_n la piaea base
firmemente a 90°. Los _ngulos intermediosse
puedenfijar con un transportadorde _ngulos.
Despu6sde solaceriaplacebass,aprietefirmaments
eltornilto.
TORNILLOB
PLACABASE
TRANSPORTADOR
DE
ANGULOS
(NoIncluidO)
21
Aeceseriu
inserei6n pare la place base
Los mudelo 7,,'ooo_xx,xx
aceptun dos aecesorios de
inserci6nde la piece-basequa puedencambiarse
quitendo Iosseistornillos(A). El accesurio de
inserci6nde ecerose utilica pare la mayoria de las
operacionesgeneralesde cortey el accesofio de
tnsorci6n de piPet!co]iso se podr_ utilizer pare
minimizer los ara_azos en superficies tines.
Aceesorio de Insercl6n antlestillas
Pare minimizer el astilludo de lasuperficie superior
de]materia! qua seest_ cortando,co]oqueel
accesorio de inserciSnantiastil!asen ]a aperture pare
Ia boja de Is place base.
Nets: Eatsacceeofio de Ineerci6nfuncionar_.
_nicamente con hojas quatienenladesamolados.
TORNILLO
ACCESORIO
DE
INSERCION
AHTIASTILLAS
ACCESORIO
DE-IHSERCI(_N
pAPALA
pLACABASE
pLACABASE
Corfe al ras
Pare permitir qua ia sierra realiceun corte
perpendicularceresde una superlicie vertical,la pTaca
basese puedecambiar de posiei6n come eigue.
Saque el tornillo(8), desplace;a place base hastela
ranura de montaje delaoteray asegOresede qua la
muesca de ret_n seencuentraalineadacon la ranura
de ret_n de la placebase. Vuelva a introducir el
torn!lie(B) en el agujero roscadom_s pr6ximoala
muesca de ret_n y apri_telofirmemente.Observequa
cuandose tetras lapleea base de esta manera
_eicamente se puedenrealizercortes de 90' y no sa
podr_utilizerla guia de torte opcionaL
_°"J
TORNILLO
i MUESCA
DE RETEN
ESCALADE
ANGULOS
NOFUERCE,ya qua esto nohar;iqua la sierracorte
m,_s_pido; dejequa la bojahagsel trabajo.
Aseg_rese
siempredequateepiezasdetrabajom_
pequefias
est_ sujetasdemanorsseguraaanbantu
oa otroapoyo.Lospansies
m_s grandessepueden
sujetarpermediodeabrazaderas
sobreun bunco
o
unoscaballeros
deaserrar.
Cuandosecorta metal, susieset aconssjableutilizer
unlubricants pareenfriarla hojay prolongerla vide
de _sta. SSpuedecomprarun lubricantsde hoies
opcionalseparadamente.
Pare comenzaruncode, marque claramentela lines
de cortey apoyela partsdelanterade la placebase
sobre la piezade trebajo.Accioneel interruptery
hagsqua la bojapenetreen la piezade trabujo
.tillzando _nicamente suficiente presi6n hacia
adelante pare mantenerla hoja cortandofirmemente.
Elijalee bojascuidadosamente,
ya queta capacidad
de ia sierra pareseguir curves,proporcionar
acabadosm_s lisoso cotter m_s r_pido est;t
directamenterelecionade conel ripe de hoja utiJizada.
22
,
I
Servicio
Centre de earvicioautofizade.Losrodamienteaquese
vuek,en ruidosos(debidoala pesadacargaoal cartede
materiales may abrasives)debeneer sust[tutdoe
inmediatamenteparaevitarel sebrecalentamieatooet
faIle delmeter.
_Et
mantenimiente pmve_lvo
malizade per persona]no
autottzadopudeder lugerala celocaci6nincorrecta
de cablesy componeniesInternesque podfia
eenstituirun pelIoroserie. Recomendamesquetodeel
earvicJode lasherramientas
seareali:zado
per en Centre
de sewicio de|_brieaSearse perunaEstaci6nde
senficio
Searsauteri_da_
Limpieza
_Para
evitar accideetes
desconectesiempre la
herremlenta de la feentede energl'eantes de la
IIrnpiezao de ta realizacJ6n
de cealqoier
manlenimienle.La herremJentesepuedelimpiar m,_s
eficazmentecon airecemprimideeace. Usegefes de
segaridadsiempreqea limpteherramientascen alre
cempdmida.
Lobdcaci6n de lee herramientas
Su herramientaha side lubricadaadecuadamentey
est_ lista pare la utilizaci6n.Serecomienda que las
herramientas cen engrenajessevuelvan a engrasar
con un lubrieante especialpareengranajesen cada
cambiode escobilIas.
Escobillasde carb6n
Las escobiII_
y elconm_dor de _ her_mientz,hen
side diseSadesparetouchesherasde ea_cio tiable.
Pare mantenerunrendimieato6ptimodel motor,
recomendamesqueeadadose seismesesse examinen
]asescobJlias.S6Iese debenuserescobiilasde repuesto
SearsgenuinasdiseSadas
especflicamenteparesu
herramienta.
Redamienlee
Despu_sde 300-400 haresde tuncioeamiento,o
despu_ de eadesegundocambiede escobi!las,
los
rodamientosdebencambiarseen on
Lasabertorasde ventilaci6n
y leepalancasde interrupter
debenmanteaerse]impiasy librssde meteriasextrafias.
No intents limpiar introdueiende
objetospuntiagudos
a
tray,s de lasaberturas.
_
Cierleaegentesde tlmpleza y
dieaiventesdaflanlas piezasde
pl_stJce,Ngunos de estessen: gasoline,tetraclorurede
carbono,disolventeade IJmpieza
cloralJos,
amonIacoy
detergentesdem_stieaaqeecontienenamenieeo.
Si ee necesario
un eerd_n
decapaz
extensi6n,
se debe user
cerd(1nconeenductoresde
tamaflo
adecuado
qoe sea
de Iranspertar
la un
corrieete
neeesaria pare la
herramlenla. Este evitar_ ea_dasde tensi6n excesivas, p_rdida de potencie o recalentamiento. Lee
herramientas cenectadasa tierra deben oear cordenes de extensi6n de 3 hiles qee tengan enehufesde 3
termioales y recept_ealespare3 terminales.
TAMAAOSRECOMENDADOS
DECORDOFJES
DEEXTENSION
HERRAMIENTASDE120 V CORRIEHTEALTERNA
dHcableen mrre
Z
Tamaflo
deI¢ordbn
enA.W.G, Tamal_o_
Capa¢idad
nominal
Longilu_l del €onl6nen pie_
Longiled deIcmd6n
eemenos
}n amperlosde
la herrarnienta
25
50 100 150
15
30
60 120
3"6
6-8
6-10
10"12
12-16
18
18
18
16
14
16
16
16
16
12
16
14
14
14
14
12
12
12
,75
.75
,75
1.0
.75
1.0
1.0
2.5
1.5
2.5
2.5
4.0
2.5
4,0
4.0
--
NOTA: CuentomtJspequeSeeeeln_merodecaiibre,
m_sgreasoeeelcord6n.
23
For in-homemajorbrandrepairservice:
Call24 hours a day, 7 days a week
1-800-4-MY-H01VIE'"
(1-800-469-4663)
Para pedir serviciode reparaci6n a domicilio- 1-800-676-5811
In Canadafor all your serviceand parts needscall
-1-800-665-4455
Au Canadapour toutle service ou los pi_ces
For the repair or replacementpartsyou need:
Call7 am - 7 pro,7 days a week
1-800-366-PART(1-800-366-7278)
Para ordenarpiezasConentregaa domicilio- 1-800-659-7084
For the location of a SearsPartsand RepairCenterin yourarea:
Call24 hours a day, 7 days a week
1-800-488-1222
For informationon purchasinga SearsMaintenanceAgreement
or to inquireaboutan existingagreement:
Call9 am - 5 pro, Monday- Saturday
1-800-827-6655
8EAFRS
HomeCentraF
The ServiceSideof Sears.
2610909051
9100
PRINTED IN U.S./L