1
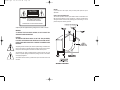
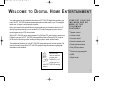
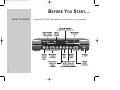
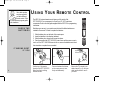
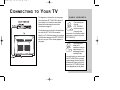
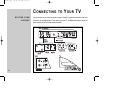
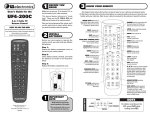
Digital Cable Set Top DCT1200 User Guide DIGITAL CABLE TELEVISION Choices. Control. Entertainment. part of your life 462487.QXD 9/1/98 2:36 PM Page iii CAUTION RISK OF ELECTRIC SHOCK DO NOT OPEN CAUTION: TO REDUCE THE RISK OF ELECTRIC SHOCK, DO NOT REMOVE COVER (OR BACK). NO USER-SERVICEABLE PARTS INSIDE. REFER SERVICING TO QUALIFIED SERVICE PERSONNEL. Graphical symbols and supplemental warning marking locations on bottom of converter. WARNING: TO PREVENT FIRE OR SHOCK HAZARD, DO NOT EXPOSE THIS APPLIANCE TO RAIN OR MOISTURE. CAUTION: TO PREVENT ELECTRICAL SHOCK, DO NOT USE THIS (POLARIZED) PLUG WITH AN EXTENSION CORD, RECEPTACLE, OR OTHER OUTLET UNLESS THE BLADES CAN BE FULLY INSERTED TO PREVENT BLADE EXPOSURE. The lightning flash with arrowhead symbol, within an equilateral triangle, is intended to alert the user to the presence of uninsulated dangerous voltage within the products enclosure that may be of sufficient magnitude to constitute a risk of electric shock to persons. The exclamation point, within an equilateral triangle, is intended to alert the user to the presence of important operating and maintenance (servicing) instructions in the literature accompanying the appliance. This installation should be made by a qualified service person and should conform to all local codes. REPAIRS: If you find the unit in need of repair, contact your cable system operator for repair or replacement. NOTE TO CATV SYSTEM INSTALLER This reminder is provided to call CATV system installers attention to Article 820-40 of the NEC that provides guidelines for proper grounding and, in particular, specifies that the cable ground shall be connected to the grounding system of the building, as close as possible to the point of cable entry as practical. 462487.QXD 9/1/98 2:36 PM Page iv IMPORTANT SAFEGUARDS 1. READ INSTRUCTIONS All the safety and operating instructions should be read before the appliance is operated. 2. RETAIN INSTRUCTIONS The safety and operating instructions should be retained for future reference. 3. HEED WARNINGS All warnings on the appliance and in the operating instructions should be adhered to. 4. FOLLOW INSTRUCTIONS All operating and use instructions should be followed. 5. CLEANING Unplug this product from the wall outlet before cleaning. Do not use liquid cleaners or aerosol cleaners. Use a damp cloth for cleaning. 6. ATTACHMENTS Do not use attachments not recommended as they may cause hazard. 7. WATER AND MOISTURE Do not use this equipment near water; for example, near a bath tub, wash bowl, kitchen sink, or laundry tub, in a wet basement, or near a swimming pool, and the like. 8. ACCESSORIES Do not place this product on an unstable cart, stand, tripod, bracket, or table. The product may fall causing serious injury and serious damage to the appliance. Use only with a cart, stand, tripod, bracket, or table recommended by the manufacturer, or sold with the equipment. Any mounting of the appliance should follow the manufacturers instructions, and should use a mounting accessory recommended by the manufacturer. 9. VENTILATION Slots and openings in the cabinet are provided for ventilation and to ensure reliable operation of the equipment and to protect it from overheating. The openings should never be blocked by placing the product on a bed, sofa, rug, or similar surface. Equipment should never be placed near or over a radiator or heat register, or in a built-in installation such as a bookcase or rack unless proper ventilation is provided. 10. POWER SOURCES This product should be operated only from the type of power sources indicated on the marking label. If you are not sure of the type of power supplied to your home, consult your local power company. For equipment intended to operate from battery power, or other sources, refer to the operating instructions. 11. GROUND OR POLARIZATION This equipment may be equipped with a polarized alternating-current line plug (a plug having one blade wider than the other). This plug will fit into the power outlet only one way. This is a safety feature. If you are unable to insert the plug fully into the outlet, try reversing the plug. If the plug should still fail to fit, contact your electrician to replace your obsolete outlet. Do not defeat the safety purpose of the polarized plug. 12. ALTERNATIVE WARNINGS This equipment may be equipped with a 3-wire grounding-type plug, a plug having a third (grounding) pin. This pin will only fit into a grounding-type power outlet. This is a safety feature. If you are unable to insert the plug into the outlet, contact your electrician to replace your obsolete outlet. Do not defeat the safety purpose of the grounding-type plug. 13. POWER CORD PROTECTION Power supply cords should be routed so that they are not likely to be walked on or pinched by items placed upon or against them, paying particular attention to cords at plugs, convenience receptacles, and the point where they exit from the appliance. 14. OUTDOOR ANTENNA GROUNDING If an outside antenna or cable system is connected to the equipment, be sure the antenna or cable system is grounded as to provide some protection against voltage surges and built-up static charges. Section 810 of the National Electrical Code, ANSI/NFPA No. 70, provides information with respect to proper grounding of the lead in wire to an antenna discharge unit, size of grounding conductors, location of antenna discharge unit, connection to grounding electrodes, and requirements to the grounding electrodes. See figure on previous page. 15. LIGHTNING For added protection for this equipment during a lightning storm, or when it is left unattended and unused for long periods of time, unplug it from the wall outlet and disconnect the antenna or cable system. This will prevent damage to the video product due to lightning and power line surges. 16. POWER LINES An outside antenna system should not be located in the vicinity of overhead power lines or where it can fall into such power lines or circuits. When installing an outside antenna system, extreme care should be taken to keep from touching such power lines or circuits as contact with them may be fatal. 17. OVERLOADING Do not overload wall outlets and extension cords as this can result in a risk of fire or electrical shock. 18. OBJECT AND LIQUID ENTRY Never push objects of any kind into this equipment through openings as they may touch dangerous voltage points or short-out parts that could result in a fire or electrical shock. Never spill liquid of any kind on the product. 19. SERVICING Do not attempt to service this equipment yourself as opening or removing covers may expose you to dangerous voltage or other hazards. Refer all servicing to qualified service personnel. 20. DAMAGE REQUIRING SERVICE Unplug this equipment from the wall outlet and refer servicing to qualified service personnel under the following conditions: a. When the power supply cord or plug is damaged. b. If the equipment has been exposed to rain or water. c. If liquid has been spilled, or objects have fallen into the equipment. d. If the equipment does not operate normally by following the operating instructions. Adjust only those controls that are covered by the operating instructions as an improper adjustment of other controls may result in damage and will often require extensive work by a qualified technician to restore the equipment to its normal operation. e. If the equipment has been dropped or cabinet has been damaged. f. When the equipment exhibits a distinct change in performance, indicating a need for service. 21. REPLACEMENT PARTS When replacement parts are required, be sure the service technician has used replacement parts specified by the manufacturer or have the same characteristics as the original part. Unauthorized substitutions may result in fire, electric shock, or other hazards. 22. SAFETY CHECK Upon completion of any service or repairs to this video product, ask the service technician to perform safety checks to determine that the product is in proper operational condition. 23. TELEPHONE EQUIPMENT Observe the following precautions when installing telephone modem equipment: a. Never install telephone wiring during a lightning storm. b. Never install telephone jacks in a wet location unless the jack is specifically designed for wet locations. c. Never touch uninsulated telephone wires or terminals unless the telephone lines have been disconnected at the network interface. d. Use caution when installing or modifying telephone lines. 462487.QXD 9/1/98 2:36 PM Page v DCT 1000/1200 U SER G UIDE W ELCOME D IGITAL H OME E NTERTAINMENT . . . . . . . . . . . . . . . PAGE 1 B EFORE Y OU S TART ...C HECK I T O UT . . . . . . . . . . . . . . . . . . . . . PAGE 2 U SING Y OUR R EMOTE C ONTROL . . . . . . . . . . . . . . . . . . . . . . . . P A G E 4 C ONTROLLING PAGE 6 Y OUR TV . . . . . . . . . . . . . . . . . . . . . . . . . . . . P A G E 7 TO C ONNECTING H AVING A THE TO DCT 1000/1200 . . . . . . . . . . . . . . . . . . . . . P ROBLEM ? . . . . . . . . . . . . . . . . . . . . . . . . . . . . . . . P A G E 11 462487.QXD 9/1/98 2:36 PM Page 1 W ELCOME TO D IGITA L H OME E NTERTAINMENT Your cable operator has just installed the state-of-the-art DCT 1000/1200 digital cable terminal in your home. The DCT 1000/1200 brings unsurpassed digital audio and video quality to your TV viewing. But whats more, its simple to set up and easy to operate. Easy to use menus and the optional electronic program guide give you convenient control of your TV viewing. By pressing a few keys you can see whats on TV, select the program you want, set-up to record programs on your VCR, and much more. With the DCT 1000/1200 you can easily purchase a Pay-Per-View (PPV) special event or recent movie. If offered in your area, the DCT 1000/1200 also supports Near Video on Demand (NVOD). Using the NVOD service is like renting a video, including the ability to pause, rewind, and fast forward. This handbook will introduce you to the DCT 1000/1200 and acquaint you with its basic operation. Full access to the many features of the DCT 1000/1200 is gained through the electronic program guide, described in its own handbook. Be sure to also read your electronic program guide handbook so youll get the most out of all the DCT 1000/1200s exciting features. YOUR DCT 1000/1200 INCLUDES ONE OR MORE OF THE FOLLOWING FEATURES: n Remote control n Volume control n Parental control n Favorite channel recall n Sleep and alarm timers n Easy PPV purchases n Electronic program guide n NVOD n Digital audio 1 462487.QXD 9/1/98 2:36 PM Page 2 B EFORE Y OU S TART... FRONT FEATURES 2 To operate the DCT 1000/1200, press the buttons on the front of the unit or on your remote control. A /B IN SW IT C H M OD U LE R F B Y PASS M OD U LE R F B Y PASS M OD U LE D U A L A/B- REAR CONNECTIONS 462487.QXD 9/1/98 2:36 PM Page 4 Your cable operator may have provided you with a different remote control. Refer to your electronic program guide user handbook. CHECK THE BATTERIES U S I N G Y OUR R EMOTE C ONTROL The XRC 100 universal remote control gives you full control of the DCT 1000/1200. You can program it to control your TV, VCR, and stereo components. Refer to the user guide supplied with the XRC 100 for programming instructions. But before you can use it, you must be sure that two AA alkaline batteries are installed in the remote. To install or replace the batteries: 1 Slide the battery door on the back of the remote open. 2 Insert the batteries in the direction indicated. 3 Slide the battery door closed until it snaps into place. 4 Point the remote at the DCT 1000/1200, press CABLE and then press POWER to turn it on. If the DCT 1000/1200 does not turn on, remove the batteries and check their orientation or replace them as needed. IT WORKS BEST IF YOU 4 Aim the top of the remote directly at the DCT 1000/1200. Make sure theres nothing between the two. Press and release the buttons on the remote one at a time, firmly and deliberately. Be sure the TV is tuned to the cable channel (3 or 4). Ask your cable installer which to use in your area. Seaside Digital Cable 4-in-1 Universal RemoteControl 462487.QXD 9/1/98 2:36 PM Page 6 C ONTROLLING THE DCT 1000/1200 You can control power on/off, channel selection, and volume control directly with the front-panel controls on the DCT 1000/1200 or with the remote control. Refer to your electronic program guide handbook to see how easy it is to use. To use the remote control, it must be set to the cable TV mode. If the remote control doesnt seem to be working, try pressing the CABLE key so that the remote knows to control your cable terminal. Your DCT 1000/1200 may be equipped with an RF bypass switch that enables you to use all the features of a cable-ready TV when the DCT 1000/1200 is off. If this is the case, the only time you must turn the DCT 1000/1200 on is when you want to watch a premium channel or purchase a PPV event. To switch between viewing through the TV and viewing through the DCT 1000/1200, press the BYPASS key on your remote control when the DCT 1000/1200 is on. TURN ON AND OFF To turn the DCT 1000/1200 on or off, press POWER on the front panel or press CABLE and then press POWER on the remote control. SELECT CHANNEL WITH UP/DOWN KEYS To step through channel selection, press the CHANNEL keys on the front panel or CHAN on the remote control. SELECT CHANNEL BY ENTERING NUMBER To go directly to the channel you want, enter its number using the numeric keys on the remote control. CONTROL VOLUME LEVEL MUTE THE SOUND 6 To control volume, press VOL on the remote control. To mute sound, press MUTE on the remote control. To restore sound, press MUTE again. 462487.QXD 9/1/98 2:36 PM Page 7 C ONNECTING TO Y OUR TV The diagrams on this and the next two pages show three basic DCT 1000/1200 hookups. If your hookup is not one of the ones shown, please take a few minutes to record the connections on page 10. The hookup shown on the left is the most basic one, with the DCT 1000/1200 connected directly to a TV. With this hookup you can enjoy all of the basic features of the DCT 1000/1200, but cant use your VCR to record programs or play tapes. BASIC HOOKUPS Disconnect power from the DCT 1000/1200 before moving it or changing cable connections. Do not place another component or object on top of the DCT 1000/1200. This setup will not allow you to experience stereo on digital channels. To enable digital stereo, including Dolby® surround sound, you must connect the DCT 1000/1200 to a properly equiped stereo receiver using the baseband RCA-type jacks on the back of the DCT 1000/1200 (refer to the diagram later in this guide). 7 462487.QXD 9/1/98 2:36 PM Page 8 C ONNECTING BASIC HOOKUPS CONTD The hookup shown on the right adds a VCR. The VCR is connected so that you can record the program you are watching, including PPV events. You can also play tapes just as you do now. For best viewing of copy-protected programs, turn your VCR off or set the TV/VCR switch to the TV position. Some PPV programs are licensed from producers as view only. These are copyrighted programs that may not be copied or reproduced for any purpose without the express, written permission of the copyright owner. 8 TO Y OUR TV 462487.QXD 9/1/98 2:36 PM Page 9 C ONNECTING TO Y OUR TV You can use this hookup if you have a TV/monitor with a video input and want to listen through a stereo receiver. In this example, a CD player is also connected to the receiver through the loop-through terminals of the DCT 1000/1200. All video and audio connections are made through cables equipped with RCA-type jacks. The DCT 1000/1200 can also directly feed a stereo TV using the same baseband RCA-type audio jacks. WITH SOUND THROUGH YOUR STEREO SYSTEM When setting up your home entertainment center, do not place another component or object on top of the DCT 1000/1200. 9 462487.QXD 9/1/98 2:36 PM Page 10 C ONNECTING RECORD YOUR HOOKUP 10 TO Y OUR TV If your hookup is not one of the ones shown on pages 7 through 9, spend a few minutes to draw in the connections on the diagram below. If you need to move your TV, the diagram will help you restore the proper connections with minimum service interruption. 462487.QXD 9/1/98 2:36 PM H AVING Page 11 A P ROBLEM ? T H I S M AY B E T H E C A U S E T RY T H I S THE PROBLEM Accidentally pressed MUTE on the remote control. Press MUTE on the remote control to restore the volume level. NO SOUND Cable signal may not be reaching your home. Check to be sure that all cables are connected properly and that your TV is tuned to the cable channel (3 or 4). If you are still not receiving a cable signal, call your cable company. NO PICTURE Coaxial cable is disconnected or loose. Reconnect the cable. PICTURE OR SOUND IS NOISY ON ONE CHANNEL Cable connections are disconnected or loose. Reconnect all cables properly. Ensure that no wires are frayed and no plugs are bent or broken. SOUND FROM ONLY ONE STEREO SPEAKER Power cord is disconnected. Reconnect the power cord. Ensure that the DCT 1000/1200 is plugged into an outlet that is always live. NO POWER Dead batteries. Change the batteries in your remote control according to the instructions on page 4. REMOTE CONTROL DOESNT WORK Obstruction between remote and cable terminal. Ensure that nothing is on the DCT 1000/1200 or blocking a clear line of sight between it and the remote control. Remote isnt set in cable TV mode. Press CABLE on the remote control. 11 DIGITAL CABLE TELEVISION Choices. Control. Entertainment. part of your life