1
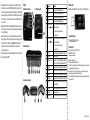
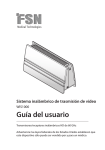
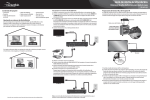
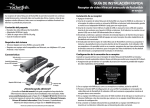
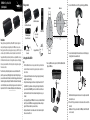
RF-WHD210 I 4-port Wireless HD Kit
Quick Setup Guide
Package contents
2 Connect the WirelessHD receiver to the TV or projector with a high-speed HDMI cable.
Top view
Side view
Transmitter
16.4 ft. (5 m)
60 GHz WirelessHD receiver
Transmitter
60 GHz WirelessHD transmitter
Introduction
Thank you for purchasing the Rocketfish 4-port WirelessHD Kit. This product is designed to
wirelessly send fully uncompressed signals from up to four HDMI source devices, such as a
Blu-ray player, cable/satellite set-top box, gaming console, laptop, etc., to a HDTV or projector
at a distance of up to 30 feet within the same room. It is important to note that the 60 GHz
frequency with which this product transmits provides the necessary bandwidth to send every
bit of information from the source device to the display with no compression or bit dropping,
but does not penetrate wall or floors. Therefore, this product is not designed to send signals
from one room to another.
Please follow the steps in this Quick Setup Guide to ensure a successful installation of this
product. If you experience any difficulty setting the product up after referring to this guide,
please consult the more detailed User Guide, also included in the package, which contains some
troubleshooting techniques that may help. If the additional instructions and troubleshooting
section of the User Guide prove unsuccessful for your setup, please contact our customer service
department at 800-620-2790 or visit www.rocketfishproducts.com for additional assistance.
High-speed HDMI cables (2)
16.4 ft.
(5 m)
16.4 ft. (5 m)
Floor
82°
Receiver
OR
16.4 ft.
(5 m)
3 Connect the included AC adapters for the transmitter and receiver to the DC input jacks,
then plug them both into an available AC outlet.
Setting up the WirelessHD Kit
Tips:
• The WirelessHD transmitter and receiver are pre-paired at the factory, and should discover
each other within about one minute after being set up and powered on as described in
these instructions.
• Test the placement of the transmitter and receiver for a good signal prior to permanently
mounting or installing everything.
• For best performance and range, mount the receiver vertically on the wall next to the TV
(not behind the TV), or upside-down on the ceiling next to the projector. Make sure that
you can see the Rocketfish and WiHD logos on the receiver from the location in the room
where the transmitter is located. For more details about mounting the receiver, see your
User Guide.
• Use only good quality high-speed HDMI cables for all connections, such as Rocketfish brand
cables. Poorly constructed HDMI cables can negatively impact performance and may not
support all of the features included in your connected devices.
• Do not place the transmitter or receiver inside a cabinet or other location where they will
not have a clear view of the room.
HDMI cable
47°
AC power adapter
for receiver
82°
AC power adapter
for transmitter
Receiver
32.8 ft.
(10 m)
Remote control
Wall mounting bracket
(for use with the receiver)
47°
32.8 ft.
(10 m)
1 Connect your HDMI source devices (up to four) to the WirelessHD transmitter with
high-speed HDMI cables.
HDMI cable(s)
Note: The included AC adapters are labeled to ensure the correct adapter is used with the
transmitter and receiver.
4 Power on the TV or projector and at least one of the source devices that is connected to the
transmitter.
Note: Be sure the TV or projector is switched to the HDMI input to which the WirelessHD
receiver is connected.
5 Switch the Power switches on the transmitter and receiver to the ON position (it does not
matter which one you power on first). The HDMI input port LED on the transmitter should
light continuously (stop blinking) to indicate that the desired input is selected. If this doesn't
happen automatically, use the included remote control or HDMI Select Switch on the back of
the transmitter to select the desired input port. For more details on HDMI port switching,
see your User Guide.
Note: The Power and Link Status indicator LED will flash while the transmitter and receiver
establish a connection. Once the connection has been established, these indicators will light
continuously (stop flashing).
Note: The transmitter and receiver are pre-paired and should discover each other shortly
after being powered on. However, should you experience an excessively long delay (over five
minutes) for the link to be established, press the HDMI/WVAN switch on the back of the
transmitter for at least three seconds to establish the link (the receiver must also be
powered on during this process).
For more detailed instructions on operating the WirelessHD kit, please refer to the included User
Guide section, “Using the WirelessHD kit”.
Features
Transmitter front/top panel
Receiver front/top panel
#
Component
Description
Remote control
1
2
3
4
5
HDMI 4
HDMI 3
HDMI 2
HDMI 1
Power and link status
indicator (transmitter)
Note: Remove the plastic film from the remote control before to using it for the first time.
6
Power and link status
indicator (receiver)
Lights to indicate that this HDMI input is selected.
Lights to indicate that this HDMI input is selected.
Lights to indicate that this HDMI input is selected.
Lights to indicate that this HDMI input is selected.
Blinking—Power is on and the transmitter is in sleep mode or
searching for the receiver.
On—The transmitter and receiver are linked.
Off—The power is off.
Blinking—Power is on and the receiver is in sleep mode or
searching for the transmitter.
On—The transmitter and receiver are linked.
Off—The power is off.
Connect the power adapter labeled “Transmitter” to this jack.
Turns the unit on or off.
Press quickly (<1 second) to switch HDMI inputs; or hold for at
least 3 seconds to join a Wireless Video Area Network (WVAN).
Connect an HDMI source device with a high-speed HDMI cable.
Connect an HDMI source device with a high-speed HDMI cable.
Connect an HDMI source device with a high-speed HDMI cable.
Connect an HDMI source device with a high-speed HDMI cable.
Connect this port to an HDMI input on the TV or projector, using
high-speed HDMI cable.
Connect the power adapter labeled “Receiver” to this jack.
Turns the receiver on or off.
Insert HDMI cable into these clips for receiver placement stability.
Transmitter back panel
Receiver back and side panels
7
8
9
DC IN jack
Power switch
HDMI select switch
10
11
12
13
14
HDMI 1 jack
HDMI 2 jack
HDMI 3 jack
HDMI 4 jack
HDMI jack
15
16
17
DC IN jack
Power switch
Cable routing clips
One-year limited warranty
Visit www.rocketfishproducts.com for details.
Contact Rocketfish:
For customer service, please call 1-800-620-2790.
www.rocketfishproducts.com
Distributed by Best Buy Purchasing, LLC
7601 Penn Avenue South, Richfield, MN 55423-3645 USA
© 2011 BBY Solutions, Inc., All Rights Reserved. ROCKETFISH is a trademark of BBY Solutions, Inc. All other products
and brand names are trademarks of their respective owners.
Best Buy Imports, S. de R.L. de C.V. Av. Santa Fe 485, Segundo Piso, Colonia Cruz Manca, Programa Parcial de
Desarrollo Santa Fe, Delegación Cuajimalpa, Distrito Federal, México 05349
© 2011 Best Buy UK Distributions Limited. All rights reserved. Distributed by Best Buy Europe Distributions Limited.
1 Portal Way, London W3 6RS
ENGLISH 11-0538