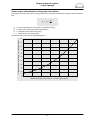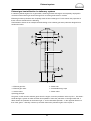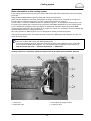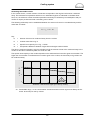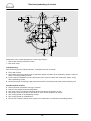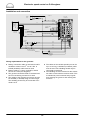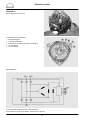
1
Foreword Dear Customer The purpose of these installation instructions is to: D Provide assistance and advice during the installation of stationary MAN industrial diesel engines of the model series D 0836 and D 2866 / D 2876 / D 2848 / D 2840 / D 2842 D Establish the conditions for trouble−free operation and avoid installation-related malfunctions and any consequential damage Area of application These installation instructions apply to the installation of stationary industrial diesel engines as drive systems for generator centrifugal pumps and power engines. They also cover the version of engines with electronic GAC regulation. Deviating regulating systems, e.g. Bosch EDC, are described in separate descriptions allocated to each engine version. General regulations The installation and operation of MAN diesel engines must satisfy all legislation and regulations valid at the place of use and for the type of operation. Warranty Warranty claims against MAN will be accepted only if these installation instructions have been complied with. All previous installation instructions for MAN industrial diesel engines are replaced herewith. Within the framework of development, MAN reserves the right to make changes of a technical nature. On request and against payment, MAN will perform acceptance tests for installations. Certifications of prototypes are only valid for series installations, provided that no retroactive modifications are carried out. If you intend to modify an engine subassembly which has been acceptance-tested by MAN, you must notify MAN in writing as renewed acceptance testing may be required. Kind regards MAN Nutzfahrzeuge Aktiengesellschaft Nuremberg Subject to technical alterations due to continuing development. © 2005 MAN Nutzfahrzeuge Aktiengesellschaft Reprinting, copying or translation, even of extracts, are not allowed without written permission from MAN.All rights under copyright laws are strictly reserved by MAN. MTDB Technical Status: 12.2005 1 51.99493−8444 Contents Page Foreword . . . . . . . . . . . . . . . . . . . . . . . . . . . . . . . . . . . . . . . . . . . . . . . . . . . . . . . . . . . . . . . . . . . . . . . . . . . . . . . . Safety regulations . . . . . . . . . . . . . . . . . . . . . . . . . . . . . . . . . . . . . . . . . . . . . . . . . . . . . . . . . . . . . . . . . . . . . . . . Engine vicinity . . . . . . . . . . . . . . . . . . . . . . . . . . . . . . . . . . . . . . . . . . . . . . . . . . . . . . . . . . . . . . . . . . . . . . . . . . . Definition of engine output of engines for gensets . . . . . . . . . . . . . . . . . . . . . . . . . . . . . . . . . . . . . . . . . . . . . Calculation of engine output of engines for gensets . . . . . . . . . . . . . . . . . . . . . . . . . . . . . . . . . . . . . . . . . . . Measuring the engine output of engines for gensets . . . . . . . . . . . . . . . . . . . . . . . . . . . . . . . . . . . . . . . . . . . Load application and control conditions for genset engines . . . . . . . . . . . . . . . . . . . . . . . . . . . . . . . . . . . . . Engine output of engines to drive pumps . . . . . . . . . . . . . . . . . . . . . . . . . . . . . . . . . . . . . . . . . . . . . . . . . . . . Access to the engine . . . . . . . . . . . . . . . . . . . . . . . . . . . . . . . . . . . . . . . . . . . . . . . . . . . . . . . . . . . . . . . . . . . . . . Engine room ventilation . . . . . . . . . . . . . . . . . . . . . . . . . . . . . . . . . . . . . . . . . . . . . . . . . . . . . . . . . . . . . . . . . . . Engine mountings . . . . . . . . . . . . . . . . . . . . . . . . . . . . . . . . . . . . . . . . . . . . . . . . . . . . . . . . . . . . . . . . . . . . . . . . Power take-off . . . . . . . . . . . . . . . . . . . . . . . . . . . . . . . . . . . . . . . . . . . . . . . . . . . . . . . . . . . . . . . . . . . . . . . . . . . Transmission of power by propshafts . . . . . . . . . . . . . . . . . . . . . . . . . . . . . . . . . . . . . . . . . . . . . . . . . . . . . . . . Air intake system . . . . . . . . . . . . . . . . . . . . . . . . . . . . . . . . . . . . . . . . . . . . . . . . . . . . . . . . . . . . . . . . . . . . . . . . . Exhaust system . . . . . . . . . . . . . . . . . . . . . . . . . . . . . . . . . . . . . . . . . . . . . . . . . . . . . . . . . . . . . . . . . . . . . . . . . . Cooling system . . . . . . . . . . . . . . . . . . . . . . . . . . . . . . . . . . . . . . . . . . . . . . . . . . . . . . . . . . . . . . . . . . . . . . . . . . Intercooling . . . . . . . . . . . . . . . . . . . . . . . . . . . . . . . . . . . . . . . . . . . . . . . . . . . . . . . . . . . . . . . . . . . . . . . . . . . . . . Electrical preheating of coolant . . . . . . . . . . . . . . . . . . . . . . . . . . . . . . . . . . . . . . . . . . . . . . . . . . . . . . . . . . . . . Fuel system . . . . . . . . . . . . . . . . . . . . . . . . . . . . . . . . . . . . . . . . . . . . . . . . . . . . . . . . . . . . . . . . . . . . . . . . . . . . . Flame starting system . . . . . . . . . . . . . . . . . . . . . . . . . . . . . . . . . . . . . . . . . . . . . . . . . . . . . . . . . . . . . . . . . . . . Electronic speed control on D 08 engines . . . . . . . . . . . . . . . . . . . . . . . . . . . . . . . . . . . . . . . . . . . . . . . . . . . . Electronic speed control on D 28 engines . . . . . . . . . . . . . . . . . . . . . . . . . . . . . . . . . . . . . . . . . . . . . . . . . . . . Electrical system . . . . . . . . . . . . . . . . . . . . . . . . . . . . . . . . . . . . . . . . . . . . . . . . . . . . . . . . . . . . . . . . . . . . . . . . . Appendix . . . . . . . . . . . . . . . . . . . . . . . . . . . . . . . . . . . . . . . . . . . . . . . . . . . . . . . . . . . . . . . . . . . . . . . . . . . . . . . . Coolant hoses . . . . . . . . . . . . . . . . . . . . . . . . . . . . . . . . . . . . . . . . . . . . . . . . . . . . . . . . . . . . . . . . . . . . . . . . . . . Recommended values for assignment: Starter, battery size and starter cable . . . . . . . . . . . . . . . . . . . . . Wiring diagram . . . . . . . . . . . . . . . . . . . . . . . . . . . . . . . . . . . . . . . . . . . . . . . . . . . . . . . . . . . . . . . . . . . . . . . . . . Index . . . . . . . . . . . . . . . . . . . . . . . . . . . . . . . . . . . . . . . . . . . . . . . . . . . . . . . . . . . . . . . . . . . . . . . . . . . . . . . . . . . 2 1 3 6 7 9 11 12 15 16 18 21 26 29 32 34 45 56 59 61 66 67 69 73 75 78 82 83 85 Safety regulations General Important safety regulations are summarised in this quick−reference overview and arranged by topic to effectively convey the knowledge necessary to avoid accidents causing injury, damage or environmental hazards. Additional information can be found in the Operator’s Manual for the engine. Important: Should an accident occur despite all precautionary measures, particularly one involving contact with corrosive acid, penetration of fuel into the skin, scalding by hot oil, antifreeze splashing into the eyes etc. you must seek medical assistance immediately. 1. Regulations designed to prevent accidents with injury to persons Checks, setting jobs and repair work must be carried out by authorised skilled personnel only. D When carrying out maintenance and repair work, ensure that the engine cannot be accidentally started by unauthorised persons. D The engine may only be started and operated by authorised personnel. D When the engine is running, do not get too close to the rotating parts.Wear closely-fitting working clothes. D Do not touch hot engine with bare hands: Risk of burns. ËË D Keep area surrounding engine, ladders and stairways free of oil and grease. Accidents caused by slipping can have serious consequences. D Only work with tools which are in good condition. Worn spanners / wrenches slip: Danger of injury. D Persons must not stand under an engine suspended on a crane hook. Keep lifting gear in good order. D Open the coolant circuit only when the engine has cooled down. If opening the coolant circuit while the engine is hot is unavoidable, observe the instructions in the chapter “Maintenance and care” in the Operating Instructions. D Do not tighten or undo pipes and hoses under pressure (lubricating oil circuit, coolant circuit and any downstream hydraulic oil circuits). The fluids which escape can cause injury. D When checking the injection nozzles, do not hold your hands in the fuel jet. Do not inhale fuel vapour. 3 Safety regulations D When working on the electrical system, first disconnect the earth cable of the battery and reconnect this last to prevent short circuits. D Follow the manufacturer’s instructions for handling batteries. Caution: Battery acid is toxic and caustic. Battery gases are explosive. D When performing welding work, observe the “Notes for welders”. 2. Regulations designed to prevent damage to engine and premature wear D The engine must be cleaned thoroughly prior to repair. Ensure that dirt, sand or foreign matter cannot get into the engine during repair work. D If engine operation is disrupted, immediately determine the cause and have it remedied to prevent additional damage. D Only ever use genuine MAN parts. Installation of “equally good parts” from other suppliers may cause severe damage for which the workshop carrying out the work is liable. D Never allow the engine to run dry, i.e. without lubricant or coolant. Appropriate notices must be attached to engines that are not in an operable condition. D Use only MAN−approved service products (fuel, engine oil, antifreeze and anti-corrosion agent). Maintain a high standard of cleanliness. Diesel fuel must be free of water. D Do not fill engine oil beyond the max. notch on the dipstick. Do not exceed the maximum permissible engine inclination. The engine may be seriously damaged if these instructions are not adhered to. D Control and monitoring devices (charge control, oil pressure, coolant temperature) must be in perfect working order. D Observe the instructions for operating the alternator; see chapter “Maintenance and care” in the Operating Instructions. 4 Safety regulations 3. Regulations designed to prevent pollution Engine oil and filter cartridges and elements, fuel / fuel filters D Old oil must be passed on for recycling. D Take strict precautions to ensure that no oil or diesel fuel gets into the drains or the ground. Caution: The drinking water supply could be contaminated. D Filter elements are classed as dangerous waste and must be treated as such. Coolant D Treat undiluted corrosion protection agents and / or antifreeze as hazardous waste. D When disposing of used coolant, the regulations issued by the relevant local authorities must be observed. 4. Notes on safety in handling used engine oil* Prolonged or repeated contact of any kind of engine oil with the skin causes the skin to degrease, which may result in dryness, irritation or inflammation. Old engine oil also contains hazardous substances that may cause skin cancer. Handling old engine oil does not pose any health hazard if the basic safety and hygiene-related regulations are observed. Health and safety regulations: D Avoid prolonged, repeated contact of old engine oil with the skin. D Use a suitable skin protection agent or wear protective gloves. D Clean the skin that has been in contact with engine oil. − Wash yourself thoroughly with soap and water. A nailbrush is an effective aid. − Special hand cleaning agents facilitate cleaning soiled hands. − Do not use petrol, diesel fuel, gas oil, fluxes or solvents as cleaning agents. D After washing, apply moisturising hand cream to your skin. D Change oil−soaked clothes and shoes. D Do not put any oil-soaked cloths into pockets. Pay meticulous attention to the proper disposal of old engine oil. − Old oil is a water hazard − For this reason, do not pour any old oil into the ground, the drains or the sewerage system. Any violation of this rule is punishable. Collect and dispose of old engine oil properly. For information concerning collection points, contact seller, supplier or the local authorities. ∗ Based on the “Notes on how to handle old engine oil”. 5 Engine vicinity The engine vicinity is gaining increasing importance for assessing the installation situations for modern diesel engines. The following reasons are decisive for this development: D The engines used nowadays are almost without exception turbocharged engines with intercoolers of high power density, as these achieve low fuel consumption and low exhaust emissions. In these engines, the slightest installation errors may lead to operating faults or damage, particularly if the engines are used continually in heavy-duty operation. Along with the power density, the necessary mass flows for combustion air, coolant, cooling air and exhaust gases to be supplied to and conducted away from the engine have also increased. D Emission−curbing regulations which cannot be met using internal engine measures necessitate the use of soot filters and catalytic converters. Incorrect design or faults in exhaust-gas cleaning devices cause operating faults or damage to the engine. D For stationary engines for driving generators, authorities are increasingly granting permits for the operation with subsidised fuel only if the primary energy used is being exploited to a high degree. This stipulation leads to the utilisation of thermal energy in coolant and exhaust gases. Using heat exchangers entails additional risks for the engine’s operational reliability if improper design causes faulty cooling and combustion. Therefore, when analysing operating faults, check the influence of all components in the vicinity of the engine to see whether they have any bearing on the engine’s operating conditions. 6 Definition of engine output of engines for gensets Definitions of rated output for genset engines The performance definitions for genset engines are laid down in the ISO 8528 standard. There, the following definitions can be found (excerpt from ISO 8528): Genset continuous power (COP = Continuous power) Genset continuous power is defined as the power which a genset can generate during an unlimited operating period per year assuming compliance with set maintenance intervals and given environmental conditions, maintenance work having to be carried out in accordance with the manufacturer’s regulations. The collective load is 100%. Rating Power limit Continuous power P1 P3 P2 P4 Time Variable prime power (PRP) Variable prime power is defined as the maximum power available during a variable power sequence during an unlimited operating period per year. Maintenance work is to be carried out in accordance with the manufacturer’s regulations. The permissible mean power output Ppp during 24 h must not exceed a certain percentage of variable genset prime power specified by the manufacturer of the reciprocating internal combustion engine. For calculations of the actual mean power output Ppa, outputs of less than 30% of variable genset prime power are to be included in the respective calculation as 30% outputs. Downtimes are not to be included in the calculation. The actual mean output is calculated as follows: P pa + P1 t 1)P2 t 2)P 3 t 3)AAA)P n t 1)t 2 ) t 3)AAA ) t n tn P1, P2, P3 ... stand for power per period of time is t1, t2, t3 .... In practice, this mostly results in use of 70% of continuous power on average (empirical value). It is important that the power output be intermittent. 7 Definition of engine output of engines for gensets Power limit Continuous power Power P3 P4 P1 P6 Permissible mean power output during 24 hours P2 Current mean power output during 24 hours 30% t = standstill 5 P5 t 1 t 2 t 3 t 4 t 5 t 6 t Time 7 Remarks: D Non-compliance with the preconditions specified will limit the service life of the reciprocating internal combustion engine. D Downtimes are not to be included in the calculation. D The period of operation at variable prime power should be long enough for the generator to reach a stable thermal condition. Limited−time running power (LTP) A genset can generate limited−time running power for 500 hours per year under the respective environmental conditions. The genset may be up and running for a period of 300 consecutive hours. Maintenance work is to be carried out in accordance with the engine manufacturer’s regulations. Please note that operation at rated output may affect the service life of the genset. Power Power limit Limited time running power P1 P2 P3 Time The period of operation at limited−time running power should be long enough for the generator to reach a stable thermal condition. 8 Calculation of engine output of engines for gensets Calculation of the power output of gensets Generator efficiency The generator does not run without loss. In the power output range from 600 − 100 kVA, approximately 4 − 8% of the supplied mechanical output is dissipated as heat into the environment. Generator efficiency 1.00 0.95 0.90 0.85 100 200 300 400 500 600 Generator output in kVA Genset efficiency (electrical power output) P elektr. + PMotor hGen. Pelectr. = genset efficiency (electrical power output) in kWe Pengine = net power output of the diesel engine, i.e. minus the power output for the fan in kW hGen. = efficiency of the alternator (0.92 to 0.96 depending on make and size) 9 Measuring the engine output of engines for gensets Estimate of the engine output on a genset engine On estimating the utilisation of an industrial or railway engine, it is not usually known what exact power is required at each operating point. The comparison of secondary variables such as charging pressure or exhaust temperature at the object on site with test unit data is too imprecise, as the set-up and operating conditions usually differ. In the case of generator drive engines, however, the engine load can be determined in each case relatively simply if the following variables are known: D The rotational speed of the engine (in Europe normally 1500 rpm, accordingly to a mains frequency of 50 Hz; in the USA and Japan 1800 rpm corresponding to a mains frequency of 60 Hz in the case of a bipolar generator). D The generator current I of each phase in Ampères. D The alternator voltage U in Volts (usually 400 V). D The efficiency η of the generator. D The reactive factor cos ϕ, determined by varometers in the control cabinet. If such a device is unavailable, it is to be assumed that in the case of “mixed consumer units” a cos ϕ of 0.8 delivers useful calculation results. In the case of consumer units with a high resistive load component (heating, light sources, no electric motors), the cos ϕ can rise up to value 1. With mains parallel operation, the value for cos ϕ is to be set as 1 as a general principle. The following relationships can be derived from these known variables: Usually, the engine has to drive not only the generator but also the fan for the radiator, i.e. the total engine output results from the total of the flywheel output and fan output. P Motor + PSchwungrad)P Lüfter In the performance class 250 − 600 kVA, the generator efficiency η is in the rang from 0.92 − 0.95. P P Schwungrad + h elektr. Generator The electrical output transferred from the generator to the consumer units is calculated as follows: P elektr. + U I Ǹ3 cos ö p3 is the so-called link factor that must be taken into account in the case of three-phase generators. 10 Measuring the engine output of engines for gensets Linking these formulas leads to the following relationship: P Motor + PLüfter) U I Ǹ3 h Generator cos ö 1000 In this formula, the following variables can be assumed as constant for an approximate equation: − U − cos ϕ − ηGenerator = 400 V = 0.8 = 0.93 This means that only the generator current remains as a variable, which leads to an astoundingly simple equation: P Motor + PLüfter)0, 6 I [kW] The fan output depends on the engine and lies between 9 kW (D 0836 LE201) and 14 kW (D 2842 LE201). This formula can be used to determine the engine output of gensets on site in a simple manner with sufficient accuracy. 11 Load application and control conditions for genset engines Load application Fundamental relationships: The speed characteristics of a genset when load is being added depends on the quality of the speed governor, the design of the diesel engine as well as on the total mass moment of inertia of the genset. In naturally aspirated engines, 100% of continuous power may be added in one go; the control precision as stipulated in DIN 6280 / ISO 3046 being satisfied. In turbocharged engines, the turbocharger and, consequently, the engine’s power output react to additional load with a delay, because some time is required before charge-air pressure has built up. As the degree to which the engine is turbocharged increases, this effect becomes all the more conspicuous. It is therefore necessary that load be added step by step in turbocharged engines. The following factors have an influence on the characteristics of the engine when load is being added: D Subsequent modification to the charge-air system (installation of the charge-air cooler at a remote position, changes to the routing of pipes) has an unpredictable detrimental effect on the genset’s characteristics when load is added. D If a larger generator is fitted, the high mass moment of inertia improves the speed characteristics when load is being added. D Low intake air temperatures and cooler fuel have a positive effect on the speed characteristics when load is being added. 12 Load application and control conditions for genset engines Load application as per DIN 6280 The diagram below is taken from DIN 6280 / ISO 3046 and shows the guideline values for maximum load application in % of continuous power as a function of the effective piston pressure. These values guarantee compliance with the permissible dynamic engine speed deviation. Load application in per cent of continuous power The limit values for the dynamic speed deviation are indicated in the table “Control conditions for diesel engines for gensets”, see page 14. 3 2 1 Mean effective piston pressure pme of continuous power À 1st power stage Á 2nd power stage  3rd power stage The effective piston pressure pme is calculated as follows: p me + P 1200 Vh n In this formula: − − − − pme = Effective piston pressure in bar P = Power in kW Vh = Overall piston displacement in litre n = Speed in rpm 13 Load application and control conditions for genset engines Control conditions The control conditions for the engine comply with the ISO standard power output: − DIN 6280, Part 3.4, Class 2 − ISO 3046, Part 4, Class A1 − ISO 8528, Part 5.16, Grade G2. Control conditions for diesel engines for gensets DIN 6280 Version class Engine speed adjustment range 2) $ % 1 2 3 2.5 2.5 ISO 8528 41) G1 G2 G3 2.5 2.5 2.5 ISO 3046 G41) A2 A1 2.5 2.5 2.5 P degree % 8 5 3 8 5 3 8 5 Pendulum width % − 1.5 0.5 2.5 1.5 0.5 1 0.8 $ % 15 10 7 18 12 10 15 10 − 5 3 10 5 3 15 8 Dynamic speed deviation 3) Settling time s A01) 1) According to agreement 2) Adjustment range upwards refers to the idle speed (i.e. rated speed + P degree + 2.5%) 3) The dynamic speed deviation applies to load cut−off from full load and to load application in accordance with diagram on page 13. 14 Engine output of engines to drive pumps Power output characteristics of the pump to be driven The engines are approved to drive rotary pumps where the power consumption complies with the propeller law: Px + P Px. = P = nx = n = ǒnn Ǔ 3 x power requirement of rotary pump at rotational speed nx output of the diesel engine with rated speed n rotational speed of the rotary pump rated speed of the diesel engine The relationship is shown in the following diagram: Propulsion power of the pump in % of engine output 100 90 80 70 60 50 40 30 20 10 0 40 50 60 70 80 90 Rotational speed of the pump in % of the engine speed 15 100 Access to the engine When installing the engine, ensure that there is sufficient space for regular maintenance work as defined in the Operator’s Manual and for possible overhauls after long periods of operation. Advantages of easy access: D Increased reliability of engine due to facilitation of inspection and service work D Lower service costs due to reduced time outlays D Simple visual check for leaks It must be possible to carry out the following jobs on the engine without obstruction in the engine room: D Changing the fuel filters (description in the Operating Instructions) D Actuation of hand pump on fuel delivery pump and venting of fuel system D Maintenance of fuel prefilters / water separators D Checking of lube oil level, replenishment of lube oil (description in Operating Instructions) D Changing the oil filters (description in the Operating Instructions) Note: The diagrams show examples of maintenance work on randomly selected engine types. Applied to other engine types, the work to be performed is practically identical. 16 Access to the engine D Draining and filling coolant (description in the Operating Instructions) D Visual check and tightening of screwed, hose and pipe connections D Maintenance of the air filters (dry air filters with cyclone separator for high dust levels, fitted at the engine or set up separately from the engine in the engine room) D Re-tensioning and replacing V-belts (description in the Operating Instructions) D Replacing starter motor, alternator and water pump D Maintenance and replacement of the battery D Setting the valves, tightening the cylinder head bolts D Checking and setting the start of delivery of the injection pump D Replacing the injection nozzles Sufficient leeway must be created for movements of the engine due to elastic mounting, in order to safely prevent contact with neighbouring parts. 17 Engine room ventilation Engine operation causes component surfaces to become hot, dissipating radiant heat which must be conducted away by means of an effective ventilation system. Engine room temperature Even under the most adverse conditions an engine room temperature of 70_C must never be exceeded (critical components: vibration damper, starter, alternator). If possible, it should be below 50_C. In systems with pressure fan, a maximum of 45_C is feasible. The following value is to be taken as a yardstick: Intake-air temperature at the air filter v ambient air temperature + 15_C Hot intake air and hot fuel mean lower output. In the event of charge-air temperatures (downstream of intercooler) of more than 50_C, engine output is to be reduced, see page 58. Radiation heat to be dissipated Depending on the engine model, the radiation heat amounts to about 5% of the thermal output supplied with the fuel. If silencers or long exhaust-gas pipes are fitted in the engine room, the heat dissipation of these components is to be taken into consideration as well. To keep the amount of radiation heat to be conducted away within limits, these components should be provided with fireproof insulation. Engines with attached fan In engines with attached fan and radiator cooling, the heat radiated by the engine is conducted away by the flow of air generated by the fan. In engines with pressure fan, this means that air enters the radiator at a higher temperature, and this must be reflected in the design of the cooling system. Engines with remote cooling equipment Here, a forced ventilation system is recommended to conduct away the radiation heat generated in the engine room. Ventilation can be achieved via both fresh air and suction ventilators. Fresh−air ventilators supply cool air from the outside to the engine room. Hot waste air flows outwards through outlet orifices. Waste-air orifices should be located at as high a point as possible, as hot air always rises. Suction fans remove hot air from the engine room. Fresh cool air enters through inlet orifices. Not only the removal of waste air, but also an unimpeded supply of fresh air must be ensured. The fresh air inlet must be located as far away from the waste air outlet as possible in order to prevent any air short circuit. 18 Engine room ventilation The air requirement to conduct away radiation heat is calculated as follows: V+ Q cp 3600 Dt r Key to this formula: Q = Total amount of radiation heat in kW to be conducted away V = Air volume flow in m3 / h cp = Specific heat capacity of air (1.005 kJ / kg K) nt = Permissible temperature difference between engine room and vicinity in K r = Density of air in kg / m3 The density of air is temperature and pressure dependent. To aid comprehension, the following table lists some values for air density as a function of the temperature at an air pressure of 1,000 mbar. Density of air as a function of the temperature at an air pressure of 1,000 mbar. Temperature in oC Density in kg/m3 0 1,28 10 1,23 20 1,19 30 1,15 40 1,11 50 1,08 In the above−mentioned calculating method, the engine room is considered to be a heat-tight system, i.e. to simplify matters, it is assumed that no heat energy will be dissipated through the walls to the ambient air. 19 Engine room ventilation Total amount of air required The total amount of air required is calculated from the sum of the air required to conduct away radiation heat and from the engine’s combustion-air requirement. The amount of air required for conducting away radiation heat is calculated by means of the above formula. The technical data sheet provides information on the engine’s combustion-air requirement. Information on the amount of cooling air required by the generator can be obtained from the manufacturer. Generally speaking, a heat dissipation value of 3 m3/min per kW power loss can be taken as a yardstick. Air ducting in the engine room In many cases, the engine room also serves as the workroom for the operating staff. For this reason, high air speeds are to be avoided, as this is found at least annoying for human beings. An upper limit value of 0.25 m/s can be assumed. If air is ducted as shown in the picture, fresh air constantly flows past the engines, safely conducting away radiation heat, while in the rest of the engine room unnecessary air turbulence is prevented. 20 Engine mountings Elastic mounts General information Elastic mounts for limiting dynamic loads channelled into the foundation are to be preferred to rigid mounts. They are advisable for engines with free speed-dependent mass forces or mass moments. The following engines fall under this category: Engine Type of load 4-cylinder in-line engine Mass force of the 2nd order 10-cylinder V-type engine Mass moment of the 2nd order Even the alternating torques inherent in every reciprocating piston engine can be virtually kept away from the engine foundation by means of suitably adjusted elastic mounts, so that the foundation has to absorb only the useful moment. The basis for designing elastic mounts is the data for the respective engine. This data is available from MAN on request. − Engine weight, centre-of-gravity co-ordinates and mass moment of inertia − Free mass forces and moments − Free alternating torques Degree of insulation When dimensioning elastic mount elements, ensure that the basic frame is as resistant to bending as possible, i.e. it must have a high stiffness. Desirable as a high degree of insulation for the mounts is, it also holds risks for the engine and machines connected with it. With rubber-metal rails which are being increasingly used, maximum spring compression ought to be v3 mm. On no account must mount elements be compressed beyond the permissible weight loads indicated by the respective manufacturer. Elastic mount elements are to be dimensioned so that the same load is applied to all mount points, i.e. that spring compression is identical. Note: In accordance with VDI guideline 2063 and DIN 6280, the maximum vibration frequencies occurring must not exceed the following values: Engine: 45 mm / s Generator: 28 mm / s If these values are exceeded in continuous operation, damage is bound to occur particularly to auxiliary units (alternator) and in the form of leaks (injection pump, exhaust manifold). 21 Engine mountings Supercritical adjustment Engines with variable speed If elastic mounts are used, supercritical adjustment n min nkrit u 1 is required to prevent resonance vibrations during engine operation (the engine passes through the resonance range only when it is being switched on and off). Adjustment is defined as the ratio of exciter frequency to natural frequency. For easy relation to the engine speed, the number of vibrations per minute is measured. The critical engine speed ncrit n krit + ne i is defined as the speed neat which resonance occurs, taking into account the lowest exciter order i. The lowest exciter order i to be taken into consideration is that of the alternating torque. In four−stroke engines it is half the number of cylinders, e.g. in a 6-cylinder in-line engine i = 3. Insulation (i.e. reduction of foundation forces in relation to exciter forces) is achieved only with an adjustment of n/ncrit > p2 In practice, elastic mounts for engine systems with variable speed are therefore adjusted to idle speed. n min Ǹ nkrit u 2 If no adequate insulation can be achieved via the elasticity of the mounts for engines of small exciter order, e.g. 4/5-cylinder in-line and 10-cylinder V-type engines, it can only be accomplished by raising the idle speed. Engines with fixed engine speed Power units with a fixed speed that are installed in buildings require harmonisation to achieve adequate sound insulation and to avoid non-permitted floor load. n min nkrit u 3 22 Engine mountings Connection lines To cancel out vibration amplitudes in systems with elastic mounts, all pipes leading away from the engine must be uncoupled elastically, as rigid connections to the foundation, frame or walls cause add-on parts to break and/or reduce at least the insulating efficiency. Engines with flanged−on generator A 1 B 2 1 2 À Engine Á Generator If a generator is flanged on to the engine, only one mounting arrangement in accordance with diagram B is permitted. Failure of one mount in an engine with flanged-on unit In firmly flanged systems, failure of one mount at the engine side or at the flange-mounted unit results in extra load on the remaining mounts. Torsional load that may occur here is absorbed by the flywheel housing. In the event of damage to the elastic mounts, the system must be stopped immediately. 23 Engine mountings Rigid mounts Suitability of engines Only engines with no free mass forces or free mass moments are suitable for rigid mounts. The following engines are suitable: Engine Type of load Rigid mounts 6-cylinder in-line engine none possible 8-cylinder V-type engine none possible 10-cylinder V-type engine mass moment of the 2nd order, weak possible with restrictions 12-cylinder V-type engine none possible It is always to be examined whether insulating mats or rubber feet under the engine frame should be provided to improve comfort, e.g. to damp or deaden structure-borne noise and/or vibrations. Rigid frame / rigid foundation Rigid mounts must be designed so rigidly that the vibration system of engine and foundation is subcritically adjusted. With four-point mounts, fully bending-resistant and torsion-resistant frames are to be used to prevent damage to the engine. It is therefore necessary that the rigid mounting points be aligned flush and in parallel on the foundation or on the frame to prevent mounting tensions from affecting the securing elements. Cracks on the engine feet, mounting bolts as well as oil pans are a sure sign of an overloaded engine mounting or one that is not without tension. Even in the case of an elastic 4-point mounting, it must be verified that mounting and operating forces do not lead to an overload or the engine mounting or warping of the drive unit. If necessary, fit an assembly frame that disengages the operating forces from the mounting points. 24 Engine mountings Calculating the supporting forces The entire weight G of the engine (including oil and coolant) acts at the centre of gravity S. Data on the centre of gravity co−ordinates is provided in the data for the respective engine. S Fa + G b a)b Fb + G * Fa Fa Fb b a If the centre of gravity lies in the crankshaft plane, the forces Fa and Fb are to be halved to obtain the supporting force per mount. If the centre of gravity does not lie in the crankshaft plane (asymmetric set-up), the front (non-flywheel-end) supporting forces are to be calculated as follows: S Fd + Fc Fc + Fa * Fd Fd c Fa c c)d d The rear supporting forces are to be calculated analogously. 25 Power take-off The flywheel Depending on the kind of engine operation, MAN offers several flywheel variants. Criteria for selecting a flywheel are: Unevenness Regulating characteristics Accelerating characteristics Possibility of attaching a clutch Possibility of flanging a device (gearbox, clutch) on to the flywheel housing D Weight D D D D D Note: To carry out an exact installation inspection, ask for the installation drawing with detailed dimensions of the flywheel or flywheel housing. All flywheel housings depicted here have an SAE1 connection. Flywheels for industrial engines from the D 28 model range À Flywheel with I = 2.412 1 kgm2. Á Flywheel with I = 2.003 kgm2 2 26 Power take-off  Flywheel with additional mass for improving the regulating characteristics of genset engines of the D 28 model range (I = 4.212 kgm2). 3 à Flywheels for industrial engines D 0836 LE2.. with I = 2.4 kgm2. 4 27 Power take-off Axial clearance of crankshaft Caution: The design axial clearance of the engines’ crankshafts must not in any event be reduced by flange-mounting couplings or other attachments. It is therefore essential that before and after the flanging on of add-on components the axial play of the crankshaft is measured by means of a dial gauge held in a magnetic holder. If the results of the two measurements are not identical, or if the crankshaft springs back after being shifted, the attachment is to be examined. Engines Axial clearance of crankshaft D 0836 LE2.. 0.15−0.28 mm D 28-R engines 0.20−0.40 mm D 28-V engines 0.19−0.32 mm Torsional vibration calculation The gas and mass forces of the engine may cause the entire driveline to vibrate. To detect the position and strength of resonance points and to prevent overstressing, a torsional vibration calculation is to be carried out. The engine data for carrying out a torsional vibration calculation, e.g. exciter factors and torsional substitute vibrators, can be obtained from MAN. Danger: For reasons of safety, rotating parts (V-belts, shafts, flanges) on stationary engines are to be fitted with suitable protection devices to prevent any contact with these parts. Observe accident prevention regulations. 28 Transmission of power by propshafts Coupling for large deflection angles The use of integrated couplings reduces vibration stress on engine and driveline. These couplings offer the following advantages: D Swivel head roughly 100 mm closer to the final crankshaft bearing D More solid axial and radial coupling bearings D Improved true running (imbalance) of swivel head through omission of centring mountings With this coupling the max. permissible deflection angle per joint is 8_ Weights: Flywheel: Coupling: Together: 39 kg 53 kg 92 kg Note: The coupling can only be fitted if the engine is equipped with the corresponding flywheel for cardan shaft couplings. The coupling cannot be mounted on standard flywheels. 29 Transmission of power by propshafts Basic guidelines for installing cardan shafts If a simple cardan, universal or ball joint is uniformly rotated while deformed, this produces irregular motion at the output end. This irregularity can be compensated for by connecting two simple joints to the cardan shaft. There are two prerequisites for absolute motion compensation: D Identical running angles at both joints (ß1=ß2) D Both inner joint forks must lie on the same plane D Input and output shafts must also lie on the same plane Z-form cardan shaft configuration W-form cardan shaft configuration Exception: The input and output shafts do not lie in the same plane in the case of a spatially deflected propeller shaft. To obtain a uniform output motion, in this case it is necessary to contra-rotate the inner joint forks so that they lie in the plane of the bend at their junction. The deflected angles must also be the same. 30 Transmission of power by propshafts Installing cardan shafts When connecting the cardan shaft halves, make sure that the markings (arrows) on the splined shaft and the splined hub face each other. Caution: If the propeller shafts are incorrectly connected, the irregularity at the output will not be compensated but rather reinforced. This will result in vibrations in the drivetrain. Joint bearings and spline profiles may also be destroyed. The propeller shafts must be arranged in such a way that the spline profile is protected as much as possible against dirt and moisture. This generally involves installing the shafts in accordance with the drawing below, where the cardan seal points downwards so that any dripping splash water is channelled away from the spline profile. The cardan shafts must not be separated or switched round as this would jeopardise the balance of the shaft. Balance weights must not be removed for the same reason. 31 Air intake system Combustion air requirement The engine requires a sufficient amount of fresh air (as indicated in the data sheets) for fully combusting the fuel and achieving full output. Air filter The size of the air filter is to be determined together with the manufacturer so that, taking into account the amount of dust which is expected to occur, the following conditions will be satisfied: D The maximum permissible intake vacuum is to be complied with. D The filter must be approved by MAN with regard to the air flow rate and degree of separation. The air intake point upstream of the filter is to be located in a low dust area well protected against rain and splashwater and arranged so that hot air from the engine room cannot be sucked in. Of the well-known filter designs, the dry air filter is to be used as a general principle. Caution: Unfiltered or insufficiently filtered intake air leads to rapid engine wear. Depending on the installation situation, the air filter is delivered either attached to the engine or loose. Underpressure downstream from air filter The intake vacuum is measured approx. 300 mm before the inlet into the engine or into the turbine at maximum air intake capacity. Maximum air intake capacity is achieved: D Naturally aspirated engine: at max. speed (cut-off speed) D Supercharged engines: at rated engine speed and full load (max. delivery output of turbocharger) The maximum permissible intake vacuum is: − Filter in “as new” condition: − Filter in contaminated condition: 30 hPa 60 hPa Electrical or visual vacuum gauges are suitable for monitoring. If the intake vacuum is too high, this leads to incomplete combustion, the formation of black smoke and a drop in output. 32 Air intake system Dry air filter for continuous operation 1 À Air inlet Á Air outlet Characteristics of the dry air filter with exchangeable paper element are high separation efficiency in all operating ranges and an increase in resistance as the element becomes dirty. 2 In many cases cyclone separators are integrated in the dry air filter housing. The cyclone separator causes air to rotate, which prompts part of the dust to be separated before reaching the downstream air filter. For dry air filters, the installation position recommended by the manufacturer is to be observed. Dry air filter for limited−time operation (standby power systems) A dry air filter (paper air filter “Duratite”) with limited service life is available for standby power units. With regard to the separation degree this air filter is comparable with the dry air filter for continuous operation. However, its service life is markedly shorter. Configuring the air intake pipe The air line from the filter to the engine must meet the following requirements: D D D D D D D D D Absolute tightness Short routing with favourable flow characteristics and with as few interfaces as possible Inside faces must be scale−free and protected against corrosion Compensation of relative movements between engine and filter by means of elastic connections (hoses) For hose connections, provide pipes with beads. Use suitable hose connections only (also see Appendix to this brochure) Before assembling, clean all pipe and hose connections on the inside Water is the only permissible lubricant for fitting hoses Air intake lines must not be laid near hot components Clear cross−section of the air intake line: − Naturally aspirated engines: − Supercharged engines: 40−50 mm2 / kW 50−65 mm2 / kW 33 Exhaust system Basic elements of the engineering design Danger: The exhaust system must be completely gastight to fully exclude the danger of asphyxiation. One or several elastic intermediate pieces (bellow expansion joints) are to be installed between engine and exhaust system. The manufacturer’s installation regulations are to be complied with. This prevents vibrations from being transferred from the engine to the exhaust system and compensates for the exhaust pipes’ longitudinal extension due to the high temperatures. Securing the exhaust system Caution: Secure and support the exhaust pipes so that the turbochargers are not subjected to mechanical loading. 4 3 2 1 À Á  à Bellow expansion joints Y−pipe Silencer Locate the fastening as close as possible to the pipe elbow 34 Exhaust system Acid-resistant steel is to be used preferably as material for the exhaust system. The high temperature of the exhaust gases of several hundred degrees Celsius heats up the exhaust pipes intensely. The guide value for the longitudinal extension of steel pipes depending on the temperature is: 1 mm per metre and 100_C To prevent the engine room from heating up too much, fire-resistant, fuel and lube−oil repellent insulation is to be recommended. The engine’s exhaust manifold and the turbocharger are to be fitted with an anti-contact protection device. Any insulation of these components requires approval. Danger: Fit a suitable anti−contact protection device to the exhaust pipes! It is inadmissible to channel the exhaust gases from several engines into one system. In multi−engine systems, separate exhaust-gas piping is required for each engine so that when one engine is running exhaust gases cannot enter another engine. Condensation may form in the exhaust system and must under no circumstances be allowed to flow into the engine. For this reason a condensation trap with drain valve is to be provided near engines with very long ascending exhaust pipes. On no account must rain water enter the exhaust system. To minimise exhaust gas backpressure, avoid sharp bends and manifolds. Pipe bends must have large radii (R / d w 1.5). When installing silencers, soot filters, catalytic converters etc., ensure that the maximum permissible exhaust backpressure is not exceeded. D R 35 Exhaust system Connecting exhaust system to engine 1 Install between the engine and exhaust system resilient connecting elements, which permit engine movements conditioned by the resilient engine mountings and isolate the engine from vibrations from the exhaust system. x 2 2 Installing exhaust expansion joint Exhaust expansion joints prevent the transmission of vibrations from the engine to the exhaust system and compensate the temperature-induced linear expansion of the exhaust pipes. Due to the high gas speeds, the expansion joints are equipped with guide pipes. The distance between the guide pipe and the fluted pipe of the expansion joint is relatively small. 3 It is therefore necessary to ensure that the expansion joints are as near to vertical as possible when installed and to attach the post-connected exhaust pipe securely. 3 4 If the post−connected exhaust pipe is installed at an incline or support in an unsuitable way, the expansion joint may be damaged. The guide pipe and the fluted pipe then come into mutual contact. Subject the expansion joint to initial tensile stress during installation Á. Initial tensile stress means that before the expansion joint is bolted into place, a distance X of 10 − 15 mm is maintained between the flange of the expansion joint and the mating flange of the post-connected exhaust pipe À. Caution: Note the direction of flow  of the exhaust gas through the expansion joint. The position of guide pipe à determines the direction of flow of the exhaust gas. Permitted exhaust backpressure Caution: In all supercharged engines, the max. permitted exhaust gas backpressure measured at rated power in a straight pipe section is 60 hPa. In the case of engines in continuous operation with downstream exhaust-gas cleaning systems or exhaust-gas heat exchangers, permanent monitoring of the exhaust gas backpressure is compulsory. Exceeding these values leads to inadmissible exhaust-gas temperature, thermal stress and an increase in the formation of smoke. For this reason, it is indispensable that during the commissioning of an engine the exhaust backpressure be measured and the exhaust-gas system re-dimensioned if necessary. 36 Exhaust system Configuration of the exhaust system We recommend that, if possible, the maximum permissible backpressure value (= pressure drop) should not be fully exploited when the exhaust system is configured. The exhaust pipe diameter, the number of manifolds, the silencers and the pipe routing are to be selected so that when the engine is new 75% of the maximum value is not exceeded. The total backpressure (total pressure drop) np in the exhaust system is calculated as follows: Dp + Dp R L ) DpK nK ) DpS where: DpR = Backpressure (pressure drop) per 1 m of pipe L Pipe length in m = DpK = Backpressure (pressure drop) per 90−degree manifold DnK = Number of manifolds DpS = Backpressure (pressure drop) in silencer If further components, e.g. soot filters, catalytic converters or heat exchangers, are installed in addition to the silencer, their resistance is also to be taken into consideration. Since the exhaust backpressure of these components rises during operation, continuous exhaust backpressure monitoring is to be provided. Example of calculations for exhaust systems An exhaust system with a pipe length of 4 m, two 90-degree manifolds and a silencer is planned. The clear pipe diameter is to be 120 mm. Is this system adequately dimensioned for a turbocharged diesel engine with an exhaust gas mass flow rate of 1,300 kg/h? The following values can be obtained from the tables: Backpressure per 1 m of pipe = 3.4 hPa Backpressure for 90−degree manifold = 5.7 hPa For backpressure specifications in the manifold, contact manufacturer. A value of 5 hPa is assumed. The total backpressure np is calculated as follows: np = npR L + npK nK + npS np = 3.4 hPa 4 + 5.7 hPa 2 + 5 hPa = 30 hPa The calculated value is within the permissible range. 37 Exhaust system Average backpressure (pressure drop) in hPa per 1 m of exhaust pipe, depending on the exhaust gas mass flow in kg/h and the clear diameter in mm (1 hPa = 1 mbar) Exhaust gas mass flow rate * Diameter in mm kg / h 80 100 120 140 160 180 200 200 0.7 0.2 0.1 −−− −−− −−− −−− 300 1.6 0.5 0.2 0.1 −−− −−− −−− 400 2.8 0.9 0.3 0.1 0.1 −−− −−− 500 4.4 1.3 0.5 0.2 0.1 0.1 −−− 600 6.3 1.9 0.7 0.3 0.1 0.1 0.1 700 8.6 2.6 1.0 0.4 0.2 0.1 0.1 800 11.2 3.4 1.3 0.6 0.3 0.2 0.1 900 14.2 4.3 1.6 0.7 0.4 0.2 0.1 1000 17.5 5.3 2.0 0.9 0.4 0.2 0.1 1100 21.2 6.5 2.5 1.1 0.5 0.3 0.2 1200 25.3 7.7 2.9 1.3 0.6 0.3 0.2 1300 −−− 9.0 3.4 1.5 0.7 0.4 0.2 1400 −−− 10.5 4.0 1.8 0.9 0.5 0.3 1500 −−− 12.5 4.6 2.0 1.0 0.5 0.3 1600 −−− 13.7 5.2 2.3 1.1 0.6 0.3 1700 −−− 15.5 5.9 2.6 1.3 0.7 0.4 1800 −−− 17.3 6.6 2.9 1.4 0.8 0.4 1900 −−− 19.3 7.3 3.2 1.6 0.8 0.5 2000 −−− 21.4 8.1 3.6 1.8 0.9 0.5 2100 −−− 23.6 9.0 3.9 1.9 1.0 0.6 2200 −−− 25.9 9.8 4.3 2.1 1.1 0.7 2300 −−− −−− 10.7 4.7 2.3 1.2 0.7 2400 −−− −−− 11.7 5.2 2.5 1.4 0.8 2500 −−− −−− 12.7 5.6 2.8 1.5 0.8 2600 −−− −−− 13.7 6.0 3.0 1.6 0.9 2700 −−− −−− 14.8 6.5 3.2 1.7 1.0 2800 −−− −−− 15.9 7.0 3.5 1.8 1.1 2900 −−− −−− 17.0 7.5 3.7 2.0 1.1 3000 −−− −−− 18.3 8.0 4.0 2.1 1.2 3100 −−− −−− 19.5 8.6 4.2 2.3 1.3 3200 −−− −−− 20.8 9.2 4.5 2.4 1.4 3300 −−− −−− 22.1 9.7 4.8 2.6 1.5 3400 −−− −−− −−− 10.3 5.1 2.7 1.6 3500 −−− −−− −−− 11.0 5.4 2.9 1.6 * For engine values, see technical data sheets 38 Exhaust system Average backpressure (pressure drop) in hPa per 90_ manifold (R/d = 1.5), depending on the exhaust gas mass flow in kg/h and the clear diameter in mm (1 hPa = 1 mbar) Exhaust gas mass flow rate * Diameter in mm kg / h 80 100 120 140 160 180 200 200 0.7 0.3 0.1 0.1 −−− −−− −−− 300 1.5 0.6 0.3 0.2 0.1 −−− −−− 400 2.7 1.1 0.5 0.3 0.2 0.1 −−− 500 4.3 1.8 0.8 0.5 0.3 0.2 0.1 600 6.2 2.5 1.2 0.7 0.4 0.2 0.2 700 8.4 3,5 1,7 0,9 0,5 0,3 0,2 800 11,0 4,5 2,2 1,2 0,7 0,4 0,3 900 13,9 5,7 2,8 1,5 0,9 0,5 0,4 1000 17,2 7,0 3,4 1,8 1,1 0,7 0,4 1100 20,8 8,5 4,1 2,2 1,3 0,8 0,5 1200 24,8 10,1 4,9 2,6 1,5 1,0 0,6 1300 −−− 11,9 5,7 3,1 1,8 1,1 0,7 1400 −−− 13,8 6,6 3,6 2,1 1,3 0,9 1500 −−− 15,9 7,6 4,1 2,4 1,5 1,0 1600 −−− 18,0 8,7 4,7 2,7 1,7 1,1 1700 −−− 20,4 9,8 5,3 3,1 1,9 1,3 1800 −−− 22,8 11,0 5,9 3,4 2,2 1,4 1900 −−− −−− 12,3 6,6 3,9 2,4 1,6 2000 −−− −−− 13,6 7,3 4,3 2,7 1,8 2100 −−− −−− 15,0 8,1 4,7 3,0 1,9 2200 −−− −−− 16,4 8,9 5,2 3,2 2,1 2300 −−− −−− 18,0 9,7 5,7 3,6 2,3 2400 −−− −−− 19,6 10,7 6,1 3,9 2,5 2500 −−− −−− 21,2 11,5 6,7 4,1 2,8 2600 −−− −−− 23,0 12,4 7,3 4,6 3,0 2700 −−− −−− −−− 13,4 7,8 4,9 3,2 2800 −−− −−− −−− 14,4 8,4 5,3 3,5 2900 −−− −−− −−− 15,4 9,0 5,6 3,7 3000 −−− −−− −−− 16,5 9,7 6,0 4,0 3100 −−− −−− −−− 17,6 10,3 6,4 4,2 3200 −−− −−− −−− 18,8 11,0 6,9 4,5 3300 −−− −−− −−− 20,0 11,7 7,3 4,8 3400 −−− −−− −−− 21,2 12,4 7,8 5,1 3500 −−− −−− −−− 22,5 13,2 8,2 5,4 * For engine values, see technical data sheets 39 Exhaust system Measuring the exhaust backpressure The exhaust backpressure must be measured during startup. Dia. 3 mm The measuring point of the exhaust gas backpressure (thread M14 x 1.5) must be located in a straight pipe section. H Measurements immediately behind the exhaust turbocharger falsify the result by up to 20 mbar. The quantity to be measured is the static pressure, i.e. the measuring connection must fit flush with the inside of the pipe wall. Measurements of the ram pressure and in pipe bends will produce inaccurate results. During the measuring operation the engine must run at maximum power and rated speed. The simplest measuring instrument is a U−pipe manometer filled with water. (1 hPa = 10 mm Ws) 40 Exhaust system Exhaust gas heat utilisation in stationary systems In stationary diesel engines for co-generation, exhaust gas heat exchangers are frequently employed in connection with exhaust-gas heat exchangers for recovering heat losses in coolant. Exhaust gas water preheaters are frequently used as heat exchangers. For this reason the properties of these units are described in the following. The illustration shows as an example the basic design of an exhaust gas water preheater designed as a smoke tube boiler. 1 2 6 3 4 5 À Exhaust gas inlet à Water inlet Á Exhaust gas outlet Ä Detachable flange caps  Smoke tubes Å Water outlet Operating principle: Hot gases, in this case the exhaust gases from the engine, enter the preheater at the top left À, flow downwards through a system of tubes and then flow upwards to leave the preheater on the right-hand side Á. Water enters the preheater at the bottom right Ã, and is channelled upwards − in the opposite direction to that of the gases − whereby it warms up and then leaves the preheater again at the top left Å. 41 Exhaust system Properties of exhaust gas water preheaters Exhaust gas water preheaters are frequently subject to considerable wear resulting from corrosion on the exhaust gas side. The cause of this is that they are charged with aggressive, acidic exhaust condensation at low wall temperatures in the partial load range. This wear can be countered by the use of suitable materials, but the use of special steel means high costs. Consideration is therefore to be given to whether it is worth making such investments to extend the service life of the respective unit or whether it is more economical to exchange the pipe cluster at certain intervals. To clean and replace the pipe cluster, the heat exchanger must be fitted with detachable flange caps. The smoke tube internal diameter must not be smaller than 22 mm to prevent the tube from prematurely clogging up and, consequently, to prevent considerable increases in the exhaust backpressure. Wear resulting from corrosion can be limited if precipitation of condensation from the exhaust gases is prevented. This can be achieved if the exhaust gas temperature at the outlet from the exhaust gas system is not less than 180_C. Exhaust gas temperature at the exhaust gas outlet w 180_C The best results are achieved if the systems always run at high load, i.e. at high temperatures, and if the preheaters are fully charged. It must be possible to switch off the exhaust gas water preheater via hot gas slides or butterfly valves. A bypass is then necessary for the exhaust gas ducting. This prevents both the heat exchanger from being charged with exhaust gases at low exhaust gas temperatures (e.g. when the system is being started) and the formation of condensation. As contamination increases, so does the exhaust backpressure of exhaust gas heat exchangers. For this reason, continuous monitoring of the exhaust backpressure is compulsory. Ascertaining the usable exhaust gas heat The amount of usable heat contained in exhaust gases is calculated with the following formula: Q + cP m Dt Key: Q = Amount of usable heat in the exhaust gases in kJ / h m = Exhaust−gas mass flow in kg / h cP = Specific heat capacity of the exhaust gases in kJ / kg degrees Dt = Usable temperature drop in the exhaust gases in Kelvin 42 Exhaust system The usable temperature drop in the exhaust gases nt = (t1 − t2) is calculated as follows: t1 = temperature of the exhaust gases at the engine outlet in degrees t2 = temperature of the exhaust gases downstream of the heat exchangerin degrees The specific heat capacity of the exhaust gases is approx 1 kJ / kg degrees. The amount of exhaust-gas heat to be conducted away is calculated in kJ/h by means of the above-mentioned formula. If this value is divided by 3,600, the unit is kW. The values for the exhaust-gas mass flow and the exhaust-gas temperature can be learned from the data sheets or can be obtained from MAN for the respective project. The exhaust-gas temperature downstream of the heat exchanger must be at least 180_C. Installing the exhaust−gas heat exchanger in the exhaust−gas system À Exhaust gases coming from the engine Á Exhaust−gas heat exchanger  Butterfly valve à Bellow expansion joints Ä Silencer 5 4 3 4 1 2 43 Exhaust system Catalytic converters The emission of harmful substances can be considerably lowered by means of exhaust-gas cleaning systems. Exhaust gases Ammonia generator ÎÎÎÎÎÎÎÎ ÎÎÎÎÎÎÎÎ ÎÎÎÎÎÎÎÎ ÎÎÎÎÎÎÎÎ ÎÎÎÎÎÎÎÎ ÎÎÎÎÎÎÎÎ ÎÎÎÎÎÎÎÎ ÎÎÎÎÎÎÎÎ SCR catalytic converter Urea solution To reduce NOx, the exhaust gases from the diesel engine are, with addition of a reducing agent, channelled through the catalytic converter integrated in the exhaust gas pipe. Ammonia or a watery urea solution may be used as reducing agent. Some minutes before the engine is switched off, the supply of the reducing agent is to be stopped so that when the engine is at a standstill no ammonia can flow back into the engine. Caution: When the engine is at a standstill, no ammonia gas from the catalytic converter must flow back into the engine. 44 Cooling system Basic information on the cooling system If the cooling system functions properly, the engine will operate with fewer faults and its service life will be prolonged. Today, almost all MAN diesel engine are fitted with charge-air intercoolers. Apart from the dissipation of the heat generated in the engine cooling circuit, recooling the charge air is therefore also of particular importance, see also chapter intercooling from page 56. For this reason − and as a standard solution for stationary engines − we recommend purchasing the cooling system (fan radiator with combined air/air intercooler) from MAN. Modifications to the cooling system, e.g. the installation of additional heat exchangers for waste heat utilisation require approval by MAN. Cooling systems matched to the installation of an engine in a vehicle or in machinery must be checked and cleared by MAN in order to safeguard warranty. All cooling systems for MAN engines are to be designed as closed, pressurised systems. They will work properly only if the coolant has been mixed with a MAN-approved antifreeze with anti−corrosion protection agent. Note: Only use coolants that comply with MAN specifications. For basic information on fuels, lubricants and coolants refer to the publication “Fuels, Lubricants and Coolants for MAN Diesel Engines”. You can find the approved products on the Internet at: http://www.man-mn.com/ " Products & Solutions " E-Business Cooling system on a stationary industrial engine of the D 28 model series (standard solution) 1 2 4 3 4 À Intercooler Á Expansion tank  Fan radiator for engine coolant à Cooling air inlet 45 Cooling system Fan cooling The following diagram shows the basic components of a standard cooling system for the engine coolant that are obligatory for non−disruptive operation of a MAN diesel engine. The intercooler is not shown here as it will be covered separately. 1 2 4 3 5 9 6 AB 8 7 x T Fan Diesel engine P À Á Â Ã Ä Å Æ Ç È X T P AB Working valve, opens at an overpressure of 0.8 − 1.1 bar, and at a partial vacuum of 0.02 − 0.03 bar Coolant level in expansion tank Air expansion volume Filler neck with safety valve, opens at 1,3 − 1,7 bar Degasifying system Permanent engine breather Filling line Radiator breather with non−return valve Overflow and venting line w 20 mm above thermostat Thermostat Coolant pump Expansion tank 46 Cooling system Stationary diesel engine for co-generation The diagram shows a heat exchanger and a second thermostat as additional components. 1 2 3 4 5 9 6 AB 8 7 Heat exchanger X T T Fan Diesel engine P À Á Â Ã Ä Å Æ Ç È X T P AB Working valve, opens at an overpressure of 0.8 − 1.1 bar, and at a partial vacuum of 0.02 − 0.03 bar Coolant level in expansion tank Air expansion volume Filler neck with safety valve, opens at 1,3 − 1,7 bar Degasifying system Permanent engine breather Filling line Radiator breather with non−return valve Overflow and venting line w 20 mm above thermostat Thermostat Coolant pump Expansion tank 47 Cooling system Properties of diesel engine for co-generation Combined generation (co-generation) of power and heat makes sense only if the system is in continuous operation. The cooling system must therefore be designed with particular care, since in continuous operation even the smallest defects may cause very serious damage. When installing additional heat exchangers and associated pipes, ensure that the flow resistance in the system is not too high, as this will cause the circulation of coolant to fall below the permissible value. Values for coolant circulation can be found in the engine data sheets. Additional heat exchangers are to be arranged in such a way that no air pockets will develop. As already mentioned, cooling systems must be designed as closed overpressure systems. In continuous heavy−duty operation. the valves installed in the caps may fail after some time without this being noticed. The system will then slowly lose pressure, which means that consequential damage to the engine may occur. Consequently, we recommend running the system with hydrostatic pre−pressure. For this purpose the expansion tank is fitted 6 − 7 m above the engine (1 m head of water corresponds to 0.1 bar). The expansion tank is to be fitted with a coolant level probe (see page 73) which will actuate the shut-off device if the coolant level drops (burst hose). 48 Cooling system Components of the cooling system The fan The fan in stationary engines is driven rigidly. If it is not possible to drive the fan from the engine, it can also be driven by means of a hydraulic or electric motor. To save fuel and to keep the noise level low, the fan for cooling the engine coolant ought to be switched on only if the coolant necessitates this. In combination radiators (radiator for both engine coolant and charge air, also see page 56) the fan must never be completely switched off even if the engine is idling or in low-load operation, because intercooling cannot be guaranteed in the event of a load on the engine. The thermostat Before the coolant reaches operating temperature, it is conducted around the bypass circuit via a thermostat upstream of the water pump. Once the operating temperature has been reached, the thermostat gradually opens the passage to the radiator. Thus the operating temperature is reached quickly and kept constant during operation. To prevent the flow of coolant from pulsating, only thermostats approved by MAN may be installed. The thermostat may be fitted either directly to the engine or in the line to the radiator. If pipe thermostats are used outside the engine, short-circuit inserts must be installed in the engine’s thermostat housing. 49 Cooling system The coolant lines 1 The clear widths of the coolant lines from the engine to the cooling system À and from the cooling system to the engine Á must have cross-sections that are at least the same as those of the engine connections. Throttles are to be avoided. The coolant piping is to be routed in such a way that its flow characteristics are as favourable as possible. Route all lines as ascending or descending to prevent the formation of air bubbles. If the engine is fitted on elastic mounts and the cooling system is fitted at a separate point, the pipe connections are to be designed flexibly. Sectional hoses are to be recommended for nonaligned installation set-ups. The length of these sectional hoses is to be kept as short as possible and dimensionally stable, particularly on the suction side of the water pump. Detailed requirements for coolant hoses can be found in the Appendix to this brochure. 2 The expansion tank The efficiency and the functioning of a cooling system depend to a large extent on whether it the system supplied with pressure and is free of bubbles. Both properties are heavily influenced by the efficiency of the expansion tank. For this reason, all cooling systems for MAN engines must be fitted with a separate expansion tank that D D D D D holds coolant expanded due to heat, builds up and maintains the operating pressure of the cooling system, separates the air bubbles from the coolant circuit, provides coolant reserves in the event of leaks, is readily accessible since coolant is filled in at the expansion tank and coolant level checks are carried out at the expansion tank. The expansion tank is to have a fluid volume of w15% and an air volume of approx. 7 − 12 % of the total filling quantity of the cooling system. A riser pipe is to be provided as a protection against overfilling. A filling line (Ø = 18 − 25 mm) must be routed from the expansion tank so that it enters the pipe between the radiator outlet and the water pump inlet at the lowest possible point in the coolant circuit. This prevents air inclusions for the most part when the coolant circuit is being filled. If the coolant circuit has several venting lines alongside the radiator breather, these ought to be combined into a collector pipe upstream of the expansion tank. For venting lines, an internal pipe diameter of 8 − 10 mm has proved adequate. 50 Cooling system To achieve more or less complete air separation, even at reduced coolant levels in the expansion tank, it is necessary to limit the coolant flow rate in the expansion tank to 7 − 10 l/min. For this purpose, a throttle (Ø approx. 3.5 mm) is usually necessary in the venting line immediately upstream of the expansion tank inlet. As described above, a separate venting line from the radiator to the expansion tank ought to be provided. Alongside a throttle, this venting line must also be fitted with a non-return valve to prevent any backflow and, consequently, prevent the engine from cooling down. The expansion tank is always to be positioned in such a way that all venting lines can be laid in a continuously ascending manner. Expansion tanks should always have two end caps of different sizes. In the smaller of these caps, a working valve is to be integrated to maintain the system pressure between 0.8 and 1.1 bar during engine operation. At the same time, however, this working valve must limit the partial vacuum in the cooling system to 0.02 − 0.08 bar if a partial vacuum should occur while the coolant is cooling down. The larger cap for the filler neck is to be fitted with a safety valve that opens between 1.3 and 1.7 bar. As regards their mechanical strength, the expansion tanks should withstand a test pressure of at least 1.5 bar at a temperature of approx. 120_C. In many cases, their strength can be improved by baffles, which simultaneously smooth the flow in the expansion tank. If a coolant level probe is to be fitted, it is to be positioned in the expansion tank in such a way that the warning signal appears if 5 − 8% of the total filling quantity has escaped while cold. However, air must not yet be sucked into the system. À Expansion tank Á Valve cap with working valve, opens at 0.8 to 1.1 bar overpressure, 0.02 to 0.08 partial vacuum. Do not open the cap unless absolutely necessary. Fill the system up via filler neck (item Â) 2  Filler neck with safety valve, opens at 1.3 to 1.7 bar overpressure. 1 3 51 Cooling system Dimensioning and designing the cooling system If the cooling system is not obtained from MAN, it must be configured by the manufacturer. The following data must be taken into consideration in the cooling system configuration: D The heat quantity to be conducted away into the coolant from the engine and other components if fitted (see technical data sheet for the respective engine). D Max. permissible coolant temperature at outlet from the engine (see technical data sheet for the respective engine). D Ambient conditions at the place of operation of the cooling system, including the highest cooling air temperature to be expected. D The minimum coolant circulation quantity required (see technical data sheet for the respective engine). D Delivery rate and lift of the water pump (water pump diagrams can be obtained from MAN). Please note that the water pump speed is to be limited to max. 3600 rpm. If this speed is exceeded, shorter service life and increased noise output must be expected. D If the radiator is fitted above the engine, the max. permissible installation height is 10 m. D The connection dimensions and the type of fan drive including the drive speed and the direction of rotation can be learned from the installation drawing. D Pipeline diameter and design as per installation drawing. Checking the coolant circuit When checking the coolant circuit, it must be ensured that D the coolant circuit can be swiftly filled (approx 8 l/min), D the coolant circuit starts immediately when the engine is started or accelerated and that there is a constant coolant circulation, D the coolant circuit vents itself automatically and completely, D no partial vacuum can arise upstream of the water pump, D a system pressure (guideline value: 0.4 − 0.5 bar) builds up in the coolant circuit and is maintained after the engine has been switched off, D the coolant circuit ensures the required coolant flow rate at max. permissible coolant temperature and fully opened thermostat, D the coolant circuit does not eject coolant even if the engine is switched off in the hot condition, D approx 10% of the filling quantity can be drained from the expansion tank before air is also sucked into the filling line, D the coolant circuit including the engine and heat exchanger can be completely emptied, D air bubbles are separated from the coolant, D no air inclusions remain in the cooling system, D hose connections are accessible for maintenance purposes. 52 Cooling system Assessing the coolant circuit In the coolant circuit, a certain amount of heat that corresponds to the engine load must be conducted away. The maximum heat quantities which occur in individual engines are indicated on the data sheet. Here, too, the minimum coolant circulation quantities necessary for satisfactory heat dissipation and prevention of vapour pockets and local overheating can be found. The following relationship can be established between the amount of heat to be conducted away and the mass flow of coolant: Q + cP m Dt Key: Q = Amount of heat to be conducted away from the coolant m = Coolant mass flow in kg / h cP = Specific heat capacity in kJ / kg Kelvin Dt = Temperature difference between engine inlet and engine outlet in Kelvin The above−mentioned formula is used to calculate in kJ/h the amount of heat to be conducted away in the coolant. If this value is divided by 3600, the result is in kW. The specific heat capacity of the coolant depends on the antifreeze/anti-corrosion agent concentration. The higher the concentration of antifreeze/anti-corrosion agent in the coolant, the less heat per kg coolant can be conducted away. c (kJ / kg K) 5 4 3 A 2 0 10 20 30 40 50 60 Antifreeze / anticorrosion agent (per cent by volume) A = Permissible range, i.e. the concentration of antifreeze/anti-corrosion agent must always be between 40 and 50 per cent by volume. 53 Cooling system The minimum coolant circulation quantities are to be large enough to ensure that at maximum (blocked) output there is a temperature difference of 5 to 75_C between engine inlet and engine outlet. If the engine runs at constant load, an equilibrium is created after several minutes, i.e. the amount of heat to be conducted away in the coolant remains constant. The specific heat capacity of the coolant is determined by the concentration of antifreeze/anti−corrosion agent in the coolant and also constitutes a constant quantity. If the flow resistance in the cooling system is increased owing to the installation of additional heat exchangers and/or long pipelines with tapered cross-sections and, consequently, the flow of coolant is throttled down, the temperature difference between the engine inlet and engine outlet is bound to increase. This relationship becomes obvious in the above-mentioned equation. The coolant temperature difference between engine inlet and engine outlet is measured with the thermostats blocked in open position and at maximum output. The coolant temperature difference between engine inlet and engine outlet is an important criterion to assess the cooling system. Caution: Coolant temperature difference between engine inlet and engine outlet x 5 − 7 K 54 Cooling system The cooling output of the fan radiator To assess the cooling output of a cooling system, the cooling constant (KK) has been found reliable. KK + t KA * t L Key: tKA = Coolant temperature at engine outlet tL Air temperature at radiator inlet = Preparation for the measurement During the measurement, the thermostats must not perform any function. For this reason, they are to be blocked in the open position. The cooling system of the engine is to be filled according to MAN instructions with a mixture of drinking water from the mains and at least 40% antifreeze based on ethylene glycol and / or anticorrosion additive. During measurement of the coolant temperature at outlet, the engine must be operated at full load. The air temperature is measured immediately before the radiator inlet area. The cooling constants can be used to assess the output of a cooling system. It is a yardstick for the max. permissible air inlet temperature tLmax, up to which the cooling system may be operated. As the cooling constant is usually measured using new cooling systems, a safety margin tS of approx. 5_C must be deducted to allow for contamination. Example: The max. permissible coolant outlet temperature in continuous operation is 90_C. A cooling constant of 40_C was ascertained. Up to what cooling air inlet temperature is the cooling system adequate if a safety margin of 5_C is deducted? t Lmax + t KAmax * KK * t S tLmax = 90_C − 40_C − 5_C tLmax = 45_C As a result, the cooling system in this example is adequate for air temperatures of up to 45_C. 55 Intercooling Intercooling Intercooling has the following functions: D As a result of the increase in combustion air density due to the reduced temperature, it is possible to markedly increase the specific output of the engines. D The recooled combustion air reduces the thermal stress on the engine. D The pollutant (NOx) content of the exhaust gas is reduced. Intercooling with air / air intercooler 1 The air / air-intercooler must be installed upstream of the radiator. À Air / air intercooler with downstream radiator for the engine coolant (combination radiator) Á Combustion air line from intercooler  Combustion air line to intercooler 2 56 3 Intercooling The following values are to be complied with in the intercooler design: D permissible charge-air temperature downstream of radiator: max. 50_C (measured at an ambient air temperature of 25_C) If this requirement cannot be complied with, the engine output is to be reduced. D permissible pressure loss in the intercooler: max. 120 mbar (including pipeline). Note: In remote intercoolers not only is the pressure loss in the pipelines to be taken into consideration, but also the additional air volume in the intercooler system, because this additional air volume may lead to delayed engine response in the event of a load change. In addition, the following data is required: D D D D heat quantity to be conducted away from the charge air, air flow rate, charge-air pressure pipe connection diameter at the engine MAN provides this data for individual projects. The intercooler must be constantly supplied with cooling air independently of the radiator. This applies even if the engine is idling or in low-load operation. Pressure lines downstream of the compressor and their connections are required to comply with the following: D D D D they must withstand overpressures of up to 3 bar and must be absolutely tight they must resist temperatures of up to 250_C they must be oil-resistant the piping must have favourable flow characteristics Selection criteria for the choice of charge-air hoses are included in the Appendix to this brochure. 57 Intercooling Intercooling with air / water intercooler If the engine and cooling system are installed separately or if the charge air is used for other purposes, air / water intercoolers are deployed, as this makes it impossible to combine intercooler and fan radiator because of long charge-air pipes. Intercooling is then effected in an intercooler charged with water or coolant. À Inlet for hot charge air from compressor Á Outlet for recooled charge air to intake manifold, temperature max. 50_C 4 Caution: An excessively high charge-air temperature causes: D Black smoke D Non-permitted exhaust temperature D Deficient performance D Seizing pistons D Destruction of the engine 2 1 3  Inlet for coolant à Outlet for coolant In closed systems the coolant for intercoolers consists of water and about 40 to 50 % of antifreeze/anticorrosion agent by volume. The intercooler cooling circuit is to be designed as a separate circuit and must not be integrated in the engine coolant circuit. The intercooler coolant is circulated by a pump and recooled in a specially provided radiator. Depending on the application, an electric circulating pump or one driven by the engine may be used. In this set-up, the intercooler coolant temperature is always above the ambient air temperature. The temperature difference between the intercooler coolant temperature and the ambient air temperature depends on the dimensioning of the recooling equipment. As in air / air intercooling, here too the following condition for full engine output applies: Reduced output in intercooled engines As was mentioned at the beginning of this chapter, the permissible charge−air temperature downstream of the intercooler must not exceed 50_C. If the charge−air temperature is higher, the engine’s output must be reduced. Reduction table for D 28 genset engines Charge-air temperature downstream of intercooler in _C Reduction in output at 1500 rpm in % Reduction in output at 1800 rpm in % 50 55 60 65 70 75 0 3 5 8 10 13 0 2 3 5 6 8 58 Electrical preheating of coolant Design and function To guarantee quick starts and the quick take-up of load (e.g. in standby power units), the engine coolant is to be preheated during standstill. This is effected with an electric heater (1.7 kW) supplied from an alternating mains current. The coolant temperature can be set on the thermometer of the heater (recommended temperature range: 30_C to 40_C). The coolant inlet in the heater has a non−return valve. The arrow on the non-return valve must point to the heating. The coolant is warmed in the heater. The coolant that is now warmer, and hence has a lower specific weight, floats up, passes into the engine and gives off its heat. As the coolant loses heat, its specific weight increases and it sinks down again, thus beginning the cycle again (convection effects). Attachment of the preheater The coolant preheater is available as a loose accessory from MAN. The heater is attached horizontally to the genset frame at the lowest possible height. The arrangement of all components can be taken from the current drawings. These drawings can be obtained from MAN. All coolant hoses are to be routed so that they do not chafe and are at an adequate distance from movable and hot parts. Fit the non-return valve horizontally. 1 2 3 Attachment of coolant preheater in D 28 in-line engines À Heater Á Electric connection 230 V  Non-return valve 59 Electrical preheating of coolant 2 1 Attachment of the coolant preheater to a D 28 V-type engine À Heater with electrical connection 230 V Á Non-return valve Commissioning After connecting up the coolant preheater, commission the unit as follows: D Fill up with coolant. D Start engine and vent coolant circuit to guarantee proper circulation in the preheating system. Check for leaks, if necessary adding coolant. D Set the required temperature on the thermostat of the screw-in heater and commission heater, using 230 V alternating current. D Functional check: the heating outlet must become warm; the heating inlet must remain relatively cool. Possible causes of faults D D D D D D D Heater has been mounted at too high a position. Heater is not attached in horizontal position. Non-return valve is not fitted horizontally and/or with the wrong direction of flow. The heating outlet connection on the heater is at the bottom instead of at the top. The cooling system is not adequately vented. The cooling system is contaminated. The hose line from the heater to the engine is not mounted in a continuously ascending manner. 60 Fuel system Fuel circuit Fuel is sucked from the tank by the supply pump and fed to the inlet chamber of the injection pump via the fuel filter. The fuel supply pump supplies more fuel than is actually needed for combustion. The delivered surplus fuel flows back to the tank via a return line. This circuit conducts away heat and prevents the formation of bubbles in the fuel system. Schematic diagrams of fuel systems can be found in the Operator’s Manual for the engine. Dimensions for the fuel pipe connections for the supply and return pipes are indicated in the installation drawing. Tank capacity The required tank capacity is determined by the engine power, the fuel consumption and the required operating period. The following equation can be used for a rough-and−ready estimate. In addition, a sufficiently large amount of reserve fuel must be taken into consideration too. V+ P be 830 t Key: V = Tank capacity in litres P = Engine output in Kilowatts (average output) t = Running time in hours be = Specific fuel consumption at full load in gram per kilowatt and hour. A guideline value of 220 g / kWh is sufficiently precise for the estimate. Requirements for a fuel tank The tank must be made of fuel-resistant and corrosion−resistant material. We recommend stainless sheet steel as tank material. Under no circumstances must galvanised sheet metal be used. The tank must be made stable. The tank bottom must have a recess with a drainage device where dirt and condensation water can collect. Condensation water in the fuel tank provides the basis for the growth of micro-organisms in diesel fuel. These micro-organisms cause premature filter blockages and corrosion damage, which is why condensation water collected in the tank and in the filter must be drained regularly. The inlet of the fuel feed line to the engine should be approx. 50 mm above the tank bottom. We recommend that the return line from the engine to the tank be located as far away from the feed line as possible and project as far into the tank as the feed line. The filling line must have an adequate cross section, lead to the tank without sharp turns and it must close securely. In addition, the tank must be equipped with a venting line. Having completed the tank assembly, remove all dirt, forging scales and welding beads from the tank and check it for leaks. 61 Fuel system Arrangement of the tank system The tank should be located at roughly the height of the engine. If this is impossible, the following points must be observed: D Tank located under the engine The max. suction height of the fuel supply pump is approx. 1 m for in-line injection pumps and approx. 0.5 m for engines with distributor injection pumps. The suction height is reduced if an additional filter is installed in the suction line or a longer pipe is required for reasons of space. If the maximum permissible suction height is exceeded, an additional fuel pump is required or, in stationary engines, a day tank may be installed that can be filled from the main tank by means of a separate fuel pump. Here it must be ensured that when the engine is switched off the static vacuum in the suction gallery / chamber of the injection pump does not exceed 100 mbar in order to prevent the system being drained. If necessary, an additional fuel tank must be fitted as an intermediate storage unit at the height of the injection pump. This tank must meet the following criteria: − Capacity approx. 2 litre − Venting line to tank − The fuel supply pipe must be screened off from the return pipe to prevent the intake of warm return fuel. Complete separation is, however, not permissible. Openings should be provided in the partition wall for pressure equalisation. See page 63 for flow diagram. D Tank located above the engine In this case, a shut-off valve may be installed in the fuel supply and return lines to prevent fuel from running out during maintenance work. Danger: If the engine is operated by mistake when the fuel return system is closed, a pressure increase caused by the leakage fuel up to the injection pressure of the injector nozzles (approx. 300 bar) can be expected. Danger for personnel, as hoses may burst. Risk of fire! 62 Fuel system Fuel flow diagram for a specialpurpose vehicle with lowlying tank located below the engine 1 2 3 4 À Á  à Injection pump Additional tank with venting line to main fuel tank Additional electrically driven fuel pump Main fuel tank 63 Fuel system Fuel lines Protect the fuel against heating up. The return line is to be routed back to the tank separately. Direct integration into the supply line leads to an increase in fuel temperature in the suction chamber of the injection pump. Since the pump supplies fuel volumetrically, output drops owing to the reduction in density. Caution: The max. permitted fuel temperature upstream of the feed pump is 50_C At fuel temperatures u 50_C, the lubricity of fuel deteriorates, which results in increasing element wear. The following applies to the internal pipe diameter: D up to 400 kW: Øi = 10 mm D above 400 kW: Øi = 12 mm Select fuel- and flame−resistant material for the fuel lines. Fuel lines are to be routed so that they are free of tension and kinks and do not chafe. Danger: Inexpertly routed fuel lines chafe and become leaky or break. Risk of fire as a result of diesel fuel which may emerge. Fuel lines must never be clamped together with a single-piece clamp. Parallel fuel lines may be grouped together by cable ties, but not together with injection lines or corrugated pipes. Lines which cross each other must not be grouped together. Do not route fuel lines over corners, edges, bolt heads etc. Before the fuel system (tank and pipes) is commissioned, the entire system is to be flushed out with diesel fuel. 64 Fuel system Fuel prefilter and water separator We recommend that a prefilter (mesh width 30µ 60µ) and a water separator be provided in the fuel supply system. Caution: Water in the fuel causes: D incomplete combustion D jammed nozzles, chipped nozzle caps D damage to the injection pumps D piston damage D destruction of the engine Fuel prefilter (example) À Drain screw Á Filter bowl  Filter cartridge 3 2 1 65 Flame starting system On request MAN engines can be equipped with a flame starting system (flame starter). The purpose of a flame starting system The flame starter is a starting aid. It reduces the formation of blue and white smoke during the cold phase by means of post−flaming and expedites the engine’s smooth running. Design and function A flame glow plug screwed into the intake pipe is preglowed at temperatures below 10_C, generating a flame through the combustion of diesel fuel. This flame preheats the intake air during the starting procedure. The diesel fuel required for this is supplied under pressure into the flame glow plug by the fuel delivery pump as the engine turns over. Fuel is supplied from the suction chamber of the injection pump, the pre−pressure (ranging from 1.0 to 2.0 bar) and is controlled by the overflow valve. In the flame glow plug, fuel is metered and supplied into the intake pipe where it is mixed with air and ignites. The generation of a flame is possible only if the flame glow plug is at operating temperature and the engine is turning over. Only then does a solenoid valve permit the supply of fuel to the glow plug. Post−flaming, i.e. maintaining the flame after the start, shortens the warming-up phase and reduces the formation of cold smoke. The post-flaming period is controlled via a temperature transmitter (NTC transmitter) as a function of the engine temperature. All functional processes are carried out automatically via an electronic flame start relay which has diagnostic functions. Wiring diagram A circuit diagram, maintenance and inspection notes are supplied together with the flame starter (publication no. 51.99493−8390). 66 Electronic speed control on D 08 engines Digital speed governor GAC SDG865-01-01 Note: All the information in this chapter is an excerpt from the Operator’s Manual of the manufacturer GAC Engine Governing Systems or of the importer HÜGLI TECH LTD SWITZERLAND. The SDG865 (MSG) device communicates via CAN bus with the Bosch injection pump VP44 (PSG) and supports all the necessary signals and messages at the interface to the pump. The device is connected at the 9-pin connector of the pump control unit. 2 1 67 3 4 5 6 9 8 7 Electronic speed control on D 08 engines Installation and connection for MAN−Cats 51.11616−1023 +− BATTERY 24VDC SDG−865−XX−01 RUN/STOP brown 2x5 white brown ZSB968993−1 6 MANNO.81.25432.0393 VP44 PSGCONNECTOR FUSE MAX10A 2x1.5 white 7 5 1 STABILITY DERIVATIVE 10 D CAN−H Speedtrim+/−50RPM 5kOhm,1/4W (OPTION) CAN−L RUN/ SETUP FAULT GAIN B C 8 2 A 1 2 3 4 5 6 7 8 9 0 + 9 E 8 7 F 6 51.27120−7032 SpeedsensorMSP6723C G brown 2x0.5shielded 2x0.5shielded 5 4 H MENU 3 white 2 I SETUP 1 2x0.5shielded J ENTER RUN 0 Speedpreselection(OPTION) _ K MAB(24VDC=STOP) brown L M N 51.27120−0014 DZGsensor O P Q R S T U V W x Y brown 1 2x0.5shielded white 2 DZG white CAN−H brown CAN−H CAN−L white CAN−L (GAC/COMAP)LSM/SYCINPUT OUTPUT:ALARM/HORNSIGNAL EMERGENCYSTOP EXTERNAL INTERNAL STOP Wiring requirements for the governor D Battery connection cable on terminals A and B should be at least 2.5 mm2 for 24 V DC. A twisted (shielded) cable must be used. D Battery positive (+) input, terminal B, should have a 10 A fuse (see diagrams). D The governor should be fitted as insulated and have no conducting connection to earth. D The cables of the magnetic rpm sensor should be shielded (or twisted) along its entire length. The shielding should only be connected at terminal A or N. D The cables of the variable speed input can be up to 10 m long. A shielded (or twisted) cable must be used. The shielding should only be connected at terminal A. D The shielding must be insulated so that it does not make contact with the machine earth. This is intended to prevent external stray signals from entering the governor and causing malfunctions. 68 Electronic speed control on D 28 engines Layout of the electronic speed control The electronic speed control system consists of three components: Rpm sensor 2 In MAN engines, the rpm sensor À, which works according to the induction principle, is located on the flywheel housing. It consists of a permanent magnet surrounded by a coil. 1 Depending on whether a tooth of the starter gear ring Á is before the magnet or not, the magnetic field changes and induces in the coil an AC voltage which is proportional to the engine speed and serves as input signal for the control unit. Electronic control unit The electronic control unit receives the signal (actual value) generated by the speed pickup and compares it with a preset value (nominal value). If the actual and the nominal values are identical, the electronic control unit generates an output signal which activates the actuator. Actuator In GAC governors, for example, the actuator is a spring-loaded linear solenoid. This solenoid is connected to the control rod of the injection pump and changes its position according to the signal from the control unit. As a result, the injection quantity and, consequently, engine speed are controlled. 69 Electronic speed control on D 28 engines Function of the electronic speed governor GAC The GAC ESD 5221 electronic speed governor is used as an example here to give a general overview of the possibilities provided by this control system and to show what characteristic data can be set or altered. Caution: When installing and commissioning, please observe the Operator’s Manual for the respective speed governor model. 1 3 4 2 5 6 7 8 9 10 11 + 12 − 13 20 19 16 17 18 70 15 14 Electronic speed control on D 28 engines À LED display for electronic overspeed control Á Output contacts “Overspeed” LED display for overspeed  Overspeed reset button: initial position of the relay contacts after overspeed signal has been sent. Resetting can also be effected by briefly interrupting the battery power supply. à Overspeed test button, lowers the switching point by approx. 12% Ä 25-step potentiometer: setting of overspeed. Let engine idle, press test button and simultaneously turn it to the left until engine stops and the display comes on. Å 25-step potentiometer: setting of rated speed. Æ Setting the stability Ç Setting the sensitivity È Additional assistance for stability improvement. In the event of very slow pendulum motion, set 10 + 20 mF capacitor from E3 to E2 É This makes it possible to set the lower idling speed limit if “L” and ”M” are connected. 11 Setting the P degree if “L” and “K” are connected. 12 Stabilised voltage 10 V for triggering additional modules. 13 Input for signals from synchroniser, load divider, smoke limiter etc. 14 Connect “G” and “H” only if a high P degree (10%) is required. 15 Operation at low idling speed if L and M are connected. 16 P degree operation if “K” and “L” are connected. 17 Speed precision setting (only required for remote control) 18 Battery 19 Pulse generator 20 Actuator Caution: Except in emergency cases, the engine must never be switched off by interrupting the cables for the actuators, but only by interrupting the battery supply. 71 Electronic speed control on D 28 engines Overspeed protection If an electronic speed governor is used, an overspeed protection independent of the governor must be provided. For this purpose an electromagnetic shut-off valve is installed in the fuel supply line to the injection pump. If the governor fails, this valve shuts off the fuel supply, thus preventing the engine from revving up in an uncontrolled manner. The triggering of the shut-off valve is to be installed by the genset manufacturer. 15 A 30 1 15 50 10 A 2 50 M F 1 2 3 E 3 4 Proposal for the circuitry of an electromagnetic shut-off valve À Á  ¯ Starter lock Shut-off valve GAC control unit GAC actuator Caution: When venting the fuel system, make absolutely sure that you switch on the electromagnetic shut− off valve, as otherwise fuel cannot reach the injection pump suction gallery / suction chamber. 72 Electrical system Engine monitoring control Monitoring the coolant level Fluid−monitoring probes may be used to monitor the coolant level in the coolant expansion tank. The probe available from MAN is a capacitive device. The sensor and the electronic evaluation system form one unit. If the coolant drops below the level to be monitored, a negative potential is sent to the signal output “S”. This can then be used to trigger a signal lamp or a relay. Output “S” must not be charged with more than 3 Watts. + max. 3 W + 24 V S S − − This output “S” must not be directly connected to the plus terminal as this would destroy the output transistor. To avoid incorrect messages, the signal is triggered with a delay of 7 seconds. The probes are equipped with a built-in function control. When the supply voltage is applied (e.g. engine is started), the signal appears for approx. 2 seconds, thus indicating operability. If this signal does not appear, check the probe. 73 Electrical system Generator Bosch generator 28 V, 80 A Connections at the generator À Á Â Ã Ä 1 W (speed signal) L (charge indication) terminal 15 via ignition lock (for pre-exciting) not connected not connected 2 3 5 Wiring diagram B1+ 4 B2+ DFM BS I5 L W Connections B1 and B2 can be used optionally The numbering of the 5-pin duplex connector can deviate 74 Appendix 75 Coolant hoses Requirements for coolant lines Excerpt from the MAN Works Standards Basis for this summary This summary is based on the MAN Works Standards nos. 334, 305 and 307. These standards can be obtained from MAN. Applicability These requirements apply to hoses with textile ply for coolant under operating conditions which are usual in motor vehicles. In the event of deviations from the usual operating conditions, further requirements may have to be taken into account. In addition, respective regulations from supervisory authorities are to be observed. The stipulations of this also standard apply analogously to machined parts. Designation s2 D s1 1 2 3 À Inner layer Á Textile ply  Outer layer 77 Coolant hoses Excerpt from factory standard MAN 334 Material property requirements for hoses and moulded parts For new constructions, electrochemically resilient materials, usually type 5 and at the request of the customer type 3, are to be used preferably. Types 4, 5, 6 and 8 are made using extrusion; type 3 and 7 have multiple layers. Types placed in brackets are to be avoided. Material (type), material types, properties Hose quality (structure) Material (type) Inner layer Outer layer Colour: usually black Colour: usually black Use Pressure carrier (plys) Permitted deployment temperatures in _C 1) Medium Max. permitted operating overpressures in bar Environment (2) 3) Material (type) 5 is always to be used even if type 2 is still specified in other valid documentation. 3 4) MAN 307-MVQ 3 MAN 307-MVQ 3 Colour: blue Colour: blue (4) MAN 305-EPDM 5 Optionally: MAN 303-ECO 2 MAN 358-CM/ CSM 1 5 MAN 305-EPDM 10 MAN 305-EPDM 10 MAN 307-MVQ 3 MAN 307-MVQ 3 Colour: manufacturer’s choice Colour: blue MAN 307-MVQ 3 MAN 307-MVQ 3 Colour: blue Colour: blue Usual type 6 6) 7 Resilience of outer layer to mineral oil products according to MAN 2910 Min. 3-layer twisted textile ply made of polyester up to 150 2.5 medium One or more textile plys made of aramide as chosen by manufacturer (other plys only after approval by MAN, dept. MTWV up to 125 2.5 medium to good up to 135 2.5 low up to 150 2.5 medium Multilayer twisted textile plys made of polyester (min. 3-layer or more) up to 150 4.5 medium Joined ply(s) made of aramide or after agreement with MAN, dept. MTWV up to 150 4.5 low One or more textile plys made of polyester up to 120 7) 8 8) MAN 305-EPDM 10 MAN 305-EPDM 10 2) If higher pressure peaks ( pressure pulses) occur frequently, it must be expected that the service life will be reduced or that the component will fail prematurely. 3) Blocked for new constructions; use type 5. 4) Only use in main circuits at request of customer. 5) Only permitted after consultation if special oil resilience is required. 6) Only at the request of the customer for subordinate load application (low pressure pulses) in auxiliary circuits. 7) Number depends on the rated width, the selected pressure carrier and the required pressure. 8) Only yard ware 78 Coolant hoses Excerpt from factory standard MAN 307 Material types, note on use Type Basic requirements according to SAE J 200 Basic requirements according to DIN 78078 Area of application Resilience properties Permitted continuous temperature _C Maximum temperature _C Media Used for 1) 1 M 4 GEx08 GFEx3x1 −55 to +175 +200 Environmental influences such as air, ozone, water, sun and limited effect of mineral oil products (no contact for long period) Gaskets and supports made of plate material 2 M 5 GEx06 GGEx3x3 −55 to +175 +200 3 M 5 GE 607 GGE 6363 −55 to +125 +150 Environmental influences such as air, ozone, water, sun; water with and without antifreeze and / or anti−corrosive agent Inner and outer layers of coolant hoses 4 M 7 GE 706 GHE 7323 −55 to +125 +150 According to M7.661.60 Shaft sealing rings 5 M 5 GE 506 GGE 5363 −55 to +175 +200 Environmental influences such as air, ozone, water, sun and limited effect of mineral oil products (contact for long period) Intermediate and outer layer of hose sections, folding hoses, moulded parts for air intake and charging air lines, oil return hoses 6 M 2 FK 607 GLE 6356 −60 to +175 +200 Environmental influences such as air, ozone, water, sun Gaskets with special cold flexibility Moulded parts, gaskets Mineral oil products according to MAN 2910 Diesel fuel FAME 2) 1) If exposed to the maximum temperature for longer periods, it must be expected that the service life will be shorter 2) FAME (fatty acid methyl ester) according to DIN EN 14214 79 Coolant hoses Excerpt from factory standard MAN 305 Material types, note on use Type Basic requirements according to SAE J 200 Basic requirements according to DIN 78078 Area of application Resilience properties Permitted continuous temperature _C Maximum temperature _C Media Used for 3) 6 M 2 CAx10 CDD 7464 −40 to +120 +125 Environmental influences such as air, ozone, water, sun Inner and outer layer of air intake / charge−air hoses and moulded parts 7 M 7 CAx14 BADx5x3 −40 to +85 +100 Environmental influences such as air, ozone, water, sun Parts subjected to high dynamic / mechanical loads M 2 DAx14 DADx5x4 −40 to +125 Environmental influences such as air, ozone, water, sun: Round sealing rings, moulded parts in the coolant circuit (8) 9 Replaced by M 3342-1, type 7 +135 water with and without antifreeze and / or anti−corrosive agent 10 M 2 DA 610 DBD 6467 −35 to +140 +150 −40 to +1204) +1304) −40 to +1355) +1505) Refrigerant R 134a and refrigerant oils Round sealing rings in the refrigerant circuit 6) Environmental influences such as air, ozone, water, sun: Inner and outer layer of coolant hoses and moulded parts with electrochemical resilience water with and without antifreeze and / or anti−corrosive agent M 2 DA 714 DAD 7565 −35 to +1405) +1505) Environmental influences such as air, ozone, water, sun Intermediate and outer layers of coolant hoses 12 M 2 CA 607 BAE 7383 −40 to +85 +100 Diluted urea solution; Inner and outer layer of hoses in GD catalytic converter systems 11 Environmental influences such as air, ozone, water, sun 3) If exposed to the maximum temperature for longer periods, it must be expected that the service life will be shorter 4) Temperature throughflow medium 5) Ambient temperature 6) Only type 9 with hardness 75 Shore A 80 Coolant hoses Dimensions Dimensions and permitted deviations Rated diameter d mm Rated dimension Wall thickness s1 mm Permitted deviation type (2), 4, 5, 8 Permitted deviation type 3, 6, 7 0 −0 −0,5 5 +0,4 −1 2 −1,2 8 10 12 18 Type 3, 7, 8 Permitted deviation 3,75 80 90 135 0 −0 −0,6 6 140 165 20 22 25 195 −0,1 −0 7 −0,7 200 45 4,5 240 28 30 32 35 38 40 Smallest permitted bending radius r 3) mm 70 4 15 16 Type (2), 4, 5, 6 Inner layer s2 2) min min. 280 −0,1 −0,9 −0 9 360 5 −0,2 −1,0 −0,2 −1,1 11 "0,6 06 "0,6 s1/2 380 420 460 480 42 −0,2 −1,2 500 45 −0,3 −1,4 14 550 50 5 650 55 60 65 750 −0,3 −1 4 −1,4 850 900 70 75 80 950 −0,4 −1 6 −1,6 1050 1150 If straight hoses are fitted so that they bend, make sure there are no kinks. For the length tolerance of hoses and moulded parts, DIN EN ISO 1307 and/or DIN 7715-40 apply. 81 Recommended values for assignment: Starter, battery size and starter cable Engine types D 08 engines D 28 R engines D 28 V engines Bosch Bosch KB Bosch KB V 24 24 24 kW 4 5,4 6,5 Starter type Rated voltage Rated power Permitted battery capacity1) Ah Starter short-circuit current A at 20_C with supply lead 1 mW/m 66 88 110 110 143 170 143 170 200 210 940 1050 1100 1570 1750 1800 1760 1810 1830 1910 Recommended starter cable length in metres Required starter cable cross sectional area (copper) mm2 50 70 95 120 140 (2 x 70) (applies for the feed and return line, voltage drop: max. 4% based on 0.5 x starter short-circuit current 5,7 7,9 10,8 13,6 15,9 5,0 7,1 9,6 12,2 14,2 3,4 4,8 6,5 8,2 9,5 − 4,3 5,8 7,3 8,5 − 4,1 5,6 7,1 8,3 − 4,2 5,8 7,3 8,5 − 4,1 5,6 7,0 8,2 − 4,0 5,5 7,0 8,2 − 3,9 5,3 6,7 7,8 Max. permitted lead lengths in metres Control lead between starting switch and starter terminal 50 mm2 2,5 4,0 6,0 4,8 6,8 9,2 11,6 13,6 9,8 15,7 23,6 20 31 47 1) Batteries as per DIN 72 311. The maximum battery capacity listed for each starter may not be exceeded to avoid damage to the starter and the starter sprokket. 82 Wiring diagram 8444 83 Index A E Air filter . . . . . . . . . . . . . . . . . . . . . . . . . . . . . . . . . . 32 Exhaust system . . . . . . . . . . . . . . . . . . . . . . . . . . . 34 Partial vacuum downstream of air filter . . . . . 32 Bellow expansion joint . . . . . . . . . . . . . . . . . . . . 36 Air intake pipe . . . . . . . . . . . . . . . . . . . . . . . . . . . . 33 Calculation . . . . . . . . . . . . . . . . . . . . . . . . . . . . . . 37 Air intake system, Combustion air . . . . . . . . . . . 32 Configuration . . . . . . . . . . . . . . . . . . . . . . . . . . . . 37 Appendix . . . . . . . . . . . . . . . . . . . . . . . . . . . . . 75–99 Securing . . . . . . . . . . . . . . . . . . . . . . . . . . . . . . . . 34 Axial clearance of crankshaft . . . . . . . . . . . . . . . . 28 Expansion tank . . . . . . . . . . . . . . . . . . . . . . . . . . . 50 C F Cardan shafts, General . . . . . . . . . . . . . . . . . . . . 30 Fan . . . . . . . . . . . . . . . . . . . . . . . . . . . . . . . . . . . . . . 49 Catalytic converters . . . . . . . . . . . . . . . . . . . . . . . . 44 Flame starting system . . . . . . . . . . . . . . . . . . . . . 66 Charge-air cooling . . . . . . . . . . . . . . . . . . . . . . . . . 56 Flywheel . . . . . . . . . . . . . . . . . . . . . . . . . . . . . . . . . 26 Charge-air temperature . . . . . . . . . . . . . . . . . . . . 56 Foundation . . . . . . . . . . . . . . . . . . . . . . . . . . . . . . . 21 Co-generation . . . . . . . . . . . . . . . . . . . . . . . . . . . . 47 Fuel feed pump . . . . . . . . . . . . . . . . . . . . . . . . . . . 62 Control conditions . . . . . . . . . . . . . . . . . . . . . . . . . 14 Fuel lines . . . . . . . . . . . . . . . . . . . . . . . . . . . . . . . . . 64 Coolant hoses, requirements . . . . . . . . . . . . . . . . 77 Fuel prefilter . . . . . . . . . . . . . . . . . . . . . . . . . . . . . . 65 Coolant level, monitoring . . . . . . . . . . . . . . . . . . . 73 Fuel system . . . . . . . . . . . . . . . . . . . . . . . . . . . . . . 61 Coolant lines . . . . . . . . . . . . . . . . . . . . . . . . . . . . . . 50 Fuel temperature . . . . . . . . . . . . . . . . . . . . . . . . . . 64 Coolant preheater . . . . . . . . . . . . . . . . . . . . . . . . . 59 Cooling circuit, assessment . . . . . . . . . . . . . . . . . 53 G Cooling constant . . . . . . . . . . . . . . . . . . . . . . . . . . 55 Generator . . . . . . . . . . . . . . . . . . . . . . . . . . . . . . . . 74 Cooling system . . . . . . . . . . . . . . . . . . . . . . . . . . . 46 L Check . . . . . . . . . . . . . . . . . . . . . . . . . . . . . . . . . . 52 Load application, genset engines . . . . . . . . . . . . 12 Dimensioning . . . . . . . . . . . . . . . . . . . . . . . . . . . 52 O E Overspeed protection . . . . . . . . . . . . . . . . . . . . . . 72 Electronic speed control . . . . . . . . . . . . . . . . . . . . 69 Electronic speed governor, description . . . . . . . 67 P Engine foundation . . . . . . . . . . . . . . . . . . . . . . . . . 24 Propeller shafts, installation . . . . . . . . . . . . . . . . . 31 Engine monitoring . . . . . . . . . . . . . . . . . . . . . . . . . 73 Engine mounting . . . . . . . . . . . . . . . . . . . . . . 21 , 24 R Engine mounting, elastic, adjustment . . . . . . . . . 22 Rpm sensor . . . . . . . . . . . . . . . . . . . . . . . . . . . . . . 69 Engine mounting), supporting forces . . . . . . . . . 25 S Engine output, calculation (genset engines) . . . 10 Safety regulations . . . . . . . . . . . . . . . . . . . . . . . . 3–8 Engine output definitions, (genset engines) . . . . 7 Handling used engine oil . . . . . . . . . . . . . . . . . . . 5 Engine output, reduction . . . . . . . . . . . . . . . . . . . 58 Preventing accidents with injury to persons . . . 3 Engine room, accessibility . . . . . . . . . . . . . . . . . . 16 Preventing damage to engine and premature wear . . . . . . . . . . . . . . . . . . . . . . . 4 Engine room ventilation . . . . . . . . . . . . . . . . . . . . 18 Engine vicinity . . . . . . . . . . . . . . . . . . . . . . . . . . . . . 6 Preventing environmental damage . . . . . . . . . . 5 Exhaust back pressure Starter . . . . . . . . . . . . . . . . . . . . . . . . . . . . . . . . . . . 82 Max. perm. . . . . . . . . . . . . . . . . . . . . . . . . . . . . . 40 Measurement . . . . . . . . . . . . . . . . . . . . . . . . . . . 40 Exhaust backpressure . . . . . . . . . . . . . . . . . . . . . 36 Exhaust gas heat, usable . . . . . . . . . . . . . . . . . . . 42 Exhaust gas heat utilisation . . . . . . . . . . . . . . . . . 41 85 Index T V Tank (manufacture) . . . . . . . . . . . . . . . . . . . . . . . . 61 Vibrations, elastic engine mountings . . . . . . . . . 21 Tank capacity . . . . . . . . . . . . . . . . . . . . . . . . . . . . . 61 W Thermostat . . . . . . . . . . . . . . . . . . . . . . . . . . . . . . . 49 Waste heat utilisations . . . . . . . . . . . . . . . . . . . . . 47 Torsional vibration calculation . . . . . . . . . . . . . . . 28 Water separator . . . . . . . . . . . . . . . . . . . . . . . . . . . 65 Wiring diagram . . . . . . . . . . . . . . . . . . . . . . . . . . . . 83 86 Index S T U W 87