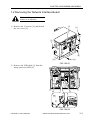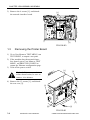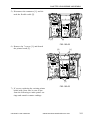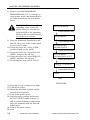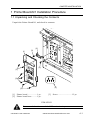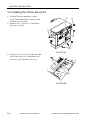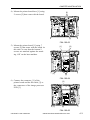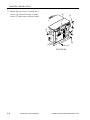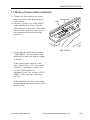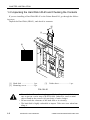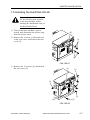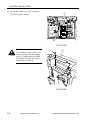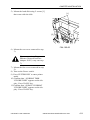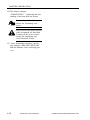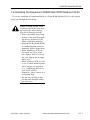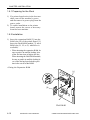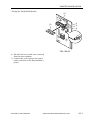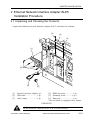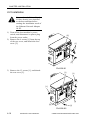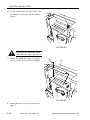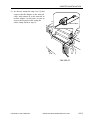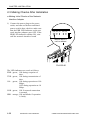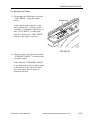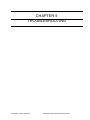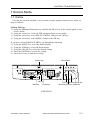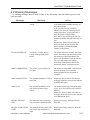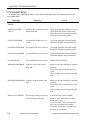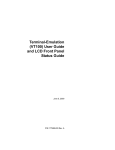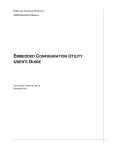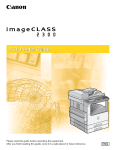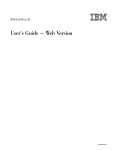
1
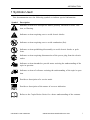
Printer Board-N1/Ethernet
Network Interface Adapter iN-E5
REVISION 0
NOV. 2001
COPYRIGHT© 2001 CANON INC. 2CANON Printer Board-N1/iN-E5 REV.0 NOV. 2001 PRINTED IN JAPAN (IMPRIME AU JAPON)
Application
This manual has been issued by Canon Inc. for qualified persons to learn technical
theory, installation, maintenance, and repair of products. This manual covers all localities
where the products are sold. For this reason, there may be information in this manual
that does not apply to your locality.
Corrections
This manual may contain technical inaccuracies or typographical errors due to
improvements or changes in products. When changes occur in applicable products or in
the contents of this manual, Canon will release technical information as the need arises.
In the event of major changes in the contents of this manual over a long or short period,
Canon will issue a new edition of this manual.
The following paragraph does not apply to any countries where such provisions are
inconsistent with local law.
Trademarks
The product names and company names used in this manual are the registered
trademarks of the individual companies.
Copyright
This manual is copyrighted with all rights reserved. Under the copyright laws, this
manual may not be copied, reproduced or translated into another language, in whole or in
part, without the written consent of Canon Inc.
COPYRIGHT © 2001 CANON INC.
Printed in Japan
Imprimé au Japon
Caution
Use of this manual should be strictly supervised to avoid disclosure of confidential information.
COPYRIGHT© 2001 CANON INC. 2CANON Printer Board-N1/iN-E5 REV.0 NOV. 2001 PRINTED IN JAPAN (IMPRIME AU JAPON)
INTRODUCTION
1 Symbols Used
This documentation uses the following symbols to indicate special information:
Symbol
Description
Indicates an item of a non-specific nature, possibly classified as Note, Caution, or Warning.
Indicates an item requiring care to avoid electric shocks.
Indicates an item requiring care to avoid combustion (fire).
Indicates an item prohibiting disassembly to avoid electric shocks or problems.
Indicates an item requiring disconnection of the power plug from the electric
outlet.
Memo
REF.
Indicates an item intended to provide notes assisting the understanding of the
topic in question.
Indicates an item of reference assisting the understanding of the topic in question.
Provides a description of a service mode.
Provides a description of the nature of an error indication.
Refers to the Copier Basics Series for a better understanding of the contents.
COPYRIGHT © 2001 CANON INC. 2001 2001 2001 2001 CANON Printer Board-N1/iN-E5 REV.0 NOV. 2001
i
INTRODUCTION
2 Outline of the Manual
This Service Manual provides basic facts and figures about the Printer Board-N1/Network Interface Board iN-E5 that may be used when servicing the Board in the field.
This Service Manual consists of the following:
Chapter 1 Introduction:
Chapter 2 Operation:
Chapter 3 Disassembly/Assembly:
Chapter 4 Installation:
Chapter 5 Troubleshooting:
Appendix:
product outline, features, specifications, operation
functional blocks of the board, upgrading
disassembly/assembly procedure
installation procedure for the board
service mode, self diagnosis
list of special tools
The descriptions in this manual are subject to change, and major changes will be communicated in the form of Service Information bulletins.
The service persons are expected to be fully familiar with the contents of this manual
and the service information bulletins so as to equipped themselves with the ability to respond to the needs of the field, i.e., isolating and correcting faults.
ii
COPYRIGHT © 2001 CANON INC. 2001 2001 2001 2001 CANON Printer Board-N1/iN-E5 REV.0 NOV. 2001
CONTENTS
Contents
CHAPTER 1 INTRODUCTION
1 Outline ................................................ 1-1
1.1 Outline ....................................... 1-1
2 Specifications ..................................... 1-2
2.1 Printer Board-N1 ....................... 1-2
2.2 Ethernet Network Interface
Adapter iN-E5 ........................... 1-2
2.3 Hard Disk HD-65 ...................... 1-2
3 Operation ............................................ 1-3
3.1 Making Network Settings ......... 1-3
3.2 Making Printer Settings ............ 1-3
CHAPTER 2 OPERATION
1 Construction ....................................... 2-1
1.1 Outline ....................................... 2-1
1.2 Functional Blocks of the
Printer Board ............................. 2-1
1.3 Upgrading .................................. 2-4
CHAPTER 3 DISASSEMBLY/ASSEMBLY
1 Disassembly and Assembly ............... 3-1
1.1 Removing the Hard Disk ........... 3-2
1.2 Removing the Network
Interface Board .......................... 3-3
1.3 Removing the Printer Board ..... 3-4
CHAPTER 4 INSTALLATION
1 Printer Board-N1 Installation
Procedure ............................................ 4-1
1.1 Unpacking and Checking the
Contents ..................................... 4-1
1.2 Installing the Printer Board-N1 4-2
1.3 Making Checks After
Installation ................................. 4-5
1.4 Unpacking the Hard Disk HD-65
and Checking the Contents ....... 4-6
1.5 Installing the Hard Disk HD-65
................................................... 4-7
1.6 Installing the Expansion RAM/
Flash ROM Module FR-65 ..... 4-11
1.6.1 Preparing for the Work ..... 4-12
1.6.2 Installation ......................... 4-12
1.6.3 Making Checks After
Installation ......................... 4-14
2 Ethernet Network Interface Adapter
iN-E5 Installation Procedure ........... 4-15
2.1 Unpacking and Checking the
Contents ................................... 4-15
2.2 Installation ............................... 4-16
2.3 Making Checks After
Installation ............................... 4-20
COPYRIGHT © 2001 CANON INC. 2001 2001 2001 2001 CANON Printer Board-N1/iN-E5 REV.0 NOV. 2001
iii
CONTENTS
CHAPTER 5 TROUBLESHOOTING
1 Service Mode ..................................... 5-1
1.1 Outline ....................................... 5-1
1.2 Functions of Service Mode ....... 5-3
2 Self
2.1
2.2
2.3
2.4
Diagnosis .................................... 5-4
Outline ....................................... 5-4
Warning Messages ..................... 5-5
Normal Error ............................. 5-6
Service Call Error ...................... 5-7
APPENDIX
1 Special Tools ...................................... A-1
iv
COPYRIGHT © 2001 CANON INC. 2001 2001 2001 2001 CANON Printer Board-N1/iN-E5 REV.0 NOV. 2001
CHAPTER 1
INTRODUCTION
COPYRIGHT © 2001 CANON INC. 2001 2001 2001 2001 CANON Printer Board-N1/iN-E5 REV.0 NOV. 2001
CHAPTER 1 INTRODUCTION
1 Outline
1.1 Outline
The names and the functions of the accessories configured in a system are as follows:
Printer Board-N1
When built inside the host machine, it enables the host to function as a printer.
With an Adobe PS3 Module-B1 mounted to the expansion ROM slot of the printer
board, the host can serve as a PS printer.
Addition of a Flash ROM Module FR-65, moreover, will enable downloading of fonts
and macros.
Ethernet Network Interface Adapter iN-E5
Built into the host machine together with a Printer Board-N1, it enables the host to
function as a network printer.
Hard Disk HD-65
Built into the host machine together with a Printer Board-N1, it will enable PDL data or
data that has undergone RIP processing.
COPYRIGHT © 2001 CANON INC. 2001 2001 2001 2001 CANON Printer Board-N1/iN-E5 REV.0 NOV. 2001
1-1
CHAPTER 1 INTRODUCTION
2 Specifications
2.1 Printer Board-N1
CPU
ROM
RAM
Interface
Page description
language
OS
Accessory
Power PC (200 MHz)
8 MB
Standard : 8 MB (72 MB max.)
Parallel (IEEE1284), USB
PCL 5e, PCL-XL 2.0
Windows 2000/NT4.0/Me/98/95 MAC OS (8.5/8.6 or later)
45 scalable fonts as standard (MicroType fonts); 32 TrueType fonts, 9
bitmap fonts
Adobe PS3 Module-B1 (includes a total of 136 fonts)
Flash ROM Module FR-65
2.2 Ethernet Network Interface Adapter iN-E5
Interface
CPU
Protocol
Print service
10Base-T, 100Base-TX
RISC CPU (100 MHz)
IPX/SPX, TCP/IP, AppleTalk, NetBIOS/NetBEUI
Bindery PServer, NDS PServer, NDPS, LPD, Port9100, IPP,
CAP (Canon AppleTalk PrintServer)
2.3 Hard Disk HD-65
Capacity
Interface
1-2
10 GB
ATA-3
COPYRIGHT © 2001 CANON INC. 2001 2001 2001 2001 CANON Printer Board-N1/iN-E5 REV.0 NOV. 2001
CHAPTER 1 INTRODUCTION
3 Operation
3.1 Making Network Settings
The Board’s network settings are made in user mode, and the settings are layered as
shown in the following diagram; for details, see the Network Guide.
USER MODE
SYSTEM SETTINGS
NETWORK SETTINGS
IP ADDRESS AUTO
IP ADDRESS
SUBNET MASK
DEFAULT GATEWAY
DNS SERVER ADD
DNS DYNAMIC SET
HOST NAME
DOMAIN NAME
VIEW IP ADDRESS
3.2 Making Printer Settings
The Board’s printer settings are made from a PC or the host’s control panel. The following shows how settings may be made from the control panel and the layers into which the
settings are grouped; for details on making settings from a driver, see the Printer Guide:
Making Settings
1) Press the System key so that ‘READY’ appears and the machine enters printer mode.
2) Press the Go key so that ‘PAUSED’ appears and the machine goes offline.
3) Press the Menu key to select the desired menu.
4) Press the Item key to select the desired item.
5) Press the Value key, select a setting, and press the Enter key to store.
COPYRIGHT © 2001 CANON INC. 2001 2001 2001 2001 CANON Printer Board-N1/iN-E5 REV.0 NOV. 2001
1-3
CHAPTER 1 INTRODUCTION
Hierarchy of the Settings
Menu Name
Description
SECURED JOB MENU
ENTER PASSWD
Prompts you to enter the password required for printing the
selected job.
COPIES
Sets the number of copies to print for the secured print job.
INVALID PASSWD REENTER Asks whether or not you want to reenter the password.
SHUTDOWN MENU
SHUT DOWN
Shuts down the printer.
TEST MENU
SHOW PAGE CONT
Displays the number of pages printed.
TEST PRINT
Prints the Test Print page.
PRINT PCL FONTS
Prints the PCL Font list.
PRINT PS FONTS *1
Prints the PS Font list.
PRINT JOB LOG
Prints the job log.
CONTINUOUS TEST
Prints the Test Print page continuously.
PRINT EN CONFIG
Prints the Ethernet configuration page.
PCL MENU
RESOLUTION
Displays the resolution used for printing.
COPIES
Sets the number of copies to print.
PAGESIZE
Sets the default paper size to use when printing from the
printer.
ORIENTATION
Sets the paper orientation.
FORM
Sets the number of lines on a page.
FNTSRC
Sets the font source.
FONTNUM
Sets the font number.
PT. SIZE
Sets the default point size.
PITCH
Sets the default pitch.
SYMSET
Sets the default symbol set.
AUTO CR
Turns auto carriage return on or off.
WIDE A4
Turns wide A4 on or off.
OVERRIDE
Turns override on or off.
PS MENU *1
RESOLUTION
Displays the resolution used for printing.
COPIES
Sets the number of copies to print.
PRINT ERRS
Specifies whether or not to print PS print errors.
FEED
Sets the paper source to use when printing.
TRAY SWITCH
Enables the printer to switch to Stack Bypass if the selected
drawer is empty.
1-4
COPYRIGHT © 2001 CANON INC. 2001 2001 2001 2001 CANON Printer Board-N1/iN-E5 REV.0 NOV. 2001
CHAPTER 1 INTRODUCTION
CONFIG MENU
JAM RECOVERY
AUTOCONT
DENSITY
ECONOMY MODE
REFINE
JOB CONTROL MENU
JOB SECURING TIME
PARALLEL MENU
PERSONALITY
BIDIRECTION
I/O TIMEOUT
USB MENU
PERSONALITY
I/O TIMEOUT
ETHERNET MENU *2
PERSONALITY
I/O TIMEOUT
Enables the printer to resume printing once a paper jam has
been cleared.
Turns the Automatic Continue function, for error handling, on
or off.
Sets the relative darkness of the printouts.
Turns Economy Mode, for reducing toner usage, on or off.
Enables the printer to enhance the quality of the printouts.
Sets the length of time a secured job is held on the printer.
Set the default print personality for the parallel interface.
Specifies whether or not to use bidirectional control.
Sets the timeout interval for print jobs received via the parallel
interface.
Sets the default print personality for the USB interface.
Sets the timeout interval for print jobs received via the USB
port.
Sets the default print personality for the optional network interface board.
Sets the timeout interval for the optional network interface
board.
LANGUAGE MENU
LANG
Sets the default language for the LCD display on the printer.
REST MENU
RESET
Resets the selected settings to their default values.
JOB LOG MENU
AUTO PRINT LOG PER 50/30 JOBS
Specifies whether or not to automatically print the job log.
AUTO CLEAR LOG EVERY 50/30 JOBS
Specifies whether or not to automatically clear the job log.
JOB LOG FULL
Sets the default action for when the job log becomes full.
GMT DIFFERENTIAL TIME Displays the time difference from Greewich Mean time.
DAYLIGHT SAVING TIME
Displays whether or not to use daylight saving time.
*1: displays only after the Adobe PS3 Module-B1 has been installed.
*2: displays only after the network interface board has been installed.
COPYRIGHT © 2001 CANON INC. 2001 2001 2001 2001 CANON Printer Board-N1/iN-E5 REV.0 NOV. 2001
1-5
CHAPTER 2
OPERATION
COPYRIGHT © 2001 CANON INC. 2001 2001 2001 2001 CANON Printer Board-N1/iN-E5 REV.0 NOV. 2001
CHAPTER 2 OPERATION
1 Construction
1.1 Outline
The three Boards described in this manual are designed for the following functions:
· Printer Board
Develops print data written in PCL.
· Network Interface Board
Connects the host machine with a network.
· Hard Disk (HDD)
Stores print data and log data.
1.2 Functional Blocks of the Printer Board
The printer board is divided into the following functional blocks:
a.CPU
It is equipped with a Power PC (200 MHz), and it processes data as instructed by the
program contained in the built-in RAM in the CPU.
[1]
[2]
[3]
[4]
[5]
[6]
Controls the SDRAM.
Controls the ROM.
Controls the printer board interface, hard disk interface, and network board interface.
Communicates with the host machine.
Controls the IEEE1284 parallel port interface.
Controls compression/expansion of image data.
b. ASIC
The ASIC controls the workings of the printer board as instructed by the control program stored in the ROM. Its main functions are as follows:
[1] Performs image smoothing.
[2] Performs EEPROM control.
c. DRAM
The DRAM possesses 8 M bytes of memory as standard, and functions as follows:
[1] Stores print data entered from an external device (reception buffer).
[2] Stores code data or pattern data resulting from conversion of image data.
[3] Stores fonts processed by the printer board.
The Board is equipped with a single slot, and addition of a 32 MB or 64 MB expansion
RAM DIMM will enable storage of up to 72 M bytes of data.
COPYRIGHT © 2001 CANON INC. 2001 2001 2001 2001 CANON Printer Board-N1/iN-E5 REV.0 NOV. 2001
2-1
CHAPTER 2 OPERATION
d.Built-In Program ROM
The built-in program ROM offers 8 MB of memory, and holds a translator used to
translate PCL into an internal processing language and then into image data; it also is
used to control the printer board and stores fonts.
e. Expansions ROM DIMM (J1, J2, J3)
The expansion ROM DIMM may be a ROM DIMM for upgrading, accessory PS module, and flash ROM DIMM (3 pc. max.; any slots may be used).
f. EEPROM (IC4, IC5)
The EEPROM is a memory capable of electrically deleting or writing data. It offers 32
K bits of memory, and is used to retain data in the absence of power (data including printing environment, number of prints).
2-2
COPYRIGHT © 2001 CANON INC. 2001 2001 2001 2001 CANON Printer Board-N1/iN-E5 REV.0 NOV. 2001
CHAPTER 2 OPERATION
50
25
26
1
4
J3
4
72
1
Expansion ROM DIMM slot
143
3
J2
69
J7
4
72
19
4
1
1
J1
2
1
72
69
1
69
1
J9
2
B20
A20
B1
A1
J4
144
Expansion RAM DIMM Slot
J8
J10
33
36
34
1
1
2
18
CPU
3
JP3
ASIC
J5
IC5
IC4
F02-102-01
JP3 : Do not use. (Be sure to keep 1 and 2 shorted.)
COPYRIGHT © 2001 CANON INC. 2001 2001 2001 2001 CANON Printer Board-N1/iN-E5 REV.0 NOV. 2001
2-3
CHAPTER 2 OPERATION
1.3 Upgrading
Mount the ROM DIMM designed for upgrading to a slot (J1, J2, or J3) so that the functions of the existing built-in program ROM will be stopped, and its contents will be replaced with the contents of the newly mounted ROM DIMM. At this time, you need not
remove the existing built-in program ROM.
When you have remove the ROM DIMM from the slot, the contents of the built-in program ROM will take over.
2-4
COPYRIGHT © 2001 CANON INC. 2001 2001 2001 2001 CANON Printer Board-N1/iN-E5 REV.0 NOV. 2001
CHAPTER 3
DISASSEMBLY/ASSEMBLY
COPYRIGHT © 2001 CANON INC. 2001 2001 2001 2001 CANON Printer Board-N1/iN-E5 REV.0 NOV. 2001
CHAPTER 3 DISASSEMBLY/ASSEMBLY
1 Disassembly and Assembly
Here, instructions on how to disassemble/assemble the machine are given together with
explanations of its mechanical characteristics; be sure to keep the following in mind when
going through the work:
Before starting the work, be sure to disconnect the power plug.
1.
2. Unless otherwise specially indicated, reverse the steps used to disassemble the machine when assembling it.
3. Identify the screws by types (length, diameter) and location.
4. To ensure electrical continuity, the mounting screws used for the grounding wire and
arrestors are equipped with toothed washers. Do not leave them out when assembling
the machine.
As a rule, do not operate the machine with any of its parts removed.
5.
COPYRIGHT © 2001 CANON INC. 2001 2001 2001 2001 CANON Printer Board-N1/iN-E5 REV.0 NOV. 2001
3-1
CHAPTER 3 DISASSEMBLY/ASSEMBLY
1.1 Removing the Hard Disk
1) Remove the 2 screws [1], and detach
the hard disk [2].
[1]
[2]
F03-101-01
3-2
COPYRIGHT © 2001 CANON INC. 2001 2001 2001 2001 CANON Printer Board-N1/iN-E5 REV.0 NOV. 2001
CHAPTER 3 DISASSEMBLY/ASSEMBLY
1.2 Removing the Network Interface Board
If a hard disk exists, be user to
remove it in advance.
1) Remove the 13 screws [1], and detach
the rear cover [2].
[1]
[1]
[1]
[1]
[1]
[1]
[2]
[1]
F03-102-01
2) Remove the USB cable [1] from the
image processor PCB [2].
[2]
[1]
F03-102-02
COPYRIGHT © 2001 CANON INC. 2001 2001 2001 2001 CANON Printer Board-N1/iN-E5 REV.0 NOV. 2001
3-3
CHAPTER 3 DISASSEMBLY/ASSEMBLY
3) Remove the 4 screws [1], and detach
the network interface board.
[1]
[1]
F03-102-03
1.3
Removing the Printer Board
1) Go to User Menu to TEST MENU, run
TEST PRINT, to output a test print.
2) If the machine has the network interface board, got to User Menu to TEST
MENU, run PRINT EN CONFIG to
output the Ethernet configuration page.
3) Turn off the power switch.
[1]
[1]
If a hard disk or a network interface board exists, be sure to
remove it in advance.
4) Remove the 13 screws [1], and detach
the rear over [2].
[1]
[1]
[1]
[1]
[1]
[2]
F03-103-01
3-4
COPYRIGHT © 2001 CANON INC. 2001 2001 2001 2001 CANON Printer Board-N1/iN-E5 REV.0 NOV. 2001
CHAPTER 3 DISASSEMBLY/ASSEMBLY
5) Disconnect the connector [1], and detach the flexible cable [2].
[1]
[2]
F03-103-02
6) Remove the 7 screws [1], and detach
the printer board [2].
[2]
[1]
[1]
[1]
F03-103-03
7) If you are replacing the existing printer
board with a new one, be sure to perform the following to make printer settings and transfer counter readings.
COPYRIGHT © 2001 CANON INC. 2001 2001 2001 2001 CANON Printer Board-N1/iN-E5 REV.0 NOV. 2001
3-5
CHAPTER 3 DISASSEMBLY/ASSEMBLY
8) Remove the RAM DIMM/ROM
DIMM/EEPROM (IC4, 5) from the existing printer board, and mount them to
the same locations on the new printer
board.
If a ROM DIMM designed for
upgrading exists on the old
printer board, be sure that the
built-in ROM or the upgrading
ROM on the new printer board
are of the latest version.
9) Press the Additional Function key and
then the ID (#) key in the control panel
to start service mode.
10) Using the cursor key, select #8 PDL
(printer-related service mode).
11) Using the cursor key, select PDL-PCL
MENU, and press the OK key.
12) Using the cursor key, select SERVICE
MENU, and Press the OK key.
13) Go through the steps in F03-103-04.
S E R V IC E M E N U
Press the Menu key.
NVRAM MENU
Press the Item key.
NVRAM MENU
N V R AM =CHECK
Press the Value key.
NVRAM MENU
N V R A M = D U P L IC A T E
Press the Enter key.
+ R E A L L Y /-IG N O R E
2,3->1
Press the Enter key.
DONE
END
F03-103-04
14) Press the Go key to end service mode.
15) Turn off the power.
16) Mount the hard disk (option) and the
network board (option).
17) Turn on the power switch.
18) Enter necessary settings referring to
the TEST PRINT output in Steps 1)
and 2) and the Ethernet configuration
page (for machines with the network
board only).
19) Turn of the power switch.
20) End.
3-6
COPYRIGHT © 2001 CANON INC. 2001 2001 2001 2001 CANON Printer Board-N1/iN-E5 REV.0 NOV. 2001
CHAPTER 4
INSTALLATION
COPYRIGHT © 2001 CANON INC. 2001 2001 2001 2001 CANON Printer Board-N1/iN-E5 REV.0 NOV. 2001
CHAPTER 4 INSTALLATION
1 Printer Board-N1 Installation Procedure
1.1 Unpacking and Checking the Contents
Unpack the Printer Board-N1, and check its contents.
[2]
[1]
[3]
[3]
[3]
[3]
[3]
[3]
[1]
[2]
Printer board ................... 1 pc.
Printer board base ........... 1 pc.
[3] Screw ............................ 15 pc.
F04-101-01
Do not touch the elements of the PCB or its circuitry.
COPYRIGHT © 2001 CANON INC. 2001 2001 2001 2001 CANON Printer Board-N1/iN-E5 REV.0 NOV. 2001
4-1
CHAPTER 4 INSTALLATION
1.2 Installing the Printer Board-N1
1) Turn off the host machine’s power
switch, and disconnect its power plug
from the power outlet.
2) Remove the 7 screws [1], and detach
the rear cover [2].
[2]
[1]
[1]
[1]
[1]
F04-102-01
3) Remove the 2 screws [1] from the right
side of the rear cover, and detach the
face cover [2] from the rear cover.
[2]
[1]
F04-102-02
4-2
COPYRIGHT © 2001 CANON INC. 2001 2001 2001 2001 CANON Printer Board-N1/iN-E5 REV.0 NOV. 2001
CHAPTER 4 INSTALLATION
4) Mount the printer board base [1] using
2 screws [2] that come with the board.
[2]
[1]
F04-102-03
5) Mount the printer board [1] using 7
screws [2] that come with the board. At
this time, be sure that the bottom 2
screws are matched against the marking ‘OP’ on the host machine.
[1]
[2]
[2]
[2]
F04-102-04
6) Connect the connector [1] of the
printer board and the flat cable [2] to
the connectors of the image processor
PCB [3].
[3]
[1]
[2]
F04-102-05
COPYRIGHT © 2001 CANON INC. 2001 2001 2001 2001 CANON Printer Board-N1/iN-E5 REV.0 NOV. 2001
4-3
CHAPTER 4 INSTALLATION
7) Mount the rear cover [3] using the 7
screws [1] removed in step 2) and 6
screws [2] that come with the board.
[1]
[1]
[1]
[2]
[1]
[2]
[3]
[1]
F04-102-06
4-4
COPYRIGHT © 2001 CANON INC. 2001 2001 2001 2001 CANON Printer Board-N1/iN-E5 REV.0 NOV. 2001
CHAPTER 4 INSTALLATION
1.3 Making Checks After Installation
1) Connect the power plug to the power
outlet, and turn on the host machine’s
power switch.
2) Press the “System” key in the control
panel, and check to be sure that the
LED indictor has gone ON. If the LED
indicator fails to go ON, check to see if
the printer board has been correctly
mounted.
"System"key
LED
F04-103-01
3) Go through the following to generate
“TEST PRINT” for the printer board,
and check to make sure that the output
is normal.
In the control panel, operate as follows: “System” key>“Go” key (so that
“PAUSE” is indicated)>“Menu” key
(so that “TEST MENU” is
indicated)>“Item” key to select “TEST
PRINT”; then, press the “Enter/Cancel” key.
If the connection is correct, the output
should indicate the name/version of the
printer board.
COPYRIGHT © 2001 CANON INC. 2001 2001 2001 2001 CANON Printer Board-N1/iN-E5 REV.0 NOV. 2001
4-5
CHAPTER 4 INSTALLATION
1.4 Unpacking the Hard Disk HD-65 and Checking the Contents
If you are installing a Hard Disk HD-65 to the Printer Board-N1, go through the following steps:
Unpack the Hard Disk (HD-65), and check its contents:
[2]
[1]
[3]
[1]
[2]
Hard disk ........................ 1 pc.
Mounting screw .............. 2 pc.
[3]
Guide sheet ..................... 1 pc.
F04-104-01
• To avoid the effects of static charges while handling the hard disk, be
sure to put on a wrist strap (CK-0534-000). Otherwise, touch a metal
object found in the room to rid your body of static charges.
• Do not touch the elements of the hard disk or its circuitry.
• The hard disk is highly vulnerable to impact. Take extra care when handling it.
4-6
COPYRIGHT © 2001 CANON INC. 2001 2001 2001 2001 CANON Printer Board-N1/iN-E5 REV.0 NOV. 2001
CHAPTER 4 INSTALLATION
1.5 Installing the Hard Disk HD-65
Be sure that the Printer BoardN1 has already been installed
to the host machine before
starting the installation work of
the Hard Disk HD-65.
1) Turn off the host machine’s power
switch, and disconnect the power plug
from the power outlet.
2) Remove the 4 screws [1] from the top
of the rear cover, and remove the face
cover [2].
[2]
[1]
[1]
F04-105-01
3) Remove the 13 screws [1], and detach
the rear cover [2].
[1]
[1]
[1]
[1]
[1]
[1]
[2]
[1]
F04-105-02
COPYRIGHT © 2001 CANON INC. 2001 2001 2001 2001 CANON Printer Board-N1/iN-E5 REV.0 NOV. 2001
4-7
CHAPTER 4 INSTALLATION
4) Fit the hard disk [1] to the connector
[2] of the printer board.
[1]
[2]
F04-105-03
If an Ethernet Network Interface Adapter iN-E5 exists, you
need to remove the mounting
screw [1] and detach the HDD
face plate [2] from the printer
board plate as shown.
[1]
[2]
F04-105-04
4-8
COPYRIGHT © 2001 CANON INC. 2001 2001 2001 2001 CANON Printer Board-N1/iN-E5 REV.0 NOV. 2001
CHAPTER 4 INSTALLATION
5) Mount the hard disk using 2 screws [1]
that come with the disk.
[1]
[2]
F04-105-05
6) Mount the rear cover removed in step
3).
If you are not installing an
Ethernet Network Interface
Adapter iN-E5, carry out step
7).
7) Mount the face cover removed in step
2).
8) Turn on the Power switch.
9) Press SYSTEM KEY to enter printer
mode.
10) Confirm that “+FORMAT DISK
-IGNORE DISK” appears on the display. Press VALUE key.
11) Confirm that “+REALLY FORMAT
-IGNORE DISK” appears on the display. Press VALUE key.
COPYRIGHT © 2001 CANON INC. 2001 2001 2001 2001 CANON Printer Board-N1/iN-E5 REV.0 NOV. 2001
4-9
CHAPTER 4 INSTALLATION
12) The display changes
“FORMATTING...” indicating that formatting of the hard disk has begun.
Memo
It takes about 10 to 20 seconds
before the formatting completes.
Never turn off the power switch
while formatting the hard disk.
Turning off the power switch
during the formatting may
cause hard disk failure.
13) After formatting completes, the display changes “DSK FMT RESTART”
and the machine enters restarting process.
4-10
COPYRIGHT © 2001 CANON INC. 2001 2001 2001 2001 CANON Printer Board-N1/iN-E5 REV.0 NOV. 2001
CHAPTER 4 INSTALLATION
1.6 Installing the Expansion RAM/Flash ROM Module FR-65
If you are installing an expansion RAM or a Flash ROM Module FR-65 to the printer
board, go through the following:
Points to Note for the Work
To protect the PCBs from damage caused by static charges,
keep the following in mind:
• Wear a grounded wrist strap.
If there is no special grounding device, ground it to the
frame of the host machine.
• Keep the PCBs (RAM/ROM)
in conducting bags until immediately before using them.
• When handling a PCB, do
not touch any of its terminals. Rather, hold it by keeping your fingers on its edges
(base area).
• When placing a PCB, be sure
to lay it where means against
static charges are provided
(e.g., conducting mat; never
on a metal surface).
Otherwise, place it on or in a
conducting bag.
• Do not keep an object that
can become charged within
the work area.
COPYRIGHT © 2001 CANON INC. 2001 2001 2001 2001 CANON Printer Board-N1/iN-E5 REV.0 NOV. 2001
4-11
CHAPTER 4 INSTALLATION
1.6.1 Preparing for the Work
1) If a printer board exists in the host machine, turn off the machine’s power,
and disconnect its power plug from the
power outlet.
2) To enable installation to the printer
board, remove the covers as necessary
from the host machine.
1.6.2 Installation
1) Insert the expansion RAM [2] into the
RAM slot (J4) of the printer board [1].
Insert the flash ROM module [3] into a
ROM slot (J1, J2, or J3; whichever is
available).
• When inserting the expansion RAM, be
sure to push it in until the locking lever
of the slot has risen as high as the slot.
When inserting the flash ROM module,
be sure to push it in until the locking lever of the slot has been locked in position in the cut-off of the ROM.
• Fitting the Expansion RAM
[1]
[2]
J4
F04-106-01
4-12
COPYRIGHT © 2001 CANON INC. 2001 2001 2001 2001 CANON Printer Board-N1/iN-E5 REV.0 NOV. 2001
CHAPTER 4 INSTALLATION
• Fitting the Flash ROM Module
[1]
J1
J2
J3
[3]
F04-106-02
2) Put back all covers that were removed
from the host machine.
3) Connect the power plug to the power
outlet, and turn on the host machine’s
power.
COPYRIGHT © 2001 CANON INC. 2001 2001 2001 2001 CANON Printer Board-N1/iN-E5 REV.0 NOV. 2001
4-13
CHAPTER 4 INSTALLATION
1.6.3 Making Checks After Installation
a.If an Expansion RAM Has Been Installed
Generate “TEST PRINT” of the printer
board as follows, and check to make sure
that the memory size reflects the size of
the installed expansion RAM.
In the control panel, operate as follows:
“System” key>“Go” key (so that “PAUSE”
is indicated)>“Menu” key (so that “TEST
MENU” is indicated)>“Item” key to select
“TEST PRINT”; then press the “Enter/
Cancel” key.
b. If a Flash ROM Module Has Been Installed
Generate “THE PINT” of the printer
board as follows, and check to make sure
that the name/version of the flash ROM
module is indicated:
In the Control panel, operate as follows:
“System” key>“Go” key (so that “PAUSE”
is indicated)>“Menu” key (so that “TEST
MENU” is indicate)>“Item” key to select
“TEST PRINT”; then, press the “Enter/
Cancel” key.
4-14
COPYRIGHT © 2001 CANON INC. 2001 2001 2001 2001 CANON Printer Board-N1/iN-E5 REV.0 NOV. 2001
CHAPTER 4 INSTALLATION
2 Ethernet Network Interface Adapter iN-E5
Installation Procedure
2.1 Unpacking and Checking the Contents
Unpack the Ethernet Network Interface Adapter iN-E5, and check its contents:
[5]
[4]
[3]
[1]
[1]
[5]
[2]
[1]
[2]
[3]
[6]
Network interface adapter1 pc.
USB cable ....................... 1 pc.
Cable clamp .................... 1 pc.
[4] HDD face plate ............... 1 pc.
[5] Mounting screw ............ 5 pc.*
[6] Ring core ........................ 1 pc.
*One of which is equipped with a washer.
F04-201-01
Do not touch the elements on the PCB or in the circuitry.
COPYRIGHT © 2001 CANON INC. 2001 2001 2001 2001 CANON Printer Board-N1/iN-E5 REV.0 NOV. 2001
4-15
CHAPTER 4 INSTALLATION
2.2 Installation
Be sure that the Printer BoardN1 has already been installed
to the host machine before
starting the installation work of
the Ethernet Network Adapter
iN-E5.
1) Turn off the host machine’s power
switch, and disconnect its power plug
from the power outlet.
2) Remove the 4 screws [1] from the top
of the rear cover, and detach the face
cover [2].
[2]
[1]
[1]
F04-202-01
3) Remove the 13 screws [1], and detach
the rear cover [2].
[1]
[1]
[1]
[1]
[1]
[1]
[2]
[1]
F04-202-02
4-16
COPYRIGHT © 2001 CANON INC. 2001 2001 2001 2001 CANON Printer Board-N1/iN-E5 REV.0 NOV. 2001
CHAPTER 4 INSTALLATION
4) Connect the network interface adapter
to the connector [1] of the printer
board, and secure it in place using 4
screws [2] that come with the adapter.
(Be sure to use the screw equipped
with a washer for the PCB.)
[2]
[1]
[2]
F04-202-03
5) As shown, connect the network interface adapter and the image processor
PCB [2] with the USB cable [1] that
comes with the adapter. At that time,
be sure to keep the USB cable in place
using the cable clamp.
[2]
[1]
F04-202-04
COPYRIGHT © 2001 CANON INC. 2001 2001 2001 2001 CANON Printer Board-N1/iN-E5 REV.0 NOV. 2001
4-17
CHAPTER 4 INSTALLATION
6) Fit the cable clamp [1] that comes with
the adapter to the plate for the printer
board.
[1]
F04-202-05
If you are not installing a hard
disk (HD-65), carry out step 7).
7) Mount the HDD face plate [2] using a
screw [1] that comes with the adapter.
[1]
[2]
F04-202-06
8) Mount the rear cover you removed in
step 3).
4-18
COPYRIGHT © 2001 CANON INC. 2001 2001 2001 2001 CANON Printer Board-N1/iN-E5 REV.0 NOV. 2001
CHAPTER 4 INSTALLATION
9) As shown, mount the ring core [1] that
comes with the adapter to the network
cable, and connect it to the network interface adapter. At this time, be sure to
secure the network cable using the
cable clamp fitted in step 6).
About 10cm
[1]
F04-202-07
COPYRIGHT © 2001 CANON INC. 2001 2001 2001 2001 CANON Printer Board-N1/iN-E5 REV.0 NOV. 2001
4-19
CHAPTER 4 INSTALLATION
2.3 Making Checks After Installation
a.Making Initial Checks of the Network
Interface Adapter
1) Connect the power plug to the power
outlet, and turn on the host machine’s
power switch; then, check to make sure
that the ERR LED indicator on the network interface adapter goes OFF. If the
ERR LED indicator remains ON, reinstall the network interface board.
ERR LNK I 0 0
TXD RXD
Be sure that it is
not lit or blinked.
F04-203-01
The LED indicators are used as follows:
RXD : green; ON during reception of
data.
TXD : green; ON during transmission of
data.
100 : green; ON during operation at 100
Mbps;
OFF during operation at 10
Mbps.
LNK : green; ON if network connection
is normal.
ERR : orange; ON and blinks if operation
is faulty.
4-20
COPYRIGHT © 2001 CANON INC. 2001 2001 2001 2001 CANON Printer Board-N1/iN-E5 REV.0 NOV. 2001
CHAPTER 4 INSTALLATION
b. Checking the Status
1) Go through the following to generate
“TEST PRINT” using the printer
board.
"System"key
In the control panel, operate as follows: System key> Go key (so that
“PAUSE” is indicated)> Menu key (so
that “TEST MENU” is indicated)>
Item key; then select “TEST PRINT”,
and press the Enter/Cancel key.
F04-203-02
2) Check to make sure that the notation
“ETHERNET MENU” is found in the
test print output.
If the notation “ETHERNET MENU”
is not indicated in the test print output
of the printer board, check to make
sure once again that the board is
mounted correctly.
COPYRIGHT © 2001 CANON INC. 2001 2001 2001 2001 CANON Printer Board-N1/iN-E5 REV.0 NOV. 2001
4-21
CHAPTER 5
TROUBLESHOOTING
COPYRIGHT © 2001 CANON INC. 2001 2001 2001 2001 CANON Printer Board-N1/iN-E5 REV.0 NOV. 2001
CHAPTER 5 TROUBLESHOOTING
1 Service Mode
1.1 Outline
You can use the host machine’s service mode to make printer-related service mode settings as follows:
Making Settings
1) Press the Additional Functions key and then the ID (#) key in the control panel to start
service mode.
2) Using the cursor key, select #8 PDL (printer-related service mode).
3) Using the cursor key, select PDL-PCL MENU, and press the OK key.
4) Using the cursor key, select MENU, and press the OK key.
If you have selected SERVICE MENU, go through the following:
5) Using the MENU key, select the desired menu.
6) Using the ITEM key, select the desired item.
7) Using the VALUE key, select the desired setting.
8) Press the ENTER key to store the setting.
9) Press the Go key to end service mode.
System key
Job indicator
123
Monitor
Online
Job
HDD
Alarm
Menu
Itern
Value
Enter/Cancel
Special Features
OK
A
1:1
#
1
2
3
4
5
6
7
8
9
ID
0
C
OK key
Back key
Cursol key
GO
Shift
I
Go key Shift key Enter key
Menu key Item key Value key
F05-101-01
COPYRIGHT © 2001 CANON INC. 2001 2001 2001 2001 CANON Printer Board-N1/iN-E5 REV.0 NOV. 2001
5-1
CHAPTER 5 TROUBLESHOOTING
The following is the menu items for service mode:
#8 PDL
PDL-LIPS MENU
PDL-PCL MENU
(not used)
PANEL CHECK
FRASH MENU
PPG CHECK SUM
PS CHECK SUM
COLD RESET A4
COLD RESET LETTER
SERVICE MENU
FEEDER MENU
STACK BYPASS SIZE
ERR/JAM LOG MENU
PRINT=ERROR LOG
PRINT=JAM LOG
FORMAT DISK
FORMAT FLASH
NVRAM=CHECK
NVRAM=DUPLICATE
FORMAT MENU
NARAM MENU
5-2
(not used)
(for R&D)
checksum for PCL firmware
checksum for PS firmware
selects A4 as default paper size
selects LTR as default paper size
selects paper size for
manual feed
generates error history
generates jam history
initializes hard disk
initializes flash ROM
checks EEPROM
copies contents of
EEPROM
COPYRIGHT © 2001 CANON INC. 2001 2001 2001 2001 CANON Printer Board-N1/iN-E5 REV.0 NOV. 2001
CHAPTER 5 TROUBLESHOOTING
1.2 Functions of Service Mode
The functions of each service mode item are as follows:
PPG CHECK SUM/PS CHECK SUM
The host machine performs a check sum operation on the requested ROM bank. The
calculated Check Sum is displayed on the LCD.
COLD RESET A4/LETTER
The host machine sets the default to the selected paper size (A4/LTR), and resets it to
zero, if the page count is less than 50.
FEEDER MENU
You may select any of the following paper sizes for manual feed:
A4, LETTER, LEGAL, A5, B5-JIS, COM10, MONARCH, C5, DL, A3, B4, 11x17,
CUSTOM, STATEMENT, B5-ISO.
ERR/JAM LOG MENU
· PRINT=ERROR LOG
Indicates the times, codes, and locations of the most recent 20 errors.
· PRINT=JAM LOG (jam history output)
Indicates the times, codes, and locations of the most recent 20 jams.
FORMAT MENU
· FORMAT DISK
Initializes the hard disk.
· FORMAT FLASH
Initializes the flash ROM.
NVRAM MENU
· NVRAM=CHECK
Indicates the counter readings of the 3 NVRAMs on the printer board.
NVRAM1=built-in NVRAM, NVRAM2=IC4, NVRAM3=IC5
· NVRAM=DUPLICATE
Copies the contents of the existing NVRAM (EEPROM) at time of printer board replacement.
The NVRAM contains the following data: page counter readings of the printer, panel
settings of the printer, error/jam history, serial number.
COPYRIGHT © 2001 CANON INC. 2001 2001 2001 2001 CANON Printer Board-N1/iN-E5 REV.0 NOV. 2001
5-3
CHAPTER 5 TROUBLESHOOTING
2 Self Diagnosis
2.1 Outline
When the host machine is turned on, the printer unit runs its self diagnostic program for
hardware, thereby checking the Board, expansion ROM, expansion RAM, and expansion
I/O port. If a fault is detected as a result, the host will indicate the following in its control
panel: warming message, NORMAL ERROR, or SERVICE CALL ERROR.
5-4
COPYRIGHT © 2001 CANON INC. 2001 2001 2001 2001 CANON Printer Board-N1/iN-E5 REV.0 NOV. 2001
CHAPTER 5 TROUBLESHOOTING
2.2 Warning Messages
A warning message may be may be any of the following; take the action given to suit
each message:
Message
Meaning
Action
MEMORY OVERFLOW A memory overflow has occurred.
The printer has received more data than
it can hold in the available memory on
the printer board.
If AUTOCONT is ON (CONFIG
MENU), the print job will be put back
online after 10 sec. If AUTOCONT is
OFF, the printer will go offline.
Press the Go key and the print job will
continue printing, although data may be
lost.
Simplify the print job by deleting unnecessary fonts or macros from the
printer memory, or add additional
memory to the printer.
FLASH OVERFLOW
A memory overflow has occurred in the optional Flash
ROM.
The printer has received more font and
macro data than it can hold in the available memory of the Flash ROM. The
printer will go offline. Press the Go button to put the printer back online.
Format the Flash ROM or delete font
and macro data to create more space.
MRT COMPRESSION
The printer is processing complex data.
The printer is using MRT Compression
because the page is too complex.
Wait a moment for the operation to
complete.
DISK ALMOST FULL
The optional hard disk is 70% or
more full.
Delete any font or macro files that are
no longer needed to increase the amount
available disk space.
DISK FULL
The optional hard disk is 95%
full, and the printer will go
offline.
The printer will be put back online after
10 sec, if AUTOCONT is ON (CONFIG
MENU).
Delete any fonts or macro files that are
no longer needed to increase the amount
of available disk space.
READY JOB LOG
FULL
The amount of stored job logs
will exceed the maximum limit.
Delete unnecessary job logs from the
hard disk.
READY NEAR STORE The number of stored print jobs
LIMIT
will exceed the maximum of
9500.
Delete unnecessary print jobs from the
hard disk.
COPYRIGHT © 2001 CANON INC. 2001 2001 2001 2001 CANON Printer Board-N1/iN-E5 REV.0 NOV. 2001
5-5
CHAPTER 5 TROUBLESHOOTING
2.3 Normal Error
A normal error indication may be any of the following; take the action given to suit
each indication:
Message
Meaning
Action
AUTHENTICATION
ERROR
Invalid password
Enter the correct password.
EXCEEDS STORE
LIMIT
Unable to save a print job on the
printer hard disk.
There is not enough available free space
on the hard disk. Delete unnecessary
print jobs from the hard disk, and then,
press the Go key on the printer.
PS OPTION ERROR
An option PS module error occurred.
An option ROM has failed the startup
checksum. Replace the option ROM.
OPTION RAM ERROR
An option RAM error occurred.
An option RAM has failed the startup
diagnostic. Replace the option RAM.
OPTION ROM ERROR
An option ROM error occurred.
An option ROM has failed the startup
checksum. Replace the option ROM.
FLASH ERROR
The Flash ROM error occurred.
Replace the Flash ROM.
WRITING DISK ERROR Unable to write to the printer
hard disk.
Make sure that the hard disk is installed
correctly.
Turn off the printer, and the turn it on
again.
If the warning persists, format the hard
disk.
READING DISK ERROR Unable to read the printer hard
disk.
Make sure that the hard disk is installed
correctly.
Turn off the printer, and then turn it on
again.
If the warning persists, format the hard
disk.
MEM ALLOC ERROR
If AUTOCONT is ON (CONFIG
MENU), the printer will be put back
online after 10 sec.
If AUTOCONT is OFF, press the GO
key to put the printer back online.
Check the printed page to ensure that
the print job is complete.
5-6
Not enough memory to process
the data and print the page.
COPYRIGHT © 2001 CANON INC. 2001 2001 2001 2001 CANON Printer Board-N1/iN-E5 REV.0 NOV. 2001
CHAPTER 5 TROUBLESHOOTING
PARALLEL INTERFACE ERROR
A parallel port error occurred.
Correct the connection after checking
the connector. Then, restart the printer.
If the warning persists, replace the
printer board.
USB INTERFACE ERROR
A USB port error occurred.
Correct the connection after checking
the connector. Then, restart the printer.
If the error persists, replace the printer
board.
ETHERNET OPTION
ERROR
A network interface board error
occurred.
Restart the printer after checking the
installation of the network interface
board.
If the error persists, replace the network
interface board.
JOB STORING REJECTED
The receiving print job will stop.
The mount of the stored job logs will
exceed the maximum limit.
Delete unnecessary job logs from the
hard disk.
2.4 Service Call Error
A service call error may be any of the following; take the action given to suit each indication:
Message
Meaning
Action
E676 CALL FOR SERVICE
A communication error occurred Restart the printer. If the error persists,
between the host machine and
replace the printer board.
the printer board.
If the error persists, replace the image
processor PCB.
E677/6F-7A CALL
FOR SERVICE
An SRAM error occurred in the
ASIC.
E677/6F-61 CALL FOR An internal ROM check error
SERVICE
occurred.
Restart the printer. If the error persists,
replace the printer board.
Restart the printer. If the error persists,
replace the printer board.
E677/6F-63 CALL FOR An internal RAM error occurred. Restart the printer. If the error persists,
SERVICE
replace the printer board.
COPYRIGHT © 2001 CANON INC. 2001 2001 2001 2001 CANON Printer Board-N1/iN-E5 REV.0 NOV. 2001
5-7
APPENDIX
COPYRIGHT © 2001 CANON INC. 2001 2001 2001 2001 CANON Printer Board-N1/iN-E5 REV.0 NOV. 2001
APPENDIX
1 Special Tools
You will need the following tools in addition to the standard tools set to service the
Board:
No.
Tool name
Tool No.
1
Wrist strap
CK-0534-000
REF.
Appearance
Rank
Remarks
A
Rank
A : Each service person is expected to carry one.
B : Each group of 5 service persons is expected to carry one.
C : Each workshop is expected to carry one.
COPYRIGHT © 2001 CANON INC. 2001 2001 2001 2001 CANON Printer Board-N1/iN-E5 REV.0 NOV. 2001
A-1