1
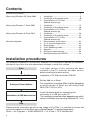
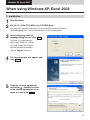
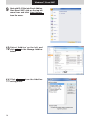
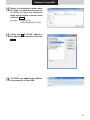
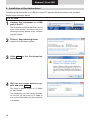
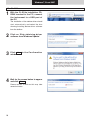
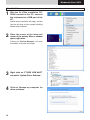
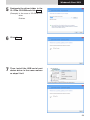
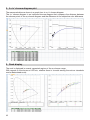
Data Management Software
CL-S10w
Installation Guide
Safety Warning
Please read this manual and the instrument and computer manual carefully
beforehand and use the software properly and safely.
Official name of the applications used in this manual
(Notation in the main text) (Official name)
Windows, Windows XP
Microsoft® Windows® XP Professional Operating System
Microsoft® Windows® 7 Professional Operating System
Windows, Windows 7
Windows, Windows 8
Microsoft® Windows® 8 Pro Operating System
ExcelMicrosoft® Excel®
Notes about the text
• Unauthorized reproduction in whole or part of this manual is prohibited.
• The contents of this document may change without notice.
• Every effort is made to ensure the information in this text is correct, but in the event of
doubt, error or omission, please contact the vendor where you made your purchase.
• No responsibility shall be bore in the event of accidents related to the use of this product
not in accordance with the instructions, notwithstanding the above mentioned.
About the registered Trademark
Microsoft, Windows, Windows XP, Windows 7, Windows 8, Excel are U.S. registered
trademarks of Microsoft corporation in the U.S. and other countries.
Software Terms of Use
The terms of use for this software is shown in the end user agreement dialog during online
installation. Installation will start only if the user agrees to the agreement.
Notes in use
• This software is an application running on the Windows XP, Windows 7 or Windows 8. Neither
OS includes this software.
• Before you install this software, one of the above OS must be installed in the PC.
• This software is an Add-Ins software for Excel 2003, Excel 2007, Excel 2010 or Excel 2013.
None of the Excel includes this software.
Before
you install this software, one of the above Excel must be installed in the PC.
•
Please
set and insert the CD-ROM smoothly and correctly into the CD-ROM drive.
•
Please
do
not stain or scratch the recording surface of the CD-ROM as it will lead to reading errors.
•
Please
avoid
extreme temperature changes and condensation.
•
Do
not
leave
in
direct sunlight or near areas with high temperatures such as heaters.
•
2
• Please do not apply force or drop the CD-ROM.
• Please do not apply water, alcohol or thinner etc to the CD-ROM.
• Please remove the CD-ROM only when the PC is switched on.
Note about the storage
• Please store the CD-ROM in its case after use and take good care of it.
• Please do not store in direct sunlight or near areas with high temperatures such as heaters.
• Please do not store the CD-ROM in areas of high humidity.
Method of disposal
•Please dispose of this product according to the rules and regulations of the governing body of
the respective region.
Package Contents
• One Installation CD-ROM of Data Management software CL-S10w
(CL-10w Setup, CL-S10w Instruction Manual, CL-500A SDK, CL-500A SDK Reference Manual)
• Installation guide (This document)
•Service Guide
This instruction guide is also installed in PDF form with a shortcut in the start menu during the
software installation.
*If you are using Windows 8, right-click on the start screen and select "All applications" at the
lower right of the screen.
To read the manual, go to <Start Menu -> All programs -> KONICAMINOLTA -> CL-S10w -> CLS10w Manual> PDF file. The installation CD-ROM also contains other language versions of the
instruction manual in PDF format. You will need the Adobe Reader® from Adobe Corporation. The
latest Adobe Reader® could be downloaded for free from the Adobe website. Also, it is possible
to use the Adobe Reader® installer included with the installation CD-ROM for installation.
(Example) When the CD-Rom is in E drive E: \Adobe Reader \EN
System Requirements
(Conditions of Use) OS
Windows XP Professional SP3 32 bit,
Windows XP Professional SP2 64 bit,
Windows 7 Professional 32 bit,
Windows 7 Professional 64 bit,
Windows 8 Pro 32 bit,
Windows 8 Pro 64 bit
(The Japanese, English, Chinese (Traditional),
Chinese (Simplified) version of the above OS)
Application Software Excel 2003 (When using Windows XP OS)
Excel 2007, Excel 2010 (When using Windows 7 OS)
Excel 2010 32 bit, Excel 2013 32 bit (When using Windows 8 OS)
(Control target)
Photometer
(Language)
Display languageJapanese, English, Chinese (Simplified) (Select any one
during installation)
CL-500A, CL-200, CL-200A
3
Contents
Installation procedures..............................................................................................................4
When using Windows XP, Excel 2003
1.Installation.......................................................5
2. Installation of the device driver.......................8
3. Uninstallation of CL-S10w .........................11
When using Windows 7, Excel 2007
1.Installation.....................................................12
2. Installation of the device driver.....................16
3. Uninstallation of CL-S10w .........................22
When using Windows 8, Excel 2013
1.Installation.....................................................23
2. Installation of the device driver.....................27
3. Uninstallation of CL-S10w .........................30
(Before version up)
About the template
1.
2.
3.
4. 5. 6.
7.
Measurement values trend...........................31
A u'v' chroma diagram plot............................32
Rank display.................................................32
Color Rendering Index..................................33
Spectral.........................................................33
Multi-point measurement..............................34
MacAdam ellipse and SDCM........................35
(Before version up)
(Before version up)
Installation procedures
This software is supplied in CD-ROM form, therefore a CD-ROM drive is required for installation.
You need to log in as a user with administrator privileges to install this software.
Start
If an older version of this software has been
installed in the PC, uninstall the older version
before installing the latest version.
Installation of CL-S10w
Installation of CL-S10w from the CD-ROM.
Setting of Excel Add-Ins
Set the Add-Ins in Excel.
The installation procedure differs slightly depending
on which version of Excel you are using; Excel
2003, 2007, 2010 or 2013.
Installation of USB device driver
Install the device driver for connecting the
instrument to a USB port of the PC.
The installation procedure differs depending on which
version of Windows you are using; Windows XP, 7 or 8.
End
Please see the instruction manual for the usage of CL-S10w. It is possible to access the
instruction manual from the Start menu (Adobe Reader® is required separately).
<Start -> All Programs -> KONICAMINOLTA -> CL-S10w -> CL-S10w Manual>
4
Windows XP, Excel 2003
When using Windows XP, Excel 2003
1.Installation
1
2
Start Windows.
Set the CL-S10w CD-ROM in the CD-ROM drive.
The installation program should start up automatically. Please double-click
on the Setup.exe icon if the installation does not start automatically.
3
Select a language from the
language dialog box and click OK .
‘Chinese’ is in simplified form.
When using Traditional Chinese
OS, please select the ‘English’.
We shall proceed and explain
with the ‘English’ hence on.
4
The wizard screen will appear and
click Next .
5
Read the License Agreement
and select ‘I accept the terms
in the license agreement’ if you
agree to it and click Next .
5
Windows XP, Excel 2003
6
Check the destination folder to
install to and click Next .
The destination folder can be changed.
Please remember the path of the destination
folder as it is necessary during the Excel
Add-Ins setup.
7
Click Install .
File copy will begin.
8
Click Finish when the installation
is completed.
9
Next add CL-S10w into Excel
Add-Ins. Start Excel 2003 and
choose ‘Add-Ins’ from ‘Tools’ in
the menu bar.
6
Windows XP, Excel 2003
10
Click Browse from the Add-Ins
setting menu.
11
Select the destination folder where
CL-S10w is installed and select
the CL-S10w.xla (the file extension
might not be shown in some cases)
and click OK .
(Example)C:
\Program Files
\KONICAMINOLTA\CL-S10w
12
Check the
‘Cl-S10w’ added in
the Add-Ins setting menu and click
OK .
13
“CL-S10W” was added to the menu
bar in Excel 2003.
7
Windows XP, Excel 2003
2. Installation of the device driver
Connecting the instrument to a USB port of the PC requires the device driver to be installed.
Please follow the steps below.
For CL-500A
1
Connect the instrument to a USB
port of the PC.
Device driver installation will begin.
2
Wait for a while until the following
message appears.
Two kinds of device drivers for CL-500A will be
installed.
The installation may take several minutes.
Do not turn off the power of CL-500A or pull out
the USB cable until the installation is complete.
3
Use the following procedure to
heck that the device drivers are
properly installed.
Select “Control panel” from the start menu
and select “System”.
The select “Device manager” from the
“Hardware” tab. The following screen will
appear.
On this screen, make sure that “USB
Composite Device” has properly been installed.
If the installation fails, the “USB Composite Device” may not be displayed on the
screen or, even if the “USB Composite
Device” is displayed, some devices may
be located under the “Other devices” directory as shown in the figure below.
In such a case, uninstall the “USB Composite Device” and some devices under
the “Other devices” directory; then perform
the installation again from step 1.
The above installation is completed.
8
Windows XP, Excel 2003
For CL-200A
1
With the CL-S10w installation CDROM inserted in the PC, connect
the instrument to a USB port of the
PC.
Select
‘No, not this time’ and click
Next , when the Found New Hardware
Wizard pops up.
2
Select ‘Install from a list or specific
location (Advanced)’ and click
Next .
3
Select ‘Search for the best driver
in these locations’ and check the
‘Search removable media (floppy,
CD-ROM...)’ and click Next .
If the ‘driver is not found’ message is
displayed after clicking Next , click Back
and the screen appears once again. Check
the ‘Include this location in the search’
and designate the driver folder in the CLS10w CD-ROM.
(Example)In the case the CD-ROM is in
the E drive.
E: \driver
9
Windows XP, Excel 2003
4
Click Finish .
5
Select
‘No, not this time’ and
click Next , when the Found New
Hardware Wizard pops up.
After clicking Next , when the screen from
Step 2 appears again, select ‘Install from
a list or specific location (Advanced)’ and
click Next .
6
Select ‘Search for the best driver
in these locations’ and check the
‘Search removable media (floppy,
CD-ROM...)’ and click Next .
If the ‘driver is not found’ message is displayed
after clicking Next , click Back and the
screen appears once again. Check the
‘Include this location in the search’ and
designate the driver folder in the CL-S10w
CD-ROM.
(Example)In the case the CD-ROM is in
the E drive.
E: \driver
7
Click Finish .
10
Windows XP, Excel 2003
8
Check the COM port assigned to
the photometer.
Select ‘Control Panel’ from the Start
menu, select ‘System’, then select ‘Device
Manager’ from the ‘Hardware’ tab and expand the ‘Ports (COM & LPT)’ to show the
assigned COM port number.
Note
This COM port number is necessary to start
CL-S10w and to connect the photometer.
The above installation is completed.
3. Uninstallation of CL-S10w (Before version up)
1
Firstly uncheck the
‘Cl-S10w’
from the Excel Add-Ins setting
menu.
Perform installation step 9 to access the
Add-ins setup screen.
2
Select the ‘Control Panel’ in the
Start menu and double click on the
‘Add/Remove Program’ icon.
Select ‘CL-S10w’ from the ‘Add/Remove
Program’ list and click on the Remove
button.
11
Windows 7, Excel 2007
When using Windows 7, Excel 2007
The screens might differ from those in Excel 2010, but the steps are the same.
Please follow the steps below.
You will see a User Account Control dialog box during installation of the software. At that time,
select "Yes" or "Continue".
1.Installation
1
2
Start Windows.
Set and insert the CL-S10w CD-ROM in the CD-ROM drive.
The installation program should start up automatically. Please double-click on the ‘Setup.exe’
icon if the installation does not start automatically.
3
Select a language from the
language dialog box and click OK .
‘Chinese’ is in simplified form. When using
Traditional Chinese OS, please select the
‘English’.
We shall proceed and explain with the
‘English’ hence on.
4
The wizard screen will appear and
click Next .
5
Read the License Agreement and
select
‘I accept the terms in the
license agreement’ if you agree to
it and click Next .
12
Windows 7, Excel 2007
6
Check the destination folder to install
to and click Next .
The destination folder can be changed.
Please remember the path of the destination
folder as it is necessary during the Excel
Add-Ins setup.
7
Click Install .
File copy will begin.
8
Click Finish when the installation
is completed.
13
Windows 7, Excel 2007
9
Next add CL-S10w into Excel Add-Ins.
Start Excel 2007, click on the top left
round icon and click Excel Options
from the menu.
10
Select ‘Add-Ins’ on the left and
click Go in the Manage Add-Ins
below.
11
14
Click Browse from the Add-Ins
setting menu.
Windows 7, Excel 2007
12
Select the destination folder when
CL-S10w is installed and select the
CL-S10w. xla (the file extension
might not be shown in some cases)
and click OK .
(Example)C:
\Program Files
\KONICAMINOLTA\CL-S10w
13
Check the
‘Cl-S10W’ added in
the Add-Ins setting menu and click
OK .
14
“CL-S10W” was added to the “Add-Ins”
in the menu bar in Excel 2007.
15
Windows 7, Excel 2007
2. Installation of the device driver
Connecting the instrument to a USB port of the PC requires the device driver to be installed.
Please follow the steps below.
For CL-500A
1
Connect the instrument to a USB
port of the PC.
The installation of the device driver should
start automatically, and select the icon
showing Installing device driver software
from the taskbar.
2
Click on ‘Skip obtaining driver
software from Windows Update’.
3
Click Yes in the Confirmation
window.
4
Wait for the screen below to appear and click Close .
Two kinds of device drivers for CL-500A
will be installed.
The installation may take several minutes.
Do not turn off the power of CL-500A or
pull out the USB cable until the installation
is complete.
16
Windows 7, Excel 2007
5
Use the following procedure to
heck that the device drivers are
properly installed.
Right click on the ‘Computer’ from
the Start menu and select ‘Properties’.
The screen below will appear after clicking
‘Device Manager’ on the left of the Control
Panel.
On this screen, make sure that “USB
Composite Device” has properly been installed.
If the installation fails, the “USB Composite Device” may not be displayed on the
screen or, even if the “USB Composite
Device” is displayed, some devices may
be located under the “Other devices” directory as shown in the figure below.
In such a case, uninstall the “USB Composite Device” and some devices under
the “Other devices” directory; then perform
the installation again from step 1.
The above installation is completed.
17
Windows 7, Excel 2007
For CL-200A
1
With the CL-S10w installation CDROM inserted in the PC, connect
the instrument to a USB port of
the PC.
The installation of the device driver should
start automatically, and select the icon
showing Installing device driver software
from the taskbar.
2
Click on ‘Skip obtaining driver
software from Windows Update’.
3
Click Yes in the Confirmation
window.
4
Wait for the screen below to appear
and click Close .
Please wait for a while as this may take
several minutes.
18
Windows 7, Excel 2007
5
Right click on the ‘Computer’ from
the Start menu and select ‘Properties’.
Clicking on ‘Device Manager’ on the left of
the Control Panel will open the screen as
shown to the right.
6
Right click on ‘FT232R USB UART’
and select ‘Update Driver Software’.
7
Click on ‘Browse my computer for
driver software’.
19
Windows 7, Excel 2007
8
Designate the driver folder in the
CL-S10w CD-ROM and click Next .
(Example)In the case of CD-ROM in E
drive.
E:\driver
9
Click Close .
10
Select the icon from the taskbar
like Step 1 as the USB Serial Port
device driver will start installation
automatically.
Click on ‘Skip obtaining driver software
from Windows Update’ and click Yes
in the Confirmation window.
11
20
Wait for the screen below to appear
and click Close .
Windows 7, Excel 2007
12
Show the Device Manager like Step 5
and right click on the ‘USB Serial Port’
and select ‘Update Driver Software’.
13
Click on ‘Browse my computer for
driver software’.
14
Designate the driver folder in the
CL-S10w CD-ROM and click Next .
(Example)In the case of CD-ROM in E
drive.
E:\driver
15
Click Close .
21
Windows 7, Excel 2007
16
Check the COM port assigned to
the photometer.
Show the Device Manager like Step 5
and expand the ‘Ports (COM & LPT)’ to
show the assigned COM port number.
Note
This COM port number is necessary to start
CL-S10w and to connect the photometer.
The above installation is completed.
3. Uninstallation of CL-S10w (Before version up)
1
Firstly uncheck the
‘Cl-S10W’
from the Excel Add-Ins setting
menu.
Please follow steps 9-10 to show the AddIns setting menu.
2
Select the ‘Control Panel’ in the
Start menu and click on the ‘Uninstalling the program’ icon.
Select ‘CL-S10w’ from the ‘Uninstalling
or changing the program’ list and click
on the Uninstall button.
22
Windows 8, Excel 2013
When using Windows 8, Excel 2013
Be sure to use a 32-bit Excel even if the OS is a 64-bit version.
The setup procedure for Excel 2010 is the same as that for Excel 2013, though the screen layout
may differ between these Excel versions.
Please follow the steps below.
You will see a User Account Control dialog box during installation of the software. At that time,
select "Yes" or "Continue".
1.Installation
1
2
Start Windows.
Set and insert the CL-S10w CDROM in the CD-ROM drive.
Click on "Tap to choose what happens
with this disc." at the upper right of the
screen.
Then click on ‘Run setup.exe’.
3
Select a language from the
language dialog box and click OK .
‘Chinese’ is in simplified form. When using
Traditional Chinese OS, please select the
‘English’.
We shall proceed and explain with the
‘English’ hence on.
4
The wizard screen will appear and
click Next .
23
Windows 8, Excel 2013
5
Read the License Agreement and
select
‘I accept the terms in the
license agreement’ if you agree to
it and click Next .
6
Check the destination folder to install
to and click Next .
The destination folder can be changed.
Please remember the path of the destination folder as it is necessary during the Excel
Add-Ins setup.
7
Click Install .
24
File copy will begin.
Windows 8, Excel 2013
8
Click Finish when the installation
is completed.
9
Adding CL-S10w into Excel Add-Ins:
Start Excel 2013 and click on Options
on the left menu.
10
Select ‘Add-Ins’ on the left and
click Go in the Manage Add-Ins
below.
25
Windows 8, Excel 2013
11
Click Browse from the Add-Ins
setting menu.
12
Select the destination folder when
CL-S10w is installed and select the
CL-S10w. xla (the file extension
might not be shown in some cases)
and click OK .
(Example)C:
\Program Files
\KONICAMINOLTA\CL-S10w
13
Check the
‘Cl-S10W’ added in
the Add-Ins setting menu and click
OK .
14
“CL-S10W” was added to the “Add-Ins”
in the menu bar in Excel 2013.
*When restarting Excel 2013 after installing CL-S10w as an add-in for the Excel, you may
find that the add-in tab is missing. (In such a case, the Option screen will show that CLS10w has been installed as an add-in.)
If the add-in tab is missing, set up the add-in again according to the following procedure:
1
2
3
Perform add-in setup steps (9 to 12) again.
When clicking "OK" at step 12, you will see a message asking you to overwrite
the setup. Click "OK" to overwrite the setup and click "OK" again to exit the
screen.
The add-in tab will be restored, and will not be missing after restarting Excel.
26
Windows 8, Excel 2013
2. Installation of the device driver
Connecting the instrument to a USB port of the PC requires the device driver to be installed.
Please follow the steps below.
For CL-500A
1
Connect the instrument to a USB
port of the PC.
Device driver installation will begin.
Two kinds of device drivers for CL-500A
will be installed.
The installation may take several minutes.
Do not turn off the power of CL-500A or
pull out the USB cable until the installation
is complete.
2
Use the following procedure to
heck that the device drivers are
properly installed.
Place the cursor at the lower left corner of
the screen. When a window opens, rightclick. Select ‘Device manager’ on the menu.
The screen as shown to the right will appear.
On this screen, make sure that “USB Composite Device” has properly been installed.
If the installation fails, the “USB Composite Device” may not be displayed on the
screen or, even if the “USB Composite
Device” is displayed, some devices may
be located under the “Other devices” directory as shown in the figure below.
In such a case, uninstall the “USB Composite Device” and some devices under
the “Other devices” directory; then perform
the installation again from step 1.
The above installation is completed.
27
Windows 8, Excel 2013
For CL-200A
1
With the CL-S10w installation CDROM inserted in the PC, connect
the instrument to a USB port of the
PC.
Device driver installation will begin, and the
task bar will show an icon named "Installing
device driver software".
2
Place the cursor at the lower left
corner of the screen. When a window
opens, right-click.
Clicking on ‘Device Manager’ will open
the screen as shown to the right.
3
Right click on ‘FT232R USB UART’
and select ‘Update Driver Software’.
4
Click on ‘Browse my computer for
driver software’.
28
Windows 8, Excel 2013
5
Designate the driver folder in the
CL-S10w CD-ROM and click Next .
(Example)In the case of CD-ROM in E
drive.
E:\driver
6
Click Close .
7
Then, install the USB serial port
device driver in the same manner
as steps 2 to 6.
29
Windows 8, Excel 2013
8
Check the COM port assigned to
the photometer.
Show the Device Manager like Step 2 and
expand the ‘Ports (COM & LPT)’ to show
the assigned COM port number.
Note
This COM port number is necessary to start
CL-S10w and to connect the photometer.
The above installation is completed.
3. Uninstallation of CL-S10w (Before version up)
1
Firstly uncheck the
‘Cl-S10W’
from the Excel Add-Ins setting
menu.
Please follow steps 9-10 to show the AddIns setting menu.
2
Place the cursor at the lower left
corner of the screen. When a window
opens, right-click.
Select ‘Program and function’ on
the menu.
Select ‘CL-S10w’ from the ‘Program and
function’ list and click on the Uninstall
button.
30
About the template
Excel templates are installed together with CL-S10w.
The measurements in CL-S10w can be done immediately in these templates. Please use them
for references when creating various templates for various use.
The templates are placed in the Template folder where CL-S10w is installed.
(Example) C:\Program Files\KONICAMINOLTA\CL-S10w\Template
In addition, select Start Menu -> All programs -> KONICAMINOLTA -> CL-S10w -> Template to
start the template.
Please refer to the instruction manual for the details of the usage of the templates.
<Start Menu-> All programs -> KONICAMINOLTA -> CL-S10w -> CL-S10w Manual>
If you are using Windows 8, right-click on the start screen and select "All applications" at the
lower right of the screen. You will see the template icons and the CL-S10w manual icon on the
screen.
1. Measurement values trend
A time series chart with continuous variation in values is shown.
31
2. A u'v' chroma diagram plot
The measured data are shown in a graph form in a u'v' chroma diagram.
The u'v' chroma diagram is an improved chroma diagram that compares the distance between
the chroma points in the xy chroma diagram and the difference in the subjective color difference.
3. Rank display
The rank is displayed in several separated regions of the xy chroma range.
With regards to the chroma of LED etc, whether there is a match among the various standards
can be determined easily.
32
4. Color Rendering Index
Color rendering indexes are shown visually for easy understanding.
5. Spectral
Spectral irradiance data are displayed as the spectral waveform.
33
6. Multi-point measurement
CL-200/CL200A allows multi-point measurement using multiple heads.
The multi-point measurement template is available in five types:
2-point measurement template containing the trend and xy chromaticity diagram
5-point measurement template containing the trend and xy chromaticity diagram
13-point measurement template containing the trend, xy chromaticity diagram and ANSI
lumen measurements
30-point measurement template containing the trend and xy chromaticity diagram
30-point measurement template containing the ranking
34
7. MacAdam ellipse and SDCM
This template shows the chromaticity variation of light sources as a MacAdam
ellipse and SDCM (Standard Deviation of Color Matching).
35
2
9222-1826-18
© 2012-2013 KONICA MINOLTA, INC.
BDMBKK