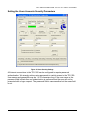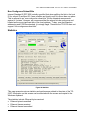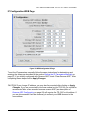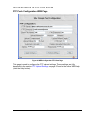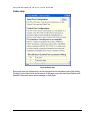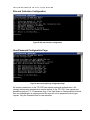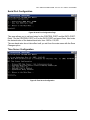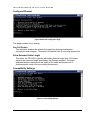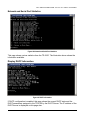
1
TR-2100 Data Buffer Installation and Users Reference Manual TELCOM RESEARCH TR-2100 Data Buffer Installation and Users Reference Manual Copyright 2006 by Telcom Research All rights reserved Telcom Research 3375 North Service Road Burlington, Ontario Canada L7N 3G2 Phone 905-336-2450 • Fax 905-336-1487 http://www.telcomresearch.com The information in this document is subject to change without notice and should not be construed as a commitment by Telcom Research. Telcom Research assumes no responsibility for any errors that may appear in this document. The software described in this document is furnished under a license and may be used or copied only in accordance with the terms of such license. Telcom Research or its affiliated companies assume no responsibility for the use or reliability of software on equipment that is not manufactured or supplied by Telcom Research. TR-2100 is a trademark of Telcom Research. Omnitronix and Data-Link are trademarks of Omnitronix, Incorporated. PollCat is a trademark of Western Telematic, Incorporated. All other trademarks are the property of their respective owners. Table of Contents Introduction........................................................................................................... 1 Network and Modem Access ........................................................................... 1 High security .................................................................................................... 2 Programmable Upload Interval ........................................................................ 2 Non-volatile Flash Memory .............................................................................. 2 Fast and Convenient Firmware Updates.......................................................... 2 High Compression Storage .............................................................................. 2 Compatibility .................................................................................................... 2 Overview .............................................................................................................. 3 Communications Commands ........................................................................... 4 Internet Protocol Features................................................................................ 4 Buffer Configuration Options............................................................................ 4 TR-2100 Windows Configuration Program .................................................. 4 TR-2100 WEB Interface............................................................................... 5 Configuration with an RS-232 terminal emulation program ......................... 5 Telnet Configuration .................................................................................... 5 Reverse ARP Configuration......................................................................... 5 Front Panel Indicators.................................................................................. 5 Rear Panel Indicators .................................................................................. 6 Rear Panel Connectors ............................................................................... 6 Supplied Accessories .................................................................................. 7 Installation ............................................................................................................ 9 Power Supply ................................................................................................... 9 Connecting Directly to a Computer Serial Port................................................. 9 Connecting to the Data Source ...................................................................... 10 Ethernet Connection ...................................................................................... 10 Data Collection ................................................................................................... 13 CDR Data Collection ...................................................................................... 13 Input/Output Records ..................................................................................... 13 Buffer State LED Interpretation ...................................................................... 13 TR-2100 Windows Configuration Program ......................................................... 15 Connecting to the PC ..................................................................................... 15 Menu Options................................................................................................. 16 File Menu................................................................................................... 16 Options Menu ............................................................................................ 17 Main Controls and Indicators ......................................................................... 18 Control Port Group .................................................................................... 18 Data Port Group ........................................................................................ 19 i Ungrouped Controls and Indicators ........................................................... 19 Main Controls and Indicators, Bottom of Page .......................................... 20 Ethernet Connection ...................................................................................... 21 Setting the IP Parameters .............................................................................. 21 Automatically Setting the IP Parameters using DHCP............................... 22 Setting the IP Parameters Manually .......................................................... 23 Reserved IP Addresses For Private Networks........................................... 24 Setting the TCP Parameters .......................................................................... 25 Setting the TCP Ports ................................................................................ 25 Setting the TCP Timeouts.......................................................................... 26 Site and Data Collection Settings................................................................... 27 Site Identification ....................................................................................... 27 End of Record Character ........................................................................... 27 Data Collection Method ............................................................................. 28 Record Modifications ................................................................................. 28 Command Sets .......................................................................................... 29 Setting the Users Accounts Security Parameters........................................... 30 SNTP (Time Server) Settings......................................................................... 31 Primary NTP Server................................................................................... 31 Secondary NTP Server.............................................................................. 32 Time Zone ................................................................................................. 32 Automatically Adjust for Daylight Time ...................................................... 32 Sync every XX Hours................................................................................. 32 FTP Upload Settings ...................................................................................... 33 FTP Server ................................................................................................ 33 FTP Server Directory ................................................................................. 33 Base File Name ......................................................................................... 33 File Extension ............................................................................................ 34 FTP Port .................................................................................................... 34 Upload Empty ............................................................................................ 34 Compressed .............................................................................................. 34 Automatic Upload ...................................................................................... 34 Delete Uploaded Records.......................................................................... 34 Upload When XX% Full ............................................................................. 34 Upload Interval .......................................................................................... 34 FTP User Name......................................................................................... 34 FTP Password ........................................................................................... 34 Setting the TCP/IP Security Parameters ........................................................ 35 Non-Contiguous Subnet Bits ..................................................................... 36 Statistics......................................................................................................... 36 ii DHCP Parameters ......................................................................................... 37 General Information ....................................................................................... 38 Terminal ......................................................................................................... 39 Display Window ......................................................................................... 39 Clear Button............................................................................................... 39 Ctrl-A, Ctrl-B, Ctrl-V and Ctrl-T .................................................................. 40 Send .......................................................................................................... 40 Command Window .................................................................................... 40 Advanced ....................................................................................................... 41 Get Resets................................................................................................. 41 Clear Resets.............................................................................................. 41 Clear Statistics........................................................................................... 41 Clear Buffer ............................................................................................... 41 Factory Reset ............................................................................................ 42 Flash Program Memory Update.......................................................................... 43 Automatic Flash Update................................................................................. 43 Starting The Flash Update ............................................................................. 43 Flash Update Errors ....................................................................................... 45 Keeping Current Settings ............................................................................... 46 Network Finder ................................................................................................... 47 Exit ............................................................................................................ 47 Find Us! ..................................................................................................... 47 By Name.................................................................................................... 47 By IP .......................................................................................................... 47 Connect ..................................................................................................... 47 Copy All ..................................................................................................... 48 Connect Using… ....................................................................................... 48 TR-2100 Web Configuration ............................................................................... 51 How to Connect ............................................................................................. 51 NetBIOS Name Resolution ........................................................................ 51 DNS Name Resolution............................................................................... 51 No Name Resolution ................................................................................. 51 Behind A Firewall....................................................................................... 52 Login Screen ............................................................................................. 52 WEB Configuration Home Page..................................................................... 53 Ethernet Configuration WEB Page................................................................. 54 Use Full Duplex ......................................................................................... 54 Allow Extended Cable Length.................................................................... 54 DHCP (IP) Configuration WEB Page ............................................................. 55 IP Configuration WEB Page........................................................................... 56 iii TCP Configuration WEB Page ....................................................................... 57 Serial Port Configuration WEB Page.............................................................. 58 Password Configuration WEB Page (Security and Accounts)........................ 58 DHCP Information WEB Page........................................................................ 59 Statistics WEB Page ...................................................................................... 60 FTP Push Configuration WEB Page .............................................................. 61 Time Server Configuration WEB Page........................................................... 62 Version Information WEB Page...................................................................... 63 TCP/IP Security WEB Page ........................................................................... 63 Site and Collection Configuration ................................................................... 64 Online Help .................................................................................................... 65 TR-2100 Interactive Monitor ............................................................................... 67 Connecting with Telnet................................................................................... 67 Name Resolution............................................................................................ 67 NetBIOS Name Resolution ........................................................................ 68 DNS Name Resolution............................................................................... 68 No Name Resolution.................................................................................. 68 Behind A Firewall....................................................................................... 69 Telnet Logon .................................................................................................. 69 Connecting With a Terminal Emulator............................................................ 69 Recommended Terminal Settings .................................................................. 69 Interactive Monitor Menu Tree ....................................................................... 70 Configuration Starting Page ........................................................................... 72 Configure IP ................................................................................................... 73 Configure TCP ............................................................................................... 73 Configure TCP/IP Security ............................................................................. 74 FTP Push Configuration................................................................................. 74 Site and Collection Configuration ................................................................... 75 User/Password Configuration Page ............................................................... 75 Serial Port Configuration ................................................................................ 76 Time Server Configuration ............................................................................. 76 Configure Ethernet ......................................................................................... 77 Use Full Duplex ......................................................................................... 77 Allow Extended Cable Length.................................................................... 77 Compatibility Settings..................................................................................... 77 Network and Serial Port Statistics .................................................................. 78 Display DHCP Information ............................................................................. 78 Version Information ........................................................................................ 79 Reset to FACTORY DEFAULTS .................................................................... 79 Restore PREVIOUS SETTINGS .................................................................... 80 iv EXIT, SAVING CHANGES............................................................................. 80 EXIT WITHOUT saving changes ................................................................... 81 Reverse ARP Configuration ............................................................................... 83 Checking Address availability ........................................................................ 84 Using PING................................................................................................ 84 Windows ARP Command .......................................................................... 84 Linux or Unix ARP Command.................................................................... 84 Connecting with Telnet .............................................................................. 85 Connecting with a WEB Browser............................................................... 85 Clearing the ARP entry from your Computer ............................................. 85 Clearing the Reverse ARP Address from the TR-2100 ............................. 85 Collecting Data from the TR-2100 ...................................................................... 87 Automatic FTP Upload ................................................................................... 87 From the Control Port..................................................................................... 87 From the Telnet Data Retrieval Port............................................................... 87 Connecting ................................................................................................ 88 Disconnecting ............................................................................................ 88 Automatic FTP Upload ....................................................................................... 89 FTP Server ................................................................................................ 89 FTP Directory ............................................................................................ 89 File Base Name ......................................................................................... 90 File Extension ............................................................................................ 90 Upload Interval .......................................................................................... 90 Upload When Empty.................................................................................. 90 Upload Compressed .................................................................................. 90 Upload When XX% Full ............................................................................. 90 FTP Port .................................................................................................... 90 Automatic Upload ...................................................................................... 90 Delete Uploaded Records.......................................................................... 90 FTP User Name......................................................................................... 90 FTP Password ........................................................................................... 90 Command Sets................................................................................................... 91 TR-2100 Native commands ........................................................................... 91 Serial Port Configuration Commands............................................................. 92 ‘^T’ GetBaud0 ............................................................................................ 92 ‘^T’ SetBaud0 ............................................................................................ 92 ‘^T’ GetBaud1 ............................................................................................ 92 ‘^T’ SetBaud1 ............................................................................................ 92 ‘^T’ GetSerialDebug................................................................................... 92 ‘^T’ SetSerialDebug ................................................................................... 92 v IP Configuration Commands .......................................................................... 93 ‘^T’ GetDHCP ............................................................................................ 93 ‘^T’ SetDHCP............................................................................................. 93 ‘^T’ GetDHCPInfo ...................................................................................... 93 ‘^T’ GetIP ................................................................................................... 94 ‘^T’ SetIP ................................................................................................... 94 ‘^T’ GetMask.............................................................................................. 94 ‘^T’ SetMask .............................................................................................. 94 ‘^T’ GetDNS1............................................................................................. 94 ‘^T’ SetDNS1 ............................................................................................. 94 ‘^T’ GetDNS2............................................................................................. 94 ‘^T’ SetDNS2 ............................................................................................. 94 ‘^T’ GetDNS3............................................................................................. 94 ‘^T’ SetDNS3 ............................................................................................. 95 ‘^T’ GetGateway ........................................................................................ 95 ‘^T’ SetGateway......................................................................................... 95 ‘^T’ GetHost ............................................................................................... 95 ‘^T’ SetHost ............................................................................................... 95 ‘^T’ GetDomain .......................................................................................... 95 ‘^T’ SetDomain .......................................................................................... 95 DHCP Assigned Configuration ....................................................................... 95 ‘^T’ GetDHCPIP......................................................................................... 95 ‘^T’ GetDHCPMask.................................................................................... 95 ‘^T’ GetDHCPDNS1................................................................................... 95 ‘^T’ GetDHCPDNS2................................................................................... 96 ‘^T’ GetDHCPDNS3................................................................................... 96 ‘^T’ GetDHCPGateway .............................................................................. 96 ‘^T’ GetDHCPServer.................................................................................. 96 ‘^T’ DHCPGetDomain ................................................................................ 96 TCP Configuration Commands ...................................................................... 96 ‘^T’ GetCfgPort .......................................................................................... 96 ‘^T’ SetCfgPort........................................................................................... 96 ‘^T’ GetCfgTimeout .................................................................................... 96 ‘^T’ SetCfgTimeout .................................................................................... 96 ‘^T’ GetCharGenPort ................................................................................. 96 ‘^T’ SetCharGenPort.................................................................................. 97 ‘^T’ GetCharGenTimeout ........................................................................... 97 ‘^T’ SetCharGenTimeout ........................................................................... 97 ‘^T’ GetRetrievalPort.................................................................................. 97 ‘^T’ SetRetrievalPort .................................................................................. 97 vi ‘^T’ GetRetrievalTimeout ........................................................................... 97 ‘^T’ SetRetrievalTimeout............................................................................ 97 ‘^T’ GetEchoRetrieval ................................................................................ 97 ‘^T’ SetEchoRetrieval ................................................................................ 97 ‘^T’ GetEchoPort........................................................................................ 97 ‘^T’ SetEchoPort ........................................................................................ 97 ‘^T’ GetEchoTimeout ................................................................................. 98 ‘^T’ SetEchoTimeout.................................................................................. 98 ‘^T’ GetHTTPPort ...................................................................................... 98 ‘^T’ SetHTTPPort....................................................................................... 98 ‘^T’ GetHTTPTimeout ................................................................................ 98 ‘^T’ SetHTTPTimeout ................................................................................ 98 ‘^T’ GetTCPTimeout .................................................................................. 98 ‘^T’ SetTCPTimeout................................................................................... 98 Time Server Settings...................................................................................... 98 '^T' SetTimeServer1 .................................................................................. 98 '^T' GetTimeServer1 .................................................................................. 98 '^T' SetTimeServer2 .................................................................................. 99 '^T' GetTimeServer2 .................................................................................. 99 '^T' SetTimeSyncInterval ........................................................................... 99 '^T' GetTimeSyncInterval ........................................................................... 99 '^T' SetTimeZoneIndex .............................................................................. 99 '^T' GetTimeZoneIndex.............................................................................. 99 '^T' SyncNTPTime ..................................................................................... 99 '^T' GetNTPSyncTime ............................................................................... 99 '^T' SetTime ............................................................................................... 99 FTP Upload (Push) Settings ........................................................................ 100 '^T' SetFTPClientAutoUpload .................................................................. 100 '^T' GetFTPClientAutoUpload .................................................................. 100 '^T' SetFTPClientDeleteRecords ............................................................. 100 '^T' GetFTPClientDeleteRecords ............................................................. 100 '^T' SetFTPClientDirectory....................................................................... 100 '^T' GetFTPClientDirectory ...................................................................... 100 '^T' SetFTPClientFileBaseName.............................................................. 100 '^T' GetFTPClientFileBaseName ............................................................. 100 '^T' SetFTPClientFileExtension................................................................ 100 '^T' GetFTPClientFileExtension ............................................................... 100 '^T' SetFTPClientInterval ......................................................................... 100 '^T' GetFTPClientInterval ......................................................................... 100 '^T' SetFTPClientUser ............................................................................. 100 vii '^T' GetFTPClientUser ............................................................................. 101 '^T' SetFTPClientPass ............................................................................. 101 '^T' GetFTPClientPass............................................................................. 101 '^T' SetFTPClientPercent......................................................................... 101 '^T' GetFTPClientPercent ........................................................................ 101 '^T' SetFTPClientPort............................................................................... 101 '^T' GetFTPClientPort .............................................................................. 101 '^T' SetFTPCompression ......................................................................... 101 '^T' GetFTPCompression......................................................................... 101 '^T' StartFTPUpload................................................................................. 101 '^T' GetFTPNextUpload ........................................................................... 101 '^T' SetFTPServer.................................................................................... 101 '^T' GetFTPServer ................................................................................... 101 '^T' SetFTPTimeout ................................................................................. 102 '^T' GetFTPTimeout ................................................................................. 102 '^T' SetUploadEmpty................................................................................ 102 '^T' GetUploadEmpty ............................................................................... 102 TCP/IP Security Configuration Commands .................................................. 102 ‘^T’ SetEnableIPSec ................................................................................ 102 ‘^T’ GetEnableIPSec................................................................................ 102 ‘^T’ SetSecIPx ......................................................................................... 102 ‘^T’ GetSecIPx ......................................................................................... 102 ‘^T’ SetSecMaskx .................................................................................... 102 ‘^T’ GetSecMaskx.................................................................................... 102 Users Security Configuration Commands .................................................... 102 ‘^T’ GetCfgName ..................................................................................... 103 ‘^T’ SetCfgName...................................................................................... 103 ‘^T’ GetCfgPass....................................................................................... 103 ‘^T’ SetCfgPass ....................................................................................... 103 ‘^T’ GetHTTPName ................................................................................. 103 ‘^T’ SetHTTPName .................................................................................. 103 ‘^T’ GetHTTPPass ................................................................................... 103 ‘^T’ SetHTTPPass ................................................................................... 103 ‘^T’ GetPollName..................................................................................... 103 ‘^T’ SetPollName ..................................................................................... 103 ‘^T’ GetPollPass ...................................................................................... 103 ‘^T’ SetPollPass....................................................................................... 104 Buffer Configuration Commands .................................................................. 104 '^T' SetEnableMDR2000.......................................................................... 104 '^T' GetEnableMDR2000 ......................................................................... 104 viii '^T' SetEnablePollCat .............................................................................. 104 '^T' GetEnablePollCat.............................................................................. 104 '^T' SetEnableOmnitronix ........................................................................ 104 '^T' GetEnableOmnitronix ........................................................................ 104 '^T' SetCollectMode ................................................................................. 104 '^T' GetCollectMode................................................................................. 104 '^T' SetSiteID ........................................................................................... 104 '^T' GetSiteID........................................................................................... 104 '^T' SetAvayaPort .................................................................................... 104 '^T' GetAvayaPort .................................................................................... 104 '^T' SetEORChar ..................................................................................... 105 '^T' GetEORChar ..................................................................................... 105 '^T' SetAddLineNumber ........................................................................... 105 '^T' GetAddLineNumber........................................................................... 105 '^T' SetAddDateTime ............................................................................... 105 '^T' GetAddDateTime............................................................................... 105 '^T' SetShortDateTime............................................................................. 105 '^T' GetShortDateTime ............................................................................ 105 '^T' SetAddCRC....................................................................................... 105 '^T' GetAddCRC ...................................................................................... 105 '^T' GetDateTime ..................................................................................... 106 '^T' SetDaylight ........................................................................................ 106 '^T' GetDaylight........................................................................................ 106 ‘^T’ ClearBuffer ........................................................................................ 106 ‘^T’ FactroyReset..................................................................................... 106 Buffer Status Inquiry Commands ................................................................. 106 '^T' GetEthernetAddress.......................................................................... 106 '^T' GetBuildInfo....................................................................................... 106 '^T' GetCapacity....................................................................................... 106 '^T' GetSerialNumber............................................................................... 106 '^T' GetSoftwareBuildDate ....................................................................... 106 '^T' GetSoftwareBuildTime....................................................................... 106 '^T' GetSoftwareRevision......................................................................... 106 '^T' GetHardwareBuildDate...................................................................... 106 '^T' GetHardwareBuildTime ..................................................................... 106 '^T' GetHardwareRevision ....................................................................... 107 '^T' GetResetEvents ................................................................................ 107 '^T' ClearResetEvents ............................................................................. 107 '^T' ClearStats.......................................................................................... 107 MDR-2000 Compatible Commands ............................................................. 107 ix ‘^V’ BE ..................................................................................................... 107 ‘^V’ CL ..................................................................................................... 108 ‘^V’ DB ..................................................................................................... 108 ‘^V’ DU..................................................................................................... 108 ‘^V’ ID ...................................................................................................... 108 ‘^V’ IM ...................................................................................................... 108 ‘^V’ MR .................................................................................................... 108 ‘^V’ OK..................................................................................................... 108 ‘^V’ SD ..................................................................................................... 109 ‘^V’ SM..................................................................................................... 109 ‘^V’ XT ..................................................................................................... 109 Additional MDR-2000 style Commands ....................................................... 109 ‘^V’ DA ..................................................................................................... 109 ‘^V’ SS ..................................................................................................... 109 Omnitronix Data-Link Compatible Commands ............................................. 109 ?............................................................................................................... 109 ACCESS.................................................................................................. 109 BYPASS .................................................................................................. 109 CLEAR..................................................................................................... 110 CLOCK .................................................................................................... 110 COLDSTART ........................................................................................... 110 COUNT.................................................................................................... 110 CRC......................................................................................................... 110 DEFAULT ................................................................................................ 110 FREE ....................................................................................................... 110 NEXT ....................................................................................................... 110 RESEND.................................................................................................. 110 PROMPT ................................................................................................. 110 PRT ......................................................................................................... 110 PUSHTEST ............................................................................................. 110 RESTART................................................................................................ 110 RL ............................................................................................................ 110 RLMODE ................................................................................................. 110 SETUP..................................................................................................... 110 STAMP .................................................................................................... 111 STATUS .................................................................................................. 111 TAG ......................................................................................................... 111 WAIT........................................................................................................ 111 ZAP.......................................................................................................... 111 ZERO....................................................................................................... 111 x WTI PollCat Compatible Commands............................................................ 111 ^B00 ........................................................................................................ 111 ^B01 ........................................................................................................ 111 ^B02 ........................................................................................................ 111 ^B03 ........................................................................................................ 111 ^B04 ........................................................................................................ 111 ^B05 ........................................................................................................ 111 ^B06 ........................................................................................................ 112 ^B13 ........................................................................................................ 112 ^B16 ........................................................................................................ 112 ^B20 ........................................................................................................ 112 ^B21 ........................................................................................................ 112 ^B22 ........................................................................................................ 112 ^B25 ........................................................................................................ 112 ^B26 ........................................................................................................ 112 ^B29 ........................................................................................................ 112 ^B30 ........................................................................................................ 112 ^B39 ........................................................................................................ 112 ^B50 ........................................................................................................ 112 ^B52 ........................................................................................................ 112 ^B54 ........................................................................................................ 112 ^B59 ........................................................................................................ 112 ^B62 ........................................................................................................ 112 ^B66 ........................................................................................................ 113 ^B67 ........................................................................................................ 113 ^B72 ........................................................................................................ 113 ^B75 ........................................................................................................ 113 ^B91 ........................................................................................................ 113 ^B92 ........................................................................................................ 113 ^B95 ........................................................................................................ 113 ^B97 ........................................................................................................ 113 ^B98 ........................................................................................................ 113 ^B99 ........................................................................................................ 113 Trouble Shooting .............................................................................................. 115 Fatal Errors .................................................................................................. 115 RAM Test Failure..................................................................................... 115 Ethernet Controller Failure....................................................................... 115 Program Memory Failure ......................................................................... 115 Microprocessor Configuration Failures .................................................... 116 Non Fatal Errors........................................................................................... 116 xi Link LED does not light............................................................................ 116 No LEDs light when power is applied ...................................................... 116 Unable to communicate with the Ctrl Port................................................ 116 Unable to receive records on the Data Port............................................. 116 Factory Default Settings ................................................................................... 119 Ethernet Configuration ................................................................................. 119 Use Full Duplex ....................................................................................... 119 Allow Extended Cable Length.................................................................. 119 Serial Port Configuration .............................................................................. 119 Control Port Baud Rate............................................................................ 119 Data Port Baud Rate................................................................................ 119 IP Parameters .............................................................................................. 119 IP Address ............................................................................................... 119 Subnet Mask............................................................................................ 119 IP Gateway .............................................................................................. 119 Primary DNS Server ................................................................................ 119 Secondary DNS Server ........................................................................... 119 Alternate DNS Server .............................................................................. 120 Host Name............................................................................................... 120 Domain .................................................................................................... 120 Enable DHCP .......................................................................................... 120 TCP Parameters .......................................................................................... 120 HTTP Configuration Port: ........................................................................ 120 Configuration Port:................................................................................... 120 Data Retrieval Port: ................................................................................. 120 Echo on Data Retrieval Port: ................................................................... 120 TCP ECHO Service Port:......................................................................... 120 TCP CHARGEN Service Port: ................................................................. 120 Site and Data Collection Settings................................................................. 120 Site Identification ..................................................................................... 120 End of Record Character ......................................................................... 120 Data Collection Method................................................................................ 120 RS-232C Data Port at XXXX Baud .......................................................... 120 Generic Plain ASCII Text as TCP/IP Server on Port 2301....................... 120 Avaya Session Layer Protocol (Definity RSP) on Port XXXX .................. 120 Record Modifications.................................................................................... 121 Add Line Numbers ................................................................................... 121 Add Record/Block CRC ........................................................................... 121 Add Local Date/Time ............................................................................... 121 Short Date/Time Format .......................................................................... 121 xii Command Sets ............................................................................................ 121 Enable MDR2000 Commands ................................................................. 121 Enable Omnitronix Commands................................................................ 121 Enable WTI/PollCat Commands .............................................................. 121 Security Parameters..................................................................................... 121 HTTP Configuration User Name.............................................................. 121 HTTP Configuration Password ................................................................ 121 Telnet Configuration User Name ............................................................. 121 Telnet Configuration Password................................................................ 121 Data Retrieval User Name....................................................................... 121 Data Retrieval Password ......................................................................... 121 SNTP (Time Server) Settings....................................................................... 121 Primary NTP Server ................................................................................ 121 Secondary NTP Server............................................................................ 122 Time Zone ............................................................................................... 122 Automatically Adjust for Daylight Time .................................................... 122 Sync every XX Hours............................................................................... 122 FTP Upload Settings .................................................................................... 122 FTP Server .............................................................................................. 122 FTP Server Directory ............................................................................... 122 Base File Name ....................................................................................... 122 File Extension .......................................................................................... 122 FTP Port .................................................................................................. 122 Upload Empty .......................................................................................... 122 Compressed ............................................................................................ 122 Automatic Upload .................................................................................... 122 Delete Uploaded Records........................................................................ 122 Upload When XX% Full ........................................................................... 122 Upload Interval ........................................................................................ 122 FTP User Name....................................................................................... 122 FTP Password ......................................................................................... 123 TCP/IP Security Parameters ........................................................................ 123 Network 1 ................................................................................................ 123 Mask 1 ..................................................................................................... 123 Network 2-6 ............................................................................................. 123 Network 2-6 ............................................................................................. 123 Enable TCP/IP Filtering ........................................................................... 123 Specifications ................................................................................................... 125 System Requirements.................................................................................. 125 Hardware Requirements.......................................................................... 125 xiii Software Requirements ........................................................................... 125 Operating Conditions ............................................................................... 125 Technical Specifications .......................................................................... 126 Connections ................................................................................................. 126 Power ...................................................................................................... 126 Serial Ports .............................................................................................. 126 Network ................................................................................................... 126 Indicators ..................................................................................................... 126 Front Panel .............................................................................................. 126 Rear Panel............................................................................................... 127 Glossary ........................................................................................................... 129 Index................................................................................................................. 139 xiv T E L C O M T R E S E A R C H T R - 2 1 0 0 D A T A B U F F E R 1 Chapter Introduction his manual describes the operational characteristics of the TR-2100 Data Buffer. All aspects of the operational capability of the TR-2100 are covered including details for unit set-up, operation and troubleshooting. In general, reference to this manual will only be required during initial installation and when programming application software to interface with the TR-2100. This programming information starts on page 91. The TR-2100 has many options and parameters that can be adjusted and set to provide optimum performance in virtually any application. Many of these settings have default values that are suitable for most applications and a typical installation will only require a few key settings to be customized. The TR-2100 Windows Configuration Program, described on page 15, is the preferred tool for setting up the TR-2100’s configuration when the TR-2100 is physically accessible. The TR-2100’s built in WEB Server, described on page 51, is the preferred tool to use when configuring the unit and the TR-2100 is not physically accessible. The Interactive Monitor can also be used for configuring the TR-2100. This can be done through a Telnet client or a terminal emulator through the TR-2100 Control Port. This is described on page 67. Electrical, physical and environmental specifications are provided in the chapter Specifications on page 125. Network and Modem Access All functions, including data retrieval and device configuration, can be done using a Network, modem or local PC (at rates up to 115,200 baud). When the TR-2100 is installed in a TCP/IP environment, Telnet or the TR-2100’s internal WEB server is used to access the command mode. Password protection prevents unauthorized access to the TR-2100. You can also dial-up an external modem connected to the TR-2100. Stored data can be reliably retrieved using a commercial data collection program, or a Telnet or serial port terminal emulation program. 1 T E L C O M R E S E A R C H T R - 2 1 0 0 D A T A B U F F E R High security The TR-2100 can send data to an FTP server automatically at regular intervals. The TR-2100 uses FTP Passive mode and acts as a client. It is not possible to make a connection from an external source to the TR-2100 FTP client. When the TR-2100 connects to your FTP server as a client, using the FTP Automatic Upload feature, upload speed can approach 50,000 compressed records per minute over the Internet. Programmable Upload Interval The TR-2100 can be programmed to automatically upload data, using the FTP Automatic Upload feature, after a specific time interval, at a specific percent full level or both. Non-volatile Flash Memory The TR-2100 uses reliable flash memory to store data records, operating parameters and configuration information. This eliminates data loss due to depleted batteries. If power to the unit is interrupted or disconnected, stored data and parameters will be retained indefinitely. There are no jumpers or switches to set, no batteries to replace, nothing to service. There should never be a reason to remove the cover. Fast and Convenient Firmware Updates The latest version of the TR-2100 Windows Configuration Program can be downloaded from www.databuffers.com. This program contains the latest firmware version and will automatically offer to update your TR-2100 when it detects an older version of the firmware. The update takes about 30 seconds. High Compression Storage High Compression storage can almost triple the number of characters that can be stored. Based on the Nortel SL1 call record format, the 8 Meg TR-2100 can store over 320,000 records. Other record formats provide similar compression ratios. Compatibility The TR-2100 has a very powerful and complete set of commands. It also supports selected commands compatible with existing data buffers including the MDR-2000, the Omnitronix Data-Link and the WTI PollCat buffers. 2 T E L C O M T R E S E A R C H T R - 2 1 0 0 D A T A B U F F E R 2 Chapter Overview he purpose of this section is to provide a general description of the TR-2100 Data Buffer. Each of the features discussed in this section will be further described in later chapters of the manual. The TR-2100 is a compact, highly versatile data collection device. It is designed for maintenance free operation with reliability features to ensure data integrity as well as low support and service costs. The TR-2100 can be installed quickly. It requires a minimum of space and has no environmental requirements other than those normally found in the office or telephone equipment room. Once in operation the TR-2100 will collect data, typically but not necessarily call detail records (CDR) from a PBX or other device, for later transmission and downstream processing. It has no battery to be replaced because it uses flash memory for data storage. The TR-2100 communicates with the data source via an RS-232C compatible port. Communications with downstream processing facilities is made possible by using another RS-232C port (the TR-2100 CONTROL PORT) via a direct connection or a modem, or via its on-board Ethernet Port. The TR-2100 serial ports can be setup to communicate at speeds from 1200 to 115,200 Baud, but a system is limited by the capability of the downstream facilities to accept the data at the higher speeds, the modem equipment and the quality of the transmission lines. To ensure data integrity, the data transmitted to the downstream processing unit can be encapsulated in a data packet. The packet contains byte count and checksum information to provide error detection capability. If the downstream collection software detects an error it may request that the TR-2100 send the packet again. This feature is important in ensuring the integrity of the downstream report processing. While the TR-2100 is transferring data downstream it continues to collect and process information from the Data Source. This facility means that real-time data collection from the TR-2100 is practical. Commands by the downstream processing unit to the TR-2100 or by technicians for remote diagnosis are very simple. Commands exist in two command structures, computer-to-computer and interactive. 3 T E L C O M R E S E A R C H T R - 2 1 0 0 D A T A B U F F E R By using groups of computer-to-computer commands the TR-2100 will perform all of the functions necessary for automatic data collection. These commands provide the functionality listed below. Communications Commands • • • • • • • • • Send the current record to the downstream processing system. Advance to the next record. Clear all of the previously transmitted records. This command makes room for new records. Reset to the beginning of the buffer. This command helps recover records lost due to downstream processing failures. Doorbell. This command returns a simple ‘Hello’ response to ensure that a connection to the TR-2100 has been made. Maintenance/Support Commands. Pass data from the DATA PORT to the CONTROL port for dynamic monitoring of PBX activity. Data is still processed and retained by the TR-2100. Commands to reset the entire TR-2100, or the TR-2100 buffer memory. It supports the test and diagnostic Internet Protocols PING, ECHO and CHARGEN. Internet Protocol Features • • • • • • • • • • FTP Protocol used for uploading data to an FTP server. HTTP Protocol used for configuration through a WEB Browser. Telnet Protocol user for configuration. Telnet Protocol for data record retrieval. NetBIOS Name Resolution Protocol. DHCP Configuration. RARP, Reverse Address Resolution Protocol. Ethernet Statistics are collected and available. Serial Port and Buffer Status Statistics are collected and available. PING, ECHO and CHARGEN protocols for network testing and diagnostics. Buffer Configuration Options There are several methods of configuring the TR-2100. They are all described in the following chapters. TR-2100 Windows Configuration Program The quickest and easiest method, if there is direct physical access to the TR-2100’s serial port, is the Telcom Research TR-2100 Windows Configuration Program. A free download of the latest version can be uploaded from our WEB Site www.databuffers.com. This program is described starting on page 15. 4 T E L C O M R E S E A R C H T R - 2 1 0 0 D A T A B U F F E R TR-2100 WEB Interface Another quick and easy method to configure the TR-2100, that can be used remotely or locally, is the TR-2100 WEB Interface. The host name of your TR-2100, which is provided on the label on the bottom of the unit, is required if this method is going to be used and theTR-2100 must be accessible via your network or the Internet. This method of initial setup is described on page 51. Configuration with an RS-232 terminal emulation program The TR-2100 contains an Interactive Monitor that lets you set all of its configuration options with a RS-232 terminal emulation program on a computer, as well as a real terminal. This method of setup is described on page 67. Telnet Configuration The Interactive Monitor is also available over its network connection with a Telnet connection on a special TCP port (default 9999). This port as well as the ports used for HTTP, PING, ECHO and CHARGEN can be changed. This method of setup is described starting on page 67. All network connections support User Name and Password configuration. It is strongly recommended that these security features be used. Reverse ARP Configuration This method is the most difficult and should rarely if ever be required. We have included it for completeness. This method of setup is described on page 83. Figure 1 Front Panel Front Panel Indicators • LINK • • ACT DHCP • HTTP • Cfg This is a green LED indicating that the Ethernet circuit is detecting the presence of valid link pulses. This is a red LED that indicates activity on the Ethernet interface. This is a red LED, which when illuminated, indicates that the TR-2100 has received valid IP configuration data from a DHCP server. This LED illuminates Red during WEB Configuration as it processes each HTTP protocol request and response. A Red LED indicating that the Interactive Monitor is connected through the Telnet Interactive Monitor Port. 5 T E L C O M • Collect • Run • Full • PBX • Ctrl R E S E A R C H T R - 2 1 0 0 D A T A B U F F E R A Red LED that illuminates when a Data Retrieval Telnet session is open or an FTP connection is uploading data. This Red/Green LED is red during start-up or during a master reset. It turns to green when the TR-2100 begins normal operation. Please refer to the paragraph Buffer State LED Interpretation on page 13 for a full explanation of this Red/Green LED indicator. This Red/Green LED indicates activity on the DATA Serial Port. It flashes green when the port is receiving and red when it is transmitting. Red/Green LED This Red/Green LED indicates activity on the Control serial port. It flashes green when the port is receiving and red when it is transmitting. Figure 2 Rear Panel Rear Panel Indicators These are duplicates of two of the Front Panel network Indicators and are supplied as a convenience. • LINK • ACT This is a green LED indicating that the Ethernet circuit is detecting the presence of valid link pulses. This is a red LED that indicates activity on the Ethernet interface. Rear Panel Connectors There are four connectors on the rear panel of the TR-2100. • • • • POWER INPUT This is a 9mm long, 5.5 mm diameter coaxial power connector. The allowed input voltage is 8 to 16 volts AC or DC. The maximum current consumption is 200 ma. CONTROL This is a 9-pin miniature male D connector wired as Data Terminal Equipment. Please see the tables on page 9 for details of the pin assignments. DATA/PBX This is a 9-pin miniature male D connector wired as Data Terminal Equipment. Please see the table on page 9 for details of the pin assignments. ETHERNET This is an RJ-45 connector. Please see the table on page 11 for details of the pin assignments. 6 T E L C O M R E S E A R C H T R - 2 1 0 0 D A T A B U F F E R Supplied Accessories Figure 3 Supplied Accessories An AC adapter and a Null Modem cable are supplied with the TR-2100 7 T E L C O M I R E S E A R C H T R - 2 1 0 0 D A T A 3 Chapter B U F F E R Installation nstallation of the TR-2100 is straight forward. There are 4 external connections and in some cases only 3. The following paragraphs describe each of these connections in detail. Power Supply The power supply that comes with the TR-2100 is shown in the photograph Supplied Accessories on page 7. This power supply has an output of 9 Volts DC at 500 milliamperes. Any similar power supply with an output voltage in the range of 8 to 16 volts AC or DC and a current capability of 250 milliamperes or more may be used. Connecting Directly to a Computer Serial Port The TR-2100 can be connected to a computer through a serial port on the computer. The PC COM port and the TR-2100 CONTROL PORT should be connected with a NULL MODEM Cable (supplied with the TR-2100) or a cable used for direct serial connection between two Windows computers (available from most computer stores). This connector is wired as Data Terminal Equipment as shown in Table 1 - 9-pin null modem cabling wiring, below. TR-2100 Control Port connector 3 Computer serial port connector 2 Transmit Data 2 3 Receive Data 7 8 Request To Send 8 7 Clear To Send 6, 1 4 Data Set Ready and Carrier Detect 5 5 Signal Ground 4 6, 1 Data Terminal Ready Signal Table 1 - 9-pin null modem cabling wiring Note: Although the ‘hand shake lines’ Request to send, Clear to send, Data terminal ready, Data set ready and carrier detect are shown above, the TR-2100 does not require them but the PC may require them. The TR-2100 only requires Signal ground, Transmit data and Receive data. 9 T E L C O M R E S E A R C H T R - 2 1 0 0 D A T A TR-2100 9 pin Control Port connector 3 25 pin Modem serial port connector 2 Transmit Data 2 3 Receive Data 7 4 Request To Send 8 5 Clear To Send 6 6 Data Set Ready 5 7 Signal Ground 1 8 Carrier Detect 4 20 Data Terminal Ready B U F F E R Signal Name Table 2 - 9 pin to 25 pin Direct Modem Wiring Connecting to the Data Source The TR-2100 can be connected to a data source such as a PBX with the 9-pin RS-232C connector labelled PBX on the rear panel. This connector is wired as Data Terminal Equipment as shown in Table 3 - 9-pin Port Wiring, below. The cable for this connector is not supplied. TR-2100 serial port connectors 1 Carrier Detect 2 Receive Data 3 Transmit Data 4 Data Terminal Ready 5 Signal Ground 6 Data Set Ready 7 Request To Send 8 Clear To Send 9 Ring Indicator Signal Table 3 - 9-pin Port Wiring Ethernet Connection Connect your TR-2100 to your network with the supplied Ethernet cable using the RJ-45 connector labelled ‘Ethernet’ on the rear of the unit. The TR-2100 Ethernet Port runs at 10Mb/sec so be sure that the hub or switch connecting it to the network can operate at this speed. If the unit is properly connected to the network the green LINK indicator next to the RJ-45 will be illuminated and the green LINK indicator on the front panel will also be illuminated. 10 T E L C O M R E S E A R C H T R - 2 1 0 0 D A T A B U F F E R The table below shows the pins and corresponding signals for the RJ-45 connector. Pin 1 2 3 6 Signal TX+ TXRX+ RX- Table 4 - Ethernet Connector Wiring Figure 4 Rear Panel Connections 11 T E L C O M T R E S E A R C H T R - 2 1 0 0 D A T A B U F F E R 4 Chapter Data Collection he purpose of this section is to describe the data collection process as well as the contents and format of the data used by the TR-2100. CDR Data Collection This section describes the details of record collection by the TR-2100. All data is collected from the Data Source over a 1200 to 115,200 Baud, RS-232C compatible port. For collection from a telephone PBX system this is generally achieved by requesting the PBX supplier to enable the port on the PBX. In general, the PBX CDR port must be configured for a standalone hardcopy terminal. That is how the TR-2100 looks to the PBX. Input/Output Records Almost all PBXs are supported by the TR-2100. Each record sent from the PBX is terminated by, or preceded by, a carriage-return/linefeed pair. All control characters (those with ASCII codes below 32) are ignored except the carriage-return that is required as the end-of-record indicator. The TR-2100 can also collect data from any other device that supplies records terminated by a carriage-return Buffer State LED Interpretation The ‘Full’ LED in the ‘Buffer’ group on the front panel indicates the state of the available and used buffer capacity. See the table on the following page for a description of how to interpret this LED’s flashing pattern. 13 T E L C O M Buffer Percent Full R E S E A R C H T R - 2 1 0 0 D A T A Full LED Red State Full LED Green State Empty Off On Solid Less than 10% 1 Flash 9 Flashes 10% to 19% 2 Flashes 8 Flashes 20% to 29% 3 Flashes 7 Flashes 30% to 39% 4 Flashes 6 Flashes 40% to 49% 5 Flashes 5 Flashes 50% to 59% 6 Flashes 4 Flashes 60% to 69% 7 Flashes 3 Flashes 70% to 79% 8 Flashes 2 Flashes 80% to 89% 9 Flashes 1 Flash 90% to Less than 100% 10 Flashes 0 Flashes Full On Solid Off Table 5 - Buffer State LED Interpretation 14 B U F F E R T E L C O M R E S E A R C H T R - 2 1 0 0 D A T A B U F F E R 5 Chapter TR-2100 Windows Configuration Program T his is a PC program that controls and configures the TR-2100 through a PC COM port. The TR-2100 and the computer should be connected as described in the Installation chapter beginning on page 9. Note: Although the TR-2100 Configuration Utility can be used to configure all the network settings, it does not require the network to be connected in order to do this. Connecting to the PC The TR-2100 Configuration Utility can use any serial port available on the PC. When you start the program it will attempt to connect to the COM port with the baud rate used the last time it was run. The result of this attempt is displayed in the window below the drop-down list labelled ‘Current Baud Rate’. If it is green and says ‘Connected’ as shown, the attempt was successful. If the window is red and says ‘Not Connected’, clicking on the ‘Find Me!’ button will start a discovery sequence where every COM port on the PC will be scanned at every baud rate looking for the TR-2100. This process only takes a few seconds on the average PC. Upon success the CONTROL PORT display will show the new COM Port and baud rate. The window below the drop-down list labelled ‘Current Baud Rate’ will be green and say ‘Connected’ as shown below. Figure 5 Communications Port Settings 15 T E L C O M R E S E A R C H T R - 2 1 0 0 D A T A B U F F E R Menu Options File Menu The File Menu allows you to load and save configuration settings. Select Configuration File This item brings up the standard Windows File Open dialog. It can be used to select an existing or a new configuration file. See the description of Get Settings on page 20 for more details. Save Configuration File This saves the currently displayed settings to the file named in the Status Bar at the bottom of the display. There is no prompt and the file will be immediately updated to reflect the currently displayed settings. See the description of Save Settings on page 20 for more details. Save Configuration File As This item brings up the standard Windows File Open dialog. It lets you save the currently displayed settings to a new or existing file of your choice. The name of the file will appear in the Status Bar at the bottom of the display. This file will then be used for subsequent Save Configuration File menu commands and Save Settings button commands (described on page 20). Recently Used File List Figure 6 File Menu This is a list of the most recently used configuration files. It is a quick and convenient way to reload a collection of standard settings that you want to use again. 16 T E L C O M R E S E A R C H T R - 2 1 0 0 D A T A B U F F E R Options Menu Figure 7 Options Menu The following features of the TR-2100 Windows Configuration Program can be enabled and disabled through the options menu. Tips Figure 8 The Tips Feature This feature provides help on all the controls and settings in the TR-2100 Windows Configuration Program screens. Splash Screen Removing the check mark under Options/Splash Screen disables the start up splash screen. 17 T E L C O M R E S E A R C H T R - 2 1 0 0 D A T A B U F F E R Main Controls and Indicators Control Port Group Figure 9 Control Port Group This section describes the main controls and indicators belonging to the ‘Control Port’ group. These are located at the top of the main window on the left side. Port This window shows the PC Serial Port being used to communicate with the TR2100. It has a drop-down list that displays all the serial ports on the PC. Current Baud Rate This window displays the baud rate currently being used to communicate with the TR-2100. It has a drop-down list that displays all the available baud rates for the selected serial port on the PC. When you make a selection with this control the results are immediately indicated by the ‘Connected - Not Connected’ window described below. New Baud Rate This window displays the baud rate that will be set for the PC and the TR-2100 when the ‘Send Settings’ button (described below) is pressed. Also see Communications Port Settings on page 15. Disconnect - Connect This button connects and disconnects the PC Serial Port connection to the TR-2100. The labelling of the button changes depending on the current Serial Port connection state. 18 T E L C O M R E S E A R C H T R - 2 1 0 0 D A T A B U F F E R Connected - Not Connected This indicator appears green with the word ‘Connected’ displayed when the PC Serial Port connection to the TR-2100 is ‘Open’. It is red and displays Not Connected when the connection is ‘Closed’. Find Me! Pressing this button starts a search sequence to check all the available serial ports on the PC at all available baud rates in an attempt to find a connected TR-2100. During the search, the label on the button changes to ‘STOP!’ and the ‘Connected’ window turns to blue and says ‘Connection’. Pressing the button at this point will terminate the search. When the program finds a TR-2100 the ‘Connected’ window turns green and the search stops. If no TR-2100 is found or the search is stopped the ‘Connected’ window turns red. Data Port Group Figure 10 Data/PBX Port This section describes the main controls and indicators belonging to the ‘Data Port’ group. These are located at the top of the main window on the right side. Baud Rate This window displays the baud rate set for the TR-2100 Data PBX/Port. It is sent to the TR-2100 when the ‘Send Settings’ button (described below) is pressed. Ungrouped Controls and Indicators Exit This control stops the TR-2100 Windows Configuration Program. It saves the TR2100 settings to the file named in the status window at the bottom of the display (described below). These settings are those programmed in the TR-2100 Windows Configuration Program and may not be the same as the settings of the connected TR-2100. 19 T E L C O M R E S E A R C H T R - 2 1 0 0 D A T A B U F F E R Cancel This control stops the TR-2100 Windows Configuration Program. It does not save any changes. Serial Port Debugging If this checkbox is selected, all data received or transmitted by the TR-2100 CONTROL PORT is to be transmitted via the DATA PORT. Any data transmitted to the TR-2100 DATA PORT, while in this mode, will still be collected properly. This feature can be used as an aid when developing software for the TR-2100. It allows a developer to monitor communications between the TR-2100 and the program being developed. It should not be used in normal operation. Main Controls and Indicators, Bottom of Page Figure 11 Main Controls and Indicators Lower Section Send Settings Pressing this button sends all the settings in the Configuration Program to the TR2100. The Status Bar just below this button shows the progress of the transfer. This control is only available when the ‘Connected - Not Connected’ indicator is green. Get Settings Pressing this button retrieves all the settings from the connected TR-2100 and updates all the displayed settings. The Status Bar just below this button shows the progress of the transfer. This control is only available when the ‘Connected - Not Connected’ indicator is green. Save Settings This control saves the settings from the TR-2100 Windows Configuration Program to the file named in the status window at the bottom of the display (described below). To save settings from the connected TR-2100, press ‘Get Settings’ before using this button. Select Settings Pressing this button retrieves all the settings from the file indicated in the Status Bar (described below) and updates all the displayed settings. 20 T E L C O M R E S E A R C H T R - 2 1 0 0 D A T A B U F F E R Print Settings This will bring up the standard Windows Print dialog and allow you to print a single page containing all the current information and settings in the connected TR-2100. This information comes directly from the connected TR-2100 and not from the information displayed on the screen. This control is only available when the ‘Connected - Not Connected’ indicator is green. Flash Update This opens the Flash Update control. The TR-2100 configuration program contains the latest version of the TR-2100 firmware. This control enables you to update the firmware in your TR-2100. It takes about 30 seconds. Please see the chapter Flash Program Memory Update on page 43 for details. Network Finder This starts a program that finds all the TR-2100s attached to your local Ethernet. It also allows you to connect to and configure them regardless of their current IP address settings. Please see the chapter Network Finder on page 47 for details. Status Bar The status bar at the bottom of the display serves 2 functions. The majority of the time it displays the name of the configuration file that was most recently loaded or saved. The displayed configuration file is the one that will be used to save the settings when the Exit button (page 19) is pressed. The second function is to display a progress bar showing the status of uploading TR-2100 settings. Ethernet Connection Physically connect the TR-2100 to your network as described in the Installation chapter on page 9. Setting the IP Parameters You will need to obtain an IP address and network mask (and possibly a gateway IP Address) from your network administrator before you can set up your TR-2100 Ethernet Port without using DHCP. 21 T E L C O M R E S E A R C H T R - 2 1 0 0 D A T A B U F F E R Automatically Setting the IP Parameters using DHCP Figure 12 DHCP Settings If there is a DHCP server on your network then you can use this protocol to configure the IP network settings for the TR-2100. The DHCP server will supply all the required IP parameters except the ‘Host Name’, which must be unique in your domain. Most DHCP servers in use today will automatically create DNS foreword (A records) and reverse (PTR records) entries in a domain’s DNS Server. Connect the TR-2100 to the network with the supplied Ethernet cable as described in the Installation chapter on page 9. The LINK light should be green if the TR-2100 can see your network. Referring to the figure above, perform the following steps: 1. Check the box labelled Enable DHCP. 2. Click the ‘Send Settings’ Button. After a few seconds the DHCP indicator should light red, indicating that the IP parameters have been set. You can now click on the DHCP tab and view the settings obtained from the DHCP server. If you are on a Windows Network you should be able to use the Ping command on the PC to verify that the TR-2100 is on the network. This command is also available on Unix 22 T E L C O M R E S E A R C H T R - 2 1 0 0 D A T A B U F F E R and Linux systems and works the same way. At a command prompt (DOS prompt in Windows 98 or earlier) enter the following: C:\Documents and Settings\Your Name>ping T713572 You should see a response similar to: Pinging T713572.home.telcomresearch.com [192.168.0.129] with 32 bytes of data: Reply Reply Reply Reply from from from from 192.168.0.129: 192.168.0.129: 192.168.0.129: 192.168.0.129: bytes=32 bytes=32 bytes=32 bytes=32 time<10ms time<10ms time<10ms time<10ms TTL=64 TTL=64 TTL=64 TTL=64 Ping statistics for 192.168.0.129: Packets: Sent = 4, Received = 4, Lost = 0 (0% loss), Approximate round trip times in milli-seconds: Minimum = 0ms, Maximum = 0ms, Average = 0ms Setting the IP Parameters Manually Figure 13 IP Settings To set the IP parameters, clear the ‘Enable DHCP’ check box and manually enter your information in the following fields: • IP Address: The Internet IPv4 address you want to assign to this TR-2100. 23 T E L C O M R E S E A R C H T R - 2 1 0 0 D A T A B U F F E R Note: After entering the rightmost IP Address field, press the TAB key. As a time saving convenience the TR-2100 will calculate standard values for the Subnet Mask and the network portion of the Gateway address and position the cursor in the first field of the local network portion of the Gateway address. Check that the Subnet Mask is acceptable and fill in the local network portion of the Gateway Address. • Subnet Mask: The Subnet Mask required for correct operation on your network. If it is set to 0.0.0.0 then all traffic is local. No communication is possible through any router on the network. See Non-Contiguous Subnet Bits on page 36 for more information on subnet masks. • Default Gateway: The Default Gateway on your network. The Default Gateway must be on the same subnet as your IP Address otherwise it will not be accepted. • Primary DNS Server: The first DNS Server to be queried during name resolution. • Secondary DNS Server: The second DNS Server to be queried during name resolution. This is optional and may be set to all zeroes or blank. • Alternate DNS Server: The third DNS Server to be queried during name resolution. This is optional and may be set to all zeroes or blank. • Host Name: This is the name that the TR-2100 will be known by on the network. It must be unique in the Domain specified below. • Domain: This is the domain to which the TR-2100 belongs. This is used with the Host Name to form the Fully Qualified Domain Name used to find the TR-2100 on the intranet or on the Internet. Note: The Host name and the Domain Name must follow the rules for ARPANET host names. They must start with a letter, end with a letter or digit, and have as interior characters only letters, digits, and hyphen. The Domain Name must contain the period character ‘.’ to separate sub domains from each other and the root domain as in T03031.home.telcomresearch.com. This is referred to as a fully qualified domain name. It is not case sensitive so T03031.home.telcomresearch.com and t03031.hoME.TelcomRESEARCH.COM refer to the same TR-2100. Reserved IP Addresses For Private Networks The following addresses are for local use and cannot be routed on the Internet. • • • • 10.0.0.0 - 10.255.255.255 169.254.0.0 - 169.254.255.255 172.16.0.0 - 172.31.255.255 192.168.0.0 - 192.168.255.255 24 T E L C O M R E S E A R C H T R - 2 1 0 0 D A T A B U F F E R Setting the TCP Parameters Figure 14 TCP Settings The TCP parameters consist of various ports used to communicate with the TR-2100 and timeout values associated with open connections on these ports. WARNING! All port numbers must be unique. No port may use a number that is used by another port. Note: If TCP Timeout is shorter than Another Timeout, TCP Timeout has priority. Any setting below 60 will use the system default value. Maximum value is 65535 (about 18 hr 12 min). Setting the TCP Ports HTTP Configuration Port: This is the port that is used for configuration with a WEB Browser. Default value is 80. Port 80 is the default HTTP port on the Internet. We recommend that you change it as a security measure. Interactive Monitor Port: This is the port that is used for configuration with the Interactive Monitor using a Telnet Client. Default value is 9999. 25 T E L C O M R E S E A R C H T R - 2 1 0 0 D A T A B U F F E R Data Retrieval Port: This is the port that is used for collecting data records from the TR-2100 using the Telnet protocol. Default value is 56789. Echo on TCP Data Retrieval: This determines whether characters transmitted on the Data Retrieval Port are echoed back to the sender. Default value is DISABLED. TCP Echo Service Port: This is the port that is used for the TCP Echo service. This is a testing and diagnostic protocol. Default value is 7. TCP Chargen Port: This is the port that is used for the TCP CHARGEN service. This is a testing and diagnostic protocol. Default value is 19. Setting the TCP Timeouts These settings determine how long a connection will be kept open with no communications activity. If there is no activity for a period equal to the timeout setting, the connection will be closed by the TR-2100. Be aware that the other end of the connection may have a shorter timeout than the TR-2100. • • • • • • TCP: Default value is 600 seconds. Data Retrieval Port: Default value is 300 seconds Configuration Port: Default value is 300 seconds. This is the timeout for the Interactive Monitor. Please note that the Interactive Monitor also uses this timeout when you are connected through the serial port. ECHO: Default value is 60 seconds. CHARGEN: Default value is 60 seconds. FTP: Default value is 60 seconds 26 T E L C O M R E S E A R C H T R - 2 1 0 0 D A T A B U F F E R Site and Data Collection Settings Figure 15 Site and Collection This page configures the site identification message and the data collection policies. It features the following settings: Site Identification This is a message that will identify a particular TR-2100 installation. It shows up in several places (WEB configuration, this program, etc.) to help you verify that you are working on the correct TR-2100. The message can be up to 64 characters long. End of Record Character This is the character that the TR-2100 recognizes as marking the end of a record. The default value is a Carriage Return (CR - 0x0D - 13 - Control-M). Another common selection is a Line Feed (LF - 0x0A - 10 - Control-J). Both of these are treated as special cases in the following way. During data collection all control characters (ASCII valued below 32) are discarded before the records are compressed stored. During data retrieval the records are expanded and the End of Record Character is added back. If the End of Record Character is either a Carriage Return or a Line Feed the combination of a Carriage Return followed by a Line Feed 27 T E L C O M R E S E A R C H T R - 2 1 0 0 D A T A B U F F E R is added to the record. Otherwise only a single character (the End of Record Character) is added to the record. Data Collection Method This selects the method that the TR-2100 will be used to collect data. All non-printing characters are discarded before saving the data. The choices are: RS-232C Data Port at XXXX Baud Data will be collected through the RS-232 serial port at the indicated baud rate. The baud rate displayed is set with the Data Port Group baud rate control. Generic Plain ASCII Text as TCP/IP Server on Port 2301 This is a TCP/IP protocol based on Telnet. The PBX operates as a client connecting to the TR-2100 acting as a server on TCP port 2301. The PBX then delivers call records in plain text format. Avaya Session Layer Protocol (Definity RSP) on Port XXXX This is a protocol used by Avaya on their Definity PBX switches. The Session Layer Protocol is used to guarantee the delivery of data from end to end, without duplication, over Transmission Control Protocol/Internet Protocol (TCP/IP) sockets. TCP/IP sockets are well known to provide best effort delivery of data over a network. The default TCP port used is 9000. The TR-2100 allows you to change this port. If you do so it must also be changed in the Avaya PBX. Record Modifications These are optional modifications that can be applied to the collected records either during collection or during retrieval. Add Line Numbers When this box is checked a six-digit number will be inserted at the beginning of all records retrieved. This means that the numbers are added when the records are output from the TR-2100. The line number will be a six-digit number with leading zeros. Add Record/Block CRC This adds a 2-byte cyclic redundancy check (CRC) to the end of each block or record as it is retrieved. These are not printable characters. They are binary 8 bit values with the high byte first. Add Local Date/Time When enabled, a date and time will be inserted at the beginning of each record collected. This is stored with the record. Short Date/Time Format Selects between the short and long form of the Date/Time stamp described above. The short format lists Month, Date, Hour and Minute (mm/dd hh:mm); the long format lists Month, Date, Year, Hour, Minute, and Second (mm/dd/yyyy hh:mm:ss). 28 T E L C O M R E S E A R C H T R - 2 1 0 0 D A T A B U F F E R Command Sets This lets you select which command sets the TR-2100 will recognize.. Enable MDR2000 Commands When checked this will enable recognition of the MDR-2000 compatible commands. If it is not checked and the TR-2100 receives an MDR-2000 command the following message is sent: ”The MDR-2000 command set is not enabled” Enable Omnitronix Commands When checked this will enable recognition of the Omnitronix compatible commands. If it is not checked and the TR-2100 receives an Omnitronix command the following message is sent: ”The Omnitronix command set is not enabled” Enable WTI/PollCat Commands When checked this will enable recognition of the WTI/PollCat compatible commands. If it is not checked and the TR-2100 receives a WTI/PollCat command the following message is sent: ”The WTI/PollCat command set is not enabled” 29 T E L C O M R E S E A R C H T R - 2 1 0 0 D A T A B U F F E R Setting the Users Accounts Security Parameters Figure 16 Users Security Settings All Internet connections to the TR-2100 can be configured to require password authentication. We strongly advise using passwords to restrict access to the TR-2100. User names and passwords may be 1 to 16 characters long. If the user name or the password field is blank then no authentication is performed and the user will not be presented with a logon request. The password field is case sensitive but the name field is not. 30 T E L C O M R E S E A R C H T R - 2 1 0 0 D A T A B U F F E R SNTP (Time Server) Settings Figure 17 SNTP (Time Server) Settings Network Time Protocol (NTP) is a protocol designed to synchronize the clocks of computers over a network. The TR-2100's internal clock uses NTP to synchronize its time at regular intervals to an NTP server on the Internet or a local intranet. NTP servers on the Internet are organized in hierarchical configurations with the top level being a National Atomic Time Standard. There is no other provision for setting the TR-2100's internal clock. Primary NTP Server This is configured as either the IP address or the fully qualified domain name of the desired NTP server. The factory default setting is tick.telcomresearch.com. To use a fully qualified domain name you must set one or more DNS entries on the IP Configuration page. If not you must only use an IP address. Lists of publicly accessible timeservers can be found at: http://ntp.isc.org/bin/view/Servers/WebHome 31 T E L C O M R E S E A R C H T R - 2 1 0 0 D A T A B U F F E R http://support.microsoft.com http://old.cpsc.ucalgary.ca/Help/time Secondary NTP Server This is set to either the IP address or the fully qualified domain name of a backup NTP server. It is optional and may be left blank if you feel that the Primary NTP Server is very reliable. The default value is time-b.timefreq.bldrdoc.gov Time Zone This selects the Standard Time offset of your region from Coordinated Universal Time. It may be a value from -12 hours to +13.75 hours. The value for Eastern Standard Time in North America is -5 hours. Automatically Adjust for Daylight Time This box selects the Daylight Time offset of your region from Coordinated Universal Time. It may be a value from -12 hours to +13.75 hours. The value for Eastern Daylight time in North America is -4 hours. Sync every XX Hours This value tells the TR-2100 how often to synchronize with the Time Server. The factory default setting is every 24 hours. The bar at the bottom displays when the next scheduled synchronization will take place. 32 T E L C O M R E S E A R C H T R - 2 1 0 0 D A T A B U F F E R FTP Upload Settings Figure 18 FTP Upload Settings The TR-2100 can act as an FTP client and upload saved records to your FTP server at regular intervals or when a predetermined capacity has been reached. FTP Server This is the fully qualified domain name of the FTP server that will receive data records from the TR-2100. It must be 64 characters or less in length and must conform to the rules for ARPANET host names. They must start with a letter, end with a letter or digit, and have as interior characters only letters, digits, and hyphen. The Domain Name must contain the period character '.' to separate sub domains from each other and the root domain as in ftp.telcomresearch.com FTP Server Directory This is the name of the directory on the FTP server that the data records will be placed in. This directory must already exist. The TR-2100 will not automatically create it. Base File Name This is the first part of the file name to be used when storing records. The full file name is made from this base name, a hyphen, a unique 6-character sequence and the file 33 T E L C O M R E S E A R C H T R - 2 1 0 0 D A T A B U F F E R extension. Assuming a Base Name of DataRecord and an extension of .txt a typical file name would be similar to DataRecord-3NEVRD.txt. The unique 6-character sequence is generated from the time and date and therefore can be used to sort files chronologically. File Extension This is the extension of the file name to be used when storing records. FTP Port This is the TCP control port on the FTP server. This is normally port 21 but it may be changed Upload Empty This is useful for uploading a zero length file at the upload interval to confirm that the TR-2100 is alive and well. Compressed To double the speed of uploading you can upload in compressed format and uncompress the data records on the FTP server. Automatic Upload This box must be selected to enable upload at the time or interval set. If Upload Interval or a Percent Full is not set this control is automatically disabled. Delete Uploaded Records If automatic upload and either an upload time interval or a percentage is set this is automatically selected. Upload When XX% Full Set the percentage full point at which you want to upload records. Values below 50% are recommended but you can set it from 0% to 90%. Upload Interval You can set the time interval in Hours and Minutes between automatic uploads. For security reasons, the FTP server automatically assigns the Data Port. FTP User Name This is the User Name to send to the FTP server for authentication. FTP Password This is the Password to send to the FTP server for authentication. 34 T E L C O M R E S E A R C H T R - 2 1 0 0 D A T A B U F F E R Setting the TCP/IP Security Parameters Figure 19 TCP/IP Security Parameters One of the most simple and powerful methods of controlling inbound access is by using TCP/IP Filtering. Internet access to the TR-2100 through TCP over IP can be restricted to certain external individual IP Addresses and/or ranges of IP Addresses. If the “Enable TCP/IP Filtering” box is checked then only TCP connections from the 6 Address and Mask fields will be accepted. IP with any protocol except TCP will still work from any address so DNS, NetBIOS Name Resolution, PING, ECHO and CAHRGEN protocols will succeed. TCP/IP Filtering can filter only inbound traffic. This feature does not affect outbound traffic or response ports that are created to accept responses from outbound requests. If the “Enable TCP/IP Filtering” box is checked and no addresses are entered (the address value is 0.0.0.0), in the Address and Mask fields, then no TCP connections are possible. To allow access from a single IP address set the Mask to 255.255.255.255. 35 T E L C O M R E S E A R C H T R - 2 1 0 0 D A T A B U F F E R Non-Contiguous Subnet Bits Internet Standard 5 (RFC 950) actually specified that when splitting the bits in the host ID for subnet ID and host ID, it was possible and legal to split it in more than one place. This is referred to as “non-contiguous subnet bits” but the standard recommends against it. It states “However, we recommend that the subnet bits be contiguous and located as the most significant bits of the local address.” Today, now that classless addressing and CIDR are standard, it is simply illegal. Therefore the TR-2100 does not support “non-contiguous subnet bits”. Statistics Figure 20 Statistics This page presents various statistics and performance related to the state of the TR2100. Information on this screen can be selected with the mouse and copied to the Windows clipboard. The statistics include: Ethernet bytes received • Ethernet bytes transmitted • Ethernet frames received • Ethernet frames transmitted 36 T E L C O M • • • • • • • • • • • • • R E S E A R C H T R - 2 1 0 0 D A T A B U F F E R Control Port bytes received Control Port bytes transmitted Control Port byte overflows Command Port UART byte overflows Data Retrieval Port bytes received Data Retrieval Port bytes transmitted Data Retrieval Port byte overflows Data Retrieval Port UART byte overflows Records currently in buffer Records currently read from buffer The buffer percent full The compression ratio Records missed because buffer full DHCP Parameters Figure 21 DHCP Lease Information 37 T E L C O M R E S E A R C H T R - 2 1 0 0 D A T A B U F F E R If DHCP configuration is enabled, this page shows the current DHCP state and the DHCP parameters assigned to the TR-2100 by the DHCP Server. Included in the information is the IP address of the DHCP server. Information on this screen can be selected with the mouse and copied to the Windows clipboard. General Information Figure 22 General Information This page presents revision information, buffer capacity, serial number and time and dates of hardware and software subsystems. Information on this screen can be selected with the mouse and copied to the Windows clipboard. 38 T E L C O M R E S E A R C H T R - 2 1 0 0 D A T A B U F F E R Terminal Figure 23 Terminal Screen This is a terminal emulation window that lets you send arbitrary commands directly to the TR-2100 through the serial port. It displays the commands and responses from the TR-2100 in the large window. Any valid TR-2100 command can be sent with this tool. Please see the section Command Sets on page 91 for lists of valid commands. It contains the following elements. Display Window This is the large window in the center. It shows the commands that have been sent to the TR-2100 and the responses revived from the TR-2100. Information on this screen can be selected with the mouse and copied to the Windows clipboard. When the window becomes full it will scroll upward. It can be scrolled back to view a full history of commands and responses. Clear Button This button clears the Display Window. 39 T E L C O M R E S E A R C H T R - 2 1 0 0 D A T A B U F F E R Ctrl-A, Ctrl-B, Ctrl-V and Ctrl-T These buttons enter control character values used in TR-2100 commands that can’t be typed on the keyboard in Windows. Send This button sends the command entered in the command window directly to its left. You can also press the ‘Enter’ key to do the same thing. Command Window This is the window to the left of the Send button. You can enter the common control characters by pressing the Ctrl-A, Ctrl-B, Ctrl-V and Ctrl-T buttons. Typing them including angle brackets exactly as shown in the following format enters other control characters: <Ctl-X> where X is the printable version of the character to be entered as a control character. Commands typed in here will be buffered and then sent to the TR-2100 when you press ‘Enter’ or the ‘Send’ button. This allows editing and correct typing mistakes before actually sending the command. This window also supports copy and paste. The command is also copied to the ‘Display Window’ so that it is easy to follow a sequence of commands and responses. 40 T E L C O M R E S E A R C H T R - 2 1 0 0 D A T A B U F F E R Advanced Figure 24 Advanced Diagnostic Screen This screen is only available if the Advanced item on the Options Menu is checked. Get Resets This will list the time and date of the last 99 events that caused the TR-2100 to restart. Possible caused include Power-On Reset, Flash Update, RESTART Command, Watchdog Timer, Brown-out, External Reset and Jump to location 0 amongst others. Clear Resets This command empties the resets list. Clear Statistics This command clears the statistics that are displayed on the Statistics screen. Clear Buffer This clears all stored data in the buffer. The data is not recoverable. 41 T E L C O M R E S E A R C H T R - 2 1 0 0 D A T A B U F F E R Factory Reset This command restores the TR-2100 to the condition it was when it left the factory. All user settings are reset to their factory defaults. 42 T E L C O M D R E S E A R C H T R - 2 1 0 0 D A T A B U F F E R 6 Chapter Flash Program Memory Update ownload and run the latest setup program for the TR-2100 Windows Configuration Program from the Telcom Research Data Buffers WEB Site. The Setup Program (TR-2100_Setup.exe ) installs the latest version of the TR-2100 Windows Configuration Program which contains a copy of the latest version of the TR2100 firmware. It also installs the latest version of this manual in PDF format. Automatic Flash Update When you run the TR-2100 Windows Configuration Program and connect to your TR2100, the program checks the current firmware version of the TR-2100 and if its version is newer, it will offer to update to the latest version and you will be presented with this window: Figure 25 Automatic Offer to Flash Update Because there may be new features in the TR-2100 that are required for the configuration program to run properly, you should select ‘Update’ to proceed. This will present the window shown in the following figure. Note: If your TR-2100 is now programmed and you want to keep your current settings see the section Keeping Current Settings on page46. Starting The Flash Update Click the ‘Update Now’ button to proceed. The update should take about 30 seconds. 43 T E L C O M R E S E A R C H T R - 2 1 0 0 D A T A B U F F E R Figure 26 Initial Flash Update Screen During the update all the buttons are disabled so that the update can’t be interrupted. If for some reason (power failure, computer crash) the update fails, please refer to Flash Update Errors on page 45. Figure 27 Flash Update in Progress When the update is finished you will see the following notice. Depending on the The TR2100 is now ready to configure or use. 44 T E L C O M R E S E A R C H T R - 2 1 0 0 D A T A B U F F E R Figure 28 Flash Update Complete Firmware updating is usually done either automatically by the TR-2100 Windows Configuration Program, if the TR-2100 Windows Configuration Program detects that the firmware distributed with the TR-2100 Windows Configuration Program is newer that the firmware present in the TR-2100, or by selecting ‘Flash Update’ in the TR-2100 Windows Configuration Program. Flash Update Errors If the communication between the TR-2100 and the PC is broken for any reason during firmware updating the TR-2100 will stop responding and will not work. All 8 LEDs on the front panel will continuously flash red. The TR-2100 is NOT broken. Simply select ‘Flash Update’ in the TR-2100 Windows Configuration Program. If you see the screen below with the red window saying ‘Not Connected’ just click ‘Find Me!’ to connect. Figure 29 Flash Update Not Connected Normally this window will be green and say ‘Connected’ and the above step is unnecessary. After connection click ‘Update Now’ and wait for the update to finish. Once this is done the TR-2100 is up and running again 45 T E L C O M R E S E A R C H T R - 2 1 0 0 D A T A B U F F E R Keeping Current Settings If your TR-2100 is now programmed and you want to keep your current settings do the following. Select ‘Cancel’ on the Automatic Offer to Flash Update dialog. Make sure you are still connected (connection window is green and says ‘Connected’). If not, click ‘Find Me!’ to connect. Click ‘Get Settings’ to save the settings from your TR-2100. Figure 30 Send/Get Settings During the ‘Get Settings’ step above you may see the following alert one or more times. Figure 31 ‘Get Settings’ Error Alert This occurs if the newer version of the TR-2100 contains settings that are not present in the older version. If you see this error alert click ‘Ignore’. Return to Starting The Flash Update to finish. After the update the TR-2100 may take up to 20 seconds to restart. After the ‘Run’ light turns solid green click on ‘Send Settings’ to restore your configuration information. 46 T E L C O M T R E S E A R C H T R - 2 1 0 0 D A T A B U F F E R 7 Chapter Network Finder his window will locate all TR-2100s on your Ethernet network. It will find them even if their IP addresses are not part of your computer’s IP subnet, they just have to be connected to your local Ethernet. For each TR-2100 found, a page is added to the window. The page contains extensive information about the TR-2100 including the settings of all programmable features. It also displays the current DHCP assigned values if DHCP has been enabled and a valid IP address has been acquired from a DHCP server. The Network Finder includes the following controls: Exit This will close the Network Finder window. Find Us! This starts the LOCATE process. As each TR-2100 is found a page of detailed information is added to the Network Finder window. Click the tabs along the top of the window to see each page. The tabs contain the Host Name of each TR-2100. By Name Tells the Connect button below to use the name of the currently displayed TR-2100 when connecting. The name is first resolved by a DNS lookup and if that fails a NetBIOS broadcast is used to resolve the name. By IP Tells the Connect button below to use the IP address of the of the currently displayed TR-2100 when connecting. Connect This button is enabled if the currently displayed TR-2100 is on the same IP subnet as your computer. It is disabled otherwise. The Button opens your default WEB browser and connects to the TR-2100. You can choose between connecting by the name on the tab or the IP address. You can now configure the TR-2100 to your requirements with your WEB browser. 47 T E L C O M R E S E A R C H T R - 2 1 0 0 D A T A B U F F E R Copy All This will copy all of the information on the current page to the Windows Clipboard. It includes information that is off the top or bottom of the page. You can then paste it into any Windows program. With your mouse you can also select a portion of the displayed page and copy it to the clipboard with Control ‘C’, Control ‘Insert’ or right clicking and selecting ‘Copy’ from the context menu. Figure 32 Network Finder Connect Using… This is the wide button along the bottom edge of the window. It will be enabled only if the TR-2100 is not on your local IP subnet. To use it, complete the IP address to the right of the button. This is a temporary address that will be used to connect your WEB browser to the TR-2100. The parts of the IP address that identify your IP subnet are already filled in and you can’t change them. After completing the address pressing the ‘Connect Using …’ button will first determine if the IP address is 48 T E L C O M R E S E A R C H T R - 2 1 0 0 D A T A B U F F E R currently in use or is reserved for another device on your network. This process can sometimes take up to 10 seconds to perform the tests necessary to verify that the address is available. If it is not available you will be informed and asked to choose another address. If it is available the address will be assigned to the TR-2100 using reverse ARP, then your browser will be opened and connected to the TR-2100. You may now change any of the settings on the TR-2100. This technique will allow you to assign a foreign IP address before installation at a remote site because the RARP address allows you to stay connected even after changing the assigned IP address or enabling DHCP. The RARP address remains active until power is removed or it is specifically removed by the ‘Clear Reverse ARP Address’ check box on the WEB browser IP page. 49 T E L C O M T R E S E A R C H T R - 2 1 0 0 D A T A B U F F E R 8 Chapter TR-2100 Web Configuration he TR-2100 can be configured through its built-in WEB Server. Configuration can be done across the room or across the world via the Internet. Embedded in this feature is integrated online help. How to Connect To connect to a TR-2100 you must know either the name or the IP address of the unit your attempting to connect to. If the address is in one of the groups in the table of Reserved IP Addresses For Private Networks on page 24 then it is not accessible outside your local network. If it is not in this group you should be able to connect to it from anywhere in the world. NetBIOS Name Resolution If you are on a Windows Network or a Linux Network that supports Samba you can use NetBIOS name resolution to connect to the TR-2100 by name and not IP address. To use this method you must specify the name of the TR-2100 as http://t0111 without a domain name (Not http://t0111.home.telcomresearch.com). The reason for not including the domain name is NetBIOS name resolution uses an IP broadcast protocol that is not routable. Therefore this will not work through routers or over the Internet. DNS Name Resolution If you are not on a Windows Network and you want to connect by name, there must be a DNS entry for the TR-2100. If you connect from outside your local network you must use the fully qualified domain name. In our example this would be http://t0111.home.telcomresearch.com. If you are connecting locally you usually only need the host portion of the name as in http://t0111. If the default WEB configuration port is not 80 then you must add :XXXX to the address, where XXXX is the WEB configuration TCP port you have selected. The default port used for connection is 80. Substitute the HTTP Configuration Port set previously in the TCP Settings of the TR2100. Port 80 is the default HTTP port on the Internet. We recommend that you change it as a security measure. No Name Resolution If you want to connect by IP address you don’t need to know the host name or the domain name. You only need to know the IP Address and the port number. In our example the address you would use in your browser is http://192.168.0.129. Notice that 51 T E L C O M R E S E A R C H T R - 2 1 0 0 D A T A B U F F E R this address is not routable according to the table of Reserved IP Addresses For Private Networks on page 24 and therefore is only accessible from the local network. Behind A Firewall If the TR2100 is behind a firewall you must use the firewall’s IP address and configure the firewall to forward port 80 to the TR-2100. Login Screen Figure 33 WEB Configuration Login When you try to connect the first thing you should see is shown above. Enter your user name and password to gain access to the TR-2100. If the TR-2100 is new or has had a Factory Reset done the User Name is AAA (case insensitive) and the Password is aaa (case sensitive). 52 T E L C O M R E S E A R C H T R - 2 1 0 0 D A T A B U F F E R WEB Configuration Home Page Figure 34 WEB Configuration Home Page After successfully connecting you should see the figure above, the TR-2100 home page. This page has hyperlinks to all the other pages. This WEB Site is only 2 levels deep. 53 T E L C O M R E S E A R C H T R - 2 1 0 0 D A T A B U F F E R Ethernet Configuration WEB Page Figure 35 WEB Configuration Ethernet Page Use Full Duplex This effectively doubles the network throughput by allowing simultaneous transmission and reception. All modern network hubs support this. Allow Extended Cable Length This allows the TR-2100 to operate with cables that are longer than 100 meters (100 meters is the maximum length specified by the Ethernet standard). The exact additional distance depends on the quality of the cable and the amount of electromagnetic noise in the surrounding environment. 54 T E L C O M R E S E A R C H T R - 2 1 0 0 D A T A B U F F E R DHCP (IP) Configuration WEB Page Figure 36 WEB Configuration DHCP Page For detailed information on using DHCP, please refer to the section Automatically Setting the IP Parameters using DHCP on page 22. To enable DHCP configuration, confirm that Enable DHCP is checked then click Apply Changes. 55 T E L C O M R E S E A R C H T R - 2 1 0 0 D A T A B U F F E R IP Configuration WEB Page Figure 37 WEB Configuration IP Page To set the IP parameters manually follow the same instructions for determining and entering the values as described in the section Setting the IP Parameters Manually on page 23. If you initially configured with Reverse ARP, check ‘Clear Reverse ARP’. After completing these steps click on Apply Changes. CAUTION! If you change IP address you may be disconnected after clicking on Apply Changes. If you are connected to the same subnet as the TR-2100 you should be reconnected after a few seconds because reverse ARP (see description of Reverse ARP Configuration on page 83) will acquire the TR-2100’s old address. If you are disconnected it will be necessary to redirect your WEB browser to the new address. 56 T E L C O M R E S E A R C H T R - 2 1 0 0 D A T A B U F F E R TCP Configuration WEB Page Figure 38 WEB Configuration TCP Page To set the TCP parameters follow the same instructions for determining and entering the values as described in the section Setting the TCP Parameters on page 25. After completing these steps click on Apply Changes. CAUTION! If you change the WEB Configuration Port you will be disconnected after clicking on Apply Changes. It will be necessary to redirect your WEB Browser using the new port. 57 T E L C O M R E S E A R C H T R - 2 1 0 0 D A T A B U F F E R Serial Port Configuration WEB Page Figure 39 WEB Configuration Serial Port Page This page sets up the serial ports in the TR-2100. Select baud rates appropriate for the Data Source you are connecting to and the modem or computer that is connected to the CONTROL PORT. Then click Apply Changes. Password Configuration WEB Page (Security and Accounts) Figure 40 WEB Configuration Security Page All Internet connections to the TR-2100 can require password authentication. We strongly advise using passwords to restrict access to the TR-2100. User names and 58 T E L C O M R E S E A R C H T R - 2 1 0 0 D A T A B U F F E R passwords may be 1 to 16 characters long. If the user name or password field is blank then no authentication is performed and the user will not be presented with a logon request. The User Name field is not case sensitive but the Password field is case sensitive. DHCP Information WEB Page Figure 41 WEB Configuration DHCP Lease Information Page If DHCP configuration is enabled, this page shows the current DHCP state and the DHCP parameters assigned to the TR-2100 by the DHCP Server. The IP address of the DHCP server is displayed in the information. Most DHCP servers in use today will automatically create DNS foreword (A records) and reverse (PTR records) entries in a domain’s DNS Server. 59 T E L C O M R E S E A R C H T R - 2 1 0 0 D A T A B U F F E R Statistics WEB Page Figure 42 WEB Configuration General Statistics Page This page shows various statistics from the TR-2100. The illustration above shows the information available. 60 T E L C O M R E S E A R C H T R - 2 1 0 0 D A T A B U F F E R FTP Push Configuration WEB Page Figure 43 WEB Configuration FTP Client Page This page is used to configure the FTP upload settings. These settings are fully described in the section FTP Upload Settings on page 33 and in the online WEB help (click the Help button). 61 T E L C O M R E S E A R C H T R - 2 1 0 0 D A T A B U F F E R Time Server Configuration WEB Page Figure 44 NTP Time Server Configuration WEB Page This page is used to configure the Network Time Server settings. These settings are fully described is section SNTP (Time Server) Settings on page 31 and in the online WEB help (click the Help button). 62 T E L C O M R E S E A R C H T R - 2 1 0 0 D A T A B U F F E R Version Information WEB Page Figure 45 Version Information WEB Page This page displays general information about the TR-2100. This is fully described in the section General Information on page 38. TCP/IP Security WEB Page Figure 46 IP Security WEB Page 63 T E L C O M R E S E A R C H T R - 2 1 0 0 D A T A B U F F E R This page is used to configure the TCP/IP Security settings. These settings are fully described in the section Setting the TCP/IP Security Parameters on page 35 and in the online WEB help (click the Help button). Site and Collection Configuration Figure 47 Site and Collection WEB Page 64 T E L C O M R E S E A R C H T R - 2 1 0 0 D A T A B U F F E R Online Help Figure 48 Online Help Each page that has settings that can be changed has an integrated online help facility. Clicking on the Help button at the bottom of the page opens a small Help Window with detailed information about all the settings on that page. 65 T E L C O M R E S E A R C H T R - 2 1 0 0 T D A T A B U F F E R 9 Chapter TR-2100 Interactive Monitor he TR-2100 Interactive Monitor can be used to configure and control the TR2100. It can be used from the Control Serial Port or over the Internet/intranet through a Telnet Protocol connection. Both methods are described in detail below. Although this method of configuration works well, the WEB interface (for remote use) or the TR-2100 Windows Configuration Program described on page 15 (for local use) are the preferred methods. Connecting with Telnet Start a Command Shell from your operating system so that you can enter the following commands directly. The symbol “ ” denotes the Enter Key. Note: To open a command prompt in Windows, click Start, point to Programs, point to Accessories, and then click Command Prompt Alternatively you can use a Telnet client program such as HyperACCESS or HyperTerminal. In the following pages we have used the Telnet client included with Windows 2000/XP. The name or the IP address of the TR-2100 is required to connect to it. If the IP Address is in one of the groups of Reserved IP Addresses For Private Networks, (page 24), it is not accessible outside your local network. However, if it is not in one of these groups you should be able to connect to it from anywhere in the world. Name Resolution The factory assigned name of the TR-2100 is printed on the label on the bottom of the case. A Factory Reset will always restore this name. The name may be changed to whatever you desire or whatever your system requirements dictate. The only restrictions for changing the name are that it be up to a maximum of 16 characters and follow the rules for ARPANET host names. The name must start with a letter, end with a letter or digit and contain only letters, digits or hyphens in the middle. 67 T E L C O M R E S E A R C H T R - 2 1 0 0 D A T A B U F F E R Figure 49 TR-2100 Label Showing Name, Ethernet Address and Serial Number NetBIOS Name Resolution If you are on a Windows Network or a Linux Network that supports Samba you can use NetBIOS name resolution to connect to the TR-2100 by name. To use this method you must specify the name of the TR-2100 without a domain name as in: C:\>telnet T3135B1 9999 The reason for not using a domain name is that NetBIOS name resolution uses an IP broadcast protocol that will not work through routers or over the Internet. DNS Name Resolution If you are not on a Windows Network and want to connect by name there must be a DNS entry for the TR-2100. If you connect to the TR2100 from outside your local network you must use the fully qualified domain name. In our example this would be C:\>telnet T3135B1.telcomresearch.com 9999 If you are connecting locally you usually only need the host portion of the name as in C:\>telnet T3135B1 9999 Notice the 9999 appended to the address. This is the default port used for connection. Substitute the Interactive Monitor Port that was previously set in the TCP settings of the TR-2100 No Name Resolution If you want to connect by IP address you don’t need to know the host name or the domain name. You only need to know the IP Address and the port number of the TR2100. Enter the following at the command prompt or use the appropriate commands for whatever Telnet client you are using. C:\>telnet 192.168.2.245 9999 Notice that this address is not routable according to the table of Reserved IP Addresses For Private Networks on page 24, and therefore is only accessible from the local network. 68 T E L C O M R E S E A R C H T R - 2 1 0 0 D A T A B U F F E R Behind A Firewall If the TR2100 is behind a firewall you must use the firewall’s IP address and configure the firewall to forward port 9999 to the TR-2100. Telnet Logon Logging into the TR-2100 through Telnet should connect you to the Interactive Monitor Port. Once connected, you will be prompted for a User Name and Password. If the TR2100 is new, or has had a Factory Reset done, the User Name is AAA (not case sensitive) and the Password is aaa (case sensitive). Figure 50 Telnet Logon Once logged into the TR2100 the Telnet Configuration Starting Page, containing all the other configuration pages, is displayed. Connecting With a Terminal Emulator To start the Interactive Monitor from the Control Serial Port, connect your computer to the TR-2100 as described in section Configuration with an RS-232 terminal emulation program on page 9. Open a terminal program such as HyperTerminal of HyperACCESS at the correct baud rate. If Omnitronix commands are enabled type SETUP followed by the Enter Key. If MDR-2000 commands are enabled type ‘^V’ IM followed by the enter key. ‘^V’ is the character generated from the keyboard by pressing the ‘V’ key while the ‘Ctrl’ key is held down. There is no requirement for a user name and password for local serial port connection to the TR-2100. Recommended Terminal Settings When communicating with the TR-2100, the following settings are recommended for terminal emulation programs and Telnet client programs: Emulation: ANSI or TTY ASCII Set-up: ASCII Sending: Send line ends with line feeds – Disabled Echo typed characters locally – Disabled ASCII Receiving: Append line feeds to incoming line ends – Disabled Force incoming data to 7-bit ASCII – Disabled Com Port Settings: Configure Bits per second – as per Control Port setting in TR2100 Data Bits – 8 69 T E L C O M R E S E A R C H T R - 2 1 0 0 Parity – None Stop bits – 1 Flow Control - None Interactive Monitor Menu Tree 1 - Configure IP 1 - IP Address: 209.121.70.248 2 - IP Mask: 255.255.255.0 3 - Default Gateway: 209.121.70.1 4 - Primary DNS Server: 209.121.70.5 5 - Secondary DNS Server: 209.121.70.19 6 - Alternate DNS Server: 0.0.0.0 7 - Host Name: TDEB000 8 - Domain: telcomresearch.com 9 - DHCP is Enabled 10 - Clear Reverse ARP Address 0.0.0.0 2 - Configure TCP 1 - WEB Configuration Port: 80 2 - Interactive Monitor Port: 23 3 - TCP Data Retrieval Port: 56789 4 - TCP Echo on Data Retrieval Port is Disabled 5 - TCP ECHO Service Port: 7 6 - TCP CHARGEN Service Port: 19 7 - TCP Timeout: 600 seconds 8 - Interactive Monitor Timeout: 300 seconds 9 - Data Retrieval Port Timeout: 60 seconds 10- TCP ECHO Timeout: 60 seconds 11- TCP CHARGEN Timeout: 60 seconds 3 - Configure TCP/IP Security 1 - Network 1: 0.0.0.0 2 - Mask 1: 0.0.0.0 3 - Network 2: 0.0.0.0 4 - Mask 2: 0.0.0.0 5 - Network 3: 0.0.0.0 6 - Mask 3: 0.0.0.0 7 - Network 4: 0.0.0.0 8 - Mask 4: 0.0.0.0 9 - Network 5: 0.0.0.0 10 - Mask 5: 0.0.0.0 11 - Network 6: 0.0.0.0 12 - Mask 6: 0.0.0.0 13 - TCP/IP Filtering is Disabled 4 - FTP Push Configuration 1 - FTP Server: FTPTest.TelcomResearch.com 2 - FTP Directory: /Call Records/Work 3 - Base File Name: TFEDCBA 4 - File Extension: txt 5 - Upload Interval (minutes): 480 6 - Upload Compressed is Disabled 7 - Upload When Empty is Enabled 8 - Upload When 25% Full 9 - FTP Port on Server: 21 10 - Automatic Upload is Enabled 11 - Delete Uploaded Records is Enabled 12 - FTP User Name: FTPTest 13 - FTP Password: FTPTest 5 - Site and Collection Configuration 1 - Collection Method: 0 - RS-232 2 - End of Record Character: 13 3 - Site Identification: Telcom Research Head Office 4 - MDR2000 Commands are Enabled 5 - Omnitronix Commands are Enabled 70 D A T A B U F F E R T E L C O M 6 - 7 8 - 9 10 - 11 - 12 - R E S E A R C H T R - 2 1 0 0 D A T A B U F F E R 6 - WTI/PollCat Commands are Disabled 7 - Add Serial Numbers is Disabled 8 - Add CRC is Disabled 9 - Add Local Date/Time is Disabled 10 - Use Short Date/Time Format is Disabled User/Password Configuration 1 - HTTP Configuration User Name: aaa 2 - HTTP Configuration Password: aaa 3 - Data Retrieval Port User Name: aaa 4 - Data Retrieval Port Password: aaa 5 - Interactive Monitor User Name: aaa 6 - Interactive Monitor Password: aaa Serial Port Configuration 1 - Control Port BAUD Rate: 38400 2 - Data Port BAUD Rate: 57600 Time Server Configuration 1 - Primary NTP Time Server: tick.telcomresearch.com 2 - Secondary NTP Time Server: time-b.timefreq.bldrdoc.gov 3 - Time Zone Index: 83 4 - Daylight Time is Enabled 5 - Synchronize Every 12 Hours Configure Ethernet 1 - Ethernet Full Duplex is Enabled 2 - Extended Range is Disabled Network and Serial Port Statistics The buffer is empty Ethernet bytes received: 8,372,914 sent: 96,006 Ethernet frames received: 109,555 sent: 673 Data Port bytes received: 0 sent: 0 Control Port bytes received: 7,077 sent: 7,137 Up for 1 days, 20 hours and 3 minutes The last time correction was 0 seconds Display DHCP Information DHCP State is BOUND IP Address: 209.121.70.127 IP Mask: 255.255.255.0 Default Gateway: 209.121.70.1 Domain: telcomresearch.com DNS (Name) Servers: 209.121.70.5 209.121.70.19 66.203.199.203 NTP (Time) Servers: 132.246.168.164 209.87.233.53 Renewal Time (T1) 3 days, 12:00:00 Rebinding Time (T2) 6 days, 3:00:00 Lease Time Value 7 days, 0:00:00 Lease Time Used 1 days, 20:04:28 DHCP Server: 209.121.70.4 Version Information Serial Number: 16702650 Uncompressed Buffer Capacity: 4,063,488 bytes Software Revision: 3.02 Software Build Time: 16:42:06 Software Build Date: Feb 13 2007 13 14 15 0 - Hardware Revision: 5.01 Hardware Build Time: 23:15:42 Hardware Build Date: Feb 12 2007 Reset to FACTORY DEFAULTS Restore PREVIOUS SETTINGS EXIT, SAVING CHANGES EXIT WITHOUT saving changes 71 T E L C O M R E S E A R C H T R - 2 1 0 0 D A T A B U F F E R Configuration Starting Page Figure 51 Configuration Starting Page Note: The Interactive Monitor behaves identically through either the serial port connection or the Telnet connection. The only exception is that while in the Interactive Monitor through the serial port all other access to the TR-2100 except for Data Collection is blocked. This includes Telnet access to the Interactive Monitor, Telnet access to Data Retrieval and WEB Configuration as well as the TCP/IP diagnostic protocols (ECHO and CHARGEN). Ping and NetBIOS Name Resolution are also not blocked. The timeout specified for TCP Telnet Configuration in the TCP settings is used for the Interactive Monitor when connected through the serial port. None of the changes you make using Interactive Monitor are applied until you select 16 from the Main Menu. To discard all of your changes and leave the Interactive Monitor, select 0 from the Main Menu. Note: When you are changing an individual parameter, if you only press Enter and type no value the original value will be retained. To select one of the pages listed, enter the page number and press 72 (the Enter key). T E L C O M R E S E A R C H T R - 2 1 0 0 D A T A B U F F E R Configure IP Figure 52 IP Configuration Page To set the IP parameters manually follow the same instructions for determining and entering the values as described in the section Setting the IP Parameters Manually on page 23. Configure TCP Figure 53 TCP Configuration Page To set the TCP parameters follow the same instructions for determining and entering the values as described in the section Setting the IP Parameters on page 25. 73 T E L C O M R E S E A R C H Configure TCP/IP Security Figure 54 Configure TCP/IP Security FTP Push Configuration Figure 55 FTP Push Configuration 74 T R - 2 1 0 0 D A T A B U F F E R T E L C O M R E S E A R C H T R - 2 1 0 0 D A T A B U F F E R Site and Collection Configuration Figure 56 Site and Collection Configuration User/Password Configuration Page Figure 57 Account and Security Configuration Page All Internet connections to the TR-2100 can require password authentication. We strongly advise using passwords to restrict access to the TR-2100. User names and passwords may be 1 to 16 characters long. If the User Name or Password field is blank then no authentication is performed and the user will not be presented with a logon request. Only the Password field is case sensitive. 75 T E L C O M R E S E A R C H T R - 2 1 0 0 D A T A B U F F E R Serial Port Configuration Figure 58 Serial Port Configuration Page This page allows you to set baud rates for the CONTROL PORT and the DATA PORT. Enter 1 for the CONTROL PORT or 2 for the DATA PORT and press Enter. Next enter the decimal value of the desired baud rate, from 1200 to 115,200. The new baud rates do not take effect until you exit from the main menu with the Save Changes option. Time Server Configuration Figure 59 Time Server Configuration 76 T E L C O M R E S E A R C H T R - 2 1 0 0 D A T A B U F F E R Configure Ethernet Figure 60 Ethernet Configuration Page This page contains only 2 settings. Use Full Duplex This effectively doubles the network throughput by allowing simultaneous transmission and reception. The majority of network hubs in use today support this. Allow Extended Cable Length This allows the TR-2100 to operate with cables that are longer than 100 meters, which is the maximum length specified by the Ethernet standard. The exact additional distance depends on the quality of the cable and the amount of electromagnetic noise in the surrounding environment. Compatibility Settings Figure 61 Compatibility Settings 77 T E L C O M R E S E A R C H T R - 2 1 0 0 D A T A B U F F E R Network and Serial Port Statistics Figure 62 Network and Serial Port Statistics This page shows various statistics from the TR-2100. The illustration above shows the information available. Display DHCP Information Figure 63 DHCP Information If DHCP configuration is enabled, this page shows the current DHCP state and the DHCP parameters assigned to the TR-2100 by the DHCP Server. The IP address of the DHCP server is displayed on this page also. 78 T E L C O M R E S E A R C H T R - 2 1 0 0 D A T A B U F F E R Version Information Figure 64 Version Information Reset to FACTORY DEFAULTS Figure 65 Reset to FACTORY DEFAULTS 79 T E L C O M R E S E A R C H T R - 2 1 0 0 Restore PREVIOUS SETTINGS Figure 66 Restore PREVIOUS SETTINGS EXIT, SAVING CHANGES Figure 67 EXIT, SAVING CHANGES 80 D A T A B U F F E R T E L C O M R E S E A R C H T R - 2 1 0 0 D A T A B U F F E R EXIT WITHOUT saving changes Figure 68 EXIT WITHOUT saving changes 81 T E L C O M R E S E A R C H T R - 2 1 0 0 R D A T A B U F F E R 10 Chapter Reverse ARP Configuration everse ARP is a method of assigning an IP address to the TR-2100 when it is not practical to use the Control Serial Port. It requires an Ethernet connection, the Ethernet address of the TR-2100 and a Telnet client running on a Windows, Linux or Unix computer. Note: This method is the most difficult and should rarely if ever be utilized. We have included it for completeness. The following directions should work on Windows, Unix and Linux systems. Physically connect the TR-2100 to your network as described in the Installation chapter, which starts on page 9. You will need to obtain an IP address and network mask (and possibly a gateway IP Address) from your network administrator before you can set up your TR-2100 Ethernet Port with this method. Find the IP address of your computer. Utilities such as IPCONFIG or WINIPCFG are useful in obtaining this information. Locate the Ethernet address of the TR-2100, which is on the underside of the case, the number will resemble the following: 02-11-22-71-32-33. This is known as the Media Access Control (MAC) address. Obtain an IP address in your address domain (i.e. 192.168.2.245). Ensure that the TR2100 is connected to the same LAN segment as your computer (i.e. there is no bridge, router or gateway between your computer and the connection you will be using to configure the unit. Start a Command Shell from your operating system so that you can enter the following commands directly. The symbol “ ” denotes the Enter Key. Note: To open a command prompt in Windows, click Start, point to Programs, point to Accessories, and then click Command Prompt The following examples use fictitious addresses for illustrative purposes only (substitute your real addresses as appropriate) as follows: Computer IP: 192.168.2.64 TR-2100 IP: 192.168.2.245 TR-2100 MAC: 02-11-22-71-32-33 83 T E L C O M R E S E A R C H T R - 2 1 0 0 D A T A B U F F E R Note: in Unix derived systems MAC addresses are usually formatted as six pairs of hexadecimal digits separated by colons whereas Windows uses dashes. Checking Address availability To check that the IP address is not already in use, enter the following at the Command Prompt: Using PING C:\>ping 192.168.2.245 When a 'Ping" command is used, a 'Request Timed Out' message will be displayed if the address is not currently in use. It should be available to be used for the TR-2100. Pinging 192.168.2.245 with 32 bytes of data: Request timed out. Request timed out. Request timed out. Request timed out. Ping statistics for 192.168.2.245: Packets: Sent = 4, Received = 0, Lost = 4 (100% loss), Approximate round trip times in milli-seconds: Minimum = 0ms, Maximum = 0ms, Average = 0ms Use Address Resolution Protocol (ARP) to statically map the Ethernet address by issuing this command: Windows ARP Command The Windows ARP command uses dashes to separate digit pairs in the Ethernet address: C:\>ARP -s 192.168.2.245 02-11-22-71-32-33 192.168.2.64 Linux or Unix ARP Command The Linux and Unix ARP command uses colons to separate digit pairs in the Ethernet address: User$>ARP -s 192.168.2.245 02:11:22:71:32:33 192.168.2.64 Enter the following command and confirm that the ARP entry has been accepted: C:\>ARP -a Interface: 192.168.2.64 on Interface 0x1000003 Internet Address Physical Address Type 192.168.2.245 02-11-22-71-32-33 static The TR-2100 IP address and MAC address should be displayed as above. 84 T E L C O M R E S E A R C H T R - 2 1 0 0 D A T A B U F F E R Connecting with Telnet Telnet can now be used to communicate with the TR-2100 to configure the network parameters. The TR-2100 is now ready to be configured. Please refer to the chapter TR-2100 Interactive Monitor, page 67, for further details on how to do this using Telnet. Connecting with a WEB Browser Configuration of the TR-2100 can also be completed using a Web Browser. In the address bar enter http://name, where name is the host name on the bottom of the TR2100. The User Name and Password are the same as in the Telnet example above Refer to the earlier chapter TR-2100 Web Configuration on page 51 for further details on configuring the TR-2100 using this method. Once configured, using either method, it is imperative that the static ARP table be removed from the computer. Clearing the ARP entry from your Computer The following two commands are used to clear the static ARP table. The first command will clear the table and the second command will verify that it has been cleared. C:\>ARP -d * C:\>ARP -a No ARP Entries Found Clearing the Reverse ARP Address from the TR-2100 The Reverse ARP address of the TR-2100 can be cleared by cycling the power or by using the WEB Interface. 85 T E L C O M R E S E A R C H T R - 2 1 0 0 D A T A B U F F E R 11 Chapter Collecting Data from the TR-2100 C ollecting Data from the TR-2100 can be done 3 ways. They are: Automatic FTP Upload From the Control Port through a modem or direct PC connection From the Telnet Data Retrieval Port Both the Control Port and the Telnet Data Retrieval Port support the same commands for data retrieval. There are some minor differences and these will be pointed out. Both ports support the MDR-2000 Compatible Commands described on page 107, the Additional MDR-2000 style Commands described on page 109, the Omnitronix DataLink Compatible Commands described on page 109 and the WTI PollCat Compatible Commands described on page 111 Automatic FTP Upload This is the quickest and most efficient method of retrieving data from the TR-2100. Please refer to the chapter Automatic FTP Upload on page 89 for details on how to configure the TR-2100 for this method of operation. From the Control Port The Control Port does not use any password authentication. This port supports all of the MDR-2000 Compatible Commands described on page 107, the MDR-2000 Compatible Commands described on page 109 and the Additional MDR-2000 style Commands described on page 109. There is no concept of a ‘connection’ from the control port. It recognizes commands as they are received and acts upon them immediately. The Baud Rate must be properly set. Refer to Control Port Group figure on page 18 for instructions. From the Telnet Data Retrieval Port The Telnet Data Retrieval Port can be configured to require a user name and password. This port supports all of the MDR-2000 Compatible Commands described on page 107, 87 T E L C O M R E S E A R C H T R - 2 1 0 0 D A T A B U F F E R the Omnitronix Data-Link Compatible Commands described on page 109 and the Additional MDR-2000 style Commands described on page 109 except the following: • ‘^V’ IM described on page 108. This is the Interactive Monitor. This is available through the Telnet Interactive Monitor Port as described in the chapter TR-2100 Interactive Monitor on page 67 The Telnet Data Retrieval Port uses the concept of a ‘connection’. A TCP connection on the appropriate port must be made and an optional user name and password must be supplied. Once these requirements are met the TR-2100 recognizes commands as they are received and acts upon them immediately. Connecting A connection is made to the TR-2100 over a TCP/IP network. You must have the IP Address or the host name of the TR-2100. You also must know which TCP port is being used for data retrieval. The default port is 56789. All these settings may be changed locally with the TR-2100 Windows Configuration Program described on page 15, remotely as described in the TR-2100 Web Configuration chapter on page 51 or through the Interactive Monitor (described on page 67) with a Terminal Emulation program running on a PC as described on page 69 or a Telnet Client as described on page 67 Disconnecting You can close (disconnect) the Telnet session by sending a ^Z (ASCII 26 or hexadecimal 1A) character to the TR-2100. 88 T E L C O M A R E S E A R C H T R - 2 1 0 0 D A T A B U F F E R 12 Chapter Automatic FTP Upload utomatic FTP Upload is the quickest and most efficient method of retrieving data from the TR-2100. The TR-2100 can act as an FTP client and upload saved records to your FTP server at regular intervals or when a predetermined capacity has been reached. Configuration options include: Automatic FTP uploads at a programmable interval from 1 minute to 168 hours and 59 minutes. Automatic FTP uploads when the TR-2100 is filled to a preset capacity adjustable from 1% to 90%. User chosen FTP file name prefix and extension. The FTP server directory can be specified. The FTP server can be entered with either a fully qualified domain name or an IP address in dotted decimal notation. An arbitrary FTP port can be specified. Records that have been successfully uploaded will be automatically deleted from the TR-2100. High security. The TR-2100 uses FTP Passive mode and acts as a client. It is not possible to make a connection from an external source to the TR-2100 FTP client. FTP Server This is the fully qualified domain name of the FTP server that will receive data records from the TR-2100. It must be 64 characters or less in length and must conform to the rules for ARPANET host names. They must start with a letter, end with a letter or digit, and have as interior characters only letters, digits, and hyphen. The Domain Name must contain the period character '.' to separate sub domains from each other and the root domain as in ftp.telcomresearch.com FTP Directory This is the name of the directory on the FTP server that the data records will be placed in. This directory must already exist. The TR-2100 will not automatically create it. 89 T E L C O M R E S E A R C H T R - 2 1 0 0 D A T A B U F F E R File Base Name This is the first part of the file name to be used when storing records. The full file name is made from this base name, a hyphen, a unique 6-character sequence and the file extension. Assuming a Base Name of ‘DataRecord’ and an extension of .txt a typical file name would be similar to DataRecord-3NEVRD.txt. The unique 6-character sequence is generated from the time and date and therefore can be used to sort files chronologically. File Extension This is the extension of the file name to be used when storing records. Upload Interval You can set the time interval in Hours and Minutes between automatic uploads. Upload When Empty This is useful for uploading a zero length file at the upload interval to confirm that the TR-2100 is alive and well. Upload Compressed To double the speed of uploading you can upload in compressed format and uncompress the data records on the FTP server. Upload When XX% Full Set the percentage full point at which you want to upload records. Values below 50% are recommended but you can set it from 1% to 90%. FTP Port This is the TCP control port on the FTP server. This is normally port 21 but it may be changed for security reasons. The FTP server automatically assigns the Data Port. Automatic Upload This checkbox must be selected to enable upload at the specified interval or Percentage Full programmed. This item is disabled unless an Upload Interval or Percent Full value greater than zero is set. Delete Uploaded Records This control is automatically selected if Automatic Upload and either an Upload Interval or Percentage Full value greater than zero are set. FTP User Name This is the User Name to send to the FTP server for authentication. FTP Password This is the Password to send to the FTP server for authentication. 90 T E L C O M T R E S E A R C H T R - 2 1 0 0 D A T A B U F F E R 13 Chapter Command Sets he TR-2100 supports three distinct command sets. They are: • The Telcom Research TR-2100 Native commands used by external software for configuring the TR-2100 and retrieving configuration and status information. These are the commands used by the TR-2100 Windows Configuration Program described on page 15. These commands are only available through the Control Serial Port. • MDR-2000 emulation commands used for data collection and retrieval. These commands are available through the Control Serial Port and the Telnet Data Retrieval Port. • The Omnitronix Data-Link compatible commands used for configuration, data collection and retrieval. These commands are available through the Control Serial Port and the Telnet Data Retrieval Port. • The WTI PollCat compatible commands used for configuration, data collection and retrieval. These commands are available through the Control Serial Port and the Telnet Data Retrieval Port. The TR-2100 Native commands available at all times, (except when in the Interactive Monitor through the CONTROL PORT), and are intended for automated or computer control. The Interactive Monitor is designed for a human, not a computer program. The MDR-2000 emulation commands, Omnitronix Data-Link and the WTI PollCat compatible commands may be selectively disabled. They are all enabled by default. TR-2100 Native commands This is a full set of native commands used to configure the TR-2100. These commands are case sensitive and must be entered exactly as shown. GetBaud0 is not the same as gETbAUD0 or getbaud0. A CR/LF pair or a single CR (ASCII 13) must end all commands. All the GET commands return a value followed by a single CR (ASCII 13). Most of the SET commands expect one or more values. The SET commands return a response of OK<CR/LF> when they have completed. 91 T E L C O M R E S E A R C H T R - 2 1 0 0 D A T A B U F F E R ‘^T’ is the character generated from the keyboard by pressing the ‘T’ key while the ‘Ctrl’ key is held down. There is no space between the ‘^T’ and the name of the command. There is exactly one space between the name of the command and any argument. Numbers may not be specified with embedded commas. ‘^T’ SetBaud0<space>115200<enter> is correct whereas ‘^T’ SetBaud0<space>115,200<enter> is incorrect. Serial Port Configuration Commands The following commands are used to configure the serial communications properties of the DATA PORT and the CONTROL PORT. ‘^T’ GetBaud0 This command gets the baud rate of the CONTROL PORT. The baud rate is returned as a decimal number followed by a CR/LF pair. ‘^T’ SetBaud0 This command sets the baud rate of the CONTROL PORT. The format is ‘^T’ SetBaud0 BAUD_RATE where BAUD_RATE is the decimal value of the baud rate to set. Any baud rate can be set from 1200 to 115,200. Note: For 0% baud rate error the baud rate must divide into 460800 leaving no remainder (460800 / BAUD_RATE = whole number). The commonly used PC baud rates (1200, 9600, 28800, 38400, 115200, etc.) meet this requirement. ‘^T’ GetBaud1 This command gets the baud rate of the DATA PORT. The baud rate is returned as a decimal number followed by a CR/LF pair. ‘^T’ SetBaud1 This command sets the baud rate of the DATA PORT. The format is ‘^T’ SetBaud1 BAUD_RATE where BAUD_RATE is the decimal value of the baud rate to set. Any standard baud rate can be set. See the comments in ‘^T’ SetBaud0 above for further details. ‘^T’ GetSerialDebug If this command returns 1, the DATA PORT will transmit all Data received or transmitted by the TR-2100 CONTROL PORT. If it is 0 the ports operate normally. For a detailed description see the description of ‘^T’ SetSerialDebug below. ‘^T’ SetSerialDebug Setting this to 1 will cause all Data received or transmitted by the TR-2100 CONTROL PORT to be transmitted by the DATA PORT. If data is transmitted to the TR-2100 DATA PORT while in this mode it will still be collected properly. This is used as an aid when developing software for the TR-2100. It allows a developer to 92 T E L C O M R E S E A R C H T R - 2 1 0 0 D A T A B U F F E R monitor communications between the TR-2100 and the program being developed. It should not be used in normal data collection operation. IP Configuration Commands These commands are used to manually configure the IP protocol in the TR-2100. All Internet protocol (IP) addresses including the mask value are sent and returned in decimal notation. For example the Internet address 209.121.70.163 would be sent to the TR-2100 as 3514386083. The formula for converting this example dotted decimal IP address to decimal is 209 X 16777216 + 121 X 65536 + 70 X 256 + 163. A detailed description of the Internet Protocols is beyond the scope of this document. Please refer to the Internet Protocol Standards at http://ietf.org/rfc.html for more detailed information. These are called Request For Comments (RFC) for historic reasons but many of them are in fact standards. The same site also has ‘Standards’, which are collections of the basic RFCs defining the core Internet Protocols. ‘^T’ GetDHCP This command tells you if the DHCP client service is enabled on the TR-2100. If it returns 1, DHCP is enabled. If it returns 0, DHCP is disabled. This is not the same as DHCP state. DHCP state is the current negotiation state of the DHCP service as it relates to a DHCP server. The DHCP state is returned by the GetDHCPInfo command. ‘^T’ SetDHCP This command enables and disables the DHCP client service on the TR-2100. An argument of 1 enables DHCP negotiation and configuration and 0 disables DHCP. ‘^T’ GetDHCPInfo This command returns several lines of information describing the current state of DHCP negotiation with a DHCP server. Possible states include: DISABLED, REBOOTING, REBOOTINGWAIT, INIT, SELECTING, SELECTINGWAIT, REQUESTING, REQUESTINGWAIT, BOUND, RENEWING, RENEWINGWAIT, REBINDING and REBINDINGWAIT. A typical response to this command is: Telcom Research 4 Meg. Data Buffer DHCP Information: DHCP State is BOUND IP Address: 209.121.70.163 IP Mask: 255.255.255.0 Default Gateway: 209.121.70.1 Primary DNS Server: 209.121.70.5 Secondary DNS Server: 209.121.70.19 Alternate DNS Server: 66.203.199.203 Domain: telcomresearch.com Renewal Time (T1) 1 days, 0:00:00 Rebinding Time (T2) 1 days, 18:00:00 Lease Time 2 days, 0:00:00 93 T E L C O M R E S E A R C H T R - 2 1 0 0 D A T A B U F F E R DHCP Server: 209.121.70.4 OK A single line containing only ‘OK’ immediately followed by a CR/LF pair terminates the response. ‘^T’ GetIP Returns the Internet protocol (IP) address manually assigned to the TR-2100. It is returned in decimal notation. For example: an IP address of 209.121.70.163 would be returned as 3514386083. ‘^T’ SetIP Sets the Internet protocol (IP) address of the TR-2100. It must be specified in decimal notation. For example: 209.121.70.163 would be sent as 3514386083. ‘^T’ GetMask Returns the mask value. The mask is used to distinguish between the host and network portions of an IP Address. ‘^T’ SetMask Sets the mask value. The mask is used to distinguish between the host and network portions of an IP address. It must be specified in decimal notation. For example: 255.255.255.0 would be sent as 4294967040. ‘^T’ GetDNS1 Returns the IP address manually assigned to the TR-2100’s primary DNS Server. This server will be the first one queried to resolve a DNS lookup. It is returned in decimal notation. ‘^T’ SetDNS1 Specifies the IP address assigned to the TR-2100’s primary DNS Server. This server will be the first one queried to resolve a DNS lookup. ‘^T’ GetDNS2 Specifies the IP address assigned to the TR-2100’s secondary DNS Server. This server will be the second one queried to resolve a DNS lookup. This server is optional and may be set to 0.0.0.0 ‘^T’ SetDNS2 Specifies the IP address assigned to the TR-2100’s secondary DNS Server. This server will be the second queried to resolve a DNS lookup. This server is optional and may be set to 0.0.0.0 ‘^T’ GetDNS3 Specifies the IP address assigned to the TR-2100’s alternate DNS Server. This server will be the third one queried to resolve a DNS lookup. This server is optional and may be set to 0.0.0.0 94 T E L C O M R E S E A R C H T R - 2 1 0 0 D A T A B U F F E R ‘^T’ SetDNS3 Specifies the IP address assigned to the TR-2100’s alternate DNS Server. This server will be the third one queried to resolve a DNS lookup. This server is optional and may be set to 0.0.0.0 ‘^T’ GetGateway This command returns the IP address of the gateway. This is a router, to which all IP traffic having a destination other than the local network, is sent. ‘^T’ SetGateway This sets the IP address of the router that is to be used to send IP traffic not destined for the local network. ‘^T’ GetHost This is the ‘network name’ of the TR-2100. ‘^T’ SetHost This sets the ‘network name’ of the TR-2100. To remain compatible with NetBIOS over TCP/IP the length of this name is limited to 16 characters. ‘^T’ GetDomain This is the domain to which this TR-2100 belongs. This is used with the Host Name to form the Fully Qualified Domain Name used to find this TR-2100 on your intranet or on the Internet. ‘^T’ SetDomain This sets the domain to which this TR-2100 belongs. This is used with the Host Name to form the Fully Qualified Domain Name used to find this TR-2100 on your intranet or on the Internet using the DNS system. DHCP Assigned Configuration ‘^T’ GetDHCPIP Returns the Internet protocol (IP) address assigned to the TR-2100 by a DHCP server. It is returned in decimal notation. For example: 209.121.70.163 would be returned as 3514386083. ‘^T’ GetDHCPMask Returns the Internet protocol (IP) subnet mask assigned to the TR-2100 by a DHCP server. It is returned in decimal notation. For example: 255.255.255.0 would be returned as 4294967040. ‘^T’ GetDHCPDNS1 Returns the Internet protocol (IP) address of the primary DNS server assigned to the TR-2100 by a DHCP server. It is returned in decimal notation. 95 T E L C O M R E S E A R C H T R - 2 1 0 0 D A T A B U F F E R ‘^T’ GetDHCPDNS2 Returns the Internet protocol (IP) address of the secondary DNS server assigned to the TR-2100 by a DHCP server. It is returned in decimal notation. ‘^T’ GetDHCPDNS3 Returns the Internet protocol (IP) address of the alternate DNS server assigned to the TR-2100 by a DHCP server. It is returned in decimal notation. ‘^T’ GetDHCPGateway Returns the Internet protocol (IP) address of the router assigned to the TR-2100 by a DHCP server. It is returned in decimal notation. ‘^T’ GetDHCPServer Returns the Internet protocol (IP) address of the DHCP server that supplied the current DHCP settings to the TR-2100. It is returned in decimal notation. ‘^T’ DHCPGetDomain Returns the domain name assigned to the TR-2100 by a DHCP server. It is returned as a string. For example: telcomresearch.com TCP Configuration Commands ‘^T’ GetCfgPort This command returns the port number used to access the Interactive Monitor through the Telnet protocol. ‘^T’ SetCfgPort This command sets the port number used to access the Interactive Monitor through the Telnet protocol. ‘^T’ GetCfgTimeout This command returns the timeout used to limit access to the Interactive Monitor through the Telnet protocol. If there is no activity for the specified time (in seconds) the connection will be closed by the TR-2100. This timeout is also used to terminate CONTROL PORT access to the Interactive Monitor. ‘^T’ SetCfgTimeout This command sets the timeout used to limit access to the Interactive Monitor through the Telnet protocol. If there is no activity for the specified time (in second) the connection will be closed by the TR-2100. This timeout is also used to terminate CONTROL PORT access to the Interactive Monitor. ‘^T’ GetCharGenPort This command returns the TCP port currently assigned to the CHARACTER GENERATOR service. This service is used for network diagnostics and testing. The default value is 19. 96 T E L C O M R E S E A R C H T R - 2 1 0 0 D A T A B U F F E R ‘^T’ SetCharGenPort This command sets the TCP port used by the CHARACTER GENERATOR service. This service is used for network diagnostics and testing. The default value is 19. ‘^T’ GetCharGenTimeout This command returns the timeout used by the CHARACTER GENERATOR service. If there is no activity for the specified time (in seconds) the connection will be closed by the TR-2100. The default value is 60 seconds. ‘^T’ SetCharGenTimeout This command sets the timeout used by the CHARACTER GENERATOR service. If there is no activity for the specified time (in seconds) the connection will be closed by the TR-2100. The default value is 60 seconds. ‘^T’ GetRetrievalPort This command returns the TCP port number used to retrieve the TR-2100 collected data through the Telnet Protocol. The default value is 56789. ‘^T’ SetRetrievalPort This command specifies the TCP port number used to retrieve the TR-2100 collected data through the Telnet Protocol. The default value is 56789. ‘^T’ GetRetrievalTimeout This command returns the timeout (in seconds) used to close the TCP Telnet Protocol data retrieval port of the TR-2100 when there is no activity on that port. The default value is 300 seconds. ‘^T’ SetRetrievalTimeout This command specifies the timeout (in seconds) used to close the TCP Telnet Protocol data retrieval port of the TR-2100 when there is no activity on that port. The default value is 300 seconds ‘^T’ GetEchoRetrieval Returns the value of the echo setting of the Telnet Data Retrieval Port. If the value is 1 then all commands will be echoed to the sender. If it is 0 this feature is disabled. ‘^T’ SetEchoRetrieval This command, with an argument of 1, sets the Telnet Data Retrieval Port to echo all commands it receives. An argument of 0 disables this feature. ‘^T’ GetEchoPort This command returns the TCP port currently assigned to the ECHO service. This service is used for network diagnostics and testing. The default value is 7. ‘^T’ SetEchoPort This command sets the TCP port currently assigned to the ECHO service. This service is used for network diagnostics and testing. The default value is 7. 97 T E L C O M R E S E A R C H T R - 2 1 0 0 D A T A B U F F E R ‘^T’ GetEchoTimeout This command returns the timeout used by the ECHO service. If there is no activity for the specified time (in seconds) the connection will be closed by the TR-2100. The default value is 60 seconds. ‘^T’ SetEchoTimeout This command sets the timeout used by the ECHO service. If there is no activity for the specified time (in seconds) the connection will be closed by the TR-2100. The default value is 60 seconds. ‘^T’ GetHTTPPort This command returns the port number used to access to the TR-2100’s WEB Configuration Server through the HTTP protocol. The default value is 80. ‘^T’ SetHTTPPort This command sets the port number used to access to the TR-2100’s WEB configuration server through the HTTP protocol. The default value is 80. Port 80 is the default HTTP port on the Internet. We recommend that you change it as a security measure. ‘^T’ GetHTTPTimeout This command returns the timeout used to close connections to the TR-2100’s WEB Configuration Server that were not properly closed by a WEB Browser. The default value is 300 seconds. ‘^T’ SetHTTPTimeout This command sets the timeout used to close connections to the TR-2100’s WEB Configuration Server that were not properly closed by a WEB Browser. The default value is 300 seconds. ‘^T’ GetTCPTimeout This command returns the TCP timeout used to close connections to TCP ports that are not closed properly. If this time is shorter than a port specific timeout, this timeout has priority. This timeout is also used for any ports that do not have their own programmable timeout. The default value is 600 seconds. ‘^T’ SetTCPTimeout This command sets the TCP timeout as described above. Time Server Settings '^T' SetTimeServer1 This sets the primary NTP timeserver. The entry can be a numeric IP address such as 209.121.70.4 or a fully qualified name like tick.telcomresearch.com. '^T' GetTimeServer1 Returns the name or IP address if the primary NTP timeserver. 98 T E L C O M R E S E A R C H T R - 2 1 0 0 D A T A B U F F E R '^T' SetTimeServer2 This sets the secondary NTP timeserver. The entry can be a numeric IP address such as 209.121.70.4 or a fully qualified name like “tick.telcomresearch.com”. '^T' GetTimeServer2 Returns the name or IP address if the secondary NTP timeserver. '^T' SetTimeSyncInterval This sets the interval between clock synchronizations. It is a number representing hours in the range of 1 to 255. If it is set to 0 synchronization will never be attempted. '^T' GetTimeSyncInterval Returns the value of SetTimeSyncInterval described above. '^T' SetTimeZoneIndex This sets the index that is used to establish the time zone in which the TR-2100 is operating. Some common values are: 4, Pacific Time (US & Canada) 10, Mountain Time (US & Canada) 20, Central Time (US & Canada) 35, Eastern Time (US & Canada) 60, Newfoundland 85, (GMT) Greenwich Mean Time '^T' GetTimeZoneIndex Returns the current time zone index. The TR-2100 currently recognizes 75 time zones. '^T' SyncNTPTime Causes the TR-2100 to immediately connect a time server and synchronize its clock. '^T' GetNTPSyncTime Returns the next time a time synchronization attempt will be made in the following format: The Next NTP Synchronization is scheduled for Friday, Dec. 01, 2006, 02:00:00 '^T' SetTime This command will set the TR-2100’s internal clock. The value is the number of seconds since 00:00 (midnight) 1 January 1900 GMT. This is an Internet standard time representation as defined in STD26 at http://www.ietf.org/rfc/std/std26.txt. For example the command <Ctl-T>SetTime 2629584000 would set the time to Saturday, Apr. 30, 1983, 19:00:00 Eastern Standard time or Sunday, May. 01, 1983, 00:00:00 GMT. 99 T E L C O M R E S E A R C H T R - 2 1 0 0 D A T A B U F F E R FTP Upload (Push) Settings '^T' SetFTPClientAutoUpload A value of 1 enables and a value of 0 disables FTP Auto Upload. '^T' GetFTPClientAutoUpload Returns the value of FTP Auto Upload described above. '^T' SetFTPClientDeleteRecords A value of 1 enables and a value of 0 disables automatically deleting stored records that have been successfully FTP Uploaded. '^T' GetFTPClientDeleteRecords Returns the value of the SetFTPClientDeleteRecords setting described above. '^T' SetFTPClientDirectory This is the name of the directory on the FTP server that will receive the TR-2100’s call records. It can be a maximum of 64 characters long. The directory must exist on the FTP server. The TR-2100 will not automatically create it. See FTP Server Directory for detailed information. '^T' GetFTPClientDirectory This gets the name of the directory on the FTP server that will receive the TR-2100’s call records. '^T' SetFTPClientFileBaseName This is the first part of the file name that will be used to store records on the FTP server. See Base File Name for an explanation. '^T' GetFTPClientFileBaseName Returns the first part of the file name that will be used to store records on the FTP server. '^T' SetFTPClientFileExtension This is the file extension that will be used to store records on the FTP server. See File Extension for an explanation. '^T' GetFTPClientFileExtension Returns the file extension that will be used to store records on the FTP server. '^T' SetFTPClientInterval This is the number of seconds between scheduled FTP upload events. '^T' GetFTPClientInterval Returns the number of seconds between scheduled FTP upload events. '^T' SetFTPClientUser This is the user name that the FTP server is expecting from the TR-2100. The maximum length is 16 characters. 100 T E L C O M R E S E A R C H T R - 2 1 0 0 D A T A B U F F E R '^T' GetFTPClientUser Returns the user name that the FTP server is expecting from the TR-2100. '^T' SetFTPClientPass This is the password that the FTP server is expecting from the TR-2100. The maximum length is 16 characters. '^T' GetFTPClientPass Returns the password that the FTP server is expecting from the TR-2100. '^T' SetFTPClientPercent This is a number between 0 and 90 that triggers an automatic FTP upload. See Upload When XX% Full for details. '^T' GetFTPClientPercent See the description of SetFTPClientPercent above. '^T' SetFTPClientPort This is the TCP port on the FTP server that the TR-2100 should connect to for FTP uploading. See FTP Port for a more detailed explanation. '^T' GetFTPClientPort Returns the TCP port on the FTP server that the TR-2100 should connect to for FTP uploading. '^T' SetFTPCompression A value of 1 enables and a value of 0 disables compression of FTP uploaded records. '^T' GetFTPCompression Returns the value of the SetFTPCompression setting described above. '^T' StartFTPUpload This will immediately start an FTP upload if the entire FTP configuration is correct. '^T' GetFTPNextUpload Returns the next scheduled Automatic FTP Upload time in the following format: The Next FTP Upload is scheduled for Thursday, Nov. 30, 2006, 22:13:58 '^T' SetFTPServer This is the fully qualified domain name or the IP address if the FTP server that the TR-2100 should connect to for FTP uploading. '^T' GetFTPServer This command returns the name or the IP address if the FTP server that the TR2100 should connect to for FTP uploading. 101 T E L C O M R E S E A R C H T R - 2 1 0 0 D A T A B U F F E R '^T' SetFTPTimeout This sets the TCP timeout for connections to the FTP server. It is in seconds. Refer to Setting the TCP Timeouts for further details. '^T' GetFTPTimeout Returns the TCP timeout for connections to the FTP server in seconds. '^T' SetUploadEmpty A value of 1 enables and a value of 0 disables uploading of empty records. '^T' GetUploadEmpty Returns the value set by SetUploadEmpty above. TCP/IP Security Configuration Commands ‘^T’ SetEnableIPSec This command enables and disables TCP/IP security filtering. A value of 1 enables address and subnet mask checking and a value of 0 disables this checking. ‘^T’ GetEnableIPSec This returns the current setting of TCP/IP security filtering. ‘^T’ SetSecIPx When TCP/IP security filtering is enabled, TCP connections from this address combined with the accompanying subnet mask (specified by SetSecMaskx below) will be accepted. Incoming connection requests are compared to these addresses (as qualified by the masks as described below) until a match is found. X is a number between 1 and 6 as in ‘^T’ SetSecIP2. ‘^T’ GetSecIPx Returns the value of the TCP/IP security filtering address described above. ‘^T’ SetSecMaskx This mask is used to qualify the IP address of attempted incoming TCP connections. The IP address from the corresponding ‘^T’ SetSecIPx filter is masked with this value and the connecting address is also masked with this value. If the results are identical to each other the connection is allowed. X is a number between 1 and 6 as in SetSecMask5. ‘^T’ GetSecMaskx Returns the value of the TCP/IP security-filtering mask described above. Users Security Configuration Commands All passwords and user names may be up to 16 characters long. A blank user name or password will bypass the connection authentication sequence and the user will not be 102 T E L C O M R E S E A R C H T R - 2 1 0 0 D A T A B U F F E R prompted for either a User Name or a Password. Only the Password field is case sensitive. ‘^T’ GetCfgName This gets the user name for access to the Interactive Monitor through the Telnet Interactive Monitor Port. ‘^T’ SetCfgName This sets the user name for access to the Interactive Monitor through the Telnet Interactive Monitor Port. ‘^T’ GetCfgPass This gets the password for access to the Interactive Monitor through the Telnet Interactive Monitor Port. ‘^T’ SetCfgPass This sets the password for access to the Interactive Monitor through the Telnet Interactive Monitor Port. ‘^T’ GetHTTPName This gets the user name for access to the WEB Configuration Server through the HTTP protocol. ‘^T’ SetHTTPName This sets the user name for access to the WEB Configuration Server through the HTTP protocol. ‘^T’ GetHTTPPass This gets the password for access to the WEB Configuration Server through the HTTP protocol. ‘^T’ SetHTTPPass This gets the password for access to the WEB Configuration Server through the HTTP protocol. ‘^T’ GetPollName This gets the user name for access to the Telnet server used to collect data from the TR-2100. ‘^T’ SetPollName This sets the user name for access to the Telnet server used to collect data from the TR-2100. ‘^T’ GetPollPass This gets the password for access to the Telnet server used to collect data from the TR-2100. 103 T E L C O M R E S E A R C H T R - 2 1 0 0 D A T A B U F F E R ‘^T’ SetPollPass This gets the password for access to the Telnet server used to collect data from the TR-2100. Buffer Configuration Commands '^T' SetEnableMDR2000 1 enables and 0 disables recognition of the MDR command set. '^T' GetEnableMDR2000 Gets the value of the MDR-2000 command set recognition described above. '^T' SetEnablePollCat 1 enables and 0 disables recognition of the WTI/PollCat command set. '^T' GetEnablePollCat Gets the value of the WTI/PollCat command set recognition described above. '^T' SetEnableOmnitronix 1 enables and 0 disables recognition of the Omnitronix command set. '^T' GetEnableOmnitronix Gets the value of the Omnitronix command set recognition described above. '^T' SetCollectMode This sets the date collection mode for the TR-2100. The following values are recognized: 0 = RS-232C on Data Port 1 = Generic Plain ASCII Text as TCP/IP Server on Port 2301 2 = Avaya Session Layer Protocol (Definity RSP) on the Port specified by the SetAvayaPort command. '^T' GetCollectMode Reports the value set by the SetCollectMode above. '^T' SetSiteID This is a message that will identify a particular TR-2100 installation. It shows up in several places (WEB configuration, this program, etc.) to help you verify that you are working on the correct TR-2100. The message can be up to 64 characters long. '^T' GetSiteID Retrieves the value set by the SetSiteID command above. '^T' SetAvayaPort Sets the TCP Port that the Avaya Secure Session Protocol will use. '^T' GetAvayaPort Gets the TCP Port that the Avaya Secure Session Protocol will use. 104 T E L C O M R E S E A R C H T R - 2 1 0 0 D A T A B U F F E R '^T' SetEORChar This is the character that the TR-2100 recognizes as marking the end of a record. The default value is a Carriage Return (CR - 0x0D - 13 - Control-M). Another common selection is a Line Feed (LF - 0x0A - 10 - Control-J). Both of these are treated as special cases in the following way. During data collection all control characters (ASCII valued below 32) are discarded before the records are compressed stored. During data retrieval the records are expanded and the End of Record Character is added back. If the End of Record Character is either a Carriage Return or a Line Feed the combination of a Carriage Return followed by a Line Feed is added to the record. Otherwise only a single character (the End of Record Character) is added to the record. It is sent as a decimal ASCII number. '^T' GetEORChar Returns the decimal ASCII representation of the End of Record character described above. A Carriage Return (CR - 0x0D - 13 - Control-M) will be sent as “13”. '^T' SetAddLineNumber A value of ‘1’ will cause a six-digit number will be inserted at the beginning of all records retrieved. This means that the numbers are added when the records are output from the TR-2100. The line number will be a six-digit number with leading zeros. A value of ‘0’ will not add line numbers. '^T' GetAddLineNumber Retrieves the value set by the SetAddLineNumber command above. '^T' SetAddDateTime A value of ‘1’ will cause a date and time to be inserted at the beginning of each record collected. This is stored with the record. '^T' GetAddDateTime Retrieves the value set by the SetAddDateTime command above. '^T' SetShortDateTime A value of ‘1’ will cause the short date and time format to be used if SetAddDateTime is active. A value of ‘0’ will cause the long date and time format to be used. '^T' GetShortDateTime Retrieves the value set by the SetShortDateTime command above. '^T' SetAddCRC A value of ‘1’ will cause a 2-byte cyclic redundancy check (CRC) to be added to the end of each block or record as it is retrieved. These are not printable characters. They are binary 8 bit values with the high byte first. '^T' GetAddCRC Retrieves the value set by the SetAddCRC command above. 105 T E L C O M R E S E A R C H T R - 2 1 0 0 D A T A B U F F E R '^T' GetDateTime Returns the current date and time in the following format: Wednesday, Nov. 29, 2006, 23:07:28 '^T' SetDaylight Enables recognition of Daylight time. When set to 1 and disables it when set to 0. The current time zone must also recognize Daylight time. '^T' GetDaylight Returns the current setting of Daylight time. 1 is enabled and 0 is disabled. ‘^T’ ClearBuffer This command permanently erases the contents of the Data Memory. ‘^T’ FactroyReset This command resets the TR-2100 to Factory Default Settings. It also clears the Data Memory. Buffer Status Inquiry Commands '^T' GetEthernetAddress Returns the Ethernet address of the TR-2100 in the following format 02-10-00-00-00-CF '^T' GetBuildInfo This command generates several lines containing version numbers including serial number, capacity, time and date information about the TR-2100. '^T' GetCapacity Reports the capacity of the TR-2100 in bytes. The actual capacity will be 2 or 3 times this figure because records are stored in a compressed format. '^T' GetSerialNumber Returns the serial number of the TR-2100 '^T' GetSoftwareBuildDate Returns the date of the installed TR-2100 firmware revision. '^T' GetSoftwareBuildTime Returns the time of the installed TR-2100 firmware revision. '^T' GetSoftwareRevision Returns the revision of the installed TR-2100 firmware. '^T' GetHardwareBuildDate Returns the date of the installed TR-2100 hardware boot loader. '^T' GetHardwareBuildTime Returns the time of the installed TR-2100 hardware boot loader. 106 T E L C O M R E S E A R C H T R - 2 1 0 0 D A T A B U F F E R '^T' GetHardwareRevision Returns the revision of the installed TR-2100 hardware boot loader. '^T' GetResetEvents This clears the list of reset events kept by the TR-2100. This list is useful for troubleshooting. It lists all events that cause the TR-2100 to restart including Flash Updates, normal power up event, brownouts, commands such as COLDSTART and RESTART, etc. '^T' ClearResetEvents This will empty the list of reset events described above. '^T' ClearStats This command resets the accumulated statistics that are displayed by the Omnitronix STATUS command, the MDR SS command, the Interactive Monitor Network and Serial Port Statistics command and the TR-2100 Windows configuration Statistics page and the WEB Configuration Statistics WEB Page. MDR-2000 Compatible Commands The TR-2100 implements a subset of the most used MDR-2000 control commands. These commands are not case sensitive. ‘^V’ bE is the same as ‘^V’ BE or ‘^V’ Be. MDR-2000 Compatible Commands utilize a very simple protocol. Each command is preceded by a SYN (ASCII 16H, or ^V) character and terminated by a carriage-return (ASCII 0DH). The commands themselves are all two characters long. Command recognition is keyed on the reception of the SYN character. Simply typing the SYN character followed by the correct command can eliminate commands partially entered in error. The normal keyboard editing characters such as Delete or Backspace have no meaning. The command does not echo on the user’s terminal. This is consistent with the operation under program control, which is the normal case. The Telnet Data Retrieval Port also supports these commands except ‘^V’ IM described on page 108. This is the Interactive Monitor. This is available through the Telnet Interactive Monitor Port as described in the chapter TR-2100 Interactive Monitor on page 67. ‘^V’ is the character generated from the keyboard by pressing the ‘V’ key while the ‘Ctrl’ key is held down. ‘^V’ BE The ‘BEgin’ command moves the buffer pointers to the beginning of the current data storage buffer. This command must be used with caution since it may result in duplicate data in the downstream processing facility. There is no reply from the TR2100 to this command. 107 T E L C O M R E S E A R C H T R - 2 1 0 0 D A T A B U F F E R ‘^V’ CL The ‘CLear’ command causes the erasure of data from the beginning, up to but not including the current buffer pointer location. A ‘CLR’ message is returned when the clear action is complete. The ‘CLR’ message is encapsulated in the same protocol used for data transmission. ‘^V’ DB The ‘Door Bell’ command causes an immediate ‘HE’ response, followed by a Carriage Return/Linefeed pair, from the TR-2100. It is used to ensure that the TR2100 is active and waiting for commands. This command also cancels an active ‘DU’ command. ‘^V’ DU The ‘DUmp’ command causes all data received on the DATA PORT to be immediately output over the CONTROL PORT. Data continues to be collected normally. The data dumped over the CONTROL PORT is unedited. When the Interactive Monitor is activated this command is cancelled. There is no reply from the TR-2100 to this command. Note that execution of the ‘IM’, ‘SD’, or ‘DB’ commands causes cancellation of the dump. ‘^V’ ID The ‘IDentification’ command outputs information about the TR-2100 including software revision, serial number, and copyright notice. No protocol is used with this output. ‘^V’ IM The ‘Interactive Monitor’ command invokes the Interactive Monitor. When invoked, an active ‘DU’ command is cancelled. Data collection proceeds as usual. This command is only available through the Control Serial Port and is available through the Telnet Interactive Monitor Port as described in the chapter TR-2100 Interactive Monitor on page 67 ‘^V’ MR The ‘Master Reset’ command is used to clear the TR-2100 data buffer. This command differs from the MDR-2000 MR command in that it does not cause an immediate hardware reset with the loss of all configuration data. To perform a complete reset, use the TR-2100 Interactive Monitor through the CONTROL PORT or the Telnet Interactive Monitor Port. ‘^V’ OK The ‘OK’ command is used to advance the buffer pointer to the next logical record in the data storage buffer. There is no reply from the TR-2100 to this command. Retrieving a data record and comparing it to the previously retrieved record can test its successful reception by the TR-2100. If they are the same the ‘OK’ command was not received by the TR-2100 correctly. 108 T E L C O M R E S E A R C H T R - 2 1 0 0 D A T A B U F F E R ‘^V’ SD The ‘Stop Dump’ command cancels the DU command. This command is automatically invoked when the Interactive Monitor is activated. There is no reply from the TR-2100 to this command. ‘^V’ SM The ‘Send Maintenance’ command is used to transmit a TR-2100 maintenance record to the host system. This record is for backward compatibility with the MDR2000. The record is encapsulated in the same protocol used for data transmission. ‘^V’ XT The ‘Transmit’ command sends the record at the current buffer pointer location in the currently selected data storage buffer. This record is encapsulated in the protocol described in the next section. An ‘END’ message is returned when the buffer is empty or the pointers have been advanced past the last record in the buffer by the ‘OK’ command. Additional MDR-2000 style Commands These commands are not supported by the MDR-2000 but are based on that general style. ‘^V’ DA This command transmits all the records in the buffer in ASCII format as originally received by the DATA PORT. A CR/LF pair terminates each line. You can interrupt the command by sending an ESC (26 or 1B hex) character on the Control or Telnet Data Retrieval Port as appropriate. ‘^V’ SS This command displays the Buffer, Network and Serial Port Statistics. Omnitronix Data-Link Compatible Commands The following Omnitronix commands are supported. They are supported for backward compatibility with existing data collection software. For a detailed explanation of these commands, please refer to the appropriate Omnitronix literature. Most of the configuration commands are also available as native TR-2100 commands as noted below. ? See the MDR SS command. ACCESS Supported only when the Omnitronix Data-Link command set is enabled. BYPASS Supported only when the Omnitronix Data-Link command set is enabled. 109 T E L C O M R E S E A R C H T R - 2 1 0 0 D A T A B U F F E R CLEAR See the TR-2100 Clear Buffer command CLOCK Displays the date and time settings of the internal real-time clock COLDSTART Supported only when the Omnitronix Data-Link command set is enabled. COUNT Supported only when the Omnitronix Data-Link command set is enabled. CRC See the TR-2100 SetAddCRC and GetAddCRC commands. DEFAULT See the TR-2100 Factory Reset command FREE See the TR-2100 Get Capacity command NEXT Sends the next data record or block. RESEND This causes the last block of data sent to be resent. PROMPT Supported only when the Omnitronix Data-Link command set is enabled. PRT Supported only when the Omnitronix Data-Link command set is enabled. PUSHTEST Attempt to connect and upload records to the FTP server specified in FTP push settings. RESTART Supported only when the Omnitronix Data-Link command set is enabled. RL Supported only when the Omnitronix Data-Link command set is enabled. RLMODE Supported only when the Omnitronix Data-Link command set is enabled. SETUP See the TR-2100 Interactive Monitor. 110 T E L C O M R E S E A R C H T R - 2 1 0 0 D A T A B U F F E R STAMP See the TR-2100 SetAddDateTime and GetAddDateTime command. STATUS See the MDR SS command. TAG See the TR-2100 SetAddLineNumber and GetAddLineNumber commands. WAIT ZAP Supported only when the Omnitronix Data-Link command set is enabled. ZERO Supported only when the Omnitronix Data-Link command set is enabled. WTI PollCat Compatible Commands The following WTI PollCat commands are supported. They are supported for backward compatibility with existing data collection software. For a detailed explanation of these commands, please refer to the appropriate WTI PollCat literature. All the WTI PollCat commands begin with ^A or ^B and are followed by one or more numbers. The symbol ^A stands for Control-A, SOH or ASCII 1 and ^B stands for Control-B, STX or ASCII 2. If ^A is used the command echo is turned off and if ^B is used the command is echoed as it is typed. Unless stated otherwise, these commands behave as described in the WTI Pollcat documentation. ^B00 Set/Reset Memory Partition ^B01 Enter Data Read Mode, ^B01[,type][,source][@n][,n] ^B02 Send Next Data ^B03 Display Site ID ^B04 Define Site ID Message ^B05 Define End Character 111 T E L C O M ^B06 Re-Send Last Data ^B13 Display Site ID/Alarm Messages ^B16 Display System Status ^B20 Display Partition Record Count ^B21 Display Remaining Space ^B22 Display Capacity & PBX Baud ^B25 Erase Partition Data ^B26 Display “Separator” Line ^B29 Enter Pass-through Mode ^B30 Exit, Return To Command Mode ^B39 Erase All Data ^B50 Default Parameters ^B52 Enable/Disable Hold End Data ^B54 Enable/Disable Data on ^B01 ^B59 Enable/Disable Line ID ^B62 Select Output Format. 112 R E S E A R C H T R - 2 1 0 0 D A T A B U F F E R T E L C O M R E S E A R C H T R - 2 1 0 0 D A T A B U F F E R ^B66 Enable/Disable Time/Date Stamp ^B67 Enable/Disable Auto Delete ^B72 Display Time, Day, Date ^B75 Enable/Disable “SURE? (Y/N)” ^B91 Define Console Port Communication Parameters ^B92 Define PBX Port A Communication Parameters ^B95 Display Program Version ^B97 Define/Display Network Parameters. The following enhancements have been added: ^B97,A,IPADDR DNS Server 1 IP Address ^B97,B,IPADDR DNS Server 2 IP Address ^B97,C,IPADDR DNS Server 3 IP Address ^B97,D,ENABLE 1 = Disable, 2 = Enable DHCP ^B98 Reset Network Port ^B99 Download Current Parameters 113 T E L C O M R E S E A R C H T R - 2 1 0 0 D A T A 14 Chapter B U F F E R Trouble Shooting W hen power is applied to the TR-2100, it performs several power on self tests. Random Access Memory (RAM) is tested first. This is a test of every RAM memory location in the TR-2100. During this test the group of LEDs labelled Buffer light green. The test takes under 2 seconds. The second, third and fourth tests verify lock bits and fuse bits in the microprocessor. The fifth test verifies that the Ethernet controller is functioning. The last test verifies that the program code has not been corrupted. During this test all front panel LEDs light red. This test takes about 2 seconds. If any of these tests fail it is a fatal error and the TR-2100 must be repaired. The test failure LED patterns are as below. Fatal Errors Unrecoverable failures are reported in the following ways: RAM Test Failure If the RAM test fails the group of LEDs labelled Buffer will flash green. Ethernet Controller Failure If the Ethernet circuit fails the Run LED will flash red and green. Three separate tests are performed on the Ethernet system. An additional LED lighting along with the Run LED flashing indicates which of these tests failed. They are: o The DHCP LED lit RED indicates that the TR-2100 was unable to successfully reset the Ethernet controller chip. o The HTTP LED lit RED indicates that the TR-2100 was unable to read the ID code from the Ethernet controller chip. o The Cfg. LED lit RED indicates that the Ethernet loop back test failed. Program Memory Failure When the Program Memory test fails all 8 front panel LEDs flash red. It may be possible to correct this error. See the next paragraph. Program Memory Failure Non-Fatal Error The non-fatal exception is when a flash update is interrupted because of a power failure, communications failure or a computer crash. If the flash update is interrupted the program memory may be left in a corrupt state and the Program Memory Failure 115 T E L C O M R E S E A R C H T R - 2 1 0 0 D A T A B U F F E R LED pattern described above will appear. This can be corrected by repeating the flash update. Please see Flash Update Errors on page 45 for a detailed explanation. Microprocessor Configuration Failures These tests confirm that the microprocessor is configured correctly at power up. These configuration bits are set during manufacturing and are never expected to change. Lock Bits Group Failure If the Lock Bits are set incorrectly the Ctrl LED flashes red and green. Fuse Bits Low Group Failure If the Fuse Bits Low Group is set incorrectly the Data LED flashes red and green. Fuse Bits High Group Failure If the Fuse Bits High Group is set incorrectly the Full LED flashes red and green. Fuse Bits Extended Group Failure If the Fuse Bits Extended Group is set incorrectly the Full LED and the Data LED flash red and green. Non Fatal Errors Link LED does not light This indicates that the Ethernet port is not connected. Verify that the cable is plugged in firmly at both ends and the clip has latched. This is can also be caused by a faulty Ethernet cable or the wrong type of Ethernet cable. To connect to an Ethernet hub or switch, use a straight through cable. To connect directly to a computer use a crossover Ethernet cable. No LEDs light when power is applied Verify that there is power at the outlet where the TR-2100’s power adapter is plugged in. Verify that the power adapter cable is inserted fully into the TR-2100. If there are still no LEDs lighting then either the power adapter or the TR-2100 has failed. Unable to communicate with the Ctrl Port If you are using the Telcom Research TR-2100 Windows Configuration Program click the Find Me! Button. This will check every available communications port and baud rate on the computer checking for a connected TR-2100. Make sure that the cable connecting the computer to the TR-2100 is a null modem cable as described in Connecting Directly to a Computer Serial Port on page 9 and Table 3 - 9-pin Port Wiring on page 10. Unable to receive records on the Data Port Refer to the section Connecting to the Data Source on page 10 and confirm that the cable wiring is correct for your data source. Ensure that the correct baud rate is set 116 T E L C O M R E S E A R C H T R - 2 1 0 0 D A T A B U F F E R on the TR-2100 Data Port. When the buffer is empty the Full light on the front panel is solid green. When records have been collected the Full LED flashes according to the patterns described in Table 5 on page 14. 117 T E L C O M F R E S E A R C H T R - 2 1 0 0 D A T A B U F F E R 15 Chapter Factory Default Settings actory default settings are the settings in the TR-2100 when it leaves the factory. There is a command available through the Control Serial Port which will restore these settings should it be necessary. Ethernet Configuration Use Full Duplex Default value is ON. Allow Extended Cable Length The default value is OFF. Serial Port Configuration Control Port Baud Rate The default value is 38,400 baud. Data Port Baud Rate The default value is 9,600 baud. IP Parameters IP Address The default value is a unique address calculated from the Ethernet address. It is in the Private Address block 169.254.0.0 - 169.254.255.255. Please refer to Reserved IP Addresses For Private Networks on page 24 for details. Subnet Mask The default value is 255.255.0.0. IP Gateway The default value is 169.254.0.1. Primary DNS Server The default value is 0.0.0.0. Secondary DNS Server The default value is 0.0.0.0. 119 T E L C O M R E S E A R C H T R - 2 1 0 0 D A T A Alternate DNS Server The default value is 0.0.0.0. Host Name The default value is a unique name calculated from the Ethernet address. Domain The default value is empty (no domain name). Enable DHCP The default value is DISABLED. TCP Parameters HTTP Configuration Port: The default value is 80. Configuration Port: The default value is 23. Data Retrieval Port: The default value is 56789. Echo on Data Retrieval Port: The default value is DISABLED. TCP ECHO Service Port: The default value is 7. TCP CHARGEN Service Port: The default value is 19. Site and Data Collection Settings Site Identification The default setting is “Put your Site Information here”. End of Record Character The default value is a Carriage Return (CR - 0x0D - 13 - Control-M). Data Collection Method RS-232C Data Port at XXXX Baud The default setting is enabled. Generic Plain ASCII Text as TCP/IP Server on Port 2301 The default setting is disabled. Avaya Session Layer Protocol (Definity RSP) on Port XXXX The default setting is disabled. 120 B U F F E R T E L C O M R E S E A R C H T R - 2 1 0 0 D A T A B U F F E R Record Modifications Add Line Numbers The default setting is disabled. Add Record/Block CRC The default setting is disabled. Add Local Date/Time The default setting is disabled. Short Date/Time Format The default setting is enabled. Command Sets Enable MDR2000 Commands The default setting is enabled. Enable Omnitronix Commands The default setting is enabled. Enable WTI/PollCat Commands The default setting is enabled. Security Parameters HTTP Configuration User Name The default value is “AAA”. This is not case sensitive. HTTP Configuration Password The default value is “aaa”. This is case sensitive. Telnet Configuration User Name The default value is “AAA”. This is not case sensitive. Telnet Configuration Password The default value is “aaa”. This is case sensitive. Data Retrieval User Name The default value is “AAA”. This is not case sensitive. Data Retrieval Password The default value is “aaa”. This is case sensitive. SNTP (Time Server) Settings Primary NTP Server The factory default setting is “tick.telcomresearch.com”. 121 T E L C O M R E S E A R C H T R - 2 1 0 0 D A T A B U F F E R Secondary NTP Server The default value is “time-b.timefreq.bldrdoc.gov”. Time Zone The default value is Eastern Standard Time in North America, GMT -5 hours. Automatically Adjust for Daylight Time The default value is enabled. Sync every XX Hours The factory default setting is every 24 hours. FTP Upload Settings FTP Server There is no default setting for this entry. It is empty. FTP Server Directory There is no default setting for this “/”. This is the root directory of the FTP server. Base File Name The default value is “cdr”. File Extension The default value is “txt”. FTP Port The default value is 21. Upload Empty The default value is disabled. Compressed The default value is disabled. Automatic Upload The default value is disabled. Delete Uploaded Records The default value is disabled. Upload When XX% Full The default value is 25%. Upload Interval The default value is 0. FTP User Name There is no default setting for this entry. It is empty. 122 T E L C O M R E S E A R C H T R - 2 1 0 0 D A T A B U F F E R FTP Password There is no default setting for this entry. It is empty. TCP/IP Security Parameters Network 1 The default value is 169.254.0.0 Mask 1 The default value is 255.255.0.0 Network 2-6 The default value is 0.0.0.0 Network 2-6 The default value is 0.0.0.0 Enable TCP/IP Filtering The default vales is disabled. 123 T E L C O M S R E S E A R C H T R - 2 1 0 0 D A T A B U F F E R 16 Chapter Specifications pecifications for the TR-2100 are presented in this chapter. These specifications were current at the time of publication of this manual but they are subject to revision or change as new features and capabilities are incorporated into the TR- 2100. System Requirements The following minimum requirements apply to the TR-2100 operating environment. Hardware Requirements For using the TR-2100 with TR-2100 Windows Configuration Program, a Pentium 233 MHz (or more) class Personal Computer with the following specifications is recommended: • • • • • 64 MBytes RAM, or more 10 MBytes of free hard disk (HD) space 16650 Compatible Serial Port (COM port) TR-2100 Windows Configuration Program installed Acrobat Reader v4.0 or later installed (optional). Software Requirements The following operating systems are currently supported by TR-2100 Windows Configuration Program: • Windows 2000 • Windows XP The TR-2100 Windows Configuration Program is constantly being updated to add new features and new TR-2100 firmware updates. See http://databuffers.com/ for the latest information. Operating Conditions Operation Temperature ---------------------------------------------------------------------- 0°C - 70°C Operating Humidity------------------------------------------------ 10 - 90 % RH (non-condensing) Supply Voltage ---------------------------------8.0V to 16.0V AC or DC (with supplied adapter) 125 T E L C O M R E S E A R C H T R - 2 1 0 0 D A T A B U F F E R WARNING! Violating the recommended operating conditions for the TR-2100 may cause incorrect operation. Technical Specifications Physical Dimensions----------------------- (H x W x D) 25.4 x 155 x 91.4 mm/1 x 6.8 x 3.6 in Weight--------------------------------------------------------------------------------------- 384 g/13.6 oz. Input Voltage Requirements ----------------8.0V to 16.0V AC or DC (with supplied adaptor) Current Consumption-------------------------------------------------------------------------- < 260 ma. Ambient Temperature (Operating) -------------------------------------------------------- 0 to +70°C Ambient Temperature (Non-operating) ----------------------------------------------- -55 to +85°C Relative Humidity (Non-condensing) (Operating)-------------------------------------- 10 to 90% Relative Humidity (Non-condensing) (Non-operating)----------------------------------5 to 95% Shock-------------------------------------------------------------------------------- 20 g, 11 ms half sine Vibration --------------------------------------------------------------------------------------------------- 5 g Control Port Serial Communications Speed ------------------------------- 300 to 115200 Baud Data Port Serial Communications Speed ---------------------------------- 300 to 115200 Baud Flash Memory ------------------------------------------------------------------------------ 1 to 8M bytes Connections Power Connector ---------------------------------------------------------9mm Long, 5.5 mm OD/2.5mm ID Serial Ports Control Port Serial Connector (RS-232C) ------------------------------------- 9-pin D-SUB Male Data Serial Connector (RS-232C)----------------------------------------------- 9-pin D-SUB Male Network Ethernet Connector (IEEE 802.3) -----------------------------------------------------RJ-45 Female Indicators Front Panel LINK --------------------------------------------------------------------------------------------- Green LED ACT ------------------------------------------------------------------------------------------------- Red LED Network LEDs DHCP----------------------------------------------------------------------------------------------- Red LED HTTP ----------------------------------------------------------------------------------------------- Red LED 126 T E L C O M R E S E A R C H T R - 2 1 0 0 D A T A B U F F E R Cfg.-------------------------------------------------------------------------------------------------- Red LED Collect ---------------------------------------------------------------------------------------------- Red LED Buffer LEDs Run----------------------------------------------------------------------------------------- Red/Green LED Full ----------------------------------------------------------------------------------------- Red/Green LED PBX ---------------------------------------------------------------------------------------- Red/Green LED Ctrl ----------------------------------------------------------------------------------------- Red/Green LED Rear Panel LINK --------------------------------------------------------------------------------------------- Green LED ACT ------------------------------------------------------------------------------------------------- Red LED 127 T E L C O M R E S E A R C H T R - 2 1 0 0 D A T A B U F F E R Glossary Frequently used terms, acronyms and abbreviations with a brief definition of each: 10BaseT A 10-Mbps Ethernet specification defined by IEEE 802.3 that uses Category 3 or Category 5 twisted pair wiring. 100BaseT A 100-Mbps Ethernet specification defined by IEEE 802.3 that uses Category 5 twisted pair wiring. Designed to integrate with existing networks with minimal disruption. Generically called Fast Ethernet 1000BaseTX Ethernet specification for unshielded twisted pair cabling that is used to transmit data at 1 Gbps (gigabits per second) with a distance limitation of 220 meters per segment. ACCESS CODE Number prefix a subscriber dials to reach the nationwide long distance network. ADDRESS MASK A bit mask used to select bits from an IP address. A logical ‘and’ with the mask produces the network portion of the address. Hosts use address masks to determine if a destination IP address represents an adjacent host (allowing direct delivery), or if routing must be employed. AMA Automatic Message Accounting; automatically records the data needed for billing customer-dialed long distance calls. ANI Automatic Number Identification; equipment that automatically records the calling number. This is part of automatic message accounting. ANONYMOUS FTP (File Transfer Protocol) The procedure of connecting to a remote computer, as an anonymous or guest user, in order to transfer public files back to your local computer. (See also: FTP and PROTOCOLS) AREA CODE Three-digit code used in dialling long distance calls from one Numbering Plan Area to another. ARP (Address Resolution Protocol) A network level protocol used to map an IP address to hardware address. IP 129 T E L C O M R E S E A R C H T R - 2 1 0 0 D A T A B U F F E R addresses are merely an abstraction to make networks hardware independent, a machine must determine the actual address of the destination machine (or the router for the first hop if the destination is not local) before any packets can be sent. ASYNCHRONOUS (ASYNC) Serial data is transmitted in one of two ways, synchronous (SYNC) or asynchronous (ASYNC). ASYNC communications involve the use of a start bit to signal the beginning of a character and a stop bit to signal the end of the character. AUTHENTICATION The verification of the identity of a person or process. BROADCAST A special type of multicast packet that all nodes on the network are always willing to receive. A broadcast message has an IP address with a host portion that is all ones or an Ethernet address consisting of all ones. BROADCAST ADDRESS An IP or Ethernet address used to denote a packet that should be received by every host on a network, consisting of the target network address and a host address of all ones (e.g. for a class C network 192.168.36.0 the broadcast address is 192.168.36.255). The Ethernet broadcast address consists of all ones. CARD DIALER Automatic pushbutton dialler combined with regular telephone; phone numbers coded on plastic cards are inserted in dialler slot for fast, accurate dialling. CATEGORY 5 A standards-based cable consisting of twisted-pair wire, with a specific number of twists per foot to reduce electrical crosstalk and provide a specific characteristic impedance (capacitive and inductive reactance) per each foot of cable. Used as an industry standard for modern cable plant, and required for Fast Ethernet. It is desirable for 10BaseT as well. CCITT International Telegraph and Telephone Consultative Committee; an organization that sets standards and promotes worldwide cooperation in communications matters. CD (Carrier Detect) A control signal from a DCE device (a modem, for example) indicating that the DCE has recognized another device and that the carrier connection is established. This signal stays on during the entire conversation between the two. CENTRAL OFFICE is a switching unit in the telephone network providing service to the general public. 130 T E L C O M R E S E A R C H T R - 2 1 0 0 D A T A B U F F E R CENTREX Type of private branch exchange (PBX) that enables incoming calls to be dialed direct to any extension, and lets extension users dial their own calls without switchboard assistance. CHECKSUM A computed value which is dependent upon the contents of a packet. This value is sent along with the packet when it is transmitted. The receiving system computes a new checksum based upon the received data and compares this value with the one sent with the packet. If the two values are the same, the receiver has a high degree of confidence that the data was received correctly. CLIENT A computer system or process that requests a service of another computer system or process. A workstation requesting the contents of a file from a file server is a client of the file server. CTS (Clear To Send) A Control Signal from the DCE that alerts the DTE device that the DCE is ready to receive data. DCE (Data Circuit terminating Equipment) An example would be a modem. In a typical RS-232 link a DTE (Data Terminal Equipment) device, such as a PC, talks to a DCE device, such as a modem. DTE and DCE are complimentary interfaces. A DTE device always transmits on pin 2 and receives on pin 3 of a DB25 connector, a DCE device does the opposite. DDD (Direct Distance Dialing) is an easy, fast telephone service, which permits customers to dial their own long distance, calls. DHCP (Dynamic Host Configuration Protocol) A way to dynamically assign IP addresses, network mask values and DNS name servers. A DHCP server dynamically assigns IP addresses to devices requesting them. These address assignments expire after a time specified by the network manager. The DHCP server then reassigns these addresses to other devices as needed. DHCP SERVER A server in a network or Internet service that assigns IP addresses and other required information to multiple stations on a network. See the description of DHCP above. DID (Direct Inward Dialling) enables outside calls to be dialed direct to extensions without going through a switchboard 131 T E L C O M R E S E A R C H T R - 2 1 0 0 D A T A B U F F E R DOD (Direct Outward Dialing) is the reverse of DID: an extension user dials out without switchboard assistance. DNS (Domain Name System) The DNS is a general purpose distributed, replicated, data query service. The principal use is the lookup of host IP addresses based on host names. The Internet naming scheme consists of a hierarchical sequence of names, from the most specific to the most general (left to right), separated by dots. The style of host names now used in the Internet is called "domain name", because they are the style of names used to look up anything in the DNS. Some important domains are: .COM (commercial), .EDU (educational), .NET (network operations), .GOV (U.S. government), and .MIL (U.S. military). Most countries also have a domain. For example, US (United States), .UK (United Kingdom), .AU (Australia). It is defined in STD 13, RFCs 1034 and 1035. DSR (Data Set Ready) A Control Signal that is sent by a DCE device indicating to the DTE device that the DCE is ready to transmit or receive data. DTE (Data Terminal Equipment) An example would be a PC serial port. In a typical RS-232 link a DTE device, such as a PC, talks to a DCE device, such as a modem. DTE and DCE are complimentary interfaces. A DCE device always transmits on pin 3 and receives on pin 2 of a DB25 connector, a DCE device does the opposite. DTR (Data Terminal Ready) A Control Signal sent by the DTE device to the DCE, letting it know that the DTE is ready ETHERNET A network protocol invented by Xerox Corporation and developed jointly by Xerox, Intel and Digital Equipment Corporation. Ethernet networks use CSMA/CD and run over a variety of cable types at 10, 100 and 1000 Mbps (megabits per second). EXCHANGE Unit of territory for telephone rate purposes; includes city, village or other community and is served by one or more central offices. FIREWALL Router, or routers placed between an internal network and an outside network to provide security by filtering packets. Firewalls prevent undesirable activity by preventing certain types of packets passing between the networks. It examines all incoming and outgoing traffic to determine if it may be routed to its destination. FQDN (Fully Qualified Domain Name) The FQDN is the full name of a system, rather 132 T E L C O M R E S E A R C H T R - 2 1 0 0 D A T A B U F F E R than just its hostname. For example, "pigeon" is a hostname and "pigeon.qut.edu.au" is an FQDN. FTP (File Transfer Protocol) allows a user to transfer files electronically from remote computers back to the user's computer. Part of the TCP/IP/TELNET software suite. FULL-DUPLEX The communication mode in which a device simultaneously sends and receives over the same link, doubling the bandwidth. A full-duplex 100Mbps connection has 200Mbps of bandwidth. A full-duplex 1000Mbps connection has 2000Mbps of bandwidth. GATEWAY A routing table entry that is used to direct packets addressed to networks not explicitly listed in the routing table. This is generally a computer that forwards and routes data between two or more networks of any size. HARDWARE ADDRESS An addressing scheme used by hardware to identify hosts on a network. Ethernet interfaces use a 48 bit addressing scheme. Each Ethernet interface is given a unique hardware address when manufactured. HOST NAME The name given to a machine. HTTP (Hypertext Transfer Protocol) is a standard that defines how requests for HTML and graphics files that make up a web page are handled between the web server and the client browser. ICMP (Internet Control Message Protocol) is an extension to the Internet Protocol. It allows for the generation of error messages, test packets and informational messages related to IP. INTERNET The series of interconnected networks that includes local area, regional, and national backbone networks. Networks in the Internet use the same telecommunications protocol (TCP/IP) and provide electronic mail, remote login, and file transfer. IP (Internet Protocol) is the Internet standard protocol that provides a common layer over dissimilar networks, used to move packets among host computers and through gateways if necessary. 133 T E L C O M R E S E A R C H T R - 2 1 0 0 D A T A B U F F E R IP ADDRESS The numeric address of a computer connected to the Internet; also called Internet address. LAYER Communication networks for computers may be organized as a set of more or less independent protocols, each in a different layer (also called level). The lowest layer governs direct host-to-host communication between the hardware at different hosts; the highest consists of user applications. Each layer builds on the layer beneath it. For each layer, programs at different hosts use protocols appropriate to the layer to communicate with each other. TCP/IP has five layers of protocols; OSI has seven. The advantages of different layers of protocols is that the methods of passing information from one layer to another are specified clearly as part of the protocol suite, and changes within a protocol layer are prevented from affecting the other layers. This greatly simplifies the task of designing and maintaining communication programs. LAN (Local Area Network) is a data network intended to provide the ability to connect all the computers, terminals and peripherals etc on a single site or an area of only a few square kilometres or less. Because the network is known to cover only a small area, optimizations can be made in the network signal protocols that permit data rates up to 100Mb/s. LOCAL CALLING AREA The area, consisting of one or more exchanges within which calls may be made without a toll charge. LONG DISTANCE CALL Any call beyond the local calling area. MAC ADDRESS The hardware address of a device connected to a shared media, typically Ethernet. MASK See ADDRESS MASK above. MODEM (Modulator/Demodulator) is a devices that convert a digital signal to an analog signal. Modems allow computer data (digital) to be transmitted over voice-grade telephone lines (analog). NAT Network Address Translation - also called IP masquerade, is a process of translating the source header of IP packets so they will be routable across wide area networks. This allows communication to be established by a device using a translated address but prevents external sources from establishing communication with the device using a translated address. In other words, only outbound connections may be established. 134 T E L C O M R E S E A R C H T R - 2 1 0 0 D A T A B U F F E R NETWORK A collection of wires, fibres, and equipment used to effect communication between a number of nodes (usually computers). NTP (Network Time Protocol) is a protocol that assures accurate local timekeeping with reference to radio and atomic clocks located on the Internet. This protocol is capable of synchronizing distributed clocks within milliseconds over long time periods. It is defined in STD 12, RFC 1119. OCTET An octet is 8 bits. This term is used in networking, rather than byte, because some systems have bytes that are not 8 bits long. PABX (Private Automated Branch Exchange) also commonly called a "PBX", or "Telephone Switch". PACKET A packet is a basic communication data unit used when transmitting information from one computer to another. The maximum length of a packet depends on the communication medium. As an example, in Ethernet networks the maximum length is1500 bytes. A data packet can be divided into two parts: the header part and the data part. The header contains information needed for communication between nodes; the data is the body of the packet that is ultimately received by the application. PBX (Private Branch Exchange) switching system of business or other organization that serves its telephones over a common group of lines from the central office. PEG COUNT A count of the number of times a circuit or piece of apparatus is used in a given period. PING (Packet InterNet Groper) is a program used to test if destinations can be reached by sending them an ICMP echo request and waiting for a reply. The term is used also as a verb: "Ping host X to see if it is up!" PORT A port is a 16-bit number (the allowed range being 1 through 65535) used by the TCP and UDP protocols at the transport layer. Ports are used to address applications (services) that run on a computer. If there was only a single network application running on the computer, there would be no need for port numbers and the IP address only would suffice for addressing services. However, several applications may run at once on a particular computer and we need to differentiate among them. This is what port numbers are used for. Thus, a port number may be seen as an address of an application within the computer. 135 T E L C O M R E S E A R C H T R - 2 1 0 0 D A T A B U F F E R PROTOCOL A mutually determined set of formats and procedures governing the exchange of information between systems. PROTOCOL STACK A layered set of protocols which work together to provide a set of network functions. PROXY ARP A technique employed by routers to obtain IP datagrams for forwarding. The router answers ARP requests for non-local IP address with its own hardware address, ensuring that all datagrams for that IP address will be sent to the router. RARP (Reverse Address Resolution Protocol) is a network layer protocol allowing hosts to discover their own IP address from a hardware address REMOTE ACCESS The ability to access a computer from a location outside the building in which it is housed. Remote access requires communications hardware, software, and actual physical links, although this can be as simple as common carrier (telephone) lines or an Internet connection. RD (Receive Data) The RS-232 line that actually carries the incoming data. RFC (Request For Comments) is the document series, begun in 1969, which describes the Internet suite of protocols and related experiments. Not all (in fact very few) RFCs describe Internet standards, but all Internet standards are written up as RFCs. The RFC series of documents is unusual in that the proposed protocols are forwarded by the Internet research and development community, acting on their own behalf, as opposed to the formally reviewed and standardized protocols that are promoted by organizations such as CCITT and ANSI. They are available at http://www.rfc-editor.org/rfc-index.html RI (Ring Indicator) A control signal used by a modem to indicate the occurrence of a telephone ring signal. Used by auto-answer modems so that they know when to "answer" the incoming call. RJ-45 Standard connectors used for unshielded twisted-pair cable. ROUTING The function of determining the route a packet should take from a subnet to get to another subnet. A component function of all internetworks, or internets. It is the process of delivering a message across a network or networks by the most appropriate path. 136 T E L C O M R E S E A R C H T R - 2 1 0 0 D A T A B U F F E R RS-232C A standard, established by the Electronic Industries Association (EIA) in 1969 to define the electrical characteristics for connecting Data Terminal Equipment (DTE) and Data Circuit Terminating Equipment (DCE). The standard dictates the voltage ranges, control signals and pin assignments. A typical example would be a connection between a PC (a DTE device) and a modem (a DCE device). The RS-232 standard is the most commonly used serial interface today. RTS (Ready To Send) A control signal sent by a DTE device to a DCE device to inform the DCE that the DTE has data ready to send. SERIAL DATA Data that is transmitted sequentially, one bit at a time. For example, if a byte consists or eight bits, a parallel link would send one byte (all eight bits) simultaneously over eight data lines. A serial transmission would send that same byte one bit at a time, over a single data line. SERIAL PORT A port that sends and receives serial data. Most PC's are equipped with one or two serial ports. SERVER A provider of resources (e.g. file servers and name servers). START BIT Because asynchronous communications use no clock to regulate data transmission, start bits and stop bits are used to signal the beginning and end of a byte. STOP BITS Because asynchronous communications use no clock to regulate a transmission, start bits and stop bits are used to signal the beginning and end of a byte. SUBNET A portion of a network, which may be physically independent, that shares a network address with other portions of the network and is distinguished by a subnet number. Subnets are created and supported by the use of routing. SUBNET ADDRESS The subnet portion of an IP address. TCP/IP Transmission Control Protocol/Internet Protocol is a combined set of protocols that performs the transfer of data between two computers. TCP monitors and ensures correct transfer of data. IP receives the data from TCP, breaks it up into packets, and ships it off to a network within the Internet. TCP/IP is also used as a name for a protocol suite that incorporates these functions and others. 137 T E L C O M R E S E A R C H T R - 2 1 0 0 D A T A B U F F E R TCP (Transmission Control Protocol) An Internet Standard transport layer protocol defined in STD 7, RFC 793. It is connection-oriented and stream-oriented, as opposed to UDP. See also: connection-oriented, stream-oriented, User Datagram Protocol. TD (Transmit Data) The RS-232 line that actually carries the outgoing data from one device to another. TELNET A portion of the TCP/IP suite of software protocols that handles terminals. Among other functions, it allows a user to log in to a remote computer from the user's local computer. TOPOLOGY A network topology shows the computers and the links between them. A network layer must stay abreast of the current network topology to be able to route packets to their final destination. TWISTED PAIR Network cabling that consists of four pairs of wires that are manufactured with the wires twisted to certain specifications. Available in shielded and unshielded versions. SWITCHED NETWORK Nationwide complex of diversified channels and reliable switching equipment that automatically routes communications to their destinations. UDP (User Datagram Protocol) An Internet Standard transport layer protocol defined in STD 6, RFC 768. It is a connectionless protocol that adds a level of reliability and multiplexing to IP. WAN (Wide Area Network) A network connecting computers within very large areas, such as states, countries, and the world. 138 T E L C O M R E S E A R C H T R - 2 1 0 0 D A T A B U F F E R Index AC......................................................................................................................................... 6, 7, 9, 125, 126 Access ............................................................................................................................................ 1, 83, 115 Accessories .................................................................................................................................. 7, 9, 67, 83 Account....................................................................................................................................................... 75 Accounts ............................................................................................................................................... 30, 58 ACT........................................................................................................................................... 5, 6, 126, 127 Address.................4, 21, 23, 24, 35, 49, 51, 67, 68, 70, 71, 83, 84, 85, 88, 93, 94, 113, 119, 129, 134, 136 Addresses................................................................................................................... 24, 35, 52, 67, 68, 119 Ambient..................................................................................................................................................... 126 ARP Command........................................................................................................................................... 84 ARPANET................................................................................................................................. 24, 33, 67, 89 ASCII ............................................................................ 13, 27, 28, 69, 88, 91, 104, 105, 107, 109, 111, 120 Baud ......................................................................................... 3, 13, 15, 18, 19, 28, 87, 112, 119, 120, 126 BAUD_RATE .............................................................................................................................................. 92 BE ............................................................................................................................................................. 107 BOUND................................................................................................................................................. 71, 93 Browser................................................................................................................................. 4, 25, 57, 85, 98 Cancel................................................................................................................................................... 20, 46 Capacity...................................................................................................................................... 71, 110, 112 CAUTION!............................................................................................................................................. 56, 57 CDR ........................................................................................................................................................ 3, 13 CHARGEN...................................................................................................................... 4, 5, 26, 70, 72, 120 CL ............................................................................................................................................................. 108 Collecting Data ........................................................................................................................................... 87 COM ................................................................................................................................. 9, 15, 24, 125, 132 Command Sets ........................................................................................................................................... 91 Commands ...........................3, 4, 29, 40, 70, 71, 87, 88, 91, 92, 93, 96, 102, 104, 106, 107, 109, 111, 121 CONTROL PORT ............................................................................... 1, 3, 9, 15, 20, 58, 76, 91, 92, 96, 108 Control Port Statistics ........................................................................................................................... 37, 71 CR/LF ..................................................................................................................................... 91, 92, 94, 109 Ctrl ...................................................................................................................... 6, 40, 69, 92, 107, 116, 127 DA............................................................................................................................................................. 109 Data Collection ................................................................................................................. 13, 27, 28, 72, 120 Data Communications Equipment .......................................................................................................... 6, 10 Data Memory ............................................................................................................................................ 106 DATA PORT ............................................................................................................... 4, 20, 76, 92, 108, 109 Data Port Wiring ................................................................................................................................. 10, 116 Data Retrieval .........................................................6, 26, 37, 70, 71, 72, 87, 88, 91, 97, 107, 109, 120, 121 Data Retrieval Port Statistics...................................................................................................................... 37 Data Source........................................................................................................................ 3, 10, 13, 58, 116 Data Terminal Equipment........................................................................................... 6, 9, 10, 131, 132, 137 databuffers.com ................................................................................................................................ 2, 4, 125 DB............................................................................................................................................................. 108 DC............................................................................................................................................. 6, 9, 125, 126 Debugging .................................................................................................................................................. 20 Default .................................................................................................. 24, 25, 26, 70, 71, 93, 106, 112, 119 Delete ..................................................................................................................... 34, 70, 90, 107, 113, 122 DHCP................4, 5, 21, 22, 23, 37, 38, 47, 49, 55, 59, 70, 71, 78, 93, 94, 95, 96, 113, 115, 120, 126, 131 Dimensions ............................................................................................................................................... 126 DISABLED .................................................................................................................................... 26, 93, 120 139 T E L C O M R E S E A R C H T R - 2 1 0 0 D A T A B U F F E R Disconnect .................................................................................................................................................. 18 DNS Server..................................................................................... 22, 24, 59, 70, 93, 94, 95, 113, 119, 120 Domain ................................................................................................... 24, 33, 70, 71, 89, 93, 95, 120, 132 Doorbell ........................................................................................................................................................ 4 D-SUB....................................................................................................................................................... 126 DU..................................................................................................................................................... 108, 109 Duplex..................................................................................................................................... 54, 71, 77, 119 ECHO ........................................................................................................... 4, 5, 26, 35, 70, 72, 97, 98, 120 Electrical ....................................................................................................................................................... 1 Enable......................................................................................... 22, 23, 29, 35, 55, 112, 113, 120, 121, 123 ESC .......................................................................................................................................................... 109 Ethernet Address ........................................................................................................................................ 68 Ethernet Configuration.................................................................................................................. 54, 77, 119 Ethernet Connection ............................................................................................................................. 10, 21 Ethernet Port............................................................................................................................... 3, 10, 21, 83 Exit .......................................................................................................................................... 19, 21, 47, 112 Extended......................................................................................................................... 54, 71, 77, 116, 119 Factory Default ................................................................................................................................. 106, 119 firewall................................................................................................................................................... 52, 69 Flash ......................................................................................................................................... 2, 14, 21, 126 Flash Program Memory Update ................................................................................................................. 43 Flash Update ................................................................................................ 21, 41, 43, 44, 45, 46, 107, 116 Format .................................................................................................................................. 28, 71, 112, 121 Found.......................................................................................................................................................... 85 FTP Upload....................................................................................................... 33, 61, 87, 89, 100, 101, 122 Gateway............................................................................................................................ 24, 70, 71, 93, 119 GENERATOR ....................................................................................................................................... 96, 97 GET ............................................................................................................................................................ 91 Hardware ............................................................................................................................................ 71, 125 Home .......................................................................................................................................................... 53 Host .................................................................................................................... 22, 24, 47, 70, 95, 120, 131 HTTP ................................................................................ 4, 5, 25, 51, 71, 98, 103, 115, 120, 121, 126, 133 Humidity............................................................................................................................................ 125, 126 HyperACCESS ..................................................................................................................................... 67, 69 HyperTerminal ...................................................................................................................................... 67, 69 ID ........................................................................................................................ 36, 108, 111, 112, 115, 126 IM .......................................................................................................................................... 69, 88, 107, 108 INIT ............................................................................................................................................................. 93 Input.................................................................................................................................................... 13, 126 Installation............................................................................................................................. 9, 15, 21, 22, 83 Interactive Monitor .................................................................................................. 67, 85, 88, 107, 108, 110 Internet Protocol ............................................................................................................... 4, 28, 93, 133, 137 Introduction ................................................................................................................................................... 1 IP Address ..........................................................21, 23, 24, 35, 51, 67, 68, 70, 71, 83, 88, 93, 94, 113, 119 IP Configuration ........................................................................................................................ 31, 56, 73, 93 IPCONFIG .................................................................................................................................................. 83 IPv4............................................................................................................................................................. 23 LAN ..................................................................................................................................................... 83, 134 Lease ........................................................................................................................................ 37, 59, 71, 93 LINK.............................................................................................................................. 5, 6, 10, 22, 126, 127 Linux ................................................................................................................................... 23, 51, 68, 83, 84 Logging ....................................................................................................................................................... 69 Logon.......................................................................................................................................................... 69 MAC .............................................................................................................................................. 83, 84, 134 Maintenance ......................................................................................................................................... 4, 109 Mask ................................................................................................................... 24, 35, 70, 71, 93, 119, 123 140 T E L C O M R E S E A R C H T R - 2 1 0 0 D A T A B U F F E R Memory............................................................................................................. 2, 21, 43, 106, 111, 115, 126 Menu................................................................................................................................... 16, 17, 41, 70, 72 MODEM ................................................................................................................................................ 9, 134 MR ............................................................................................................................................................ 108 Native.......................................................................................................................................................... 91 NetBIOS Name Resolution................................................................................................... 4, 35, 51, 68, 72 Network Finder ........................................................................................................................................... 47 Non-Contiguous Subnet Bits ................................................................................................................ 24, 36 NONE ......................................................................................................................................................... 93 OK......................................................................................................................................... 91, 94, 108, 109 Overview....................................................................................................................................................... 3 Password ..............................................................1, 5, 34, 52, 58, 59, 69, 70, 71, 75, 85, 90, 103, 121, 123 PBX....................................................................................... 3, 4, 6, 10, 13, 19, 28, 112, 113, 127, 131, 135 PC..................................................................................... 1, 9, 15, 18, 19, 22, 45, 87, 88, 92, 131, 132, 137 Pentium..................................................................................................................................................... 125 Performance and Statistics......................................................................................................................... 36 Ping................................................................................................................................... 22, 23, 72, 84, 135 PORT...................................................................... 1, 3, 4, 9, 15, 20, 58, 76, 91, 92, 96, 108, 109, 135, 137 Print ............................................................................................................................................................ 21 Program ....................................................1, 2, 4, 15, 17, 19, 20, 21, 43, 45, 67, 88, 91, 113, 115, 116, 125 RAM.................................................................................................................................................. 115, 125 RARP.............................................................................................................................................. 4, 49, 136 REBINDING................................................................................................................................................ 93 REBINDINGWAIT....................................................................................................................................... 93 REBOOTING .............................................................................................................................................. 93 REBOOTINGWAIT ..................................................................................................................................... 93 Record ............................................................................................................ 27, 28, 70, 105, 112, 120, 121 RENEWING ................................................................................................................................................ 93 RENEWINGWAIT ....................................................................................................................................... 93 REQUESTING ............................................................................................................................................ 93 REQUESTINGWAIT ................................................................................................................................... 93 Requirements ................................................................................................................................... 125, 126 Reserved IP Addresses For Private Networks ........................................................... 24, 51, 52, 67, 68, 119 Reverse ARP Configuration ....................................................................................................................... 83 RFCs........................................................................................................................................... 93, 132, 136 RH............................................................................................................................................................. 125 RJ-45 ................................................................................................................................ 6, 10, 11, 126, 136 RS-232C ..................................................................................................... 3, 10, 13, 28, 104, 120, 126, 137 Run ......................................................................................................................................... 6, 46, 115, 127 Samba .................................................................................................................................................. 51, 68 Save................................................................................................................................................ 16, 20, 76 SD..................................................................................................................................................... 108, 109 Secondary........................................................................................................... 24, 32, 70, 71, 93, 119, 122 SELECTING ............................................................................................................................................... 93 SELECTINGWAIT ...................................................................................................................................... 93 Serial Port Debugging ................................................................................................................................ 20 SET............................................................................................................................................................. 91 SM ............................................................................................................................................................ 109 Specifications................................................................................................................................ 1, 125, 126 Splash......................................................................................................................................................... 17 SS ............................................................................................................................................. 107, 109, 111 Standards ................................................................................................................................................... 93 Start ...................................................................................................................................................... 67, 83 State ..................................................................................................................................... 6, 13, 14, 71, 93 Status.......................................................................................................................... 4, 16, 20, 21, 106, 112 Subnet Mask....................................................................................................................................... 24, 119 141 T E L C O M R E S E A R C H T R - 2 1 0 0 D A T A B U F F E R SYN .......................................................................................................................................................... 107 TCP CHARGEN ........................................................................................................................... 26, 70, 120 TCP Configuration .......................................................................................................................... 57, 73, 96 TCP ECHO ................................................................................................................................... 26, 70, 120 TCP Parameters .................................................................................................................... 25, 57, 73, 120 TCP Ports .................................................................................................................................................. 25 TCP Security ............................................................................................................................................. 35 TCP Settings......................................................................................................................................... 25, 51 TCP Timeout........................................................................................................................... 25, 26, 70, 102 TCP/IP ....................................1, 28, 35, 63, 64, 70, 72, 74, 88, 95, 102, 104, 120, 123, 133, 134, 137, 138 TCP/IP Filtering ............................................................................................................................ 35, 70, 123 TCP/IP Security ................................................................................................. 35, 63, 64, 70, 74, 102, 123 telcomresearch.com ...................................................23, 24, 31, 33, 51, 68, 70, 71, 89, 93, 96, 98, 99, 121 Telnet Configuration ........................................................................................................... 5, 26, 69, 72, 121 Telnet Data Retrieval ................................................................................................ 87, 88, 91, 97, 107, 109 Telnet Interactive Monitor ......................................................................................... 5, 69, 88, 103, 107, 108 Telnet Protocol.................................................................................................................................. 4, 67, 97 Temperature ..................................................................................................................................... 125, 126 Tips ............................................................................................................................................................. 17 Transmit.................................................................................................................................. 9, 10, 109, 138 Trouble Shooting ...................................................................................................................................... 115 UART .......................................................................................................................................................... 37 Unix................................................................................................................................................. 22, 83, 84 User Name......................................................................5, 34, 52, 59, 69, 70, 71, 75, 85, 90, 103, 121, 122 Users Security .................................................................................................................................... 30, 102 Version.................................................................................................................................... 63, 71, 79, 113 Vibration.................................................................................................................................................... 126 Voltage.............................................................................................................................................. 125, 126 WARNING! ......................................................................................................................................... 25, 126 WEB Browser ....................................................................................................................... 4, 25, 57, 85, 98 WEB Configuration ......................................................................................................................... 51, 85, 88 WEB Interface......................................................................................................................................... 5, 85 WEB Server ............................................................................................................................................ 1, 51 WEB Site .......................................................................................................................................... 4, 43, 53 Weight....................................................................................................................................................... 126 Windows Configuration Program....................................1, 2, 4, 15, 17, 19, 20, 43, 45, 67, 88, 91, 116, 125 Windows Network ........................................................................................................................... 22, 51, 68 Windows Printing ........................................................................................................................................ 21 WINIPCFG.................................................................................................................................................. 83 WTI CRB .................................................................................................................................. 109, 110, 111 XP ....................................................................................................................................................... 67, 125 XT ............................................................................................................................................................. 109 142