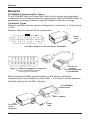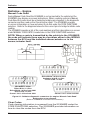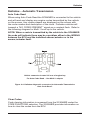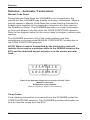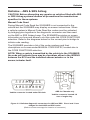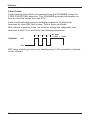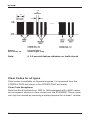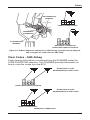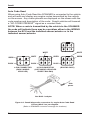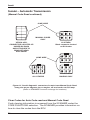
1
SEE APPLICABLE COVERAGE SHEETS FOR VEHICLE APPLICATIONS Hyundai, Daewoo, Kia, Daihatsu, Subaru and Suzuki Vehicle Communication Manual November 2010 Use in conjunction with the applicable Scanner User’s Reference Manual and Diagnostic Safety Manual. Before operating this unit, please read this manual and any applicable Scanner User’s Manual. Safety Notices..................................... Refer Diagnostic Safety Manual Quick Reference Contents Listing .... page 5 Using the Scanner Module ................ Refer to relevant User's Manual for more information Hyundai, Daewoo, Kia, Daihatsu, Subaru and Suzuki Vehicle Communication Manual November 2010 BEFORE OPERATING THIS UNIT, PLEASE READ THIS MANUAL CAREFULLY, ALSO PAY PARTICULAR ATTENTION TO THE SAFETY PRECAUTIONS IN THIS MANUAL AND THE DIAGNOSTIC SAFETY MANUAL. The information, specifications, and illustrations in this manual are based on the latest information available at the time of publication. The SCANNER manufacturer and the vehicle manufacturers reserve the right to make equipment changes at any time without notice. Copyright © 2010 Snap-on Technologies Inc. Quick Reference Contents Detailed Contents are at the beginning of each part Part 1 — Vehicle Identification..............................................................6 Gives you general information on vehicle identification. Information on SCANNER startup troubleshooting also is included. Part 2 — Vehicle Connection and Diagnostics...................................10 Daewoo........................................................................................................ 12 Daihatsu....................................................................................................... 18 Hyundai........................................................................................................ 27 Kia................................................................................................................. 41 Subaru.......................................................................................................... 48 Suzuki........................................................................................................... 70 Appendix B – Vehicle does not communicate with SCANNER..........80 Part 1 - Vehicle Identification Contents Vehicle Identification..............................................................................6 Entering the Vehicle Identification........................................................7 System Selection....................................................................................8 SCANNER Connection Message.............................................................8 After you select this software, the SCANNER then requires you to enter the vehicle ID into the SCANNER, this done by selecting the manufacturer, the year of the vehicle, model and engine displacement. Pressing N at any point in the first few steps lets you back up to the previous step to correct a choice. Pressing N at the final step will return to the start of the identification process. ‘AUSTRALIA’ is for vehicles that are manufactured for the Australian market and ‘USED IMPORTS’ refers to vehicles that were originally sold new in Japan and have since been exported to other countries, including Australia and New Zealand. The SCANNER does not list every model that is available but does cover the more popular vehicles that are available. CAUTION: Although every effort has been made to provide accurate information, due to the many models available and the lack of information available for these vehicles the information that is contained in the SCANNER for these Used Import vehicles may not always be accurate for the particular model being tested. Vehicle Identification Entering The Vehicle Identification After you select the vehicle manufacturer, the screen displays the following message (example): SELECT MODEL YEAR MODEL: MODEL YEAR: 1989 ENGINE: Move the thumbpad or thumbwheel up or down until the correct year for the vehicle you are testing is displayed. Then press Y to enter the model year. The display now shows the model year that you selected in the previous step and asks you to select the model name: SELECT MODEL TYPE MODEL: LANTRA MODEL YEAR: 1992 ENGINE: Move the thumbpad or thumbwheel up or down and press Y to select the model name. The display now shows the model name that you selected in the previous step and asks you to select the engine displacement: SELECT ENGINE TYPE MODEL: LANTRA MODEL YEAR: 1992 ENGINE: 1.6L Move the thumbpad or thumbwheel up or down and press Y to select the engine displacement. The display now shows the engine that you selected in the previous step. Transmission and Air Conditioning Information At the end of vehicle identification, the SCANNER may display the complete model and engine identification, similar to this: SELECT VEHICLE OPTIONS: > A/T WITH A/C A/T WITHOUT A/C M/T WITH A/C M/T WITHOUT A/C Vehicle Identification Scroll arrow to select correct option of vehicle being tested and press Y. NOTE: A/T = Automatic Transmission M/T = Manual Transmission A/C = Air Conditioning If the identification is correct, press Y to store the identification in memory. If the identification is not completely correct, press N to return to the start of the identification steps. System Selection For some vehicles, the SCANNER provides engine and transmission test capabilities. After you press Y to store the identification for these vehicles, the screen will display this message: SELECT SYSTEM ENGINE AUTO TRANS ANTI LOCK BRAKES AIRBAG (SRS) Move the thumbpad or thumbwheel up or down to move the cursor to the desired system and press Y. The above display does not appear for vehicles without transmission tests. SCANNER Connection Message After you press Y to store the vehicle identification or after you select the engine or transmission system for testing, the screen display tells you how to connect the SCANNER to the vehicle. For example: CONNECT HYUNDAI-2 TO 12-PIN CONNECTOR LOCATED IN FUSE BOX. PRESS Y TO CONTINUE. After the SCANNER is connected to the vehicle, press Y to proceed to the MAIN MENU. PAGE INTENTIONALLY LEFT BLANK Part 2 — Vehicle Connection and Diagnostics Contents Connecting the SCANNER to the vehicle ........................................ 11 Note on Functional Tests .................................................................. 11 Important Information on Graph Mode ............................................ 11 Daewoo – ........................................................................................... 12 Connector Types................................................................................ 12 Engine................................................................................................ 13 Auto Transmission............................................................................. 15 Daihatsu – .......................................................................................... 18 Used Import Vehicles . ...................................................................... 18 Connector Types . ............................................................................. 19 Code Types ....................................................................................... 20 Engine................................................................................................ 21 Auto Transmission............................................................................. 23 ABS & SRS Airbag (refer Caution note on page 16) ....................... 25 Hyundai – ........................................................................................... 27 Connector Types................................................................................ 27 Engine ............................................................................................... 28 Auto Transmission ............................................................................ 34 ABS ................................................................................................... 36 SRS Airbag (refer Caution note on page 25) ................................... 37 Special Notes on Vehicle Communications ..................................... 39 Kia – ................................................................................................... 41 Connector Types . ............................................................................. 41 Engine ............................................................................................... 42 Auto Transmission ............................................................................ 46 Special Notes on Vehicle Communications ..................................... 47 Subaru – . ........................................................................................... 48 Used Imports .................................................................................... 48 Communication Types ...................................................................... 48 Important Notes on Subaru Live Data .............................................. 49 SCANNER Connection ..................................................................... 50 Test Menu for Live Data Models ....................................................... 52 Engine – Non Live Data .................................................................... 59 Auto Transmission ............................................................................ 64 ABS ................................................................................................... 67 SRS Airbag (refer Caution note on page 46) ................................... 68 Suzuki – ............................................................................................. 70 Used Import Vehicles . ...................................................................... 70 Engine................................................................................................ 73 Auto Transmission ............................................................................ 75 ABS & SRS Airbag (refer Caution note on page 68) ....................... 77 10 Vehicle Connection & Diagnostics Connecting the SCANNER to the Vehicle This section of the manual gives you drawings of the vehicle diagnostic connectors and tells you which SCANNER adaptor to use. The carmakers are listed alphabetically for quick-reference. After you identify the vehicle, the SCANNER display then tells you where to find the diagnostic connector and which vehicle adaptor to use. CAUTION: Ensure vehicle identification as entered on the screen is same as the vehicle connected to the SCANNER. Ensure SCANNER adaptor is connected to correct vehicle pins as failure to observe above can damage the diagnostic equipment and the cost of repairs is not covered by warranty. Note on Functional Tests Functional tests are not applicable to Ethos software. Important Information on Graph Mode Note that not all vehicle systems will be able to be displayed in the Graph Mode due to the communication type. It may also take several attempts to establish communication in Graph Mode. This is not a fault of the scan tool or vehicle. 11 Daewoo Daewoo SCANNER Communication Types The SCANNER has live Codes and Data for the engine and automatic transmissions on Daewoo vehicles supported by the SCANNER. Refer to applicable coverage sheets for specific Daewoo vehicle coverage. Connector Types Daewoo vehicles use two types of diagnostic connectors, a 12 pin and a 16 pin. Daewoo refer to these as ALDL connectors. Power lead Use GM-1 adaptor as directed by the SCANNER. Use DL-16 adaptor. Use key as directed by SCANNER. Figure 1:1 Daewoo diagnostic connectors (Refer to SCANNER connector message for locations) When testing the Matiz engine system or the Espero automatic transmission a new adaptor is used, DAE-1. It is used in series between the data cable and the GM-1 adaptor. To SCANNER data cable DAE-1 adaptor To vehicle 12-pin connector 12 GM-1 Power lead Daewoo Daewoo – Engine Codes & Data The SCANNER will display engine data and any engine codes transmitted by the vehicle on the screen. Any codes that are present in the ECU are displayed at the top of the on-screen data list, if there are no codes present the SCANNER will display (NO CODES PRESENT). The codes displayed may either be current, intermittent or from a previous fault. NOTE: When a code is transmitted by the vehicle to the SCANNER the code will indicate there may be a problem either in the WIRING between the ECU and the indicated sensor/actuator or in the indicated sensor/actuator. Sample of a screen display with no codes present. RPM____825 O2(mV)___898 INTEGRATR__102 ** CODES & DATA. OK TO DRIVE. ** (NO CODES PRESENT) OPEN/CLSD LOOP__CLSD O2 STATUS__RICH Sample of a screen display with codes present. RPM____825 O2(mV)___898 INTEGRATR__102 ** CODES & DATA. OK TO DRIVE. ** 22 TPS LOW 33 MAP SENSOR HIGH OPEN/CLSD LOOP__CLSD O2 STATUS__RICH 13 Daewoo Daewoo – Engine Matiz The test menu for the Matiz appears as such: TEST MENU > CODES ONLY DATA ONLY CODES ONLY This test menu heading is for displaying the ECU codes. When selected the SCANNER will request codes from the Engine ECU. Any codes displayed may be either currently active or may have been previously set. When these codes are displayed only the codes set in the ECU are displayed on screen. When a code is transmitted by the vehicle to the SCANNER the code will indicate there may be problem either in the WIRING between the ECU and the indicated sensor/actuator or in the indicated sensor/ actuator. These codes can be cleared by selecting CLEAR CODES from the SCANNER exit menu. See Clear Codes later in this section. DATA ONLY This test menu selection will display ECU live data only (no codes will be displayed). Some parameters may show a value when the engine is not running for example RPM, this is a normal function and does not indicate a fault in the vehicle or SCANNER. When the vehicle is running the value should read correctly. See the Parameter Listing section in this Manual for descriptions and explanations of the parameters. NOTE: For Leganza vehicles fitted with the 2.2L engine refer to the OBD-II and EOBD Vehicle Communication Manual for engine testing information. Clear Codes Clear codes are usually available on the data list exit menu for all Daewoo engines but if not displayed then remove a battery terminal for a period of at least 1 minute. NOTE: When removing battery terminals it is good practice to check radio stations settings and for security system operation prior to terminal removal. 14 Daewoo Daewoo – Automatic Transmissions Codes & Data The SCANNER will display automatic transmission data and any automatic transmission codes transmitted by the vehicle on the screen. Any codes present are displayed at the top of the on-screen data list, if there are no codes present the SCANNER will display (NO CODES PRESENT). The SCANNER can display “CURRENT CODES” or “HISTORICAL CODES” for the automatic transmissions except for the Espero automatic transmission. Current Codes, or hard codes, are codes that are present at the time of testing - the fault is still there. Historical Codes, or soft codes, are codes that have been registered in the past but are not present at the time of testing – either the code has been set by an intermittent fault or was repaired previously and the code not cleared. Current codes are displayed first and Historical codes second. Espero Only Notes Codes & Data communication with the Espero auto trans takes longer to establish than other model Daewoo’s, this is a characteristic of the TCM (Transmission Control Module) communication type and is not indicative of a problem with the vehicle or the SCANNER. The Espero transmission does not distinguish between a current code and a historical code. While the SCANNER is communicating with the Espero if a code is set the SCANNER will not beep. NOTE: When a code is transmitted by the vehicle to the SCANNER the code will indicate there may be a problem either in the WIRING between the ECU and the indicated sensor/actuator or in the indicated sensor/actuator. Sample of a screen display with no codes present. ENG RPM____1147 VEH SPEED (KPH)___0 ** CODES & DATA. OK TO DRIVE. ** (NO CODES PRESENT) INPUT RPM______730 OUTPUT RPM______0 Sample of a screen display with Current code only set. ENG RPM____1147 VEH SPEED (KPH)___0 ** CODES & DATA. OK TO DRIVE. ** P1791 THROTTLE POSITION SIGNAL MALF INPUT RPM______730 OUTPUT RPM______0 15 Daewoo Sample of a screen display with Current code and Historical code set. ENG RPM____1147 VEH SPEED (KPH)___0 ** CODES & DATA. OK TO DRIVE. ** P1791 THROTTLE POSITION SIGNAL MALF HC HISTORICAL CODES FOLLOW P1791 THROTTLE POSITION SIGNAL MALF INPUT RPM______730 OUTPUT RPM______0 NOTE: line 4 indicates “HC HISTORICAL CODES FOLLOW”, any codes displayed after this are Historical Codes. Clear Codes Clear codes is available on all supported Daewoo automatic transmissions, it is accessed from the Codes & Data exit menu. NOTE: Current Codes can only be cleared by rectifying the fault that has set the code. Special note on vehicle communication If the SCANNER loses communication with a vehicle, when N is pressed to exit back to the vehicle ID, the MODIS will beep until N or Y is pressed. This is normal operation for the SCANNER module on Daewoo vehicles. 16 PAGE INTENTIONALLY LEFT BLANK 17 Daihatsu Daihatsu CAUTION FOR ABS AND SRS SYSTEMS Before attempting any repairs on vehicles fitted with ABS or SRS Airbag systems observe all precautions the manufacturer specifies for these systems. Used Import Vehicles Used Import vehicles are vehicles that were sold new in Japan and have since been exported to other countries including Australia and New Zealand. The SCANNER does not list every model that is available but does cover the more popular vehicles that are available. CAUTION: Although every effort has been made, due to the many models available and the lack of information available for these vehicles, the information that is contained in the SCANNER for these Used Import vehicles may not always be accurate for the particular model being tested. NOTE: For the Used Import model Delta Wide see the Toyota section of the latest Reference Manual containing Toyota information. 18 Daihatsu SCANNER Communication Types The SCANNER supports Auto Code Read for the Engine and Automatic Transmission systems on some vehicles, all other systems are Manual Code Read including all ABS and SRS Airbag systems. The SCANNER will indicate which type of code reading will apply to the system you are testing. Connector Types Daihatsu vehicles use three types of diagnostic connectors, a 6 pin, a 16-pin and a 17-pin connector. Side power Use Multi-1 adaptor Side power Toyota-1 adaptor For Manual Code Reading. Figure 2:1 Daihatsu diagnostic connectors. 19 Daihatsu Daihatsu – Code Types There are two different types of codes output Daihatsu Engine, Auto Trans, ABS and SRS Airbag systems, they are classed as type 09 and type 10. Type 09 flashes a 2-digit (tens/ones) CHECK ENGINE lamp code. The lamp flashes each digit as 0.5-second pulses, with 1.5 secnds between digits. If more than one code is present, the light will remain off for 2.5 seconds and then indicate the next code. After all codes have been displayed, there is a 4.0-second pause and the sequence is repeated. Continuous flashing indicates that the system is normal, and no trouble codes are present. CODE TYPE 9 Used on: Daihatsu Pattern:10’s and 1’s Read codes on: CHECK ENGINE lamp/“Easy” lamp or SRS lamp Start codes by: Connect vehicle diagnostic connector terminals together and turn ignition on When done: Turn ignition off, disconnect connectors, clear codes Type 10 flashes the CHECK ENGINE lamp a number of times equal to the trouble code (straight count), every 4.0 seconds. If more than one code is present, the light will remain off for 2.5 seconds and then indicate the next code. After all codes have been displayed, there is a 4.0-second pause and the sequence is repeated. A code 1 indicates system normal, no trouble codes present. CODE TYPE 10 Daihatsu Straight count CHECK ENGINE lamp Connect vehicle diagnostic connector terminals together and turn ignition on When done: Turn ignition off, disconnect connectors, clear codes Code 1 is pass code (system OK). Used on: Pattern: Read codes on: Start codes by: 20 Daihatsu Daihatsu – Engine Auto Code Read When using Auto Code Read the SCANNER is connected to the vehicle and will read and display any engine codes transmitted by the vehicle on the screen. Any codes present are displayed on the screen with the code number and description of the code. Daihatsu vehicles will transmit a “NO CODES PRESENT” signal as a constant flash. NOTE: When a code is transmitted by the vehicle to the SCANNER the code will indicate there may be a problem either in the WIRING between the ECU and the indicated sensor/actuator or in the sensor/actuator itself. WHITE BLACK Side power s s s GREEN Use Multi-1 adaptor Connect Multi-1 adaptor like this Side power Vehicle connector located LH side of engine bay Toyota-1 adaptor Figure 2:2 Daihatsu diagnostic connectors for engine ‘Auto Code Read’. 21 Daihatsu Daihatsu – Engine Manual Code Read During Manual Code Read the SCANNER is not connected to the vehicle but the SCANNER may display on-screen instructions. When a vehicle system is Manual Code Read the codes must be activated by bridging pins together in the diagnostic connector and then read on the Check Engine Lamp. The SCANNER provides on screen information on how and where to do this under the CODE FUNCTIONS selection. Refer to the diagrams below for the correct pins to bridge to initiate code reading. The SCANNER provides a list of the code numbers and their descriptions on screen under MANUAL CODE ENTRY, located also in the CODE FUNCTIONS selection. NOTE: When a code is transmitted by the vehicle to the SCANNER the code will indicate there may be a problem either in the WIRING between the ECU and the indicated sensor/actuator or in the sensor/actuator itself. Sirion M100 1.0 litre to 2000 Applause A101B 1.6 litre Terios J100 1.3 litre YRV M201 1.3 litre Sirion M101 1.3 litre Sirion M100 1.0 litre from 2001 Terios J102 1.3 litre Cuore L701 1.0 litre from 2001 Cuore L701 1.0 litre to 2000 Figure 2:3 Daihatsu diagnostic connectors for engine ‘Manual Code Read’. Bridge pins as per diagram. (Refer to SCANNER for location of connector.) Clear Codes Code clearing information is accessed from the SCANNER under the CODE FUNCTIONS selection. The SCANNER provides information on how to clear the codes from the ECU. 22 Daihatsu Daihatsu – Automatic Transmission Auto Code Read When using Auto Code Read the SCANNER is connected to the vehicle and will read and display any engine codes transmitted by the vehicle on the screen. Any codes present are displayed on the screen with the code number and description of the code. Daihatsu vehicles will transmit a “NO CODES PRESENT” signal as a constant flash. Refer to the following diagram for Multi-1 hook up to the vehicle. NOTE: When a code is transmitted by the vehicle to the SCANNER the code will indicate there may be a problem either in the WIRING between the ECU and the indicated sensor/actuator or in the sensor/actuator itself. Vehicle connector located LH rear of engine bay For Auto Code Read – Use Multi-1 adaptor Figure 2:4 Daihatsu diagnostic connector for Automatic Transmission ‘Auto Code Read’. Clear Codes Code clearing information is accessed from the SCANNER under the CODE FUNCTIONS selection. The SCANNER provides information on how to clear the codes from the ECU. 23 Daihatsu Daihatsu – Automatic Transmission Manual Code Read During Manual Code Read the SCANNER is not connected to the vehicle but the SCANNER may display on-screen instructions. When a vehicle system is Manual Code Read the codes must be activated by bridging pins together in the diagnostic connector and then read on the Overdrive 4 Lamp. The SCANNER provides on screen information on how and where to do this under the CODE FUNCTIONS selection. Refer to the diagram below for the correct pins to bridge to initiate code reading. The SCANNER provides a list of the code numbers and their descriptions on screen under MANUAL CODE ENTRY, located also in the CODE FUNCTIONS selection. NOTE: When a code is transmitted by the vehicle the code will indicate there may be a problem either in the WIRING between the ECU and the indicated sensor/actuator or in the sensor/actuator itself. Figure 2:4a Daihatsu diagnostic connector for Auto Trans ‘Manual Code Read’. Bridge pins as per diagram. (Refer to screen for location of connector.) Clear Codes Code clearing information is accessed from the SCANNER under the CODE FUNCTIONS selection. The SCANNER provides information on how to clear the codes from the ECU. 24 Daihatsu Daihatsu – ABS & SRS Airbag CAUTION: Before attempting any repairs on vehicles fitted with ABS or SRS Airbag systems observe all precautions the manufacturer specifies for these systems. Manual Code Read During Manual Code Read the SCANNER is not connected to the vehicle but the SCANNER may display on-screen instructions. When a vehicle system is Manual Code Read the codes must be activated by bridging pins together in the diagnostic connector and then read on the ABS or SRS Airbag Lamp. The SCANNER provides on screen information on how and where to do this under the CODE FUNCTIONS selection. Refer to the diagrams below for the correct pins to bridge to initiate code reading. The SCANNER provides a list of the code numbers and their descriptions on screen under MANUAL CODE ENTRY, located also in the CODE FUNCTIONS selection. NOTE: When a code is transmitted by the vehicle to the SCANNER the code will indicate there may be a problem either in the WIRING between the ECU and the indicated sensor/actuator or in the sensor/actuator itself. Vehicle connector located under RH dash ABS for Charade only Vehicle connector located LH rear of engine bay Figure 2:3 Daihatsu diagnostic connectors for ABS and SRS. Pins 4 and 13 are bridged for both ABS and SRS codes. (Refer to screen message for location of connector.) 25 Daihatsu Clear Codes Code clearing information is accessed from the SCANNER under the CODE FUNCTIONS selection. The SCANNER provides information on how to clear the codes from the ECU. Later model vehicles require a bridging sequence of diagnostic terminals to clear SRS fault codes. This is done as follows. With vehicle’s ignition in the ‘on’ position bridge the diagnostic test terminals 4 and 13 on and off in the following sequence: TERMINAL All gaps 1.0 sec. ± .4 sec. ON OFF SRS lamp should go from on to flashing every 0.25 seconds to indicate codes cleared. 26 Hyundai Hyundai CAUTION FOR ABS AND SRS SYSTEMS Before attempting any repairs on vehicles fitted with ABS or SRS Airbag systems observe all precautions the manufacturer specifies for these systems. SCANNER Communication Types The SCANNER supports live Codes and Data for most Engine, Automatic Transmission, ABS and SRS Airbag systems on Hyundai vehicle systems that are supported by the SCANNER. There are some exceptions to this: The screen messages will indicate which systems are Auto Code Read or Manual Code Read. The screen message will also indicate if a system is not supported on that particular model. NOTE: Not every vehicle is fitted with every system. Connector Types Hyundai vehicles use two types of diagnostic connectors, a 12 pin and a 16 pin. SIDE POWER MUST BE USED Use Hyundai-2 and battery power lead. NOTE USING MODIS: Side power must be supplied to the MT2500-51 adaptor on the following Hyundai vehicles: 9/1994-1995 Excel 1.5L SOHC 11/1992-1995 S Coupe 1.5L 1992-1995 S Coupe 1.5L Turbo 27 Hyundai VEHICLE CONNECTOR Use DL-16 with specified key. Figure 3:1 Hyundai diagnostic connectors (Refer to SCANNER connector message for locations) 28 Hyundai Hyundai – Engine Hyundai vehicles using the Hyundai-2 adaptor NOTE: Side power must be supplied to the Hyundai-2 adaptor using SOLUS or Scanner with VCI cartridge. MODIS must at least have side power on the following Hyundai vehicles: 9/94-95 Excel 1.5L SOHC 11/92-95 S Coupe 1.5L 92-95 S Coupe 1.5L Turbo Codes & Data The SCANNER will display engine data and any engine codes, with descriptions, transmitted by the vehicle to the SCANNER. Live Codes and Data For live Codes & Data vehicles there is two different SCANNER Engine test menus’ available. An example of each follows: Type 1: Type 2: MAIN MENU—ENGINE >CODES & DATA CUSTOM SETUP ACTUATOR TESTS OTHER SYSTEMS MAIN MENU—ENGINE >TEST MENU CUSTOM SETUP OTHER SYSTEMS Type 1: Codes & Data The SCANNER will display engine data and any engine codes transmitted by the vehicle on the screen. Any codes that are present are displayed, along with its description, at the top of the on-screen data list, if there are no codes present the SCANNER will display (NO CODES PRESENT). NOTE: When a code is transmitted by the vehicle to the SCANNER the code will indicate there may be a problem either in the WIRING between the ECU and the indicated sensor/actuator or in the indicated sensor/actuator. A sample of a screen display with no codes present. RPM____825 O2(mV)___898 INTEGRATR__102 ** CODES & DATA. OK TO DRIVE. ** (NO CODES PRESENT) OPEN/CLSD LOOP__CLSD O2 STATUS__RICH 29 Hyundai Hyundai – Engine Sample of a screen display with codes present. RPM____825 O2(mV)___898 INTEGRATR__102 ** CODES & DATA. OK TO DRIVE. ** 08 AIRFLOW METER OR CIRCUIT 12 THROTTLE POSITION (TP) SENSOR OPEN/CLSD LOOP__CLSD O2 STATUS__RICH Codes & Data Actuator Tests There are various tests available under this menu option, including Injector tests, Purge solenoid valve tests, Fuel Pump test and Idle speed actuator tests. The SCANNER provides on-screen instructions on how to perform the tests. Injector Tests Test type 1 There are two different types of injector tests available on Hyundai vehicles, the type of test is determined by the vehicle system and the SCANNER automatically presents the correct tests. One type of test is carried out with the engine RUNNING, it disables a selected injector for a set time and the engine accordingly should run rough while it is disabled. This can be used as a cylinder balance check or to check for a ‘dead’ cylinder or injector. Test type 2 The other test is carried out with the engine OFF and ignition ON, it switches the injector from the engine ECM/PCM and can be checked by taking a voltage reading from the switch side of the injector. The reading should ‘spike’ as the injector is opened, it can also be checked with the MODIS Labscope, a Snap-on Vantage or oscilloscope for a conventional injector pattern showing the injector opening, holding and then closing. The fuel pump does not operate during this test. 30 Hyundai Hyundai – Engine Select ACTUATOR TESTS from the MAIN MENU for these vehicles and the SCANNER displays a list of the tests available. The list of actuator tests will appear similar to: SCROLL TO SELECT A TEST: >EGR SOLENOID VALVE FUEL PUMP INJECTOR #1 (ENGINE RUNNING INJECTOR #2 (ENGINE RUNNING INJECTOR #3 (ENGINE RUNNING INJECTOR #4 (ENGINE RUNNING INJECTOR #5 (ENGINE RUNNING INJECTOR #6 (ENGINE RUNNING PRESSURE CONTROL SOL VALVE FUEL PRESSURE SOLENOID PURGE CONTROL SOLENOID ONLY) ONLY) ONLY) ONLY) ONLY) ONLY) The tests available will vary, depending on the model. During testing, you must monitor the selected actuator with a voltmeter, ammeter, or by listening for actuator activation. The engine controller does not monitor the selected actuator. A completed test does not mean that the actuator was activated. The SCANNER can only monitor the engine controller ON/OFF commands to the actuator. Move the thumbpad or thumbwheel up or down to the desired actuator test and press Y to select the test. The SCANNER displays a screen similar to: ACTIVATING EGR SOLENOID VALVE FOR 5 SECONDS. The SCANNER tells the engine controller to activate the selected actuator. Approximately 5 seconds later, the engine controller deactivates the actuator. After the test is complete, the SCANNER displays a screen similar to: EGR SOLENOID VALVE TEST HAS BEEN COMPLETED. PRESS Y TO REPEAT TEST. PRESS N FOR ACTUATOR TEST MENU. 31 Hyundai Hyundai – Engine If a key-on, engine-off test (all actuator tests, except injector tests) is selected with the engine running, the SCANNER displays a screen similar to: EGR SOLENOID VALVE TEST HAS BEEN REJECTED. PRESS Y TO REPEAT TEST. PRESS N FOR ACTUATOR TEST MENU. In either case, press Y to repeat the selected actuator test, or press N to return to the actuator test selection list. Type 2: Codes and Data Test Menu When type 2 is selected the SCANNER will then display another menu with up to 4 options, not all vehicles will have 02 MONITORS or FREEZE FRAME TEST MENU >CODES ONLY 02 MONITORS* DATA ONLY FREEZE FRAME* * Some vehicles may not have these menu selections. Codes Only This selection will display any codes transmitted by the vehicle, all codes are displayed with descriptions. NOTE: When a code is transmitted by the vehicle to the SCANNER the code will indicate there may be a problem either in the WIRING between the ECU and the indicated sensor/actuator or in the indicated sensor/actuator. Data Only This option displays engine data only with no codes displayed. On some vehicles the DATA ONLY exit menu has a Custom Data option that allows you to select only the parameters that you may want to view. Using this option with fewer parameters on screen increases the rate at which the data is updated. 02 Monitors This option allows access to 9 different tests that look at various ways the Oxygen Sensor is working. Not every vehicle supports all of the tests. Refer to the OBDII and EOBD Vehicle Communication Manual for specific information on these tests. 32 Hyundai Hyundai – Engine Freeze Frame When the first DTC or Diagnostic Trouble Code is set the PCM will log various data parameters from the engine data list. These parameters can assist in determining what may have set the DTC. If there are no DTC’s set then there is no Freeze Frame data recorded by the PCM. Manual Code Read When Manual Code Read is indicated by the screen message follow the below procedure to read the codes from the ‘Check Engine’ light on the dash. To initiate code output, locate the 12-pin diagnostic connector in the RH kickpanel, near the fuse panel. Ground the pin as shown to initiate code output and read the codes, if there are any present, on the ‘Check Engine’ light. A code list is available on the SCANNER when ‘Manual Code Read’ is selected. NOTE: When a code is transmitted by the vehicle to the SCANNER the code will indicate there may be a problem either in the WIRING between the ECU and the indicated sensor/actuator or in the indicated sensor/actuator. Ground this pin and read codes from ‘Check Engine’ light on dash. Vehicle connector located in RH kick panel fuse box 33 Hyundai 0.5 SECONDS 1.5 Pattern: Read codes on: Long and short Check Engine lamp Note: 8 0.5 second flashes indicates no faults stored Clear Codes for all types Clear codes is available on Hyundai engines, it is accessed from the CODES & DATA exit menu or the CODES ONLY exit menu. Clear Code Exceptions Note that Excel models from 1992 to 1994 equipped with a MAP sensor do not support electronic clear codes from the SCANNER. These codes can only be cleared by removing a battery terminal for at least 1 minute. 34 Hyundai Hyundai – Automatic Transmission Hyundai vehicles using the Hyundai-2 adaptor NOTE: Side power must be supplied to the Hyundai-2 adaptor using SOLUS or Scanner with VCI cartridge. MODIS must at least have side power on the following Hyundai vehicles: 9/94-95 Excel 1.5L SOHC 11/92-95 S Coupe 1.5L 92-95 S Coupe 1.5L Turbo Test Menu - Codes Only & Data Only Some Hyundai vehicles have a separate selection for CODES ONLY or DATA ONLY on the Auto Trans TEST MENU. When using these selections the CODES selection will display only codes (no data displayed) and the DATA selection will display only data (no codes displayed). Auto Code Read for Sonata 1989 only 1989 Sonata 2.4L automatic transmissions are Auto Code Read only. To ensure correct diagnosis of the automatic transmission, follow this testing procedure. 1) Connect the SCANNER to the vehicles diagnostic connector using the Hyundai-2 adaptor. 2) Enter the Auto Code Read option, with the ignition on and the engine off the SCANNER should display code “12 No Ignition Reference Signal” as the engine is not running and not producing an ignition reference signal. This is normal and indicates the diagnosis system is working. 3) Start the engine and code 12 will no longer be output by the vehicle. 4) Road test the vehicle if possible and check for any codes output. The vehicle will only display one code at a time, the fault causing this code must be rectified before any other codes will be displayed by the vehicle. 5) Turning the vehicle off will erase any codes so ensure you have checked the codes before switching the vehicle off. 6) No fault code output is a system pass. 35 Hyundai Hyundai – Automatic Transmission Clear Codes Clear codes is available on most Hyundai automatic transmissions, it is accessed from the CODES & DATA menu or from the CODES ONLY exit menu. Clear Code Exceptions Note that with Excels up to August 1994 and 2.4L Sonata’s these automatic transmissions do not support clear codes electronically from the SCANNER, these can only be erased by removing a battery terminal for at least 1 minute. 1989 Auto Code Read Sonata codes are cleared when the ignition is switched off. Actuator Test On selected Hyundai vehicles there is an Actuator Test available for the automatic transmission. The test is available from the Auto Trans Main Menu for vehicles with Cods & Data. The test is for the Pressure Control Solenoid Valve (PCSV) and can be conducted with the Key On and the Engine Off (KOEO). During the test the pressure control solenoid is pulsed for 5 seconds at 50% duty, the solenoid valve should be heard as a buzzing noise when activated. 36 Hyundai Hyundai – ABS WARNING: Diagnosis and repair of the ABS system should be carried out by qualified personnel using appropriate workshop manuals and using all precautions detailed by the manufacturer of the vehicle. Codes & Data The SCANNER will display ABS data and any codes, with descriptions, transmitted by the vehicle on the screen. Any codes that are present are displayed at the top of the on-screen data list, if there are no codes present the SCANNER will display (NO CODES PRESENT). NOTE: When a code is transmitted by the vehicle to the SCANNER the code will indicate there may be a problem either in the WIRING between the ECU and the indicated sensor/actuator or in the indicated sensor/actuator. Sample screen with no codes set. ABS (NO CODES PRESENT) LHF WSS(KPH)_____0 Sample screen with a code set. DATA RHF WSS(KPH)______0 ABS DATA 34 BATTERY POWER LOW LHF WSS(KPH)_____0 RHF WSS(KPH)______0 Test Menu - Codes Only & Data Only Some Hyundai vehicles have a separate selection for CODES ONLY or DATA ONLY on the ABS Airbag TEST MENU, when using these selections the CODES selection will display only codes (no data displayed) and the DATA selection will display only data (no codes displayed). Clear Codes Clear codes is available on Hyundai ABS, it is accessed from the CODES & DATA exit menu or the CODES ONLY exit menu. Actuator Tests On Hyundai vehicles there are Actuator Tests available for the ABS. The tests are for the hydraulic modulator pump and for the solenoids in the hydraulic modulator. When the solenoids are tested the pump motor is also activated, check for solenoid activation by back-probing the connector using an appropriate voltmeter. 37 Hyundai Hyundai – SRS Airbag WARNING: Diagnosis and repair of the SRS Airbag system should be carried out by qualified personnel using appropriate workshop manuals and using all precautions detailed by the manufacturer of the vehicle. Codes & Data The SCANNER will display SRS Airbag data and any codes, with descriptions, transmitted by the vehicle on the screen. Any codes that are present are displayed at the top of the on-screen data list, if there are no codes present the SCANNER will display (NO CODES PRESENT). NOTE: When a code is transmitted by the vehicle to the SCANNER the code will indicate there may be a problem either in the WIRING between the ECU and the indicated sensor/actuator or in the indicated sensor/actuator. Sample screen with no codes. CRASH (NO CODES PRESENT) DEPLOYMENTS_____0 Sample screen with a code set. CRASH 34 BATTERY POWER LOW DEPLOYMENTS_____0 Test Menu - Codes Only & Data Only DATA LAMP_________OFF DATA LAMP_________OFF Some Hyundai vehicles have a separate selection for CODES ONLY or DATA ONLY on the SRS Airbag TEST MENU, when using these selections the CODES selection will display only codes (no data displayed) and the DATA selection will display only data (no codes displayed). Clear Codes Clear codes is available on Hyundai SRS Airbag, it is accessed from the CODES & DATA exit menu or the CODES ONLY exit menu. 38 Hyundai Hyundai – General Notes Special Notes on Vehicle Communications Using MODIS on Hyundai vehicles with the Hyundai-2 adaptor NOTE FOR MODIS:Side power must be supplied to the Hyundai-2 adaptor on the following Hyundai vehicles: 9/94-95 Excel 1.5L SOHC 11/92-95 S Coupe 1.5L 92-95 S Coupe 1.5L Turbo Waiting for Data On some vehicles when CODES & DATA, CODES ONLY or DATA ONLY is selected the SCANNER can take some time to establish communication with the vehicle system selected. This is a normal operation of the SCANNER and the vehicle and is not indicative of a vehicle or SCANNER problem. This can apply to Engine, Auto trans, ABS and Airbag systems. Data Refresh Rates On some systems on Hyundai vehicles the rate at which live data information is updated on the screen can appear to be slow. This is normal for the communication type on these vehicles. For vehicles that have the TEST MENU selection (NOT vehicles with the CODES & DATA selection) a faster update rate of the information is achieved by using the Custom Data List selection on the DATA ONLY exit menu. By selecting only a few parameters for viewing the update rate can be enhanced. For example if only the RPM, IGN ADVANCE, MAF and INJECTION mS were of interest, these can be selected from the Custom Data List and then only these parameters will be displayed on the screen. Data Appears Frozen On some Scoupe (11/92 to 95), Sonata (1990 to 1998) and Excel (9/94 to 2000) models when viewing a live data display with the key on and the engine off (KOEO) the data will appear to be frozen on the screen. This a normal function of the vehicle, it will not update live data information with the engine not running. Codes may be read and erased with the KOEO, but the vehicle ECU cannot set codes in this mode, codes will only be set while the engine is running. 39 Hyundai Hyundai – General Notes Code Definitions When a code is transmitted by a vehicle ECU to the SCANNER, the code will indicate there may be a problem either in the indicated sensor/ actuator or in the wiring for that sensor/actuator. Use the codes as a guide when repairing vehicle systems – remember wiring and connectors are far more likely to cause problems than faulty sensors and actuators. Clear Code exceptions There are various Hyundai systems that do not support electronic clear codes, this means that the vehicle system itself has no provision for clear codes from a scan tool. The following is a list of those vehicle systems: Excel Automatic Transmission 1990 – August 1994 Excel Engine July 1992 – August 1994 Sonata 2.4L Automatic Transmission 1989 – 1991 To clear codes from these systems, disconnect a battery terminal for 1 minute. When disconnecting battery terminals observe all necessary precautions. Setting Codes If the SCANNER module is communicating with a vehicle and a code is set the MODIS may or may not beep depending on what type of communication system the vehicle has. If you are unsure of whether the SCANNER is displaying codes correctly create a code by removing the connector from a known sensor and then check on the screen to see if the code has been set by the vehicle and sent to the SCANNER. You may need to run the engine at operating temperature for a while or cycle the ignition off and on to get the code to set in the vehicle’s computer. 40 Kia Kia SCANNER Communication Types The SCANNER supports a mixture of live Codes & Data, Codes only and Auto Code Read for the engine and automatic transmissions on Kia vehicles supported by the SCANNER. Connector Types Early Kia vehicles use one type of diagnostic connector, a 20-pin type connector. It is located in a small box labelled DIAGNOSTIC in the engine bay. Either the KIA-2 or Multi-1 adaptor used as per instruction on Scanner ID screen. 41 Kia Kia – Engine Kia engines allow for live Codes and Data or Auto Code Read. The SCANNER will automatically set for either depending on the vehicle that is entered. The SCANNER may also indicate that a system may not be supported. Auto Code Read IMPORTANT NOTE for Auto Code Read vehicles: These systems have no output from the vehicle unless a code has been set in the PCM/TCM. This mean that the vehicle may appear to not respond to the SCANNER, if you are unsure try setting a code manually and then reading the code on the SCANNER. If the SCANNER directs you to use the Multi-1 adaptor, refer to the following diagram for hook up details. Side power Use Multi-1 adaptor Engine Connection: Mentor 1.5L SOHC and DOHC Yellow Green s s s White Use Multi-1 with battery power cable in side of adapter. 42 Black lead of adaptor to ground Kia Kia – Engine Engine Connection: Sportage and Credos Green Black lead of adaptor to ground s s Blue Figure 4:3 Multi-1 connection to vehicle diagnostic connector. Automatic Trans Connection: Sportage and Mentor Blue s Black lead of adaptor to ground s White Figure 4:3 Multi-1 connection to vehicle diagnostic connector. Codes and Data For live Codes & Data vehicles here is two different SCANNER Engine test menus’. An example of each follows: Type 1: Type 2: MAIN MENU—ENGINE >CODES & DATA CUSTOM SETUP ACTUATOR TESTS OTHER SYSTEMS MAIN MENU—ENGINE >TEST MENU CUSTOM SETUP OTHER SYSTEMS 43 Kia Kia – Engine Type 1: Codes & Data The SCANNER will display engine data and any engine codes transmitted by the vehicle on the screen. Any codes present are displayed, along with descriptions, at the top of the on-screen data list, if there are no codes present the SCANNER will display (NO CODES PRESENT). NOTE: When a code is transmitted by the vehicle to the SCANNER the code will indicate there may be a problem either in the WIRING between the ECU and the indicated sensor/actuator or in the indicated sensor/actuator. A sample of a screen display with no codes present. RPM____825 O2(mV)___898 INTEGRATR__102 ** CODES & DATA. OK TO DRIVE. ** (NO CODES PRESENT) OPEN/CLSD LOOP__CLSD O2 STATUS__RICH Sample of a screen display with codes present. RPM____825 O2(mV)___898 INTEGRATR__102 ** CODES & DATA. OK TO DRIVE. ** 08 AIRFLOW METER OR CIRCUIT 12 THROTTLE POSITION (TP) SENSOR OPEN/CLSD LOOP__CLSD O2 STATUS__RICH Codes & Data Actuator Tests There are various tests available under this menu option, including Injector tests, Purge solenoid valve tests and Idle speed actuator tests. The SCANNER provides on screen instructions on how to perform the tests. Note that not all vehicles have actuator tests. Injector Test This test is carried out with the engine OFF and ignition ON, it switches the injector from the engine ECM/PCM and can be checked by taking a voltage reading from the switch side of the injector. The reading should ‘spike’ as the injector is opened, it can also be checked with a Snap-on Vantage or oscilloscope for a conventional injector pattern showing the injector opening, holding and then closing. The fuel pump does not operate during this test. 44 Kia Kia – Engine Type 2: Test Menu When type 2 is selected the SCANNER will then display another menu with 4 options. TEST MENU >CODES ONLY 02 MONITORS* DATA ONLY FREEZE FRAME* * Some vehicles may not have these menu selections. Codes Only This selection will display any codes transmitted by the vehicle, all codes are displayed with descriptions. If there are no codes present the SCANNER will display (NO CODES PRESENT). NOTE: When a code is transmitted by the vehicle to the SCANNER the code will indicate there may be a problem either in the WIRING between the ECU and the indicated sensor/actuator or in the indicated sensor/actuator. Data Only This option displays engine data only with no codes displayed. On the exit Data Only exit menu there is a Custom Data option that allows you to select only the parameters that you may want to view. Using this option with fewer parameters on screen increases the rate at which the data is updated. 02 Monitors This option gives you access to 9 different tests that look at various ways the Oxygen Sensor is working. Not all of the tests are supported by every vehicle. Refer to the OBD-II and EOBD Communication Manual for specific information on these tests. Freeze Frame When the first DTC or Diagnostic Trouble Code is set the PCM will log various data parameters from the engine data list. These parameters can assist in determining what may have set the DTC. If there are no DTC’s set then there is no Freeze Frame data recorded by the PCM. Clear Codes for all types Clear codes is available on Kia engines, it is accessed from the data list exit menu. Mentor 1.5L SOHC vehicles do not support electronic clear codes, these must be cleared by removing a battery terminal for at least 1 minute. For vehicles that are Auto Code Read, clear codes by removing a battery terminal for 1 minute. 45 Kia Kia – Automatic Transmission Kia Automatic Transmissions allow for live data Codes Only or Auto Code Read. The SCANNER will automatically set for either depending on the vehicle that is entered. Mentor 1.5L SOHC and Sportage to June 1999 are Auto Code Read, all other Kia vehicles have live data codes only. For vehicles that support Auto Code Read refer to Auto Code Read in this manual for further information. IMPORTANT NOTE for Auto Code Read vehicles: These systems have no output from the vehicle unless a code has been set in the PCM/TCM. This mean that the vehicle may appear to not respond to the SCANNER, if you are unsure try setting a code manually and then reading the code on the SCANNER. Test Menu - Codes Only The SCANNER will display automatic transmission codes transmitted by the vehicle on the screen. Any codes present are displayed along with its description on the screen, if there are no codes present the SCANNER will display (NO CODES PRESENT). NOTE: When a code is transmitted by the vehicle to the SCANNER the code will indicate there may be a problem either in the WIRING between the ECU and the indicated sensor/actuator or in the indicated sensor/actuator. Test Menu - Data Only Some automatic transmissions have a DATA ONLY option that allows the SCANNER to display some automatic transmission parameters. Clear Codes Clear codes is available on Kia automatic transmissions with Test Menu – Codes Only, it is accessed from the code list exit menu. For vehicles that are Auto Code Read, codes are cleared by removing a battery terminal for 1 minute. 46 Kia Kia – General Notes Special Notes on Vehicle Communications Waiting for Data On some vehicles when CODES & DATA, CODES ONLY or DATA ONLY is selected the SCANNER can take some time to establish communication with the vehicle system selected. This is a normal operation of the SCANNER and the vehicle and is not indicative of a vehicle or SCANNER problem. Data Refresh Rates On some Kia vehicle systems the rate at which live data information is updated on the screen can appear to be slow. This is normal for the vehicle communication type and is not controlled by the SCANNER. On vehicles that have the DATA ONLY selection a faster update rate of the information can be achieved by using the Custom Data List selection on the Data Only exit menu. By selecting only a few parameters for viewing the update rate can be enhanced. For example if only the RPM, IGN ADVANCE and INJECTION mS were of interest, these can be selected from the Custom Data List and then only these parameters will be displayed on the screen. Code Definitions When a code is transmitted by a vehicle ECU to the SCANNER, the code will indicate there may be a problem either in the indicated sensor/ actuator or in the wiring for that sensor/actuator. Use the codes as a guide when repairing vehicle systems – remember wiring and connectors are far more likely to cause problems than faulty sensors and actuators. 47 Subaru Subaru CAUTION FOR ABS AND SRS SYSTEMS Before attempting any repairs on vehicles fitted with ABS or SRS Airbag systems observe all precautions the manufacturer specifies for these systems. Used Import Vehicles Used Import vehicles are vehicles that were sold new in Japan and have since been exported to other countries including Australia and New Zealand. The SCANNER does not list every model that is available but does cover the more popular vehicles that are available. CAUTION: Although every effort has been made, due to the many models available and the lack of information available for these vehicles the information that is contained in the SCANNER for these Used Import vehicles may not always be accurate for the particular model being tested. SCANNER Communication Types The SCANNER supports Subaru live data as well as Auto Code Read and Manual Code Read. Live Data systems include Engine systems for selected models, Automatic Transmissions for selected models and ABS for selected models. See applicable coverage sheets for more coverage details. The SCANNER will specify what is available on specific vehicles. 48 Subaru Important notes on Subaru Live Data 1. Subaru Vehicles that use the Multi-2 Adaptor When testing Subaru vehicles that use the 9-pin Multi-2-C connector, the adaptor must have side power supplied to it for communication. Use the battery power lead to supply the Multi-2 adaptor with side power. 2. Refresh Rate Due to the speed at Subaru Electronic Control Units (ECU’s) communicate with the SCANNER the data refresh rate may be slow compared to some other live data systems. This is not controlled by the SCANNER but by the vehicle ECU. 3. Communication Dropouts As above the Subaru Electronic Control Units may be delayed in responding to the SCANNER, this may manifest itself in a very intermittent loss of communication with the vehicle. This is not controlled by the SCANNER but by the vehicle ECU. Communications may also dropout if the vehicle is started while the SCANNER is communicating. 4. Establishing Communication Some vehicle systems may take up to 10 seconds for the SCANNER to establish communication. If there is no response after 20 seconds or the no communication screen appears, exit by pressing “N” and press “N” again to clear the vehicle ID information. Re-enter the vehicle ID and try to communicate again with the vehicle. If no communication occurs again then refer to Appendix B in this Reference Manual. 49 Subaru SCANNER Connection Subaru use 2 different types of connectors for engine and automatic transmission, a 9-pin type and a 16-pin type. Vehicles with the 9-pin type use Multi-2 adaptor along with the SUB-1 adaptor. This adaptor MUST be powered using the battery power cable. The SUB-1 adaptor is placed in series between the data cable and the Multi-2 adaptor. To SCANNER data cable SUB-1 adaptor To vehicle 9-pin connector Multi-2 adaptor BATTERY POWER CABLE MUST BE USED. Vehicles with the 9-pin connector use the Multi-2 adaptor with the SUB-1 adaptor. NOTE: Side power must be supplied to this adaptor for communication to be established. Use battery power cable. 50 Subaru SCANNER Connection (continued) Vehicles with the 16-pin type use the DL-16 adaptor and the personality key S-42. VEHICLE CONNECTOR Use DL-16 with specified key. 51 Subaru SCANNER Test Menu for Live Data models Engine, Automatic Transmission and ABS The SCANNER may display three different test menu’s depending on what model and system has been selected. Type 1 TEST MENU >CURRENT/MEM CODES DATA ALL - SLOW DATA A - FASTER DATA B - FASTER TEST MENU >CODES ONLY DATA ALL - SLOW DATA A - FASTER DATA B - FASTER TEST MENU >CODES A CODES B CODES C DATA ALL - SLOW DATA A - FASTER DATA B - FASTER Type 2 Type 3 Type 1 Test Menu CURRENT/MEM CODES This test menu heading is for displaying the ECU Current and Memory codes. When selected the SCANNER will request Current and Memory codes from the Engine or Auto Trans ECU. Current codes are codes that are active, the fault is present at the time of testing. Memory codes are codes that are not active, the fault is not present at the time of testing but has been present previously. When a code is indicated as having a YES status by the vehicle this will indicate there may be problem either in the WIRING between the ECU and the indicated sensor/actuator or in the indicated sensor/ actuator. When these codes are displayed the FULL LIST of codes is displayed and the status of each code is displayed either by YES (code is set) or NO (code is not set). !!ATTENTION!! ALL codes must be scrolled through to determine their individual status. Keep scrolling until the [END OF LIST] message is seen. 52 Subaru An example of a CURRENT/MEM CODES list: CODE LIST ** SCROLL COMPLETE LIST TO CHECK CODES ** (SCROLL FOR MORE) 11 CRANKSHAFT SENSR (CURRENT DTC)_____NO (MEMORY DTC)____YES 12 STARTER SIGNAL (CURRENT DTC)_____NO (MEMORY DTC)_____NO 13 CAMSHFT POS SNSR (CURRENT DTC)_____YES (MEMORY DTC)____NO 14 FUEL INJECTOR #1 (CURRENT DTC)_____NO (MEMORY DTC)____YES Note DTC = Diagnostic Trouble Code. This is only a partial list, all of the codes are displayed and the whole list will need to be scrolled through to determine the status of each code. Looking at the list above it can be observed that two memory codes are set and one current code is set. The two memory codes are 11 CRANK SHAFT SENSOR and 14 FUEL INJECTOR #1. The current code is 13 CAMSHAFT POSITION SENSOR. Current codes will only clear when the fault is no longer present and the ignition has been cycled OFF and ON again. Memory codes can be cleared by selecting CLEAR CODES from the SCANNER exit menu. See Clear Codes later in this section. DATA ALL – SLOW This test menu selection will display all live data parameters available for the system being tested. No codes are displayed. The refresh rate is slower compared to the other two DATA options when they are available. Some parameters may show a value when the engine is not running – for example RPM. This is a normal function and does not indicate a fault in the vehicle or SCANNER. When the vehicle is running the value should read correctly. DATA A – FASTER This test menu selection displays fewer parameters at a faster refresh rate. Typically this selection displays analog type parameters, eg RPM, TPS, O2S. 53 Subaru DATA B – FASTER This test menu selection displays fewer parameters at a faster refresh rate. Typically this selection displays discrete ON/OFF type parameters, eg FUEL PUMP, CRANK SW. See the Australian Data Parameter Manual for descriptions and explanations of the parameters. Note some parameters listed may only be applicable to vehicles equipped with 4WD. Type 2 Test Menu CODES ONLY This test menu heading is for displaying the ECU codes. When selected the SCANNER will request codes from the Engine ECU. Note: this selection may take up to 10 seconds to initiate communications between the SCANNER and the vehicle. Any codes displayed may be either currently active or may have been previously set. When these codes are displayed only the codes set in the ECU are displayed on screen. When a code is transmitted by the vehicle to the SCANNER the code will indicate there may be problem either in the WIRING between the ECU and the indicated sensor/actuator or in the indicated sensor/ actuator. These codes can be cleared by selecting CLEAR CODES from the exit menu. See Clear Codes later in this section. DATA ALL – SLOW This test menu selection will display all live data parameters available for the system being tested. No codes are displayed. The refresh rate is slower compared to the other two DATA options when they are available. Some parameters may show a value when the engine is not running – for example RPM. This is a normal function and does not indicate a fault in the vehicle or SCANNER. When the vehicle is running the value should read correctly. DATA A – FASTER This test menu selection displays fewer parameters at a faster refresh rate. Typically this selection displays analog type parameters, eg RPM, TPS, O2S. 54 Subaru DATA B – FASTER This test menu selection displays fewer parameters at a faster refresh rate. Typically this selection displays discrete ON/OFF type parameters, eg FUEL PUMP, CRANK SW. See the Australian Data Parameter Manual for descriptions and explanations of the parameters. Type 3 Test Menu CODES A, CODES B & CODES C These test menu headings are for displaying the ECU codes. When one selected the SCANNER will request a certain range of codes from the Engine ECU. !!ATTENTION!! ALL selections CODES A, CODES B & CODES C MUST be selected and viewed to determine whether any codes are in the vehicle ECU. Any codes displayed may be either currently active or may have been previously set. Note: this selection may take up to 10 seconds to initiate communications between the SCANNER and the vehicle. When these codes are displayed only the codes set in the ECU are displayed on screen. When a code is transmitted by the vehicle to the SCANNER the code will indicate there may be problem either in the WIRING between the ECU and the indicated sensor/actuator or in the indicated sensor/ actuator. !!ATTENTION!! Before clearing codes check ALL code selections. Clearing codes from one selection will clear ALL codes from ALL the other selections also. These codes can be cleared by selecting CLEAR CODES from the exit menu on each exit menu. See Clear Codes later in this section. 55 Subaru DATA ALL – SLOW This test menu selection will display all live data parameters available for the system being tested. No codes are displayed. The refresh rate is slower compared to the other two DATA options when they are available. Some parameters may show a value when the engine is not running – for example RPM. This is a normal function and does not indicate a fault in the vehicle or SCANNER. When the vehicle is running the value should read correctly. DATA A – FASTER This test menu selection displays fewer parameters at a faster refresh rate. Typically this selection displays analog type parameters, eg RPM, TPS, O2S. DATA B – FASTER This test menu selection displays fewer parameters at a faster refresh rate. Typically this selection displays discrete ON/OFF type parameters, eg FUEL PUMP, CRANK SW. See the Australian Data Parameter Manual for descriptions and explanations of the parameters. Clear Codes Clear codes is available for all live data Subaru vehicles from the exit menu. When clearing codes on Subaru vehicles the ignition must be cycled OFF (for at least 5 seconds) then ON again to reset the ECU. If “no communication” appears wait for 15 seconds while the SCANNER re-establishes communication with the vehicle. If the SCANNER does not re-establish communication then press “N” to exit and then re-enter the same vehicle ID and return to the codes selection to check that the codes have been cleared. 56 Subaru Code Type 08 – Subaru – Engine, Auto Transmission, ABS and SRS Airbag Subaru uses two types of code patterns: type 8a for engines, 4EAT (version 2) transmissions, ABS and Airbag and type 8b for 4EAT (version 1) transmissions. Code type 8a flashes a two-digit (long/short) code. The LED flashes each 10’s place digit as 1.2-second pulses, with 0.3 second between each pulse. The LED flashes each 1’s place digit as 0.2-second pulses, with 0.3 second between each pulse. There is a 0.3-second pause between each digit, and a 1.8-second pause between multiple codes. Code type 8b consists of a 2-second flash, followed by a 1-second pause, followed by a series of short (0.1-second) flashes. FWD vehicles will have ten short flashes, 4WD will have eleven short flashes. The short flashes represent code numbers 1 through 10 (or 11). A long (0.6second) flash indicates a fault at the indicated position. For example, SHORT—SHORT—SHORT—SHORT—LONG—SHORT—SHORT— SHORT—SHORT—SHORT—SHORT indicates code 5 because the fifth flash is long. If no codes are present the eleven flashes will all be short (0.1-second). The code sequence is followed by a 2.5-second pause, a 2-second flash, and then the pattern repeats itself. 57 Subaru CODE TYPE 08a Pattern: Long and short Read codes on: LED on ECU for engines; panel lamp for transmissions, ABS or SRS Start codes by: Follow appropriate Subaru procedure When done: Clear codes according to Subaru procedure CODE TYPE 08b Pattern: Long flash Read codes on: POWER lamp on instrument panel Start codes by: Follow appropriate Subaru procedure When done: Clear codes according to Subaru procedure 10 (or 11) short flashes is pass code. 58 Subaru Subaru – Engine Auto Code Read When using Auto Code Read the SCANNER is connected to the vehicle and will read and display any engine codes transmitted by the vehicle on the screen. Any codes present are displayed on the screen with the code number and description of the code. NOTE: When a code is transmitted by the vehicle to the SCANNER the code will indicate there may be a problem either in the WIRING between the ECU and the indicated sensor/actuator or in the indicated sensor/actuator. Subaru uses three types of diagnostic connectors for transmitting trouble codes. The 13-pin and 17-pin connectors require Multi-1 adaptor hookup. The 9-pin connector requires the Multi-2C adaptor. IMPORTANT: Use the Multi-1 adaptor and yellow terminal converters for the 13-pin and 17-pin connectors. Connect the ground extension from the Multi-1 black lead to vehicle ground. All vehicles with 9-pin connector use Multi-2-C adaptor. All models Use ground extension on Multi-1 black lead. Figure 5:1 Subaru uses three different types of diagnostic connectors. 59 Subaru Subaru Auto Code Reading During Subaru auto code reading, you must perform certain diagnostic checks on the vehicle. Two different checks must be performed: ECS check (U-check), and D-check. The specific steps you must perform depend on the Subaru model and year you are testing: • ECS Check (U-Check) — All Subarus, you do this only if the ECS lamp on the dash is lit • Pre-1987 MPI D-Check — All 1983-86 vehicles with multipoint injection (MPI) • MPI D-check — 1987-91 multipoint injection (MPI) vehicles. Failure to follow the required procedure may result in misreading codes or inaccurate diagnosis. The following sections tell you how to perform these checks. Use these procedures with the AUTO CODE READ instructions in the previous section. ECS Check (U-Check) On pre-1987 vehicles the ECU does not have memory capability. CAUTION: On these vehicles, do not turn off the ignition if the ECS lamp is lit or the trouble codes can be lost. If the ECS lamp is not lit, proceed to the D-check procedure for the vehicle you are testing. If the ECS lamp is lit: 1. On vehicles with ECU memory capability, continue with step 2. On vehicles without ECU memory capability, leave the engine running and skip to step 3. 2. On vehicles with ECU memory, turn the key off and connect the vehicle read-memory connectors together. Some cars have black connectors, some have clear connectors. 3. Identify the vehicle, connect the SCANNER, and confirm the identification. On vehicles with ECU memory capability, turn the key on and leave the engine off. 4. Select CODE FUNCTIONS from the MAIN MENU. Then select AUTO CODE READ and follow the instructions in the previous section, “Using AUTO CODE READ.” At this point, the SCANNER will read and display any codes stored in the ECU memory 5. Disconnect the read-memory connectors previously connected. 6. Proceed to the D-check procedure for the vehicle you are testing. 60 Subaru Subaru – Engine Subaru Pre-1987 MPI D-Check Use this D-check procedure for all 1985-86 vehicles with multipoint injection (MPI). If the ECS lamp is lit, perform the ECS check (U-check) before doing this D-check. With the SCANNER connected to the vehicle, proceed as follows: 1. Connect the green D-check connectors. 2. Turn the ignition on but do not start the engine. The ECS lamp should light. 3. Start the engine. The ECS lamp should go off. 4. Idle the engine 2 minutes; then snap the throttle fully open 5 times. 5. Briefly race the engine to activate the pressure switch test; then drive the car above 6 mph. (This can be done carefully on a service rack, if necessary.) Run the engine at 2500 rpm until the ECS lamp lights. A flashing lamp means the system is OK. A continuously lit lamp means trouble codes are present. The SCANNER will read the codes. 6. Select AUTO CODE READ from the CODE FUNCTIONS menu and follow the instructions in the section, “Using AUTO CODE READ.” 7. Repeat this procedure until no trouble codes are found. 8. Disconnect the D-check connectors. 1987-91 MPI D-Check Use this D-check procedure for all 1987-91 multipoint injection (MPI) vehicles. If the ECS lamp is lit, perform the ECS check (U-check) before doing this D-check. With the SCANNER connected to the vehicle, proceed as follows: 1. Start the engine and warm it to normal operating temperature. 2. Turn off the engine and connect the green D-check connectors. 3. Turn the ignition on, but do not start the engine. The ECS lamp should light. 4. Depress the accelerator completely, release it halfway, hold it for two seconds, and then release it. 5. Start the engine. The ECS lamp should go off. 61 Subaru Subaru – Engine 6. Drive the vehicle at least 7 mph for at least one minute. (This can be done carefully on a service rack, if necessary.) Shift a manual transmission vehicle into 4th gear. 7. Warm the engine at 2000 rpm until the ECS lamp turns on. A flashing lamp indicates the system is OK. A continuously lit lamp indicates trouble codes are present. The SCANNER will read these codes. 8. Select AUTO CODE READ from the CODE FUNCTIONS menu and follow the instructions in the section, “Using AUTO CODE READ.” 9. Repeat this procedure until no trouble codes are found. 10.After verifying the repair, repeat the D-check procedure with the read-memory connectors connected to clear codes from ECU memory. 11.Disconnect the D-check connectors. Subaru Identity Codes Some pre 1994 Subaru’s output an identity code which the SCANNER will read. This code is for vehicle identification and is NOT a trouble code. The code is displayed when there are no trouble codes present and is not displayed with trouble codes. No description will be displayed after this identity code. If in doubt remove a known sensor to induce a code, run test to confirm. After testing replace disconnected sensor (and clear codes). 62 Subaru Subaru – Engine Manual Code Read During Manual Code Read the SCANNER is not connected to the vehicle but the SCANNER may display on-screen instructions. When a vehicle system is Manual Code Read the codes must be activated by bridging pins together in the diagnostic connector and then read on the Check Engine Lamp. The SCANNER provides on screen information on how and where to do this under the CODE FUNCTIONS selection. Refer to the diagrams below for the correct pins to bridge to initiate code reading. The SCANNER provides a list of the code numbers and their descriptions on screen, located also under the CODE FUNCTIONS selection. NOTE: When a code is transmitted by the vehicle to the SCANNER the code will indicate there may be a problem either in the WIRING between the ECU and the indicated sensor/actuator or in the indicated sensor/actuator. Figure 5:2 Subaru diagnostic connectors for engine Manual Code Read. Clear Codes for Auto Code Read and Manual Code Read Code clearing information is accessed from the SCANNER under the CODE FUNCTIONS selection. The SCANNER provides information on how to clear the codes from the ECU. 63 Subaru Subaru – Automatic Transmission Manual Code Read During Manual Code Read the SCANNER is not connected to the vehicle but the SCANNER may display on-screen instructions. To read the codes on Subaru Automatic Transmissions a procedure must be followed to activate code output by the vehicle. The instructions for these procedures are listed on the SCANNER under the CODE FUNCTIONS selection as well as the list of codes for the particular vehicle ID entered. The transmission control systems are placed in the diagnostic, codedisplay, mode by performing vehicle-specific diagnostic routines. These routines consist of a series of ignition cycles, throttle movements, and gear selections. To read Subaru transmission codes manually, you must follow the appropriate diagnostic procedure. Failure to follow the procedure may result in misreading codes or inaccurate diagnosis. The Subaru control systems are placed in the diagnostic, code-display, mode as explained in the following sections. NOTE: When a code is transmitted by the vehicle to the SCANNER the code will indicate there may be a problem either in the WIRING between the ECU and the indicated sensor/actuator or in the indicated sensor/actuator. Clear Codes Code clearing information is accessed from the SCANNER under the CODE FUNCTIONS selection. The SCANNER provides information on how to clear the codes from the ECU. 1987-91 4EAT Transmission (Version 1) Use this procedure to test the 4EAT transmission in 1987-94 L-series, and 1988-90 Leone. You can determine if any codes are present by simply turning the ignition on (engine off). Codes are present if the POWER lamp flashes four times, after the 2 second bulb check. If the POWER lamp remains on, there is a problem in the lamp circuit or with the controller. If the lamp remains off after the 2 second lamp check, no codes are present. To place the transmission controller in the diagnostic, code-display mode, proceed as follows: 64 Subaru Subaru – Automatic Transmission – Manual Code Read 1. Start and warm the engine to operating temperature. 2. Turn off the ignition and set the 1st gear HOLD switch OFF. (HOLD switch is on center console, adjacent to gear selector.) 3. Place the gear selector in PARK and start the engine. The POWER lamp on the instrument panel should light for approximately 2 seconds. 4. Turn the ignition off, place the gear selector in DRIVE, and set the 1st gear HOLD switch ON. 5. Turn the key on and the engine off, wait more than 2 seconds, and then move the gear selector to 3RD. 6. Set the 1st gear HOLD switch OFF, move the gear selector to 2ND, and then set the 1st gear HOLD switch ON. 7. Fully depress and release the throttle to begin manual code gathering. The POWER lamp will flash code type 8b. 1990-93 4EAT Transmission (version 2) Use this procedure to test the 4EAT transmission in 1990-97 Liberty’s, 1992-97 SVX’s and the 1993-97 Impreza’s. You can determine if any current codes are present by simply turning the ignition on (engine off). Current codes are present if the POWER lamp flashes four times, after the 2 second bulb check. If the POWER lamp remains on, there is a problem in the lamp circuit or with the controller. If the lamp remains off after the 2 second lamp check, no current codes are present; however, history codes may still be in memory. (See "4EAT Transmission (version 2) History Codes" section.) To place the transmission controller in the diagnostic, code-display mode, proceed as follows: 1. Start and warm the engine to operating temperature. Drive the vehicle above 20 kph. 2. Turn off the ignition and set the MANUAL switch OFF. (MANUAL switch is on center console, adjacent to gear selector.) 3. Place the gear selector in PARK and start the engine. The POWER lamp on the instrument panel should light for approximately 2 seconds. 4. Turn the ignition off, place the gear selector in DRIVE, and set the MANUAL switch ON. 65 Subaru Subaru – Automatic Transmission – Manual Code Read 5. Turn the key on and the engine off, wait more than 2 seconds, and then move the gear selector to 3RD. 6. Set the MANUAL switch OFF, move the gear selector to 2ND, and then set the MANUAL switch ON. 7. Move the gear selector to 1ST and set the MANUAL switch OFF. 8. Fully depress and release the throttle to begin manual code gathering. If no codes are present, the POWER lamp will flash evenly 2-times per second. If codes are present, the POWER lamp will flash code type 8a (long/short), figure 3-50. A vehicle that flashes the 2-times per second pass code may still have history codes stored in memory. 4EAT Transmission (version 2) History Codes Use this procedure to check the 4EAT transmission for history codes in 1990-97 Liberty’s, 1992-97 SVX’s, and 1993-97 Impreza’s. A vehicle that flashes the 2-times per second pass code may still have history codes stored in memory. To place the transmission controller in the diagnostic, history-code display-mode, proceed as follows: 1. Start and warm the engine to operating temperature. Drive the vehicle above 20 kph. 2. Turn off the ignition and set the MANUAL switch OFF. (MANUAL switch is on center console, adjacent to gear selector.) 3. Place the gear selector in PARK and start the engine. The POWER lamp on the instrument panel should light for approximately 2 seconds. 4. Turn the ignition off, place the gear selector in 1ST, and set the MANUAL switch ON. 5. Place the gear selector in 2ND, and set the MANUAL switch OFF. 6. Place the gear selector in 3RD, and set the MANUAL switch ON. 7. Place the gear selector in DRIVE, and set the MANUAL switch OFF. 8. Fully depress and release the throttle to begin manual history code gathering. If no codes are present, the POWER lamp will flash evenly 2-times per second. If codes are present, the POWER lamp will flash code type 8a (long/short). Version 3 See SCANNER on-screen instructions used on Impreza 98-2000 and Forrester. 66 Subaru Subaru – ABS CAUTION: Before attempting any repairs on vehicles fitted with ABS or SRS Airbag systems observe all precautions the manufacturer specifies for these systems. Test Menu for ABS Live Data Models TEST MENU >CODES ONLY DATA ONLY Codes Only This test menu heading is for displaying the ABS ECU codes. When selected the Scanner will request codes from the ABS ECU. Any codes displayed may be either currently active or may have been previously set. Only a maximum of 3 codes can be recorded by the ABS ECU. So the maximum number that will be displayed by the Scanner is 3. When these codes are displayed only the codes set in the ECU are displayed on screen. When a code is transmitted by the vehicle to the Scanner the code will indicate there may be a problem either in the WIRING between the ECU and the indicated sensor/actuator or in the indicated sensor/actuator. These codes can be cleared by selecting CLEAR CODES from the Scanner exit menu. Data Only This test menu selection will display ABS ECU live data only (no codes will be displayed). Some parameters may show a value when the engine is not running, for example Vehicle Speed Sensors. This is a normal function and does not indicate a fault in the vehicle or Scanner. When the vehicle is driven the value should read correctly. See the Australian Data Parameter Manual for descriptions and explanations of the parameters. Manual Code Read During Manual Code Read the SCANNER is not connected to the vehicle but the SCANNER may display on-screen instructions. When a vehicle system is Manual Code Read the codes must be activated by bridging pins together in the diagnostic connector and then read on the Check Engine Lamp. The SCANNER provides on-screen information on how and where to do this under the CODE FUNCTIONS selection. Refer to the diagrams below for the correct pins to bridge to initiate code reading. The SCANNER provides a list of the code numbers and their descriptions on screen, located also under the CODE FUNCTIONS selection. NOTE: When a code is transmitted by the vehicle to the SCANNER the code will indicate there may be a problem either in the WIRING between the ECU and the indicated sensor/actuator or in the indicated sensor/actuator. 67 Subaru 2ND DIAGNOSTIC TERMINAL 123 4 5 6 7 8 LIBERTY/OUTBACK ONLY DIAGNOSTIC CONNECTOR 1ST DIAGNOSTIC TERMINAL DIAGNOSTIC CONNECTOR OTHER THAN LIBERTY/OUTBACK Figure 5:3 Subaru diagnostic connector for ABS. Jump pins as per diagram, key on engine off, read codes on ABS lamp. Clear Codes Code clearing information is accessed from the SCANNER under the CODE FUNCTIONS selection. The SCANNER provides information on how to clear the codes from the ECU. Subaru – SRS Airbag CAUTION: Before attempting any repairs on vehicles fitted with ABS or SRS Airbag systems observe all precautions the manufacturer specifies for these systems. Manual Code Read During Manual Code Read the SCANNER is not connected to the vehicle but the SCANNER may display on-screen instructions. When a vehicle system is Manual Code Read the codes must be activated by bridging pins together in the diagnostic connector and then read on the Check Engine Lamp. The SCANNER provides on-screen information on how and where to do this under the CODE FUNCTIONS selection. Refer to the diagrams below for the correct pins to bridge to initiate code reading. The SCANNER provides a list of the code numbers and their descriptions on screen, located also under the CODE FUNCTIONS selection. NOTE: When a code is transmitted by the vehicle to the SCANNER the code will indicate there may be a problem either in the WIRING between the ECU and the indicated sensor/actuator or in the indicated sensor/actuator. 68 Subaru 2ND DIAGNOSTIC TERMINAL 123 4 5 6 7 8 LIBERTY/OUTBACK ONLY DIAGNOSTIC CONNECTOR 1ST DIAGNOSTIC TERMINAL DIAGNOSTIC CONNECTOR OTHER THAN LIBERTY/OUTBACK Figure 5:4 Subaru diagnostic connector for SRS Airbag. Jump pins as per diagram, key on engine off, read codes on SRS lamp. Clear Codes – SRS Airbag Code clearing information is accessed from the SCANNER under the CODE FUNCTIONS selection. The SCANNER provides information on how to clear the codes from the ECU. Ground pins 1 and 2 simultaneously to clear codes OTHER THAN LIBERTY/OUTBACK Ground pins 2 and 3 simultaneously to clear codes 123 4 5 6 7 8 LIBERTY/OUTBACK ONLY DIAGNOSTIC CONNECTORS 69 Suzuki Suzuki CAUTION FOR ABS AND SRS SYSTEMS Before attempting any repairs on vehicles fitted with ABS or SRS Airbag systems observe all precautions the manufacturer specifies for these systems. Used Import Vehicles Used Import vehicles are vehicles that were sold new in Japan and have since been exported to other countries including Australia and New Zealand. The SCANNER does not list every model that is available but does cover the more popular vehicles that are available. CAUTION: Although every effort has been made, due to the many models available and the lack of information available for these vehicles the information that is contained in the SCANNER for these Used Import vehicles may not always be accurate for the particular model being tested. SCANNER Communication Types The SCANNER supports Codes & Data or Auto Code Read for the Engine and Automatic Transmission systems on some vehicle’s, all other systems are Manual Code Read including all ABS and SRS Airbag systems. The SCANNER will specify what is available on specific vehicles. Connector Type (Codes & Data 16-pin type) Vehicles with the 16-pin type use the DL-16 adaptor and the personality key S-36. VEHICLE CONNECTOR Use DL-16 with specified key. 70 Suzuki Connector Types (Auto Code and Manual Code Read) Suzuki vehicles use two types of diagnostic connectors a 4 pin and a 6 pin. Baleno models use 2 6-pin connectors located in the engine bay fuse box. 4-PIN s Engine s AUTO TRANS (CLOSEST CONNECTOR TO ENGINE) 6-PIN Forward Fender s ENGINE & AUTO TRANS (CLOSEST CONNECTOR TO FENDER) BALENO CONNECTORS IN ENGINE BAY FUSE BOX Figure 6:1 Suzuki diagnostic connectors. (Refer to SCANNER connector message for locations) 71 Suzuki Auto Code Read and Manual Code Read Code Type for Engine, Auto Transmissions, ABS and SRS You can read code type 01 automatically with the AUTO CODE READ function. You also can read code type 01 visually by jumpering two pins together. Then, with the key on and the engine off, observe the flashing lamp on the dash. Code 12 is always displayed first to indicate proper operation of the self-diagnostic system. The lamp flashes each digit as 0.3-second pulses, with 1 second between each digit. If more than one code is present, the lamp will remain off for 3 seconds and then indicate the next code. Each code (including code 12) is flashed three times, before proceeding to the next code. This cycle repeats until the system is reset. CODE TYPE 01 Pattern:10’s and 1’s Read Codes on: CHECK ENGINE lamp Start codes by: Install jumper wire between two pins and turn ignition on When done: Turn ignition off, remove jumper wire, clear codes Code 12 always appears first. Each code repeats three times, including code 12. Code display cycle repeats as long as system is in diagnostic state. 72 Suzuki Suzuki – Engine Codes & Data SCANNER Test Menu TEST MENU >CODES ONLY DATA ONLY Codes Only This test menu heading is for displaying the ECU codes. When selected the SCANNER will request codes from the Engine ECU. Note: This selection may take up to 10 seconds to initiate communications between the SCANNER and the vehicle. Any codes displayed may be either currently active or may have been previously set. When these codes are displayed only the codes set in the ECU are displayed on screen. When a code is transmitted by the vehicle to the SCANNER the code will indicate there may be a problem either in the WIRING between the ECU and the indicated sensor/actuator or in the indicated sensor/actuator. Thse codes can be cleared by selecting CLEAR CODES from the exit menu. See Clear Codes later in this section. Data Only This test menu selection will display ECU live data only (no codes will be displayed). Some parameters may show a value when the engine is not running, for example RPM. This is a normal function and does not indicate a fault in the vehicle or SCANNER. When the vehicle is running the value should read correctly. Note: This selection may take up to 10 seconds to initiate communications between the SCANNER and the vehicle. See the Australian Data Parameters Manual for descriptions and explanations of the parameters. Clear Codes Clear codes is available on Suzuki live data systems. It is accessed from the CODES ONLY exit menu. 73 Suzuki Auto Code Read When using Auto Code Read the SCANNER is connected to the vehicle and will read and display any engine codes transmitted by the vehicle on the screen. Any codes present are displayed on the screen with the code number and description of the code. Suzuki vehicles will transmit a “NO CODES PRESENT” signal as a constant flash. NOTE: When a code is transmitted by the vehicle to the SCANNER the code will indicate there may be a problem either in the WIRING between the ECU and the indicated sensor/actuator or in the indicated sensor/actuator. WHITE WHITE GREEN WHITE GREEN BLACK BLACK BLACK 4-PIN CONNECTOR (EARLY MODEL VEHICLES) 6-PIN CONNECTOR (LATE MODEL VEHICLES EXCEPT BALENO) GREEN (BALENO ONLY) Side power Use Multi-1 adaptor Figure 6:2 Suzuki diagnostic connectors for engine Auto Code Read. Connect Multi-1 as per diagram. (Refer to SCANNER connector message for locations) 74 Suzuki Suzuki – Engine Manual Code Read During Manual Code Read the SCANNER is not connected to the vehicle but may display on-screen instructions. When a vehicle system is Manual Code Read the codes must be activated by bridging pins together in the diagnostic connector and then read on the Check Engine Lamp. The SCANNER provides on screen information on how and where to do this under the CODE FUNCTIONS selection. Refer to the diagrams below for the correct pins to bridge to initiate code reading. The SCANNER provides a list of the code numbers and their descriptions on screen, located also under the CODE FUNCTIONS selection. NOTE: When a code is transmitted by the vehicle to the SCANNER the code will indicate there may be a problem either in the WIRING between the ECU and the indicated sensor/actuator or in the indicated sensor/actuator. JUMP WIRE MANUAL CODES 4-PIN CONNECTOR (EARLY MODEL VEHICLES) MANUAL CODES 6-PIN CONNECTOR (LATE MODEL VEHICLES EXCEPT BALENO) MANUAL CODES (BALENO ONLY) Figure 6:3 Suzuki diagnostic connectors for engine Manual Code Read. Jump pins as per diagram, key on engine off, read codes on Check Engine lamp. (Refer to SCANNER connector message for locations) Clear Codes for Auto Code read and Manual Code Read Code clearing information is accessed from the SCANNER under the CODE FUNCTIONS selection. The SCANNER provides information on how to clear the codes from the ECU. 75 Suzuki Suzuki – Automatic Transmission Codes & Data SCANNER Test Menu TEST MENU >CODES ONLY DATA ONLY Codes Only This test menu heading is for displaying the ECU codes. When selected the SCANNER will request codes from the Engine ECU. Note: This selection may take up to 10 seconds to initiate communications between the SCANNER and the vehicle. Any codes displayed may be either currently active or may have been previously set. When these codes are displayed only the codes set in the ECU are displayed on screen. When a code is transmitted by the vehicle to the SCANNER the code will indicate there may be a problem either in the WIRING between the ECU and the indicated sensor/actuator or in the indicated sensor/actuator. Thse codes can be cleared by selecting CLEAR CODES from the exit menu. See Clear Codes later in this section. Data Only This test menu selection will display ECU live data only (no codes will be displayed). Some parameters may show a value when the engine is not running, for example RPM. This is a normal function and does not indicate a fault in the vehicle or SCANNER. When the vehicle is running the value should read correctly. Note: This selection may take up to 10 seconds to initiate communications between the SCANNER and the vehicle. See the Australian Data Parameters Manual for descriptions and explanations of the parameters. Clear Codes Clear codes is available on Suzuki live data systems. It is accessed from the CODES ONLY exit menu. 76 Suzuki Auto Code Read When using Auto Code Read the SCANNER is connected to the vehicle and will read and display any automatic transmission codes transmitted by the vehicle on the screen. Any codes present are displayed on the screen with the code number and description of the code. Suzuki vehicles will transmit a “NO CODES PRESENT” signal as a constant flash. NOTE: When a code is transmitted by the vehicle to the SCANNER the code will indicate there may be a problem either in the WIRING between the ECU and the indicated sensor/actuator or in the indicated sensor/actuator. WHITE GREEN s s Engine Forward Use Multi-1 adaptor Fender s BLACK BALENO AUTO TRANSMISSION ONLY USING MULTI 1 ADAPTOR Figure 6:4 Suzuki diagnostic connectors for automatic trans Auto Code Read. Connect Multi-1 as per diagram. (Refer to SCANNER connector message for locations) Manual Code Read During Manual Code Read the SCANNER is not connected to the vehicle but may display on-screen instructions. When a vehicle system is Manual Code Read the codes must be activated by bridging pins together in the diagnostic connector and then read on the “O/D” lamp on the dash. The SCANNER provides on screen information on how and where to do this under the CODE FUNCTIONS selection. Refer to the diagrams below for the correct pins to bridge to initiate code reading. The SCANNER provides a list of the code numbers and their descriptions on screen, located also under the CODE FUNCTIONS selection. NOTE: When a code is transmitted by the vehicle to the SCANNER the code will indicate there may be a problem either in the WIRING between the ECU and the indicated sensor/actuator or in the indicated sensor/actuator. 77 Suzuki Suzuki – Automatic Transmission (Manual Code Read continued) JUMP WIRE MANUAL CODES ONLY VITARA 4CYL CONNECTOR LOCATED UP UNDER RH DASH AND ATTACHED TO BRACKET NEAR KICK PANEL V6 VITARA Black connector located on RH fender JUMP WIRE ALL OTHERS BALENO ONLY Figure 6:5 Suzuki diagnostic connectors for auto trans Manual Code Read. Jump pins as per diagram, key on engine, off read codes on O/D lamp. (Refer to SCANNER connector message for locations) Clear Codes for Auto Code read and Manual Code Read Code clearing information is accessed from the SCANNER under the CODE FUNCTIONS selection. The SCANNER provides information on how to clear the codes from the ECU. 78 Suzuki Suzuki – ABS & SRS Airbag CAUTION: Before attempting any repairs on vehicles fitted with ABS or SRS Airbag systems observe all precautions the manufacturer specifies for these systems. Manual Code Read During Manual Code Read the SCANNER is not connected to the vehicle but may display on-screen instructions. When a vehicle system is Manual Code Read the codes must be activated by bridging pins together in the diagnostic connector and then read on the ABS or SRS Lamp. The SCANNER provides on screen information on how and where to do this under the CODE FUNCTIONS selection. Refer to the diagrams below for the correct pins to bridge to initiate code reading. The SCANNER provides a list of the code numbers and their descriptions on screen, located also under the CODE FUNCTIONS selection. NOTE: When a code is transmitted by the vehicle to the SCANNER the code will indicate there may be a problem either in the WIRING between the ECU and the indicated sensor/actuator or in the indicated sensor/actuator. ABS 6-pin connector SRS yellow 4-pin connector SRS late type 2-pin connector Figure 6:6 Suzuki diagnostic connectors for ABS and SRS. Jump pins as per diagram, key on engine off, read codes on ABS or SRS lamp. (Refer to SCANNER connector message for locations) Clear Codes Code clearing information is accessed from the SCANNER under the CODE FUNCTIONS selection. The SCANNER provides information on how to clear the codes from the ECU. 79 Suzuki Suzuki – SRS – Airbag Late model Suzuki vehicles use a 2-pin diagnostic connector. The B terminal must be connected to a known good ground to trigger code reading. A B To Ground Suzuki 2-pin SRS-Airbag diagnostic connector. Ground pin B as per above. See SCANNER for connector location. 80 PAGE INTENTIONALLY LEFT BLANK 81 Appendix B — Vehicle Does Not Communicate With SCANNER Contents General Checks.................................................................81 No Codes are Displayed....................................................................81 Kia vehicles with Auto Code Read ....................................................82 Engine Will Not Start and ECU Will Not Communicate with Ignition On...........................................................82 Engine Runs but Will Not Communicate...........................................83 Check SCANNER Connection and Operation.................83 Check the CHECK ENGINE Lamp....................................84 Special Cases — Specific Vehicles..................................84 1989 and later Hyundai Sonatas . .....................................................84 Using MODIS on Hyundai Excel and S Coupe vehicles ..................85 Subaru Vehicles Using the Multi-2 Adaptor ......................................85 Diagnostic Connector Pinouts ..........................................................86 If a control system fails to communicate with the SCANNER, a problem may exist with the wiring or other circuit parts on the car; or the vehicle identification to the SCANNER may be incorrect. The vehicle’s failure to communicate can be an important symptom for diagnosing a driveability problem. NOTE: Also check vehicle specific information in Part 2. 82 Appendix B — Vehicle Does Not Communicate General Checks Check the following points first: 1. Vehicle identification — Check the vehicle identification entered. The control modules do not all transmit the same amount of data at the same speed. Nor do they all transmit the same information in the same order. Additionally, the SCANNER must address, or “question,” some modules to establish communication. All of these points mean that the SCANNER must know exactly what year and model module it is connected to. If the SCANNER thinks it is receiving data from one car and it is connected to another (through incorrect identificaton), it will either not communicate at all or display some data readings that are clearly incorrect. Always enter a new vehicle identification when testing a new vehicle, even if two vehicles are exactly the same model with the same engine. 2. SCANNER connections — See "Check SCANNER Connection and Operation" for information on SCANNER cables and connections. 3. Loss of power to a control module — The modules receive battery voltage through one or more fuses or fusible links in the wiring harness. Use a wiring diagram to check module connections for battery voltage and ground. If a module fuse or fusible link is open, the module cannot communicate with the SCANNER. 3. Ignition off when connecting SCANNER — Be sure the ignition is off when connecting and disconnecting the SCANNER. If the ignition is on when the SCANNER is connected or disconnected, SCANNER memory may be disrupted. Erase and reenter vehicle identification if this occurs. No Codes are Displayed Most data stream vehicles transmit trouble codes along with their data. Therefore, if the data is displayed, an absence of trouble codes does not indicate a communication problem. Some vehicles transmit trouble codes separately from the data stream. Some vehicles with AUTO CODE READ capability transmit a "pass code," others do not. Therefore, the absence of trouble codes may or may not indicate that there is a communication problem. However, if the car you are testing will not start, or has a driveability symptom, and no codes are present, there probably is a communication problem. 83 Appendix B — Vehicle Does Not Communicate You can diagnose a communication problem on some AUTO CODE READ cars by attempting to manually gather codes. Refer to "Reading Different Code Types" in Scanner Plug-in User’s Manual for vehiclespecific manual code gathering instructions. However, many AUTO CODE READ cars do not provide manual code gathering as an option. You can also try inducing a trouble code. Unfortunately, there is no common way to do this. The method will vary, depending on the vehicle make and model year. Generally, you can induce a code by disconnecting a resistive-type sensor, such as a TPS or coolant temperature sensor. However, the best method is to use your experience based on what you have seen on similar cars in the past. Kia Vehicles with Auto Code Read The Kia electronic control assembly for engine and auto trans continuously monitors engine and transmission operation for conditions that would set codes. If no codes are present, the system will not transmit any for the SCANNER to display. When you press Y in this case to select either key-on, engine-off or engine-running self-test, the SCANNER will display: SELF TEST INITIATED ... WAITING FOR CODES. Because no codes are present for the system to transmit, the display will not change. If the system does not respond within a few seconds, press N to return to the SERVICE CODE MENU. IF NO CODES DISPLAYED AND YOU WISH TO VERIFY THAT THE VEHICLE IS OK PULL A KNOWN SENSOR, RUN TEST AND KNOWN CODE SHOULD APPEAR – REPLACE SENSOR AND CLEAR CODES. Engine Will Not Start and ECU Will Not Communicate With Ignition On If the engine does not start and the PCM will not communicate with the ignition on, follow the instructions in the section titled "Check the CHECK ENGINE Lamp" to see if the vehicle will display codes on the instrument panel lamp. Also make these basic tests: • Battery — Check the battery state of charge and cranking capacity. Note: The SCANNER may appear to operate normally even if the battery does not have enough power to crank the engine or operate the vehicle computer. 84 Appendix B — Vehicle Does Not Communicate • ECU supply voltage — Check a wiring diagram for the location of the ECU fuses or fusible links and test for an open circuit. • ECU ground — Use a wiring diagram to identify the location of the ground connection. An open ground can keep a fuel-injected engine from starting. A high-resistance, or “dirty,” ground can cause overall poor operation. An open ground or battery voltage (B+) circuit on a fuel-injected engine will remove power from the PCM and keep the engine from starting. A carbureted engine may start and run even if the power circuit to the PCM is open. It probably will run very poorly, however, because it will be running without feedback fuel control or spark advance control. Engine Runs But Will Not Communicate The way in which the engine runs can be a clue to the cause of a test problem. If the engine seems to run normally but the PCM will not communicate with the SCANNER, the cause may be a wiring problem to the diagnostic connector that does not affect the rest of the system. If the engine runs poorly, the cause may be a poor system ground or a voltage problem that affects the PCM or the entire system. Refer to the sections, "Check the CHECK ENGINE Lamp" and “Check the diagnostic Connector” for troubleshooting instructions. Check SCANNER Connection And Operation Begin troubleshooting the test or communication problem by determining if the SCANNER is working normally. If the SCANNER works properly on other vehicles, particularly same-model vehicles, the problem is probably in the vehicle, not the SCANNER. If the SCANNER fails to light up or if the readings are unsteady, the SCANNER may be at fault or there may be a power problem on the vehicle. If the SCANNER intermittently resets or goes blank, a wire may be opening intermittently in one of the cables or in the adaptor. Use an ohmmeter to check continuity of the SCANNER data cable from pin to pin between the D-shaped connectors at either end of the cable. 85 Appendix B — Vehicle Does Not Communicate Check the CHECK ENGINE Lamp Many cars and trucks with PCM diagnostic capabilities have a CHECK ENGINE lamp on the instrument panel. On some vehicles, the lamp is labeled simply ENGINE, or has a symbol to indicate the PCM. Regardless of the label, they all can be referred to as the CHECK ENGINE lamp. The CHECK ENGINE lamp can be an important device for checking the PCM’s ability to transmit to the SCANNER. If the SCANNER cannot communicate with the vehicle, disconnect the SCANNER and see if the PCM will flash trouble codes on the CHECK ENGINE lamp. This applies only to some vehicles. Turn the ignition on and verify that the CHECK ENGINE lamp lights with the ignition on and the engine off. If it does not, troubleshoot and repair the problem before going farther. It could be as simple as a burned out lamp bulb or a blown fuse. Refer to the carmaker's shop manual for the CHECK ENGINE lamp troubleshooting procedure on the specific vehicle you are testing. Common causes of CHECK ENGINE lamp circuit problems include: • A blown circuit fuse (GAUGES or other lamp fuse) • A burned-out lamp bulb • A wiring or connector problem • A defective lamp driver • A diagnostic connector problem Special Cases — Specific Vehicles The vehicles listed in the following sections are specific models that may have problems communicating with the SCANNER. 1989 and later Hyundai Sonatas Models with 2.4-litre 4-cylinder, or 3.0-litre V6 sohc engines transmit data at 63 baud. These vehicles can appear to have communication problems when actually, they simply tranmsit data at a very slow speed. This also applies to Scoupe late 1992 to 1995 and Excel 1994 to 2000. The baud rate determines how fast the SCANNER responds to the PCM and how fast the data readings change on the screen. It also affects the time that it takes to record a movie. Readings from these vehicles can take up to seven seconds to change. This display speed, or “data update rate” depends on the ECU; it is not controlled by the SCANNER. 86 Appendix B — Vehicle Does Not Communicate Using MODIS on Hyundai Excel and S Coupe vehicles that use the Hyundai-2 adaptor The following Hyundai vehicles require side power supplied to the side of the Hyundai-2 adaptor for communication to establish with the engine system. Use battery power or cigarette power lead to supply side power to adaptor. Vehicles affected: 1994-1995 Excel 1.5L SOHC 1992-1195 S Coupe1.5L 1992-1995 S Coupe1.5L-T Subaru vehicles using the Multi-2 adaptor Note: Subaru vehicles that use the Multi-2 adaptor must have side power supplied to side socket of adaptor to establish comunication. Use battery power or cigarette power lead to supply side power to adaptor. NOTE: Also check vehicle specific information in Part 2. 87 Appendix B — Vehicle Does Not Communicate Diagnostic Connector Pinouts Use these diagrams to check the diagnostic connectors only and not as a complete guide to check for no communications. Daewoo For Matiz, Espero and others For Nubira and Leganza 88 Appendix B — Vehicle Does Not Communicate Hyundai 1. Engine pulsing 0 to 12 volts 2. Excel with MAP sensor 1992-1994 0 volts 3. Excel 9/1994 to 1995 11 volts Excel 9/1994 to 1995 0 volts s s s Ground s 5 to 8 volts s Auto trans Pulsing 0 to 12 volts Kia Ground s s s s 2.5 to 5 volts Sportage pre 6/99 0 volts 89 Appendix B — Vehicle Does Not Communicate Subaru 90 PAGE INTENTIONALLY LEFT BLANK 91 ®SNAP-ON TOOLS (AUSTRALIA) PTY LTD ABN 55 010 793 683 92 Form ZEEMAUHYU104 11/10