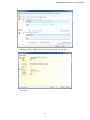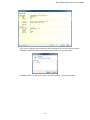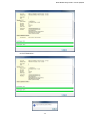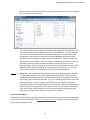
1
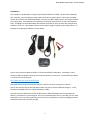
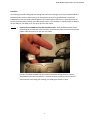
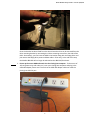
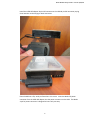
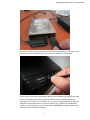
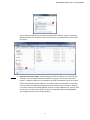
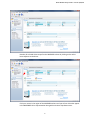
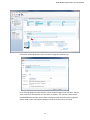
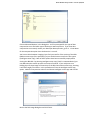
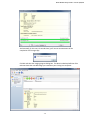
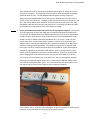
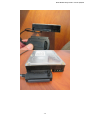
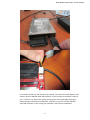
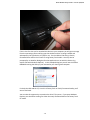
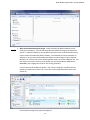
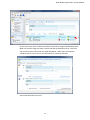
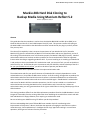
Mackie d8b Disk Cloning Procedure – Revision 3/26/2014 Mackie d8b Hard Disk Cloning to Backup Media Using Macrium Reflect 5.2 Revision 3/26/2014 – bitSync Abstract This guide describes the procedure I used to clone the Mackie d8b 20 GB hard disk drive (HDD) to an identical HDD and also to a Trend 4 GB Compact Flash (CF) card. This process transfers everything on the Mackie d8b’s source HDD to the destination media to include the OS, the plug‐ins, and any session files you may have. The value of this capability is that it ensures the persistence of your Mackie OS 5.0/5.1 (hereafter Mackie OS 5) given the unavailability of Mackie’s OS 5 authorization code server (apparently, and as of this writing, this authorization server still functions properly for Mackie’s d8b plug‐in licenses). Mackie’s authorization code server has been unable to produce the correct authorization codes for legitimate licenses when installing or upgrading to Mackie OS 5. If you are installing or re‐installing your Mackie OS 5 and you do not know your Mackie OS 5 authorization code, you are out of luck; you will not be able to authorize it for use. Should that be your circumstance and your HDD fails, without a backup of the OS 5 for your specific d8b control surface, you will not be able to operate your Mackie OS 5. The earlier Mackie OS 3 is operable without this unique authorization code. The authorization code for your specific instance of the Mackie OS is uniquely dependent on a value maintained on an IC chip inside the d8b control surface. As of this writing, the algorithm to produce the authorization code from the ID within the control surface is unknown and Mackie has no estimate for when or whether this authorization code server will be available again. Should Mackie’s authorization code server for Mackie OS 5 be restored to operations, the OS 5 can be installed or re‐installed and authorized at that time using the Mackie server’s authorization code. But until then, without an authorization code, your only guaranteed use of OS 5 given a HDD failure is having a backup copy of that HDD elsewhere. This cloning procedure differs from the HDD replacement procedure found in the d8b database in that it images the new media from the existing HDD rather than rebuilding the new disk from scratch with MS‐
DOS and Mackie OS 5 floppy diskettes, thus requiring an authorization code. Be sure to backup your HDD files using FTP before you do this procedure! I’d like to acknowledge the input of fellow d8b Forum member Carlo for contributing to the improvement of this process. Where I had taken the approach of imaging the entire drive to make a restoration copy, Carlo used Macrium’s ‘Intelligent Sector Copy’ approach resulting in a much faster operation, shaving tens of minutes from the procedure. ‐1‐ Mackie d8b Disk Cloning Procedure – Revision 3/26/2014 Note: The information in this procedure was correct as of the date of publication. Service marks and trademarks found in this document are the property of their respective owners. This procedure is not endorsed by or affiliated with MacriumTM, MackieTM or Loud TechnologiesTM in any way. The user of this procedure accepts all liability for the outcome, no matter how tragic. ‐2‐ Mackie d8b Disk Cloning Procedure – Revision 3/26/2014 Prerequisites This procedure is predicated on having a fully functional Mackie OS 5 HDD. You will need a Windows host computer, your cloning host (I used a Win7 x64 machine), with at least 1 USB 2.0 port available. You will also need to have a USB2‐IDE adapter to mount your d8b’s HDD as well as your target media to your cloning host. These adapters are inexpensive and can be found online or at your local computer shop. The adapter must accommodate IDE interfaces and USB 2.0; some of these offer multiple drive interfaces, SATA, etc. Your adapter should include a power supply to power up the subject drives. An example of an appropriate adapter is shown below. You will need to get the Macrium Reflect 5.2 free/trial software for Windows. Presumably, newer releases of Macrium Reflect will retain the same functionality as version 5.2. The free Macrium Reflect 5.2 software can be found here – http://www.macrium.com/reflectfree.aspx Download and install the free Macrium Reflect 5.2 software on your cloning host computer. You will also need to have on hand whatever media you plan to write the d8b HDD image to. In this procedure both HDD and CF are used as destination media. Once you have your destination backup media and your USB2‐IDE adapter and you have Macrium Reflect 5.2 installed on your cloning host, and you have backed up the files on your HDD, you are ready to proceed. Be sure to wear a grounding wrist strap for this procedure to prevent damaging electronic components with static electricity charges. ‐3‐ Mackie d8b Disk Cloning Procedure – Revision 3/26/2014 Procedure The following procedure will guide you through the process of creating a clone of your Mackie d8b OS 5 HDD onto either another HDD or onto CF for the purposes of preserving a Mackie OS 5 installation, independent of the functional status of Mackie’s OS 5 authorization code server or your possession of the correct authorization code for your d8b control surface. This procedure is equally useful for Mackie OS 3 for d8b, for your HDR, or for any other drive for that matter. 1. Remove the stock HDD from the d8b CPU/PSU chassis ‐ With the d8b CPU/PSU chassis powered down and the case cover removed, remove the DC power connector and the IDE ribbon cable connector from the rear of the HDD. In order to remove the HDD from the chassis the bracket holding the drive must be detached from the base of the chassis. Remove the drive mounting bracket from the chassis base by unscrewing the 4 locking nuts holding the bracket in place. ‐4‐ Mackie d8b Disk Cloning Procedure – Revision 3/26/2014 Once the bracket has been freed from the chassis base the drive can be removed from the drive mounting bracket by unscrewing the 4 drive mounting screws from the sides of the HDD. Alternatively, you can leave the HDD in the bracket along with the floppy drive and just remove the floppy drive power and data cables. Either way, at the end of this step the Mackie d8b HDD will no longer be tethered to the d8b CPU/PSU chassis. 2. Power up the source HDD and attach it to the cloning host computer ‐ Find a source of 115vac (power strip, wall outlet, etc.) near your cloning host computer and plug in the USB2‐IDE adapter power cord. Ensure that the USB2‐IDE adapter cable can reach the cloning host USB 2.0 port. ‐5‐ Mackie d8b Disk Cloning Procedure – Revision 3/26/2014 Install the USB2‐IDE adapter 40‐pin IDE connector to the HDD 40‐pin IDE connector paying close attention to the keying on both connectors. Place the HDD on a flat, sturdy surface where it is secure. Insert the Molex DC power connector from the USB2‐IDE adapter into the power connector on the HDD. The Molex 4‐pin DC power connector is designed to insert only one way. ‐6‐ Mackie d8b Disk Cloning Procedure – Revision 3/26/2014 You will hear the drive spin up to speed. Once the drive speed appears to be stable, insert the USB2‐IDE cable USB connector in your cloning host computer’s USB 2.0 port. If this is the first time you’ve attached this device to your computer you will get a message from the operating system notifying you that the device driver is being installed and subsequently that your device is ready for use. You may also be prompted by an AutoPlay dialog box for what application to use with this device (e.g., explore files with Windows Explorer). In this dialog box you will see the volume ‘MKIED8B3’ naming the HDD you just mounted to your cloning host computer. ‐7‐ Mackie d8b Disk Cloning Procedure – Revision 3/26/2014 You can take this opportunity to examine the d8b HDD’s FAT32 file system. If you open Windows Explorer you should be able to see the directory and file contents of the FAT32 file system. 3. Copy the source drive image ‐ Invoke the Macrium Reflect software on the cloning host computer. If you already have Macrium Reflect running, it’s best to shut it down and restart it. If Macrium Reflect is running before the HDD is mounted the drive may not be visible to the Macrium Reflect software. Once booted you’ll be prompted as to whether or not you want to allow Macrium Reflect to make changes to your computer. Respond ‘Yes’ and you will see the following display under the ‘Create a Backup’ tab. You may have to scroll your view but on this display you will see the Mackie HDD volume MKIED8B3, your imaging source for this cloning procedure. ‐8‐ Mackie d8b Disk Cloning Procedure – Revision 3/26/2014 Deselect all selected drives except for the MKIED8B3 volume by clicking on the select boxes adjacent to the drives. Click your mouse in the region of the MKIED8B3 volume and you will see a blue bar appear in the MKIED8B3’s drive representation along with an Actions drop‐down menu. ‐9‐ Mackie d8b Disk Cloning Procedure – Revision 3/26/2014 Click on the Actions drop‐down menu and select ‘Image this partition only’. In the ensuing dialog box select a folder to write the disk image to and click Next. You will see a summary of the operation you are about to perform. The summary should name the MKIED8B3 volume label you are about to image and the name of the disk image that will be saved on your cloning host computer and in which directory it will reside. ‐10‐ Mackie d8b Disk Cloning Procedure – Revision 3/26/2014 Click on Advanced Options in this dialog box. You’ll be prompted for the type of data compression to use and which type of backup you want to perform. If you trust data compression to accurately restore your data upon decompression, go for it. I chose None for the compression option since the data size is so small. You have a choice between imaging a byte‐for‐byte transfer of the entirety of the HDD (Make an exact copy of the partition(s)) or just the disk sectors used in the file system (Intelligent sector copy). Both of these options have been successfully employed for cloning the d8b HDD. By selecting Intelligent sector copy (Carlo’s recommendation) you can abbreviate the transfer process to a matter of seconds. If you really want a no kidding, byte‐for‐byte image of the entirety of the disk then make an exact copy, knowing it will take roughly 13 minutes. In this procedure we’ll use the Intelligent sector copy option. Make the compression selection and choose Intelligent sector copy and click OK. Back to the Disk Image dialog box and click Finish. ‐11‐ Mackie d8b Disk Cloning Procedure – Revision 3/26/2014 You’ll see a dialog box asking if you want to run now – choose Run this backup now. If you like, you can choose to create an XML Backup Definition File to abbreviate the process for future use. Make your selection and press OK. You’ll see a dialog box showing the progression of the backup. ‐12‐ Mackie d8b Disk Cloning Procedure – Revision 3/26/2014 And eventually (in this case, 12 seconds later) you’ll see an announcement of the completion of the image copy. Click OK and close the imaging progress dialog box. The Macrium Backup Definition Files tab now shows the new d8b image you created on your cloning host computer. ‐13‐ Mackie d8b Disk Cloning Procedure – Revision 3/26/2014 This concludes the step for transferring the Mackie HDD image to an image file on your cloning host computer. This image file will be the source file for writing out to whatever media you want to clone. Use the Windows USB management utility to eject the temporarily mounted MKIED8B3 source HDD volume. Windows will announce that it is safe to remove this USB device. Unplug the USB2‐IDE cable from the host computer’s USB port. Remove the Molex power connector from the source drive and remove the USB2‐
IDE adapter cable IDE connector from the source drive. Let the HDD spin down and then set the d8b source HDD aside for later re‐installation or storage. 4. Power up the destination media and attach it to the cloning host computer ‐ For this part of the procedure we will write the image out to two different destination media types; one drive will be a Maxtor 6L020J1 20 GB IDE HDD identical to the one that shipped with my d8b, the other drive will be a 4 GB Compact Flash (CF) (Team TG004G2NCFJX 233X) seated in an IDE‐CF adapter (Startech PLATEIDE2CF RTL). For this CF, I used a PCI slot bracket type; there are other form factors available; I chose the PCI slot bracket type adapter so that I could access the boot/OS drive media from the back of the d8b chassis without unracking or opening the d8b. The procedure is essentially the same for both drive types, but the CF example and illustrations are provided for anyone who might be considering migrating from the Mackie d8b HDD to a silent CF storage solution. More details on the CF upgrade can be found in the d8b database. Please note that the HDD and CF imaging were done at different times; they are just combined here for brevity. Find a source of 115vac (power strip, wall outlet, etc.) near your cloning host computer and plug in the USB2‐IDE adapter power cord. Ensure that the USB2‐IDE adapter cable can reach the cloning host USB 2.0 port. This is more than likely the same power source you used to copy the source drive image to your cloning host computer. For the HDD or the CF, install the USB2‐IDE adapter 40‐pin IDE connector to the 40‐pin IDE connector paying close attention to the keying on both connectors. ‐14‐ Mackie d8b Disk Cloning Procedure – Revision 3/26/2014 ‐15‐ Mackie d8b Disk Cloning Procedure – Revision 3/26/2014 Place the HDD or the IDE‐CF adapter on a flat, sturdy surface where it is secure. Insert the Molex DC power connector from the USB2‐IDE adapter into the power connector on the destination media. The Molex 4‐pin DC power connector is designed to insert only one way. For the HDD you will use the larger Molex from factor plug. For the IDE‐CF adapter you’ll use the smaller, floppy drive Molex form factor plug, which may require a power plug adapter. ‐16‐ Mackie d8b Disk Cloning Procedure – Revision 3/26/2014 For the HDD you will hear the drive spin up to speed. Once the drive speed appears to be stable, insert the USB2‐IDE cable USB connector in your cloning host computer’s USB 2.0 port. For the CF, you won’t hear a thing, this being one of the advantages of using CF, another being no possibility of a HDD crash. With the CF you can insert the USB2‐IDE cable USB connector in your cloning host computer’s USB 2.0 port immediately. ‐17‐ Mackie d8b Disk Cloning Procedure – Revision 3/26/2014 If this is the first time you’ve attached this device to your computer you will get a message from the operating system notifying you that the device driver is being installed and subsequently that your device is ready for use. For the HDD we’ll be using a freshly formatted drive and for the CF we’ll be using factory fresh media. You may also be prompted by an AutoPlay dialog box for what application to use with this device (e.g., explore files with Windows Explorer). In this example dialog box you will see the volume 00000000 naming the HDD you just mounted to your cloning host computer. For both the HDD and the CF, since this is factory fresh or freshly formatted media, you’ll see no files listed. You can take this opportunity to examine the drive’s file system. If you open Windows Explorer you should see nothing for either the newly formatted HDD or the factory fresh CF media. ‐18‐ Mackie d8b Disk Cloning Procedure – Revision 3/26/2014 5. Write out the destination drive image ‐ Invoke the Macrium Reflect software on the cloning host computer. If you already have Macrium Reflect running, shut it down and restart it. If Macrium Reflect is running before the new media is mounted the drive may not be visible to the Macrium Reflect software. Once booted you’ll be prompted as to whether or not you want to allow Macrium Reflect to make changes to your computer. Respond ‘Yes’ and you will see the following display under the ‘Create a Backup’ tab. You may have to scroll your view but on this display you will see the Mackie HDD volume MKIED8B3, your imaging source file for this cloning procedure. Click the Restore tab on Macrium Reflect. You’ll see the image file available from the backup you made in the earlier step. You’ll also see the target destination drive to be written to. Click on Restore Image for the desired image file. ‐19‐ Mackie d8b Disk Cloning Procedure – Revision 3/26/2014 On the next screen you’ll see Macrium Reflect’s Source drive image and Destination drive. Make sure that the image you want is shown and that the destination drive is the drive you currently have mounted with the USB2‐IDE adapter. When you are completely confident that the correct source and destination are selected, click Next. Source and destination for the CF ‐20‐ Mackie d8b Disk Cloning Procedure – Revision 3/26/2014 A summary of the pending restore operation is displayed. For the HDD ‐ or for the CF – ‐21‐ Mackie d8b Disk Cloning Procedure – Revision 3/26/2014 This is your last opportunity to make sure you’re writing out to the correct volume and not accidentally overwriting a drive with all the family photos on it. Check carefully. No kidding, make sure you’ve got it right. Then click Continue. The HDD destination ‐ ‐22‐ Mackie d8b Disk Cloning Procedure – Revision 3/26/2014 or the CF destination ‐ ‐23‐ Mackie d8b Disk Cloning Procedure – Revision 3/26/2014 Windows Explorer will automatically come up showing the contents of your newly imaged drive, a carbon copy of the source. This concludes the step for transferring the Mackie HDD image from an image file on your cloning host computer onto a destination medium, either HDD or CF. This new media will serve as an exact replacement for your source boot/OS media. Use the Windows USB management utility to eject the temporarily mounted MKIED8B3 destination volume. Windows will announce that it is safe to remove this USB device. Unplug the USB2‐IDE cable from the host computer’s USB port. Remove the Molex power connector from the destination drive and remove the USB2‐IDE adapter cable IDE connector from the destination drive. If you’re writing out to a HDD, let the HDD spin down and then set the d8b HDD aside for later re‐installation or storage. If you’re writing out to CF, you don’t have to wait for anything, just disconnect the CF from the attached adapter 6. Wrap it up – You can dismiss Macrium Reflect and any open Windows Explorer windows. It’s a good idea to check out your newly imaged media in your d8b. Install your newly imaged boot/OS media and make sure the system boots properly and that all your session files and plug‐ins are where you left them. If you’re re‐installing your HDD just reverse the removal procedure. If you’re replacing your HDD with a newly imaged CF, follow the procedures elsewhere in the d8b database for CF installation. Button up the d8b CPU/PSU chassis and rest easy knowing that even if you don’t have your Mackie OS 5 authorization code, you still have a backup image of your OS 5 that will keep you going even though there may be no Mackie OS 5 authorization code server available. Corrections and Updates Please submit any corrections and change requests for this procedure by way of Private Messaging (PM) to user bitSync on the new d8b forum at http://www.d8bforum.com/. Special thanks to Petersueco for hosting and managing this forum. ‐24‐