1
[]
®
AIR CO
Useand CareManual
AIBEACONOIC_ON£I}O
P£_._A
_ABiTACIONES
Manual de Use y Ma_stenimiento
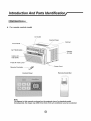
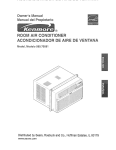
Remote control
f_
AW-10CRI
}f
FLU
:
r
}:ii::
?
: _
illllllllllllllllllllllllllllllll
i
2 il :?illlllllllllllllllllllllllllll
: 2 :::::::
Mechanical control
:)
AW-i OCM1 FLU
i
}
a
;2: 2:::: 2 2::22; 22:/22 ?:: 2::: 2:::::::::::::::::::::::::; £
i
2
....
''
--
/
.¢
Thank you for purchasing an Admiral"room air conditioner. P_ease read this "Use and Care ManuaI" carefully
before instai|ing and using this appliance. Keep this manuat for future reference.
MLcbase f_rac as f:_o_ ompe U_-_
aide acor_dicio__ado .a_mi_
Lea at:entame_te e 'Mar_,_a de Uso y
Mantenimie¢_to' a_te de ir_staiar y uti_izar este p_oducto. Co serve este mar_ual pa_a co_su_ ado en el t,£_Jas.
For Service Call 1 877 465 3566
Para obteser seivicio t(sc,,x_ico_
Itame al 1 877 465 356_
Page,
Air Conditioner Safety
....
......................
_ntreductien and Pa,_sidentification
..............
.....
2_3
4-5
Electrtca! Specifications
Tips Before Installation
Installationinstructions
°.. 8o10
Operating instructions
,, 11-14
Care and Maintenance
m
TroubleshootingGuide
Warranty
.....
15
.....
!6
...............................
Page,
lntreducci6n ...................
.....
Identificaci6n de las Piezas .......
.. i8-19
£specificaciones E!_ctric_s
....... 20
.......
!8
Consejos Antes _ela Instalaci_n ....
.....
Instruccionesde _nsta!a¢i6n ........
,. 22-24
Instruccionesde OperatiOn
.. 25-28
......
21
Cuida_o y Man_enimiento ..........
......
29
Guta para I_ Soluci6n _e Problemas
......
30
What YouNeedto KnowAboutSafety Instructions
Warning and important Safety instructions appearing in this manua! a_e not meant to cover
all possible conditions and situations that may occoc Common sense, caution, and care
must be exercised when operating or cleaning tools and equipment.
Always contact your deaie5 distributor, service agent, or manufacturer about problems or
conditions you do not understand.
This:is the safety alert symbol tt s used to a_ertyou to potential personal injury hazards
ai! safety messagesthat foiiOWthis symbol tO avoiidpossible inlu_yor deat:k
DANGER' nd cate,_
_ an imminently hazardous situation which, f not
avoided, wi!! resuit: in death or serious in ury,
WARNING indicates a potentially hazardoussituation which, if not
avoided, could result in death or' serious injury,,,
CAUTIONindicated a potentially hazardous situation which if not
avoided, may result in reiinoror moderate injury,
..................................................................................
CAUTIONused without the safety alert symbo}indicated a
! CAUTioN
property damage,
PORTANT
To reduce the risk of fire, eiectrica]
shock, or injury when using your air
conditioner;, follow these basic precautions:
• Plug into a grounded
3_prong out!or.
,, Do not use an extension
= Do net remove
,,' gnptug air conditioning
before servicing,
ground prong.
Use
two
or more
and install
people
cord,
to move
air conditioner,
THESE INSTRUCTIONS
The potableai_cond tloner
shouldbe conneoted
fo a 115 V_60 Hz 15_ or R0_,am#fiJsed 3@_n@
Power Supply Cord
• The use of a _im_deiay fuse or time_,_ay c#suit
bre_akeriS recommer!ded
A.IIwidng mus_ c_'np_y with local mad natioeaJ
et_strical _d_
and be Installed by a qua!iliad
eiectr_cian if you have any questions coetact
a qualdied electdeia_,
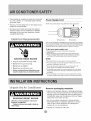
Ebctrical Requirements
ELECTRIC
B Test ButtOn
S_OCK _AZASII
• Pla_ into_ grounded
• Do r_t
A Bes_ B_wte_
3_@rong eufiet
remove groaad
prong,
Do r_ot uae ae adapter,
Do _ot u._e an extension
cord,
" Failure to fellow _ese instructions can
resuR in de_
fire_ er electrical
shook,
Unpack the Air C0ndit:i0 er
EXCESSIVE
WE!6_T
HAZARD
Use two or mo_e _epte
to move and
install air coraltloner,
Failure to _e _o _an re_u!! t# back or
ell'mr injttry.
Remove
packaging
materials
Remove a_'_dproperly dispose o_ _ckag#_# materials
Remove tape and glue residue #ore eu_acee before
t_ming on lhe air condAioner.
Rub a small amount
o_ iqu_ @sh soap over the _heslve
w_h your fingers
Wipe wth warm water and dP#r
• Do not use sharp 7nsfrume_ts, rubbing alcohol
flammable fluids_ or abrasive oleaners to remove
tape e_ gtue_ These products can damage the
surface of your air conditior_e_
• Handle
aft conditioner
with care°
Thank _u for
provides
ff pro_tty
ins
ins
this' roan air
_ c_l
your home, This USE AND CARE MANUAL
#on ne
_¢ the proper care and maJnte#ance of _ur new room air condit_ne_
maJn'ta_n_, your air conditioner wil_ give you many years of trouble h_e epe_tian. To avoid
read instt'ucdens completely before starting. "Tl_ismanuat contains infe_a#on for the
and c_ra#en
For mechanlca!
Ne_;
The fig#resin
Cens_uent/y,
of your room air condi#ene_
control
mode|
this manual a_ bas_ on :the externa! view era atandand _deL
the shape may di_r from tha_ of the alr cendltiener ye# ha_ aeSected.
For remote contro| mode!
Power Cod
Note:
The figures in this manual are, ba.s_ on the external view of a standard medial
Conseq_._ently, the shape may differ #ore that of th_ air conditioner you have setested_
A_ wi_ng must comply w_th _e_l and national
e_ec_rica_codes and must be insia_ed by a
q_Ja_ieedele_rician
Once you have any
questions, regarding t_e fo#c_wing inst_Jctions,
co_act a qual#ied e_ridan
2. Che_
_f the a_r _ndf_ener
has; a serial p_ate rating
d !t5 veils and up to and in_ud_ag 75 amps
the uni_ maybe on a fu_ or circuit breaker
wi_ other devils
However, the maximum
amps of at_
on that fuse or circuit
breaker can not exceed _e ampe of the fuse
of circuit breake_
avai_ab:_epower supply and :resolve aey
wiring p_ebiems BEFORE i_sta#ing and ope_atJeg
this umit
If the _ir _ndiflener
has a serial p_ate rating
of 1!5 vo_ts ned greater than 7.5 amps _t
mua_ have _ts ow_ fuse o_ circuit breaker,
a_d :no ether devi_ or u_it should be
operated o# _he fuse er circuit breaker.
3. For _r
To avoid the possib{iity of per_na_ ir_ju_/,
d_scaane¢t power to the _tt before _stall_g
safety and protection:
This unit _s
grounded throughthepower cord when
p_uggedintoa ma_ch_r_waiio_et,,_fyou are
not sure whether your wa|i| outlet is pro_dy
grounded, please _nsu_t
e|ectriciae,
a qua|tiled
4. The 'wa!_ou_let(3op_} _us_ match _he p_
(_p_R) oa the _rv.ice cord s_pplied "with the u#_o
DO NOT use p_ug a_apters or extension cord
& The _ti#g plate on _he umlt _n_in;s
e!ectd_l
and other i[echni_ da_o The rating p_ate is _o_ted
o_ the dght side of _e unit.
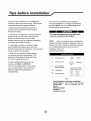
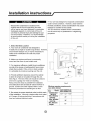
YourRoommr Condit:_oner
unit
is designed b
be h_ghlye_cient arid save energy,, Fo_ow these
_ecommendations
for greater efficiency,
1. Sol,oct thermostat setting that suits your
c#mfoA Meeds and _eave the ff_ermostat at:
'tbur Room Air CoodiHoner was designed
for e_sy _nstaih_ion in _ single or doub_e-h£%
window. NOTE: This ur_i__ NOT designed for
vedii_[ (s!_er type) w-indows_
2_The fi_ter is very efficient in remevi% airborne
paAide& Keep air fi_tet ciean, Norma_y flter
should _ cle_r_ed once a _oR[h, Mote
frequent c_eaning may _ necessa_
on outdoor a_d iad_r air quality.
de_nding
3 Use drape& curtains, or shades to keep
direct sun}ig;ht from heating your room, but
DO NOT obstru_ the air conditioner_ Allow _ree(3}
inches a_und unit to Circ_4!ate_
NOT_;
Save the shipping _rto_
arid pack_%
materials for future s_o_ge or transpsd of _he uniL
Ptea_ check the eo_te_ of hardware kit against
_e correspondin_ mode_ che_k _ist,F_r
testa[laden tithe unit.
4. StaA your air conditioner before outdoor
ar _cornes ho_ and un_mfod_ble.
This
_voids a_ _att[a! _od
the u_ff is co_ng
5, When ou_r
of d_scornfoA whi_e
off the _m
temperature
is _ol
(?"':"
'.#4"Sc'_e'_s(!2)
2i5"Sc_e,w_(8}
enough use HIGH or LOW FAN
only TNs ei_cul_es indoer air, p_._vidi%
some c@ling oomfo¢ and uLilizes less
eiectricity than when eperati% o_
_lif_
_ettin 9,
Tools N_ded for Window Installation
_w
drive_s: Both Phiiip_ _nd flat head
Power drill
1/8 inch diameter dd_f bit
Penei_
Measuring tape
Carpenters level
E Your unit was designed _o evaporate co_densatb_
u_er aerma_ c_it_on&
Hewever_ _nde_e×treme
Becausethe_mp_esBorisheatedenthe
_nt_o[ssided the unit (right si_e), this side
humidity _ed_t_oae excess _nde_ation
wilt _ heavier ar_ mere awkward _ manipulate°
inadequate suppo_ on contr_ side d the unit
_n result _npercent _nju_ and damage b your
unit and greedy, Bherefore, it is re.remanded
to have som_ne assist you dunng the insta]_ation
d thisuniL
may ¢_use
basepa# to, ove_ow Rethe _tside.
The u_it sheuJd be l_s_aHed where condensation
_n_eff can.t
drip o_ p_estrians
or neighboring
1. Select the Best Location
AwniR_
A, Your t_m att _ndl_ioa÷r was de_ign_ b
A ÷asi!y _nte a s!ng!e or doeb_e hung win_ew,
However,
since window designs vary, it m_y be ne_ry
make some medificatbns for safe and proof
;ns_ltatbn
to
B, Make sure window and frame is _ructurally
_und a_d _r_ from d_ and retted wo_,
C For ma×imum efft,ci_cy, ias_!t the air conditioner
on side of the house or building which favors _re
shade than sun_ighL _fthe ua_t is _ direc_ su_/ighL
it is advisable Reprovide ae awning over the uniL
D Provide sentient
deara_
around lhe cabJae!
to allow for ampb ai_ gtrcula_Jen lbreu,g_ the u#iL
Gru_d
See _@_2). The rear of the unit _ould _ outdoors
a#d _o¢ in a garage nor inside of a building.
Keep uRit as far away as possible from ebstacles
and obs_rucaens a_ at toast 30" above _e f_r or
g_und CuAai_s and o_her objecls within a room
_houtd be prevented [tom blocking the air flc_.
Fig.2
Wt#dow e_ai_g
reqebemee_
(see t_ble belew_
E. Be cer_ai_ the proper e_tti_l
outlet i_ within reaCh
o_the installation Use ea!y a single out/at circuit rat_
at_t5 ampso All w;ri_g sheuW be i_ a_erdan_
_o_i and n_.bnal e_ectd_ codes
wi_
e_ng
Mi_, Wiadew
15_,
_
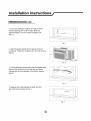
1, !f _ur air conditioner _bi_et _ _ w i aeo
it: w_il fff
^4"
*_
38"
wimdow o_n#mga z
,o
inwide, Minimum
openin# height is 15" _om bottem of sash _o sill
2_ _nsed the guide panels into _e gu des ef _he air
c_di_ione{: Fasten the _ins
ta _h÷ unit wi#_ screws
F!g_ 2
3, Cut the adbesive@ack_
_al strip the window w_th,
Remove the backing f_om the seal stdp and attach
the seai s_rip te the underside of the _ttom: window,
4 Measure _e inside wind_
_e _ater
si!_width a_ fi#_
line as shown in Fig 4.
[!
........
5_#_s_!!theL
b_ckeLs oa the outer sill with #_e
sh_ s_de of the bracket against the back of he
inner si_L _nst,all one L bracket 8,1" to each side
af center line, See Fig 5,
& Carefully l_A_he air cond{_aner and slide it into
the open w_ndow_ Make s_m _he _ttem gu_e of
he air _nd_t_oner drops !ere _he notches of the L
brackets When the air c_ditioner
drops into _he L
brackets_ the air conditioner wil} be centered [n w_ndow
e_ning as show inFig 6
While steadying the air candit©nef_ _reNI]y
b#ng
the window sash down behind [he top cha_nei
of _e air _nditk}neB as shown in Fig 7
First, fix beth sides o_e _he wind_.*_ sW w_th two 3/4 _'
s_-ews and on_ 2/5" scr_
( which _sunscrewe_ f_om
each s_de of the unit), Then fl× _op channel to widow
sash with one 3/4" scow and fi× s_e cu&a#_ frays
with four 314" screws as shown inFig6
Fi# 6
7 !f storm window presents intederence_ fasten a
2" wide wood s_rip [a the inner windaw sill acrass
the full wid_ af the sill The 'wo_ strip shouJd be hick
enough to raise _he height afhhe wind_ sill so that
he u n_tcan be Installed witha_t t_t,ede_n_ _m _he
storm window #ame, as shaw in Hg, 8.
Top of w_d strip should _ approximately 3/4" higher
than the storm window frame to he_p coedensafiee to
d_ain pre_dy
to _heeu_ide.
!ns[a_ a se_nd wood st@ (a£preximate_y 6" !ORgby
1lf2"wide a_d same thickness :as fl_t strip} _nthe center
Fig 7
d hhe outer sill flush against the back d _e i_ner sill
Screw the L brackets into this stri_,
This wil_ raise the L bracket as shown in F_go8.
F@,8
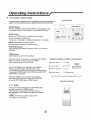
For mechanica!
contro!
model
MODE
The mode keob _ntrots
fan s_eds
and oooling
speeds, To _t desired cooling tempera[are simply
rotate Me mode _mob dia_ _ _he appropriate
_tt_ng, See Fig, 9,
The thermostat au_omat_y
c_ntro_s 'the _iing
cycle (compres_t)of
the 8# conditIoner to mairda_e
m_m [em_rature., However, the fan motor wl/|
_inue
to opera[e after the compressor (cooling
cycle) is _m£1_t_.
See Fig&
L_
M_e knob
Thermostat knob
FAN will circuie4e the 8it at a minimum s_
NIGH FAN w_ circulate the air _t a ran×imam s_
m
LOW COOL p_vides _ing,
automatica_#y with
minimum _ir c_reu_ation Recomme_d_
for aighttime use,
HIGH COOL provides e_iing_
aul_3mat_iiy
with
q_ick cooling 0¢ for extremely ho_ days, Once r_m
_sc_led,
redu_
_tti_g
_o LOW COOL,
OFF wi_Jce;mplete_¥ shut-off the unit:
NO_;
After setting the _de
minutes before swishing
al;!_ 3
_ ano_he;_mode
, When #sing FAN _ntroL [urn slowly a_bwing on#
Wh÷_ usi#g THERMOSTAT, _e s_Jre_ aliow three
mi#utes b_or_ cha#gi_ temperature. Adjus4_ng
t_o quJ_y _ay cause an eve#end resulting i# a
blown fuse,
For r_mote control model
Contro_ Pane_
ON/OFF buffen
The air condit_er
will be staAed 'when it is energized or will
be s_op#_ when A _s In oper_tion_ if you press this button
MODE button
Each time MODE butch is pressed Me operatb#
mode is changed _n sequ_a_:
CO0 LING _ FAN ONLY-_ENE RGY SAVING-_COOLiNG
NOTE; After sett_n@_e mode allow 3
minutes before swi_;hing _o aaoeher mode.
FAN SPEED bu_ea
U_d to selec_ fan s_ed
TIMER button
U_d te set or _i
in sequer_c÷ auto_ tow, medium
_imer _erat_on,
Whe_ the unitis inoper_ion, you _n set: OFF TIMER.
Whe_ _he un_ _soff, y_ _.n se_ ON TIMER,
_imer se[ting _g÷ is 0 to 2:4 hour,
if the OFF T_MER is s_L t_he_imer LED dispiays
_he re _inin 9 _ime _e turn eft _he uni_ for on_y
12 second& the_ LED shifts to display set temperature,
if y_ press T_MER bUttOn w_in _he !2 seconds, OFF
TtM_R w_ll _ candied
if the ON TIM_R is set, the t_mer LED displays
the remaining time to turn on the unit,, if ye_ wa_t
to ea_
ON TIMER, _ss TIMER _ton
Used _ set room temperature in COOUNG mode
0_ used to set time _nT!MER mode°
ill the two keys. are pressed at Me same time,
the temperature LED display wi!l affemate between
'C and 'I:'_
NOTE_ Temperature se_mg range isfrom
t9%. (66T)_e
3t_C'(88°Y)
iaeieaUo_
symbols
_ LED oa _atro|
panel;
Display _e_ _e_p
High fan sr_d
_2_ Enemy sav_r_
Re_e
Cent_ffer
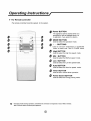
For Remote
cont_]|er
The_mote controller t_nsmi_ signals to the system
Power
6
i
m
i
BUTTON
The appliance _! _ st_
when il is
energ_z_ or will _ ste_ed when i_is
in operati_no ;f you press _hi_ button_
Used to sele_ the operation m_eo
.............................................
÷ _-" BU_ONS
Used 'to se[ r_m _em_ratu_
i# COOLING
mode e_ used _ _t
_ime inTI M_R mode°
High BUTTON
Used to se|ect the high fa_ sp_
mode_
Mid
Used to se}e_ the Mie {an speed mode°
Low
BUTTON
Used to se_e_ the Low fan _ed
mode,
Auto BUTTON
Used to &e_e_ the Auto fan s_d
mode
Timer BU_ON
Used _e se_ or canoe! _rner o_rat_en
Power Save_ BU_ON
Used _0 select the Energy_saving mode
b, For Remote
contro||er
How to insert the Batteries
Remove the batte_ _over a¢_rding
to _he arrow direc_ion_
Insert new batlerie_ mak_n9 sure thatthe
bat_e_ a_e match_ _rrectly.
Reat_ach the _ver
(÷) and I-)of
by sHYing tt back _ato posi#on
How to Use
To operate the room air c_nditioner, aim
the remot_ controller _o the signa_ receptor.
The remote con|roller wi_io#erate the air
_r_ditioner at a distance _ up 1o 23 fee_
when pointi#g at sigma! re_£to_- of _nit.
Whense_cin@_e airconditioner,
besureto
tamthemodeswitchtothe"OFF"pos_tio,
n arm
dis_nn_ the power co_d from the e_rica_ out_L
1_ DO NOT use 9aso!ine, bovine, min#er or
other chemicals on [he air conditioner as these
substa_s
may, ca_
damage _o t.he paint finish
and deforma#on d plastic parts,
]DO NOT forge_ to inset! [he air f_te{. [_fthe air
condi_oner is leI_ to operate without the air fi_ter.
dust is not rem_aved from the room and may
cause your air _ndit_ener _o fa_L
When the air filter inlet gnu ned cabinet are dirty,
w_oe w_th _ukewarm water (:h_tow 40_C). Use of
mild deter#e_t is [_commended.
2, Never a_emp_ to _ur water di_y
on the
front of the a_it as _his wiil cau_ deterioration of
the electrical insulation
C_ean_ng the Air Filter
!f _e air filter becomes ci_#ed w_th dust, air41ow
is obs_ct_
and reduces efficiency: The air filter
1 Re_ve
dus_ _ogged in the fiiter by
tapping _tot vacuum dean _t
should _ cleaned once a month More h'eq_eat
dealing may_
ne_ssary de_,nding on outdoor
40_C (104 "_F)wile
a_d indoor _r _uailty.
result.s, wash it w_th soapy wate_ or a neu_a_
Air Fil|er Removal
The air fiiter o_ _he _ve
2 Wash the flt_r we_! with _u_arm
water be!ew
_ubbing _igh_ly:To ge_ be_e_
3, Rinse _he fi_ter wefi using dean wa_r then
modeis is iocated
behind the ai_ intake fro_t _ll,.
_n_of_Seaso_
To _meve the air flits, open the air Inlet £dI!_ artd
_ke _he a_t filter
!_ O_te
_he fan alone [or haft a _ay to d_ eut
t_ _nstde d the un&
To reinstall the air fi_teh rever_
Procedure
2 TUrn off power and remove _ug from walt s_ket
the above
Care
& C;ean filter,
4. Sto_ t_ a dry location,
Frequ_y_
a probiem i_ minor and a sewiee _[
PROBLEM
Air conditioner
POSSIBLE
will
No _er
may net be neoesse_
CAUSE
use this #oubiesheoting
SUGGESTED
to the unit,
Check _nnectJon
power sour_
guide for a
SOLUT|ON
of power _rd
to
Check fuse or circuit breaker.
Set MODK knob to pos_t_on other
than "OFPc
|neScient
or no _]ing
Dirty air fi[tec
C:ie_n er replace
for appl_catJon_
Check wi_h dealer to determine
ca_city
for applicat_n.
Blo_ed
N_sy
Odors
_nit
air flow,
air lifter,
Remove obs_ru_ioa
o_td_r louvers.
proper unit
from grill or
Power _nterruptiem setLings
change too q_cktyi or
_mpressor
overload trip_d,
Let fan run=
to restart compres_r
(in approximetely
t0 m_nutes ).
Loose _s,,
'_9hten loose ps_
Prov'Jde add_Jona_ seppoA to unit
Fo_maSon of mo_d_ miidew
a!g_e on wet sudaoes_
er
Remove dra_n plug a_d drain base pan,
Replace d_ain plug.
C_ean unitthoroaghty_
Condensation run-off is _otma!
during hot and h_mid wea_er
Add _exJb_e tubing to redirect water flow.
allow water to dra#_ outside,
cond.ensat_on run.off. Check _he unit and
Low outside tom.future
When outdoor tem_rature
_sappro×imete!y
65T er below, fret may form w_en unit is in
®oiin 9 m_e. Sw#_h unit to F_ (only)
operation un_##est me_ts,
Unit air filter is dirty,.
Remove and dean flits,
NOTA:
if c_rcu_tbmakez" is tripped repeatedl_ o¢ fuse _sb_own ,more than once contact a qualified technician
For one year f_m the date of purchase by the original _ner,
a_¢ part which
fails in materials or workmanship
under norma_ use, the part wilt be replaced,
During
this
period,
aH parts
and service
will be provided
_ong as the air conditioner has been insta!ted
the written
instructions
in this manual,This
For the
second
warranty
product
wi!l
through
pr_,4de
faiiur&
the
a replacement
The customer
to repJacing
the compressor
responsible
for
the unit° Cost
the
user's
third year
the
service
_
move
home
may
i, This warranty
the
from
date
of original
free
will be responsible
iabor
and
be required
and
possible
of charge
three.
freight
to the
are the
does not apply if damage
purchase,
for the labor
two through
air conditioner
so
and operated in accordance
with
war_nty
includes
in home servic&
compressor
in years
free of charge,
user's
occurs
related
consumer
charges
servicers'
due to
charges
The
this
is
for shipping
shop
and back
to
_sponsibi|ity.
because
of accident,
imp_per
handling or operation,
shipping damage, abuse, misuse,
unauthorized
repairs made or attempted,
comme_ial
use of the product
or any other
•
does not cover service
trips
to your
caused
by accident,
home to educate
_u
on
the use of the product,
or !oss of food and drink due to spoi!age.
This warranty
does not apply outside the continental
United States.
ALL 'WARRANTIE&
EXPRESSED OR IMPLIED, LAST FOR 3 YEARS FROM
THE DATE OF ORIGINAL PURCHAS&
THIS WARRANTY
DOES NOT COVER
UABILITY FOR _NCIDENTAL OR CONSEQUENTIAL
DAMAGES FOR ANY
CAUSE
•
it _,_s not intended.
This warranty
does not apply to damage to _e product
fir_ floods, acts of wa5 terrorism,
or acts of God,
• This warranty
•
i
use for which
WHATSOEVER.
This warranty
is to the original owner for products
purchased
for home use
within the USA, Some state do not ailow the exclusive or _mitation
of
incidental damages, This warranty gives you specific rights, and you may
also have other r_ghts which may vary from state to state. To. know what
your _egal rights
or your state's
are, consult
Attorney
your
Gene_l.
local or state
consumers
affairs
office
Gradas pof eleg_r ÷s_e a_fe acondidonado para enfria¢ su h(_at. Este MANUAL DE USO Y MAN
p_eporciona ta m_nnad_n t_ecesat_a pat_ cuida¢ y mantener en fofma adecuada su nuevo aire acen
F_ncioeaz_ sin p_ob_emas durante muchos a_3ossi _ebdnda e_manten_miento ap_p_ado_ Para edtar
preblemas a¢ mstala#o, _ea comp_etamente tas instt'ucciones antes de co,._nz_t'. Este ma_uaJ confene
in
n a_ema de !_ _ns
' y d _ndonamiento de/atte a¢_nd_donado pafa hab
e,s,
Modeto
Mec_nico
Pane_ Frontal
Outlet
Gab!aete
#e Aire
Filtro de Aire
Palanca
de A_re
Fte_eo
Cable
de A_imentaci6_
Nora:
La8 imagenes de este ma#ea!esta_ basadas e_ ]a vista e×tema _÷ ua modelo es_adar
_n consecue_cia, es probable que i_ forma se_ di_ereate a [_ d÷l atte aco_dicto_ado
q_e usted se_eccion6_
TO
do.
Mede|o
de Remote
controlador
P:nel F_ontal
Outlet de Aire
Gabine_:
Tab!÷ro de
Ma:#dos
....
Fi:ttro de Aire
Contro!
Nemol[O
Pa_ar:c:a
de Aire
Fresco
Pane! de Control
Cable de Al_men_a_t_:_
Oontro|
Remot:o
Nora:
Las im6gene$ de este manua_ estdn basadas en !avista e×tema de un mode!o es_nda:,
En c@nsec_encia_ es iprobab_e q ue a forma sea diferen[e a _a de_ aire acondicionado
que u_ed seleccion_,
1 Todosioscabtesdebe_cumplt_
@nlosc_t_digos
e!¢ctrico.s
!_atesy na@onates
y _osdebe insta_ar
un e_ectricista ticenciado. Si tiene pregum.as
cuando se Io enchufa a an tomacomente de pared
ptovisto de conex]#n a tier_ Si no est8 seguro de
Si e_ nstu!o deI ai_ acondicionado
_ndita 115
voRios y Basra 75 am@erios, la unidad se
puede _neotar
a un 6o_ci_cu_o
o fusible
ufl_izado pot o_ros dispos_tivo8 NO obscure,
_a suma de _os amperi,os maximos; de todos
!os dIsposit_vos conec_ados a dtcho
c_rtacircuito o fusible _o deben exceder _os
amperios _e_ mismo
Si el r6_u!o de_ aire a_3n{_icioaad0 indica 1 !5
roUSes y mas de 7.5 ampedios_ de_ tea,er su
ptopiofus_bte o cor_circuito y no _ debera
conectat aln9_3_
o_ro _ sposkivo o unida_ a d_cho
fusibte e cortadrcuito.
q_e et _omacorriente de pared cue_l.a c_ !a
c_ne×iSn a tie_ra apropiada c_nsulte co_ un
e_ectfic_sta iicenciado_
Para evitar iesiones f_ si@s_ _esco_ecte
suminis_ro de energi a de ta unidad
antes de instaiad;a o repararla.
r,e_adonadas con tas siguientes insttucciones_
eOmun[quese@n
sn electricista ticenciado.
2. Ved_que e! sumi_ist_o de eaer9} a disponib!e y
resuetva cua_q_ier prob_ema _
ios cabies ANTES
de ins_alar y hacer funcionar esta _nidad.
3. Para su segufidad y pro_eccian e_a unidad est_
cone_sda a _ierra a tray,s de_ cable de a_imen_sci6n
4. E_tomaco_iente de pared (de 3 c_aviias ) debe
_inddir
con ÷! enchufe (de 3 c!aviias) de_ cab!e de
aiimentad_n sum nist_do _n ia unid_,_ NO ut_lice
adap_dores
de e_chu[e _i cables de ex_ensk_n.
Consu_le la Tab]a 1 _e_a ob_ener
de receptacuio® y fi_s b_es_
MODEL
ir'_©f_'f}SC_6R
AW,40CRtFLU
AW-IOCM t FLU
CAPACtDAD
DE VOLT@S
AMP_R!OS
i25
15
AM?EROS
TAI£_AiNO _€
acerca
EL_US_BLE
1:5
ei
5 El #6tut_ de Ia un_dad ¢on_iene datos el_ctricos y
_acnices. La _laca de grado est_ situada en el lado
derecho de la unidad,
S#_n_dad
deAireAcondic_anado
!3araHabitaciones
sehadise4_dopara_Ogmr
#na_orendimien_o
y
ahorra_
enetg_a e!_ctric&Siga_asslguien_es
sugere_c_as
paraIQgrar
un mayor rendimiente
Ei A_re A_dioionado
para Habitac_ones se ha
d senado de m_Jo tal que resut_e f'_:_c_
su nsta_ac_an
e_ ver!ta#as a_madas sencilIas o dobles. NOTA: es_a
_idad
NO se ha d seSado pata ve_(anaa ve_Icales
{de t_podes_izante)
i Aius[e el termos[ato a all _ive_ qae leresulte
ag_adabl÷ y d_je!o e_ el nivel s÷Ieccionado.
Z E_ rH[ra es may e_c_en[e a _aho_a de e_m_nar
pa_cutas que se desp_aza_ pot el sire. lqantenga
iimpio el _itr,o de ai_ Par !o _enera!, ef @_redelta
iimpia_e u_a vez ai mes. E8 probabJe que sea
neces ar_o t!mp_ar_o(_n mas frecoe_cia dependiendo
de _acaiidad dei aire exterior o interior',
NOTA: _nserve
{a caja de _aunidad y !as ma_efia_es
de empaqee papa almaceaada o _ransportada en e!
fu_uro_,A_es de ins_alar _ _nidad co.pare e!
con_enido de_ jue9o de, h<_rrajescon I_ HsLade conf:ro_
d,e_made_o eorrespor_diente Consu/te las sig_ien¢es
_istas (Fig t)
3 P#÷de u_i}izar tap ces, _>rtinas o pantaHas para
evi_a=rque la !uz direc_a ddl so! c_liente su hab_aciL_rk
pete NO obst_ya el aire acondicionade Pe[m_ta
que e_ aim c_rc#le a!rededor de Ia un!dad sn
ObsL_u_ion÷s.
f_bfica m_#a_a_#
4 _ffcienda el ai#e acandic_or_ado antes de que _a
tempemtura exter_o_ sea _emasia_o e]evada y
d_sagradable_ De _ta manera evitare sufrir ca_or
mienttas la erfidad enfr/a la habitacWm.
Sa_o_e L(2)
i iii i /i
i_i
i_i
, !._.;_L
5. Cuando _a_emperahjra exterior es Io sdi@ea_eme#_e
_te_a, a[{lioe s#!o H{GH _AN (ven_ilador al m_x_mo.)o
i ii i¸ [i ! iiii;i
/ ii{i!_i/_i:
_ii i_i
{ j
(Fig. !:)
Neta: Tomi|!e Exc_ente
Para _ Usa de Rese_a_
LOW FAN (veat_lado_ _{_ml alma) 8sta hate que e! aite
in_e_'iorcirc_e a una temperatura agradab_e y _esume
m_no_ ene_#[ a e_rica
q_e :sihic_era f_JRCJo_ar_a
_nidad coma ÷nf_ador de aire.
Ner_m[en_s
Necesa_ia_ p_ra [a i_s_alac!6n e_ Ventana:
Destomiliaderes: Phtlips y de ca_za plaaa
Ta[adroe_ecttico: _eca _ 1_8pulgada ee d{{_me/ro
61ata m_ltica
Pasos para la instalaci6nen ventanas
1 Si e_ aire ar_ndisionado
tiene un 9aWnete de i8 °
de anchor podra c_l_rse
en abe_uras de venta_as
de 24 " a 38" de ancho La a_tura m_nima de abertura
es de 15" desda _a pa_e inferior de_ marco hasta el
umbrai (Fig, 1)
Fig,
I
2o Une el selb d_! canal a_ rondo del canal, e insta_a
ei canai superior al ai_ acond_c_onado coa los tomi as,
e inse_a _as guias de_ bast.idor de _a co_ina hasta las
gufas de ia unidad,, y despu#s sujeta las co_inas a _a
unidad con los tom,Has, Vea Fig.2o
_ig, 2
3.. Carte !a _ira de sel!o adhesivo de! ancho de la ventana.
Qui_e e] reves_Jmiento de la ti_a adhe@va y peguela en el
intenor de fa parte infedor de ta ventana (Fig 3),
Fig_ 3
4, Mida ei ancho dei interior de_ umbra! de _a vemtana y
defina la tl nea {y_nt_'aital coma se i_dica en la Fig. 4,
F_
4
Sii i i i
......
5 _nsta!e los sopor_es en L en e_ umbra! extemo_ de
m_o
que !a parte m6s c_rta de_ soporte apoye eontra
_a parte posterior de_ umbra_ interne, ins_aie un seperte
en L a 8,1 '_de cada lade, de la hlea ©entrai Vea _a
Fig 5
6_ Levante e_ a_re a¢ondicionado
c,_ muceo cu_dado )f
desHee_o eor la ventana ab_eHa° Aseg_'ese
gu}a in,odor del aire a_ndicionad_
ranuras de los so_rtes
de que _a
Fig. 5
se _nserte en tas
en _ Caando e_ aire
acondicionado apoye e_l los soDo_les en L quedar4
cenlrado en a aoenura de la ventana tal come se
indica en _a Fig 6
...............
/117::
.......................
ii¸i i
M_entras acomoda el aire aco[}dioioT_ado_ o@e el
marco oe _a ve[_tana con macho c_dado
canal su porter de} a_[e acondicionado_
y ap6ye_o en el
ta_ come se indtca
eli la _lg. 7. Pdmeroo ajuste ambos _a_os a_ umbra_ de la
vemana con dos tomillos
de 3/4" y u_o de 2/5" (que se
des_orni_a de carla lade de la unidad) Lu_o a_uste e_
canal su pealer al rnaroo de Ja ventana con un tomillo de
3/4" y ajus[e los marcos de macortina la_eral _n
tomi_los de 3/4 _, ta_ _mo
i!
cuatro
se indica en [a Fig. 6.
7,, Si una ven_ana _esisten_e a hurasanes inte_ere_
adhiera una taNa de madera de 2 " de ancho a! umb_al
interne de _a ventana a _o largo ee rode e_ ancho de_
umbra!. La tabla de madera deber_ set Io suficientemente
gruesa come para e_eva_ !'a altura de_ umbra_ de la
ventana
de mode que la unidad pueda insta_arse sin
que e!: marco de !a ventana _esistente a huracanes
inteff_era0 ta_ come se i_dioa en la Fig. 8
Papa que sea _ti_ la parte supedor de _a tab_a de madera
deber_ estar apto×imadamente
3/4 ° m_;_5amba que e_
marco de la ventana res_stente a hura_nes
_nsta_e uaa ®egunda tabla de madera
Fig 7
para surn_dero,
(de apro×imadamer_te
6" de largo per t 1/2 _ de ancho y et mismo groser,de
ia
primera _abla} en e_ centre de_ umb_ai e×temo coetra _a
parte posterior del umbral in_emo AtornNte _os sopodes
en L a est_ _ab[a. Esto e_evat6 el _potte
en L _l come se
indica en _a Fig_ &
F_9_a
MODE (Modo)
La ped_a de m_o controla las velocidades de
vsnt;_ador y de eafriamiento Para fijar aria tempera_ura
de enfriamien[o_ simp_erne_e haga rotar' a pe_ l[a y
cok4que!a en et nve_ deseado. Vea ]a Fig, l&
THERMOSTAT (Termostato)
BI termosta_.o continua autom_:_ticamente e_ cicio de
e_f#amiento (oom#tesor} de] aite aoo#d cionado pata
mar_.ener la temperatura del ambient, No obsta_e, e_
motor dei ven_iiador eoe_inear_ fug6 o#aado _na vez
f!_'_a]!_adoe_funcionamiento deJ c_mpr'esor (c.iclo de
edhansien_o}. Vea la gg,15
LOW FAN (Ventiladot a_ M_nimo} hare que e_ aire
¢ircule a a_a ve_ecidad m lnima si_ enf_ar.
HiGH FAN {Ventilader al Moximo)har_ que el aire
¢imu!e a ana ve_ocidad m_×ima sin enfriar,
LOW COOL (_r_ o M _nimo} eaf_ a el ambiente
au_om_4_camente con u_a c rcu_aci@_m in#ha de aire
Se reeomisada da_a_te _a_oche
HiGH COOL (Fro Me_×imo}ef_ffla e[ ambieate
autom_tica_ent÷ de manera r@ida o durance d _as de
r>a_oriatense Uea vez que la hab_ac_m est# frla,
red_zca e_ nivel a LOW COOL.
OFF (A#agado} a_aga la unidad comple_mente,
Esteaireacondicionade
sepuedeoperarfaci_mente
conlosbotonesdel#anetdecontroias_cometamb_n
cone_controlteRlo_:o
Pane|
_e Control
Boner
S _resiona
es_e bot_;,n encende_@
aire scondicionado,
Cuasdo el aire acondicionado
esta de caiefaeci_n
se pet
imprentar
este bot6n 3 min_tos desp_,_s,
Bo_6n Mode (Mode}
Cada vez que se presiona ei botan MODE, e! mode
de operation cambia en esta8 eecuenc as:
COOLING (Enf_iamiente) FAN ONLY {S#_o ven[itador}
ENERGY SA)FiNG (Above d,e Energi a) COOUNG
@
NOTA:: Despues de setecc_onar u_ rivet, espere 3
minutes antes de pasar a otto
Bet6n Fan Speed (rebec dad de Vent crier}
Se uti_iza pare se!eccionar
_a veioc _ad de_ ventilador
en secuencta:
au_ore6tica,
baia, media y a_ta,
Bob, n timer(Temporizador)
Se utiiiza #are ptegramaro
cancefa_'
funcionamiento
de_ [emporizador
se_eccv)na
fijada
OFF
Si ores_ona
T_MFR
la panta_ta
veleci_ad baia
V_t_iado_ e#
velo6 dad _#di_
de
temponza_or
Botan _
Se uti_iza pare _l;ar la temperaturaambiente
la horn _n meoo
T_MER.
19°C{66
°F]y
31°C
t_m pera_ras
t88_F}
asc_ta _n_re
AJ'to;rO
d® er_e_gia
Mes_rar _o_iaprogra_a4_
12
TI_ER.
el ran@o_e
de! panel _e! _entro|::
vslecJdad s_a
ind_car6e_ _iem_o res[an[e
oara e_ encend_do
de #a umdad.
Si tesea cance_ar _atunc!6n ONTIMER
[)resiar_ee_ bo_n
NOTA:
d_i indicador
veloc dad a_orn_iica
e_ bo_'_n T_MER dentine de esos
COOll dt,JG o oar,a programar
S; m_otos
e_
C_ando la #nidad es_en func[onamiento,
puede
seleccienar
OFF TIMER (Apagar Temporizad0O_
C_a_do la unidad es_apagada,
p_ede se_eecionar
ON T_M_R Encender
TempoSzadet_
E _an#o ee no_as eara programar
et tern por_zaeo¢
es deO a24 he,as
S
@ @
.............................................................................................................................................
:'_......
en mode
Las lutes de! indicadot LED ante[io_'mea_:e
meac ona_as s@enc_enden cuando se usen be
ControJ
remoto
Power
(EnCendW0!Apagado}
K_aparato se enceader._ s es_ apagado
o apagar_ cuando ÷sta en operac_)n
be_n
Bot6n Mode
(Mode)
UtiHce este bot6_ _ara selecc_o_ar
_0
U
m
6
Bot6n
+-
BOrates _,eaj_s_e de _empe_atu_a optima
gara a_ustar _a temepratura _e_ cuar_o.
oprma para programar _ahera,
Bot6n
High
PaPa ajus_ar e_ mode a|ta velecidad de
ven_: iador,,
Bot6n M id
Pare ajuatar el mode me,diana (a_ mismo
baja) ve!oc: dad de ve_ti_ador
Bot6n
Low
Pare ajusta_e_ ma_o baja ve_ocidad ae
veniiiadoL
Bot6n Auto
Papa a_ustar el mode a_to veiocidad de
ver_tilador
Bot6n
Timer
(Temper zade_)
Rata #eae_ o ca heeler la o_eracb_
BatOn
Power
de timer,
Saver
Pare a}ustar e! made de energia-ahor_o_
- Des#u_s de se_eccie_ar _ hive} espere 3 minutes antes de pasar a otto,
' Espere 3 m nut,as antes de recomenza_'et aparato,
Contro!
• Col_ai6n
_re
m
_a_
remoto
de ]as pilas
de _1_en et sen_do _ 1_ fl_
|as pilas nuevaso_:_n_ado
VueJva a in_l:_r ma_pa,_s_
a _ _s_6n,
•
C _mo
ndo_ _ra vet
use
Para ope_ate! aire acondlc!onado,
apunte el contto|ado_
remoto i_tseminar
dei r_¢_ptot.
E! controiador remoto se ra a operar e_ aire acondiCiondo
c_n una _atanct_ h_s_ 23 p_escuan_
apun_ a la se_ar
_el receptor_e
la unidad,
NO olvide insla!ar el ill,re de aire,_$i el site
acondicio_ad, o fun¢iena si_ el fi;|_ro_e aire,
! NO _iJice gaseai#a bencisa, dise/vent_ u otres
p_oductos qu races e_ e! a#'e acend4c}onado, ya que
es_s sustan<$_aspuede# d'a_[_ e_aea[_ado de p _'_[uta
y _fom_a_ las piezas de p_s_ir_,
2 Nenca _errarne ag_a dire¢_ame#t_ ea el fremte de la
u_kJad ya q_e dai:_ar_a el aistsm_en_o _rico
e! polvo no se puede eliminarde la
hebiaei¢_ y as posib|e qae |a _aidad se
C_a_do la rejilla de entraps _e aire y el
gabinete est_n s_,ies, |lmpieles ¢0_ a_a
template {per debaje de i_s 40 eC:_IO4°F}o
Se _ecemte_da el _so _e _n deCergen_ suave,
Limpieza d_ _Btro de Aire
S_ e__il!_ede ai_e se e_ru:_e co_ peeve e_fluio de sire
_u_a obs_ruide y edu_
e_ reedimicn_o de Ja_nidad. Et
fii_to de aide de_)er_ ! mpiarse u_8 vez a rues Es, probable
que _,a _e_s_ho _im_ia_o cor_ m _ frec_e_c:_a
de_ndJer_de de _aca_idad de sire e_t,eri_ o i¢_terior,
C_
Q_i_ar _ Fil#o d_ Aide;
E_fii_ de aide d_:)as m_elo8 antedon_e_e
le _ro_ssuaveme_[e: Pars obtgner mejore_ resul_ado&
I@¢eiocon ag_a iabenosa e con _ produc_o de
mencionad_s
e_c_ent_a _e_s _e a re_ _ade enlra_a _e aide delantera
Papa q_,ilar!o t_me ei ma_go dei fii_ro _b_sade enla _rl,e
superior de ia rejii_a _ e_ada de aide y de_i ceie h,ac_a
a_ba.
Pats velve_ s i_sk_e
a a n_r'_
Limpieza dell Fit_ro de Airs
1 E_imine _1 pokes amumuiado en e! f@e P_a
e!!o ap! _e_e uno_ go!pea suaves o _a
aspiradeta dem6sNca
_ea!ir_a_os pf¢c£_ mie_to8 a_te_io;es
3 Enjuague bien e_fil_ro
con agaa limpia y _e_o
s_!.qse_o_mp_etameate,
C_i_de de Fin ee Tempo_ada
1_,H_ga funcie_are_ ven_ilader durance media d_a
pa_ que se _eq_e et in_eder de _su_idad
2 A_@L_ele y desenchdele dei toma_rriente de
3. Limpie ei f_i[ro
4 A_ma_:melo en an lugar seco
Generatmen_e
!asproblemassonse#ei!_os
yes probable( uenoseanecesarlot_amaraun_cn_co
Esta9u_ puedeayudadoa rose,varies,
PROBL, EMA
El aire _condicionado
no funciona
CAUSA
POS_BLE:
La unidad no _cibe
suminis_ro e_ect_ico,
SOLUCI_N
SUGERtDA
Verifique si ei ca_e de ali_ntaci#n
s_aco_ectado ai tom.affianCe.
e
Verifique el fu@b_e o e_ c;ortacircui_o,
Fij÷ e_l FAN _NTROL
{c_tto_ de_
ven_!!ado[) en una _sician que no _a
OFF
ER_t_: 8 pace
O _da
FH[ro de atre _Jeio,
Limpie
Capacidad
Habfe ear e! t_eaeR_a_e
#ara
de_erml_ar cu_! ea la cap_;idad
a#eeuada para _ _Iicac 6n
iaadecuada
Fi_Jjo de aIre _s_tui_o
Carte de en_g[ a e_c_r ca,
se eamb_,de Htvel
demasiado
_pi#o o se
dispar6e_ interrupter
par
sobrecarga
de_ eom£resor
Unidad
ruidosa
Piezas suel_tas
Sopor_e inadecuado.
_s _o_al
_a d_oarga
de
condena_ck_a cuaado e!
c_ima es _lido y Ira',merle,
.........................................................................................
Gotea _gua; adentro
La u_idad no est:abien i_c_ina
da come para _rmitir
ei
Getea agua afuera
o reer_lace
Qui_÷ _oda obs_racc_6n de ia rej_la o de
!aa _ersiaRa8 extedore8
Haga funcionar e_ veniilador para
reiniciar ei compresor {on
aproximadame_te
10 miau_os/,
Ajuste ias _iezas sue_tas.
Proporcio_e
soporte adic_oi_al a _a uaid_
Utiiice tu_r[ as fte×ibles para desviar ei
f!UjO de _gua:
L_:_Biaaa aeS_ instala:_e_..............
_,_ un Hge_r_
desn_vel para #armi_r u_a;_sca_,ga
a_ec_ada _e la ce_#saci_n,
Vedf_que
:
_a un_dad y rea_oe
¢_ecesatios,
Se farina
eacarcha
hieJo o
Baja _empe_atura ex[erior,
_I flRro _
es_sucio
e_ f#[ro _ aire
ios a_tes
Cua_de la _empe(at_ra e×_edor_a in,fetio_a
los 6B°F e,s posible que _ Nrme esoarcha si
ta uadad funcioaa en m_o de enfr_amiento
Cambie ei Nac_o_amien_ de ia unidad a _AN
(so!amente) hasta qua la escarch_ _e derd_&
a_re de _a _q_d_
NOTA;
Si e_co_acitcui_e interrumpe la cer_'ier_tevadas votes o e__sibte _ qaema mas de una vez, oomun _quese
con un t,_cn;i_ !ir_rmiado,
1. Garantia completa de un afio
Per un a_o a pa_ir de la fecha en de compra del due_o, original,
cua_quier parte que faHe matedales o ejecuciSn bajo ei use normal de _a
unidad set& substituid&
Durante este pedodo_ todas ias piezas y servicio
ser_n proporcionados
gratuitamente,
siempre y cuando el acondicionadorde
ha estado instalado y funcionado
de acuerdo con las instrucciones
escdtas en este manual
_ncluye de la garantia en e_ seP_'icio casero.
aire
2, Limitada segunda a garant{a de tercer afio
Para e_ segundo con el tercer afio a partir de la fecha de la compra
origina!, esta garantia proporcionar_
un compresor de_ reemplazo
gratuitameate
debido a producir una fa_ta. El cliente va a ser responsable
para e_ cargo re_atado
aSoS.
E_ consumidor
dei _abuor de cambiar
es
posible
gasto
mover
e! acondicionador
nuevo atos
de ser,,icio
usuarios
responsabilidad
responsabie
e| compresor
de _os gastos
para embarcar
de dos atres
del trabaio
las unidades.
de aire a _os servisiaderes
a casa, Come puede
E! gasto para
hace compras
set requerido
y de
yes
y de
_a
de los usuarios..
3. Que no se cubre
i Esta garant_a, no apHca daSe si ocurride debido a accidente,
la direcci6n
_a ope_acidn incorrecta, e_ daSo de env_o el abuse, el use erroneo,
desautodzados
reparada o grocurada0 o e! use ¢omercial del producto,
e ning_n etro use para el cual no fuera peRsado,
o
• Esta garantia
no aplica, dafio at producto causado per accidente,
fuego
y Jas inundaciones,
o los actos de ta guerra, de! terrorismo,
o de! acto de dies,
• Esta garaatia
no cubre viajes del seP¢icio a su begat para educade en
el use del producto, p6rdida de alimento y bebida
debido a los desperdicios
que esta garantfa no se ap_ica fuera de_ oontinente los Estados Unities,
• TODAS LAS GARANT|AS0 EXPR
AS O IMPLICADAS, DURAN PeR
3
A_4OS A
DE _
DE LA COMPRA
GARANT{A NO CUBRE LA RESPONSABiUDAD
PeR LOS DA_OS FORTUiTOS
O CONSECUENTES
PARA CUALQUtER
• Esta ga_-ant_a est_ _1 duefio
use casero dentro de USA
original
CAUSA.
para _os productes
comprados
para ei
Un cie_o est_do _o permite ia exdusiw
o i_ limitaci6n
de daSos
fo_uitos. Esta garant_a le da. _os derechos especfficas, y usted puede tambien
tener ethos derechos que puedan variar de estado al estadoo Para saber cuales
son, CORSUltaR SUS derechos legates a s_ oficina de los consumidores
de ios
asuntos o general _ocai o de_ estado del abogado de su estado,
@)2OO6Ad_,
Kelon _r
Kelon Air Condittion_
Co
Ud.
and Keion USA, inc, Aii tights resew_
Condi_:ene r Co., Ltd.
Ke|on USA, inc.
No, i2 Qiaodong Road
Ronggui, £i"lund,e, Guangdor_g Chiina 528303
m_
{_ _:h!_
1700,5 Everg_eert P_ace B_ag A
City of _dus_,CA
£!745
Versien
No819043293o01