1
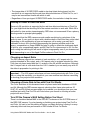
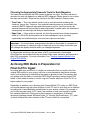
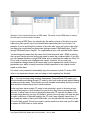
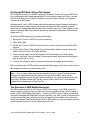
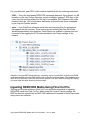
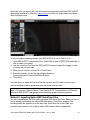
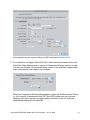
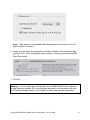
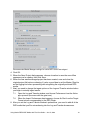
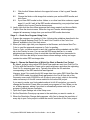
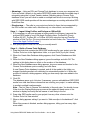
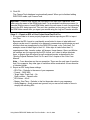
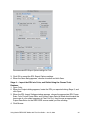
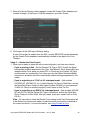
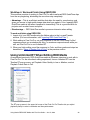
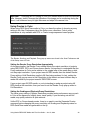
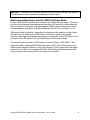
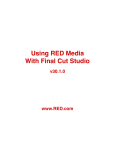
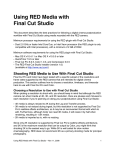
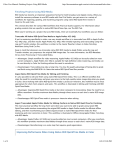
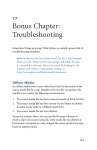
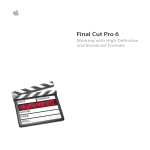
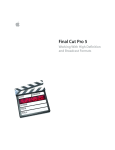
Using RED Media with
Final Cut Studio
This document describes the best practices for following a digital cinema postproduction workflow with Final Cut Studio using media recorded with the RED camera.
Minimum processor requirements for using the RED plugin with Final Cut Studio:
• Dual 2.0 GHz or faster Intel Core Duo, or Intel Xeon processor (the RED plugin is only
compatible with Intel processors), with a minimum of 2 GB of RAM.
• Rendering at 4K resolution requires a minimum of 512 MB VRAM.
Minimum software requirements for using the RED plugin with Final Cut Studio:
•
•
•
•
Mac OS X v10.5.6 or later
QuickTime 7.6 or later
Final Cut Pro 7.0, Color 1.5, and Compressor 3.5
The latest version of the RED Final Cut Studio Installer
(available at http://www.red.com/)
Choosing Camera Settings with Final Cut Studio
Compatibility in Mind
Final Cut Pro and Color have been tested with a specific subset of the resolutions and
frame rates supported by the RED camera that are intended for digital cinema
production. This section outlines how to choose a resolution, timebase, and timecode
track to use with Final Cut Pro and Color.
Choosing a Camera Resolution to Use with Final Cut Studio
Regardless of the original resolution of your REDCODE media, the best resolution for
your finished project depends on how you plan on finishing it.
• When you ingest 4K REDCODE media as native RED QuickTime files, the native 4K
image data is kept intact. However, since only 2K media is supported by the real-time
effects architecture of Final Cut Pro, native RED QuickTime files are resized to 2K on
the fly while you work in Final Cut Pro. When you send a sequence using native RED
QuickTime files to Color, the native 4K data within each RED QuickTime file is
accessed, and you have the option of rendering your graded project at 4K resolution.
• If you transcode 4K REDCODE media to any of the Apple ProRes codecs, it will be
automatically resized to 2K resolution.
Using Native REDCODE Media with Final Cut Studio – Jun 15, 2009
1
• The image data of 3K REDCODE media is also kept intact during ingest, but this
resolution is not supported by the real-time effects architecture of Final Cut Pro, so it
may be an inconvenient format with which to edit.
• Regardless of how you ingest 2K REDCODE media, the resolution is kept the same.
Shooting 2K Versus 4K REDCODE Media
Since only 2K resolution is supported by the real-time effects architecture of Final Cut
Pro, you might think that shooting 2K is the easiest resolution to work with. While 2K is
well-suited for slow-motion cinematography, RED does not recommend 2K as a primary
shooting mode for principal photography.
Keep in mind that the RED camera records smaller resolutions by using less of the
sensorʼs area. If your goal is to shoot with a shallow depth of field, this may not be ideal.
Depending on the combination of lens and exposure youʼre using, you may find it
preferable to shoot 4K in the field (thus exposing the greatest possible area of the
sensor, comparable to a Super 35MM film gate) in order to obtain the shallowest depth
of field for your compositional needs, and let Final Cut Pro downconvert to 2K. Itʼs also
worth noting that shooting 4K will result in higher image quality even if you downconvert
while transcoding to one of the Apple ProRes codecs in Final Cut Pro.
Choosing an Aspect Ratio
The RED camera supports two variants of each resolution, a 2:1 aspect ratio for
projects intended for film output, and a 16:9 aspect ratio for projects intended for video.
Color has only been tested with the 2:1 variants of the 2K and 4K resolutions. Although
the 2:1 aspect ratio is a bit wider than the 1.85:1 standard, you can easily crop a bit off
the sides in preparation for printing to film.
Important — The 16:9 aspect ratios have not been tested extensively with Color. If you
plan on using this resolution, you should do your own workflow tests before committing
to shooting your project at this resolution.
Choosing a Frame Rate to Use with Final Cut Studio
The Color workflows in this document have only been tested with timebases of 23.98
and 24. Although the RED camera supports shooting other frame rates such as 25,
29.97, 50, and 59.94 that are appropriate for broadcast, you should perform your own
workflow tests with Final Cut Pro and Color before you commit to shooting an entire
project with one of them.
Turn Off the Cameraʼs MAX Setting Before You Shoot
Thereʼs a checkbox labeled MAX In the PROJECT submenu of the SYSTEM menu of
the RED ONE camera. If youʼre planning on finishing your project using Final Cut Pro
and Color, itʼs best to turn this setting off before you begin shooting. Leaving it on may
adversely affect real-time performance of RED media in Final Cut Studio.
Using Native REDCODE Media with Final Cut Studio – Jun 15, 2009
2
Choosing the Appropriate Timecode Track for Each Magazine
The timecode recorded by the RED camera is always non-drop. The timecode that is
recorded for each clip depends on what the RED cameraʼs Display menu is set to when
the clips are recorded. There are two choices in the RED cameraʼs Display menu:
• Time Code — This is the default, which is set to record timecode matching the
cameraʼs “time of day.” However, if an external timecode source is connected to the
cameraʼs SMPTE timecode input and the camera is put into Jam Sync mode, the
external timecode will be recorded to each clip instead. In either case, the timecode of
subsequently recorded clips will likely be discontinuous.
• Edge Code — If this option is selected, the first clip recorded onto a blank magazine
starts at 01:00:00:00, and the timecode of each subsequent clip is recorded
sequentially and continuously as more and more clips are recorded.
Important —You should never change timecode tracks in the middle of a magazine. If
you find it necessary to change the type of timecode youʼre recording, make sure you
only change the display timecode when you change magazines.
In offline/online workflows, the reel name, clip ID, and timecode of transcoded
QuickTime files are matched with the enclosing folder name, filename, and timecode of
their R3D counterparts. For more information, see “Tracking Ingested Media to the
Original R3D Media.”
Archiving RED Media in Preparation for
Final Cut Pro Ingest
No matter what your workflow is, itʼs highly recommended that you archive all of the
original RED media for your project onto one or more backed-up hard drive volumes,
even if youʼre planning on transcoding the media to another format. This ensures that
you always have the option to retransfer RED QuickTime clips from the original R3D
media. It also makes it easier to use the Log and Transfer window in Final Cut Pro to
ingest media for your project.
Regardless of whether youʼre shooting with CompactFlash (CF) cards or a RED Drive,
you should always copy the entire contents of each CF card or drive that youʼve finished
recording with to an individually named folder on your archive volume. For example, if
youʼve shot a project using 12 CF cards, the contents of each card should be copied
into separate directories. At the end of the process you should have 12 different
directories (perhaps named “MyGreatProject_01” through “MyGreatProject_12”), each
of which contains the entire contents of the CF card to which it corresponds.
Using Native REDCODE Media with Final Cut Studio – Jun 15, 2009
3
Example of four archived directories of RED media. The name of each RDM folder is used as
the reel name for all the media it contains.
If youʼre using a RED Drive, you should copy the entire contents of the drive to a new
folder every time you fill it up or are finished with a particular part of your shoot. For
example, if youʼre archiving the contents of the drive after every dayʼs shoot, then after
four days you should have four directories (perhaps named “MyGreatProject _Day01”
through “MyGreatProject_Day04”). For organizational ease, use sensible folder names.
You should also be aware that the name of the folder that ends with “.RDM” is used by
the Log and Transfer process as the reel name for each clip contained within. If you like,
you can change the name of each RDM folder prior to ingesting the media into Final Cut
Pro in order to create more intelligible reel names. However, do not under any
circumstances change these folder names after youʼve ingested the media. Doing so
jeopardizes your ability to easily reconform offline sequences to the original source
media at a later date.
For safety, most productions immediately copy the contents of each CF card or RED
drive to two separate volumes once recording on that magazine has finished.
Tip — If youʼre shooting using relatively inexpensive CompactFlash (CF) media, you
should consider purchasing enough CF cards to shoot your entire project without having
to erase and reuse cards. This provides you with valuable redundancy should your hard
drive archival volumes later prove to have problems.
At the very least, have enough CF cards for an entire dayʼs worth of shooting so you
can verify the integrity of your media at the end of each day, before reusing them the
next day. In either case, be sure to physically label each CF card with the name of the
corresponding directory you copy its media to, as this is the only way youʼll later be able
to match a directory of archived media to the CF card it was originally copied from. If
you change the name of that cardʼs RDM folder, you should write the new name on the
CF cardʼs label as well. Should you need to restore media from that card, youʼll be able
to rename its RDM folder as it was before.
Using Native REDCODE Media with Final Cut Studio – Jun 15, 2009
4
Archiving RED Media Using Disk Images
For additional protection, consider copying the contents of each CF card or RED Drive
into a disk image thatʼs sized appropriately for the contents using Disk Utility. You can
use the Disk Image from Folder command to copy the entire contents of a mounted
volume into a disk image.
Archiving each “reel” of RED media using disk images provides checksum verification
when the media is initially copied, as well as every time the disk image is mounted,
which lets you immediately discover data errors should they occur. It also gives you the
option of creating read-only archives, preventing unwanted manipulation of the source
media later on.
To archive a RED media volume using a disk image:
1. Mount the CF card or RED Drive youʼre archiving.
2. Open Disk Utility.
3. Select the CF card or RED Drive from the list of drives at the left of the Disk Utility
window.
4. Choose File > New > Disk Image from [volume name], where volume name is the
name of the CF card or drive you selected.
5. Enter a unique name for the disk image in the New Image from Folder dialog,
choose “read only” from the Image Format pop-up menu, and leave the Encryption
pop-up menu set to “none.”
6. Choose the volume to which you want to save the disk image, and click Save.
After archiving reels of RED media into separate disk images, youʼll need to mount each
disk image you want to log and transfer from.
Note — You can also initiate this process directly from the Log and Transfer window,
although the resulting archives are always the size of the media volume youʼre
archiving, regardless of how full that volume actually is. For more information, see the
“Archiving File-Based Media from Cards” section of the Final Cut Pro User Manual,
available in the Help menu of Final Cut Pro.
The Structure of RED Media Directories
The RED media recorded to a CF card or RED Drive consists of an RDM folder (the
name of which is used as the reel name for all media contained within) that contains a
series of RDC (Red Digital Clip) folders . Thereʼs one RDC folder for each clip that was
recorded. Alongside the RDM folder are two files with “.log” and “.profile” extensions that
contain camera data that, while not used by the workflows described in this document,
should be retained. When archiving any kind of RED media, you should always copy the
entire directory structure of every volume you record to.
Using Native REDCODE Media with Final Cut Studio – Jun 15, 2009
5
For your reference, each RDC folder contains media files with the following extensions:
• .R3D — This is the high-quality REDCODE raw image data itself. Since thereʼs a 2 GB
limitation on file sizes, longer clips may consist of multiple “spanned” R3D files. In this
case, every file must be present for the clip to be readable. R3D filenames with suffix
numbers (such as _001) should never be altered, as this will make them unreadable
by the Log and Transfer window.
• .mov — Four QuickTime reference movie files serve as proxy files for applications
that support this file structure. These movies are not used by the Final Cut Studio
workflows described in this document. QuickTime proxy creation is optional, and can
be turned off by toggling the QT Proxies checkbox in the Project settings of the
camera.
Example of a single RED media directory, containing .log and .profile files, as well as the RDM
folder that contains the actual RDC folders that contain the recorded media. The media stored in
each RDC file consists of one R3D file and four optional .mov files. When archiving RED media,
you must keep the entire directory structure intact.
Ingesting REDCODE Media Using Final Cut Pro
The Log and Transfer window in Final Cut Pro is the preferred method of ingesting
REDCODE media into Final Cut Pro. When using the Log and Transfer window, the
R3D files that are recorded by the RED ONE camera are converted to QuickTime media
using one of two methods.
Using Native REDCODE Media with Final Cut Studio – Jun 15, 2009
6
Method 1: Transcoding to One of the Apple ProRes Codecs
You can transcode R3D media to any one of the Apple ProRes codecs. The one you
should choose depends on your planned workflow:
• ProRes 4444 – Suitable for high-quality ingest of 4:4:4 chroma-sampled/RGB color
space media, mastering of HD and 2K media for output to 4:4:4 tape formats, and
mastering of 4K media intended for film output.
• ProRes 422 (HQ) – Suitable for ingest and mastering of high-quality chromasubsampled/YʼCbCr color space media for high definition broadcast masters.
• ProRes 422 – Suitable for ingest and mastering of high-quality chroma-subsampled/
YʼCbCr color space media for standard definition broadcast masters, or good-quality
mastering at HD resolutions.
• ProRes (LT) – A low-bandwidth version of Apple ProRes thatʼs suitable for more highly
compressed YʼCbCr mastering, or offline-quality editing.
• ProRes (Proxy) – An extremely low-bandwidth version of Apple ProRes intended for
offline editing and display of media at proxy resolutions. This codec is also very useful
for ingesting media at offline quality for multi-camera editing; its low bandwidth makes
it ideal for simultaneous playback of many streams of video in Final Cut Pro.
Using the Final Cut Pro Log and Transfer window to transcode REDCODE media to any
of the Apple ProRes codecs makes it easy to reingest the original media whenever you
need to reconform your project using a higher-quality codec. This makes it feasible to
ingest REDCODE media using an offline-quality Apple ProRes codec, and later reingest
the same media using an online-quality Apple ProRes codec.
To transcode RED media to clips using one of the Apple ProRes codecs:
1. Mount the volumes that contain your archived RED media.
2. Open the Log and Transfer window, and choose Preferences from the Action pop-up
menu (the menu with the gear icon).
3. When the Import Preferences sheet appears, choose one of the Apple ProRes
codecs from the Target Format column corresponding to the RED Digital Cinema
REDCODE item in the Source Format column.
Using Native REDCODE Media with Final Cut Studio – Jun 15, 2009
7
Choosing an Apple ProRes codec for transcoding REDCODE media
4. Optionally, you can choose a color option from the RED FCP Log and Transfer
plugin submenu of the Action pop-up menu. By default, this is set to As Shot, but you
can choose any other option from this submenu with which to preprocess the
ingested clips. More information about this option appears below.
5. To proceed with ingest, follow the instructions in the “Overview of Transferring FileBased Media” section of the Final Cut Pro 7 User Manual, found in the Final Cut Pro
Help menu.
Color Space When Transcoding with the Log and Transfer Window
When you transcode RED media using the Log and Transfer window, the raw RED
media is encoded as YʼCbCr image data whether youʼre transcoding to one of the Apple
ProRes 422 codecs, or to Apple ProRes 4444. However, the chroma sampling will be
different:
• If youʼre transcoding RED media to one of the Apple ProRes 422 codecs (Proxy, LT,
422, or HQ), then the RED media will be decoded as YʼCbCr image data with 4:2:2
chroma subsampling.
• If youʼre transcoding RED media to Apple ProRes 4444, then the RED media will be
decoded as YʼCbCr image data with full 4:4:4 chroma sampling. Apple ProRes 4444 is
capable of encoding either RGB or YʼCbCr image data, but always at 4:4:4.
Color Processing When Transcoding with the Log and Transfer Window
The Color, Color Temp, and View RED ONE camera settings that were in use during the
shoot are stored as metadata within each recorded R3D file. When you transcode R3D
media to Apple ProRes, this metadata is used to preprocess the color and contrast of
the transcoded media as long as the RED FCP Log and Transfer plugin submenu of the
Action menu is set to As Shot, which is the default setting. The result is that each
transcoded clip visually matches the image that was monitored during the shoot. This
preprocessing is “baked” into each ingested clip. If you want to later reapply a different
type of image preprocessing to a clip, you need to reingest it.
Using Native REDCODE Media with Final Cut Studio – Jun 15, 2009
8
If necessary, you can choose other color preprocessing options from the RED FCP Log
and Transfer plugin submenu of the Action pop-up menu.
The image preprocessing options found in the RED FCP Log and Transfer plugin submenu
By default, there are five options:
• As Shot — The Default. Uses each clipʼs internal metadata to preprocess the clip.
The result should look nearly identical to the image as it was monitored during the
shoot.
• Tungsten — Preprocesses each clip with a color temperature correction that assumes
warmer (more orange) Tungsten lighting, to achieve a neutral result.
• Daylight — Preprocesses each clip with a color temperature correction that assumes
cooler (more blue) Daylight lighting, to achieve a neutral result.
• Warm – An adjustment that attempts to preprocess the image so that the final result is
warmer (more orange) than the originally monitored image.
• Sepia – An aggressive adjustment that preprocesses the image with a sepia-tone
result.
Important — The color preprocessing option you choose is applied to every clip that
you ingest in the current queue; itʼs not possible to specify different color preprocessing
options for individual clips in advance. However, after one queue has finished ingesting,
you can change the color preprocessing option before queuing up more clips, and it will
be applied to all clips ingested from that point forward.
Using Native REDCODE Media with Final Cut Studio – Jun 15, 2009
9
Optionally, you can export your own color preprocessing preset using the RED ALERT!
application (available for free from www.red.com) and use it to preprocess transferred
clips in different ways.
To export image-processing presets from RED ALERT! to use in Final Cut Pro:
1. Open RED ALERT!, and choose File > Open R3D to open a REDCODE media file to
use to create your preset.
2. Use the controls at the left of the RED ALERT! window to adjust the image in order
to create the look you want.
3. When youʼre finished, choose File > Save Preset.
4. Save the resulting .rlx file into the following directory:
/Library/Application Support/REDAlert/Presets
5. Click Save.
The next time you open the Log and Transfer window, youʼll be able to choose your
custom image-processing preference from the Action pop-up menu.
Note – The Curves, Gamma Space, Color Space, OLPF Compensation, and Denoise
settings in RED ALERT! are ignored when exporting image-processing presets.
Method 2: Ingesting Native RED QuickTime Files
You can instead ingest the R3D media as native RED QuickTime files. When you do so,
youʼre actually embedding the native R3D data within a QuickTime wrapper. The
resulting media file appears to be like any other QuickTime file to the Finder, but
provides direct access to the original, native R3D camera data for specifically
Using Native REDCODE Media with Final Cut Studio – Jun 15, 2009
10
compatible applications. This is faster than transcoding to any of the Apple ProRes
codecs, and provides the highest quality along with access to the native REDCODE
settings when using Color, but the resulting media is more processor-intensive to work
with.
To ingest RED media as RED QuickTime files:
1. Mount the volumes that contain your archived RED media.
2. Open the Log and Transfer window, and choose Preferences from the Action pop-up
menu (the menu with the gear icon).
3. When the Import Preferences sheet appears, choose Native from the Target Format
column corresponding to the RED Digital Cinema REDCODE item in the Source
Format column.
Choosing Native to ingest native RED QuickTime files
4. To proceed with ingest, follow the instructions in the “Overview of Transferring FileBased Media” section of the Final Cut Pro 7 User Manual, found in the Final Cut Pro
Help menu.
Tracking Ingested Media to the Original R3D Media
Whether you choose to transcode to QuickTime files using one of the Apple ProRes
codecs, or ingest native RED QuickTime files, the correspondence between the source
R3D media and the QuickTime files that are created during the Log and Transfer
process is maintained in three ways:
Using Native REDCODE Media with Final Cut Studio – Jun 15, 2009
11
• The name of the RDM directory that encloses each set of archived RDC directories
(that contain the source R3D files) is used as the reel name of ingested clips.
• The name of each R3D file is used to create the universally unique ID number (UUID)
(also referred to as the Clip ID) for each ingested clip. This ID number, which is not
user-accessible, is used to track the correspondence between ingested clips and the
original source media from which they came. This means you can rename clips in the
Log and Transfer window as you ingest them, or afterward in the Browser, without
losing the correspondence between a clipʼs UUID tag and the name of the original
R3D file. For this reason, do not, under any circumstances, rename the R3D filenames
of your archived media.
• Each ingested clipʼs non-drop frame timecode matches that of the corresponding
archived R3D file.
Specifications for RED QuickTime Media
Once ingested, RED QuickTime files have the following characteristics:
•
•
•
•
•
•
•
•
•
Color space — RGB
Chroma sampling — 4:4:4
Bit depth — 12-bit
Supported resolutions — 4096 x 2048 (4K, 2:1) or 2048 x 1024 (2K, 2:1)
Pixel aspect ratio — Square
Field dominance — None
Supported progressive frame rates— 23.98, 24
Timecode — Non-drop
Audio — 24-bit (upconverted to 32-bit during ingest), 48 kHz, up to 4 channels
Important – Native RED QuickTime files are read-only compatible with Final Cut Studio
applications. These applications can import RED QuickTime files for use in a project,
but can neither render nor export clips using the REDCODE compressor.
Using RED QuickTime Media in Final Cut Pro
This section covers important information about using RED QuickTime media in a Final
Cut Pro project.
Automatically Conforming a Sequence for RED Media
You can always change a sequenceʼs settings to accommodate RED media by editing a
native RED QuickTime clip into it while itʼs still empty.
To quickly change a new sequence to support RED QuickTime media:
1. Ingest a native RED QuickTime clip into a Final Cut Pro project.
2. Create a new sequence, open it, and edit the RED QuickTime clip into it.
3. When a dialog asks you to “Change sequence settings to match the clip settings?”
click Yes.
Using Native REDCODE Media with Final Cut Studio – Jun 15, 2009
12
Note — When you automatically adjust a sequenceʼs settings in this way, the Video
Processing tab of the Sequence Settings is automatically set to “Render 10-bit material
in high-precision YUV” for the highest-quality output.
Creating a “RED Using ProRes” Sequence Preset in Final Cut Pro
If you plan to work on lots of projects that use native RED QuickTime files in Final Cut
Pro, you may find it convenient to create a custom sequence preset. Because RED
QuickTime media is read-only, you need to make sure the Codec pop-up menu in the
General tab of the Sequence Settings window is set to Apple ProRes 4444 in order to
render and play effects such as transitions, filters, and motion settings.
To create a sequence preset for RED QuickTime media:
1. Choose Final Cut Pro > Audio/Video Settings.
2. Open the Sequence Presets tab, select one of the presets in the list (the Apple
ProRes 4444 1920x1080 24p 48 kHz preset is a good one to start with), and click
Duplicate to make a copy.
3. When the Sequence Preset Editor appears, enter a new name (such as “RED Using
ProRes”) and description in the top two fields.
4. Adjust the settings of the General tab in the following order:
• Frame Size – 2048 x 1024 (for 2K at a 2:1 aspect ratio)
• Aspect Ratio pop-up menu – Custom
• Pixel Aspect Ratio – Square
• Field Dominance – None
• Editing Timebase – 23.98 or 24
• Timecode Rate – Same As Editing Timebase
• Compressor – Apple ProRes 4444, or Apple ProRes 422 (HQ)
• Rate – 48 kHz
• Depth – 24-bit
• Config – Channel Grouped
Using Native REDCODE Media with Final Cut Studio – Jun 15, 2009
13
Recommended sequence preset settings for RED media edited in Final Cut Pro
5. If you decide to use Apple ProRes 422 (HQ), then click the Advanced button in the
QuickTime Video Settings area to open the Compression Settings window, in order
to access the “Enable 4:4:4 chroma filtering” option for the maximum image quality
when rendering the final output of your program.
When the Compression Settings dialog appears, select the “Enable chroma filtering
for 4:4:4 sources” checkbox and click OK. Since RED media uses 4:4:4 chroma
sampling, this option results in a higher-quality conversion to the 4:2:2 chroma
subsampling employed by ProRes 422.
Using Native REDCODE Media with Final Cut Studio – Jun 15, 2009
14
Note — This option is only available when the sequence is set to use one of the
Apple ProRes 422 codecs.
6. Lastly, open the Video Processing tab, and select “Render 10-bit material in highprecision YUV.” This is the highest-quality setting for rendering and exporting RED
QuickTime media.
7. Click OK.
Warning — Do not, under any circumstances, choose REDCODE as the compressor
for your sequence settings. All of the workflows described in this document rely upon
the Sequence Settings using one of the Apple ProRes codecs as the compressor.
Using Native REDCODE Media with Final Cut Studio – Jun 15, 2009
15
Real-Time Performance in Final Cut Pro Using RED QuickTime Media
Because native RED QuickTime media is extremely processor-intensive to work with,
youʼll want to use Unlimited RT while you work. Otherwise, you may need to do a lot of
rendering.
Rendering Native RED QuickTime Clips That Use Effects
RED media is read-only in Final Cut Studio applications; you can neither render nor
export media using the REDCODE codec. This means that whenever you render a
native RED QuickTime file, the rendered file will use a different codec, specified by your
sequence settings. If youʼre finishing, this should ideally be a high-quality codec such as
Apple ProRes 422 (HQ) or Apple ProRes 4444.
Since RED media is natively RAW (which is not a color space youʼd want to work in),
the color space that is used when RED media is decoded and rendered depends on
which codec youʼre using, and which application is doing the rendering.
• If youʼre rendering native RED QuickTime media in Final Cut Pro, and your sequence
is set to one of the Apple ProRes 422 codecs (Proxy, LT, 422, or HQ), then the RED
media will be decoded as YʼCbCr image data with 4:2:2 chroma subsampling.
• If youʼre rendering native RED QuickTime media in Final Cut Pro, and your sequence
is set to Apple ProRes 4444, then the RED media will be decoded as YʼCbCr image
data with 4:4:4 chroma sampling. Apple ProRes 4444 is capable of encoding either
RGB or YʼCbCr image data, but always at 4:4:4.
• If youʼre rendering native RED QuickTime media using Color, and the QuickTime
Export Codec of your Project Settings is set to Apple ProRes 4444, then the RED
media will be decoded as RGB image data with 4:4:4 chroma sampling.
Note – Whenever youʼre rendering native RED QuickTime media in Final Cut Pro, you
should set the Video Processing option in the Sequence Settings to “Render 10-bit
material in high-precision YUV” to obtain the highest quality. Itʼs also a good idea to
select “Enable Chroma Filtering for 4:4:4 sources” in the Advanced Compression
Settings dialog of the Sequence Settings. For more information, see “Creating a RED
Using ProRes Sequence Setting.”
Editing Tips in Final Cut Pro When Outputting to Film from Color
Keep the following guidelines in mind when youʼre editing a project that you want to
grade in Color and render as DPX or Cineon image sequences to be printed to film:
• Restrict transitions in your project to cross dissolves only. When you render DPX
image sequences out of Color and use the Gather Rendered Media command to
prepare a single image sequence for film printing, Color automatically processes all
cross dissolves in your program. Other transitions are not supported, and will instead
be processed as cross dissolves if theyʼre present in your project.
Using Native REDCODE Media with Final Cut Studio – Jun 15, 2009
16
• Donʼt use the Motion tab to create animated pan and scan effects. Instead, use the
Pan & Scan tab in the Geometry room of Color, which lets you scale, recenter, change
the aspect ratio of, and rotate your clips, and which can be keyframed. Pan & Scan
effects are rendered along with your grades when you render DPX or Cineon image
sequences out of Color.
• Donʼt use superimpositions, transfer modes, speed effects, or filters, unless youʼre
planning on prerendering these clips (exporting each as a self-contained QuickTime
clip for reediting into the Timeline to replace the original effect) as ProRes 4444 media
before you send to Color. Color does not render these effects.
Color Workflows Using RED Media
This section covers the four supported post-production workflows when finishing
programs with RED media using Final Cut Pro and Color.
Workflow 1: Work and Finish Using Apple ProRes
This workflow describes transcoding your REDCODE media to 2K resolution Apple
ProRes clips, and then mastering using Apple ProRes.
• Advantage — This is a straightforward workflow with no reconforming necessary.
Editing using the Apple ProRes 422 (HQ) codec is simple and efficient, especially for
programs that are destined for output to a YʼCbCr-based tape format. Optionally
transcoding to Apple ProRes 4444 lets you retain the advantage of working with the
4:4:4 chroma sampled media, which provides additional latitude for color correction.
• Disadvantage — You lose the quality advantage of being able to grade and finish
using the original raw, linear light image data that native RED QuickTime files provide.
Also, transcoding RED media to one of the Apple ProRes codecs can be timeconsuming. Transcoded media is always resized to 2K resolution.
To Ingest and Finish Using Apple ProRes
1. Transcode your archived RED media to a suitable online-quality Apple ProRes
codec using the Log and Transfer window. (For more information, see “Transcoding
to One of the Apple ProRes Codecs.”)
2. Edit, finish, and output using the Apple ProRes codec you selected as you would any
other project.
Workflow 2: Work Offline Using Apple ProRes;
Reconform to Native RED QuickTime Media in Final Cut Pro
This workflow describes transcoding to Apple ProRes for efficient offline editing, then
reconforming your edited sequence to reingested RED QuickTime media for final
mastering and color correction using Color.
• Advantage — Editing media thatʼs been transcoded using one of the lower-bandwidth
Apple ProRes codecs is less processor-intensive than editing using native RED
QuickTime files. After you reconform your project to native RED QuickTime media, you
Using Native REDCODE Media with Final Cut Studio – Jun 15, 2009
17
can work in Color at higher quality with access to all of the raw linear light image data
in the R3D file, as Color can bypass QuickTime and use the RED framework directly.
You gain the ability to render your project at 4K resolutions in Color.
• Disadvantage — Reconforming is an extra step that requires good organization.
Stage 1 — Ingest Using ProRes, and Perform an Offline Edit
1. If itʼs necessary to edit your program at offline quality for efficiency, transcode the
archived RED media to one of the Apple ProRes codecs: ProRes 422 (Proxy),
ProRes 422 (LT), ProRes 422, or ProRes 422 (HQ) using the Log and Transfer
window in Final Cut Pro. (For more information on each codec, see “Transcoding to
One of the Apple ProRes Codecs.”)
2. Edit your project in Final Cut Pro as you normally would.
Stage 2 — Reconform Your Project to RED QuickTime Media
1. Once your edit is locked, prepare your edited sequence to be media-managed by
moving all video clips that arenʼt being superimposed as part of a compositing
operation down to track V1. This makes navigation and grade management much
easier once you start working in Color, and may eliminate unused clips from the
Timeline, reducing the amount of media that needs to be reconformed.
2. If you havenʼt already, create a “RED Using ProRes” sequence preset in Final Cut
Pro. (For more information, see “Creating a RED Using ProRes Sequence Preset in
Final Cut Pro.”) Youʼll use this preset to media manage your edited sequence.
3. Right-click the edited sequence in the Browser, and choose Media Manage from the
shortcut menu to open the Media Manager. The recommended settings are:
• Media pop-up menu – Create Offline
• Include render files – Off
• “Set sequences to” pop-up menu — “RED Using ProRes” (the name you gave the
sequence preset you created)
• Include master clips outside selection – Off
• Delete unused media from duplicated items – On (this is optional, but
recommended)
• Use Handles – On (this is also optional, as is the duration specified)
• Include affiliate clips outside selection – Off
• “Base media file names on” pop-up menu – existing file names
• Duplicate selected items and place into a new project – On
• Include nonactive multiclip angles – Off
Using Native REDCODE Media with Final Cut Studio – Jun 15, 2009
18
Recommended Media Manager settings for native RED QuickTime reingest
4. Click OK.
5. When the Save Project dialog appears, choose a location to save the new offline
sequence youʼre creating, then click Save.
6. When the new media-managed project has been created, save and close the
original project file before continuing. Itʼs also a good idea to set the Master Clips bin
as the logging bin before proceeding with reingesting the originally archived RED
media.
7. Next, you need to change the ingest options of the Log and Transfer window before
you begin to actually ingest media:
7.1. Open the Log and Transfer window, and choose Preferences from the Action
pop-up menu (the menu with the gear icon).
7.2. When the Import Preferences sheet appears, choose As Shot from the Target
Format column corresponding to the RED Plugin.
8. After you set the Log and Transfer windowʼs preferences, you need to add all of the
RED media that youʼll be retransferring into the Log and Transfer browse area.
Using Native REDCODE Media with Final Cut Studio – Jun 15, 2009
19
8.1.
Click the Add Volume button in the upper-left corner of the Log and Transfer
window.
8.2. Choose the folder or disk image that contains your archived RED media, and
click Open.
8.3. If you have RED media in other folders or on other hard drive volumes, repeat
steps 8.1 and 8.2 until all the RED media referenced by your project has been
added to the Log and Transfer browse area.
9. Lastly, right-click the new offline sequence thatʼs been created, and choose Batch
Capture from the shortcut menu. When the Log and Transfer window appears,
reingest all necessary footage from your archived RED media directories.
Stage 3 — Grade Your Program Using Color
1. Prepare the sequence for sending to Color, following the guidelines described in the
“Moving Projects Between Final Cut Pro and Color” section of the Color User
Manual, available in the Color Help menu.
2. When you finish, right-click your sequence in the Browser, and choose Send To >
Color to send the prepared sequence to Color for grading.
Once in Color, you have access to each clipʼs camera setting metadata via the RED
tab in the Primary In room. You can use the RED image data as is, or make
adjustments as necessary. Keep in mind that clips that have been transcoded to
ProRes 4444 lose the ability to access these camera settings, as they no longer
contain the native RED raw image data.
Stage 4 – Choose the Resolution at Which You Want to Render Your Project
By default, projects using native RED QuickTime media are sent from Final Cut Pro
to Color with the Resolution Preset set to match whichever resolution the originating
Final Cut Pro sequence was set to. Typically this will be the 2K resolution
corresponding to the RED media that was ingested.
However, since Color reads the full 4K image data from native RED QuickTime files
or REDCODE media, the default Scale parameter in the Pan & Scan tab of the
Geometry room reads 2.000000 for all 4K clips in your project, which is the scaling
value necessary to fit the 4K source media into the current 2K project.
If you want to render your final graded media at its full 4K resolution, you need to
change the Resolution Preset after you send your program to Color. When you do
so, a dialog appears, asking if you want to automatically resize each clip in your
program to match the new resolution.
1. Open the Project Settings tab of the Setup room.
2. Set the Resolution Preset pop-up menu to the resolution you want to render at.
3. When the Resolution Change dialog appears, click Yes to change the resolution of
every clip in your Color project to match the new 4K resolution of the Color project.
Using Native REDCODE Media with Final Cut Studio – Jun 15, 2009
20
As a result, all 4K clips that match the resolution you chose have their scale
parameter reset to 1.000000, which is the native resolution of your media.
4. You also need to open the User Preferences tab of the Setup room and check the
Render Proxy setting before you render, to make sure that your project is rendered
at the correct resolution. For more information, see Using Proxies in Color.
Important – When Color renders native 4K RED QuickTime source files, any Pan &
Scan adjustments that you make are rendered by Color and “baked” into the rendered
media. This happens whether youʼre outputting DPX media for printing to film, or
QuickTime files to send back to Final Cut Pro.
Stage 5 — Render Out of Color
1. When youʼre ready to render the color-corrected project, you have two choices:
• If youʼre printing to film – Set the Render File Type to DPX. As with the digital
intermediate workflow described in the Color User Manual, Pan & Scan effects are
rendered within Color when you select DPX or Cineon as your Render File Type,
and dissolves are rendered by Color when you use the Gather Rendered Media
command to assemble the final consecutively numbered image sequence for film
output.
• If youʼre outputting to a YʼCbCr 4:2:2 videotape format – (this includes
DVCPRO HD, HDCAM, D-5, etc.) Set the Render File Type to QuickTime, and set
the QuickTime Export Codec to either Apple ProRes 422 (HQ) or Uncompressed
10-bit 4:2:2. After you render the project, send it back to Final Cut Pro.
• If youʼre outputting to an RGB 4:4:4 videotape format – (this includes HDCAM
SR and 2K D-5) Set the Render File Type to QuickTime, and set the QuickTime
Export Codec to ProRes 4444. After you render the project, send it back to Final
Cut Pro.
Workflow 3: Work Offline Using ProRes;
Reconform to Native REDCODE Media Using Cinema Tools and Color
This workflow describes transcoding to one of the Apple ProRes codecs for efficient
offline editing, then exporting your edited sequence to Color via an Edit Decision List
(EDL), and relinking it to the original archived REDCODE media using a Cinema Tools
database. This workflow is ideal for programs that are not effects-intensive.
Using Native REDCODE Media with Final Cut Studio – Jun 15, 2009
21
• Advantage —Using an EDL and Cinema Tools database to move your sequence into
Color and relink it directly to the native REDCODE media eliminates the added step of
reingesting using the Log and Transfer window. Relinking using a Cinema Tools
database is fast: you can relink to media on multiple hard drives in one step. Working
with REDCODE media provides all the same advantages as working with native RED
QuickTime files.
• Disadvantage — The edits in your project are limited to those that are supported by
the EDL format: one video track, dissolves only, no other effects, and no audio.
Stage 1 — Ingest Using ProRes, and Perform an Offline Edit
1. If itʼs necessary to edit your program at offline quality for efficiency, transcode the
archived RED media to one of the Apple ProRes codecs: ProRes 422 (Proxy),
ProRes 422 (LT), ProRes 422, or ProRes 422 (HQ) using the Log and Transfer
window in Final Cut Pro. (For more information on each codec, see “Transcoding to
One of the Apple ProRes Codecs.”)
2. Edit your project in Final Cut Pro as you normally would.
Stage 2 — Build a Cinema Tools Database
1. Drag the folder that contains the REDCODE media used by your project onto the
Cinema Tools icon in the Applications folder, or in your Dock (if you put it there).
2. When the Create New Database dialog appears, click Create Database and Add
Clips.
3. When the New Database dialog appears, ignore the settings and click OK. The
settings in this dialog have no effect on the creation of the database.
4. When the New Database save dialog appears, choose a name and location for the
Cinema Tools database youʼre creating, and click Save.
A new Cinema Tools database is created, and all of the media in the folder you
dragged (including media in all subfolders) is automatically added to it. When this
process is finished, a dialog appears, telling you how many clips were added to the
database.
5. Click OK.
The database opens up in List view. If necessary, you can add additional REDCODE
media from other hard drive volumes that are used by your project, to make relinking
to media in multiple locations easier.
Note – The List View in Cinema Tools defaults to Keycode view. You should choose
Video from the Display Mode pop-up menu at the upper-left hand corner of the
window to display and verify the reel names of each entry in the list.
6. Drag other RED media used by your project from any other volumes onto the
Cinema Tools List View window.
7. When a dialog appears asking if you want to “Add new clips to the database?” click
OK.
When this process is finished, another dialog appears, telling you how many clips
were added.
Using Native REDCODE Media with Final Cut Studio – Jun 15, 2009
22
8. Click OK.
The Cinema Tools database is automatically saved. When youʼre finished adding
REDCODE media, quit Cinema Tools.
Important – Cinema Tools derives the reel name of all clips from a particular RDM
folder using the name of the RDM folder itself. For a successful reconform process, itʼs
essential that the name of each RDM folder match the reel name of each corresponding
event in the EDL being imported. This wonʼt be a problem as long as you donʼt change
the RDM folder names after you ingest your media using the Log and Transfer window.
Stage 3 — Export an EDL of Your Project from Final Cut Pro
1. Itʼs a good idea to do some project preparation before exporting an EDL to import
into Color.
Because the EDL format is considerably more limited in terms of what edits and
effects can be used, itʼs prudent to be extremely conservative and eliminate any and
all effects that are unsupported by the CMX EDL formats, or by Color itself. For
example, move all video clips to track V1. Video clips in tracks other than V1,
superimposed clips, transfer modes, still images, freeze frames, filters, and Motion
tab settings are not supported by the EDL format, so itʼs best to either eliminate
them, or export clips with effects as self-contained movies as described in the
“Moving Projects Between Final Cut Pro and Color” chapter of the Color User
Manual.
Note — Cross dissolves are the one exception. These are the only type of transition
that Color supports. Any other type of transition will be rendered as a cross dissolve
of identical length.
2. Export an EDL using these settings:
• EDL Title – Defaults to the name of your sequence
• Format – CMX 3600
• Target Video Track Only – On
• Reel conflicts – Generic edits
• EDL Notes – All off
• Master, Start Time – Defaults to the first timecode value in your sequence
• Audio Mapping – Audio events are ignored, but you can set all tracks to None to
simplify the resulting EDL.
Using Native REDCODE Media with Final Cut Studio – Jun 15, 2009
23
Recommended EDL Export Options settings for Color
3. Click OK to accept the EDL Export Options settings.
4. When the Save dialog appears, choose a location and click Save.
Stage 4 — Import the EDL into Color, and Relink Using the Cinema Tools
Database
1. Open Color.
2. When the Projects dialog appears, locate the EDL you exported during Stage 3, and
click Open.
3. When the EDL Import Settings window appears, choose the appropriate EDL Frame
Rate, Color Project Frame Rate, and Source Frame Rate (all three should match the
frame rate of your edited sequence in Final Cut Pro), then choose an appropriate
Project Resolution for the REDCODE source media youʼll be relinking.
4. Click Browse.
Using Native REDCODE Media with Final Cut Studio – Jun 15, 2009
24
5. When the Source Directory dialog appears, locate the Cinema Tools database you
created in Stage 2 (it will have a .ctdb file extension), and click Choose.
6. Click Import in the EDL Import Settings dialog.
A new Color project is created from the EDL, and the REDCODE media referenced
by the Cinema Tools database is automatically relinked to the clips in the Color
Timeline.
Stage 5 — Render the Color Project
1. When youʼre ready to render the color-corrected project, you have two choices:
• If youʼre printing to film – Set the Render File Type to DPX. As with the digital
intermediate workflow described in the Color User Manual, Pan & Scan effects are
rendered within Color when you select DPX or Cineon as your Render File Type,
and dissolves are rendered by Color when you use the Gather Rendered Media
command to assemble the final consecutively numbered image sequence for film
output.
• If youʼre outputting to a YʼCbCr 4:2:2 videotape format – (this includes
DVCPRO HD, HDCAM, D-5, etc.) Set the Render File Type to QuickTime, and set
the QuickTime Export Codec to either Apple ProRes 422 (HQ) or Uncompressed
10-bit 4:2:2. After you render the project, send it back to Final Cut Pro.
• If youʼre outputting to an RGB 4:4:4 videotape format – (this includes HDCAM
SR and 2K D-5) Set the Render File Type to QuickTime, and set the QuickTime
Export Codec to ProRes 4444. After you render the project, send it back to Final
Cut Pro.
Note – Itʼs important to check the Render Proxy setting in the User Preferences tab
of the Setup room before you render, to make sure that your project is rendered at
the correct resolution. For more information, see Using Proxies in Color.
Using Native REDCODE Media with Final Cut Studio – Jun 15, 2009
25
Workflow 4: Work and Finish Using REDCODE
This workflow consists of working in Final Cut Pro with transferred RED QuickTime clips
from the very beginning, eliminating the reconform step completely.
• Advantage —This is an efficient workflow that skips the need for reconforming, and
gives you access to high-quality image data when you grade in Color. Ingesting RED
QuickTime media is fast when compared to transcoding. This is a good workflow for
projects such as short-forms and spots.
• Disadvantage — RED QuickTime media is processor-intensive when editing.
To work and finish using REDCODE:
1. Import all of your RED media using the Native option in the Log and Transfer
window. (For more information, see “Ingesting RED QuickTime Files.”)
2. While editing in Final Cut Pro, set your sequence to use the “RED using ProRes”
sequence preset you created earlier. Also, for maximum responsiveness while you
edit, set Final Cut Pro to use Unlimited RT.
3. When you finish editing, send the sequence to Color, and then grade and output as
described in “Stage 4: Render Out of Color” in the previous section.
Using Unlimited RT When Editing RED Media
As mentioned previously, RED QuickTime media is processor-intensive to work with in
Final Cut Pro. For the smoothest editing experience, choose Unlimited RT from the
Timeline RT pop-up menu, set Playback Video Quality to Low or Medium, and set
Playback Frame Rate to Full.
The RT pop-up menu in the upper-left corner of the Final Cut Pro Timeline lets you adjust
playback quality in order to maximize real-time performance.
Using Native REDCODE Media with Final Cut Studio – Jun 15, 2009
26
Primary In Room Parameters for RED Media in Color
When RED QuickTime media is sent to or imported into Color, a RED tab appears in the
Primary In room, next to the Basic and Advanced tabs. There is no corresponding RED
tab in the Primary Out room.
The RED tab appears in the Primary In room whenever a RED QuickTime clip is selected as the
current shot, and provides access to RED-specific parameters.
The RED camera writes linear light image data to the R3D files that are recorded. The
controls found in the RED cameraʼs Audio/Video menus in no way alter the way the
image data is written within each R3D file. Instead, whatever settings were chosen at
the time are stored within each recorded clip as metadata (similar to a LUT) that
determines how these media files are displayed by compatible software. This metadata
can be overridden during the log and transfer process.
Using Native REDCODE Media with Final Cut Studio – Jun 15, 2009
27
For clips that were imported with native color metadata, the RED tab provides access to
the clip Color, Color Temp, and View metadata originally written by the RED camera.
However, this metadata can also be overwritten during ingest using a custom colorprocessing option in the Log and Transfer window. These parameters are provided so
that you can begin grading each clip in the state at which it was originally monitored
during the shoot, or at which it was ingested using the Log and Transfer window.
Note — Although there is functional overlap between the controls found in this tab and
those found elsewhere in Color, the Kelvin and Tint controls are specially calibrated to
provide the most photometrically accurate white balance adjustments for RED
QuickTime media.
RED Image Controls
The RED tab has the following parameters and controls:
• Enabled — Turns all of the parameters found within the RED tab on or off. Turning
Enabled off suspends the effect of these parameters on the final rendered image in
Color.
• Saturation — This parameter is available in the RED cameraʼs Color submenu, and
adjusts the color intensity of the image. The overall range is 0 (monochome) through
5.0 (extremely high), where 1 is unity.
• Kelvin — This value is set by options in the RED cameraʼs Color Temp menu, along
with Tint. This setting is designed to compensate for the “warmth” of the available
lighting to keep white elements of the scene looking neutral. Low Kelvin values will
compensate for “warmer” lighting (such as tungsten), while higher Kelvin values
compensate for “cool” lighting (such as noon-day sun or overcast days). Two userselectable options set Kelvin to predetermined values: Tungsten (3,200K), and
Daylight (5,600K). The Auto WB option automatically chooses a custom value for this
parameter based on analysis of a white card, while Manual WB lets the operator
choose any value. The correction made by this parameter is designed to work
specifically with RED linear light image data to provide the most photometrically
correct result.
• Tint — This value is adjustable within the RED cameraʼs Color Temp menu, along with
Kelvin. Tint is designed as an additional white balance compensation for light sources
with a green or magenta component, such as fluorescent or sodium vapor bulbs. The
correction made by this parameter is designed to work specifically with RED linear
light image data to provide the most photometrically correct result.
• Exposure — Available in the RED cameraʼs Color menu. Increases and lowers image
lightness in increments calibrated to ƒ-stops. When raising the signal up to 100 or
lowering it down to 0, the image is clipped at the boundaries of broadcast legality. The
overall range is –7 to +7, where 0 is unity.
• Red, Green, and Blue Gain — Available in the RED cameraʼs Gain submenu. Allows
individual adjustment of each color channel. Adjusting any of these gain parameters
Using Native REDCODE Media with Final Cut Studio – Jun 15, 2009
28
boosts or lowers the maximum value of the corresponding color channel, and scales
the midtones while pinning the bottom of the channel to 0 percent. Lowering does the
opposite. The overall range is 0 to 10, where 1 is unity.
• Contrast — Available in the RED cameraʼs Color menu. Raising the contrast boosts
the highlights and lowers the shadows, while leaving the midtones centered around 50
percent unaffected. As the video signal reaches the boundaries of 100 and 0 percent,
itʼs compressed rather than clipped. The overall range is –1 to +1, where 0 is unity.
• Brightness — Available in the RED cameraʼs Color menu. Raises and lowers image
lightness. When raising the signal close to 100 or lowering it down to 0, the image is
compressed rather than clipped. The overall range is –10 to +10, where 0 is unity.
• Gamma pop-up menu — In-camera, the Gamma setting is determined by the Color
Space option thatʼs selected in the RED Cameraʼs View menu (itʼs not available as an
individually adjustable parameter). There are six options for gamma available in Color.
• Linear Light — No gamma adjustment is applied at all, linear-to-light as captured
by the Mysterium sensor.
• Rec. 709 — The standard gamma curve as specified by the Rec. 709 standard for
video gamma.
• REDspace – Similar to Rec. 709, but tweaked to be perceptually more appealing,
with higher contrast and lighter midtones.
• REDlog – A nonlinear, logarithmic gamma setting that maps the native 12-bit RED
image data to a 10-bit curve. The blacks and midtones that occupy the lowest 8
bits of the video signal maintain the same precision as in the original 12-bit data,
while the highlights that occupy the highest 4 bits are compressed. While this
reduces the precision of detail in the highlights, this is a relative loss as the linearly
encoded data has an overabundance of precision.
• PDLOG 685 – Another logarithmic gamma setting that maps the native 12-bit RED
image data into the linear portion of a Cineon or film transfer curve.
• Color Space pop-up menu — These options are available in the RED Cameraʼs
View menu (in-camera these options are tied to corresponding Gamma settings).
• CameraRGB — Identified on the camera as RAW, this mode bypasses the RED
camera matrix and represents the original, uncorrected sensor data.
• REDspace — Fits the raw RED image data into a color space thatʼs larger than
that of Rec. 709. Appropriate for digital cinema mastering and film output.
• Rec. 709 — Fits the raw RED image data into the standard color space specified
by the REC 709 standard for high definition video. Appropriate for HD video
mastering.
• ISO pop-up menu — A gain operation (similar to Exposure), which pins the black
point at 0 while raising or lowering the white point of the image, linearly scaling
everything in between. The range is 100–2000; 320 is the default unity gain setting (no
change is made). Raising the signal too much can result in clipping.
Using Native REDCODE Media with Final Cut Studio – Jun 15, 2009
29
Important — Changing the ISO setting of your RED camera does not alter the recorded
data. However, since it changes the lightness of the image youʼre monitoring during the
shoot, it will influence how you light the scene and adjust the cameraʼs iris.
Using Proxies in Color
When using RED QuickTime media in Color, you have the option of choosing a proxy
setting in the User Preferences tab of the Setup room; otherwise, Colorʼs proxy
mechanism is only available with DPX or Cineon image sequence–based projects.
The Render, Grading, and Playback Proxy pop-up menus are found in the User Preferences tab
of the Setup room of Color.
Setting the Render Proxy Resolution Appropriately
As its name implies, the Render Proxy setting affects the output resolution of projects
using REDCODE, DPX, and Cineon source media. Itʼs important to understand that the
Proxy mechanism in Color works relative to the original size of the media files on disk,
not the project resolution. If your project uses 4K RED media, then the default Render
Proxy setting of Half Resolution results in 2K files being rendered. In fact, setting the
Render Proxy pop-up menu to Half Resolution is the fastest and most efficient way to
render 2K media if your project uses 4K REDCODE source.
If your project uses 2K RED media, or youʼre intending to render a project using 4K
RED media at 4K resolution, then you need to set the Render Proxy pop-up menu to
Full Resolution.
Setting the Grading and Playback Proxy Resolutions
The lower proxy setting of Quarter Resolution provides faster performance as you work
in Color at the expense of slightly lower visual quality. If youʼre starting out with 4K
media, any quality reduction is quite minimal.
Unlike DPX or Cineon-based proxies, there is no need to use the Generate Proxies
command before changing the proxy resolution; all Grading and Playback proxies for
RED QuickTime media are generated on the fly.
Using Native REDCODE Media with Final Cut Studio – Jun 15, 2009
30
Important — Whenever you work with proxies, itʼs a good idea to review your grades at
Full Resolution at least once before rendering your final output.
Minimum and Maximum Levels for RED QuickTime Media
In Color, RED QuickTime media is processed in its native RGB color space. This does
not allow for processing values above absolute white (100 percent) or below absolute
black (0 percent). As a result, all grades applied to RED media will clip beyond these
outer boundaries, regardless of whether Broadcast Safe in Color is turned on or off.
If Broadcast Safe is turned on, expanding the broadcast safe range by raising Ceiling
IRE above 100 or lowering Floor IRE below 0 will have no effect on the image.
However, restricting the broadcast safe range by lowering the Ceiling IRE below 100 or
raising the Floor IRE above 0 will clip image values to the narrower limits.
The default Printing Density for RED media is “Linear (0 Black - 1023 White).” This
means that when rendering RED QuickTime media as DPX files for film printing, the
minimum and maximum values of 0 and 100 percent in Color correspond to the digital
values of 0 and 1023 in the rendered DPX files. The Printing Density setting for each
shot is located in the Settings 2 tab to the right of the Timeline.
Using Native REDCODE Media with Final Cut Studio – Jun 15, 2009
31