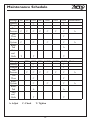
1
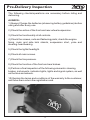
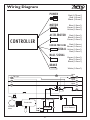
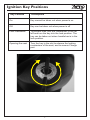
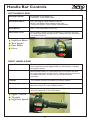
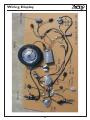
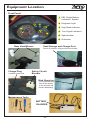
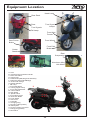
OWNER’S
MANUAL
Operation and Maintenance Instructions
We strongly recommend that you
read this entire manual before
using your vehicle for the first time
www.zapworld.com
ZAP © 2008 - All Rights Reserved
Contents Page
Read before riding
Page 2
Delivery Inspection
Page 3
Point Inspection
Page 4
Installing the mirrors
Page 4
Technical Specifications
Page 5
Wiring Diagram
Page 6
Ignition Key Positions
Page 7
Handle Bar Controls
Page 8
Accelerating & Braking
Page 9
Battery & Charging
Page 10
Performance
Page 11
Maintenance
Page 12
Maintenance Schedule
Page 13
Frequently Asked Questions
Page 14 -16
Troubleshooting
Page 17
Diagnostic Warning Signal Lights
Page 18
Warranty
Page 19 - 21
Wiring Display
Page 22
Equipment Location
Page 23 - 24
WARNING! Read Before Riding
1) To ensure the vehicle is functioning correctly, do a quick check of th vehicle's tires
and check that the brakes are working. (For more detailed maintenance instructions
see the Maintenance Schedule). Your vehicle has been thoroughly checked by our
engineers before delivery but on the spot checks are equally important.
2) When the key is inserted and turned to the "ON" position, the power indicator will
illuminate. If current drain is over 60A, the power will be automatically cut off to avoid
over-heating. Wait for one minute and then press the red button (see pg.7) to restart
the vehicle.
3) To avoid unplanned acceleration, always turn the key to the “OFF” position before
dismounting or leaving the bike unattended.
4) SAFETY NOTICE: Be sure that you are seated on the bike and kick stands
are clear of the floor before touching the throttle handle. If you twist the
throttle before you are ready to go or while you are mounting the bike it may
run away from you and could lead to an accident.
5) This vehicle may be ridden in wet conditions, but be sure to avoid soaking it during
cleaning to avoid damaging any of the electric components.
6) The vehicle should not be left in strong, direct sunlight for long periods as some of
the electric components may overheat.
7) Motorcyclists and moped users must abide by the same traffic rules and
regulations as other motorists. Before taking your motorcycle/moped on a public
road, be familiar with DMV traffic rules and regulations and any special
requirements for motorcycles/mopeds. Note: Some states may classify ZAPINO as
a moped, others a motorcycle.
8) Never drink and ride. Alcohol slows reflexes and greatly limits your ability to
operate a motorcycle/moped. Even a very small amount of alcohol will reduce your
ability to operate a motorcycle/moped safely.
9) ALWAYS wear an approved safety helmet!
If you believe that your vehicle has a defect which could cause a crash or could cause injury or death, you
should immediately inform the National Highway Traffic safety Administration (NHTSA) in addition to
notifying ZAP.
If NHTSA receives similar complaints, it may open an investigation, and if it finds that a safety defect exists
in a group of vehicles, it may order a recall and remedy campaign. However, NHTSA cannot become
involved in individual problems between you, your dealer, or ZAP.
To contact NHTSA, you may call the Vehicle Safety Hotline toll-free at 1-888-327-4236 (TTY: 1-800-4249153); go to http://www.safercar.gov ; or write to: Administrator, NHTSA, 400 Seventh Street, SW.,
Washington DC 20590. You can also obtain other information about motor vehicle safety from
http://www.safercar.gov.
2
Pre-Delivery Inspection
The following checks/operations are necessary before riding and
delivering.
ALWAYS:
1) Always Charge the batteries (observing battery guidelines) before
using and after every use.
2) Check the action of the front and rear-wheel suspension.
3) Check the functionality of all controls.
4) Check the screws, nuts and fastening parts; check the engine
fixing, main and side kick stands, suspension strut, yoke and
steering-head bearing.
5) Check the lights/headlight.
6) Check all main screws.
7) Check the tire pressure.
8) Check the function of the front and rear brakes
9) Perform a final inspection of the following elements: steering,
brakes, instuments, indicator lights, lights and signal system, as well
as the tires and wheels.
10) Explain the terms and conditions of the warranty to the customer,
and have them return the registration card.
3
Point Inspection before every use
Item
Front Brake
Action
Squeeze right hand brake and push the vehicle to
see whether it rolls easily. If it does, then the brake
must be tightened. Tighten the bolt until the vehicle
will no longer move with the brakes applied.
Rear Power/Disc Brake Listen for any noticeable grinding or squealing from
the tires while the brake is applied. If so, contact
the dealer to adjust.
Brake Fluid
Check fluid gauge on the left handlebar to ensure
that the brake fluid is above the indicated level. If
not, top it up with a good brand of brake fluid.
Electric Switch Handle Turn THrottle counter clockwise then release; the
Throttle should spring back to stop position. If not,
contact your supplier.
Tires
Check the tire pressure is 36 PSI
Controller/ Motor
Check the usage and condition
Battery
Check the power level by looking at the gauge or
with a voltage meter.
Signal
Check to make sure your lights are working.
Nuts and Bolts
Check to make sure that all nuts and bolts are
tightened and secured.
Speed Switch
Normal Moped operation is DOWN
Important Notes
1. Regularly perform a routine maintenance check. Doing so will
help protect yourself and your vehicle.
2. If any parts are damaged, whether normal or abnormal, please
check with the dealer before riding.
Installing the mirrors
1. Mirrors need to be attached to the handle bars between the grips
and the brake handle.
2. Screw in the mirror clockwise. The mirror that goes on the left side
is curved to the left and the mirror that goes on the right side curves to
the right.
3. Secure mirrors by tightening the bolts.
4. Clean and adjust both mirrors before you ride. Adjust each mirror
so you can see the lane behind you and as far as possible the lane
next to you. When the mirror is properly adjusted you can see the
edge of your arm and shoulder.
4
Technical Specifications
Motor Power
3000W Brushless Hub Motor
Battery
DC 60V, 38AH with the green saver ( silicone power) batteries
Charger
5A,110V~250V/50 Hz ~60Hz
Charging Time
6~10 Hours
Life of Battery
400 Deep Cycles
Wheelbase
10 Inches
Torque
103Nm (76 ft-lb)
Top Moped Speed
30 mph (50km/H) for 3000W motor
Single Charge
30Mile (50km) based on 38AH battery
Climbing Capacity
1:4 Gradient for a 155 lb. (70kg) Rider
Maximum Weight Capacity
282 lbs (128kg)
Tire
Front:3.50-10.00 Inch 8PR
Gross Weight
297 lbs (135kgs) with 38AH60V battery
Net Weight
178 lbs (81kgs) (not include battery)
Battery Weight
128lbs (58kgs)
Product Size
L 70” x W 27” x H47”
Brake System
Front and Rear Disc brake
OPTIONS
£ Solar Panel
£ Fast Charger
£ Extended Range Battery
Rear:3.5-10.00 Inch 8PR, tubeless
£ Luggage Boxes
£ 220V Charger
5
Wiring Diagram
POWER
Red (0.75mm2)
Red (2.5mm2)
2
Black (2.5mm )
MOTOR
Blue (2.5mm )
2
Green (2.5mm )
Yellow (2.5mm2)
ACCELEROTOR
Red (0.3mm2)
Black (0.3mm2)
Green (0.3mm2)
UNDER-PRESSURE
Red (0.3mm )
2
Brown (0.3mm )
2
Yellow (0.3mm )
2
Red (0.3mm )
2
CONTROLLER
SIGNAL
2
HALL SIGNAL
Green (0.3mm2)
Blue (0.3mm2)
Black (0.3mm2)
BRAKE
White (0.3mm2)
Lights
Tail Light
Lights
Lights
Relay
Lights
Horn
+12V
Key Lock
Controller
Brushless
Motor
DC to DC
6
60 V. Battery
Ignition Key Positions
Key Position
Description
On
Key cannot be taken out when power is on
Off
Key can be taken out when power is off
Lock Handlebar
To prevent theft, turn the Handle Bar to the far
left and turn the key into the lock position. The
key can be taken out when handle bar is in the
lock position.
Opening the seat
Turn the key in the slot to release the locking
mechanism of the seat, and to access Charge
port.
7
Handle Bar Controls
LEFT HANDLE BAR
Headlight Switch
High Beam Push switch up
Low Beam Push switch down
Horizontal Switch
Left Turn Signal Slide switch to the left
Right Turn Signal Slide switch to the right
Turning off Signal Press central release button
Horn Button
Horn Push red button on the left.
Rear Brake Lever
When Brake Handle is compressed the rear wheel will slow
to a stop and power will be cut off. Power will flow once lever
has been released.
1
2
3
4
High/Low Beam
Turn Signals
Rear Brake
Horn
1
2
4
3
RIGHT HANDLE BAR
Speed Switch
Economical speed switch can ensure longer range and high
speed switch provides bigger AMP for accelerating, climbing
and higher speed.
Front Brake Lever
When brake handle is compressed the front wheel will slow
to a stop and power will be cut off. Power will flow once lever
has been released. To start, turn the throttle counter
clockwise.
Throttle
Turn throttle counter clockwise to increase speed.
Parking Lights
The dashboard lights, headlight, and taillight will turn on
when the switch is in the middle position.
Head Light
The dashboard lights, headlight, and taillight will turn on
when the switch is in the left position.
1
2
3
Lights -On/Off
Throttle
High/Low Speed
2
1
3
8
Accelerating and Braking
THROTTLE TIPS
1. Turn the key to the 'ON' position, and turn the Throttle gradually to
accelerate.
2. To prevent losing control of the vehicle, please turn the Throttle
slowly until the speed increases.
3. Do not turn the Throttle until you are in the position to drive.
4. To stop, release the throttle and apply the front and rear brake
simultaneously.
5. To move, release the brakes and turn the Throttle gradually.
6. The Brushless motor makes a small electromagnetic noise when
turning the Throttle to start. This is normal.
7. Please, for your safety and security, take the key out when you are
not riding.
BRAKING TIPS
1. For safety, this vehicle has a circuit cut-out brake system. When
the front and rear brake is applied, the controller will disable the
circuit; to run, release the throttle back to the start position then
accelerate again.
2. Less sudden braking will increase range entirely. If running under
top speed, don't always full throttle. Frequently releasing the
throttle and running with inertia will longer increase range too.
This motor has good torque and the inertia momentum is
enough to run an automatic distance without electric power.
9
Battery Gauge and
Charging Instructions
Color
Description
Green
While riding, when the battery is fully charged the gauge light
will be green.
Green (2nd)
This light indicates that the battery is 75% of full charge
Yellow
When power is low (around 50%) the battery gauge will turn
to yellow.
Red
When the battery is discharged the motor will be
automatically cut off. This means that there is less than 25%
charge remaining. Switch to “Economical speed” and find
the nearest charging point asap.
CHARGING
The battery for this vehicle is a sealed, maintenance free D/C
battery. The owner must use the factory-supplied charger with an
110V (or 240V) outlet.
£ Turn off all switches while charging the battery. Plug one side to an
110V (or 240V) outlet and the other to charging plug on the vehicle
(located under the seat).
£ The average charging time is 8 hours (90%). To fully charge
battery, charging time will be 4 to 10 hours.
£ After charging, turn the ignition to the 'On' position and unplug the
charger from both sides.
£ To keep the battery in good condition, charge it after each use.
Please charge the battery fully once a month, even when the vehicle
has not been ridden.
£ The range with standard battery is 30miles.
£
BATTERY LONGEVITY
The driver should ALWAYS charge the scooter after every trip as this
will help the battery's life. The life of the Green saver battery is 400
deep cycles (100% discharged), but if you charge the battery every
time or when its capacity falls below 50%, the battery life will be
greatly increased. Therefore we advise the rider to charge the bike
as often as possible.
10
Performance
1. A range of up to 55M (90km) has been recorded, yet the distance
and speed depend upon various elements of the rider's style and the
road conditions. A 20mph constant speed will ensure the longest
range but our figures include going flat out too. Other factors include
weather, vehicle condition, and battery charge. Drivers must be
cautious when driving on rough roads, in poor weather, or when the
battery charge is low.
2. This vehicle has a power-cut circuit brake system to protect the
vehicle when the brake is applied;
3. After each trip, the driver should turn off the vehicle, take out the
key and charge the battery. This battery does not have memory (i.e.
you do not have to run it down completely to achieve a good charge.
On the contrary, regular charging will lengthen the life of the battery)
and can be charged at any time in the cycle of the battery.
4. Always check the battery gauge while you are riding and be sure
that it does not get too low too often.
11
Maintenance
This electric motor bike represents a new generation of
environmentally friendly two-wheeled transportation. Therefore,
good maintenance will play a major role in keeping your vehicle in
good working condition and prolonging the life of the batteries.
Please follow these suggestions:
£ To prevent rust always keep your vehicle dry and clean.
Regularly check the front and rear tires, suspension and body
frame and all fasteners.
£
When riding in rain do not go through deep puddles or muddy
areas; excessive water may harm the motor and other electrical
components.
£
To prevent rust from forming on the vehicle, avoid parking your
vehicle in high humidity and corrosive areas.
£
To avoid damage to the electrical parts of this vehicle, especially
the controller, do not store the vehicle in direct sunlight or in heavy
rain.
£
Customers should NEVER attempt to take out any of the parts, or
attempt major maintenance without consulting the supplier/dealer
(this will invalidate the warranty).
£
Never overload and ride the vehicle for an extended period of time,
prolonged use with excessive weight could cause damage to the
electronic and mechanical parts.
£
Always check your vehicle and perform necessary maintenance tires, brakes, nuts and bolts.
£
For your safety, perform routine maintenance on your vehicle. This
will lower the potential for damage.
£
12
Maintenance Schedule
Mileage 400 1000 2000 3000
Battery
C
Charger
C
Tire
Pressure C
C
C
C
Tire
Wear
Brake
System C
C
Brake
Pad
Nuts
and
Bolts
T
T
Mileage
Battery
Charger
Tire
Pressure
Tire
Wear
Brake
System
Brake
Pad
Nuts
and
Bolts
A: Adjust
4000
5000
6000
C
C
Maintenance
C
C
C
A
C
C
C
A
A
T
7000 8000 9000 10,000 11,000 12,000 Maintenance
C
C
C
C
C
C
C
C
C
C
A
C
C
C: Check
C
C
C
A
A
T
T
T: Tighten
13
A
Frequently Asked Questions
1. Fully charged, what is the range of the electric vehicle?
I. The Range is affected by the weight of rider, the type of terrain
and the speed at which the vehicle is driven. Under optimal
conditions (push red button and keep a steady 20mph rate
speed), a range of (50 miles) has been recorded on a single
charge.
II. See the specification sheet for the full range and speed of the
models.
2. Is riding an electric vehicle a comfortable riding experience?
I. Riding an electric vehicle is indescribably more comfortable
than riding a gasoline motor vehicle. The silence and the
smoothness of a direct drive electric-motor-powered vehicle are
incomparable.
II. Quick accelerating---speed from 0 to 30 mph (50km/H) takes
only 4 seconds.
3. Do you have to warm-up the electric vehicle before riding it?
I. When the driver turns the ignition key, three beeps will
immediately follow telling the driver that the vehicle is ready to
drive. There is absolutely no warm-up time needed. Just turn the
key and you are ready to go.
4. What about maintenance?
I. This motor bike is designed for minimum maintenance.
Considering the fact that this vehicle has no combustion engine,
no transmission, no belts, no chains, no gasoline, no lubricants,
no ignition plugs, no carburetor, etc. The unique design of the
direct drive system and the total absence of belts or chains make
this vehicle much easier to maintain than other electric scooters.
Practically any scooter dealer can do most of the maintenance
that may be required. The motor is brushless so there is never a
need to change brushes.
5. What about parts, is it a problem getting parts for the Zapino?
I. ALL parts can be purchased directly from the dealer including
batteries, tires, bulbs, body shells, seats etc.
II. We supply a 6 month warranty for all parts (subject to normal
care from the driver) excluding batteries, tires and other normal
wear parts. (See warranty)
14
Frequently Asked Questions
6. Can the electric vehicle be cleaned or washed with water
without any concern?
I. One should be careful not to pour water directly into the
charger outlet, the controller and the internal battery set when
washing or cleaning.
7. Do you need to wear a helmet to drive the ZAPINO?
I. For safety reasons we always advise the use of a helmet.
ALWAYS follow local laws.
8. Is it easy to recharge the batteries?
I. Yes. The user just needs to insert the input plug of the Battery
Charger into any regular wall outlet of AC110V (or AC220V) and
the output plug into the inlet on the right rear side of the vehicle,
which is clearly marked. This will start to recharge the batteries.
Daily charge of the battery will lengthen its life cycle, up to 1000
deep charges from 400 occasional charges.
9. How long will the batteries last, what is the batteries life
cycle?
I. The battery's life cycle will be reduced or damaged if an
insufficient charge level is retained for a long period of time.
Depending on the user's operation, between 400 and 1000
cycles. Normally the batteries should last between one and three
years if the user charges it regularly.
10. How can I know the batteries condition and energy level?
I. The display panel includes a row of LED lights, which clearly
indicate the power level of the batteries in your vehicle.FULL:
First green light is on.
£ 75% FULL: Second green light is on.
£ 50% LEFT: Yellow light is on and you also hear a Warning Beep
(At this level, charging is highly recommended).
Low 25% LEFT : Red light is on (Immediate charging is
necessary).
£
15
Frequently Asked Questions
11. If one of the batteries has a problem do I need to change all
the four batteries?
I. Not necessarily. Simply check the condition of all batteries and
only replace the battery which shows lack of charge.
12. Why is this product UNIQUE?
It has a Brushless wheel motor. We emphasize "brushless" not
just because this is the latest technology, but because these
permanent magnet motors are extremely efficient! These motors
produce high torque at low speeds, keeping an acceptable
balance of torque and energy across the whole speed range. In
addition to not wasting energy at idle, the motors offer the
advantage of using the permanent magnet motor's energy
recovery capability during deceleration (regenerative braking),
so the batteries recharge during deceleration. Often other types
of electric vehicles on the market today will still use sealed brushtype motors that are dependant upon brush life that build up
brush dust (residue) and susceptible to wear over time which
may affect maximum speed and electrical noise or become
problematic in other ways.
16
Troubleshooting
Problem
Condition
Check
Solution
When I turn
my vehicle
on nothing
happens.
1. Power
indicator light is
off while riding.
1. Check power
connection and battery
level.
1. Fasten connections.
2. Indicating
light on motor is
not illuminated.
2. Check battery and
motor connection.
2. Recharge battery.
3. Assess the weather for
humidity.
3. Loosen connection and
wipe down with a damp rag
and dry and fasten again.
Contact the supplier.
4. Check regulator.
4. If there is any corrosion
replace. Contact the supplier.
5. Battery level is low.
5. Change or replace
damaged part. Contact the
supplier.
1. Check the grip for
damage
1. Use a flat head
screwdriver to adjust the gap
between the rubber handle
and the cover.
2. Check the Throttle
spring.
2. Readjust the Throttle
spring position. Contact the
supplier.
3. The Throttle handle is
loose.
3. Lubricate the Throttle
spring. Contact the supplier.
1. Check the charger plug
position.
1. Check by unplugging
charger and plugging in
again.
2. Check the fuse in the
charger box.
2. Unplug the charger and
replace the fuse. Contact the
supplier to order a new
charger fuse/charger.
3. Charger has blown a
fuse.
4. A bad connection
exists between the
charger and the battery.
3. Replace the charger fuse.
The fuse box is located on
the floorboard, unscrew the
two screws and open the
fuse case, and replace
scooter. Contact the supplier
to order a new fuse.
4. Unplug and plug in again.
Otherwise contact the
supplier.
1. Check Connection.
1. Fasten Connection.
2. Adjustment Screw.
2. Turn for desired sound.
The Throttle
does not
work or
switch on,
the vehicle
moves
without
acceleration.
The
batteries do
not take a
charge.
Horn
The Throttle
does not return
to stop position.
Charger light is
off
No Noise
17
Diagnostic Warning Signal Lights
If the ZAPINO is not working, check the diagnostic light (break down
lights) above the speedometer, the signals are as follows:
£ First flash 3 and after a pause flash 3 times again:
problem with throttle spring, it didn't come back to normal position.
£ Flash 1 time and after a pause then 1 time again:
problem with brake, check brake level for kick stand released or not.
£ First flash 1 time and after a pause then 2 times again:
problem with connection of throttle, broken wire is loosened.
£ First flash 1 and after a pause 4 times again:
problem with voltage, battery too low (charge).
£ First flash 1 and after a pause 5 times again:
battery too high voltage.
£ First flash 3 times and after a pause 1 time again:
problem with motor, overloaded.
£ First flash 0 and after a pause 3 times again:
problem with motor, overloaded.
£ First flash 0 and after a pause 2 times again:
the battery overload can't release enough current to motor.
£ First flash 0 and after a pause 10 times again:
motor thermal sensor problem.
£ First flash 2 and after a pause 3 times again:
overheat protection, leave to cool.
£ First flash 3 and after a pause 2 times again:
problem on controller current sensor. Restart the key or repair
controller.
£ First flash 2 and after a pause 1 time again:
Motor rotated hold back. Release the motor.
£ First flash 2 times:
Brake light on, brake stuck on, or broken circuit.
18
Warranty
June 1, 2007
1. WARRANTY COVERAGE PERIOD
ZAP (ZAP) warrants from the date of delivery to the first consumer, that each
ZAPINO Electric Vehicle sold as “NEW” and “UNUSED” in 2008 and predelivered by an authorized ZAP dealer, and a copy of the bill of sale and
registration-warranty card has been presented to ZAP will be free from any
defect in material and/or workmanship for a period of:
SIX (6) MONTHS WARRANTY
NINETY (90) DAYS, for rental use owners
PRORATED WARRANTY on the batteries
All-Inclusive Coverage
ZAP will repair or replace, as its option, all genuine ZAP parts found faulty in
material and/or workmanship, under normal use, maintenance and service, with
genuine ZAP parts without charge for parts and labor, at any authorized ZAPINO
dealer during warranty coverage period.
All genuine ZAP accessories are warranted with respect to parts and labor
against defects in materials and workmanship for a period of 90 days from the
date of purchase to original retail purchaser. Except as otherwise provided
herein:
2. WHAT IS NOT COVERED
# Normal wear and tear items such as the charger plug and receptacle, seats,
windshield wiper blades, trim pieces, fuses, decals (except safety decals), brake
pads, brushes, bushings, light bulbs, mats and pads, cosmetic deterioration, and
items which deteriorate or fail due to exposure;
# Damage caused by failure to provide proper service, maintenance and/or
storage, as described in the ZAP Owner's Manual.
# Damages resulting from improper repairs, modifications or use of nonapproved parts or repairs done by a non-authorized ZAP dealer;
# Damage resulting from continued use of the vehicle after a defect is or should
have been discovered.
# Damage resulting from accident, fire, explosion, theft, vandalism, riot or any
act of God.
# Damages to batteries resulting from lack of maintenance, too deep of
discharge, or from freezing condition.
# Misusing the ZAP vehicle, such as driving over curbs, overloading or racing.
# Tampering with the ZAP vehicle.
# Altering or modifying the ZAP vehicle, including the body, chassis, mechanical
or electrical.
# Customer applied chemicals or accidental spills.
# Using contaminated or improper fluids.
# Non - ZAP parts installed after the vehicle leaves the ZAP factory or control.
# Transportation expenses for warranty services (covered under the On-Site
Program).
# Damages related to plastic and finish on plastic, including but not limited to
scratches, cracks, and discoloration.
# Driving through water deep enough to cause electrical system damage.
# This warranty does not cover such tires that have failed as a result from
19
Warranty
normal wear, road hazards such as: (cuts, bruises, impacts, punctures, etc.);
overloading, excessive speed, spinning on slippery surfaces, improper inflation,
tire chains, wheel misalignment; improper application, damage caused by abuse,
collision, accident, fire or vandalism. Any damage caused by a puncture or tire
repair also is not covered.
# Parts and labor needed to maintain the ZAP vehicle, and the replacement of
parts due to normal wear and tear.
# Surface rust and deterioration of paint, trim, upholstery, and other appearance
items that result from use and/or exposure to the elements.
# Using the ZAP to tow other vehicles, trailers etc., may void warranty.
2(a) SEPARATE MANUFACTURER'S WARRANTY
Batteries, Controller, and Charger are covered under separate manufacturer's
warranty.
3. VOIDING OF WARRANTY
THIS AND ANY OTHER WARRANTY SHALL BE VOID IF THE VEHICLE IS
ABUSED OR USED IN AN UNINTENDED MANNER OR SHOWS INDICATIONS
THAT IT HAS BEEN ALTERED IN ANYWAY, INCLUDING, BUT NOT LIMITED
TO, USE OF NON-GENUINE ZAP PARTS, MODIFICATION OF THE SPEED
GOVERNOR, BRAKING SYSTEM, STEERING, TRANS-AXLE, OR OTHER
OPERATING SYSTEMS OF THE VEHICLE TO CAUSE IT TO PERFORM
OUTSIDE ZAP SPECIFICATIONS. THE WARRANTY IS LIKE WISE VOID IF
THE VEHICLE SHOWS INDICATIONS THAT REASONABLE OR NECESSARY
MAINTENANCE AS OUTLINED IN THE OPERATION AND MAINTENANCE
SECTION OF THE OWNER'S MANUAL WAS NOT PERFORMED AT THE TIME
AND IN THE MANNER SPECIFIED IN SUCH MANUALS.
FAILURE OF DEALER TO PROVIDE A PDI, BILL OF SALE AND
REGISTRATION-WARRANTY CARD MAY VOID WARRANTY.
4. INTERNATIONAL SALES
All inclusions and exclusions of the ZAP Warranty apply, except for
reimbursement for shipping of parts outside the United States.
5. HOW TO MAKE A WARRANTY CLAIM
Customer must give ZAP or authorized ZAPINO dealer notice of any claim within
a reasonable period of time, not to exceed thirty days. ZAP will not repair any
condition or replace any part if a claim is not made in a timely manner. Customer
must present the vehicle or defective part to an authorized ZAPINO dealer. Prior
to the beginning of repair or replacement of defective parts a repair/work order
must be signed, and the ZAPINO Warranty Registration Card and/or proof of
purchase must be presented to the dealer. Dealer must have returned the PDI to
ZAP. All parts replaced under this warranty become the property of ZAP.
6. DISCLAIMER
THIS WARRANTY IS EXCLUSIVE. ZAP MAKES NO OTHER WARRANTY OF
ANY KIND, EXPRESS OR IMPLIED. ANY IMPLIED WARRANTIES OF
MERCHANTABILITY OR FITNESS FOR A PARTICULAR PURPOSE WHICH
EXCEED THE OBLIGATIONS OR TIME LIMITS STATED IN THIS WARRANTY
20
Warranty
ARE HEREBY DISCLAIMED BY ZAP AND EXCLUDED FROM THIS
WARRANTY. THE PURCHASER AND ZAP EXPRESSLY AGREE THAT THE
REMEDY OF REPAIR OR REPLACEMENT OF THE DEFECTIVE VEHICLE OR
COMPONENT THEREOF IS THE EXCLUSIVE AND SOLE REMEDY OF THE
PURCHASER. ZAP MAKES NO OTHER REPRESENTATION OR WARRANTY
OF ANY KIND, AND NO REPRESENTATIVE, EMPLOYEE, OR DEALER OF
ZAP HAS THE AUTHORITY TO MAKE OR IMPLY ANY REPRESENTATION,
PROMISE, OR AGREEMENT WHICH IN ANY WAY VARIES THE TERMS OF
THIS WARRANTY. ZAP RESERVES THE RIGHT TO MODIFY THIS
WARRANTY AT ANY TIME, BEING UNDERSTOOD THAT SUCH
MODIFICATION WILL NOT ALTER WARRANTY CONDITIONS APPLICABLE
TO THE ZAPINO SOLD WHILE THIS WARRANTY IS IN EFFECT.
7. SOLE REMEDY
ZAP'S ONLY LIABILITY UNDER THIS WARRANTY, OR IN ANY ACTION
WHETHER BASED UPON WARRANTY, CONTRACT, NEGLIGENCE, STRICT
PRODUCT LIABILITY OR OTHERWISE, IS LIMITED TO THE REPAIR OR
REPLACEMENT, AT ZAP'S OPTION, OF A VEHICLE OR COMPONENT
THEREOF THAT ZAP DEEMS TO BE DEFECTIVE. REPLACEMENT SHALL
MEAN FURNISHING, DURING THE APPLICABLE WARRANTY PERIOD, A
NEW VEHICLE OR FACTORY RECONDITIONED VEHICLE OR COMPONENT
THEREOF WHICH IS IDENTICAL OR REASONABLY EQUIVALENT TO THE
WARRANTED PRODUCT OR COMPONENT AT NO COST TO THE
PURCHASER. REPAIR SHALL MEAN REMEDYING A DEFECT IN THE
VEHICLE OR COMPONENT THEREOF AT NO COST TO THE PURCHASER
DURING THE APPLICABLE WARRANTY PERIOD. IF ZAP ELECTS TO
REPAIR THE VEHICLE, IT MAY PROVIDE FACTORY RECONDITIONED
PARTS OR COMPONENTS. ALL PARTS AND COMPONENTS REPLACED
UNDER WARRANTY SHALL BECOME THE PROPERTY OF ZAP.
8. NO CONSEQUENTIAL DAMAGES
IN NO EVENT SHALL ZAP BE LIABLE FOR ANY INCIDENTAL OR
CONSEQUENTIAL DAMAGES INCLUDING, BUT NOT LIMITED TO, SHIPPING
COST TO DEALER, LOSS RELATED TO PROPERTY OTHER THAN THE
VEHICLE, LOSS OF USE, LOSS OF TIME, INCONVENIENCE, OR ANY
OTHER ECONOMIC LOSS.
Some states allow neither limitation on the duration of an implied warranty nor
exclusions or limitation of incidental or consequential damages. Therefore, the
above limitations or exclusions may not apply to you.
9. CUSTOMER ASSISTANCE
In the event of a controversy or a dispute arising in connection with this ZAP
Warranty, ZAP suggests that you try to resolve the issue at the dealership level.
We recommend discussing the issue with your authorized dealer's service
manager or owner. If further assistance is required, please submit your complaint
in writing to:
ZAP, Customer Service Department, 501 Fourth Street, Santa Rosa, CA 95401
USA. [email protected] (707) 525-8658.
21
Wiring Display
22
Equipment Location
Front Panel
1 DBI “Digital Battery
Indicators” System
4
2 Diagnosis Light
3
4
5
1
6
2
3 High Beam Indicator
4 Turn Signal Indicators
5 Speedometer
6 Odometer
Rear View Mirrors
Seat Storage and Charge Port
Room for helmet, charger and tools inside.
Charge Plug
Located under seat
Safety Circuit
Breaker
Kick Stand
(This automatically
cuts off the power
so the scooter will
remain stationary)
Maintenance Tools
BATTERY
CHARGER
23
Equipment Location
Head Lamp
Rear Rack
Rear
Turn Signals
Turn Signal
Lamps
Tail Lamp
Front Mud
Fender
Front Wheel
Rear Power
Brake
Front Disk
Brake
Center
Stand
Rear
Suspension
Aluminum Alloy
Hub Motor
Digital Controller
Batteries
A. Horn
B. Throttle and Front Brake Handle
C. Rear View Mirror
D. Head Lamp
E. Dash Board (DBI,Diagnosis indicator)
F. Odometer (Kilometer/Mileage)
G. Under seat storage
H. Rubber Blanket
I. Tail Lamp
J. Front Disk Brake
Z
K. Turning Signal Lamp
L. Front Shock Absorber
M. Center Stand
N. Kick Stand
I
O. Speed switch
P. Front Mud Fender
K
Q. Rear Disc Brake
R. Front Wheel
S. Hub motor
T. Controller
Q, S
U. Charging Plug
V. Circuitry braker (inside)
W. Battery Box
X. DC /DC Voltage converter
Y. Charge plug (inside)
Z. Rear Rack
C
E, F
D
A, B, O
K
H
G, U, V,
W, X, Y
P
L
M
T
J
N
24
R
501 4th Street. Santa Rosa, CA. 95401 USA Tel.(707)525-8658 Fax(707)525-8692 Stock Symbol:ZAAP