1
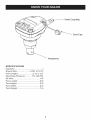
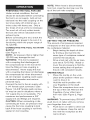
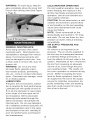
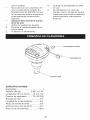
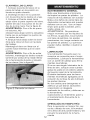
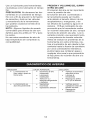
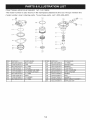
OperationManuaJ
MIN! PALM NAILER
Model 142.18839
CAUTION:
Read, understand
•
Safety
and follow all Safety Rules
and Operating instructions in
this manual before using this
product.
•
Know Your Nailer
•
•
Operation
Maintenance
PRECAUCION: Lea, comprenda y
siga todas las reglas de seguridad y
las instrucciones de operaci6n en este
manual antes de operar este producto
•
Troubleshooting
•
Espa_ol
•
Parts List
Sears Brands Management
www.craftsman.com
Corporation,
Hoffman
Estates,
IL 60179 U.S.A.
WORK AREA
Keep your work
area clean
and well lit. Cluttered benches
Warranty
......................................
2
and dark areas invite accidents.
Safetylnstructions
....................
2-3
Know
Your
Nailer
.........................
4
Do not operate power tools in
explosive atmospheres,
such
Operation
.................................
5-6
Maintenance
................................
6
as in the presence of flammable liquids, gases, or dust.
Troubleshooting
..........................
7
Power tools create sparks which
Espa_ol
..................................
8-13
Parts
andIllustrations
List..........
14
may ignite the dust of fumes.
CRAFTSMAN ONE YEAR FULL
WARRANTY
FOR ONE YEAR from the date of
purchase, this product is warranteed
against any defects in material or
workmanship. A defective product will
be replaced free of charge.
For warranty coverage details to
obtain free replacement,
visit the
web site: www.craftsman.com
This ONE YEAR warranty is void
if this product is ever used while
providing commercial services or if
rented to another person. For 90 DAY
commercial use terms, see listing
on Craftsman warranty web page.
This warranty gives you specific legal
rights, and you may also have other
rights which vary from state to state.
Sears Brands Management Corp.
Hoffman Estates, IL 60179
Read and follow all safety rules and
operating instructions in this manual
and on warning label of tool before using this tool. Failure to follow warnings
could result in DEATH or SERIOUS
INJURY.
WARNING: Some dust created by
using power tools contains chemicals
known to the State of California to
cause cancer and birth defects or
other reproductive
harm.
Keep bystanders,
children and
visitors away while operating
a power tool. Distractions can
cause you to lose control.
PERSONAL SAFETY
Eye protection
which conforms to ANSI specifications
and provides protection
against flying particles both
from the FRONT and SIDE
should ALWAYS be worn by
the operator and others in
the work area when loading,
operating and servicing this
tool. Eye protection is required
to guard against flying fasteners
and debris, which could cause
severe eye injury.
Additional
safety protection
will be required in some
environments.
For examples,
the working area my include exposure to noise level which can
lead to hearing damage. The
employer and user must ensure
that any necessary hearing
protection is provided and used
by the operator and others in the
work area. Some environments
will require the use of head
protection equipment. When
required, the employer and user
must ensure that head protection
conforming to ANSI Z89.1-1997
is used.
Stay alert, watch what you
are doing and use common
sense when operating a power
tool. Do not use tool while tired
may result. Do not interfere with
the proper operation of the workpiece contact mechanism.
Use only the size and type
of fasteners designated
in
the Specifications list in this
manual,
or under the influence of drugs,
alcohol or medication. A moment
of inattention while operating
power tools may result in serious
personal injury.
Dress properly. Do not wear
loose clothing or jewelry. Contain
long hair. Keep your hair,
clothing and gloves away from
moving parts. Loose clothes,
jewelry, or long hair can be
caught in moving parts.
Keep fingers away from trigger when not driving fasteners
to avoid accidental firing.
Do not overreach. Keep proper
footing and balance at all times.
Proper footing and balance
enables better control of the tool
in unexpected situations.
Use safety equipment. Always
wear eye protection. Dust mask,
nonskid safety shoes, hard hat,
or hearing protection must be
used for appropriate conditions.
Do not use a ladder or unstable support. Stable footing on
a solid surface enables better
control of the tool in unexpected
situations.
Store idle tools out of reach of
children
and other
untrained
persons. Tools are dangerous
the hands of untrained users.
in
OPERATION
Check operations of the
workpiece contact mechanism
frequently. Do not use the tool
if the workpiece contact mechanism is not working correctly as
accidental driving of a fastener
Keep the tool and its handle
dry, clean and free from oil
and grease. Always use a
clean cloth when cleaning.
Never use brake fluids, gasoline,
petroleum-based
products, or
any strong solvents to clean
your tools. Following this rule
will reduce the risk of loss of
control and deterioration of the
enclosure plastic.
Do not use oxygen, combustible gases or bottled gases
as a power source for this tool
as tool will explode, possible
causing injury or death.
Do not use with an air com-
1.
2.
3.
4.
5.
pressor which can potentially
exceed 200 psi as tool may
burst, possibly causing injury.
Always disconnect
air supply:
Before making adjustments
When servicing the tool
When clearing a jam
When tool is not in use
When moving to a different work
area, as accidental actuation
may occur, possibly causing
injury.
Male
Coupling
Nosepiece
SPECIFICATmONS
Capacity
..............................................
1
Shank
Size
......................
0.08"
to0,t6"
Nail
Lengths
........................
2"to3-1/2"
Operating
Pressure
............
70-120
PSI
AirInlet............................................
1/4"
Tool
Length
.....................................
2.6"
Tool
Height
......................................
3.9"
Tool
Width
.......................................
2,2"
Tool
Weight
.....................................
1Ib
NOTE:
When
hose
isdisconnected
from
tool,
snap
thedust
cap
over
the
PREPARING
THE
TOOL
FOR
USE tipofthetool
male
coupling.
Under
normal
conditions,
thetool
should
belubricated
before
connecting
thetool
toanairsupply.
Add
airtool
lubricant
into
themale
coupling
onthe
tool
once
daily
with
minimal
use,
or
twice
aday
with
heavy
use.Only
a
fewdrops
ofoilatatime
isnecessary.
Too
much
oilwillonly
collect
inside
thetool
and
willbenoticeable
inthe
exhaust
cycle.
Before
connecting
thetool,
check
the Figure
1-Connecting
theAirSupply
aircompressor
gauge
tobesure
itis SETTING
THE
AIR
PRESSURE
functioning
within
theproper
range
of The
amount
ofairpressure
required
70-120
PSI.
will
depend
on
the
s
ize
o
f
t
he
nailand
CONNECTmNG
THE
TOOL
TOANAIR theworkpiece
material.
SUPPLY
Begin
testing
thedepth
ofdrive
(See
Figure
1)
bydriving
atest
nailinto
the
NOTE:
Airpressure
that
ishigher
than
same
type
ofworkpiece
material
120
PSI
may
damage
thetool.
used
fortheactual
job.
WARNING:
This
tool
isequipped
Drive
atest
nailwith
theairpreswith
acoupling
that
discharges
all
sure
setat70-75
PSI.Raise
or
thecompressed
airinthetoolatthe
lower
theairpressure
tofind
the
time
thefitting
orhose
coupling
is
lowest
setting
that
willperform
disconnected.
Never
equip
thistoot
thejobwith
consistent
results.
with
acoupling
that
does
notdischarge
DRIVmNG
NAmLS
thecompressed
airwhen
disconnectPlace
thenail
tipontheworked.Animproper
coupling
could
cause 1. piece
attheposition
where
you
unintended
operation
and
serious
want
todrive
itin.
personal
injury.
2. Hold
thenail
inposition
with
Connect
thetooltotheairsupply
with
your
fingertips
on
the
shaft.
a1/4"
female
quick
connector.
(See 3. Place
thenosepiece
down
onto
Figure
1)A3/8"
female
quick
connec- thetopofthenail.
Remove
the
tormay
beused
insituations
where
a
fingertips
ofyour
other
hand
1/4"
suppty
lineisnotavailable.
For
from
nail.
(See
Figure
2,Page
maximum
tool
performance
a3/8"
5).
supply
lineand
fittings
arerequired. WARNING:
Toprevent
injury,
DONOT
CAUTmON:
When
connecting
ordis- push
down
onnailer
until
you
remove
connecting
airhose,
airpressure
may your
fingertips
from
nail.
cause
thethehose
coupling
tokick 4. Push
down
onnailer
todrive
nail
back
ifthehose
coupting
isnotfirmly
into
w
orkpiece.
Keep
the
nail
in
seated
ontoo!
coupling.
linewith
thenosepiece
asthe
nailisdriven.
WARNING:
Toavoid
injury,
keep
fin- COLD WEATHER OPERATION
gers
completely
above
thelower
half For cold weather operation, near and
oftoolwhen
driving
nails
(See
Figure below freezing, the moisture in the
2,Page
5),
air line may freeze and prevent tool
operation. Use air tool lubricant as a
cold weather lubricant.
CAUTION: Do not store tools in a cold
weather environment to prevent frost
or ice formation on the tool operating
valves and mechanisms that could
cause tool failure.
NOTE: Some commercial air tine
Figure
2-Driving
Nails
GENERAL
MAINTENANCE
Avoid using solvents when cleaning plastic parts. Most plastics are
susceptible to damage from various
types of commercial solvents and
may be damaged by their use. Use
a clean cloth to remove dirt, dust, oil,
grease, etc.
WARNING:
Do not at any time
let brake fluids, gasoline, petroleum-based projects, penetrating
oils, etc., come in contact with plastic
parts. Chemicals can damage, weaken or destroy plastic.
LUBRICATION
Frequent, but not excessive, lubrication is required for best performance.
Lubricate tool with quality air tool oil.
If no air tine lubricator is used, place
a few drops of oil into open end of
tool nosepiece. Oil for pneumatic
fastening tools added through the
airline connection will lubricate the
internal parts. Do not use detergent
oil or additives as these lubricants will
cause accelerated wear to the seals
and bumpers in the tool, resulting in
poor tool performance and frequent
tool maintenance.
drying liquids are harmful to "O" rings
and seals. Do not use these low temperature air dryers without checking
compatibility.
AIR SUPPLY PRESSURE AND
VOLUME
Air volume is as important as air
pressure. The air volume supplied to
the too! may be inadequate because
of undersize fittings and hoses, or
from the effects of dirt and water in the
system. Restricted air flow will prevent
the toot from receiving an adequate
volume of air, even though the pressure reading is high. The results will
be a slow operation or reduced driving
power. Before evaluating tool problems for these symptoms, trace the
air supply from the tool to the supply
source for restrictive connectors, low
points containing water and anything
else that would prevent fuji volume
flow of air to the tool.
PROBLEM
*
Tool does
nothing or
operates
sluggishly
POSSIBLE
*
*
*
*
Tool jams
frequently
*
*
CAUSE
SOLUTION
Inadequate air
supply
Inadequate
lubrication
Worn, damaged Orings or bumper
*
Incorrect fasteners
Damaged fasteners
*
*
*
*
Verify adequate air
supply
Lubricate tool
Replace O-rings
and/or bumper
Verify that fasteners
are the correct size
Replace fasteners
ADVERTENCIA:
Et polvo creado por
el uso de herramientas neumatcias
Garantia
.............................................
8 contienen quimicos conocidos en el
de California por ocasionar
Instrucciones
deseguridad
...........
8-10 estado
Conozca
suclavadora
......................
t0 cancer y malformaciones congenitas u
Operaci6n
...................................
11-12otros dar_os de la reproducci6n.
Mantenimiento
............................
12-13AREA DE TRABAJO
Diagn6stico
deaverias
.....................
13
Mantenga su &rea de trabajo
Lista
departes
eilustraciones
...........
14
limpio y adecuadamente
ilumi=
nado.
PLENA
GARANTJA
DE UN ANO DE
CRAFTSMAN
POR UN ANO a partir de ta fecha
de compra, este producto estar_
garantizado contra cualquier defecto
en cuanto al material y mano de obra.
Un producto defectuoso sera repuesto
sin costo alguno.
Por los detalles de cobertura de garantia para asi obtener un repuesto
gratuJto, visite el sitio web: www.
craftsman.corn
Esta garantia de UN ANO se anutar_
si este producto se usara alguna vez
para brindar servicios comerciales
o si se rentara a otra persona. Por
los t@minos de uso comercial de 90
DJAS, vea la lista en ta p_gina web
de garantias de Craftsman.
Esta
garantia le brinda derechos legales
especificos y usted puede contar
con derechos adicionales los cuales
varian de estado a estado.
Sears Brands Management Corp,
Hoffman Estates, IL 60179
Lea y siga todas las reglas de seguridad e instrucciones de operaci6n
en este manual yen ta etiqueta de
advertencia de la herramienta antes
de emplear esta herramienta,
Hacer
caso omiso al seguir tas advertencias podria ocasionar la MUERTE o
LESIONES SERIAS,
Los bancos abarrotados
y _reas oscuras invitan los
accidentes.
No opere las herramientas
neum_ticas
en ambientes
explosivos,
tales como en
la presencia de liquidos
inflamables,
gases o polvo.
Las herramientas neum_ticas
crean chispas tas cuales podrian
encender el polvo de los humos.
Mantenga a los espectadores, ni_os, y visitantes
lejos
durante la operacion de una
herramienta
neum_tica. Las
distracciones pueden ocasionar
la perdida de control.
SEGURIDAD
PERSONAL
Se deber& Ilevar SIEMPRE
proteccion
de ojos la cual
conforma con las especificaciones de ANSI y que brinda
proteccion
contra particulas
voladoras tanto del LATERAL
como de la FRENTE por parte
del operador y otros en e! &rea
de trabajo durante la carga,
operaci6n
y mantenimiento
de
esta herramienta.
Se requiere
la protecci6n de ojos para
protegerse contra sujetadores y
escombros volantes los cuales
podrian ocasionar lesiones
serias de los ojos.
Se requerirA proteccion
de seguridad adicional en algunos
ambientes.
Por ejemplo, el _rea
de trabajo puede estar expuesto
a niveles sonoros los cuales
podrian ocasionar
la p@dida au-
ditiva.
Elempleador
yelusuario
deben
asegurarse
que
sebrinde
cualquier
protecci6n
auditiva
yque
tamisma
sea
usada
por
elusuario
yotras
personas
enel_rea
detrabajo.
AIgunos
ambientes
requerir_n
elusode
equipo
deprotecci6n
detacabeza.Cuando
sea
requerida,
el
empteado
yelusuario
deber_n
asegurarse
que
seuse
protecci6n
delacabeza
conforme
ala
norma
ANSI
Z89.1-1997.
Mant_ngase alerto y observe
Io que hace y use el sentido
cornun durante la operaci6n
de una herrarnienta neurn&tica. No use ta herramienta
cuando uno este cansado o bajo
la influencia de drogas, alcohol
o medicamentos.
Un minuto de
descuido durante la operaci6n
de tas herramientas neumaticas
podria ocasionar lesionas personales serias.
Vistase adecuadarnente.
No
Ileve puesto ropa floja ni joyeria.
Mantenga su cabello, ropa y
guantes lejos de tas partes
m6viles. La ropa floja, la joyeria
o el cabello largo puede atraparse en las partes m6viles.
Con el fin de prevenir el
disparo accidental,
mantenga
los dedos lejos del disparador
cuando no se est_ sujetando
los sujetadores.
No intente alcanzar dernasiado
lejos. Mantenga buen equilibrio
con los pies bien ptantados en
todo momento. El buen equilibrio con los pies bien plantados
permite un mayor control de
la herramienta en situaciones
inesperadas.
Use equipo de seguridad.
Siempre tleve puesto protecci6n
de los ojos. Se deben usar una
mascara contra el polvo, zapatos
de seguridad antideslizantes,
un
casco de seguridad y protecci6n
de oidos en las condiciones
adecuadas.
NO use una escalera ni
soporte inestable. El buen
ptanteamiento de los pies sobre
una superficie s61ida permite un
mejor control de ta herramienta
en situaciones inesperadas.
Alrnacene las herramientas
fuera de uso fuera del alcance
de los nil]os y de otras personas no capacitadas.
Las
herramientas son peligrosas
en las manos de usuarios no
capacitadas.
OPERACION
Revise frecuenternente
las
operaciones
del rnecanismo
de contacto de la pieza de
trabajo. No use ta herramienta
si el mecanismo de contacto
de la pieza de trabajo no esta
funcionando correctamente ya
que et disparo accidental de un
sujetador podria resultarse. No
interfiera con la operaci6n adecuada del mecanismo de contacto
de la pieza de trabajo.
Use solo el tama_o y tipo de
sujetadores
designados
en la
lista de especificaciones
de
este manual.
Mantenga la herrarnienta y su
mango secos, lirnpios, y Iibre
de aceite y grasa.
Siempre
use un trapo timpio al momento
de limpiar. Nunca use liquidos
de frenos, gasolina, productos
con base de petr61eo ni ningOn
disolvente fuerte para limpiar
sus herramientas.
AI seguir esta
regla se disminuira et riesgo de
perdida de control y el deterioro
de la envoltura de ptastico.
No use oxigeno, gases combustibles no gases embotelladas
como la fuente de potencia de
esta herramienta dado que la
herramienta explotara, potencialmente ocasionando lesiones o
aun
lamuerte.
4.
Notause
conuncompresor
de
aire
elcual
podria
exceder
po- 5.
tencialmente
tas
200
PSiyaque
laherramienta
podria
exptotarse,
potenciaimente
ocasionando
lesiones.
1.
2.
3.
Cuando la herramienta no est9
en use
AI cambiarse a un area de
trabajo nuevo, ya que se podria
ocasionar una acci6n accidental,
potencialmente
ocasionando
lesiones.
Siempre desconecte
el suministro de aire
Antes de realizar los ajustes
Durante el mantenimiento de la
herramienta
At liberar un atoramiento
Guardapolvos
ESPECmFmCACmONES
Capacidad ...........................................
1
TamaSo del eje ................. 0.08" a 0,t6"
Longitudes de los clavos ...... 2" a 3-1/2"
Presi6n de operaci6n .......... 70-120 PSI
Entrada de aire .............................. 1/4"
Longitud de ta herramienta ............. 2.6"
Attura de la herramienta ................. 3.9"
Anchura de ta herramienta ............. 2.2"
Peso de la herramienta ............... 1 libra
10
rendimiento
PREPARANDO
PARA USO
LA HERRAMmENTA
se
y
conectar y desconectar la manguera
de aire, ta presi6n de aire podria
ocasionar un cutetazo del acoplamiento de ta manguera si el acoplamiento
de la manguera no est9 asentado
firmemente en el acoplamiento de la
herramienta.
Bajo condiciones normales, ta herramienta deber_ tubricarse antes de
conectar la herramienta al suministro
de aire. ASade lubricante para herramientas neumaticas en el acoplamiento macho en ta herramienta una vez
al dia con uso minimo, o dos veces
diarias con uso pesado. Solo se
requieren dos gotas de aceite a la
vez. Demasiado aceite se acumulara
NOTA: Cuando la manguera se desconecta de ta herramienta, abroche
e! guardapolvo sobre la punta del aceptamiento macho de la herramienta.
adentro de ta herramienta y ser_
perceptible en el cicto de escape.
Antes de conectar la herramienta,
revise el caiibrador de compresi6n de
aire para asegurarse que este funcionando dentro det tango adecuado de
70 a 120 PSI.
CONECTANDO
LA HERRAMIENTA A
UN SUMINISTRO DE AIRE
(Vet la figurat )
NOTA: Una presi6n de aire mayor a
las 120 PSI puede dadar la herramienta. Air
ADVERTENCiA:
Esta herramienta
Figura 1-Conectando el suministro
de aire
AJUSTANDO
LA PRESION DE AIRE
La cantidad de presi6n de aire requerida depender_ del tamar_o det ctavo y
del material de la pieza de trabajo.
, Comience a probar la profundidad
de encaje al ctavar un clave de prueba
en el mismo tipo de material que el
de la pieza de trabajo usado para el
trabajo real.
,Conduzca un clavo de prueba con ta
presi6n de aire ajustada a unas 70-75
PSI. Eleve o baje ta presi6n de aire
para Iocalizar el ajuste mas bajo con
el que se realizar_ el trabajo con resultados consistentes.
viene equipada con un acopiamiento
el que descarga todo el aire comprimido en la herramienta en el momento
en el que se desconecte la junta o el
acoplamiento de manguera
Nunca equipe esta herramienta con
un acopiamiento el que no descarga
el aire comprimido al desconectarse.
Un acopiamiento inadecuado podria
ocasionar una operaci6n indeseada y
por ende lesiones personales serias.
Conecte la herramienta al suministro
de aire con un conectador hembra
r_pido de 1/4". (Vet ta figura 1) Un
conectador hembra r_pido de 3/8"
puede usarse en situaciones en las
que una linea 1/4" de suministro no
esta disponibie.
Para un m_ximo
de la herramienta
requieren una linea de suministro
acoples de 3/8".
PRECAUClON: AI momento de
11
CLAVANDO
LOS CLAVOS
1. Cotoque la punta del ctavo en la
pieza de trabajo en la posici6n en
donde se quiera clavarlo.
2. Sostenga el clavo en su posici6n
con los puntos de los dedos en et eje.
3. Cotoque et Puente nasal hacia
abajo sobre la parte superior del clavo.
Quiten del ctavo los puntos de los dedos de la otra mano (Ver ta figura 2).
ADVERTENClA:
Con el fin de prevenir lesiones, NO
empuje hacia abaje sobre la ctavadora
hasta que se extraigan los puntos de
los dedos del clavo.
MANTENIMIENTO
GENERAL
Evite usar disolventes at memento
de limpiar las partes de plgstico. La
mayoria de los pl_sticos son susceptibles a los daSos de varios tipos de
disolventes comerciales and pueden
daSarse con su uso. Use un trapo
limpio para quitar suciedad, polvo,
aceite, grasa, etc.
ADVERTENCIA:
No permita en
ningL_n momento que los liquidos de
los frenos, la gasolina, los proyectos
con base de petr61eo, los aceites
penetrantes, etc. tenga contacto con
las partes de pl_stico. Lo quimicos
pueden daSar, debilitar o destruir el
pl_stico.
4. Empuje hacia abajo sobre ta clavadora para ctavar el clavo en la pieza
del trabajo.
Mantenga el clavo en tinea con el
puente nasal mientras que se clave
el ctavo.
ADVERTENClA:
Con el fin de evitar
lesiones, mantenga los dedos completamente por arriba de la mitad inferior
de la herramienta durante el clavado
LUBRICAClON
Una lubricaci6n frecuente pero no
excesiva es requerida para el mejor
rendimiento. Lubrique la herramienta
con un aceite de calidad para herramientas neum_ticas.
de los clavos (Ver la figura2).
Si no se usa ningOn tubricador de ta
linea de aire, coloque unas cuantas
gotas de aceite en el extremo abierto
del puente nasal de la herramienta.
Et aceite destinado para tas herramientas neum&ticas agregado por ta
conexi6n de ta tinea de aire lubricar_
Figura 2-Clavando
las partes internas.
No use aceite para detergentes ni
aditivos ya que dichos tubricantes
ocasionar_n un desgaste
acelerado de los sellos y defensas en
la herramienta,
ocasionando un rendimiento pobre y
el mantenimiento frecuente de la
herramienta.
los clavos
OPERAClON
EN TIEMPO FRiO
Para la operaci6n en tiempo frio, cerca de y debajo de cero, la humedad
en la tinea de aire puede helarse y asi
prevenir la operaci6n de la herramienta
12
PRESION Y VOLUMNE DEL SUMINUse
unlubricante
para
herramientas
neumaticas
como
iubricante
entiempoISTRO DE AIRE
frio.
El volumen del aire es tan importante
PRECAUCION:
No almacene
las her-
como la presi6n de aire.
El volumen del aire suministrado
ramientas en un ambiente de tiempo
frio con el fin de prevenir la formaci6n
de escarcha y hielo en las valvulas
y mecanismos de la herramientas
que podrian ocasionar la falla de la
herramienta.
NOTA: AIgunos liquidos
comerciales para lineas
da_inos para los anillos
los sellos.
No use estos secadores
bajo temperatura
compatibilidad.
de secado
de aire son
en "O" y para
de aire de
sin comprobar
PROBLEMA
•
•
La herramienta no
hace nada o opera de
forma lenta
La herramienta se
atora frecuentemente
su
CAUSA POTENCIAL
•
a
la herramienta puede set insuficiente debido al tamaSo inferior de los
acoplamientos y mangueras, o de
los efectos de suciedad y agua en el
sistema.
El flujo restringido de aire
prevendra que la herramienta reciba
un volumen adecuado de aire, aunque
la lectura de presi6n sea alta. Los resultados incluiran una operaci6n lenta
o una potencia de clavado reducida.
Antes de evaluar los problemas de la
herramienta por estos sintomas, rastree el suministro de aire desde la herramienta hasta la fuente de suministro
pot unos conectadores restrictivos,
puntos bajos que contienen agua o
cualquier otra cosa la que prevendria
el flujo pleno de voiumen de aire a ia
herramienta.
SOLUCION
Suministro de aire
inadecuado
Lubricacion
inadecuada
•
•
Anillos en Q y
defensas desgastados
o dafiados
•
Reponga los anillos
en O y/o la defensa
•
Sujetadores
incorrectos
Sujetadores dafiados
•
Verifique que los
sujetadores sean del
tamafio correcto
Reponga los
sujetadores
•
•
•
•
13
Verifique el suministro
adecuado de aire
Lubriquela
herramienta
CRAFTSMAN
MINI PALM NAILER
The model number
model number
NO. 142.I8839
is also found on the nameplate
when ordering
parts. To purchase
attached
to the tool. Always
mention
the
parts, call 1-800-469-4663.
I
I
_;_04
ITEM
PARTS
ITEM
PARTS
101
2040100-03020-0
NO
"ARTS
SOLTASSY
NAME
111
2041104-03060-0
O - RiNG
102
11369-072P301-1
SAP
112
11204-0724702-1
DRIVER
103
2041104-04013-0
3-
113
11327-0724702-1
BUMPER
104
11399-0724701-1
SOLLAR
114
11384-0721301-1
tOOL
BODY
105
11302-0720004-1
SYLINDER
CAP
115
1135M-0000007-1
TOOL
COUPLING
106
11321-0720004-1
SYLINDER
SPACER
116
2040203-04010-0
¢TAVE
WASHER
107
2041108-04100-0
3-
117
1135C-0720003-1
SPRING
108
1136X-0724702-1
SEAL
118
11395-0720007-1
ROD
109
11320-0720005-1
SYLINDER
119
1134E-0720001-1
MAGNET
110
2041108-03103-0
3-
120
1132N-0724708-1
DEEP
121
1132L-0010001-1
¢IR
RING
RING
RING
SEAL
14
NO
PARTS
NAME
UNIT
IMPACT
PLUG
CAP
SOCKET
1
CRRFTSMRN
Sears Brands Management
Corporation
Hoffman Estates, IL 60179 U.S.A.
www.craftsman.com