1
TEST REPORT
SEPTEMBER 2007
vConsolidate performance on multi-processor
Intel and AMD processor-based servers
Executive summary
Intel® Corporation (Intel) commissioned Principled
Technologies (PT) to measure performance with Intel’s
vConsolidate beta 2 workload on the following dual- and
quad-processor servers:
•
•
•
•
A server with four Dual-Core AMD* Opteron*
processors 8222 SE (3.00GHz, 120W)
A server with four Dual-Core Intel Xeon®
processors 7140M (3.40GHz, 150W)
A server with two Quad-Core Intel Xeon
processors X5365 (3.00GHz, 120W)
An Inspur* NF520D2 server with four Quad-Core
Intel Xeon processors X7350 (2.93GHz, 130W)
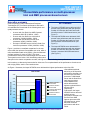
KEY FINDINGS
z
The Inspur* NF520D2 server delivered 100.5
percent more performance with the optimum
number of CSUs than the Dual-Core Intel®
Xeon® processor 7140M -based server (see
Figure 1).
z
The Inspur NF520D2 server delivered 108.5
percent more performance with the optimum
number of CSUs than the Quad-Core Intel
Xeon processor X5365-based server (see
Figure 1).
z
The Inspur NF520D2 server delivered 85.8
percent more performance with the optimum
number of CSUs than the Dual-Core AMD*
Opteron* processor 8222 SE-based server
(see Figure 1).
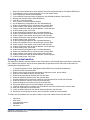
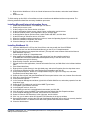
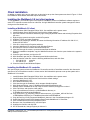
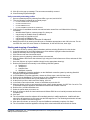
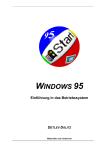
Figure 1 provides a normalized comparison for the test
servers with the optimum vConsolidate work units, which it
calls consolidation stack units (CSUs). (See the Workload
and later sections for more on CSUs.) This chart
normalizes the results to the lowest single one-CSU result.
That system’s score is thus 1.00. Normalizing makes each
data point in the chart a comparative number, with higher numbers indicating better performance.
In this section, we discuss the best results for all servers. For complete details of the performance of each server
with varying CSUs, see the Test results section.
Normalized score
As Figure 1 illustrates, the Inspur NF520D2 server delivered the highest performance at the four-CSU
vConsolidate workload,
delivering a 105.9 percent
vCon results
performance increase over
the Dual-Core Intel Xeon
4.00
processor 7140M-based
3.50
server and the Quad-Core
4 CSUs
Intel Xeon processor
3.00
X5365-based server,
Two Quad-Core Intel Xeon
which delivered their
processors X5365
2.50
highest results with three
Four Dual-Core Intel Xeon
and two CSUs,
processors 7140M
2.00
respectively.
Four Dual-Core AMD Opteron
Furthermore, the Inspur
processors
8222
SE
1.50
3 CSUs
NF520D2 server delivered
3
CSUs
Four Quad-Core Intel Xeon
2 CSUs
an 84.2 percent
processors X7350
1.00
performance increase over
the Dual-Core AMD
0.50
Opteron processor 8222
0.00
SE-based server, which
delivered maximum
Processor/num ber of CSUs
performance with three
CSUs.
Figure 1: vConsolidate results at the optimal number of CSUs for the four servers we tested.
Workload
Intel defined, implemented, and supplied the vConsolidate beta 2 workload. vConsolidate includes four different
performance tests—database, Java, mail, and Web—that run simultaneously in different virtual machines (VMs)
on a server. A fifth, idle VM is also present during the test. vConsolidate refers to a single collection of these five
virtual machines as a consolidate stack unit (CSU). Depending on the type of server and its available resources,
testers can choose to run one or more CSUs. The typical goal is to run enough CSUs to push the server under
test to its maximum capacity by consuming 100 percent of the CPU capacity or very close to that amount.
vConsolidate amalgamates the throughput results of each of the workloads in a CSU to create an overall score for
that CSU, and it uses the scores of all the CSUs to create an overall score for the server under test. See the Test
results section for more information on this process.
vConsolidate uses the following four performance tests:
LoadSim
Microsoft* Exchange* Server 2003 Load Simulator (LoadSim) is a benchmark that measures a server’s
performance handling email. LoadSim uses the MAPI Messaging Benchmark 3 (MMB-3) to simulate MAPI email
clients. The simulated clients issue requests to an Exchange server to generate an email load. LoadSim
measures both the server’s response time and the number of messages it delivers. LoadSim is available for free
download from www.microsoft.com/downloads/details.aspx?FamilyId=92EB2EDC-3433-47CA-A5F80483C7DDEA85&displaylang=en.
SPECjbb2005*
SPECjbb2005 is an industry-standard benchmark from the Standard Performance Evaluation Corp. (SPEC*) that
measures a server’s Java performance. SPEC modeled SPECjbb2005 on the three-tier client/server architecture,
with the middle layer as the primary focus. According to SPEC, “Random input selection represents the first (user)
tier. SPECjbb2005 fully implements the middle tier business logic. The third tier is represented by tables of
objects, implemented by Java Collections*, rather than a separate database.” For more information about
SPECjbb2005, see www.spec.org/jbb2005/docs/UserGuide.html.
The results we quote here for this workload are not official SPECjbb2005 results because the vConsolidate
workload uses a slightly modified version of the benchmark. These results are not comparable to SPECjbb2005
results on ’SPEC’s Web site.
SysBench*
The developers at SourceForge.net* (www.sourceforge.net) created SysBench to test various aspects of the
performance of servers running database systems. The benchmark’s original target was the MySQL* database
system (see www.mysql.com). Intel created a version of SysBench 0.4.0 that would work with Microsoft* SQL
Server* 2005 Enterprise Edition (www.microsoft.com/sql/editions/enterprise/default.mspx). We ran that version in
our test. In the vConsolidate workload, SysBench created a 100,000-row SQL database and executed a batch of
online transaction processing (OLTP) transactions against that data.
WebBench*
WebBench 5.0 (128-bit US version) is an industry-standard benchmark for Web server software and hardware. It
uses PC clients to send Web requests to the server under test. It generates performance results by incrementally
increasing the number of clients making HTTP 1.0 GET requests to the Web server; the result is a curve showing
the server’s performance under increasing load. The peak of that curve represents the peak throughput of the
server. WebBench reports both the total number of requests per second the server handled and the server’s total
throughput in bytes per second. To be certain that we found the true peak performance in our testing, we verified
that the server’s processor utilization reached or was extremely close to 100 percent during the test.
vConsolidate profiles
The vConsolidate workload comes with four sets of VM specifications, which it calls profiles. These profiles define
five key factors for each workload VM:
Principled Technologies, Inc.: vConsolidate performance on multi-processor Intel and
AMD processor-based servers
2
•
•
•
•
•
number of virtual CPUs (vCPUs) the workload should receive
amount of virtual RAM (vMemory) the workload should receive
the operating system (OS) the workload should run
the key application the workload should run
the workload itself
As we noted earlier, vConsolidate refers to a single collection of these five virtual machines as a consolidate stack
unit (CSU). Depending on the type of server and its available resources, you may choose to run one or more
CSUs. The typical goal is to run enough CSUs to push the server under test to its maximum capacity by
consuming 100 percent of the CPU capacity or very close to that amount.
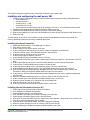
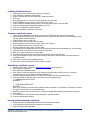
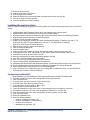
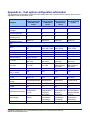
vConsolidate offers four profiles; we tested with its profile 2 and which we detail in Figure 2.
WebBench (Web)
LoadSim (mail)
SysBench (database)
SPECjbb2005 (Java)
Idle
vCPUs
2
1
2
2
1
vMemory
1.5 GB
1.5 GB
1.5 GB
2.0 GB
0.4 GB
Profile 2
OS
Windows* 32-bit
Windows 32-bit
Windows 64-bit
Windows 64-bit
Windows 32-bit
Application
IIS
Exchange
SQL Server
BEA JVM
Figure 2: The vConsolidate profile we used in our testing.
Test results
For further information on vConsolidate, please contact Intel.
Test results
The result for an execution of the vConsolidate workload amalgamates the results of all four of the workloads it
includes. To calculate a final score for a vConsolidate run, we used the following three steps, as vConsolidate
specified:
1. Benchmark throughput = benchmark’s raw results/benchmark duration (for each of the four benchmarks)
2. Normalized throughput = benchmark throughput/reference system’s benchmark throughput
3. vConsolidate score = geomean (normalized throughput of all four benchmarks in a CSU)
The first step in this process uses whatever raw results a benchmark produces, such as number of transactions or
operations, and the benchmark’s duration in seconds. We calculate a benchmark’s duration by subtracting the
start time of the vConsolidate test from its stop time and converting that time to seconds.
WebBench is an exception to this process, because it automatically produces a score in requests per second. For
this benchmark, we calculate the average requests per second for the three WebBench mixes that run while the
other benchmarks are running and record this result as its throughput.
The second step is to normalize the throughput. We use the score of one of the systems under test as the
reference system and assign it a normalized score of 1. The last step is to take the geomean of the normalized
throughput for all four benchmarks. In this test, we used as the reference score the one-CSU score on the DualCore Intel Xeon processor 7140M-based server.
For the two-, three- and four-CSU tests, we summed the score of the all individual CSUs to obtain the workload’s
final score.
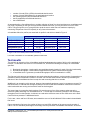
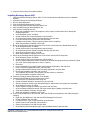
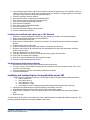
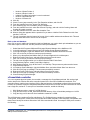
Figure 4 shows the final score (the median of three runs) and CPU utilization of the test servers by number of
CSUs. The CPU utilization percentage is the average over the period the vConsolidate workload ran. All servers
Principled Technologies, Inc.: vConsolidate performance on multi-processor Intel and
AMD processor-based servers
3
except the Inspur NF520D2 server achieved CPU saturation with three CSUs, so we show no four-CSU results
for the other three systems.
Server
vCon
score
1 CSU
% CPU
utilization
2 CSUs
vCon
% CPU
score utilization
3 CSUs
vCon
% CPU
score utilization
Dual-Core AMD Opteron
processor 8222 SE-based server
1.17
60.7
1.66
89.7
1.87
98.4
Dual-Core Intel Xeon processor
7140M-based server
1.00
65.2
1.52
85.3
1.73
97.6
Quad-Core Intel Xeon processor
X5365-based server
1.25
63.7
1.66
96.1
1.58
98.4
Inspur NF520D2 server
1.29
30.8
2.43
62.2
3.20
86.2
4 CSUs
vCon
% CPU
score utilization
3.47
95.3
Figure 4: vConsolidate median results for the four test systems with one, two, three, and four CSUs. Higher scores are better.
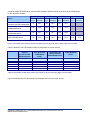
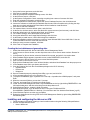
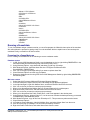
Figure 5 shows the one-CSU median results, by benchmark, for the test servers.
Benchmark
Java
Database
Mail
Web
Score
Dual-Core AMD
Opteron
processor 8222
SE-based server
Dual-Core Intel
Xeon processor
7140M-based
server
Quad-Core Intel
Xeon processor
X5365-based server
Inspur NF520D2
server
1 CSU
1 CSU
1 CSU
1 CSU
17,429.75
162.49
6.83
1,053.54
1.18
13,670.04
112.61
7.27
956.91
1.00
17,382.19
184.21
7.16
1,125.50
1.25
17,555.97
198.04
7.00
1,232.74
1.29
Figure 5: vConsolidate one-CSU median results, by benchmark, for the four test servers. Higher scores are better.
Figure 6 shows the two-CSU test results, by benchmark and CSU, for the test servers.
Principled Technologies, Inc.: vConsolidate performance on multi-processor Intel and
AMD processor-based servers
4
Dual-Core AMD
Opteron processor
8222 SE-based
server
Benchmark
Java
Database
Mail
Web
Score by
CSU
Final score
Dual-Core Intel Xeon
processor 7140Mbased server
Quad-Core Intel
Xeon processor
X5365-based server
Inspur NF520D2
server
CSU 1
CSU 2
CSU 1
CSU 2
CSU 1
CSU 2
CSU 1
CSU 2
14,927.35
67.06
6.78
718.65
15,819.19
74.90
6.61
676.19
10,368.97
72.22
7.72
603.45
11,116.48
72.21
7.75
584.04
11,911.68
87.32
7.31
672.53
11,877.29
88.22
7.39
660.15
15,469.60
169.39
7.76
1,211.15
14,524.79
163.83
7.33
1,260.25
0.82
0.84
0.76
0.76
0.83
0.83
1.23
1.20
1.66
1.52
1.66
2.42
Figure 6: vConsolidate two-CSU median results, by benchmark and CSU, for the four test servers. Higher scores are better.
Figure 7 shows the three-CSU test results, by benchmark and CSU, for the Dual-Core AMD Opteron processor
8222 SE-based server and Quad-Core Intel Xeon processor X5365-based server.
Dual-Core AMD Opteron processor
8222 SE-based server
Benchmark
Java
Database
Mail
Web
Score by
CSU
Final score
CSU 1
CSU 2
10,678.77
49.40
6.09
393.13
0.59
Quad-Core Intel Xeon processor
X5365-based server
CSU 3
CSU 1
CSU 2
CSU 3
10,599.97
62.29
6.81
436.64
9,737.58
54.36
7.33
421.19
7,627.79
51.05
7.61
385.50
7,757.70
52.04
7.71
374.84
8,018.72
51.16
7.81
384.62
0.65
0.63
0.57
0.58
0.58
1.87
1.73
Figure 7: vConsolidate three-CSU median results, by benchmark and CSU, for the Dual-Core AMD Opteron processor 8222 SEbased server and Quad-Core Intel Xeon processor X5365-based server. Higher scores are better.
Figure 8 shows the three-CSU test results, by benchmark and CSU, for the Quad-Core Intel Xeon processor
X5365-based server and Inspur NF520D2 server.
Quad-Core Intel Xeon processor
X5365-based server
Benchmark
CSU 1
CSU 2
CSU 3
Java
Database
Mail
Web
Score by
CSU
Final score
7,056.83
49.05
7.93
279.12
7,131.89
49.64
7.96
284.38
0.52
0.52
Inspur NF520D2
CSU 1
CSU 2
CSU 3
7,030.53
50.66
8.11
319.79
13,680.36
132.21
8.02
1,015.46
13,809.96
130.68
7.31
1,027.97
13,777.23
127.14
7.67
1,006.20
0.54
1.08
1.06
1.06
1.58
3.20
Figure 8: vConsolidate three-CSU median results, by benchmark and CSU, for the Quad-Core Intel Xeon processor
X5365-based server and the Inspur NF520D2 server. Higher scores are better.
Principled Technologies, Inc.: vConsolidate performance on multi-processor Intel and
AMD processor-based servers
5
Figure 9 shows the four-CSU test results, by benchmark and CSU, for the Inspur NF520D2 server. We show no
four-CSU runs for the other test servers because they reached CPU saturation with three CSUs.
Inspur NF520D2 server
Benchmark
Java
Database
Mail
Web
Score by
CSU
Final score
CSU 1
CSU 2
CSU 3
CSU 4
11,167.45
95.41
8.28
695.54
11,099.96
96.77
7.42
699.84
11,584.37
97.14
8.26
702.45
11,042.29
95.93
8.43
664.07
0.87
0.85
0.88
0.86
3.47
Figure 9: vConsolidate four-CSU median results, by benchmark and CSU, for the
Inspur NF520D2 server. Higher scores are better.
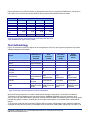
Test methodology
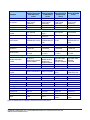
Figure 10 summarizes some key aspects of the configurations of the four server systems; Appendix A provides
detailed configuration information.
Server
Processor frequency (GHz)
Front-side bus frequency
(MHz)
Number of processor packages
Number of cores per processor
package
Number of hardware threads
per core
Motherboard
Chipset
RAM
Dual-Core
AMD Opteron
processor
8222 SE
3.0 GHz
2,000 MHz
HyperTransport
4
Dual-Core Intel
Xeon
processor
7140M
3.4 GHz
Quad-Core
Intel Xeon
processor
X5365
3.0 GHz
2.93 GHz
800 MHz
1,333 MHz
1,066 MHz
4
2
4
2
2
4
4
1
2
1
1
Intel
SR4850HW4x
Intel
S5000XALO
Intel
S7000FC4UR
Intel SE8500
Intel 5000X
Intel ID3600
32GB (16 x
2GB) PC2-3200
DDR2
16GB (8 x 2GB)
PC2-5300 FBDDR2
32GB (16 x
2GB) PC2-5300
FB-DDR2
HP*
PB729AE9QUD
O49
NVIDIA*
nForce4
32GB (16 x
2GB) PC2-5300
DDR2
Inspur
NF520D2
server
Figure 10: Summary of some key aspects of the server configurations.
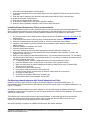
With the following exceptions, we used the default BIOS settings on each server: we enabled Virtualization
Technology on all Intel based servers and set the QLogic* SANblade QLE2462 to the boot controller on all
servers. The Dual-Core AMD Opteron processor 8222 SE offered an AMD Virtualization option in the BIOS, which
is disabled by default. However, enabling this did not improve performance so we tested with the default BIOS
options.
To be sure we could push the processors of each of the four system configurations to their maximum capacities,
we tested each server with as many vConsolidate CSUs as the server could handle, starting with one CSU, up to
Principled Technologies, Inc.: vConsolidate performance on multi-processor Intel and
AMD processor-based servers
6
or extremely close to 100 percent processor utilization. The rest of this section details how we set up the servers
and the vConsolidate workload.
Hardware and software the test involved
Software
We used the following software to configure and run the vConsolidate workload:
•
•
•
•
•
•
•
•
•
•
•
•
•
VMware* ESX Server* 3.0.2 build 54542
VMware Virtual Infrastructure Client* version 2.0.1
Microsoft Windows Server 2003 R2 Enterprise Edition
Microsoft Windows Server 2003 R2 Enterprise x64 Edition
Microsoft Exchange Server 2003
Microsoft SQL Server 2005
BEA* JRockit* 1.5.0_10-b03
WebBench 5.0
Microsoft Exchange Server Load Simulator (LoadSim) 06.05.7775
SPECjbb2005 v1.07
SysBench v0.4.0
Intel vConsolidate framework package version Beta-2
VMware Converter 3.0.0
Hardware
Our test bed consisted of the following hardware:
•
•
•
•
•
•
•
The server under test
Eleven custom-built Intel Desktop Board D915GMH with Intel Pentium 4 3.0GHz w/HT systems, which we
used for all WebBench clients, LoadSim clients, and WebBench controllers (CSU 2, CSU 3, and CSU 4).
One custom-built Intel Server Board S5000PSL system, which we used as both the main vConsolidate
controller and the CSU 1 WebBench controller
Netgear* GS724T, which we set up into two VLANs (one for external network and one for internal
network)
Network Appliance* NetApp FAS960 filer
Two Network Appliance DS14 Disk Shelves, with 14 x Seagate* Cheetah ST373307FC 73.4 GB disk
drives each
QLogic SANblade QLE2462 Dual Port 4-Gbps Fibre Channel Host Bus Adapter (HBA) installed in the
server under test
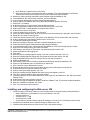
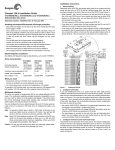
Figure 11 illustrates this test bed in its four-CSU configuration.
Principled Technologies, Inc.: vConsolidate performance on multi-processor Intel and
AMD processor-based servers
7
Figure 11: Our vConsolidate test bed.
Server installation
We configured all servers with the same disk setup using the NetApp FAS960 filer. We split the storage into five
volumes, one 10 GB and four 130 GB each. For each server, we installed VMware ESX Server on the 10 GB
volume and installed a CSU on each of the four 130 GB volumes. We installed no hard drives in the server’s drive
chassis on the server.
Installing VMware ESX Server 3.0.2
We did the following to install VMware ESX Server 3.0.2 build 54542 on the server under test (SUT):
1.
2.
3.
4.
Boot with the VMware ESX Server CD.
When prompted, press Enter to boot in graphical mode.
Press Enter to skip the media test.
Click Next through the following screens (accepting the default options): Welcome, Select Keyboard,
Select Mouse, and License Agreement.
5. Select Recommended for the disk partitioning option, and click Next.
6. When the warning appears that all partitions will be lost, click Yes.
Principled Technologies, Inc.: vConsolidate performance on multi-processor Intel and
AMD processor-based servers
8
7. Click Next to accept the partition disks settings.
8. At the advanced options screen (the default option is to boot VMware ESX Server from the hard drive),
click Next.
9. Enter the static IP address (192.168.0.250) and subnet mask (255.255.255.0), and click Next.
10. Select the time zone, and click Next.
11. Enter the root password, and click Next.
12. At the about to install screen, click Next to start the installation.
13. When the server installation completes, click Finish to reboot the server.
Installing Virtual Infrastructure Client on the controller
We managed VMware ESX Server with a separate system we call the controller. We ran Microsoft Windows
Server 2003 Enterprise Edition on this system and connected it to the VMware ESX Server with a network switch.
We followed this process to install the necessary VMware Infrastructure Client software on this system.
1. On the remote client, open a Web browser, and type the server’s IP address (http://192.168.0.250) in the
address pane.
2. At the VMware ESX Server 3 Welcome page, select download the VMware Infrastructure Client.
3. When the file download security warning pops up, click Run to install the client software.
4. Install the client software by clicking Next through the installation option windows (which accepts all
default options).
5. When the installation completes, click Finish.
6. Close the Web browser window.
7. Launch the VMware Infrastructure Client application by double-clicking the desktop icon.
8. At the client log in screen, enter the VMware ESX Server IP address (192.168.0.250), root user, and
password, then click Log on.
9. Before you can properly use the VMware ESX Server, you must first install a license file. You can deploy
that file with either host-based or server-based licensing. For our testing, we used the host-based license
method by following these steps:
a. To install the license, click the Configuration tab in the Virtual Infrastructure Client.
b. Under the Software section on the left side of the screen, click Licensed Features.
c. Make sure the license file (which VMware should have provided with the copy of VMware ESX
Server) is on the controller.
d. Click Edit next to the License Sources.
e. In the pop-up window, select Use Host License File.
f. Click the browse button, and browse to the location of the license file on the server.
g. Click open to select the file.
h. Click Edit next to VMware ESX Server License Type.
i. Select VMware ESX Server Standard, and click OK.
Configuring network adapters with Virtual Infrastructure Client
Before we set up the VMs, we had to configure the network adapters on the VMware ESX Server. To
accommodate all the network traffic the test required, we used five network ports on the VMware ESX Server, as
Figure 11 illustrates.
We assigned the External Network port the IP address of 192.168.0.250 during the VMware ESX Server
installation, because this is the network port that the Virtual Infrastructure Client, and the database, Java, and idle
VMs use to communicate.
The remaining four network ports are part of the Internal Network, on which the Web and mail server traffic
travels. We configured one network port to handle traffic from the Web and mail VMs for only one CSU.
Therefore, each CSU had its own network port for network traffic.
We did the following to configure the VMware ESX Server for the network adapters:
Principled Technologies, Inc.: vConsolidate performance on multi-processor Intel and
AMD processor-based servers
9
1.
2.
3.
4.
5.
6.
7.
8.
9.
10.
11.
12.
13.
14.
15.
16.
17.
18.
19.
20.
21.
22.
23.
24.
25.
26.
27.
Within the Virtual Infrastructure Client window, select the configuration tab for the VMware ESX Server.
In the hardware section, select networking to view the network setup.
Click Properties for Virtual Switch vSwitch0.
In the vSwitch0 Properties window, highlight the Virtual Machine Network, and click Edit.
Rename the Network Label to External Network.
Click OK to close the window.
Click Close to close the Properties window.
On the Networking configuration tab, click Add Networking.
Select Virtual Machine for the connection type, and click Next.
Under Create a virtual switch, select vmnic1, and click Next.
Change the Network Label to Internal Network 1, and click Next.
At the summary page, click Finish.
At the Networking configuration tab, click Add Networking.
Select Virtual Machine for the connection type, and click Next.
Under Create a virtual switch, select vmnic2, and click Next.
Change the Network Label to Internal Network 2, and click Next.
At the summary page, click Finish.
At the Networking configuration tab, click Add Networking.
Select Virtual Machine for the connection type, and click Next.
Under Create a virtual switch, select vmnic3, and click Next.
Change the Network Label to Internal Network 3, and click Next.
At the summary page, click Finish.
At the Networking configuration tab, click Add Networking.
Select Virtual Machine for the connection type, and click Next.
Under Create a virtual switch, select vmnic4, and click Next.
Change the Network Label to Internal Network 4, and click Next.
At the summary page, click Finish.
Creating a virtual machine
The steps below describe how we created a base virtual machine. We followed these basic steps to create each
of the VMs the test required. We list the exact parameters we specified for each VM in the section below on
installing and configuring that VM.
1.
2.
3.
4.
5.
6.
7.
8.
9.
10.
11.
12.
13.
14.
In Virtual Infrastructure Client, highlight the VMware ESX Server (localhost.localdomain).
Select FileÆNewÆVirtual Machine.
Select Custom on the Select the Appropriate Configuration screen, and click Next.
Enter the Virtual Machine Name, and click Next.
Select the Storage that will hold the VM, and click Next.
Select the Operating System for the VM, and click Next.
Use the dropdown box to select the number of virtual processors for the VM, and click Next.
Select the amount of memory for the VM, and click Next.
Select the Network Connection for the VM, and click Next.
Accept the default option for the SCSI Adapter, and click Next.
Leave the default option to create a new virtual disk on the Select a Disk screen, and click Next.
Enter the virtual disk size, and click Next.
Leave the default options for the Specify Advanced Options, and click Next.
Review the virtual machine summary, and click Finish to create the virtual machine.
To create one vConsolidate CSU, we had to create the five virtual machines that CSU describes:
•
•
•
•
•
mail server
Web server
Java application server
database server
idle server
Principled Technologies, Inc.: vConsolidate performance on multi-processor Intel and
AMD processor-based servers
10
The following subsections detail how we created and configured each of these VMs.
Installing and configuring the mail server VM
1. Follow the steps in the earlier Creating a virtual machine section using the following VM specifications:
• Name: MailServer1
• Virtual processors: 1
• Virtual memory: 1.5 GB
• Virtual Disk Size: 10 GB
• Virtual Network: Internal Network (set the IP address to 192.168.11.115 in Windows within the VM)
2. Install Microsoft Windows Server 2003 R2 Enterprise Edition in the VM.
3. Install Microsoft Windows Server 2003 Service Pack 2 with default settings.
4. Right-click the MailServer1 VM in the Virtual Infrastructure Client window, and select Install VMware tools.
5. Reboot the VM.
To finish setting up this VM for vConsolidate, we had to install several additional software components. The
following subsections detail the necessary installation processes.
Installing the domain controller
1.
2.
3.
4.
5.
6.
7.
8.
9.
10.
11.
12.
13.
14.
15.
16.
17.
18.
19.
20.
Select StartÆAdministrative ToolsÆManage Your Server.
Click Add or remove a role.
At the Configure Your Server window, click Next.
At the Configuration and Options screen, select Custom Configuration, and click Next.
At the Server Role screen, select Domain Controller, and click Next.
At the Summary of Selections screen, click Next.
At the Welcome pop-up window, click Next.
At the Operating System Compatibility screen, click Next.
For the Domain Controller Type, leave the default option (Domain controller for a new domain), and click
Next.
At the Create New Domain screen, leave the default (Domain in a new forest), and click Next.
At the Install or Configure DNS window, select No, and click Next.
At the New Domain Name screen, type a domain name (vcon.com), and click Next.
At the NetBIOS Domain Name screen, enter a NETBIOS domain name (vcon), and click Next.
Click Next through the following screens: Database and Log Folders, Shared System Volume, and
Permissions. Doing so accepts the default options for each of those screens.
At the Directory Services Restore Mode Administrative Password screen, enter a password (password),
and click Next.
When the installation software prompts you to do so, insert the OS CD, and click OK.
At the Completing the Active Directory Installation Wizard screen, click Finish.
When the system prompts you to reboot the VM, click Restart Now.
After the VM reboots, login to the system.
At the This Server is Now a Domain Controller window, click Finish.
Installing Internet Information Services 6.0
1.
2.
3.
4.
5.
6.
7.
8.
9.
10.
Select StartÆControl PanelÆAdd or Remove Programs.
Click Add/Remove Windows Components.
Select Application Servers, and click Details.
Click ASP.NET, and make sure a check is showing in the check box.
Select Internet Information Services (IIS), and click Details.
Click NNTP Services and SMTP Services, make sure a check appears in both check boxes, and click OK.
Click OK to close the Application Server window.
At the Windows Components Wizard, click Next to begin the installation.
When the system prompts you to do so, insert the OS CD, and click OK.
At the Completing the Windows Components Wizard window, click Finish.
Principled Technologies, Inc.: vConsolidate performance on multi-processor Intel and
AMD processor-based servers
11
11. Close the Add or Remove Programs window.
Installing Exchange Server 2003
1. Insert the Microsoft Exchange Server 2003 CD. The CD should automatically launch the installation
software.
2. Choose Exchange Server Enterprise Edition.
3. Run the Setup application.
4. Click the Exchange Deployment Tools link.
5. Click the Deploy the first Exchange 2003 Server link.
6. Click the New Exchange 2003 Installation link.
7. Click the Run ForestPrep now link.
a. When the compatibility issue notice appears, click Continue, and check the Don’t display this
message again box.
b. At the Welcome screen, click Next.
c. Accept the End User License Agreement, and click Next.
d. At Component Selection Screen, keep the defaults, and click Next.
e. Leave the default account information, and click Next.
f. Installation should start. (This process may take a while to complete.)
g. When the installation completes, click Finish.
8. Return to the Exchange Server Deployment Tools screen, and click the Run DomainPrep now link.
a. At the Welcome screen, click Next.
b. Accept the End User License Agreement, and click Next.
c. At Component Selection Screen, keep the defaults, and click Next.
d. At the insecure domain notice, click OK.
e. When the installation completes, click Finish.
9. Return to the Exchange Server Deployment Tools screen, and click Run Setup Now.
a. At the Welcome screen, click Next.
b. Accept the End User License Agreement, and click Next.
c. At the Component Selection screen, the action for Microsoft Exchange should by default be Typical.
(If it is not, use the drop-down box to set it to Typical.)
d. Click Next.
e. For the Installation Type, select Create new Exchange Organization, and click Next.
f. Enter vcon as the Organization Name, and click Next.
g. Accept the Microsoft Exchange Server Licensing Agreement, and click Next.
h. Review the installation summary, and click Next.
i. The installation should start. (This process may take a while to complete.)
j. When the installation completes, click Finish.
10. Close the Exchange Server Deployment Tools window.
11. Install Microsoft Exchange Server 2003 Service Pack 2.
a. Insert the SP2 CD, and double-click setup exe.
b. Accept the default location to extract the file, and click OK.
c. After the extraction finishes, open Windows Explorer, and browse to the update.exe executable.
d. At the Welcome screen, click Next.
e. Select I agree to accept the License Agreement, and click Next.
f. At the Component Selection window, leave the default option (Update), and click Next.
g. Verify the installation Summary, and click Next.
h. When the installation completes, click Finish.
12. In the Virtual Infrastructure Client console, add a new 90 GB virtual hard disk to this VM by doing the
following:
a. Right-click the MailServer1 VM, and select Edit Settings from the menu.
b. On the Hardware Tab, click Add.
c. For Select Device Type, choose Hard Disk, and click Next.
d. Select Create a new virtual disk, and click Next.
e. Set the Disk Capacity to 90 GB, and click Next.
f. At the Specify Advanced Options page, leave the default options, and click Next.
Principled Technologies, Inc.: vConsolidate performance on multi-processor Intel and
AMD processor-based servers
12
13.
14.
15.
16.
17.
18.
19.
20.
21.
22.
23.
24.
25.
26.
27.
28.
29.
30.
31.
32.
33.
34.
35.
36.
37.
38.
39.
40.
41.
42.
43.
44.
45.
46.
47.
48.
49.
50.
51.
g. At the Read to Complete screen, click Finish.
h. Wait for the Reconfigure Virtual Machine task to complete. (The status will appear in the Recent
Tasks section, which is at the bottom of the Virtual Infrastructure Client window.)
Restart the VM by selecting StartÆShut downÆRestart inside the MailServer VM.
In the MailServer VM, right-click My Computer, and select Manage.
In the Computer Management Console, select Disk Management.
When a Welcome to Initialize and Convert Disk Wizard window appears, click Next.
Select Disk 1 to Initialize.
At the Select Disk to Convert screen, leave the disk unchecked.
At the Completing the Initialize and Convert Disk Wizard screen, click Finish.
Right-click the Disk 1 unallocated box, and select New Partition.
At the Welcome screen, click Next.
Leave the partition type as Primary, and click Next.
Accept the default Partition Size, which should be the same as the Maximum disk space, and click Next.
Assign the drive letter E, and click Next.
Format the partition with the NTFS File system, enter Mail Store for the volume label, and click Next.
At the Completing the New Partition Wizard screen, click Finish.
The partition should begin formatting.
When the formatting completes, close the Computer Management console.
Select StartÆAll ProgramsÆMicrosoft ExchangeÆSystem Manager.
In the left-hand window pane, expand Servers and MailServer so the First Storage Group is visible.
Right-click First Storage Group, and select Properties.
Click Browse, and change the Transaction log and System path location to E:\.
Check the Enable circular logging box.
Click Apply.
When the pop-up message appears asking if you want to perform this task, click Yes.
When the message appears saying that all mounted stores are back online, click OK.
Right-click Mailbox Store under First Storage Group, and select Properties.
Select the Database tab.
Click Browse, and move the Exchange database and Exchange streaming database to E:\.
Check the This database can be overwritten by a restore box.
Click Customize next to Maintenance interval.
Remove all blue from the boxes so the system will not perform maintenance, and click OK.
At the Mailbox Store Properties window, click Apply.
When a warning message appears, click Yes.
When the message that the database files have been moved appears, click OK.
Click OK to close the Mailbox Store Properties window.
In the left-hand pane of the Virtual Infrastructure Client, right-click the MailServer1 VM, and select Install
VMware Tools.
At the Install Tools pop-up window, click OK.
Click Next through the Installation Wizard to install the VMware Tools. This process accepts all defaults.
When the installation completes, click Finish.
Click Yes to reboot the virtual machine.
Installing and configuring the Web server VM
1. Follow the steps in the earlier Creating a virtual machine section using the following VM specifications:
• Name: WebServer1 (use WebServer for the Host Name in the VM)
• Virtual processors: 2
• Virtual memory: 1.5 GB
• Virtual Disk Size: 10GB
• Virtual Network: Internal Network (set the IP address to 192.168.12.215 in Windows within the VM)
3. Install Microsoft Windows Server 2003 R2 Enterprise Edition in the VM.
4. Install Microsoft Windows Server 2003 Service Pack 2 with default settings.
Principled Technologies, Inc.: vConsolidate performance on multi-processor Intel and
AMD processor-based servers
13
5. Right-click the WebServer1 VM in the Virtual Infrastructure Client window, and select Install VMware
tools.
6. Reboot the VM.
To finish setting up this VM for vConsolidate, we had to install several additional software components. The
following subsections detail the necessary installation processes.
Installing Microsoft Internet Information Server
1.
2.
3.
4.
5.
6.
7.
8.
9.
10.
Select StartÆAdministrative ToolsÆManage Your Server.
Select Add or remove a role.
At the Configure Your Server window, click Next.
At the Configuration Options screen, select Custom configuration, and click Next.
At the Server Role screen, select Application Server, and click Next.
At the Application Server Options screen, select Enable ASP.NET, and click Next
At the Summary of Selections screen, click Next.
When the installation software prompts you to do so, insert the Operating System CD, and click OK.
When the installation completes, click Finish.
Close the Manage Your Server window.
Installing WebBench 5.0
1. Insert the WebBench 5.0 CD into the Virtual Client, and connect with the Virtual CDROM.
2. Copy wbtree.exe from the \wb50\workload directory on the CD to C:\inetpub\wwwroot.
3. Double-click wbtree.exe to expand the workload. (This step will create a wbtree folder with all the test
data WebBench required.)
4. Create a cgi-bin folder in c:\inetpub\wwwroot.
5. After installing the WebBench controller, copy simcgi.exe from the controller machine in
C:\WebBench\Controller\Suites\WebBench\Examples directory to the Web server VM’s
C:\Inetpub\wwwroot\cgi-bin\ directory.
6. Right-click My Computer, and select Manage.
7. Expand Services and Applications, Internet Information Services, and Web Sites in the left-hand window
pane.
8. Click Default Web Sites.
9. Right-click the cgi-bin directory in the right-hand pane, and select Properties from the drop-down menu.
10. In the Execute permissions field, select Scripts and Executables, and click OK.
11. Using Windows Explorer, browse to C:\Inetpub\wwwroot\cgi-bin, right-click simcgi.exe, and select
Properties from the drop-down menu.
12. Select the Security tab, and grant Read/Read & Execute permissions to the user, Internet Guest Account.
13. Click OK to close simcgi.exe properties.
14. Close Windows Explorer.
15. In the Computer Management window, right-click the Default Web Server, and select properties from the
drop-down menu.
16. Select the HTTP Headers tab, and click the MIME Types button.
17. In the MIME Types window, click New.
18. In the Extension text box, enter .ex.
19. In the MIME type text box, enter application/octet-stream, and click OK.
20. Click OK again to close the MIME Types window and the Default Web Site Properties window.
21. In the Computer Management console, select Web Service Extension.
22. Select All unknown CGI Extensions in the right pane, and click Allow.
23. Click Yes, you do want to allow All Unknown CGI Extensions in the pop-up window
24. Open a Web browser, and type the URL http://localhost/cgi-bin/simcgi.exe to verify you correctly installed
the WebBench files. You should see text about the system inside the browser window.
25. Close the Web browser.
Principled Technologies, Inc.: vConsolidate performance on multi-processor Intel and
AMD processor-based servers
14
Installing Certificate Server
1.
2.
3.
4.
5.
6.
7.
8.
9.
10.
Select StartÆControl PanelÆAdd or Remove Programs.
Click Add/Remove Windows Components.
Select Certificate Servers, and accept the CA Service warning.
Click Next.
Select Standalone root CA in the CA Type Windows, and click Next.
Enter WEBBENCH in the common name field, and click Next.
At the Certificate Database Settings screen, leave the default options, and click Next.
When the warning about stopping IIS appears, click Yes.
Click Yes to enable Active Server Pages.
When the installation completes, click Finish.
Creating a certificate request
1. In the Computer Management Console, right-click the Default Web site, and select Properties.
2. Select the Directory Security tab, and then click Server Certificate under Secure Communications to start
the Web Server Certificate Wizard.
3. At the Welcome screen, click Next.
4. Select Create a new certificate, and click Next.
5. Select Prepare the request now, but send it later, and click Next.
6. Type Default Web Site for the certificate name.
7. Use the default bit length (1024), and click Next.
8. Type MyWeb for the organization name and Development Dept for the organizational unit, and click Next.
9. Type the server name as the common name, and click Next.
10. Enter your location information, and click Next.
11. Save the certificate information to the default path and file name, and click Next.
12. Verify the information that you have typed, and then click Next to complete the process and create the
certificate request.
13. Click Finish to close the IIS Certificate Wizard.
14. Click OK to close the Default Web Site Properties window.
Submitting a certificate request
1.
2.
3.
4.
5.
6.
7.
8.
9.
10.
Open a Web browser, navigate to http://localhost/CertSrv/, and press Enter.
Click Request a certificate.
Click Advanced certificate request.
Click Submit a certificate request by using a base-64-encoded CMC or PKCS #10 file, or submit a
renewal request by using a base-64-encoded PKCS #7 file.
Open the request document that you created in the "Create a certificate request" section.
Copy the contents of the document to a text box with the following format.
• -----BEGIN NEW CERTIFICATE
REQUEST----• ……
• -----END NEW CERTIFICATE
REQUEST------Note: If you saved the document with the default name and location, it is located at C:\Certreq.txt. Be sure
to copy all of the content as we illustrated above.
Paste the contents of the document into the Web form’s Base64 Encoded Certificate Request text box.
Click Submit.
You should receive a Certificate Pending message in the Web browser.
Close the Web browser window.
Issuing and downloading a certificate
1. Select StartÆAll ProgramsÆAdministrative ToolsÆCertificate Authority.
2. In the Certificate Authority window, expand the server name.
3. Click the Pending Requests folder.
Principled Technologies, Inc.: vConsolidate performance on multi-processor Intel and
AMD processor-based servers
15
4. In the pending request folder, right-click the pending certificate request that you just submitted, select All
Tasks, and then click Issue. (Note: After you select Issue, the certificate no longer appears in this window
and folder. It now resides in the Issued Certificate folder.)
5. Close the Certificate Authority window.
6. Open a Web browser, and type http://localhost/CertSrv/.
7. Click View the status of a pending certificate request.
8. Click the certificate request that you can see.
9. Click Download Certificate.
10. Click Save in the File Download window.
11. Save the certificate to C:\.
12. Close the download complete pop-up window.
13. Close the Web browser window.
Installing the certificate and setting up an SSL Web site
1.
2.
3.
4.
5.
6.
7.
8.
9.
10.
11.
12.
Open the Computer Management console by right-clicking My Computer, and selecting Manage.
Right-click the Default Web site, and select Properties.
Select the Directory Security tab.
Under Secure Communications, click Server Certificate. This step will start the Certificate Installation
Wizard.
At the Welcome screen, click Next.
Select Process the pending request and install the certificate, and click Next.
Browse to the location of the certificate that you downloaded in the Issue and download a certificate
section, and click Next.
Keep the default SSL Port, and click Next.
Verify the information is correct on the Certificate Summary page, and click Next.
Click Finish to complete the installation.
Click OK to close the Default Web Site Properties window.
Close the Computer Management window.
Configuring and testing the certificate
1. Open a Web browser, and type https://webbench/cgi-bin/simcgi.exe.
2. You may receive a security alert that states that the certificate is not from a trusted root CA. Click Yes to
continue to the Web page.
3. If the page appears, you have successfully installed the certificate.
4. Close the Web browser.
Installing and configuring the Java application server VM
1. Follow the steps in the earlier Creating a virtual machine section using the following VM specifications:
a. Name: JavaServer1
b. Virtual processors: 2
c. Virtual memory: 2 GB
d. Virtual Disk Size: 10 GB
e. Virtual Network: External Network (keep the default Windows Network DHCP settings)
2. Install Microsoft Windows Server 2003 R2 Enterprise x64 Edition in the VM.
3. Install Microsoft Windows Server 2003 Service Pack 2.with default settings.
4. Right-click the JavaServer1 VM in the Virtual Infrastructure Client window, and select Install VMware
tools.
5. Reboot the VM.
To finish setting up this VM for vConsolidate, we had to install and modify an additional software component. The
following subsections detail the necessary installation processes.
Principled Technologies, Inc.: vConsolidate performance on multi-processor Intel and
AMD processor-based servers
16
Installing SPECjbb2005
1. Copy the BEA JRockit JVM 1.5.0_10-b03 folder to the root of C: in the VM.
2. Install SpecJBB2005 in the VM directory: c:\vSpecJBB2005.
3. Add the BEA JRockit JVM to the Windows system path by doing the following:
a. Right click My Computer, and select Properties.
b. Select the Advanced tab, and click Environment Variables.
c. In the System variables section, select Path, and click Edit.
d. Add the following to the end of the Variable value string: C:\jrockit-jdk1.5.0_10\bin (jrockitjdk1.5.0_10 is the folder name of the JVM installation).
e. Click OK to close the Edit System Variable, Environment Variables, and System Properties
windows.
4. Open a command prompt by selecting StartÆRun.
5. Type cmd, and click OK.
6. Change to the vSpecJBB2005 directory by typing cd C:\vSpecJBB2005, and then press Enter.
7. Type runit.bat, and press Enter to verify SPECjbb2005 starts.
8. Press Ctrl-C to stop the benchmark.
9. Confirm that you do want to stop the run by typing Y and pressing Enter.
10. Copy the following files from the vConsolidate package to the VM directory C:\:
• Daemon.exe
• killapp.exe.
Modifying SPECjbb2005
To run the vConsolidate benchmark, you must modify SPECjbb2005 as follows:
1. Modify the following three original source files in the SPECjbb directory (C:\SPECjbb2005\src\spec\jbb\)
by opening each file with WordPad and making the changes below. Save each file after you have made
the changes.
• Company.java
Change “private long measurement_time;” to “public long measurement_time;”.
Change “JBButil.SecondsToSleep((int) measurement_time);” to
“JBButil.SecondsToSleep(Long.MAX_VALUE/1000);”.
• DeliveryTransaction.java
After the line “customerPtr.adjustBalance(matchingOrder.getTotalAmount());”, add the following lines:
int timerCount = 0;
timerCount = (short)JBButil.random(1,100);
if (timerCount == 1)
JBButil.milliSecondsToSleep(company.measurement_time);
• TransactionManager.java
Change “myTimerData.updateTimerData(txntype, txntime);” to the following lines:
{
myTimerData.updateTimerData(txntype, txntime);
if (txntype==0 && myTimerData.getTransactionCount(0)%1000 == 0) {
int sum = 0;
for (int k=0; k<=5; k++)
sum += myTimerData.getTransactionCount(k);
System.out.println("===="+this+":"+"===="+sum);
}
}
2. Open the command prompt by clicking StartÆRun, type cmd, and press Enter.
3. At the command prompt, type cd C:\SPECjbb2005\src\spec\jbb\.
4. At the command prompt, type the following commands. Press Enter after each command:
• mkdir class
Principled Technologies, Inc.: vConsolidate performance on multi-processor Intel and
AMD processor-based servers
17
•
5.
6.
7.
8.
9.
10.
11.
"C:\Program Files\Java\jrockit-jdk1.5.0\bin\javac" -cp "C:\Program Files\Java\jrockitjdk1.5.0\jre\lib\rt.jar" -d class\ *.java infra\Util\*.java validity\*.java ..\reporter\*.java
• cd class\
• "C:\Program Files\Java\jrockit-jdk1.5.0\bin\jar" -cf jbb.jar spec\jbb\*.class spec\jbb\infra\Util\*.class
spec\reporter\*.class
• "C:\Program Files\Java\jrockit-jdk1.5.0\bin\jar" -cf check.jar spec\jbb\validity\*.class
Type exit to close the command prompt.
Open Windows Explore from the start menu.
Copy the jbb.jar and check.jar files from C:\SPECjbb2005\src\spec\jbb\class to C:\vSpecJBB2005\.
When the system asks if you want to overwrite files, click Yes to overwrite the original jbb.jar and
check.jar files.
Using Windows Explorer, navigate to C:\vSpecJBB2005, and open the SPECjbb.props file.
Make the following changes to the SPECjbb.props file:
• Change “input.starting_number_warehouses=1” to “#input.starting_number_warehouses=1”
• Change “input.increment_number_warehouses=1” to “#input.increment_number_warehouses=1”
• Change “#input.sequence_of_number_of_warehouses=1 2 3 4 5 6 7 8” to
“input.sequence_of_number_of_warehouses=2”
Note: Set the above parameter to be equal to the number of vCPUs you configured for Java
server VM.
• Change “input.measurement_seconds=240” to “input.measurement_seconds=10”.
In the C:\vSpecJBB2005 directory, right click runit.bat, and change “set JAVAOPTIONS=-Xms256m Xmx256m” to “set JAVAOPTIONS=-Xms1000m –Xmx1000m -Xxthroughputcompaction -XXallocprefetch
-XXallocRedoPrefetch -XXcompressedRefs –XxlazyUnlocking -XXtlasize128k”
Installing and configuring the database server VM
1. Follow the steps in the earlier Creating a virtual machine section using the following VM specifications.
• Name: DBServer1
• Virtual processors: 2
• Virtual memory: 1.5 GB
• Virtual Disk Size: 10 GB
• Virtual Network: External Network (keep the default Windows Network DHCP settings)
2. Install Microsoft Windows Server 2003 R2 Enterprise x64 Edition in the VM.
3. Install Microsoft Windows Server 2003 Service Pack 2.with default settings.
4. Right-click the DBServer1 VM in the Virtual Infrastructure Client window, and select Install VMware tools.
5. Reboot the VM.
To finish setting up this VM for vConsolidate, we had to install several additional software components. The
following subsections detail the necessary installation processes.
Installing Microsoft Internet Information Server
1.
2.
3.
4.
5.
6.
7.
8.
Select StartÆAdministrative ToolsÆManage Your Server.
Select Add or remove a role.
At the preliminary steps screen, click Next.
At the Server Role screen, select Application Server, and click Next.
At the Summary of Selections screen, click Next.
When the installation software prompts you to do so, insert the OS CD, and click OK.
When the installation completes, click Finish.
Close the Manage Your Server window.
Installing Microsoft SQL Server 2005
1. Insert the SQL Server 2005 CD into the controller, and connect with the Virtual CD ROM.
2. Click the Server Components link under the Install section to begin the installation.
Principled Technologies, Inc.: vConsolidate performance on multi-processor Intel and
AMD processor-based servers
18
3.
4.
5.
6.
7.
8.
9.
10.
11.
12.
13.
14.
15.
16.
17.
18.
19.
20.
Accept the license agreement, and click Next.
Click Next to install the prerequisites.
After the prerequisites complete installing screen, click Next.
At the Welcome screen, click Next.
At the System Configuration Check, assuming everything has a status of success click Next.
Enter the registration information, and click Next.
At the Components to Install screen, select SQL Server Database Services, then click Advanced.
Instruct the software to install both the Database Services and Client Components by clicking the dropdown arrow on both and selecting Entire feature will be installed on local hard drive.
Click Next to start the installation.
For Instance Name, leave the default option, and click Next.
At the Service Account screen, select Use the built-in system account (Local account), and click Next.
Keep the default option for Authentication Mode, and click Next.
For Collation Settings, leave the defaults, and click Next.
Accept the default Error and Usage Report Settings, and click Next.
At the Ready to Install screen, click Install to begin the installation.
When the installation software prompts you to do so, insert Microsoft SQL Server 2005 disk 2. Use the
Virtual CDROM to connect it to the VM, and click OK.
When the setup process completes, click Next.
Click Finish to complete the installation.
Creating the test database and generating data
1. Select StartÆMicrosoft SQL Server 2005ÆSQL Server Management Studio.
2. In the Connect to Server window, use the drop-down menu next to Server name to select <Browse for
more>.
3. In the Browse for Server window, select the Network Servers tab, and wait for it to retrieve data.
4. When Database Engine appears, expand the menu, select DBSERVER1, and click OK.
5. At the Connect to Server window, the server name should be present.
6. Click Connect to connect to the server.
7. Right-click the Database folder in the left-hand window, and select New Database from the pop-up menu.
8. In the Database name field, type sbtest, and click OK.
9. Copy the following files from the vConsolidate package to the VM C:\ directory:
• vSysbench.exe
• Daemon.exe
• killapp.exe.
10. Open a command prompt by selecting StartÆRun, type cmd, and click OK.
11. In the command prompt, type cd \ to change to C:\.
12. To prepare the database, type “vsysbench.exe --test=oltp --oltp-table-size=100000 prepare”, and press
Enter.
13. When the command finishes, you see the C:\ prompt.
14. Type exit, and press Enter to close the command prompt.
15. In SQL Server 2005 Management Studio, stop the database service by right-clicking DBSERVER1 in the
left-hand window pane, and then select stop from the drop-down menu.
16. Using Windows Explorer, create the folder C:\backup.
17. With Windows Explorer, copy all sbtest files from C:\Program File\Microsoft SQL
Server\MSSQL.1\MSSQL\Data\ to c:\backup. (You should see two files: sbtest.mdf and sbtest_log.ldf.)
18. Close Windows Explorer once the copy completes.
19. Restart the database service using SQL Server 2005 Management Studio by right-clicking DBSERVER1
and selecting start.
Installing and configuring the idle server VM
1. Follow the steps in the earlier Creating a virtual machine section using the following VM specifications.
2. Use the VM Specifications below:
• Name: IdleServer1
Principled Technologies, Inc.: vConsolidate performance on multi-processor Intel and
AMD processor-based servers
19
3.
4.
5.
6.
• Virtual processors: 1
• Virtual memory: 0.4 GB
• Virtual Disk Size: 5 GB
• Virtual Network: External Network (keep the default Windows Network DHCP settings)
Install Microsoft Windows Server 2003 R2 Enterprise Edition in the VM.
Install Microsoft Windows 2003 Service Packs with the default settings.
Right-click the IdleServer1 VM in the Virtual Infrastructure Client window, and select Install VMware tools.
Reboot the VM.
Installing and configuring the second CSU
To create the VMs the second CSU requires, we used VMware Converter to make a copy of the five VMs we had
already created. We then started each VM and entered a new IP address and Host name. The following steps
explain how to copy a VM with VMware Converter. They assume you have installed the VMware Controller on the
same machine as the VMware Virtual Infrastructure Client.
1.
2.
3.
4.
5.
6.
7.
8.
9.
10.
11.
12.
13.
14.
15.
16.
Open VMware Converter, and click Import Machine.
At the Welcome screen, click Next.
At the Source screen, click Next.
Select VMware ESX Server for the Source, and click Next.
Enter the IP address, user name, and password of the VMware ESX Server, and click Next.
Select the virtual machine that you want to copy (for example: JavaServer1), and click Next.
For the Source Data, leave the default (Import all disks and maintain size), and click Next.
At the Destination screen, keep the default, and click Next.
For Destination Type, select VMware ESX server, and click Next.
Enter the IP address, user name, and password of the VMware ESX Server, and click Next.
Enter the virtual machine name (for example, if you are copying JavaServer1, the name of the second
one should be JavaServer2), and click Next.
Select the host system, and click Next.
Select the Datastore, and click Next.
Select the Network connection for the virtual machine, and click Next.
Leave the default Customization settings, and click Next.
Review the summary, and click Finish to begin copying the virtual machine.
Registry changes
To simplify testing, we made two registry changes to every VM we created.
Auto logon
We changed this entry to allow each VM to automatically log into the OS after a system reboot. We changed the
following Registry key to have the values we show here.
[HKEY_LOCAL_MACHINE\SOFTWARE\Microsoft\Windows NT\CurrentVersion\Winlogon]
• "DefaultPassword"="password"
• "AutoAdminLogon"="1"
• "DefaultUsername"="administrator"
Computer name
We changed this entry to display the host’s name of the system under the My Computer desktop icon. We
changed the following Registry key to have the values we show here.
[HKEY_CLASSES_ROOT\CLSID\{20D04FE0-3AEA-1069-A2D8-08002B30309D}]
• "LocalizedString"=hex(2):25,00,43,00,4f,00,4d,00,50,00,55,00,54,00,45,00,52,00,\
4e,00,41,00,4d,00,45,00,25,00,00,00
Principled Technologies, Inc.: vConsolidate performance on multi-processor Intel and
AMD processor-based servers
20
Client installation
In addition to setting up the server under test, we also had to set up the client systems we show in Figure 11. Both
the WebBench and LoadSim workloads require test clients.
Installing the WebBench 5.0 test client systems
To run WebBench, you need two types of test systems. WebBench clients use WebBench software engines to
send HTTP requests to stress the server under test. A single WebBench controller system manages the clients
during as the benchmark runs.
Installing a WebBench 5.0 client
1. Install Windows 2003 Enterprise Edition 32-bit. Use mailclient as the system name.
2. Install Windows Server 2003 Service Pack 2 with the default settings.
3. Open the Network Connections window by right clicking My Network Places and selecting Properties from
the menu.
4. Right-click the network connection, and click Properties.
5. Highlight TCP/IP, and select Properties.
6. Select Use the following IP address, and enter the following information: IP address 192.168.12.211,
Subnet 255.255.255.0.
7. Click OK to close the two Properties windows.
8. Insert the WebBench CD, and open it with Windows Explorer.
9. Run setup.exe from the location /wb50/client/setup.exe.
10. Click Next through all screens, a process that accepts the defaults.
11. When the installation completes, copy the WebBench shortcut icon from the open window to the system’s
desktop.
12. Close the open windows, and eject the CD.
13. With WordPad, open the file c:\Windows\system32\drivers\etc\hosts.
14. After the last text in that file, enter the following additional lines, and click Save.
• 192.168.22.210
controller
• 192.168.22.215
server
15. Close the hosts file and Windows Explorer.
Installing the WebBench 5.0 controller
We used a single system as both the WebBench 5.0 controller and the vConsolidate controller. We discuss the
specifics of the vConsolidate controller in a later section. We followed this process to set up that system as the
WebBench 5.0 controller.
1.
2.
3.
4.
5.
6.
7.
8.
9.
10.
11.
12.
13.
14.
15.
16.
Install Windows 2003 Enterprise Edition 32-bit. Use mailclient as the system name.
Install Windows Server 2003 Service Pack 2 with the default settings.
Insert the WebBench 5.0 CD.
Run /wb50/controlr/setup.exe.
Click Next through the installation, which accepts all default options.
With Windows Explorer, open C:\WebBench\Controller\Clientids\client.cdb.
Add the client’s IP address to the top of the file. Enter Tab twice, and type the number 1.
Click FileÆSave, and close the client.cdb file.
Copy vConsolidate.tst file from the vCON\WebBench directory to
C:\WebBench\controller\suites\WebBench.
Copy ecommerce_cgi_template_w2k3.tst and ecommerce_cgi_template_w2k3.wl files from
vCON\WebBench directory to C:\WebBench\controller\suites\WebBench.
Copy all files from \vCON_framework\WebBench_daemon in the vConsolidate package to C:\.
Select StartÆAll ProgramsÆPC Magazine BenchmarksÆWebBench 5.0 Controller.
Click Create/Edit from the Suites drop-down menu.
Browse to the vConsolidate.tst file, and click Open.
Highlight the first Mix, and click Edit.
On the General tab, change Engines per client to 8.
Principled Technologies, Inc.: vConsolidate performance on multi-processor Intel and
AMD processor-based servers
21
17.
18.
19.
20.
21.
22.
Select the Workload tab.
Change the number of threads to 1.
Click the Copy across button.
Select the Engines per client and Number of threads check boxes, and click OK.
Click OK to close the suites windows.
Close the WebBench Controller window.
Installing the mail test client
Each mail server VM requires one physical test client system. We used the following process to set up each such
system.
1.
2.
3.
4.
5.
6.
7.
8.
9.
10.
11.
12.
13.
14.
15.
16.
17.
18.
19.
20.
21.
Install Windows 2003 Enterprise Edition 32-bit. Use mailclient as the system name.
Install Windows Server 2003 Service Pack 2 with the default settings.
Open the Network Connections window by right-clicking My Network Places and selecting Properties.
Right-click the network connection, and click Properties.
Highlight TCP/IP, and select Properties.
Select Use the following IP address, and enter the following information: IP address 192.168.11.110,
Subnet 255.255.255.0, Preferred DNS server 192.168.11.115 (MailServer1 IP address).
Click OK to close the two Properties windows.
Right-click My Computer, and select Properties.
Click the Computer Name tab.
Click the change button,
Select Domain in the member of section, and type the domain vcon.com into the text box.
In the pop-up window, enter administrator for user name, password for password, and click OK.
At the Welcome to the domain screen, click OK.
When the warning that you must restart dialog appears, click OK.
Click OK to close the System Properties window.
Click Yes to the pop-up message to restart the computer.
Login to the domain by using administrator and password.
Install Microsoft Outlook 2003 with the default settings. (Outlook 2003 doesn’t require any configuration.)
Install LoadSim 2003 by double-clicking the loadsim.msi installation file. Accept all defaults.
Open LoadSim 2003, and make sure no error messages appear.
Copy c:\Program Files\LoadSim\lslog.exe file to a floppy disk or USB thumb drive. You will need this file
during the vConsolidate controller installation.
Configuring LoadSim 2003
1.
2.
3.
4.
5.
6.
7.
8.
9.
10.
11.
12.
13.
Start LoadSim by clicking Start MenuÆAll ProgramsÆExchange LoadSimÆLoadSim 2003.
From the LoadSim menu bar, select ConfigurationÆTopology Properties.
Click the Servers tab.
In the left pane, click the + next to the name of this server.
In the left pane, select the First Storage Group.
In the right pane, set the number of users to 500.
Select the Security and Credentials tab.
Leave the Credentials choice set to Login to users using the account LoadSim is running on.
In the password portion of the tab, enter the password "Password1", and click OK.
From the LoadSim menu bar, select ConfigurationÆTest Properties, and click Add.
Click Customize Tasks.
Select the Initialization tab.
Enter the following settings:
• Number of messages in Inbox: 150
• Number of messages in Deleted items: 1
• Number of new folders: 2
• Messages per new folder: 100
Principled Technologies, Inc.: vConsolidate performance on multi-processor Intel and
AMD processor-based servers
22
14.
15.
16.
17.
18.
19.
20.
21.
• Number of Smart Folders: 3
• Number of Rules in Inbox: 5
• Initialize Free/Busy Information: Leave it unselected
• Number of appointments: 25
• Number of contacts: 64
Click OK.
Check Forever (stop manually) in the Test Properties window, and click OK.
From the LoadSim menu bar, choose FileÆSave As.
Save a backup copy of the simulation file as C:\loadsim.sim.
From the LoadSim menu bar, select RunÆCreate Topology, and wait until the Creating Users and
Creating DLs tasks complete.
From the LoadSim menu bar, select RunÆInitialize Test.
When a dialog box appears with the question Do you want to initialize Public Folders from this client
machine?, click Yes.
The run is complete when the bottom left corner of the LoadSim window shows Status: Idle. This task
typically takes about two to three hours to complete.
Back up the mail database
Once you’ve set up LoadSim and created its initial mail database, you need to back up that database so you can
have clean copies for each test. Use this process to back up that database.
1.
2.
3.
4.
5.
6.
7.
8.
9.
10.
11.
12.
13.
14.
15.
16.
Select StartÆAll ProgramsÆMicrosoft ExchangeÆSystem Manager in the MailServer VM.
In the left-hand pane, expand Servers until First Storage Group appears highlighted.
In the right-hand pane, right-click Mailbox Store, and select Dismount Store from the menu.
Click Yes on the Do you want to continue pop-up message.
When you’ve dismounted the Mailbox Store, a red arrow appears in the window pane.
Right-click Public Folder Store, and select Dismount Store from the menu.
Click Yes on the Do you want to continue pop-up message.
The red arrow will appear when you’ve dismounted the Public Folder Store.
Using Windows Explorer, create a new folder e:\backup.
With Windows Explorer, copy all files from E:\ to E:\backup. This process may take several minutes.
Close Windows Explorer.
In Exchange System Manager, right-click Mailbox Store, and select Mount Store from the menu.
Click OK on the pop-up message, The store was successfully mounted.
Right-click Public Folder Store, and select Mount Store from the menu.
Click OK on the pop-up message, The store was successfully mounted.
Close Exchange System Manager.
vConsolidate controller
You use a separate physical system, the controller, to manage the vConsolidate workload. We used a single
section both for this function and as the controller system for the first CSU’s WebBench benchmark. This
controller offers a graphical user interface (GUI) to start and stop the vConsolidate workload. After the workload
finishes, the controller copies the independent benchmark result files from all the VMs and combines their results
into a single file, results.txt. To set up this vConsolidate controller, we did the following:
1. With Windows explore, create a C:\vCON directory.
2. Copy all files from the \vCON_framework\controller directory of the vConsolidate package to c:\vCON.
3. Copy the lslog.exe file the mail client installation created to c:\vCON.
The vCON directory contains a Profiles sub-directory. The Profiles directory contains four sample profiles,
1CSU.profile, 2CSU.profile, 3CSU.profile, 4CSU.profile and a blank template, Profile.template. vConsolidate uses
these files to identify the number and name of the VMs a test should include. An example 1CSU.profile contains
the following:
<Profile>
Principled Technologies, Inc.: vConsolidate performance on multi-processor Intel and
AMD processor-based servers
23
<Name>1 CSU</Name>
<CSUNum>1</CSUNum>
<Servers>
<DB>
<OS>Win</OS>
<Host>DBServer1</Host>
</DB>
<Loadsim>
<Host>192.168.202.110</Host>
</Loadsim>
<Java>
<OS>Win</OS>
<Host>JavaServer1</Host>
</Java>
<WebBench>
<Host>192.168.202.210</Host>
</WebBench>
</Servers>
</Profile>
Running vConsolidate
To run vConsolidate and get consistent results, you must first prepare the VMs with clean copies of the test data.
We outline below the process for getting ready to run the workload. We then explain how to start and stop the
workload. Finally, we detail how to find its results.
Preparing the vConsolidate run
Prior to running vConsolidate we do the following to ensure consistent results.
Database restore
1. In SQL Server 2005 Management Studio, stop the database service by right-clicking DBSERVER1 in the
left-hand window pane and selecting stop from the drop-down menu.
2. Using Windows Explorer, copy sbtest.mdf and sbtest_log.ldf from C:\backup.
3. With Windows Explorer, paste the sbtest files into C:\Program File\Microsoft SQL
Server\MSSQL.1\MSSQL\Data\
4. Click Yes on the pop-up message asking if you want to replace these files.
5. Close Windows Explorer once the copy completes.
6. Restart the database service using SQL Server 2005 Management Studio by right-clicking DBSERVER1
and selecting start.
Mail store restore
1. Select StartÆAll ProgramsÆMicrosoft ExchangeÆSystem Manager.
2. In the left-hand pane, expand Servers until First Storage Group appears highlighted.
3. In the right-hand pane, right-click Mailbox Store, and select Dismount Store from the menu.
4. Click Yes on the Do you want to continue pop-up message.
5. When you’ve dismounted the Mailbox Store, a red arrow appears in the window pane.
6. Right-click Public Folder Store, and select Dismount Store from the menu.
7. Click Yes on the Do you want to continue pop-up message.
8. When you’ve dismounted the Public Folder Store, a red arrow appears in the window pane.
9. Using Windows Explorer, delete all files in E:\, but be sure not to delete the backup directory you created
in the Backup the mail database section.
10. With Windows Explorer, copy all files from E:\backup to E:\. This process may take several minutes.
11. Close Windows Explorer.
12. In Exchange System Manager, right-click Mailbox Store, and select Mount Store from the menu.
13. Click OK on the pop-up message, The store was successfully mounted.
14. Right click Public Folder Store, and select Mount Store from the menu.
Principled Technologies, Inc.: vConsolidate performance on multi-processor Intel and
AMD processor-based servers
24
15. Click OK on the pop-up message, The store was successfully mounted.
16. Close Exchange System Manager.
Verify connectivity and setting profiles
1. Open a command prompt by selecting StartÆRun, type cmd, and click OK.
2. Type the following commands at command prompt:
• net use \\loadsim client IP Address\c$
• net use \\JavaServer1\c$
• net use \\DBServer1\c$
• net use \\WebBench Controller IP Address\c$
3. Verify that the vConsolidate controller can read and write remote files to all VMs with the following
commands:
• With Windows Explorer, create an empty file, dummy.txt.
• copy dummy.txt \\loadsim client IP Address\c$
• copy dummy.txt \\JavaServer1\c$
• copy dummy.txt \\DBServer1\c$
• copy dummy.txt \\WebBench Controller IP Address\c$
4. Modify the profile file by entering the VM name or IP address appropriate to each VM in the test. For the
one-CSU test, enter four server names or IP addresses; for the two-CSU test, enter eight.
Starting and stopping vConsolidate
1.
2.
3.
4.
5.
6.
7.
8.
9.
10.
11.
12.
13.
14.
15.
16.
17.
18.
19.
20.
21.
22.
Shut down all VMs by selecting StartÆShutdown and then selecting Shutdown from the window.
In the left-hand pane of the Virtual Infrastructure Client window, highlight localhost.localdomain.
Select the Summary tab in the right hand pane.
Click Reboot under the Commands section.
While the server is rebooting, reboot all clients in the test bed.
After the VMware ESX Server has rebooted, login using the Virtual Infrastructure Client, and start all VMs
in the test.
Once the VMs are up, log the LoadSim client(s) into the appropriate domain(s).
Double-click Daemon.exe manually on the following VMs and systems:
a. DataServer1
b. JavaServer1
c. LoadSim client
d. WebBench controller
Start the WebBench Controller application on the WebBench controller system by selecting StartÆAll
ProgramsÆPC Magazine Benchmarks.
In the WebBench Controller application, choose the Clients menu, and click Start Log In.
Double-click the WebBench 5.0 client shortcut on all the WebBench test client desktops.
Once all the client machines are log into WebBench, click OK.
At the Would you like to add a test suite? dialog, click Yes.
In the Select a test suite window, choose vConsolidate.tst, and click OK.
When the Would you like to start executing the test suites? window appears, do NOT click Yes or No. The
vConsolidate controller application will handle that task that at the start of the test.
Double-click c:\vCON\vconsolidate.exe.
Select the profile name you want to run.
Wait 10 minutes to allow all virtual machines and VMware ESX Server to load all processes and become
completely idle.
Click start.
The vConsolidate controller software will immediately start the LoadSim application. LoadSim will take
about 60 to 80 seconds to log 500 users onto the Exchange Server. The remaining benchmarks will start
once all the LoadSim users have logged in.
After about 30 minutes, as soon as you see the WebBench workload(s) complete, click Stop!.
The vConsolidate controller application will stop all the other benchmarks and collect their results.
Principled Technologies, Inc.: vConsolidate performance on multi-processor Intel and
AMD processor-based servers
25
Locating and interpreting the results file
vConsolidate places all result data in the following location:
c:\vCON\vCONMM-dd-hh-mm
where MM is the month, dd is the day, hh is the hour, and mm is the minute of the test. The file result.txt in that
directory summarizes all the results. It contains the following information:
•
•
•
•
•
Java transaction score
Database transaction score
Mail transaction score
Web server throughput
Start and stop times
Figure 12 shows an example results.txt file for a test with one CSU. We have labeled each score with a brief
description. See the Test results section for more information on how we used these individual results to calculate
each server’s overall score on the workload.
Figure 12: Example of vConsolidate results file.
Principled Technologies, Inc.: vConsolidate performance on multi-processor Intel and
AMD processor-based servers
26
Appendix A – Test system configuration information
This appendix provides detailed configuration information about each of the test server systems, which we list in
alphabetical order by processor name.
Servers
Dual-Core AMD
Opteron processor
8222 SE-based
server
General processor setup
Number of processor
4
packages
Number of cores per
2
processor package
Number of hardware
1
threads per core
System Power
Always on
Management Policy
CPU
Vendor
AMD
AMD Opteron 8222
Name
SE
Stepping
3
Socket type
Socket F (1207)
Core frequency (GHz)
3.0 GHz
Front-side bus
2,000 MHz
frequency (MHz)
HyperTransport
64 KB + 64 KB
L1 Cache
(per core)
Dual-Core Intel
Xeon processor
7140M-based
server
Quad-Core Intel
Xeon processor
X5365-based
server
Inspur NF520D2
server
4
2
4
2
4
4
2
1
1
Always on
Always on
Always on
Intel
Dual-Core Intel
Xeon MP 7140M
8
mPGA604
3.4 GHz
Intel
Quad-Core Intel
Xeon X5365
7
LGA 771
3.0 GHz
Intel
Quad-Core Intel
Xeon X7350
B
mPGA604
2.93 GHz
800 MHz
1,333 MHz
1,066 MHz
12 KB + 16 KB
(per core)
32 KB + 32 KB
(per core)
2 x 4 MB (each 4
MBs shared by
two cores)
NA
L2 Cache
2 x 1 MB
2 x 1 MB
L3 Cache
Thermal design power
(TDP, in watts)
Platform
Vendor and model
number
Motherboard model
number
Motherboard chipset
Motherboard revision
number
NA
16 MB
32 KB + 32 KB
(per core)
2 x 4 MB (each 4
MBs shared by
two cores)
NA
120
150
120
130
HP* ProLiant*
DL585 G2
Intel
Intel
Inspur*
NF 520D2
PB729AE9QUDO49
SR4850HW4x
S5000XAL0
S7000FC4UR
NVIDIA nForce4
Intel SE8501
Intel 5000X
Intel ID3600
A4
11
B3
01
Intel Corporation
SHW40.86B.P.1
2.00.0076,
02/15/2007
Enabled
Virtualization
Technology
Intel 8.3.0.1013
Intel Corporation
S5000.86B.P.07.
00.0079,
06/05/2007
Enabled
Virtualization
Technology
Intel 7.4.0
Intel Corporation
SFC4UR.86B.01
.00.0010.050420
071510
Enabled
Virtualization
Technology
Intel 8.4.0
BIOS name and version
HP BIOS A07
(v2.10)
BIOS settings
Default
Chipset INF driver
HP 1.0.0.0
Principled Technologies, Inc.: vConsolidate performance on multi-processor Intel and
AMD processor-based servers
27
Dual-Core AMD
Opteron processor
8222 SE-based
server
Dual-Core Intel
Xeon processor
7140M-based
server
Quad-Core Intel
Xeon processor
X5365-based
server
Inspur NF520D2
server
Vendor and model
number
Hynix*
HYMP525P72BP4Y5 AB-T
Kingston*
KVR400D2D4R3
/2G
Type
PC2-5300 DDR2
PC2-3200 DDR2
Speed (MHz)
Speed in the system
currently running @
(MHz)
Timing/Latency (tCLtRCD-iRP-tRASmin)
Size
Number of RAM
modules
Chip organization
Hard disk
Vendor and model
number
Number of disks in
system
Size
Buffer size
RPM
Type
667 MHz
400 MHz
Kingston
KVR667D2D4F5
/2G
PC2-5300 FBDDR2
667 MHz
Samsung*
M395T5750EZ4CE66
PC2-5300 FBDDR2
667 MHz
667 MHz
400 MHz
667 MHz
667 MHz
5-5-5-15
3-3-3-9
5-5-5-15
5-5-5-15
32,768 MB
32,768 MB
16,382 MB
32,768 MB
16
16
8
16
Double-sided
Double-sided
Double-sided
Double-sided
HP DH072ABAA6
Seagate
ST3146854LC
Seagate
ST336754SS
Seagate
ST973401SS
1
1
1
1
72 GB
16 MB
15,000
SAS
146.8 GB
8 MB
15,000
SCSI
36 GB
16 MB
15,000
SAS
Smart Array* P400
Controller
LSI* Logic PCI-X
Ultra320 SCSI
LSI Adapter
SAS3000 series
VMware
5.2.3790.1830
VMware
5.2.3790.1830
73.4 GB
8 MB
10,000
SAS
Intel
631xESB/6321E
SB/3100 Chipset
Serial ATA
Storage
Controller – 2680
VMware
5.2.3790.1830
Microsoft
Windows Server
2003 R2
Enterprise
Edition
3790
SP2
NTFS
ACPI
English
Microsoft
Windows Server
2003 R2
Enterprise
Edition
3790
SP2
NTFS
ACPI
English
Microsoft
Windows Server
2003 R2
Enterprise
Edition
3790
SP2
NTFS
ACPI
English
9.0c
9.0c
9.0c
VMware ESX
Server 3.0.2
VMware ESX
Server 3.0.2
VMware ESX
Server 3.0.2
Servers
Memory module(s)
Controller
VMware
5.2.3790.1830
Operating system (Windows)
Driver version
Name
Microsoft Windows
Server 2003 R2
Enterprise Edition
Build number
3790
Service Pack
SP2
File system
NTFS
Kernel
ACPI
Language
English
Microsoft DirectX
9.0c
version
Operating system (VMware)
VMware ESX Server
Name
3.0.2
Principled Technologies, Inc.: vConsolidate performance on multi-processor Intel and
AMD processor-based servers
28
Servers
Build number
File system
Kernel
Language
Graphics
Vendor and model
number
Dual-Core AMD
Opteron processor
8222 SE-based
server
54542
ext3 (server)
Vmfs (virtual
machines)
2.4.21-47.0.1.EL
English
Dual-Core Intel
Xeon processor
7140M-based
server
54542
ext3 (server)
Vmfs (virtual
machines)
2.4.21-47.0.1.EL
English
Quad-Core Intel
Xeon processor
X5365-based
server
54542
ext3 (server)
Vmfs (virtual
machines)
2.4.21-47.0.1.EL
English
54542
ext3 (server)
Vmfs (virtual
machines)
2.4.21-47.0.1.EL
English
ATI ES1000
ATI ES1000
ES1000
ES1000
Inspur NF520D2
server
Type
Memory size
BK-ATI
VER008.005.013.00
0
Integrated
32 MB
ATI Radeon*
7000
ATI Radeon
7000 PCI
BK-ATI
VER008.004.037
.001
Integrated
16 MB
Integrated
16 MB
BK-ATI
VER008.005.031
.000
Integrated
32 MB
Resolution
1,024x768
1,024x768
1,024x768
1,024x768
VMware SVGA
11.2.0.0
VMware SVGA
11.2.0.0
VMware SVGA
11.2.0.0
Intel PRO/1000
EB Network
Interface Adapter
Intel PRO/1000
EB/Intel
82575EB
Integrated
Intel 8.1.8.0
Integrated
Intel 8.1.8.0
Chipset
BIOS version
ATI* ES1000
ES1000
VMware SVGA
11.2.0.0
Network card/subsystem
Driver version
01.00
Type
Driver version
Optical drive
Vendor and model
number
USB ports
Number
Type
Power supplies
Total number
Wattage of each
Cooling fans
Total number
Integrated
Intel 8.1.8.0
Broadcom*
BCM5704 dual
NetXtreme*
Gigabit Adapter
Integrated
Intel 8.1.8.0
TEAC* DW-224E-R
Philips* SDR089
Matshita* SR8178
Optiarc* DVDROM DDU810A
4
USB 2.0
5
USB 2.0
3
USB 2.0
5
USB 2.0
1
1,300
1
1,470
1
750
1
1,570
6
4
Dimensions
120 mm
120 mm
Voltage
12 V
12 V
Amps
3.9 A
3.3 A
6
4x80 mm +
2x60 mm
12 V
4 x 2.34 A + 2 x
1.68 A
8
4x80 mm +
4x120 mm
12 V
4 x 1.76 A + 4 x
3.3 A
Vendor and model
number
HP NC371i
Multifunction Gigabit
Server Adapter
Figure 13: Detailed system configuration information for the four test servers.
Principled Technologies, Inc.: vConsolidate performance on multi-processor Intel and
AMD processor-based servers
29
Principled Technologies, Inc.
1007 Slater Road, Suite 250
Durham, NC 27703
www.principledtechnologies.com
[email protected]
Principled Technologies is a registered trademark of Principled Technologies, Inc.
Intel and Xeon are trademarks or registered trademarks of Intel Corporation or its subsidiaries in the United States and other
countries.*All other product names are the trademarks of their respective owners
Disclaimer of Warranties; Limitation of Liability:
PRINCIPLED TECHNOLOGIES, INC. HAS MADE REASONABLE EFFORTS TO ENSURE THE ACCURACY AND VALIDITY OF ITS
TESTING, HOWEVER, PRINCIPLED TECHNOLOGIES, INC. SPECIFICALLY DISCLAIMS ANY WARRANTY, EXPRESSED OR
IMPLIED, RELATING TO THE TEST RESULTS AND ANALYSIS, THEIR ACCURACY, COMPLETENESS OR QUALITY, INCLUDING
ANY IMPLIED WARRANTY OF FITNESS FOR ANY PARTICULAR PURPOSE. ALL PERSONS OR ENTITIES RELYING ON THE
RESULTS OF ANY TESTING DO SO AT THEIR OWN RISK, AND AGREE THAT PRINCIPLED TECHNOLOGIES, INC., ITS
EMPLOYEES AND ITS SUBCONTRACTORS SHALL HAVE NO LIABILITY WHATSOEVER FROM ANY CLAIM OF LOSS OR DAMAGE
ON ACCOUNT OF ANY ALLEGED ERROR OR DEFECT IN ANY TESTING PROCEDURE OR RESULT.
IN NO EVENT SHALL PRINCIPLED TECHNOLOGIES, INC. BE LIABLE FOR INDIRECT, SPECIAL, INCIDENTAL, OR
CONSEQUENTIAL DAMAGES IN CONNECTION WITH ITS TESTING, EVEN IF ADVISED OF THE POSSIBILITY OF SUCH DAMAGES.
IN NO EVENT SHALL PRINCIPLED TECHNOLOGIES, INC.’S LIABILITY, INCLUDING FOR DIRECT DAMAGES, EXCEED THE
AMOUNTS PAID IN CONNECTION WITH PRINCIPLED TECHNOLOGIES, INC.’S TESTING. CUSTOMER’S SOLE AND EXCLUSIVE
REMEDIES ARE AS SET FORTH HEREIN.
Principled Technologies, Inc.: vConsolidate performance on multi-processor Intel and
AMD processor-based servers
30