1
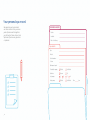
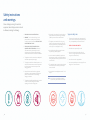
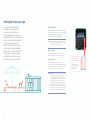
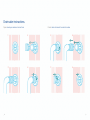
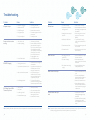
Vortex Spas
User Manual
Dear Spa Buyer,
Congratulations on your purchase of a new Vortex Spa. You now possess the
ultimate passport to tranquility – a miniature vacation at home, ready and waiting
for you in your own backyard!
We want you to enjoy your Spa. Many hours of research have gone into the design
of your spa, to ensure the ultimate in hydrotherapy and relaxation. Only the highest
quality components have been used, to ensure years of trouble-free operation.
Your comfort and enjoyment has been designed into your Spa from the start.
Please take the time to read through this Owner’s Manual. In it, you will find
guidelines on caring for your spa, a complete explanation of the controls, safety
instructions, a troubleshooting section, and lots more.
Once again, we welcome you to the family of Vortex Spa owners.
Sincerely,
VORTEX Team
Vortex Spas
Contents
Your personal spa record
Safety instructions and warnings
Important general operating instructions
Basic Installation Information
_ Initial start up procedure
Start up or refill checklist
_ Check barrel unions are tight
_ Check valves are open
_ Check drain valve is closed and firmly tightened
_ Check all jets are open
_ Fill water to correct level in spa
Heat pump connection instructions
_Parts supplied
_Tools and parts required
Getting to know your spa
_ Filter cartridges
_ Aromatherapy canister
_ Air venturi controls
_ Water diverters
_ Waterfall control dials
Drain valve instructions
Spa pool maintenance
_Changing the water
_Total alkalinity
_The pH level
_Sanitising the spa
_Recommended levels
Pump maintenance
Barrel union maintenance
Troubleshooting
_01
Your personal spa record.
We appreciate your business and
our sincere desire is that you receive
years of pleasure and therapy from
your Vortex Spa. Please call your local
Spa Dealer if you have any questions
or problems.
Installation details
Dealer
Installer
Date of delivery
Spa details
Spa
Model
Serial number
Colour
Equipment pack
_02
Circulation pump
Fitted
Not fitted
Sanitiser
Ozone
UV
Jet pumps
1
Heat pump
Fitted
2
3
4
Not fitted
Size
kw
Safety instructions
and warnings.
When installing and using this electrical
equipment, basic safety precautions should
be followed, including the following:
1. READ AND FOLLOW ALL INSTRUCTIONS.
2.
WARNING: To reduce the risk of injury, do not permit children to use this product unless they are closely supervised at all times. KEEP SPA COVER LOCKED WHEN NOT IN USE.
3.
THIS APPLIANCE MUST BE INSTALLED BY A QUALIFIED SERVICE TECHNICIAN. All electrical connections must be performed by a licensed electrician and must confirm to all national, state and local electrical codes in effect at time of installation.
4. The appliance must be connected to a suitably rated and weather protected power supply.
5.
The supply line should be a dedicated power circuit and means for disconnection must be incorporated in the fixed wiring in accordance with your local wiring regulations.
6.
Means for disconnection from the supply mains should have a contact separation in all poles that provide full disconnection under overvoltage category III conditions.
7. The appliance should be supplied through a residual current device (RCD) having a rated residual operating current not exceeding 30mA.
_04
8. If the supply cord is damaged, it must be replaced by the manufacturer, its service agent or similarly qualified persons in order to avoid a hazard.
9.
The appliance is not intended for use by young children or infirm persons unless they have been adequately supervised by a responsible person to ensure they can use the appliance safely.
10.Young children should be supervised to ensure they do not play with the appliance.
11.In order to avoid the possibility of hyperthermia (heat stress) occurring it is recommended that the average temperature of the spa pool water should not exceed 40oC.
12. The control box, heater, pumps and other electrical items should only be serviced by a qualified spa service technician.
Spa pool safety rules
1. This spa pool is a heated water environment and if you are concerned that it may adversely affected you it is your responsibility to seek a medical advice.
2. NEVER PUT HEAD UNDER WATER.
3. All children must supervised by an adult.
4. Do not use the spa pool area while under the influence of drugs or alcohol (certain medications may produce adverse effects).
5. It is safer not to use the spa pool alone.
6. It is recommended that you use the spa pool for no longer than 15 minutes at a time.
13. Do not operate electrical appliances within 1.5m of the spa.
NOTE: It is the owner’s responsibility to display all required safety notices within view of the spa.
_05
Important general
operating instructions.
The following operating and maintenance
instructions are very important and must
be followed carefully. With proper care
and maintenance your spa will provide
you with years of satisfaction with
minimum effort.
1.
The filtration pump should be operated for a minimum of four (4) hours per day for cleaning and filtering of the spa water (your spa has been configured to 4hrs by default). Information on adjusting filter duration can be found in the control panel’s instruction manual.
2.
The length of time required to heat your spa to the desired water temperature will vary, depending on the air temperature, season, and wind velocity. Therefore, this is something each owner must adjust to their desired liking. We highly recommend using the hard cover to minimize heat loss and to protect your spa when not in use.
3. The replaceable filter cartridges are trouble free and easy to clean. A routine cleaning is the best practice. Cartridges should be removed and hosed
down weekly using a water hose with pressure nozzle. Make sure all pumps are turned OFF before
removing the cartridge(s) for cleaning. In addition, at least once a month the cartridges should be removed and soaked in a filter cartridge cleaning solution for a minimum 30 minutes (or as directed by the cleaning solution’s instructions). After soaking, the cartridges should be thoroughly rinsed using a water hose with pressure nozzle. The frequency of soaking required varies with amount of spa use. The more the spa is used the more often the filters should be cleaned.
4. If your spa is fitted with a Purezone micro filter, this does not require cleaning. However, this filter should be replaced at least every 3 - 4 months, or as required dependant on amount of spa use.
NOTE:DO NOT add any SPA SHOCK chemical to your spa water if using the Purezone micro filter, only use spa sanitiser and pH balancers.
5. Keep the spa water level at least 50mm above the skimmer at all times. Never allow the water level to _06
drop below the bottom of the skimmer opening. If the water level is too low, the skimmer will allow air
into the water lines of the pump, causing it to lose its prime (water -flow). Running the pump without water flow will damage the pump seal assembly and could result in further equipment damage, which will not be covered by the product warranty.
6.
It is your responsibility to regularly check and maintain the chemical water balance of the spa pool to ensure it remains within reasonable pH (acid/
alkaline) limits (7.4 - 7.6 pH). Unbalanced water chemistry greatly accelerates corrosion and may lead to early product or component failure. Product or component failures caused as a result of poor water chemistry maintenance will NOT be covered by the product warranty.
7. Your spa may be equipped with an ozone or uv sanitiser and a Purezone micro filter to assist with water sanitization and filtration, however your spa water will still require regular treatment with some form of chemical spa sanitiser. Consult your local spa dealer for advice on regular water testing and treatment procedures.
8. You should empty and clean your spa at least every 3-4 months. Performing a pipe and jet degrease before draining is recommended. Drain the spa water and use a liquid cleanser free of abrasives to clean your spa. Fill with regular tap water and chemically treat the water before use, for a clean and healthy spa.
9. CAUTION:Cover must be kept on spa at all times spa shell is empty, direct exposure to
sunlight can damage plastic parts and interior surface, jets, or any other interior components. Damage resulting from the above will not be covered under warranty.
_07
Basic Installation
Information.
Your new portable spa must be
placed on a uniformly flat and level
surface. A concrete pad 100mm thick
is recommended. We recommend you
contact your local for up to date fencing
regulations and requirements. If your
spa is located near sprinklers, adjust or
cap them so as not to hit the siding of
the spa.
Initial start up procedure
1.
15 amp spas are supplied with a power cord but must be connected to a weatherproof 15A outlet. 32 amp – 60 amp spas must be hardwired directly to your house supply. All electrical connections must be performed by a licensed electrician and must confirm to all national, state and local electrical codes in effect at time of install.
2. DO NOT turn power ON to the spa until it is filled with water.
3. Remove the cabinet door panel on the electronic keypad side of the spa and check that the pump(s) and heater barrel unions are tightened (NOTE: It is possible for these connections to become loose during transportation). Also check that all T-handled gate vales are pulled UP in the open position.
4. Ensure that the external drain valve is firmly tightened and the jets are in the open position.
300mm
5. Remove the Purezone micro filter from the spa and fill the spa using a garden hose by inserting the hose down into the filter pipe. This will flood the pipe work during filling to help prevent air locks. If your spa is not fitted with a micro filter, remove the cartridge(s) and fill through any filter pipe.
7. Once spa has been filled with water to the correct level, plug the power cord into the power point and switch the power ON. If the spa is hardwired, switch the spa ON at the isolation switch. Any switches should be located within 3 metres of the spa.
8.
The filtration pump will start immediately after
the power is turned on. ENSURE THAT YOU SEE
WATER CIRCULATING. If water is not visibly moving, switch the spa OFF and contact your appointed hand over technician.
9. Once you have the water circulating, adjust the water temperature to the desired level and set the time (please refer to separate instructions provided for the control panel).
10.Add and adjust your chemicals to the spa water following the chemical start up procedure supplied to you by your spa dealer.
11.Ensure that the hard cover is placed on the spa as this will greatly reduce heat up time.
6. Your spa should be filled until the water level is at least 50mm above the skimmer (a water fill level is marked on the side of the filter area).
_08
_09
Start up or refill checklist.
Remove spa cabinet side panel (on keypad side) to access
equipment bay
3.Check drain valve is closed and firmly tightened
1. Check Barrel Unions are tight
Barrels unions are the connections between the pumps and heater and the plumbing of the spa. If they become loose, this can cause water loss. It is important to check the tightness of these unions periodically, and especially when spa is first delivered. The unions are designed to be retightened by hand. Rotate the locking nut clockwise to tighten.
Please refer below illustration showing the valve being closed.
NOTE: If you see water escaping from beneath your spa, the barrel unions should be the first thing you check. LEAKS FROM BARREL UNIONS ARE NOT COVERED BY THE SPA’S WARRANTY.
2. Check valves are open
T-handled valves enable the water flow to be closed to allow removal of spa equipment for servicing without the need to empty the spa water. The T handles must be pulled UP to be OPEN and allow water flow, and they should be secured open with clips.
4. Check all jets are open
Water flow to most jets can be turned on or off by rotating the jet face clockwise (on) or anti-clockwise (off). Check to ensure all jets are open before filling with water.
ON
Valves
(open)
OFF
5. Fill water to correct level in spa
Barrel
Unions
The spa should be filled until the water level is at least 50mm above the skimmer A water fill level is marked on the side of the filter area (refer picture below).
Water Level
_10
NOTE: Always remember to remove the filters and fill spa through filter pipes
_11
Heat pump connection instructions.
1. Turn off spa and close shut off valves to the circulation pump and controller. (Marked 1 on
the diagram)
2. Consult the Spa Net installation guide to connect power and control wire.
3. Remove existing plumbing between circulation pump and SV controller. (Marked 2 on the diagram)
4. Fit the new 40mm circulation pump union supplied and point it in the direction where the heat pump will be located.
5. Cut holes into the cabinet where the pipe will run into the heat pump, be sure cut the holes at a height that allows the pipes to remain even and supported on the cabinet.
6. Run 40mm pipe form the circulation pump to the inlet of the heat pump.
7. From the outlet of the heat pump, run 40mm pipe to the inlet of the SV controller using the supplied union to make new the connection.
NOTE: You must use PVC hard pipe on the outside of the spa, flexible pipe may only be used internally.
8. Open the shut off valves. (Marked 1 on the diagram)
9. Undo the top outlet on the heat pump to bleed air out of the system.
10. Close it once water comes out and then switch on the spa.
Parts supplied:
•1x circulation pump barrel union.
•1x 40mm 90 degree elbow.
•1x SV barrel union.
Tools and parts required:
•40mm or larger hole saw
•PVC Pipe Glue
•Hacksaw
•40mm hard pipe
(The amount of pipe or fittings required will depend on
your installation)
11. Make sure the circulation pump is flowing and is free of any air locks.
12.Depending on the installation, Purezone filters may create a flow error, we suggest replacing this filter with a standard paper version.
Spa Pool
2 Existing Plumbing
40mm Pipe
SV Control Box
1
1
Valve
Heat Pump
Circulation Pump
Heater
The heat pump must be installed
at least 1 metre from the spa pool.
The heat pump must be not
further than 2.5 metres from
the circulation pump.
_12
NOTE: The heat pump must be installed at the same approximate level as the circulation pump.
_13
Getting to know your spa.
Your new Vortex portable spa has
many features to help adjust and
customize the water flow to your
chosen configuration and enjoyment.
Individual jets can be turned on and off,
aeration to water flow can be adjusted,
water can be diverted to certain
specific zones and jets of the spa or
mixed throughout, and waterfalls and
fountains can be turned on and off. The
following pages and pictures will give
you a brief overview of how to adjust
and use some of the various features.
Filter Cartridges
Most Spas are equipped with two or three filter cartridges
(depending on pump configuration). The filtration cartridge
supplied is usually a Purezone micro filter. Refer picture
below depicting differences in filter cartridges.
NOTE: Filter cartridges may require replacement or cleaning more frequently depending on length and frequency of regular spa use.
Removing filters
To remove filters simply unscrew the cartridge in an
anti-clockwise direction and pull out from spa pool.
Reinstalling filters
When reinstalling filters first hold the cartridge
underwater until the air stops bubbling (at this point most
air has been removed from the cartridge). Then screw the
cartridge back into place in a clockwise direction.
Primary Filter
•Rotate with other paper filters
•Position for optional Purezone micro filter
(do not rotate with paper filters.)
NOTE: DO NOT screw the cartridge back into place excessively tight. Only screw the cartridge until it no longer spins freely. The suction from the pumps will pull the cartridges in further once operated. If the cartridge is screwed in place excessively tight before pump operation, the cartridge may be difficult to remove or could even cause the filter thread connection to twist or break the next time the cartridge is removed and breakage is not covered by warranty.
_14
_15
Getting to know your spa.
Air Venturi Controls
Water Diverters
Each seat in your spa will have an air venturi control.
This regulates the amount of air that flows through the
jet with the water. The more air, the more powerful the
jet’s stream. You can adjust the pressure in the entire
seat by adjusting this air venturi control clockwise or
anti-clockwise.
Your spa may be fitted with one or more water flow
diverters. These diverters control the flow of water from
each jet pump between various zones of the spa. You
can have full pressure in one zone and no pressure in
another zone by turning the diverter handle all the way
to the left or right, or part pressure in each zone by
setting the diverter handle to the middle position.
Air Venturi
Control
NOTE: Upon completion of spa use the air venturi controls should be turned back to the OFF position (no air through jets). This prevents air entering the spa and cooling the water when
spa not in use.
NOTE: It is important NOT to push these diverter handles past the natural stop point as breakage is not covered by the spa’s warranty.
Aromatherapy Canister
Waterfall Control Dials
If your spa is equipped with an air blower an
aromatherapy canister may also be fitted. The canister
can be easily identified due to its coloured cap. Scented
ceramic blocks or beads can be placed in the canister
which creates a fragrance to rise up from the air
bubbles when the air blower is operated.
Your spa may also be fitted with one or more waterfalls
and back lit water cascade. These water features
operate with either the filtration or jet pump and can be
turned on or off by rotating the control dial(s) clockwise
or anti-clockwise. Similar in appearance to air venturi
controls however their larger size and higher profile
makes them easily distinguishable.
Water
Diverter
Waterfall
Control Dials
Aromatherapy
Canister
_16
_17
Drain valve instructions.
Open: How to open valve and connect hose
_18
Closed: How to disconnect hose and close valve
1
2
5
6
3
4
7
8
_19
Spa pool maintenance.
If you own a spa pool or hot tub, it is
important to understand that it requires
a certain amount of owner maintenance
to ensure it operates properly and that
the water remains clean and healthy.
The water treatment requirements
for a spa pool differ from those for a
swimming pool, because you are dealing
with hot water. Hot water requires
different treatment to prevent the
growth of bacteria and algae.
The correct use of chemicals will
maintain the water in a clean and
healthy condition. The parameters that
need to be regularly checked are, total
alkalinity, pH and sanitiser level. Your
local spa retailer should be able to
supply a suitable test kit and advise on
its correct use. It is advisable to test the
water on a daily basis.
SPECIAL NOTE: Do not mix chemicals. Do not add water to the chemicals, only add chemicals to the water
IMPORTANT:
_20
Not maintaining your water chemistry can void parts of your spa warranty.
Changing the water
Sanitising the spa
The spa water should be changed every three to four
months, or remove and replace approx 30% or 1/3 of
the volume of water every three to four weeks.
Sanitising your spa is essential for safe, healthy water,
free of harmful micro-organisms. The most commonly
used sanitiser for spa pools is a form of chlorine
(Lithium Hypochlorite). Ozone or UV may also be used,
but because there can be no residual, a form of chlorine
must be used in conjunction with it.
Total alkalinity
The total alkalinity should be in the range of 90 - 150
ppm (parts per million). A spa or hot tub with low total
alkalinity would require constant adjustment of the pH.
To raise total alkalinity, add sodium bicarbonate in small
quantities. To lower the total alkalinity, add acid (Dry
Acid – Sodium Bisulphate) in small quantities. Test in
one hour.
The pH level
pH is the measure of the acid/alkaline level of the
water. It is important to maintain the correct pH level
as it effects the action of other chemicals. The pH is
measured on a scale of 1 to 14. Seven is neutral, below
seven is acidic, and above seven is alkaline.
Incorrect pH levels can cause poor sanitiser efficiency,
eye and skin irritations, corrosion of metal fittings,
cloudy water and formation of scale on the pool
walls and fittings. The pH should always be above 7.0
(measured at room temperature, not hot) to avoid
possible corrosion of equipment. However, it should not
be higher than 7.8, as this would reduce the efficiency of
the sanitiser.
If the pH level needs to be increased, add soda ash; to
reduce the pH level, add dry acid. Wait for one hour and
test again.
The amount of disinfectant required depends on a
number of factors, including, water temperature, the
frequency of use and the number of people using the
spa. It is most important to always keep the sanitiser
level at 2.00 to 3.00 ppm. In very hot water the sanitiser
can be used up very quickly, and should be checked
regularly whilst the spa is being used.
After heavy use of the spa or on a weekly basis, the
water should be shock dosed with sanitiser. Be sure to
check the level again before use. If the spa or hot tub
is not being used, add sanitiser every second day to
prevent contamination.
Recommended Levels
ItemLevel
Sanitiser (Chlorine)
2.0 – 3.0 ppm
Total Alkalinity
90 – 110 ppm
pH Level
7.4 – 7.6
It is important to note that if the right pH and sanitiser
levels are maintained, viruses and bacteria should not
survive in the water. In terms of general hygiene, it is
important to keep the filter and pump clean. Clean the
filter regularly and where ever possible always shower
before spa use.
_21
Pump maintenance.
Barrel union maintenance.
The pumps in your spa are high
performance motors that require
regular checking. It is a requirement
of your spa’s warranty to check the
pumps every four (4) months for signs
of leaking or corrosion.
Barrels unions are the connections
between the pumps and heater and
the plumbing of the spa. They are used
to enable easy removal of the spa
equipment in the event of servicing.
However over time with vibration from
pumps and water flow, and ageing of
o-ring seals, it is possible for the unions
to work loose.
Any sign of leaking or calcium build up at the bottom of
the pump between the plastic wet end and metal part
of the motor indicates that the seals of your pumps are
worn and need replacing. It is recommended that you
contact your local spa dealer to arrange a service of your
pump before the motor develops further problems.
Pump seal corrosion and wear is generally caused
by incorrect pH and alkalinity levels within the spa,
or heavy use /excessive dosage of sanitisers such as
Chlorine or Bromine. In order to avoid problems, please
follow the water chemistry instructions provided to you
by your dealer.
Barrel
union
If they become loose, this can cause
water loss. It is important to check the
tightness of these unions periodically.
The unions are designed to be
retightened by hand. Rotate the locking
nut clockwise to tighten.
NOTE: If you see water escaping from beneath your spa, the barrel unions should be the first thing you check. LEAKS FROM BARREL UNIONS ARE NOT COVERED BY THE SPA’S WARRANTY.
_22
_23
Troubleshooting.
Problem
Cause
Solution
Problem
Cause
Solution
No power to spa
1. Power cord unplugged
2. Isolator switch OFF
3. ELCB/RCD tripped
4. Faulty power point
1. Check plug connection
2. Check power switched ON
3. Reset breaker in meter box
4. Test another appliance from the power point
5. Contact spa dealer
Will not heat
1. Time not set correctly
2. Sleep timers or power save settings incorrect
1. Set the clock on control pad
2. Read control pad manual & check timer settings, consult spa dealer for assistance
3. Check heating mode in control pad menu is set to normal (NORM)
4. Turn air blower off. Heating is inefficient when the blower is running
5. Check set temperature point and raise if needed
6. Fit hardcover to spa and ensure it is fitted correctly
5. Faulty control panel
Pumps run but no water
moving
1. Water level too low
2. Air lock in plumbing
3. Shut off valves closed
ELCB/RCD tripping
1. Drawing excess current
2. Spa not wired to dedicated circuit
3. Water on electrical components
4. Earth leakage problem
ER-3 Water Prime & ER-4
Thermal Trip Errors
1. Low water level
2. Dirty filters
3. Air lock in pipe work
4. Fault with filtration pump
4. Air blower ON all the time
1. Add water to spa fill mark
2. Remove all filters and flush filter pipes with water from garden hose. If unsuccessful turn power off and slightly loosen barrel union to pump to release (bleed) air from pipes. Once air has been released and water is flowing retighten union
3. Check all valves are open
1. Heater load shed not configured, contact dealer
2. Spa pools must be supplied by a dedicated power circuit, not through an extension cord
3. Check water level, lower if overfilled. Power OFF, remove side panels and allow time for equipment bay to dry out
4. Turn power off and inspect power cable for damage. Contact electrician or spa dealer for advice
1. Refill spa if necessary
2. Clean, soak or replace filters
3. Bleed air from pipe work by loosening barrel unions
4. Contact dealer for service
Note: If possible, please take a photo and send to service department of technician to assist in the speed of the repair.
_24
3. Heating Mode set to Away or Weekend
5. Thermostat turned down
6. Excessive heat loss
Water not clean
1. Filter clogged or due for replacement
2. Poor water chemistry
3. Filter duration not set high enough
1. Clean and soak filters, or replace Purezone micro filter
2. Check water balance and sanitiser levels. Refer to chemical instructions.
3. Increase daily filtration time in control pad setup menu
Water at base of the spa.
1. Check for condensation from spa cover.
2. The wine cooler (if fitted) self drains which will create water at base of spa. This is normal.
3. Wait to see if moisture dries out.
4. Remove cabinet panel under touch pad and inspect all barrel union connections as per page 23 in this manual.
You have identified a spa
leak.
1. If a barrel union connection is leaking, please tighten as per instructions.
2. If you have a leak from a jet body
or plumbing, please call the service department or your local dealer.
Note: Repairs are subject to warranty conditions, which have been provided with your spa. If you are unsure of your warranty coverage, please contact the service department or your local dealer.
_25
Notes
Notes