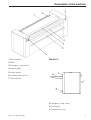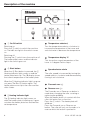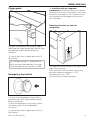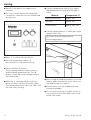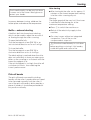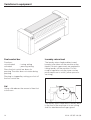
1
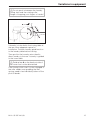
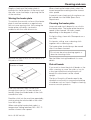
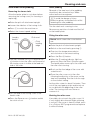
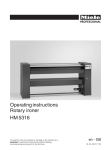
Operating instructions
Rotary ironer
MM 50-175
MM 50-205
To avoid the risk of accidents or damage
to the machine it is essential to read these
instructions before it is installed, commissioned
and used for the first time.
G
M.-Nr. 05 567 240 /03
2
M.-Nr. 05 567 240 /03
Contents
Warning and Safety instructions . . . . . . . . . . . . . . . . . . . . . . . . . . . . . . . . . . . . . . . . . . . . . . . 4
Caring for the environment . . . . . . . . . . . . . . . . . . . . . . . . . . . . . . . . . . . . . . . . . . . . . . . . . . . . 6
Description of the machine . . . . . . . . . . . . . . . . . . . . . . . . . . . . . . . . . . . . . . . . . . . . . . . . . . . . 7
Safety features . . . . . . . . . . . . . . . . . . . . . . . . . . . . . . . . . . . . . . . . . . . . . . . . . . . . . . . . . . . . . . 9
Finger guard. . . . . . . . . . . . . . . . . . . . . . . . . . . . . . . . . . . . . . . . . . . . . . . . . . . . . . . . . . . . . . . . . 9
Emergency stop switch . . . . . . . . . . . . . . . . . . . . . . . . . . . . . . . . . . . . . . . . . . . . . . . . . . . . . . . . 9
Emergency release during a power cut . . . . . . . . . . . . . . . . . . . . . . . . . . . . . . . . . . . . . . . . . . . 10
Preparing the laundry . . . . . . . . . . . . . . . . . . . . . . . . . . . . . . . . . . . . . . . . . . . . . . . . . . . . . . . 11
Condition of linen . . . . . . . . . . . . . . . . . . . . . . . . . . . . . . . . . . . . . . . . . . . . . . . . . . . . . . . . . . . . 11
Preparing the flatwork . . . . . . . . . . . . . . . . . . . . . . . . . . . . . . . . . . . . . . . . . . . . . . . . . . . . . . . . 11
Ironing . . . . . . . . . . . . . . . . . . . . . . . . . . . . . . . . . . . . . . . . . . . . . . . . . . . . . . . . . . . . . . . . . . . . 12
Baffle – exhaust ducting. . . . . . . . . . . . . . . . . . . . . . . . . . . . . . . . . . . . . . . . . . . . . . . . . . . . . . . 13
Pick-off bands . . . . . . . . . . . . . . . . . . . . . . . . . . . . . . . . . . . . . . . . . . . . . . . . . . . . . . . . . . . . . . 13
Variations in equipment . . . . . . . . . . . . . . . . . . . . . . . . . . . . . . . . . . . . . . . . . . . . . . . . . . . . . . 14
Foot control bar . . . . . . . . . . . . . . . . . . . . . . . . . . . . . . . . . . . . . . . . . . . . . . . . . . . . . . . . . . . . . 14
Lid . . . . . . . . . . . . . . . . . . . . . . . . . . . . . . . . . . . . . . . . . . . . . . . . . . . . . . . . . . . . . . . . . . . . . . . 14
Laundry return feed . . . . . . . . . . . . . . . . . . . . . . . . . . . . . . . . . . . . . . . . . . . . . . . . . . . . . . . . . . 14
Important notes . . . . . . . . . . . . . . . . . . . . . . . . . . . . . . . . . . . . . . . . . . . . . . . . . . . . . . . . . . . . 16
Power cut during ironing . . . . . . . . . . . . . . . . . . . . . . . . . . . . . . . . . . . . . . . . . . . . . . . . . . . . . . 16
Motor protection . . . . . . . . . . . . . . . . . . . . . . . . . . . . . . . . . . . . . . . . . . . . . . . . . . . . . . . . . . . . . 16
Feed-in table adjustment range . . . . . . . . . . . . . . . . . . . . . . . . . . . . . . . . . . . . . . . . . . . . . . . . . 16
Cleaning and care . . . . . . . . . . . . . . . . . . . . . . . . . . . . . . . . . . . . . . . . . . . . . . . . . . . . . . . . . . 17
Waxing the heater plate . . . . . . . . . . . . . . . . . . . . . . . . . . . . . . . . . . . . . . . . . . . . . . . . . . . . . . . 17
Care of the aluminium heater plate . . . . . . . . . . . . . . . . . . . . . . . . . . . . . . . . . . . . . . . . . . . . . . 17
Pick-off bands . . . . . . . . . . . . . . . . . . . . . . . . . . . . . . . . . . . . . . . . . . . . . . . . . . . . . . . . . . . . . . 17
Emptying the compressor . . . . . . . . . . . . . . . . . . . . . . . . . . . . . . . . . . . . . . . . . . . . . . . . . . . . . 17
Cleaning and care . . . . . . . . . . . . . . . . . . . . . . . . . . . . . . . . . . . . . . . . . . . . . . . . . . . . . . . . . . 18
Steel wool roller padding . . . . . . . . . . . . . . . . . . . . . . . . . . . . . . . . . . . . . . . . . . . . . . . . . . . . . . 18
Cleaning and care . . . . . . . . . . . . . . . . . . . . . . . . . . . . . . . . . . . . . . . . . . . . . . . . . . . . . . . . . . 19
Leaf-type roller padding. . . . . . . . . . . . . . . . . . . . . . . . . . . . . . . . . . . . . . . . . . . . . . . . . . . . . . . 19
Explanation of symbols on the data plate . . . . . . . . . . . . . . . . . . . . . . . . . . . . . . . . . . . . . . . 21
Noise emissions . . . . . . . . . . . . . . . . . . . . . . . . . . . . . . . . . . . . . . . . . . . . . . . . . . . . . . . . . . . . . 21
Notes for the installer. . . . . . . . . . . . . . . . . . . . . . . . . . . . . . . . . . . . . . . . . . . . . . . . . . . . . . . . 22
Transport struts. . . . . . . . . . . . . . . . . . . . . . . . . . . . . . . . . . . . . . . . . . . . . . . . . . . . . . . . . . . . . . 22
Setting up the machine . . . . . . . . . . . . . . . . . . . . . . . . . . . . . . . . . . . . . . . . . . . . . . . . . . . . . . . 22
Electrical connection . . . . . . . . . . . . . . . . . . . . . . . . . . . . . . . . . . . . . . . . . . . . . . . . . . . . . . . . . 23
External compressed air connection . . . . . . . . . . . . . . . . . . . . . . . . . . . . . . . . . . . . . . . . . . . 24
Compressor . . . . . . . . . . . . . . . . . . . . . . . . . . . . . . . . . . . . . . . . . . . . . . . . . . . . . . . . . . . . . . . . 24
Exhaust ducting (exhaust extraction) with electrically heated rollers . . . . . . . . . . . . . . . . . . . . 24
The rotary ironer may only be commissioned by a
Miele service technician or Miele authorised Service
Dealer.
M.-Nr. 05 567 240 /03
3
Warning and safety instructions
Read the operating instructions before
using this machine for the first time.
This way you will avoid the risk of
accidents and damage to the machine.
The machine is only completely isolated
from the electricity supply either when it
is switched off at the isolator switch or the
mains fuse has been withdrawn.
Use
Correct usage
Only iron materials with this ironer which
are suitable for machine ironing and
which were washed in water.
Technical and electrical safety
This machine must not be operated in
the same room as dry cleaning
machines which use solvents containing
PERs or CFCs.
This ironer must only be operated in a
room with a low relative humidity level.
Any removable outer panels must be
back in place, and all heated, moving or
electrical parts shielded before the machine
is switched on.
Do not damage, remove or bypass the
safety features, fixtures and control
elements of this machine.
Do not use a machine with damaged
controls or cables. These must be
repaired before it is used again.
Repairs to electrical appliances should
only be carried out by a suitably
qualified and competent person in
accordance with local and national safety
regulations. Repairs and other work by
unqualified persons could be dangerous.
This machine is not a toy! To avoid the
risk of injury never allow children to play
on or near the rotary ironer, or to operate it
themselves.
When the ironer is heated up with the
heater plate in position, there is an acute
danger of burning, if the edge of the heater
plate is touched on the feed out side.
When ironing double layered items, do
not reach in between the layers to
straighten out the fabric. This is extremely
dangerous as you may not be able to extract
your hands in time. The same applies when
ironing garments with pockets.
Do not iron items with fringes, thin ties
and straps etc. These could get tangled
in the feed-in belts and cause a fault.
Do not reach between the feed-in tabling
and the rotating roller. Your hands might
get trapped.
Always keep a fire extinguisher
accessible in the rare event of textiles
igniting.
It is imperative that all local and national
safety regulations concerning the use of
this machine are observed.
Faulty components must only be
replaced by genuine Miele original spare
parts. Only when these parts are fitted can
the safety standards of the machine be
guaranteed.
The electrical safety of this machine can
only be guaranteed if connected to a
correctly installed earthing system on site.
It is most important that this basic safety
requirement is tested regularly, and if there is
any doubt the wiring system should be
checked by a suitably qualified electrician.
The manufacturer cannot be held liable for
the consequences of an inadequate
earthing system (e.g. electric shock).
4
M.-Nr. 05 567 240 /03
Warning and safety instructions
Using accessories
Accessory parts may only be fitted when
expressly approved by Miele. If other
parts are used, guarantee, performance and
product liability claims may be invalidated.
Notes on the use of this machine
All personnel working with this machine
must be fully trained in all aspects of its
use and safety.
Keep these instructions in a safe and
accessible place.
This ironer must be operated at all times
in accordance with the legal
requirements of the Health and Safety Acts.
Persons with especially slim fingers
should only work at the receiving side
and not at the feed-in.
When working with the ironer, always
wear close fitting clothes and keep long
hair tied back. Long hair, wide sleeves,
apron straps, scarves and ties etc. could be
taken in by the roller.
Remove rings and bracelets before
ironing.
Smooth out folds as far away from the
feed-in on the feed-in table as possible.
Feed pillow cases and duvet covers into the
ironer with the open end first. Do not take
hold of the corners from the inside. Do not
take hold of vest straps or apron straps etc.
from the inside.
Check daily that safety devices are
functioning correctly. This way you will
avoid the danger of burns, squashed fingers
and even loss of hands.
Check daily that safety devices are
functioning correctly.
Make sure that safety features cannot be
bridged.
Before switching to reverse make sure
that nobody is endangered.
Lubricate machine parts only when the
machine is shut off.
M.-Nr. 05 567 240 /03
5
Caring for the environment
Disposal of the packing material
The transport and protective packing has
been selected from materials which are
environmentally friendly for disposal and can
normally be recycled.
Ensure that any plastic wrappings, bags etc.
are disposed of safely and kept out of the
reach of babies and young children. Danger
of suffocation!
Rather than just throwing these materials
away, please ensure they are offered for
recycling. Contact your local authorities for
details of your local recycling centre.
Disposal of your old machine
Old machines contain materials which can
be reclaimed or recycled. Please contact
your dealer, your local waste collection
centre or scrap merchant about potential
recycling schemes.
Ensure that the machine presents no danger
to children while being stored for disposal.
See appropriate advice in the "Warning and
safety instructions".
6
M.-Nr. 05 567 240 /03
Description of the machine
1 Pick-off band
MM 50-175
2 Roller
3 Emergency stop switch
4 Feed-in table
5 Finger guard
6 Laundry collector box
7 Control panel
3 Emergency stop switch
8 Out tabling
9 Exhaust extraction
M.-Nr. 05 567 240 /03
7
Description of the machine
s On-Off switch
Switching on:
Press the s switch to switch the machine
on. The indicator light in the switch comes
on.
Switching off:
Pressing the s switch turns the machine off.
The heater plate lowers and the indicator
light in the switch goes out.
h Start button
When the h Start button is pressed, the !
Heating indicator light comes on and the
heater plate heats up. The °C display shows
the current temperature of the heater plate.
When the ! Heating indicator light has gone
out, press the Start h button again. The
heater plate moves up to the roller and the
roller rotates.
! Heating indicator light
The ! Heating indicator light comes on
while the heater plate is heating up. It goes
out when the heater plate has reached the
set temperature.
8
Temperature selector p
Turn the temperature selector clockwise to
increase the temperature of the ironer and
anti-clockwise to decrease the temperature.
Temperature display °C
This shows the current temperature of the
ironer in 1 degree Celsius steps.
Speed selector m/min
The roller speed is increased by turning the
speed selector clockwise and decreased by
turning it anti-clockwise.
Forwards run Ü
Reverse run Ä
The Forwards run or Reverse run button is
used when changing the roller covering or
replacing the padding.
When the heater plate is in contact with the
roller this button has no function.
Press the s switch. The heater plate will
withdraw.
Press the Forwards run or Reverse run
button. The roller will only run forwards or in
reverse whilst this button is pushed in.
M.-Nr. 05 567 240 /03
Safety features
Finger guard
On machines with an integrated
compressor the automatic pressure release
mechanism has to be re-set before switching
the machine on again if the compressor was
running when the emergency stop switch
was activated.
Releasing the pressure from the
compressor
If fingers slip between the laundry feed in
table and the finger guard, the roller will stop
immediately and the heater plate will
withdraw.
To switch the ironer on again press the h
Start button.
,The finger guard is a safety feature
which must be checked daily for proper
functioning before the machine is used.
Emergency stop switch
First open the service panel in the right hand
side of the machine.
Press the black On/Off switch (next to the
pressure release coupling) in = OFF
and then pull it out = ON.
Close the service panel up again.
As soon as the emergency stop switch is
pushed in the roller stops and the heater
plate is withdrawn.
To reset the emergency stop switch after it
has been used, turn the ribbed disk
clockwise.
To switch the ironer on again press the h
Start button.
M.-Nr. 05 567 240 /03
9
Safety features
Emergency release during a power
cut
In the event of a power cut, the heater plate
is automatically withdrawn to prevent any
damage to the roller cover or the laundry.
The laundry can then be removed.
To switch the ironer on again press the h
Start button.
On machines with an integrated
compressor the automatic pressure release
mechanism has to be re-set before switching
the machine on again if the compressor was
running when the emergency stop switch
was activated.
See page 9.
10
M.-Nr. 05 567 240 /03
Preparing the laundry
Condition of linen
For a good finish the ideal residual moisture
level lies between 25-50%.
If the laundry is rinsed with hot water in the
final rinse, the residual heat in the laundry,
together with the reduced residual moisture
content, will lead to shorter processing times
and save energy.
Laundry with a synthetic fibre content
greater than 50% (e.g. Dralon) must not
be ironed as the high temperatures would
melt the fabric. Laundry with a lower
synthetic content can be ironed at a lower
temperature.
Metal and plastic buckles and very bulky
buttons should not be passed through the
ironer.
Note!
Clean the flatwork ironer before using for
the first time by passing through a cloth
along the entire length of the roller.
Preparing the flatwork
Before starting to iron, laundry should be
sorted according to size and type of fabric.
First iron articles made from:
Perlon, nylon etc. (approx. 100 °C)
then
Woollens, silks
(approx. 150 °C)
and then
Cottons, linen fabrics
(approx. 180 - 200 °C).
If you want to switch back to ironing at a
lower temperature, turn the selector
anti-clockwise and wait until the ! Heating
indicator light comes on.
Starched laundry should be ironed last to
prevent any starch residues on the heater
plate from affecting other items of laundry.
Items with buttons should be passed
through the ironer with the buttons facing
into the roller padding. If they face
downwards there is a danger of them being
damaged or torn off when the item is passed
through the ironer.
A cloth should be placed over zips, metal
buttons and hooks to protect the heater
plate during ironing.
M.-Nr. 05 567 240 /03
11
Ironing
^ Switch on the electricity supply to the
machine.
^ On rotary ironers without an integrated
compressor: open the on-site compressed
air stopcock.
^ Use the temperature selector p to select
the temperature according to the type of
fabric.
Material
Temperature °C
Perlon/artificial silk
approx 100
Silk/wool
approx 150
Cottons/linen
approx 180 -200
^ Use the speed selector to select the m/min
speed of the roller.
,Check that the finger guard is
functioning properly.
^ Press s to switch the machine on.
^ Turn the temperature selector p
anti-clockwise to the lowest setting.
^ Presss the Start h button.
The ! Heating indicator light comes on
and the heater plate heats up. The °C
display shows the current temperature of
the heater plate.
^ When the ! heating indicator light has
gone out, press the Start h button again.
The heater plate moves up to the roller and
the roller starts turning.
^ Start ironing by feeding laundry in from the
feed-in table, making sure it lies flat across
the feed-in belts as it goes in.
^ Smooth items from the middle outwards
towards the edges.
^ Do not restrict ironing of smaller articles to
any one part of the roller. Make use of the
whole roller width.
12
M.-Nr. 05 567 240 /03
Ironing
After ironing
The ironed laundry can be very hot when
it comes out of the ironer. Wear gloves to
protect your hands.
In pauses between ironing, withdraw the
heater plate and reduce the temperature.
^ After ironing let the roller run for approx. 5
minutes on the lowest temperature setting
to let the roller covering dry out.
Warning:
The finger guard will be very hot if the ironer
is switched off after being run at the
maximum temperature setting.
^ Press s to switch the machine on.
Baffle – exhaust ducting
A baffle is built into the exhaust ducting
which can be used to adjust the amount of
air flowing through the roller covering.
To open the baffle fully:
Turn the hexagonal screw (SW 19) in an
anti-clockwise direction as far as it will go.
To close the baffle:
Turn the hexagonal screw (SW 19) in
clockwise direction as far as it will go.
^ Switch off the electricity supply to the
machine.
^ On rotary ironers without an integrated
compressor: Turn off the on-site
compressed air stopcock.
,Allow the ironed laundry to cool down
before packing or storing it. Hot laundry
could self-ignite and cause a fire.
The ideal setting is reached when the roller
dries out sufficiently to leave no water spots
either on the covering or on flatwork with the
lowest throughput of air.
If the air throughput is too high, the roller will
cool down too much, thus reducing the
ironer’s performance.
Pick-off bands
The pick-off bands are used for picking
laundry off the roller. Laundry does not need
to be removed manually from the roller. If
one of the pick-off bands is dislocated by a
piece of laundry, it should be pushed back
into position manually.
M.-Nr. 05 567 240 /03
13
Variations in equipment
Foot control bar
Laundry return feed
Functions:
not activated
activated
The laundry return feed enables ironed
laundry to be taken off the machine at the
feed-in. No extra personnel are required for
taking laundry off the machine. For this
mode of operation only the ironer can be
positioned close to a wall, (allow space for
servicing).
- ironing setting
- pressing setting
Press the foot control bar down for
pressing.The roller does not rotate during
pressing.
Pressing is stopped by raising your foot off
the foot control bar.
Lid
Using a lid reduces the amount of heat lost
to the room.
A
The laundry return feed directs laundry back
to the front of the machine on to an ironing
shelf located above the finger guard.
14
M.-Nr. 05 567 240 /03
Variations in equipment
,Do not reach in between the laundry
ironing shelf and the rotating roller.
Danger of trapping your fingers or hands!
A
If laundry is to be fed to the ironing table at
the rear allow adequate space for
installation. Fold the laundry guide back on
to the laundry table before starting.
Then position the laundry return feed to
direct laundry to the rear. Laundry is guided
to the ironer table.
,Guide plate A on the feed-out side of
the ironer must not be dismantled.
If the ironing cloth cover is to be changed or
the roller needs more padding the lifter
springs need to be individually taken off the
pick-off bands.
M.-Nr. 05 567 240 /03
15
Important notes
If there is a power cut whilst ironing
Power cut during ironing with an on-site
compressed air supply
In the event of a power cut, the heater plate
is automatically withdrawn to prevent any
damage to the roller cover or the laundry.
The laundry can then be removed.
To switch the ironer on again press the h
Start button.
Power cut during ironing with an
integrated compressor
In the event of a power cut, the heater plate
is automatically withdrawn to prevent any
damage to the roller cover or the laundry.
The laundry can then be removed.
On machines with an integrated compressor
the automatic pressure release mechanism
has to be re-set before switching the
machine on again if the compressor was
running when the emergency stop switch
was activated.
First open the service panel in the right hand
side of the machine.
Press the black On/Off switch (next to the
pressure release coupling) in = OFF
and then pull it out = ON.
Close the service panel up again.
Protection of the motor and the roller
cover
In pauses between ironing and when you
have finished ironing, withdraw the heater
plate. Not doing this can reduce the life of
the roller cover and of the motor.
It is very important to avoid running the
ironer without passing laundry through it.
Do not restrict ironing smaller articles to any
one part of the roller; make use of the whole
roller width. This way an equal amount of
heat is obtained from the heater plate and
the roller padding is protected from uneven
use.
Motor protection
If the winding is heated excessively due to
overload, the motor is switched off
automatically by a winding thermostat. The
heater plate is withdrawn. Once the ironer
has cooled down, it will need to be switched
on again by pressing the h Start button.
Feed-in table adjustment
To switch the ironer on again press the h
Start button.
Operating and maintenance instructions
are supplied with the compressor.
The feed-in table has an adjustment range of
max. 14.5 mm.
16
M.-Nr. 05 567 240 /03
Cleaning and care
Regular cleaning of the heater plate is
essential for the protection of the motor and
the roller cover, and helps to prolong the life
of the machine.
Waxing the heater plate
To maintain the smooth surface of the heater
plate it must be waxed on a regular basis
with an ironer waxing cloth. Not waxing the
heater plate sufficiently can lead to
problems with the roller drive motor.
When cleaning the heater plate, select the
lowest temperature setting and the slowest
roller speed.
A special ironer cleaning cloth and wax can
be ordered from the Miele Spare Parts
Department.
Cleaning the heater plate
Limescale and starch deposits can stick to
the heater plate. The heater plate therefore
needs to be cleaned 1-3 times a week,
depending on the degree of soiling.
For light soiling, clean with Cleanpaste on a
wax cloth.
For heavier soiling, use a cleaning cloth
together with a cleaning mat.
The heater plate should always be waxed
after it has been cleaned.
Wax
Sprinkle the special wax into the centre of a
thin piece of cloth.
Direction of feed
Do not use abrasive cleaning agents or
abrasive cleaning cloths.
See the Miele Ironing Handbook for more
details.
Pick-off bands
If you want to clean the pick-off bands or the
roller covering, re-cover the roller or iron for
a short period without using the pick-off
bands this attachment can be raised
upright.
The tips of the pick-off bands need to be
cleaned occasionally to remove the build-up
of residues such as starch. Regular cleaning
ensures smooth operation.
Fold over the ends, then run the cloth
through the ironer as if it were an item of
laundry. Keep the folded ends of the cloth
towards the roller.
Feed the cloth into the machine repeatedly,
moving along the whole width of the roller
from left to right.
When waxing the heater plate select a
temperature setting between 180 - 200 °C
and the slowest roller speed.
M.-Nr. 05 567 240 /03
17
Cleaning and care
Gearbox
The gearbox has sufficient lubricant for
many years of use.
Contact the Service Dept. for maintenance
and lubrication.
,After maintenance work any
removable outer panels must be put back
in place, and all moving or electrical parts
shielded before the machine is switched
on.
Emptying the compressor
Ironers with an integrated compressor have
to have the pressurised reservoir regularly
emptied of condensed water.
Depending on individual circumstances and
the humidity level of the room in which the
ironer is installed, this will need to be done
at least twice a year.
Refer to the operating and maintenance
instructions supplied with the compressor for
instructions on how to do this.
18
M.-Nr. 05 567 240 /03
Cleaning and care
Steel wool roller padding
Roller padding
Removing the ironer cloth
Renewal of the steel wool roller padding
should only be carried out by a Miele
authorised service engineer.
Allow the heater plate to cool down before
removing the ironing cover (for cleaning or
replacing).
^ Raise the pick-off attachment upright.
^ Loosen the side ties of the ironing cloth.
^ Press s to switch the machine on.
^ Select the slowest speed setting.
,To avoid the danger of injury
protective gloves should be worn whilst
renewing the roller padding.
Trim the steel wool covering to size.
Remove any particles of steel wool that fall
on the heater plate.
Fitting the roller cover
Laundry
feed-in
Cloth end
Cloth
leading
edge
Do not wash a new roller cover before
use.
^ Raise the pick-off attachment upright.
^ Switch on the machine by pressing s.
^ Then turn the temperature selector
anti-clockwise to the lowest setting.
^ Press the Start h button.
^ Use the Forwards run Ü or Reverse run
Ä button to turn the roller until the end of
the ironing cover is visible at the feed-out
side of the roller.
^ When the ! heating indicator light has
gone out, press the Start h button again.
The heater plate moves up to the roller and
the roller starts turning.
^ Brush out the front edge of the cover with
a steel brush.
^ Place the roller cover on to the roller
following the direction of the arrow on the
steel wool padding. Run the cloth through
on the slowest setting.
Let the roller rotate for about 5 minutes. Then
cut off the overlapping strips and brush out
as you did with the beginning of the roller
cover. The ironing cloth must have no
creases in it.
^ Turn the end of the ironing cover to the
feed-in side.
^ Press the Reverse run Ä button and let
the cloth roll out.
M.-Nr. 05 567 240 /03
Washing the roller cover
If possible, do not wash the roller cover if it
is only slightly discoloured. Slight yellowing
is normal. If the cover is heavily soiled, wash
it in a Cottons 95°C programme and replace
it while still damp.
19
Cleaning and care
Leaf-type roller padding
To ensure smooth functioning of the ironer
and high capacity ironing, low maintenance
and long life, the leaf-type padding should
be covered with the specially made roller
cover.
Laundry
feed-in
Cloth end
Cloth
leading
edge
,Only iron articles up to max. 3mm
thick. Bulky fabrics, protruding buttons,
curtain weights etc. could damage the
leaf-type padding.
After commissioning
It is advisable approx. 40 operating hours
after commissioning to cut back the overlap
of the ironing cover which has occurred
through stretching, to about 50 mm overlap
and then to brush out about 50 mm of this
using a wire brush. This is to avoid damp
streaks and shadowing. The roller cover
must be the same thickness along the whole
length of the roller and fit firmly up to the
heater plate.
^ Use the Forwards run Ü or Reverse run
Ä button to turn the roller until the end of
the ironing cover is visible at the feed-out
side of the roller.
Washing the roller cover
Washing will remove any wax deposits and
restore the ironing cover to a softer, more
elastic and absorbent condition. It should,
however, be washed as infrequently as
possible in a Cottons 95°C programme. The
cover should be completely alkali free after
the last rinse.
Do not treat with acidic agents. Do not spin
at too high a speed to avoid the danger of
creasing.
Removing the ironer cloth
^ Turn the end of the ironing cover to the
feed-in side.
^ Press the Reverse run Ä button and let
the cloth roll out.
^ When removing the ironing cover pull
slowly and carefully away from the
grippers on the leaf-type padding.
^ Raise the pick-off attachment upright.
^ Press s to switch the machine on.
^ Select the slowest speed setting.
20
M.-Nr. 05 567 240 /03
Cleaning and care
Fitting the ironing cover on a roller with
leaf-type padding
If a new ironing cover is being fitted it
should first be washed in a Cottons 95 °C
programme.
,After changing the ironer cloth
The finger guard must be retested for
safety.
If it is not working correctly contact the
Service department.
The ironing cover should be wound back on
when still damp.
A double layer is wound on to the roller in
one operation. Do not tuck in the cloth at the
ends of the roller.
Discolouration of the ironer cloth
^ Raise the pick-off attachment upright.
To avoid the cloth turning black:
^ Place the cloth in position.
– always use the complete width of the
roller.
^ Switch on the machine by pressing s.
^ Select the slowest speed setting, press the
"Forwards run Ü" button and feed the
ironing cloth in, following the laundry feed
direction, until it lies smooth and flat. This
is to ensure that the heater plate does not
get damaged by the grippers on the
leaf-type padding.
Some discolouration of the ironer cloth from
light to dark brown is normal.
– space out smaller items and do not always
place them in the same place.
– In pauses between ironing, withdraw the
heater plate and reduce the temperature.
^ Then turn the temperature selector
anti-clockwise to the lowest setting.
^ Press the Start h button.
^ When the ! heating indicator light has
gone out, press the Start h button again.
The heater plate moves up to the roller and
the roller starts turning.
^ Feed in the second layer. The ironing cloth
must have no creases in it. Let the roller
rotate for about 5 minutes.
It is advisable approx. 40 operating hours
after first using a new ironing cover to cut
back the overlap of the cover which has
occurred through stretching, to about 50 mm
overlap and then to brush out about 50 mm
of this using a wire brush.
This is to avoid damp streaks and
shadowing. The roller cover must be the
same thickness along the whole length of
the roller and fit firmly up to the heater plate.
M.-Nr. 05 567 240 /03
21
Explanation of symbols on the data plate
Noise emissions
Registered on the "A" scale
MM 50-175
MM 50-205
70.3 dB
70.3 dB
Measured in Germany in accordance with
DIN (IEC) 45 635 Machine noise regulations,
3. GSGV § 1. 1.a
1 Machine model
2 Serial number of the machine /
Year of construction
3 Voltage/Frequency
4 Control fusing
5 Drive motor
15 Electric heating
16 Fusing (to be installed on site)
20 Commissioning date
In the event of any faults please contact your
Dealer or the nearest Service Department.
Please quote the model number and serial
number of your machine. These are given on
the data plate.
Only use original Miele Spare Parts on
this machine. When ordering spare parts
from the Spare Parts Dept. please quote the
model and serial number of your machine
[Fabr.-No].
22
M.-Nr. 05 567 240 /03
Notes for the installer
Setting up the machine
The rotary ironer may only be
commissioned by a Miele service
technician or Miele authorised Service
Dealer.
This machine must not be operated in the
same room as dry cleaning machines which
use solvents containing perchlorethylene
(PER) or chlorofluorocarbons (CFCs). On
combustion, the escaping vapours are
decomposed to form hydrochloric acid
which can have dangerous consequences.
The machine must be transported to its
installation site with the transport struts in
position. Maintain the safety distances from
walls as specified on the installation
diagram. Dismantle the sides from both side
stands and remove the screws from the
wooden frame.
Transport struts
To lift the machine use the square pipe
supplied (see illustration). Slide the square
pipe into the holder in the side stand and lift.
If necessary place planks of wood under the
stands as a safety precaution when lifting
the machine. Do not lift the ironer any higher
than is necessary.
Parts 1 to 5 are wooden struts, screwed in
position to protect the machine during
transportation. They must not be removed
until the machine has been moved to the site
where it will be installed.
,The machine must not be moved
without the transit struts in place.
Store the transit struts in a safe place for
future use. They must be re-fitted if the
machine is to be moved again (e.g. when
moving location).
M.-Nr. 05 567 240 /03
,Do not reach underneath the machine.
Danger of injury.
Pull the wooden frame away from under the
machine.
Remove the planks from under the stands
very carefully one by one.
Using the installation diagram supplied drill
holes for the plugs (supplied in the
accessory pack) into the floor at the correct
distance from the wall. Insert the plugs.
23
Notes for the installer
Levelling and securing the ironer
Electrical connection
Use a spirit level and adjuster panels to
align the machine.
The ironer should be secured to the floor
using the screws and washers supplied in
the accessories pack.
The electrical connection may only be
carried out by a suitably qualified technician
in accordance with local and national safety
regulations.
,It is essential to secure the machine to
the floor, as it could tip up if too much
laundry was placed on the out-tabling.
Attaching the out-tabling
The two support brackets for the out-tabling
on the inside of the end stands should each
be secured with 2, M 8 screws supplied.
The out-tabling is then placed on the
brackets and levelled so that the gap
between the feed-out edge of the roller and
the out tabling is as small as possible.
Secure the out-tabling with the wood screws
provided.
The electrical components on the machine
conform to EN 60204-1.
The machine is supplied ex-works for AC 3N
50 Hz. See data plate for details.
Connection to the electrical supply must
be carried out in accordance with the
wiring diagram, installation diagram and
installation instructions supplied. These
are important to ensure the machine is
connected correctly.
The machine must be connected to a
permanent on-site electricity supply with a
suitable cable.
The wiring diagram and connection box are
located in the left hand side stand. The
mains cable terminals are located in the
connection box.
Warning:
Make sure that the exhaust fan is turning in
the correct direction (see directional arrow
on the fan). If it turns in the wrong direction,
2 phases have to be changed.
24
M.-Nr. 05 567 240 /03
Notes for the installer
External compressed air
connection
The compressed air connection point is
located at the rear of the right hand side
stand.
Compressor
Ironers with an integrated compressor
If the compressed air container is empty the
ironer’s lifting motor will not work. The
pressure reducer on the compressor (see
also instructions for use and maintenance of
the compressor) will therefore need to be
closed (set to 0) when comissioning the
machine, until the pressure container is full.
The manometer on the pressure container
will then show a reading of approx. 8 bar.
The pressure reducer can then be opened
as far as it will go again (to 8).
Exhaust ducting (exhaust
extraction) with electrically heated
rollers
The exhaust ducting stub C100 mm is
located at the rear of the right hand stand.
Make sure that the extraction fan is turning in
the correct direction.
See installation diagram and installation
instructions supplied.
,After setting up and connecting the
machine ensure that all outer casing parts
are correctly fitted back into position.
M.-Nr. 05 567 240 /03
25
26
M.-Nr. 05 567 240 /03
M.-Nr. 05 567 240 /03
27
Alteration rights reserved
This paper consists of cellulose which has been bleached without the use of chlorine.
25.03