1
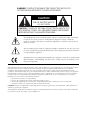
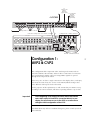
Owner’s Manual
CVP2
Component Video
Processor
WARNING: TO REDUCE THE RISK OF FIRE OR ELECTRIC SHOCK, DO
NOT EXPOSE THIS APPLIANCE TO RAIN OR MOISTURE.
CAUTION
RISK OF ELECTRIC SHOCK
DO NOT OPEN
CAUTION: TO REDUCE THE RISK OF ELECTRICAL SHOCK, DO
NOT REMOVE COVER. NO USER-SERVICEABLE PARTS INSIDE.
REFER SERVICING TO QUALIFIED PERSONNEL.
The lightning flash with arrowhead symbol, within an equilateral triangle, is intended
to alert the user to the presence of uninsulated “dangerous voltage” within the
product’s enclosure that may be of sufficient magnitude to constitute a risk of electric
shock to persons.
The exclamation point within an equilateral triangle is intended to alert the user to the
presence of important operating and maintenance (servicing) instructions in the literature
accompanying the appliance.
Marking by the “CE” symbol (shown left) indicates compliance of this device with the EMC
(Electromagnetic Compatibility) and LVD (Low Voltage Directive) standards of the
European Community.
NOTICE
This equipment has been tested and found to comply with the limits for a Class B digital device, pursuant to Part 15 of the
FCC Rules. These limits are designed to provide reasonable protection against harmful interference in a residential
installation. This equipment generates, uses and can radiate radio frequency energy and, if not installed and used in
accordance with the instructions, may cause harmful interference to radio communications. However, there is no guarantee
that interference will not occur in a particular installation. If this equipment does cause interference to radio or television
reception, which can be determined by turning the equipment on and off, the user is encouraged to try to correct the
interference by one or more of the following measures:
•
•
•
•
Reorient or relocate the receiving antenna;
Increase the separation between the equipment and the receiver;
Connect the equipment into an outlet on a circuit different from that to which the receiver is connected;
Consult the dealer or an experienced radio/TV technician for help.
CAUTION: Changes or modifications to this equipment not expressly approved by the manufacturer could void the user’s
authority to operate the equipment.
The information contained in the manual is subject to change without notice. The most current version of this manual will
be posted on our web site at http://www.madrigal.com.
Important Safety Instructions
Please read all instructions and precautions carefully and completely before operating your Proceed
component.
1.
ALWAYS disconnect your entire system from the AC mains before connecting or disconnecting
any cables, or when cleaning any component.
2.
This product is equipped with a three-conductor AC mains power cord which includes an
earth ground connection. To prevent shock hazard, all three connections must ALWAYS be
used. If your electrical outlets will not accept this type of plug, an adapter may be purchased.
If an adapter is necessary, be sure it is an approved type and is used properly, supplying an
earth ground. If you are not sure of the integrity of your home electrical system, contact a licensed electrician for assistance.
3.
ALWAYS keep electrical equipment out of the reach of children.
4.
AC extension cords are not recommended for use with this product. If an extension cord must
be used, be sure it is an approved type and has sufficient current-carrying capacity to power
this product.
5.
NEVER use flammable or combustible chemicals for cleaning audio components.
6.
NEVER operate this product with any covers removed.
7.
NEVER wet the inside of this product with any liquid.
8.
NEVER pour or spill liquids directly onto this unit.
9.
NEVER block air flow through ventilation slots or heatsinks.
10. NEVER bypass any fuse.
11. NEVER replace any fuse with a value or type other than those specified.
12. NEVER attempt to repair this product. If a problem occurs, contact your Proceed® dealer.
13. NEVER expose this product to extremely high or low temperatures.
14. NEVER operate this product in an explosive atmosphere.
15. ALWAYS unplug sensitive electronic equipment during lightning storms.
Table of Contents
Maximizing the Value of Your Purchase .................................................... 5
send in that warranty card! .............................................................................. 5
Unpacking and Placement ....................................................................... 6
unpacking the CVP2 ......................................................................................... 6
remote control ................................................................................................... 6
placement .......................................................................................................... 6
ventilation ........................................................................................................... 6
custom installations ........................................................................................... 6
serial number ...................................................................................................... 7
register your purchase! ..................................................................................... 7
Operating Voltage& Frequency ................................................................ 8
A Word About Installation .......................................................................... 9
Special Design Features ........................................................................... 10
high performance transcoding ...................................................................... 10
component video switching .......................................................................... 10
flexible configuration options ......................................................................... 10
software updatable ........................................................................................ 11
4
Front Panel ................................................................................................. 12
Rear Panel ................................................................................................. 13
Configuration 1: AVP2 & CVP2 ................................................................. 17
Configuration 2: AVP2/CVP2/PVP ........................................................... 20
Configuration 3: AVP2/PVP/CVP2 ........................................................... 23
Troubleshooting ......................................................................................... 27
Care and Maintenance ........................................................................... 28
U.S. and Canadian Warranty ................................................................... 29
90-day limited warranty .................................................................................. 29
five year extended warranty .......................................................................... 29
Obtaining Service ..................................................................................... 30
Specifications ............................................................................................ 31
Dimensions ................................................................................................ 33
CVP2 Rack Installation ............................................................................. 34
Maximizing the Value
of Your Purchase
Congratulations on choosing a superb product. Your Proceed Component
Vdieo Processor (CVP2) is designed to give you many years of outstanding
performance, and we are confident you will be happy with it.
We value our relationship with our customers, and often are in a position to
help you enjoy your home entertainment system even more—if we have some
way of contacting you.
send in that warranty card!
Sending in your warranty card registers your product with us so that warranty
service in the U.S. and Canada (see the warranty policy at the end of this
manual) can be obtained easily and quickly even if you have lost your original
sales slip. (And how many of us are organized enough to retain all those sales
slips?) Moreover, for customers in the U.S. and Canada, sending in the card automatically extends the warranty from 90 days to five years, at no cost to you.
Please send it in soon, before you forget.
But there are even more benefits to sending in your registration card:
✓ software update notices
✓ performance upgrade notices
5
We occasionally offer software updates to our products, providing new features and control options. In the case of the CVP2, these updates are easily
done without even opening up the unit, via flash-memory. If they include features you would like to have, you can get them—if you know about them.
We also try to offer hardware-oriented performance upgrades and/or conversions to make upgrading within a family of products as cost-effective as possible for our customers. While not all upgrades can be inexpensive, we work
to ensure that they all represent excellent values to you—if you know about
them.
So please, take a few minutes to fill out the warranty
registration card, and drop it in the mail.
Unpacking and Placement
unpacking the CVP2
Important!
remote control
placement
Unpack your CVP2 and remove all accessories from the carton.
Keep all packing materials for future transport of your CVP2.
Shipping your new component in anything other than its
purpose-designed packing material may result in damage
that is not covered by the warranty.
Your CVP2 normally operates seamlessly as an extension to your Proceed
AVP2, via a dedicated RS-232 communications link. For this reason, it needs no
separate remote control, and will not add to the clutter of remote controls you
may already own.
Place the CVP2 near the video sources, thus keeping the interconnecting
cables reasonably short. It may be placed on a shelf or in a cabinet where it’s
convenient to operate. It may also be placed on top of an AVP2
6
Don’t crimp the cables!
Note that adequate clearance for the power cord and
connecting cables must be left behind the CVP2. We suggest
leaving at least three inches of free space behind the CVP2
to allow all cables sufficient room to bend without crimping
or undue strain.
This is particularly important for video cables, as acute
bends may result in altering their characteristic impedance
of 75Ω. The result would be a degraded picture due to
reflections and imperfect transmission of the video signal
along the length of the cable.
ventilation
custom installations
It is normal and perfectly safe for your CVP2 to run slightly warm. Be sure to
allow 2 to 3 inches of clearance above it to allow heat dissipation through air
circulation. Avoid placement on soft surfaces that would restrict airflow (such
as carpeting).
Drawings are included in this manual to facilitate special installations and custom cabinetry (see Dimensions).
serial number
The serial number for your CVP2 is found on the rear panel of the unit. Please
note and record this number for your future reference.
register your purchase!
Having found the serial number, now would be a good time to fill out the registration card. Please register your purchase so we can advise you of software
updates and other items of interest.
In the U.S. and Canada, registering your purchase also automatically
extends your warranty from 90 days to five years. It will take only a
minute or so. Please complete the card now, before you forget.
7
Operating Voltage
& Frequency
The CVP2 is supplied with a “universal” power supply that will convert 100V250V AC power to the much smaller DC power that it requires. This power is
further filtered and regulated inside the unit itself.
Do not replace this external power supply with anything but an exact replacement from Madrigal. Attempting to operate the CVP2 with an improper power
supply can damage the unit. Such damage would not be covered under the
warranty.
Warning:
There are no user-serviceable parts within the unit. Please
refer any problems to an authorized Proceed service center.
The CVP2 can easily be powered by a normal 15-ampere AC mains line, as it
draws only a few watts of power. If other devices are also powered from the
same AC line, their additional power consumption should be taken into account.
8
A Word About Installation
Every effort has been made to make the Proceed CVP2 simple and straightforward to install and use.
Still, the CVP2’s flexibility allows for many possible configurations. This user’s
manual will document the most common of these configurations, which between them should account for 95% or more of the actual installations. If your
system’s needs are not entirely met by one of the configurations described
herein, we suggest you consult with your local, authorized Proceed dealer/
installer. As versatile as the CVP2 is, the hugely varied system requirements in
this transitional world of both analog and digital television may require the
specific attention of a professional installer.
For this reason, we strongly encourage you to have your
system installed and calibrated by your dealer, whose
experience, training, and specialized equipment can make
a profound difference in the final usability and performance
of the system.
If you need or prefer to rack mount your CVP2, the necessary hardware is
supplied with the unit. To use the rack mount kit, simply follow the instructions on page 34. Once the rack brackets are in place, you may bolt the entire
unit securely to any EIA-standard rack.
9
Special Design Features
Congratulations on your purchase of the Proceed Component Video Processor
(CVP2). We have gone to great lengths to ensure that the CVP2 remains
“future-proof” even in these times of change. As a result, you will be able to
enjoy the outstanding performance of the CVP2 for many years. In case you
are interested in technical details, what follows is a brief outline of some of
the key technologies in your new product.
high performance
transcoding
The CVP2 converts standard-definition (SDTV) NTSC- or PAL-formatted composite and S-Video signals to high quality component (YPbPr) or RGB signals
(both sync on green and composite sync outputs are supported). The result is
an interlaced component output (480/60i for NTSC; 525/50i for PAL) that may
be deinterlaced by the Proceed PVP or by other video processors. The CVP2
may also be used to perform transcoding (color space conversion) between
SMPTE level interlaced component (YPbPr) and interlaced RGsB (sync on
green) video.
The quality with which the composite and S-video signals are converted to
component video is extremely high, with a great deal of attention paid to the
precision with which these consolidated signals are re-separated into component form. The only significant improvement to be had over the CVP2’s
transcoding is to keep signals that are already available in the component domain in their original form. For that reason,.…
10
component video switching
The CVP2 also adds robust component switching to the AVP2 system. With
four component inputs and a bandwidth of 70 MHz, any of the ATSC HDTV
signals can be handled without signal loss—even 1080/24p signals, the most
challenging of all HDTV standards (and one that thus far, no one is yet proposing to actually broadcast).
Two of these component inputs are four-connector designs that can support
either RGBCs (Red, Green, Blue + Composite Sync) video or YPbPr component
video. These four-connector component inputs may therefore be used to support switching the SCART standard popular in Europe (with the appropriate
SCART-to-BNC or SCART-to-RCA adaptor).
flexible configuration options
The CVP2 has been designed to support a variety of possible needs, depending on the combination of source signals and display device you have in your
system.
A common configuration might be as a “component switching expander” of
the basic AVP2 system. In this configuration, the AVP2 “sees” the additional
four component inputs simply as additional, available inputs; it also routes any
composite or S-video signal that is selected on the main output path to the
CVP2 for transcoding to YPbPr component or RGsB video. In this way, you can
have a single, high-quality connection to your television, or to a video processor such as the Proceed PVP. You no longer have to remember what type of
source you are selecting, so that you can switch the television’s input as well
as the audio/video processor’s input. The system handles the details for you.
Another configuration might include both traditional interlaced sources and
new-format digital sources (480p, 1080i, 720p, even 1080p). In this case, the
challenge is to make the most of the “legacy” sources so that watching them
does not become a huge disappointment after watching HDTV signals.
Once again, the CVP2 works for you to both make the most of these legacy
sources by trancoding them to interlaced component video with exceptional
quality, while also handling the switching of up to four HD sources via its
component inputs. All you need is a digital television that can accept all these
signal formats at its component input, and the operation of even such a diverse system becomes a “one-touch” operation.
Specific system configurations follow, later in the manual (after the description
of the basic hardware of the CVP2).
software updatable
All the software that the CVP2 uses is stored in special “flash” memory that can
easily be updated as improvements are made available.
For example, support for system configurations that are uncommon today may
be added as we progress into the world of HDTV and new configurations are
required to meet new challenges.
Configuring the CVP2 may be done either via the menu system of a linked
AVP2, or via the RS-232 port (using an external RS-232 controller). Similarly,
routine operation is normally “transparent” to the user, happening automatically as the AVP2 is used in its normal fashion. Your installer also has the option of creating a custom control interface using an external RS-232 system
such as AMX, Creston, or Elan, but this subject is beyond the scope of this
manual.
11
햲
component
video processor
power
Front Panel
1
POWER INDICATOR
This LED illuminates to indicate that power is being supplied to the
CVP2.
If this indicator is not lit, power is not being supplied to the unit. Check
to make sure that the external power supply is connected properly, and
that it is also plugged into an active AC outlet.
12
햲
햳
input 1
Y/G
Pb/B
햴
input 2
Pr/R
Csync
Y/G
Pb/B
Pr/R
햵 햶햷
input 3
Csync
Y/G
Pb/B
input 4
Pr/R
Y/G
Pb/B
Pr/R
input 5
input 6
composite
s video
햸
햹햺햻
output
Y/G
Pb/B
Pr/R
RS-232 control
Csync
to controller
to AVP2
5V DV
1A reg.
WA R N I N G !
Use only with
MADRIGAL
supplied
power supply.
Rear Panel
Please remember to make a note of what sources you connect to which inputs. You will need to set up the relationships between front panel buttons
and rear panel connectors later, in the setup menu.
For now, you can connect any component source to any compatible set of
connectors—just keep a list of what-goes-where.
Be careful to connect the multi-wire component connections correctly,
whether YPbPr or RGBCs, as confusing these connections will lead to truly bizarre colors on your display. Nothing can be damaged by this cable confusion.
But if all the colors appear completely fouled up, either: the cables were confused; or the CVP is confused about whether it is handling YPbPr or RGBCs signals (which are treated quite differently). Careful cable connection now will
make your life a little easier later.
1
COMPONENT INPUT 1
Component Input 1 includes four BNC connectors, which are commonly
used on professional video sources. It may be used in any of several
ways, as shown in the table below:
Input 1
Output
HDTV YPbPr
pass through
HDTV RGBCs
pass through
HDTV RGsB
pass through
SDTV (interlaced) RGsB
RsGsBs or YPbPr
(composite available on C sync)
SDTV (interlaced) YPbPr
RsGsBs or YPbPr
(composite available on C sync)
SDTV (interlaced) RGBCs
pass through
13
2
COMPONENT INPUT 2
Component Input 2 is functionally the same as Component Input 1 except that it uses four high quality RCA connectors, which are more common in consumer-grade video products. It may be used in any of several
ways, as shown in the table below:
Input 2
Output
HDTV YPbPr
pass through
HDTV RGBCs
pass through
HDTV RGsB
pass through
SDTV (interlaced) RGsB
RsGsBs or YPbPr
(composite available on C sync)
SDTV (interlaced) YPbPr
RsGsBs or YPbPr
(composite available on C sync)
SDTV (interlaced) RGBCs
pass through
3
COMPONENT INPUT 3
Component Input 3 is what most people would consider a “standard”
(YPbPr) component video input, and uses three high quality RCA connectors. Input 3 may be used several ways, as shown below.
Input 3
Output
HDTV YPbPr
pass through
HDTV RGsB
pass through
SDTV (interlaced) RGsB
RsGsBs or YPbPr
(composite available on C sync)
SDTV (interlaced) YPbPr
RsGsBs or YPbPr
(composite available on C sync)
14
If you choose to route the progressive output of a Proceed PVP through
your CVP2, it must be connected to Component Input 3. See Configuration 3 for more details.
4
COMPONENT INPUT 4
Component Input 4 is what most people would consider a “standard”
(YPbPr) component video input, and uses three high quality RCA connectors. Input 4 may be used several ways, as shown below.
Input 4
Output
HDTV YPbPr
pass through
HDTV RGsB
pass through
SDTV (interlaced) RGsB
RsGsBs or YPbPr
(composite available on C sync)
SDTV (interlaced) YPbPr
RsGsBs or YPbPr
(composite available on C sync)
5
COMPOSITE INPUT 5
Any composite video signal connected to this input can be converted to
high quality YPbPr component or RGsB SDTV video, depending on how
the CVP2 is configured.
The most common use for this input is accepting the main composite
output of the AVP2. In this way, any composite source connected to the
AVP2 can be converted to component video.
6
S-VIDEO INPUT 6
Any S-video signal connected to this input can be converted to high
quality YPbPr component or RGsB SDTV video, depending on how the
CVP2 is configured.
The most common use for this input is accepting the main S-video output of the AVP2. In this way, any S-video source connected to the AVP2
can be converted to component video.
7
VIDEO OUTPUTS
The CVP2 has two video outputs: a three-wire component/RGB signal
and a composite video signal for simple monitoring and other applications. All three outputs use high quality 75Ω BNC connectors, the standard for professional video applications.
When the CVP2 has been configured to convert SDTV inputs to SDTV
YPbPr component video output, the connectors (as seen from the rear)
provide Y, Pb, and Pr respectively, read left to right.
If the CVP2 has been configured instead to convert SDTV inputs to SDTV
RsGsBs video, the connectors (as seen from the rear) provide G, B, and R
respectively, read left to right. Sync signals are available on all three
channels, as well as on the fourth connector (which may be used for
composite sync in SCART connections).
When the CVP2 is converting SDTV inputs to SDTV component or RsGsBs
output, the fourth (right-most) connector contains a composite video version of the same video signal, which may be used to drive a standard
television monitor.
8
RS-232 TO CONTROLLER
The CVP2 includes a general-purpose RS-232 port that may be used in
conjunction with external control systems such as Audioaccess, AMX, or
Crestron. This facility enables control of the AVP2 and CVP2 as a system.
Your dealer can assist you in taking advantage of these advanced features.
This RS-232 port may also be used to update the operating software of
the CVP2.
9
RS-232 TO AVP2
The CVP2 includes a dedicated RS-232 port, the use of which is reserved
for communications with the Proceed AVP2. Connect this RS-232 port to
your AVP2’s RS-232 port, using the supplied RJ-11 cable (which looks
like but is not the same as a telephone extension cable).
15
Caution!
Do not attempt to substitute a generic telephone extension
cable for the cable included with your CVP2, as they are not
wired the same. If you require a longer cable, please consult
with your dealer who can either order or custom-build an
appropriate cable for you.
10
DC INPUT
The Proceed CVP2 uses a high quality, regulated external power supply
to convert the AC mains power to a smaller DC voltage prior to introducing the power to the CVP2 itself. This power is then re-regulated within
the CVP2 to provide extremely pure and clean power to all the CVP2’s
critical circuitry.
Connect the external power supply to the AC mains wall outlet first, then
connect the DC connector of the power supply to the DC Input connector on the CVP2.
16
The Proceed CVP2 is designed for operation with its included
external power supply. Do not substitute any other power
supply. If for some reason you need a replacement, it must
be ordered from Madrigal via your local, authorized Proceed
dealer. Use of any other external power supply may cause
damage that would not be covered under the warranty.
to
composite
video
monitor
(optional)
to ex te r n a l
RS-232
control
system
(optional)
to te l evi s i o n
YPbPr or RGsB
S DT V / H DT V
input 1
Y/G
Pb/B
input 2
Pr/R
Csync
Y/G
Pb/B
Pr/R
input 3
Csync
Y/G
input 4
Pb/B
Pr/R
Y/G
Pb/B
Pr/R
input 5
input 6
composite
s video
output
Y/G
Pb/B
RS-232 control
Pr/R
Csync
to controller
5V DV
1A reg.
to AVP2
WA R N I N G !
Use only with
MADRIGAL
supplied
power supply.
component or RGsB sources
selected composite or S-video source➔
analog inputs
R
1 2
3
1
2
L
1 2
3
3
4
6
7
8
1
L
L
R
R
2
R
2 1
3
PR O C E E D
2 1
3
C
LR
R
S
audi o vi d e o p re amp l i f i e r
RR
2 1
3
A2
m a d e i n u. s. a. by
b
4
5
6
6
7
8
7
remote/record
video ou tpu ts
record
L
PUSH
A1
3
main
video
outputs
L
L
control por ts
PHASTL ink™ compatible
2 1
3
2
5
remote
L
L
1
video
inputs
3
1 2
3
4
C
composite & S-video sources
digital inputs
5
analog outputs
R
➔
2 1
3
R
RS232
ir
input
R
digital
output
c o
n t r o
l
triggers
outputs
1
2
~ A C
m a i n s
RS-232 communications
Configuration 1:
AVP2 & CVP2
This configuration adds component video switching to the AVP2, and can
transcode all SDTV video formats, either for direct connection to a television
or in preparation for further video processing. HDTV signals are passed
through to the output of the CVP2.
In this way, one can have a single connection to the display device, and enjoy
one-touch selection of any A/V source on the AVP2 (without having to also
select different video inputs on the television).
For the purposes of this explanation, we will assume that your AVP2 is set up
according to its owner’s manual, and that its operating software is up to date.
Important!
At the beginning of this setup procedure, make sure that the
main video output of the AVP2 is connected directly to your
display. You must have access to the AVP2 on-screen menus
during the initial configuration of the CVP2.
If in doubt about any of these conditions being met, please consult your local
Proceed dealer.
17
1
SELECT THE VIDEO OUTPUT OPTIONS IN THE AVP2
This menu is accessed by pressing menu to display the main menu of
the AVP2, followed by enter to select the Set Video Outputs menu. Then,
assuming your television (or video processor) requires a standard component video input, make the following selections in the Video Outputs
menu:
VIDEO OUTPUTS
AVP2: OUT TO CVP2
CVP2: YPbPr TO TV
PVP: NOT USED
If your television (or video processor) requires an RGsB signal instead of
a standard component signal, your AVP2 Video Outputs menu would
look like this instead:
VIDEO OUTPUTS
AVP2: OUT TO CVP2
CVP2: RGB TO TV
PVP: NOT USED
18
2
Note:
CONNECT ANY COMPONENT VIDEO SOURCES TO THE CVP2
Any component video sources that exist in the system should be connected to suitable inputs on the CVP2.
Make a note of which sources are connected to which
inputs, as you will need this information later for defining your
new sources in the AVP2 menu.
Any progressive or high definition component video signals will be
passed through the CVP2 without modification. Your display device must
be able to display these signals in their unaltered form when receiving
them on its component input.
3
DEFINE YOUR NEW A/V INPUTS IN THE AVP2 MENU SYSTEM
Having told your AVP2 that there is now a CVP2 in the system, define
your new source components as “buttons” on the AVP2 in the usual fashion, taking advantage of the new component input options that will be
available in your menu system.
4
CONNECT THE MAIN VIDEO OUTPUTS OF THE AVP2 TO INPUTS 5 AND
6 OF THE CVP2
Until now, you have been using the main video output of the AVP2 for
reading the on-screen menus. You can now shift over to your new video
connections and continue to use the on-screen menus. This is the first
step in doing so.
Connect the main composite video output of the AVP2 to Input 5 of the
CVP2.
Connect the main S-video video output of the AVP2 to Input 6 of the
CVP2.
These connections supply the selected composite or S-video source to
the CVP2 for conversion to component (or RGsB) video. Use high quality
video cables. Both the composite and the S-video connections must be
made.
5
CONNECT THE VIDEO OUTPUT OF THE CVP2 TO YOUR TELEVISION
This is the second step in shifting over to your new video connections.
Connect the main component (or RGsB) output of the CVP2 to a component (or RGsB) input on your television, using high quality 75Ω BNC
cables. If your display device uses RCA connectors instead of professional BNC connectors, you may need BNC-to-RCA cables or BNC-toRCA adapters.
If you need a standard composite signal for monitoring purposes, connect this output to your monitor. (Note that this output is only valid for
selected SDTV inputs. The CVP2 does not “downconvert” progressive or
HDTV signals.)
If you are using a SCART connection, you may use the composite output
connector to provide the composite sync signal needed for that standard.
6
Caution!
CONNECT THE RS-232 PORT OF THE AVP2 TO THE CVP2
Connect the port labelled to AVP2 of your CVP2 to your AVP2’s RS-232
port using the supplied RJ-11 cable.
Do not attempt to substitute a generic telephone extension
cable for the cable included with your CVP2, as they are not
wired the same. If you require a longer cable, please consult
with your dealer who can either order or custom-build an
appropriate cable for you.
7
CYCLE THROUGH STANDBY
Cycling the AVP2 from standby back to operate will ensure that the RS232 connection between the AVP2 and the CVP2 is active. This will allow
the two components to work together, as a single system.
19
4 8 0 / 6 0 p o r 525 / 5 0 p
to te l evi s i o n
audio outputs
progressive out
Y/RS video
Pb/G
Y/R
s-video
Pb
232
WARNING:
DEVICE,
BEFORE
REFER
OPERATING
HAZARDOUS
TO
ATTEMPTING
OWNER'S
INSTRUCTIONS
VOLTAGE
TO
OPERATE
MANUAL
AND
FOR
SAFETY
AVAILABLE
THIS
PROPER
PRECAUTIONS.
INSIDE;
DISCONNECT
AC ~ MAINS CABLE BEFORE OPENING UNIT.
modular DVD transport
composite
s video composite
Pr/B
composite/S
Pb/G
Pr/B
composite
Pr
control ports
PHASTLink compatable
composite
Y
digital
trigger remote
in
ir
~ ac
mains
video
inputs
video
video
out
video
S/N
designed and manufactured in USA
www.madrigal.com
CLASS 1
Apparatus Claims of U.S. Patent Nos. 4,631,603; 4,577,216;
LASER PRODUCT
4,819,098 and 4,907,093 licensed for limited viewing uses only.
No User Serviceable Components Inside.
For service, contact Madrigal Audio
Laboratories or an Authorized Dealer. Any modifications to this equipment will void all warranties.
4 8 0 / 6 0 i o r 525 / 5 0 1 YP b Pr
input 1
Y/G
Pb/B
input 2
Pr/R
Csync
Y/G
Pb/B
Pr/R
input 3
Csync
Y/G
Pb/B
input 4
Pr/R
Y/G
Pb/B
Pr/R
input 5
input 6
composite
s video
output
Y/G
Pb/B
RS-232 control
Pr/R
Csync
to controller
5V DV
1A reg.
to AVP2
WA R N I N G !
Use only with
MADRIGAL
supplied
power supply.
4 8 0 / 6 0 i o r 525 / 5 0 1 co m p o ne n t s o u rce s
composite & S-video sources
analog inputs
R
1 2
3
1
2
L
1 2
3
3
4
6
7
8
1
L
L
R
R
2
C
5
remote
L
R
2 1
3
PR O C E E D
20
2 1
3
L
C
LR
A1
R
S
RR
A2
audi o vi d e o p re amp l i f i e r
m a d e i n u. s. a. by
b
4
5
6
6
7
8
7
remote/record
vid e o o u tp u t s
record
L
PUSH
2 1
3
3
main
video
outputs
L
L
R
R
RS232
control por ts
PHASTL ink™ compatible
2 1
3
2
video
inputs
3
1 2
3
4
analog outputs
R
1
digital inputs
5
2 1
3
digital
output
PHAST™ communications
c o
n t
r o
ir
input
l
triggers
outputs
1
2
~ A C
m a i n s
RS-232 communications
Configuration 2:
AVP2/CVP2/PVP
This configuration adds SDTV component video switching to the AVP2,
transcodes all SDTV non-component video signals to interlaced SDTV component video, and routes the resulting signals to the Proceed PVP for conversion
to progressive video.
In this configuration, all video sources must be interlaced (480/60i NTSC or
525/50i PAL). If you have progressive or HD sources, you must use either
Configuration 1 (no PVP) or Configuration 3 (includes a PVP).
This configuration simplifies day-to-day operation of even complex video systems with a variety of SDTV composite video, S-video and component video
sources by providing a “universal translator” of those various signals to a
single standard. Everything will be displayed as either 480/60p or 525/50p
progressive video, depending on whether the original signal was NTSC- or
PAL-formatted (respectively).
In this way, one can have a single connection to the display device, and enjoy
one-touch selection of any A/V source on the AVP2 (without having to also
select different video inputs on the television).
For the purposes of this explanation, we will assume that your AVP2 is set up
according to its owner’s manual, and that its operating software is up to date.
Important!
At the beginning of this setup procedure, make sure that the
main video output of the AVP2 is connected directly to your
display. You must have access to the AVP2 on-screen menus
during the initial configuration of the CVP2.
If in doubt about any of these conditions being met, please consult your local
Proceed dealer.
1
SELECT THE VIDEO OUTPUT OPTIONS IN THE AVP2
This menu is accessed by pressing menu to display the main menu of
the AVP2, followed by enter to select the Set Video Outputs menu. Then,
make the following selections in the Video Outputs menu:
VIDEO OUTPUTS
AVP2: OUT TO CVP2
CVP2: YPbPr TO PVP
PVP: OUT TO TV
21
2
Note:
CONNECT ANY COMPONENT VIDEO SOURCES TO THE CVP2
Any component video sources that exist in the system should be connected to suitable inputs on the CVP2.
Make a note of which sources are connected to which
inputs, as you will need this information later for defining your
new sources in the AVP2 menu.
Only interlaced component signals may be used in this configuration,
either 480/60i (NTSC) or 525/50i (PAL).
3
DEFINE YOUR NEW A/V INPUTS IN THE AVP2 MENU SYSTEM
Having told your AVP2 that there is now a CVP2 in the system, define
your new source components as “buttons” on the AVP2 in the usual fashion, taking advantage of the new component input options that will be
available in your menu system.
4
CONNECT THE MAIN VIDEO OUTPUTS OF THE AVP2 TO INPUTS 5 AND
6 OF THE CVP2
Until now, you have been using the main video output of the AVP2 for
reading the on-screen menus. You can now shift over to your new video
connections and continue to use the on-screen menus. This is the first
step in doing so.
Connect the main composite video output of the AVP2 to Input 5 of the
CVP2.
Connect the main S-video video output of the AVP2 to Input 6 of the
CVP2.
These connections supply the selected composite or S-video source to
the CVP2 for conversion to component video. Use high quality video
cables. Both the composite and the S-video connections must be made.
5
CONNECT THE COMPONENT VIDEO OUTPUT OF THE CVP2
TO YOUR PVP COMPONENT INPUT
This is the second step in shifting over to your new video connections.
Connect the main component output of the CVP2 to a component input
on your television, using high quality 75Ω BNC cables. If your display
device uses RCA connectors instead of professional BNC connectors, you
may need BNC-to-RCA cables or BNC-to-RCA adapters.
If you need a standard composite signal for monitoring purposes, connect this output to your monitor.
22
6
CONNECT THE OUTPUT OF THE PVP TO YOUR DISPLAY
The progressive output of the PVP is YPbPr, as described in the PVP
manual.
7
CONNECT THE RS-232 PORT OF THE AVP2 TO THE CVP2
Connect the port labelled to AVP2 of your CVP2 to your AVP2’s RS-232
port using the supplied RJ-11 cable (which looks like but is not the
same as a telephone extension cable).
Caution!
Do not attempt to substitute a generic telephone extension
cable for the cable included with your CVP2, as they are not
wired the same. If you require a longer cable, please consult
with your dealer who can either order or custom-build an
appropriate cable for you.
8
CYCLE THROUGH STANDBY
Cycling the AVP2 from standby back to operate will ensure that the RS232 connection between the AVP2 and the CVP2 is active. This will allow
the two components to work together, as a single system.
SD or HD component sources
S D / H D o u t to te l evi s i o n
input 1
Y/G
Pb/B
input 2
Pr/R
Csync
Y/G
Pb/B
input 3
Pr/R
Csync
Y/G
input 4
Pb/B
Pr/R
Y/G
Pb/B
Pr/R
input 5
input 6
composite
s video
output
Y/G
Pb/B
RS-232 control
Pr/R
Csync
to controller
5V DV
1A reg.
to AVP2
WA R N I N G !
Use only with
MADRIGAL
supplied
power supply.
4 8 0 / 6 0 p o r 525 / 5 0 p
to CVP2
audio outputs progressive out
Y/RS video
Pb/G
Y/R
s-video
Pb
232
WARNING:
DEVICE,
BEFORE
REFER
OPERATING
HAZARDOUS
TO
ATTEMPTING
OWNER'S
INSTRUCTIONS
VOLTAGE
AND
TO
OPERATE
MANUAL
SAFETY
AVAILABLE
FOR
THIS
PROPER
PRECAUTIONS.
INSIDE;
DISCONNECT
AC ~ MAINS CABLE BEFORE OPENING UNIT.
modular DVD transport
composite
s video composite
Pr/B
composite/S
Pb/G
Pr/B
composite
Pr
control ports
PHASTLink compatable
composite
Y
digital
trigger remote
in
ir
~ ac
mains
video
inputs
video
video
out
video
S/N
designed and manufactured in USA
www.madrigal.com
CLASS 1
Apparatus Claims of U.S. Patent Nos. 4,631,603; 4,577,216;
LASER PRODUCT
4,819,098 and 4,907,093 licensed for limited viewing uses only.
No User Serviceable Components Inside.
For service, contact Madrigal Audio
Laboratories or an Authorized Dealer. Any modifications to this equipment will void all warranties.
composite & S-video sources
analog inputs
R
1 2
3
1
2
L
1 2
3
3
5
6
7
8
C
1
L
L
R
R
analog outputs
R
1
digital inputs
4
R
L
C
LR
A1
R
S
RR
A2
3
4
5
1 2
3
5
remote
L
6
2 1
3
PR O C E E D
2 1
3
audi o vi d e o p re amp l i f i e r
m a d e i n u. s. a. by
b
4
6
7
8
remote/record
vid e o o u tp u t s
record
L
PUSH
2 1
3
3
main
video
outputs
7
L
L
R
R
control por ts
PHASTL ink™ compatible
2 1
3
2
video
inputs
2
2 1
3
digital
output
PHAST™ communications
c o
RS232
n t r o
ir
input
l
triggers
outputs
1
2
~ A C
m a i n s
RS-232 communications
Configuration 3:
AVP2/PVP/CVP2
This configuration converts all the legacy interlaced sources input to the AVP2
to progressive signals (either 480/60p or 525/50p, respectively), while adding
HD-capable component switching capability that integrates seamlessly with
routine operation of the AVP2.
It is best used in a system that includes both high definition YPbPr and standard definition video signals. This configuration will make the most of the interlaced sources by converting them to progressive scan, while also providing
for routing of high definition component signals such as 1080i, 720p, or even
1080p directly to your display.
In this way, one can have a single connection to the display device, and enjoy
one-touch selection of any A/V source on the AVP2 (without having to also
select different video inputs on the television).
23
For the purposes of this explanation, we will assume that your AVP2 is set up
according to its owner’s manual, and that its operating software is up to date.
Important!
At the beginning of this setup procedure, make sure that the
main video output of the AVP2 is connected directly to your
display. You must have access to the AVP2 on-screen menus
during the initial configuration of the CVP2.
If in doubt about any of these conditions being met, please consult your local
Proceed dealer.
1
SELECT THE VIDEO OUTPUT OPTIONS IN THE AVP2
This menu is accessed by pressing menu to display the main menu of
the AVP2, followed by enter to select the Set Video Outputs menu. Then,
assuming your television requires a standard component video input,
make the following selections in the Video Outputs menu:
VIDEO OUTPUTS
AVP2: OUT TO PVP
CVP2: YPbPr TO TV
PVP: OUT TO CVP2 In3
24
2
Note:
CONNECT ANY COMPONENT VIDEO SOURCES TO THE CVP2
Any component video sources that exist in the system should be connected to suitable inputs on the CVP2.
Make a note of which sources are connected to which
inputs, as you will need this information later for defining your
new sources in the AVP2 menu.
Any high definition component video signals will be passed through the
CVP2 without modification. Your display device must be able to display
these signals in their unaltered form on its component input.
3
DEFINE YOUR NEW A/V INPUTS IN THE AVP2 MENU SYSTEM
Having told your AVP2 that there is now a CVP2 in the system, define
your new source components as “buttons” on the AVP2 in the usual fashion, taking advantage of the new component input options that will be
available in your menu system.
4
CONNECT THE MAIN VIDEO OUTPUTS OF THE AVP2 TO THE PVP
Until now, you have been using the main video output of the AVP2 for
reading the on-screen menus. You can now shift over to your new video
connections and continue to use the on-screen menus. This is the first
step in doing so.
Connect the main composite video output of the AVP2 to the Composite
input of the PVP.
Connect the main S-video video output of the AVP2 to the S-video input
of the PVP.
These connections supply the selected composite or S-video source to
the PVP for conversion to progressive video. Use high quality video
cables. Both the composite and the S-video connections must be made.
5
CONNECT THE COMPONENT OUTPUT OF THE PVP TO THE CVP2
INPUT 3
Using high quality 75Ω cables, connect the progressive component output of the PVP to Component Input 3 of the CVP2. This will make all of
the legacy sources connected to the AVP2 available to the CVP2, but in
progressive form.
6
CONNECT THE VIDEO OUTPUT OF THE CVP2 TO YOUR TELEVISION
This is the last step in shifting over to your new video connections.
Connect the main component output of the CVP2 to a component input
on your television, using high quality 75Ω BNC cables. If your display
device uses RCA connectors instead of professional BNC connectors, you
may need BNC-to-RCA cables or BNC-to-RCA adapters.
If you need a standard composite signal for monitoring purposes, connect this output to your monitor.
6
Caution!
CONNECT THE RS-232 PORT OF THE AVP2 TO THE CVP2
Connect the port labelled to AVP2 of your CVP2 to your AVP2’s RS-232
port using the supplied RJ-11 cable.
Do not attempt to substitute a generic telephone extension
cable for the cable included with your CVP2, as they are not
wired the same. If you require a longer cable, please consult
with your dealer who can either order or custom-build an
appropriate cable for you.
25
26
7
CONNECT THE PHAST COMMUNICATIONS PORTS BETWEEN THE
AVP2 AND THE PMDT/PVP
This communications connection utilizes RJ-45 connectors, as is described fully in the AVP2 and PMDT owner’s manuals. It allows the AVP2
and the PMDT/PVP systems to coordinate their actions to provide seamless operation.
8
CYCLE THROUGH STANDBY
Cycling the AVP2 and the PMDT from standby back to operate will ensure that the RS-232 connection between the AVP2 and the CVP2 is active, as well as the PHAST connection between the AVP2 and the PMDT/
PVP. This will allow all the components to work together as a single system.
Troubleshooting
Your Proceed CVP2 has been designed to deliver many years of satisfaction.
Its flexibility requires a bit of attention when first configuring the system, but
results in tremendous ease of operation in daily use.
It has been our experience that most difficulties encountered with the CVP2
are due to improper initial setup. Please review the relevant portions of this
manual for the details of the setup procedure.
I CAN’T SEE THE MENUS ON MY VIDEO DISPLAY
✓ Be sure to follow the configuration instructions in order. You
need to have a functional display to begin with, in order to
make the changes needed to change your display.
✓ Use the composite video (monitor) output on the CVP2 to determine whether perhaps you have a bad set of component cables
between the CVP2 and the display.
I AM GETTING A STABLE PICTURE, BUT THE COLORS ARE ALL WRONG.
✓ Make sure you have not crossed up your component video connections, either YPbPr or RGB. The mixup may be on either the
input or the output side of the CVP2—please check everything.
✓ Once you are convinced your wires are connected properly,
make sure that the CVP2 is configured correctly in the AVP2’s
Video Outputs menu. If you have configured it for RGB when
you are hooking it up for YPbPr, you will get some pretty strange
results. Note that nothing will be damaged by any of this crossconnection. You simply won’t get the picture you expect until it
is rectified.
I DON’T GET A PICTURE WHEN I SWITCH TO AN HDTV INPUT.
✓ Make sure your display device can handle the high scan rates of
HDTV. Not all “digital televisions” (DTV) can handle HDTV
(high definition television) signals.
✓ Make sure that your HDTV inputs on the CVP2 are configured
for a straight pass through. (If you have HD sources in your system, you should be using either configuration 1 or Configuration
3.)
THE POWER LED ON THE CVP2 DOES NOT LIGHT UP.
✓ Check AC power where your power supply is plugged in, or use
a different outlet.
✓ Check that the DC power supply cable is properly inserted in
the 5VDC input of the CVP2.
27
Care and Maintenance
To remove dust from the cabinet of the CVP2, use a feather duster. To remove
dirt and fingerprints, we recommend isopropyl alcohol and a soft cloth.
Caution!
28
Always apply the isopropyl alcohol to the soft cloth and then
wipe the CVP2 with the dampened cloth. Never pour or
spray even small amounts of any liquid directly on the CVP2,
as doing so may allow the liquid to reach the circuitry inside
the unit. Any liquid inside the unit poses a hazard to both the
user and to the unit, and must be avoided.
U.S. and Canadian Warranty
90-day limited warranty
This Proceed® product is warranted to be free from defects in material and
workmanship under normal use for a period of ninety (90) days from the date
of purchase. To extend the warranty of this Proceed product, return the warranty
registration card along with a copy of the original receipt of purchase to Madrigal, Inc.,
P. O. Box 781, Middletown, CT 06457.
Alternatively, you may extend your warranty by registering your new Proceed
product online at
http://www.madrigal.com/madrigal_warranty3.asp
There is also a link to this warranty registration form on the Madrigal home
page, at http://www.madrigal.com/. (This may save you some typing.)
five year extended warranty
The extended warranty for this Proceed product is five (5) years from the date of
purchase. During the warranty period, any Proceed component exhibiting defects in materials and/or workmanship will be repaired or replaced, at our option, without charge for either parts or labor, at our factory. The warranty will
not apply to any Proceed component that has been misused, abused or altered.
Any Proceed component not performing satisfactorily may be returned to the
factory for evaluation. Return authorization must first be obtained by either
calling or writing the factory prior to shipping the component. The factory will
pay for return shipping charges only in the event that the component is found
to be defective as above mentioned. There are other stipulations that may apply to shipping charges.
There is no other express warranty on this component. Neither this warranty
nor any other warranty, express or implied, including any implied warranties
of merchantability or fitness, shall extend beyond the warranty period. No responsibility is assumed for any incidental or consequential damages. Some
states do not allow limitations on how long an implied warranty lasts and
other states do not allow the exclusion or limitation of incidental or consequential damages, so that the above limitation or exclusion may not apply to
you.
This warranty gives you specific legal rights, and you may also have other
rights which vary from state to state. This warranty is applicable in the United
States and Canada only. Outside of the U.S. and Canada, please contact your
local, authorized Proceed distributor for warranty and service information.
29
Obtaining Service
We take great pride in our dealers. Experience, dedication, and integrity make
these professionals ideally suited to assist with our customers’ service needs.
If your Proceed component must be serviced, please contact your dealer. Your
dealer will then decide whether the problem can be remedied locally, or
whether to contact Madrigal for further service information or parts, or to obtain a Return Authorization. The Madrigal Technical Services Department
works closely with your dealer to solve your service needs expediently.
Important!
Return authorization must be obtained from Madrigal’s
Technical Services Department BEFORE a unit is shipped for
service.
It is extremely important that information about a problem be explicit and
complete. A specific, comprehensive description of the problem helps your
dealer and the Madrigal Technical Services Department locate and repair the
difficulty as quickly as possible.
A copy of the original bill of sale will serve to verify warranty status. Please
include it with the unit when it is brought in for warranty service.
30
Warning!
All returned units must be properly packaged (preferably in
their original packing material), and the proper return
authorization numbers must be marked on the outer carton
for identification. If the packaging to protect the unit is, in our
opinion or that of our dealer, inadequate to protect the unit,
we reserve the right to repackage it for return shipment at
the owner’s expense. Neither Madrigal nor your dealer can
be responsible for shipping damage due to improper (that is,
non-original) packaging.
Your dealer can order a new set of shipping materials for you if you need to
ship your component and no longer have the original materials. There will be
a charge for this service. We strongly recommend saving all packing materials
in case you need to ship your unit some day.
Specifications
■
■
■
■
Pass-through gain:
Pass-through frequency response:
Pass-through differential gain:
Pass-through differential phase:
■
■
Decode/encode path gain:
Decode/encode path frequency response:
Composite & S-video inputs
Component inputs
■
+0.0 dB, - 0.2 dB
+0.25 dB, - 3.0 dB to 70 MHz
less than 0.2%
less than 0.2°
±0.2 dB
+0.2dB, -1.0 dB to 5.0 MHz
+0.2dB, -0.5 dB to 5.0 MHz
Decode/encode path differential gain:
To Composite output
■
less than 2%
Decode/encode path differential phase:
To Composite output
■
Decoder composite input filter:
■
■
Composite & S-video inputs:
SD Component YPbPr inputs for decoding:
■
■
■
■
■
■
■
■
less than 1°
4 line adaptive comb filter
NTSC or PAL, autodetecting
SMPTE standard levels
Y channel
-300 mV sync, +700 mV peak
Pb/Pr channels
±350 mV
Field rate
50 or 60 Hz interlaced, autodetecting
SD Component RGsB inputs for decoding:
G channel
-300 mV sync, +700 mV peak
B/R channels
+700 mV peak with or without sync
Field rate
50 or 60 Hz interlaced, autodetecting
Maximum input signal offset, all inputs:
±2VDC
Input impedance, all inputs:
75Ω
SD encoded YPbPr output levels:
SMPTE levels
SD encoded RsGsBs output levels:
w/60 Hz input
-286 mV sync all channels, +714 mV peak
offset +337 mV
w/50 Hz input
-300 mV sync all channels, +700 mV peak
offset +352 mV
Output impedance:
75Ω
Crosstalk:
better than -55 dB @ 10 MHz
better than -45 dB @ 35 MHz
RS-232 “to controller” port:
Baud rate
38.4 kbaud
Data bits
8
Parity
None
Stop Bits
1
Data format
AVP2 ASCII commands only
(see AVP2 documentation)
Pinout
Tx=pin 3
Rx=pin 2
Ground=pin 5
(continued next page)
31
■
■
■
Power consumption:
Overall dimensions:
Shipping weight:
less than 5 W
See “Dimensions”
12 lbs. (5.5 kg)
For more information, see your Proceed dealer, or contact:
Madrigal, Inc., P.O. Box 781,
2081 South Main Street, Middletown, Connecticut 06457 USA
Telephone (860) 346-0896
FAX (860) 346-1540
If purchased in the United States or Canada, the warranty on this Proceed
product is owner-transferable. If your product requires service, you must
obtain a Return Authorization before shipping it to Madrigal. Madrigal
reserves the right to repack any product which arrives improperly packed for
shipment and to charge the owner for the required packing material. For
warranty information and conditions on products purchased in other
countries, contact your local dealer or distributor.
32
Dimensions
33
CVP2 Rack Installation
Included in the original shipping carton, locate the following parts:
2
4
4
4
pieces
pieces
pieces
pieces
rack bracket
insulating washer
rack mounting scres (black #10 socket cap screw)
screw for rack bracket to CVP2 (#4 phillips scres)
Assemble in the following sequence:
1. Attach one rack bracket to each side of the CVP2 using two #4
Phillips screws per side.
2. Position the CVP2 on the rack.
3. Attach to the rack using the four black #10 cap screws and four
insulating washers (the insulating washer must be between the
screw head and the rack bracket).
See image:
34
35
Madrigal, Inc.
2081 South Main Street, P.O. Box 781
Middletown, Connecticut 06457 USA
Telephone: (860) 346-0896
Fax: (860) 346-1540
http://www.madrigal.com
,
is a registered trademark of Madrigal, Inc.
a Harman International company
630671-1
© 7/2002 Madrigal, Inc. All rights reserved.
Printed in U.S.A.