1
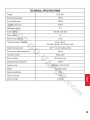
A
-V
O
-G
0
80
1Owner’s manual
o
.c
R
O
P
LADYBUG TEKNO 2350
m
STEAM VAPOR SYSTEM DESCRIPTION
ENGLISH
o
.c
R
O
P
A
-V
O
-G
0
80
18. no water indicator light
9. LCD display
10. steam hose socket
11. hinged cover on hose socket
12. casters
13. power cord and plug
m
1
1. carry handle
2. water tank cap
3. start button
4. iron switch
5. main switch indicator light
6. steam ready indicator light
7. economy indicator light
WARNING!
Do not use this machine if there are
signs of damage (cracks, breaks), if
the power cord is damaged, or if you
suspect that there may be an internal
defect (from shipping damages).
Vapor must never be directed
toward equipment containing
electrical parts.
Do not put any type of substance
(detergents or anything else) in the
steam generator if not specifically
approved by the manufacturer.
Do not leave the machine unattended while it is plugged in.
Do not let children or other unqualified persons use the machine.
-G
Read the rating-plate located under
the machine; make sure the voltage
and input ratings comply with the
system’s capacity.
A
Do not submerge the machine in
water!
P
Disconnect the machine from the
electrical power source by pulling the
plug. Do not disconnect it by pulling
on the cord, as this could damage the
machine.
This machine has been manufactured for use in enclosed (covered)
areas.
-V
While moving the machine, avoid
tugging on the power cord.
Only use the machine’s original
accessories, which are guaranteed
compatible by the manufacturer.
O
To provide continued protection
against risk of electric shock, connect
to properly grounded outlets only.
Only use original replacement parts
for any necessary repairs. Please
call an authorized service center for
repairs.
Disconnect the equipment from the
electrical system before proceeding
with cleaning or maintenance
operations on this appliance.
The boiler drain plug for emptying
the boiler must be fully secured
prior to using the system.
O
Not for space heating purposes.
Before using the machine to clean
surfaces that may get damaged (e.g.
synthetic fibers, plastics, wood,
etc.), check their capacity to withstand high temperatures by doing
testing on a hidden area and by
carefully following manufacturer’s
instructions.
o
.c
R
Do not point the steam
nozzle at persons or
other living things. This
machine produces high-temperature
steam. Avoid direct contact with
the skin.
ATTENTION! Danger of Scalding.
ENGLISH
0
80
1-
If the power cord is damaged, a manufacturer authorized service center
must replace it since a special tool is
needed to access it.
m
2
USE
HOW TO CONNECT THE ACCESSORIES
0
80
1-
Press the button to unlock and extract
the connector.
The lock and release position is indicated in the icon positioned on this
grip. The push-button for delivering
steam is a low voltage (12V) switch.
The handle is provided with an easy
as 1-2-3 quick selector for the steam
level. Select the desired steam level,
then pull the trigger (S) to release
the steam. 1 = low - 2 = medium - 3
= high
CORD REWIND
Attach the hose assembly connector
(C) to the vapor system as follows:
Hook the socket flap on to the lower
hook of the connector.
Turn the steam generator as shown
in the diagram in order to rewind the
cord inside the coiler. Fasten the cord
terminal with the special lock.
HOSE HANDLE
EXTENSIONS
These are connected to the handle
so that the work field is expanded
allowing you to reach high areas,
and low areas without stooping. The
extensions have the same attachment.
HOW TO FASTEN THE PIECES
TOGETHER
All the pieces have a bayonet style
push ‘n’ lock security connector. To
connect the handle to the extensions
or to the accessories simply insert
and push as shown in the drawing
(A). To extract the accessory turn the
ring clockwise and pull (quick twist
‘n’ pull) (B).
o
.c
ENGLISH
R
O
P
A
Pull the flap well open.
-V
O
-G
Make sure that the appliance is
disconnected from the electrical
socket.
3
m
Insert the connector into the socket
until it clicks into place.
This component is part of the hose
assembly and enables attachment of
various cleaning accessories. The
grip has a button for the distribution
of steam (S) and a trigger safety lock.
To block or release the steam use
the button positioned on the side of
the grip.
LARGE BRUSH
TRIANGULAR BRUSH
The large brush can be used together
with a cloth. The two spring clamps
fasten the cloth at the sides.
1-
NOZZLE
0
80
The triangular brush is attached to
the extensions or directly on to the
handle. Can be used to clean fabric.
A cotton or microfiber cloth can
be attached to the brush for various
cleaning operations.
The nozzle can attach to the extensions or directly on to the handle.
It can reach even the most awkward
corners.
-G
IRON
To turn the large brush, lift the tab and
pull it in the direction shown in the
diagram so as to free the handle.
To lock the handle into position:
hold it upright, turn the tab in the
opposite direction to the one shown
in the diagram.
BRUSHES AND SCRAPER
-V
O
P
A
The large brush has an articulated
joint so that the handle can be turned 90° to the right and to the left.
This tool enables special points to
be cleaned, which would be otherwise inaccessible with the other
accessories. The other accessories
are attached to the end of the nozzle.
WINDOW CLEANER
o
.c
ENGLISH
R
O
For instructions on how to use the
iron please refer to the relevant
instruction handbook.
Other optional accessories are
available.
1. Press on the script “open” to lock
the clamp in an open position.
2. Place the cloth in the correct position. 3. Press on the script “close”
to secure the cloth.
m
This is attached to the extensions
or directly on to the handle.The
window cleaner combines steam
with the mechanical action of a
rubber blade.
4
HOW TO FILL WITH WATER
LCD DISPLAY
The appliance is equipped with an
automatic filling system, and may be
filled with water while the boiler is
under pressure.
The appliance is equipped with an
LCD display showing pressure and
temperature conditions in the heater,
general conditions of the appliance
and malfunctions of heating or
hydraulic systems.
1-
Each time the appliance is used, a few
drops of water may come out of
the nozzle when the start button is
pressed for the first time.
0
80
This is quite normal and is due to
condensation which forms when the
tube is still cold. The same thing may
happen after an interval of any great
length.
The warning light switches on to
indicate that the iron is operating in
the economy mode.
Wait a few minutes until the heating
element light switches off. Steam
is now available for cleaning or
ironing.
During initial start up when the blue
light comes on, it is now time to burp
or purge the system.
-G
Depending on the appliance state,
display shows the messages below.
Temperature and pressure value indicated below are purely indicative.
-V
O
ATTENTION!
Do not use distilled or demineralized water. It could cause the unit to
malfunction.
Press the button to use the iron.
The iron can be used without the
steam boiler, for no-steam ironing.
When used with the steam boiler, the
appliance automatically switches to
economy mode.
STARTING UP THE VAPOR
SYSTEM
NOTE: while the appliance is in use,
the heating element light will
switch on and off several times; this
heating element light may be ignored
while the appliance is being used.
An electronic bell will ring to warn
that there is no water in the heater.
P
A
Insert the plug into the electrical
socket. Press the start button .
ENGLISH
o
.c
R
O
The heating element light
switches on. This shows that the appliance is working. After initial check,
a message may appear on the LCD
screen indicating the boiler requires
cleaning. An electronic bell will ring
intermittently. If the boiler has already
been cleaned, ignore this message.
The low water light indicates that
the cold water reservoir is empty. The
appliance has a power save mode
which is activated automatically when
steam is not used for a few minutes.
The ironing is normally done in the
power save mode.
m
5
ENGLISH
o
.c
R
O
P
A
-V
O
-G
0
80
1-
m
6
STEAM CLEANING
Use as an ordinary brush: the steam
will loosen the dirt which will remain
on the cloth.
The brush handle can be articulated
so that it will turn 90° to the right and
to the left.
CLEANING BETWEEN FLOOR
TILES
0
80
1-
WAX REMOVAL
HOW TO APPLY WAX
-G
To clean the spaces between the floor
tiles use the large brush as shown in
the diagram.
Remove floor wax by rubbing the
brush sideways and backwards and
forwards. Use a cloth to remove residual wax. The floor will be completely
clean.
The large brush can be used with or
without the extensions to clean tiles.
The large brush is suitable for
cleaning walls.
Together with the nozzle use a dry
cloth to remove any dirt from the
walls.
Clean the cracks between the baseboard and the floor.
In this way the cracks will be disinfected and any insects or parasites
eliminated.
WALL TILES
o
.c
R
BLINDS
m
7
Use the brush as shown in the
diagram for a more energetic cleaning
action.
Wipe away the dissolved dirt with a
dry cloth.
The large brush can be used with a
cloth.
Use the spring clamps to fasten the
cloth on either side.
Put a layer of wax on the cloth and
apply it by using steam together with
a back and forth motion.
The wax will be more fluid and will be
distributed more evenly.
O
ENGLISH
P
A
-V
O
CRACKS
Use the large brush on the extension to clean blinds.
WINDOWS
BATHROOM
Use the steam to clean and disinfect
the kitchen counters, floors,
cupboards, etc. including electrical
appliances such as the oven, fridge
and freezers. Grease and dirt can be
removed from the oven and the gas
rings.
0
80
1-
NOTE: electrical appliances must be
unplugged from the electrical outlet
during steam cleaning.
Use the steam to clean and disinfect
the bathroom: floor, walls, fittings etc.
FABRIC
-G
A combination of steam and the
squeegee action of the rubber blade
ensures that the window cleaning accessory will give you perfectly clean
windows, glass and mirrors.
Place a dry cloth underneath to catch
any residue.
WHERE ANIMALS LIVE
CARS AND MOTORBIKES
-V
O
KITCHEN
ENGLISH
o
.c
m
Use the steam to disinfect beds, food
bowls and bird cages.
Do not spray the animal directly.
Use the steam to remove grease and
dirt from the engine, wheels and
mudguards as well as to clean and
disinfect the internal car upholstery.
R
Use the steam to clean and disinfect
all the places where domestic
animals, such as dogs, cats, birds
etc. live.
O
P
A
Use the small brush with the towel to
clean sofas, armchairs, cushions and
mattresses.
8
MAINTENANCE
A certain amount of deposit will form inside the boiler according to how much it is used and how hard the water is. You
should drain the boiler once a month to remove this deposit.
HOW TO DRAIN THE BOILER
-G
0
80
1-
First the unit MUST be completely cool. Using the allen wrench supplied with the unit, unscrew the boiler nut located next
to the reservoir fill cap. Remove the reservoir fill cap along with the filter on the inside of the opening. Turn the unit upside
down and allow water from reservoir and boiler to drain completely. After draining replace the boiler nut and refill the
reservoir, then you can restart your machine.
DISPOSAL INSTRUCTIONS AND ENVIRONMENTAL STANDARDS
ENGLISH
o
.c
R
O
P
A
-V
O
Dispose of packaging in accordance with current standards. Follow the instructions for any material recycling (segregated collection) in your area.
m
9
The technical data and information given in this handbook are not binding. The manufacturer reserves the right to carry out
any necessary modifications without prior notice or replacement.
ENGLISH
o
.c
R
O
P
A
-V
O
-G
0
80
1-
m
10
m
Advanced Vapor Technologies
7719 230th Street SW
Edmonds, WA 98026
Local: (425) 775-9000
Toll-Free: (800) 997-6584
Fax: (425) 775-1993
[email protected]
o
.c
R
O
P
A
089006_00_622055XXLB
-V
O
-G
0
80
1www.advap.com