1
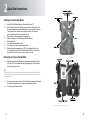
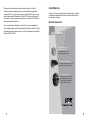
Definitions of Notices, Cautions and Notes
NOTICES:
A NOTICE indicates either potential damage to camera or loss of data and tells you how
to avoid the problem.
CAUTIONS:
A CAUTION indicates a potential for camera or accessory damage.
NOTES:
A NOTE indicates important information that helps you make better use of your Recon Camera.
Notices, Cautions and Notes
NOTICE:
Recon Outdoors shall not be liable for technical or editorial errors or omissions contained
herein; nor for incidental or consequential damages resulting from the furnishing, performance,
or use of this material. All information, specifications and hardware associated with the camera
are subject to change without notice or obligation on the part of Recon Outdoors.
CAUTION:
(Busy LED) Avoid turning camera off while busy LED is on. LED is on during image/movie
capture and storage functions. If busy LED is on for longer than 60-seconds then turn
camera off, wait three seconds and turn camera back on.
CAUTION:
(Compact Flash Card) The compact flash card should only be removed while the Mode Switch
is in the OFF position. Do not remove the flash card while the keypad “BUSY” LED is on,
this may corrupt the flash card.
NOTE:
(Compact Flash Card) The CF card must be formatted in FAT. When formatting cards on
the computer it is very important not to use FAT32 format. The Flash card will not work in
camera under FAT32 formatting. Be sure not to select the Quick Format option.
CAUTION:
(Battery Installation) Improper installation of batteries may result in damage to the
camera. Replace the batteries only with the same or equivalent type recommended by
the manufacturer. Discard used batteries according to the manufacturer’s instructions.
Recommend Duracell batteries.
CAUTION:
(LASER) Never look directly in to the laser. It could cause injury to your eyes.
ii
Table of Contents
1. Talon IR, Talon 3.0 and Extreme 5.0 Features . . . . . . . . . . . . . 1
2. Quick Start Instructions . . . . . . . . . . . . . . . . . . . . . . . . . . . . . . . . 3
Fielding the Camera (Run Mode) . . . . . . . . . . . . . . . . . . . . . . . . . . . 3
Retrieving the Camera (Setup Mode) . . . . . . . . . . . . . . . . . . . . . . . . 3
3.
Programming Your Scouting Camera . . . . . . . . . . . . . . . . . . . . 5
Power/Mode Switch . . . . . . . . . . . . . . . . . . . . . . . . . . . . . . . . . . . . . . 5
Keypad and Text Display. . . . . . . . . . . . . . . . . . . . . . . . . . . . . . . . . . 5
Laser Button . . . . . . . . . . . . . . . . . . . . . . . . . . . . . . . . . . . . . . . . . . . . 6
4.
Setup Menus . . . . . . . . . . . . . . . . . . . . . . . . . . . . . . . . . . . . . . . . . . 7
Set Time Menu . . . . . . . . . . . . . . . . . . . . . . . . . . . . . . . . . . . . . . . . . 7
Set Date Menu . . . . . . . . . . . . . . . . . . . . . . . . . . . . . . . . . . . . . . . . . 8
Set ID Menu . . . . . . . . . . . . . . . . . . . . . . . . . . . . . . . . . . . . . . . . . . . 8
5.
Camera Settings . . . . . . . . . . . . . . . . . . . . . . . . . . . . . . . . . . . . . . 9
Status Menu . . . . . . . . . . . . . . . . . . . . . . . . . . . . . . . . . . . . . . . . . . . . 9
Capture Menu . . . . . . . . . . . . . . . . . . . . . . . . . . . . . . . . . . . . . . . . . . 9
Delete Menu . . . . . . . . . . . . . . . . . . . . . . . . . . . . . . . . . . . . . . . . . . . . 9
Mode Menu and Flash Card Capacity . . . . . . . . . . . . . . . . . . . . . . . . 9
Internal Memory . . . . . . . . . . . . . . . . . . . . . . . . . . . . . . . . . . . . . . . . 10
Time Delay Menu . . . . . . . . . . . . . . . . . . . . . . . . . . . . . . . . . . . . . . . 10
Motion Menu . . . . . . . . . . . . . . . . . . . . . . . . . . . . . . . . . . . . . . . . . . 11
Walk Test . . . . . . . . . . . . . . . . . . . . . . . . . . . . . . . . . . . . . . . . . . . . . 12
iii
6.
Using the Recon Camera - Field Setup . . . . . . . . . . . . . . . . . 13
Direction of Camera . . . . . . . . . . . . . . . . . . . . . . . . . . . . . . . . . . . . . . 13
Above Ground Height . . . . . . . . . . . . . . . . . . . . . . . . . . . . . . . . . . . . . 13
Distance from Target . . . . . . . . . . . . . . . . . . . . . . . . . . . . . . . . . . . . . . 13
Use on Trail . . . . . . . . . . . . . . . . . . . . . . . . . . . . . . . . . . . . . . . . . . . . 13
7.
Viewing Images or Movies . . . . . . . . . . . . . . . . . . . . . . . . . . . . 14
Video Playback Menu . . . . . . . . . . . . . . . . . . . . . . . . . . . . . . . . . . . 14
Removable Compact Flash™ Memory Card . . . . . . . . . . . . . . . . . . 14
Formatting Memory Card . . . . . . . . . . . . . . . . . . . . . . . . . . . . . . . . . 14
Video Port . . . . . . . . . . . . . . . . . . . . . . . . . . . . . . . . . . . . . . . . . . . . 15
Field Viewing . . . . . . . . . . . . . . . . . . . . . . . . . . . . . . . . . . . . . . . . . . 15
8.
Problem Solving . . . . . . . . . . . . . . . . . . . . . . . . . . . . . . . . . . . . . . 16
Error Condition . . . . . . . . . . . . . . . . . . . . . . . . . . . . . . . . . . . . . . . . . 16
Frequently Asked Questions (FAQ) . . . . . . . . . . . . . . . . . . . . . . . . . 16
Contacting Recon Outdoors . . . . . . . . . . . . . . . . . . . . . . . . . . . . . . . 17
Warranty . . . . . . . . . . . . . . . . . . . . . . . . . . . . . . . . . . . . . . . . . . . . . . 18
Accessories . . . . . . . . . . . . . . . . . . . . . . . . . . . . . . . . . . . . . . . . . . 18
9.
Tables and Figures
Figure 1 – External View . . . . . . . . . . . . . . . . . . . . . . . . . . . . . . . . . . 4
Figure 2 – Internal View . . . . . . . . . . . . . . . . . . . . . . . . . . . . . . . . . . . 4
Figure 3 – Keypad and LCD Display . . . . . . . . . . . . . . . . . . . . . . . . . 6
Table 1 – Military Time Table . . . . . . . . . . . . . . . . . . . . . . . . . . . . . . . 7
Table 2 – Typical Storage Capacities . . . . . . . . . . . . . . . . . . . . . . . . 10
iv
1
Talon™ and Extreme 5.0™ Features
Talon IR™, Talon 3.0™ and Extreme 5.0™ lead the industry as the most
technologically advanced Scouting Cameras on the market. These full-featured, .
all-digital Scouting Cameras have unrivaled performance and flexibility. The 1.3 .
and the 3.0 Mega Pixel lens captures high-quality black & white pictures and movies
day and night (Extreme 5.0 Mega Pixel lens captures high-quality color pictures and
movies by day and black and white pictures and movies by night). The Covert Infrared
Illuminator allows you to capture multiple pictures of the same animals without
spooking them! “No Flash - No Dash™”. Camera does not disturb the wildlife .
feeding and mating habits.
Summary of Talon™ features
• Overlay data stamped on each Image
(Customer Name/Moon Phase/Temperature/Time/Date)
• Video Port (View Images in the Field)
• Removable Compact Flash™ Memory Card
(No More 35mm Film Processing)
• Optional accessories include High-Security Lock-Box,
TV/USB Card Readers, and 5” Black and White TV
Setup is a snap with Recon’s sealed five-button user friendly keypad and two-line text
display. No computers required to change time, date and camera settings. A series
of simple and easy to use menus allow you to setup and maintain your Recon™
camera. These menus include set time, set date, set motion sensor sensitivity, set
delay and set mode (picture or movie). These settings are stored and remain in effect
even when the power is turned off or when the batteries are removed. These settings
can be modified over and over as required for each scouting trip.
• High Resolution 1.3 and 3.0 Mega Pixel Panoramic lens
• Invisible Infrared Illuminator* “No Flash – No Dash™”
• Records Pictures and Movies • Programmable Event Delay
• Built-In Laser Beam Module for Picture Perfect Aiming
• Walk-Test LED
• Passive Infrared Motion Detector
(Triggers the camera based on heat and movement)
• Overlay data stamped on each Image
(Customer Name/Moon Phase/Temperature/Time/Date)
• Video Port (View Images in the Field)
• Removable Compact Flash™ Memory Card .
(No More 35mm Film Processing)
• Optional accessories include High-Security Lock-Box,
TV/USB Card Readers, and 5” Black and White TV
The cameras store thousands of images on industry standard Compact Flash™
memory cards. Load pictures into your computer using optional card readers. E-mail
and print your digital images. View the images at the site with built-in video output
port (portable viewer not included). Camera also Interfaces with a standard TV
and VCR. Reliable motion detection with programmable sensitivity eliminates false
triggers. Camera attaches to the tree with supplied strap or with optional Lock-Box (see accessories list).
• High Resolution 5.0 Mega Pixel Panoramic lens
• Invisible Infrared Illuminator* “No Flash – No Dash™”
• Records Color Day Pictures and Movies • Records Black and White Night Pictures and Movies
• Programmable Event Delay
• Built-In Laser Beam Module for Picture Perfect Aiming
• Walk-Test LED
• Passive Infrared Motion Detector
(Triggers the camera based on heat and movement)
Recon cameras use a PIR (Passive Infrared Receiver) or motion detector to detect
motion in front of the camera. The PIR senses targets day or night, and has been
carefully designed to work over a wide range of temperatures while eliminating
virtually all false target detections in the scouting area. Once the camera is alerted .
by the PIR that a target is in view, the PIR will wake up the camera and take a picture. It won’t take another picture until the time on the time delay setting has been exceeded.
Summary of Extreme™ Features
1
*Infrared Flash is invisible compared to Bright White Flashes of Color Scouting
Cameras. Internal power management allows the camera to sleep between events,
drawing only MICRO-Amps of current allowing the six D-cell batteries to have an
extended life from hours to as much as one full hunting season. Once motion is
detected, the camera wakes up, takes a picture and then goes back to sleep. Each
picture is tagged with customer name, moon phase, temperature, date and time, so that
you will be able to analyze not only the type of game that you are monitoring but also
the time patterns associated with the game. Motion is detected at distances of up to .
40 feet, thus ensuring the maximum coverage of your game scouting area. 2
2
Quick Start Instructions
Figure – 1
Fielding the Camera (Run Mode)
Step 1: Install Six D-Cell Alkaline Batteries. (Recommend Duracell™)
Step 2: Install Compact Flash Card: With the power switch in the off position, install
the compact flash memory card with the label on top and pointed to the right. The compact flash must be properly installed in order for the camera to
operate. Neverforce the memory card into the slot.
Step 3: Place camera in setup mode using the toggle switch.
Step 4: Observe messages on LCD display (version/time/date/etc).
Step 5: Perform walk-test.
Step 6: Turn camera off and wait 3-seconds.
Step 7: Turn camera to run mode using the toggle switch.
Step 8: Observe the status messages on the LCD. This is followed by the countdown blinking of the green LED located behind the PIR lens. There will be
approximately 1-minute to close the unit and leave the area.
Retrieving the Camera (Setup Mode)
Figure – 2
Step 1: When returning to the scouting area, open the camera and wait for the busy
LED to go off. Turn the camera off using the toggle switch. Wait 3-seconds
before entering setup mode.
NOTE:
(Compact Flash Card) The compact flash card should only be removed while the Mode Switch
in the OFF position. Do not remove the flash card while the keypad “BUSY” LED is on, this may
corrupt the flash card.
Step 2: Turn the camera to the setup mode. One of the display messages will indicate
the number of stored pictures. View the images using the video port.
Step 3: Turn the camera off when finished.
External and Internal Views - Figure 1-2
3
4
3
Programming and Using
Your Camera
Power/Mode Switch
Use the mode toggle switch to select between Setup/Off/Run. Push the toggle switch
to the up position to select setup mode, down to select run mode, and center for off.
Setup mode is used by the Recon camera for the walk-test, laser pointing, video
playback, memory card delete functions, and other functions such as changing .
date, time and ID.
Laser Button
The laser is toggled on and off by pressing the “LASER” button/key. The laser is helpful
in marking the center of the PIR (Passive Infrared Receiver) or motion detector zone that
triggers the camera system. It also indicates the center of the picture area to be taken. Remember, the mode switch must be in the setup position for the laser to be activated. With the camera system securely attached, open the door of the system, wait for
the camera to complete its startup messages, then turn the laser on. If the laser is
working, this will confirm that the batteries are properly installed and working. Next,
close the camera system door, and use the laser to sight in the camera system
ensuring that laser beam is parallel to the ground and points to the place where
the game animal is expected to have its picture taken. Once this is done, open the
camera system door and turn the laser off. The laser should not be left on for more
than a few minutes at a time. Place the camera into the run mode prior to leaving the field. There is a built in 1minute delay between the time that the run mode switch is activated and the time .
the camera is activated. This allows you time to close and secure the camera before .
it becomes active and ready to take a picture. The green LED will double blink .
during this 1-minute countdown.
Place the mode switch in the “off” position to preserve batteries when the camera .
is not being used.
CAUTION:
(Compact Flash Card) The compact flash card should only be removed while the Mode
Switch is in the OFF position. Do not remove the flash card while the keypad “BUSY” LED
is on, this may corrupt the flash card.
CAUTION:
(Battery Installation) Improper installation of batteries may result in damage to the camera.
Replace the batteries only with the same or equivalent type recommended by the manufacturer.
Discard used batteries according to the manufacturer’s instructions. Recommend
Duracell batteries.
NOTE:
The laser is automatically shut-off when the camera system is moved into the run mode.
NOTE:
The laser is disabled in the manual capture menu.
NOTE:
The laser is disabled each time you enter a menu (example: Set Time/Set Date).
Keypad and Text Display
Setup is a snap using Recon’s user-friendly keypad and text display. .
A series of simple and easy to use menus allow you to setup and maintain .
your Recon™ camera.
Keypad and LCD Display - Figure 3
5
6
4
Setup Menus
Set Date Menu
Use the “MENU” key to cycle through the available menus. Use the “SELECT” key .
to enter the menu. When you are ready to exit the menu, press the “MENU” key. Press the “MENU” key to exit the menu. This will save your date setting.
When the camera is first turned on, a series of status messages are displayed. .
They include software version number, current time, and current date. These settings
can be changed by scrolling to the appropriate menu. NOTE:
The camera remembers your camera settings even when the batteries have been removed.
Your settings are maintained until you change them.
Set Time Menu
Press the “MENU” key until the set time menu appears on the display. Press the
“SELECT” key to enter the menu. Use the “UP” and “DOWN” keys to increment and
decrement the hour and minute fields. Use the “SELECT” key to change between
hours and minutes. Remember that the time is maintained in military notation .
(see table-1). Press the “MENU” key until the set date menu appears on the display. Press the
“SELECT” key to enter the menu. Use the “UP” and “DOWN” keys to increment and
decrement the month, day, and year fields. Use the “SELECT” key to change between
months, days, and years.
Set ID Menu
Press the “MENU” key until the set ID menu appears on the display. Press the
“SELECT” key to enter the menu. Use this menu to enter your name or some other
descriptive identifier such as location. These characters are stamped in the lower.
left corner of each image. Press the “MENU” key to exit the menu.
NOTE:
Remember, the camera retains the ID setting when it is powered off and even when the
batteries are removed.
Press the “MENU” key to exit the menu. This will save your time setting.
Military Time Table - Table 1
7
8
5
Camera Settings
rate of 1.5 seconds for 60 seconds. Low-resolution movies are recorded with 320x240
resolutions at a frame rate of 1 second for 45 seconds. The movie feature provides
spectacular time lapsed movie action, Day and Night! Table-2 gives approximate
storage capacities for various Compact Flash™ card sizes.
Status Menu
The status menu is used to examine the battery voltage, temperature and image
count (# images stored on the Compact Flash™ card). Press the “MENU” key until the status menu appears on the display. Press the
“SELECT” key to enter the menu. Use the “UP” and “DOWN” keys to increment
through the available status fields.
Press the “MENU” key to exit the menu.
Capture Menu
Press the “MENU” key until the capture menu appears on the display. Press the
“SELECT” key to enter the menu. Use the “SELECT” key to manually snap pictures. The busy LED on the keypad will stay on during capture and during the storage of .
the image or movie to the Compact Flash™ card.
Press the “MENU” key to exit the menu.
WARNING:
Do not insert or remove the compact flash memory card unless the mode switch is in the off
position. Also, do not remove the flash memory card while the keypad “busy” LED is on.
Delete Menu
Press the “MENU” key until the delete menu appears on the display. Press the
“SELECT” key to enter the menu. Use the “UP” and “DOWN” keys to change between
“Yes” and “No”. Use the “SELECT” key to start the delete function. The busy LED will
be on during delete.
WARNING:
Do not turn the camera off or remove memory card until the delete function is finished
(this will corrupt the card).
Mode Menu and Flash Card Capacity
Use this menu to choose between picture mode, high-resolution movie mode, and
low-resolution movie mode. Picture mode is the only mode that stores the date/
time/moon phase/temperature/customer name. The movie modes do not have this
capability. High-resolution movies are recorded with 640x480 resolutions at a frame
9
256 MB
1100
250
250
512 MB
2500
500
500
1 GB
5000
1000
1000
Typical Storage Capacities - Table 2
Press the “MENU” key until the mode menu appears on the display. Press the
“SELECT” key to enter the menu. Use the “UP” and “DOWN” keys to change .
between the available modes. Press the “MENU” key to exit the menu. This will save your mode setting.
NOTE:
The camera remembers the mode settings even when the batteries have been removed.
Your settings are maintained until you change them.
Internal Memory
Recon cameras have a built-in memory chip that is used to store images when a
Compact Flash Card is not installed. The memory chip will store up to 25 images. These images are automatically transferred to a CF card the next time the camera
enters setup mode with a CF card installed.
Time Delay Menu
Press the “MENU” key until the delay menu appears on the display. Press the
“SELECT” key to enter the menu. Use the “UP” and “DOWN” keys to change .
between the available delay settings. This setting determines the minimum time between pictures. Choose one of five
available settings: 30-second, 1-minute, 5-minute, 10-minute, or 60-minute settings. Press the “MENU” key to exit the menu.
NOTE:
The camera retains the delay setting when the camera is powered off or even when the batteries
have been removed. Longer delay settings may cause some action to be missed.
10
Motion Menu
Press the “MENU” key until the motion menu appears on the display. Press the
“SELECT” key to enter the menu. Use the “UP” and “DOWN” keys to change between
the available DISTANCE setting (Short, Medium and Long). Once the desired
DISTANCE setting has been selected, press the “MENU” key to exit the menu. For best results leave the “MOTION” setting on “Long” all year round. “Long” is the
most sensitive and longest distance detecting mode. If you have a desire to shorten
the distance of detection use the “Medium” or “Short” setting.
Example: If at a given temperature the “Long” setting detects at 30ft then “Medium”
will detect at about 18ft and “Short” will detect at about 12ft.
NOTE:
The camera remembers the mode settings even when it is powered off and even when the
batteries have been removed. Your settings are retained until you change them.
In order to have the best chance of getting good pictures and no
“false triggers”, you should consider doing the following:
• Select the “Long” Distance setting (PIR).
• Select a site that ideally has the deer about 25 feet from the camera.
• Select a site that has very few leaves in the field of view to avoid potential .
“false triggers”.
• Set the camera up so it is looking away from the sun. This minimizes glare on .
the lens and ensures the best lighting on the target.
• Understand the use of the laser and how you aim the camera for best results. You
would like for the PIR and camera to point at the center body mass of the game
animal. A suggestion would be to put a stick in the ground about where you
expect the game animal to be. Turn the laser on, and then point the camera so
that the laser hits the stick at the proper height above the ground. You can use an
object to wedge the camera up or down to obtain the proper height. Remember,
the PIR beam width is about 2 feet wide and 1 foot high at a distance of 25 feet
from the camera.
Walk-Test
The Recon camera comes equipped with a WALK-TEST which is only active when
the switch is in Setup. A red LED, located behind the round motion lens in the upper
right corner, will flash when the motion circuit detects a moving heat source. This
will allow you to determine the left and right edges of motion activiation. The WALKTEST in conjuction with the LASER, which gives you your UP and DOWN alignment,
will pin point exactly where your picture will be taken. It is important to know that the
Motion Circuit or PIR, Passive Infrared Receiver, is like a flashlight beam. It is about .
2 feet wide and 1 foot high at 25 feet.
11
12
6
Using The Recon Camera Field Setup
7
Viewing Images and Movies
Video Playback Menu
Direction for the Recon Camera
The camera should always point away from the sun, if possible. This will give the best
lighting on the target and prevent glare from getting into the camera lens. If you are
not able to do this, try not to point it directly into the sun. The imager can be damaged
by pointing directly at the sun, and the images will appear to be washed out. Keep in
mind, the changing angle of the sun could cause camera to malfunction.
Above Ground Height
The camera should be about the height of a deer or about two and one half feet
above the ground. You will also have the best results if the ground is level and the
camera is pointing parallel to the ground. This will give the best range and the most
coverage of the terrain. The best results will occur if you place the camera on a trail .
or rub that shows signs of recently being used. The less you disturb the site, the
better your results will be for attracting older and larger game animals.
Distance from Target
For best results, try to place the camera so that the game animal will be 20 to 30 feet
from the camera when the picture is taken. This will ensure that there is enough light
and that you will get a full picture of the game animal. The PIR will reliably detect the
game animal and there should be plenty of pixels and light on the target so that the
antlers are easy to see. Images taken at 50 feet will have less detail and illumination. The use of food / bait on active trails or rubs can help position game animals at the
desired distances from the camera.
(Use food/bait only where permitted)
Use on Trail
For best results place the camera so it is aimed down the trail not across it. .
This will allow the camera more time to take a picture of the animal or target.
Press the “MENU” key until the video menu appears on the display. Press the
“SELECT” key to enter the video playback menu. Use the “Select” key to choose
either still or movie playback. Use the “UP” and “Down” keys to cycle through the
available images or movies. Each time the keys are pressed, the next available .
image is retrieved from the flash card and fed to the video port.
The display will indicate the current image number to be viewed on the video port. Connect the camera to your TV or VCR using the supplied video cable. Portable/
hand-held TV devices can be used to view images at the tree. Press the “MENU” .
key to exit the menu. Removable Compact Flash™ Memory Card
The Recon camera uses industry standard Compact Flash™ memory cards. Currently, Recon Outdoors can supply 256MB, 512MB and 1GB cards. Before you
can format a memory card, you must have a compact flash reader for your computer.
NOTE:
Recon Outdoors recommends Sandisk brand Compact Flash Cards.
Formatting Memory Card
Step 1: Load the memory card in the computer Compact Flash Card
reader. Be sure that the memory card is properly loaded.
Step 2: Click on “Start”.
Step 3: Scroll down to “Programs”.
Step 4: Click on “Windows Explorer”.
Step 5: Scroll down to removable disk and left click and then right click.
Step 6: Select the format option.
Step 7: Select FAT (NOT FAT32) format from menu and click on “start”.
DO NOT SELECT “QUICK FORMAT” FUNCTION AS THIS FORMAT MAY
CAUSE PROBLEMS.
WARNING:
Verify that you have selected the Removable Compact Flash Drive (reader). Take care not to
accidentally select the wrong drive!!! Verify that the size of the drive closely matches the size
of the Compact Flash Card being formatted.
13
14
Step 8: Click on “yes”.
Step 9: Click on “done”. WARNING:
Do not remove compact flash card until formatting has finished. This process can take up
to 2 minutes.
Video Port
The Video port connects the camera to conventional TVs and VCR recorders. Playback images and movies on your TV or record them on your VCR recorder. The
supplied cable provides a standard RS170 composite video signal output to an RCA
plug. Use the Up/Down switch to sequence through the captured images and movies. The video port is only active in the setup mode, be sure that the toggle switch is in the
setup position. Images through the video port are viewed in low resolution (320x240). View full resolution using the computer and TV card readers.
8
Problem Solving
Error 0001
Green and red continuously blinking LEDs indicate a problem initializing the Compact Flash™ Interface. To resolve the problem, try the following:
• Install another Compact Flash™ Memory Card.
• Use the USB Card Reader to Re-Format the Compact Flash™ Memory Card.
NOTE:
Video port will take about 10 seconds to load images.
• Check Compact Flash™ Memory Card to ensure that it is properly installed. .
If the Compact Flash™ Memory Card is not properly inserted into the camera,
the green and red LEDs will continue to blink and, the camera will not go into .
the setup mode or the run mode.
• Check for bent pins on the camera card socket
Field Viewing
Frequently Asked Questions (FAQ)
Use a portable, battery operated TV with video input or a VCR camera with video
input to view images and movies at the tree. Simply connect to the camera video port
with the toggle switch in the Setup mode and use the Up/Down switch to sequence
through the captured images and movies.
My Recon camera is stuck on “RECON OUTDOORS” and the Busy light
stays on. Why?
Check for Flash Card incompatibility. Make sure Mode on/off switch is in the OFF
position then remove Compact Flash Card from card holder. Flip Mode switch to
Setup, the LCD should scroll thru the Menu screens to Video Menu. If this occurs
then there is a problem with the Compact Flash Card. Recon Outdoors recommends
Sandisk brand Compact Flash Cards. If problem continues call Recon tech support. How many pictures will my Recon camera take on a set of batteries?
You can take approximately 800 to 2,000 pictures depending on the temperature and
number of night pictures.
I am not getting as many pictures as I think I should. Why?
Check the MOTION setting: make sure it is set to the LONG DISTANCE setting. Use
the Laser to check the aim point of the camera; it may be set too high or too low. You
want to aim for the center body mass of the target. For optimum performance make
sure the camera is 20 to 25 feet from where you expect your target to be.
15
16
Why does my Recon camera have pictures where the object is too bright?
The Recon camera is designed to have one of the longest flash ranges in the
business, 40 feet +. If you are set up for pictures at less than 20 feet, you can use
electrical tape to mask off the bottom half of the IR LEDs located in the upper left
hand corner. For optimum peformance make sure the camera is 20 to 25 feet from
where you expect the target to be. Limited Warranty
There is a full one year warranty from the date of purchase on defects .
in materials and workmanship. The laser unit has a 30-day warranty
from the date of purchase.
Optional Accessories
I live in a cold climate and batteries do not last. Do you have any suggestions?
Recon Outdoors makes an Extreme Weather kit that utilizes an external 12 volt gel
cell battery that works in extreme heat or cold. For more information contact Recon
Outdoors at 866-647-3266.
256MB, 512MB and 1GB
Compact Flash™ Cards
Store images and movies on these
high-quality Compact Flash™ Cards.
TV Set Memory Card Reader
View images captured by your Talon™ on your
television and on your personal computer.
High-Security Lock Box
Keep your camera safe and secure with
this specially designed lock box. Steel
construction helps to prevent theft and
destruction. Padlock not included.
17
18
Notes
19
Notes
20
Sample Photos
21