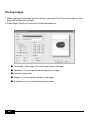
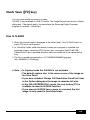
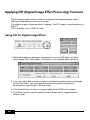
1
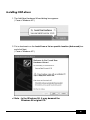
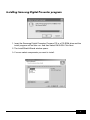
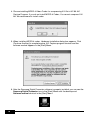
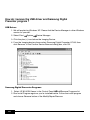
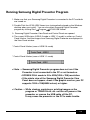
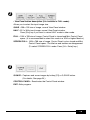
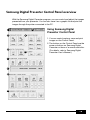
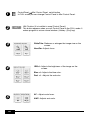
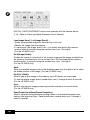
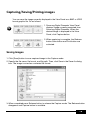
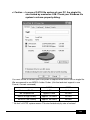
Samsung Digital
Presenter
Software
User’s Guide
Contents (Windows Program)
Installing Samsung Digital Presenter Software......3
System requirements ...............................................................................3
Installing software ....................................................................................4
Connecting Samsung Digital Presenter to PC .................................4
Installing USB driver .........................................................................5
Installing Samsung Digital Presenter program ................................7
Installation tips .........................................................................................9
How can I determine if my computer's USB port is enabled?...........9
How do I remove the USB driver and Samsung Digital Presenter program? ...10
Running Samsung Digital Presenter Program ........11
Samsung Digital Presenter View Panel overview ..................................12
Samsung Digital Presenter Control Panel overview ..............................15
Capturing/Saving/Printing images .........................................................19
Samsung Digital Presenter Mini Control Panel overview.......................22
Quick Save ([F2] key) ............................................................................23
Applying DIP(Digital Image Effect Processing) Functions .....................24
Digital Image Effect Processing Description ..........................................25
Using Samsung Digital Presenter TWAIN Driver...27
Scanning Images ..................................................................................28
Keyboard Map ......................................................................................29
Using Samsung Digital Presenter AVI Capture ..................30
Troubleshooting ..................................................................................35
1
Contents (Macintosh Program)
Installing the UF-80 Viewer ...................................................................37
System Requirements .............................................................................37
Connecting the UF-80 .............................................................................38
Program Installation ................................................................................39
Running the UF-80 Viewer.....................................................................43
UF-80 Viewer Screen ..............................................................................43
UF-80 Viewer Control Buttons.................................................................46
Image Capture/Save/Output....................................................................49
Quick Saving and Configuration..............................................................52
Image Rotation ........................................................................................52
Troubleshooting(Macintosh Program) ..............................................53
2
Installing Samsung Digital Presenter Software
The supplied Samsung Digital Presenter program CD contains :
• USB driver
• Samsung Digital Presenter program
To control your Samsung Digital Presenter on the PC, save the images into the
computer HDD, or print the images, you must connect Samsung Digital Presenter to
the PC through USB interface, then install the USB driver and Samsung Digital
Presenter program using the supplied program CD.
Follow the procedures below.
System requirements
To install the Samsung Digital Presenter software, your computer must have at least
the following system configuration :
• IBM or IBM compatible computer with a Pentium II 350Mhz or higher processor
(*USB 2.0: Pentium 4 or higher)
• Windows 98 or later (*USB 2.0: Windows 2000 pro or later)
• Display : XGA 1024 x 768, 65536 colors or higher
• USB 2.0/1.1 interface connector
(*USB 2.0: On-board type USB chipset recommended)
• 64MB or higher RAM (*USB 2.0: 128MB or higher recommended)
• CD-ROM drive
✔ Note : • USB 2.0 mode is not officially supported in the Windows
98/98SE/ME OS.
• It cannot perform at regular speed when you use
PCI/PCMCIA type USB 2.0 card.
3
Installing software
To install the software
1. Connect your Samsung Digital Presenter to the PC with USB cable. See the
current page.
2. Install the USB driver. See page 5.
3. Install the Samsung Digital Presenter control program. See page 7.
Follow the instructions below to complete the installation:
Connecting Samsung Digital Presenter to PC
1. Make sure that both the Samsung Digital Presenter and a computer are turned on.
2. Plug one end of the USB cable into the USB port on the Samsung Digital
Presenter.
3. Plug the other end into the USB port on the computer.
DVI
MOUSE
RS-232C
VGA OUT
VGA IN
USB
✔ Caution : • We recommend to connect to USB port which is attached
on computer main board.
(It can make troubles in extended front-side USB port or
USB hub without power depending on computers.)
4
Installing USB driver
1. The Add New Hardware Wizard dialog box appears.
( Case of Windows XP )
2. Put a checkmark on the Install from a list or specific location (Advanced) box
and click Next.
( Case of Windows XP )
✔ Note : In the Windows 98, it may demand the
Windows 98 original CD.
5
3. Insert the SAMSUNG program CD into your CD-ROM drive, then put a checkmark
on the CD-ROM drives box and Include this location in the search box then
type x:\ (where x is the drive letter for the CD-ROM drive). Click Next.
4. Click Finish. The USB driver will be inserted.
6
Installing Samsung Digital Presenter program
1. Insert the Samsung Digital Presenter Program CD in a CD-ROM drive and the
install program will be auto-run. And then select ENGLISH.Click Next.
2. The InstallShield Wizard window opens.
3. You can select components you want to install.
7
4. Choose installing MPEG-4 Video Codec for compressing AVI file in UF-80 AVI
Capture Program. If you do not install MPEG-4 Codec, You cannot compress AVI
file. We recommend to install codec.
5. When installing MPEG-4 codec, Hardware Installation dialog box appears. Click
[Continue Anyway] to complete setup. AVI Capture program shortcut and the
software manual appears in the [Start] Menu.
6. After the Samsung Digital Presenter software is properly installed, you can see the
Samsung Digital Presenter icon in the [Start] Menu and the desktop and
Software manual shortcut in the [Start] Menu.
8
Installation tips
How can I determine if my computer’s USB port is enabled ?
1. We will explain by Windows XP. Please find the Device Manager in other Windows
version for yourself.
2. Select Start
System
Device Manager
3. If you see USB host controllers and a USB root hub listed, USB interface is
properly enabled.
4. If you see USB Enhanced Host controller listed, USB 2.0 mode is properly
enabled.
9
How do I remove the USB driver and Samsung Digital
Presenter program ?
USB Driver :
1. We will explain by Windows XP. Please find the Device Manager in other Windows
version for yourself.
2. Select Start
System
Device Manager
3. Click the plus (+) icon before the Imaging Device.
4. From the Imaging devices items select Samsung Digital Presenter UF-80, then
click Remove. In the Confirm Device Removal dialog box, click OK.
Samsung Digital Presenter Program :
1. Select UF-80 USB Viewer in the Control Panel
Add/Remove Programs list
2. Run Install Program again as you’ve installed before. Follow the install program
and choose Remove button of the Modify/Repair/Remove.
10
Running Samsung Digital Presenter Program
1. Make sure that your Samsung Digital Presenter is connected to the PC and both
are turned on.
2. Double-Click the UF-80 USB Viewer icon (automatically placed on the Windows
desktop when you install). You can also select Samsung Digital Presenter
Program
UF-80 USB Viewer
program by clicking Start
3. Samsung Digital Presenter View Panel and Control Panel are opened.
4. The current USB status (USB 2.0 mode or USB 1.1 mode) is written on Control
Panel title bar. And the images from Samsung Digital Presenter are displayed in
the View Panel window.
* Control Panel title bar (case of USB 2.0 mode)
* Control Panel title bar (case of USB 1.1 mode)
✔ Note : • Samsung Digital Presenter program does not run if the
Presenter is not connected to the PC or not turned on.
• SCREEN FULL mode is fit to XGA(1024 x 768) resolution.
• If the whole view of the Samsung Digital Presenter View
Panel does not appear, check if the graphic card on your PC
supports 1024 x 768(65536 colors) or higher.
✔ Caution : • While viewing, capturing or printing images on the
program or TWAIN Driver, do not turn off power of the
presenter or remove the USB cable off the PC.
It may cause the presenter or the PC to make trouble.
11
Samsung Digital Presenter View Panel overview
4
1
2
1
3
View area
You can see the images presented from the presenter in this view area.
When you adjust the image using the Samsung Digital Presenter Control Panel or
remote controller,you can see the applied result in this area.
12
2
• View Panel button description (It is invisible in FULL mode).
Allows you to select the input image size.
QUAR : 256 x 192 size of image, normal View Panel window
HALF : 512 x 384 size of image, normal View Panel window.
Press [Esc] key if you want to return HALF mode in other mode.
FULL : 1024 x 768 size of image, Control Panel is closed and Mini Control Panel
opens. (It is recommended to select this mode in a XGA or higher Monitor.)
SCREEN FULL : 1024 x 768 size of image, Control Panel is also closed and Mini
Control Panel opens. The title bar and taskbar are disappeared.
(To select SCREEN FULL mode: Press [Alt + Enter] key.)
3
Q-SAVE : Captures and saves images by hotkey [F2] or Q-SAVE button.
(For details, See page 23.)
CONTROL PANEL : Reactivates the Control Panel window.
EXIT: Exits program.
13
4
Option Dialog
1. Current Q-SAVE folder path (USB 2.0 only)
You can change Q-SAVE folder to save images when you press Q-SAVE button or
[F2] key.
(For details about Q-SAVE, see page 23.)
2. Auto-Hide Mini Control Delay
You can adjust the time you want to display Mini Control Panel in SCREEN FULL
mode. The default value is 5 seconds. The value ranges 0 to 30. When you set 0
seconds the Mini Control Panel is always visual. (For details about Mini Control
Panel see page 22.)
3 Always Full Resolution Save/Print
Though in HALF of QUAR mode, the image is applied to FULL size (1024 x 768)
when you press SAVE/Q-SAVE/PRINT buttons.
4) Safe Mode
Making use of some Low-end PC(include DVMT type graphic card) makes trouble
with displaying images in 20 frame/sec(USB2.0). The program can operate slower
less than 10 frame/sec.
✔ Note : • Just make sure to restart the viewer program when you
check the 'Always Full Resolution Save/Print' item.
(Recommended USB 2.0 mode)
14
Samsung Digital Presenter Control Panel overview
With the Samsung Digital Presenter program, you can control and adjust the images
presented from your presenter. You can also save it as a graphic file and print the
images through the printer connected to the PC.
2
1
3
Using Samsung Digital
Presenter Control Panel
4
1. You can control capture, save and print
images on the Control Panel.
5
6
2. The buttons on the Control Panel are the
same as buttons on Samsung Digital
Presenter or those of a remote controller.
(For details, refer to Samsung Digital
Presenter User’s Manual.)
7
8
9
10
15
1
2
3
ControlPanel
Mini Control Panel switch button
In FULL mode you can change Control Panel to Mini Control Panel.
HALF button (It is invisible in usual Control Panel.)
This button appears when you call Control Panel in the FULL mode. It
makes program to return normal window. (Hotkey : [Esc] key)
Wide/Tele: Reduces or enlarges the image size on the
screen.
Near/Far: Adjusts focus
4
IRIS+/-: Adjusts the brightness of the image on the
screen.
Blue +/-: Adjusts the blue color.
Red +/- : Adjusts the red color.
5
16
AF: Adjusts auto focus
AWC: Adjusts auto color
6
Lamp ON/OFF: Turns the lamp On/Off.
7
Rot. (Rotate): To rotate the image by 90° / 180° / 270° / 0°
The images on the View Panel do not change.
(For the UF-80DX only)
Aper. (Aperture): Turns on/off aperture mode. (TEXT MODE/IMAGE MODE)
Fz. (Freeze): Turns on/off Freeze mode. The images on the View Panel do not
change.
Hz (Frequency): Switches frequency of the presenter between 60Hz and 75Hz.
The images on the View Panel do not change.
Ext. (External): Use this to select internal or external image. The images on the
View Panel do not change.
8
Displays the status of CONTROL FUNCTION and DIGITAL FUNCTION,
PRESET. Shows the current status of the presenter and also shows the number
selected at DIGITAL FUNCTION, PRESET status.
17
9
DIGITAL FUNCTION/PRESET button inter-operates with the number button
(1~8). (Refer to Samsung Digital Presenter User’s Manual)
I-sav(Image Save) / I-rcl(Image Recall) :
• Saves the projected image into the memory of this unit.
• Recalls the image from the memory.
•To save/recall the image, press I-sav / I-rcl button and specify the memory
location within 5 seconds using the number keys from 1 through 8.
(For the UF-80DX only)
Div2(Image Divide):
Divides the screen to show both of the current image and the image recalled from
the memory simultaneously on one screen.Press Div2 and specify the memory
location within 5 seconds using the number keys from 1 through 8.
(For the UF-80DX only)
Shift:
Shifts the recalled image shown in the divided screen from the right to left to show
the hidden portion of the image. (For the UF-80DX only)
Div9(3 x 3 Multi):
Allow to see all the images in the memory (up to 8 frames) on one screen.
To view the whole image, press number keys from 1 through 8 within 5 seconds.
(For the UF-80DX only)
Free:
Allow to stop current image processing function and return to normal mode.
(For the UF-80DX only)
Psav(Preset Save)/Pexe(Preset Execution):
Allow to save the customized user setting values or to activate the preset user
setting. After pressing Psav / Pexe button press number keys from 1 through 4
within 5 seconds.
18
Capturing/Saving/Printing images
You can save the image currently displayed in the View Panel as a BMP or JPEG
format graphic file. Do as follows:
10
1. Samsung Digital Presenter View Panel
displays image currently presented from
Samsung Digital Presenter. When the
desired image is displayed in the View
Panel, click Capture button.
2. When capturing is complete, the Release
button,Save button and Print button are
activated.
Saving Images
1. Click [Save] button to save captured image in the Capture mode.
2. Specify the file name, file format, and file path. Then, click Save in the Save As dialog
box. The image is saved as a selected file format.
3. When completed press Release button to release the Capture mode. The Release button
disappears and Capture button is available.
19
Printing images
1. When capturing is complete, the Print button is activated. Click Print button,then the Print
page Setup dialog box prompts.
2. Select Paper Size/Print Position/Print Size/Orientation etc.
■ Fit to page : The image is fit to the page size you selected.
■ Specified : You can specify the printing size of image.
■ Maintain aspect ratio
■ Margins : You can set the margins of the paper.
■ Orientation: You can set the printing orientation.
20
3. Select print options and click OK to start printing.
4. After printing is complete, click Release button to release the capture mode. If you do not
release the capture mode, the View Panel remains occupied with the captured image.
✔ Note : • The Save/Print size is originally set to the same one as View
Panel image size. To Save/Print the Full size(XGA) image,
check the ‘Always Full Resolution Save/Print’ item in the
Option dialog box.
• It may take 0.5 ~ 2 seconds to capture or release image in
USB 1.1 mode.
21
Samsung Digital Presenter Mini Control Panel overview
Mini Control Panel is used not to hide the image in the FULL mode and it is
composed to key functions of Control Panel. If you want to use the Control Panel,
press 5 button.
5
1
1
Wide / Tele / AWC : See page 16.
2
Capture Image/ Save / Print : See page 19.
3
DIP : See page 24.
4
Half : See page 16.
5
Opens Control Panel on which you can control all functions of
presenter.
2
4
3
✔ Note : • Mini Control Panel disappears within several seconds, you
can set this moment in the option dialog box. (Default : 5
seconds, see page 14 for details.)
• While capturing , the Mini Control Panel doesn’t disappear.
• When you change Mini Control Panel to Contorl Panel, the
Control Panel would not disappear for itself.
• You can see the Mini Control Panel in FULL/SCREEN FULL
mode.
22
Quick Save ([F2] key)
You can save quickly by button or hotkey.
Q-SAVE is only available in USB 2.0 mode. The image file path can be set in Option
dialog box. (The default path is located where the Samsung Digital Presenter
program is installed + QuickCap.)
How to Q-SAVE
1. When the closed image is displayed in the View Panel, Click Q-SAVE button or
press [F2] key to save quickly.
2. In ‘QuickCap’ folder under the directory where your program is installed, the
captured image is saved as JPEG format. (ex> c:\program files\UF-80 USB
Viewer\Quick Cap or specified directory which you have set in the option dialog
box)
3. The file is named automatically as YYYYMMDDHHMMSS.jpg type.
(ex> 20040330_152340.jpg)
✔ Note : • In Capture mode the Q-SAVE is not available.
• The default capture size is the same as one of the image on
the View Panel.
• If you have checked ‘Always Full Resolution Save/Print’ item
in the Option dialog box the image is saved as full size.
• In the FULL/SCREEN FULL mode, the only hotkey [F2] is
available to execute Q-SAVE function.
• If you execute Q-SAVE two or more in a second, the last
image is only saved in QuickCap folder.
23
Applying DIP (Digital Image Effect Processing) Functions
DIP produces a impressionistic effect on a selection by displaying pixels and by
finding and highlighting contrast in an image.
The original image of presenter doesn’t change. The DIP image is transformed just in
the PC.
DIP is available only in USB 2.0 mode.
Using DIP for Digital Image Effect
1. While the image from presenter is displayed, if you click DIP button on (Mini)
Control panel, DIP Panel opens. This button is not available while capturing.
2. If you click effect button what you want to produce the applied image is displayed
on the View Panel. You can adjust the value from mouse or keyboard in
Binarization/ Image Rotation / Mosaic mode.
3. Click Default button to return to original image status.(RGB colors image)
4. Click Reset button to reset to default value in Binarization / Image Rotation /
Mosaic mode.
24
Digital Image Effect Processing Description
1) Default: The original image (RGB colors)
[Uses : Displays the original image from the Digital Presenter.]
2) Grayscale: The image(RGB colors) is changed to grayscale.
[Uses : You can enhance readability or legibility of the image.]
3) Histogram: The program shows the histogram on the left-up side. This effect is
available on Default, Grayscale, Binarization mode.
[Uses : Lets you adjust the Digital Presenter's bright value or turn the lamp On/Off
efficiently.]
✔ Note : A histogram illustrates how
pixels in an image are distributed by
graphing the number of pixels at each
color intensity level. This can show you
whether the image contains enough
detail in the shadows (shown in the left
part of the histogram), midtones
(shown in the middle), and highlights
(shown in the right part) to make a
good correction. The histogram also
gives a quick picture of the tonal range
of the image, or the image key type.
4) Negative: This toggles Negative and Positive Image.
[Uses : Converts negative film or slide image into positive image.]
5) Binarization: Assigns the image to 1 or 0 by threshold value. The threshold ranges
16~251 and the value is not automatically decided. The default value
is 128 and you can set the value of Binrization by mouse or
[ ], [ ] keys.
[Uses : Applied to Image Analysis / Image Interpretion. (OCR, Pattern
Recognition)]
6) Edge Detection: Identifies the areas of the image with significant transitions and
emphasizes the edges. Find edges,outlines the edges of an
image using the Prewitt mask.
[Uses : Applied to Image Analysis / Image Interpretion in the Computer Vision.]
25
7) Image Rotation: This effect lets you rotate an entire image. You can rotate the
image easily (–180˚ ~ 180˚) by mouse or [ ], [ ] keys. You
may not see the whole image because the image is rotated on the
center.
[Uses : Rotates an Image -180~+180 degree to View or Save an image.]
8) Emboss: Makes a selection appear raised or stamped by converting its fill color to
gray and tracing the edges with the original fill color.
[Uses : Applied to Image Analysis / Image Interpretion in the Computer Vision.]
9) Mosaic: Draws the image as if it were made up of small chips or tiles and adds
group between the tiles. The default value is 8 and you can adjust the
value by mouse or [ ], [ ] keys.
[Uses : Mosaics the original image from the Digital Presenter.]
26
Digital Image Effects
Save
Print
Processing time
Default
O
O
Quick
Grayscale
O
O
Negative
O
O
Binarization
O
O
Edge Detection
O
X
Image Rotation
O
X
Emboss
O
X
Mosaic
O
X
Range
16~251
-180 ~+180
Slow
0 ~16
Using Samsung Digital Presenter TWAIN Driver
1 System requirement
• Samsung Digital Presenter USB device driver
• TWAIN supported application program
* To use TWAIN driver your PC had been installed Samsung Digital Presenter USB
device driver.
2. Install Samsung Digital Presenter TWAIN driver
• Refer to install Samsung Digital Presenter program (See page 7 for details.)
• If you’ve not installed TWAIN driver in InstallShield program you have to install it
separately.
3 Running TWAIN driver in your Application Software (case by case)
1) Adobe Photoshop : [File]
[Import]
2) JASC Paintshop Pro :
[Import]
[TWAIN]
[File]
[File]
[Import]
[TWAIN]
[UF-80 TWAIN Data Source]
[Select Source…]
[Acquire…]
Then select UF-80 TWAIN
3) Microsoft Office :
[Image]
[Scanner or Digital Camera …]
[Insert]
Select [UF-80 TWAIN Data Source], then select [Custom Insert].
4) In the other TWAIN supported application software refer to application manual.
4 Scan images through UF-80 TWAIN driver
Samsung Digital Presenter TWAIN driver operates almost same as Samsung
Digital Presenter USB program. Refer to that program description (page 12) except
TWAIN function.
✔ Note : • In SDP TWAIN driver you can capture and scan full size
image(1024 x 768) in the HALF preview mode.
✔ Caution : • Samsung Digital Presenter TWAIN Driver cannot support
Q-SAVE, DIP and scanning QUAR(256 x 192) size image.
• Because some graphic softwares have program bug in
TWAIN acquisition, it may make an error while scanning
SDP TWAIN driver. Download and install the latest
software update patch, or request technical support of
software vendor.
27
Scanning Images
1 The images from a presenter are displayed on the View Panel.
Select the size you want to scan through TWAIN. (The default size: HALF mode on
View Panel)
2 Press Capture button to scan in application program.
3 When completed Capture, the TWAIN Scan button activates. If you click the button,
the captured image is transferred to the application program.
4 For more information about TWAIN Driver, refer to the graphic application software
manual.
✔ Note : • In FULL / SCREEN FULL mode, you can scan FULL(1024 x
768) size image only.
You cannot scan HALF(512 x 384) size image in FULL
Preview mode.
28
Keyboard Map
Keys
[Alt + Enter]
Description
Remark
Set the window SCREEN FULL mode.
[While displaying]
Return to HALF size mode
[ESC]
[While capturing]
Release captured image
[F2]
[Alt + F4]
You can specify the path your Q-SAVE images are
saved.
(See page 23.)
For operating Q-SAVE the other functions are
temporarily unavailable.
Exits this program.
29
Using Samsung Digital Presenter AVI Capture
With the Samsung Digital Presenter AVI Capture program, you can capture digital
images from Digital Presenter (512x384 pixels, 20 frame/sec) to AVI file (USB 2.0
only)
1. Make sure that your Samsung Digital Presenter is connected to the PC and both
are turned on.
2. Select and Click [Start]
Capture]
[Program]
[UF-80 USB Viewer]
[UF-80 AVI
3. AVI Capture program is available in USB2.0 mode (Windows 2000/XP or higher)
(See page 3, System Requirements)
30
✔ Caution : • In case of FAT32 file system of your PC, the single file
size limited by maximum 4 GB. Check your Windows file
system in volume property dialog.
You must format or convert your file system to capture more than 4 GB on single file.
We recommend to use MPEG-4 video Codec. (Ask the technical support to use
Format, Convert command)
Maximum File Size
FAT32
NTFS
4 GB
No limit
No Compression
Approx. 6 Min
No limit
MPEG-4 High Quality
Approx. 12 Hours
No limit
MPEG-4 Low Quality
Approx. 40 Hours
No limit
* 'No limit' of NTFS system means "File size limited only by size of volume"
31
4. Using UF-80 AVI Capture Program
(1) Capture Time Limits
You can set capture time limits to capture AVI file for a fixed period by minute.
Program will show required HDD space approximately based on the Compression
Mode.
✔ Note : The Captured AVI file size may be different from approximate
captured file size because of the amount of motion of images
or dropped frames.
(2) Compression Mode
You can choose one of the compression modes (3-type)
1> No Compression
- The captured AVI file will not be compressed.
- You can capture best quality AVI file without the distortion of image.
- Required HDD space : 39Gbyte / hour
- Dropped frames can occur frequently if HDD is low-speed device.
2> MPEG-4 (High Quality)
- The Captured AVI file will be compressed using MPEG-4 Codec.
- You can capture fast-motion image with High-quality MPEG-4 Codec.
- Required HDD space: approx. 300Mbyte / hour
3> MPEG-4 (Low Quality)
- The Captured AVI file will be compressed using MPEG-4 Codec.
- You can capture low-motion image (like a manuscript or stopped object) with
lower HDD space but low image quality.
- Required HDD space: approx. 99Mbyte / hour
✔ Note : If your CPU is low-end device, Dropped frames can occur
frequently using MPEG-4 Codec, the time length of captured
AVI file may be different from real time sequence.
32
(3) Capture Status
Once You've started recording, status lamp turns on red light and capturing time
displays below status lamp.
(4) Flip image vertical
According to digital presenter lens position, preview images can be reversed. So,
using Flip image vertical option, you can capture the right direction image
(5) Frame rate per second
The Frame rate per second choices let you specify how many movie frames per
second will be recorded. We recommend 20 frames/sec. If your computer is not
fast enough to capture and compress images, you must lower Frame rate per
second as your condition.
✔ Note : For example, if you capture 1 minute AVI file using Capture
Time Limits option,but playback movie is recoded 30 sec AVI
file (default : 20 frames/sec), you must lower Frame rate to 10
frames/sec (20 x (30/60) = 10) for capturing real time movie.
(6) Display local time in AVI file
You can display local time in top-left of AVI playback file by this option.
(7) Display user caption in AVI file
You can display user caption (up to 50 characters) in top-left of AVI playback file
by this option.
(8) Capture
After setting all the parameters for your AVI file, you may start recording by clicking
Capture button. Specify the file name and file path. Then, click Save in the Save
As dialog box. The capture process will be stated as a selected file.
33
(9) Stop
Stop button will be activated when capture process stated, you may save AVI file
safely by clicking Stop button.
(10) Exit
Exits AVI capture program.
✔ Notice : 1. While capture processes, Do not turn off power of the
presenter or remove the USB cable off the PC. It may
cause the presenter or the PC to make trouble.
2. While capture processes, [Exit] button would not finalize
AVI file. For saving AVI file safely, Push [Stop] button
first.
3. AVI capture program and USB Viewer program aren't
executed at the same time.
34
Troubleshooting
Symptom
Solution
Fails to run Samsung
Digital Presenter
program
There is a communication error between Samsung
Digital Presenter and the computer. Exit Samsung
Digital Presenter program and do as follows:
• Unplug the USB cable and then plug in it again.
• Close other unnecessary software programs that are
running (especially programs related to USB
communication and which occupy many system resources).
• If you turn the unit off, turn it back on after at least 10
seconds.
The following error
message: "There is a
problem in communication
of USB. Please disconnect
the plug of USB and
reconnect it."
System error occurred during USB communication.
Do as follows:
• Unplug the USB cable and then plug it back in.
• Check the power condition of presenter.
The following error
message: "Fail to find
USB device driver.
Check the USB plug or
the power of USB set."
Your computer system could not find USB driver.
• Check the USB cable connection.
• Check that USB driver is properly installed. For
details, see page 7.
• Reboot the computer and try again. If you fail again,
remove the driver (See page 10.) and reinstall the
device driver. (See page 5.)
The following error
message: "The Program
Already Exists or In the
Process of
Termination."
• Run the program after minimum 3 seconds.
• In case of Abnormal Off, disconnect the plug of USB
and reconnect it.
The following error
message: "Fail to save
image."
The error occurs in the following cases.
• In case you have selected the Q-SAVE folder to CDROM drive or write-protected storage driver.
• In case you didn’t save image as a BMP or JPEG file
format.
• In case the libraries related to save image are
deleted or damaged.
35
36
Symptom
Solution
The following error
message (Windows XP
message):
“HI-SPEED USB device
is plugged in non-HISPEED USB hub. ”
The system operates USB 1.1 mode like this case.
• Make sure that the USB 2.0 function is ON in CMOS.
• Download and install Microsoft USB
patches.(KB822603)
Select Start
System
• On [Control Panel]
Device Manager
[Universal Serial Bus controllers]
lists select the property of USB 2.0 root hub and
select the Power Management tab. Uncheck the ‘To
turn off this device for saving Power’ item.
• Turn off the power management (S3) of computer.
When the file you
captured cannot be
played
(Re)Install the codecs included with a CD.
Installing the UF-80 Viewer(Macintosh Program)
System Requirements
• Power PC G3 400MHz or above (USB 2.0: PowerPC G4 800MHz or above
recommended)
• MacOS 10.2 or above
• At least 64MB RAM or above, 128MB recommended
• USB 1.1- or USB 2.0- compatible port (USB 2.0 recommended)
• OpenGL-compatible Graphics Board recommended
• CD-ROM Drive
✔ Notice : • USB 2.0 PCI Cards or USB 2.0 PCMCIA Cards are not
formally supported.
• USB 2.0 PCMCIA Cards may not demonstrate full USB 2.0
capability.
37
Connecting the UF-80
1. Make sure that both the Samsung Digital Presenter and a computer are turned on.
2. Plug one end of the USB cable into the USB port on the Samsung Digital
Presenter.
3. Plug the other end into the USB port on the computer.
DVI
MOUSE
RS-232C
VGA OUT
VGA IN
USB
✔ Caution : For a Macintosh installed with USB 2.0, the USB port at the
rear of the system is 2.0, but the port on the keyboard is
1.1. Hence a Macintosh with USB 2.0 works in 1.1 mode
when the digital visual presenter is connected to the
keyboard.
38
Program Installation
After inserting the CD, double-click the following program icon to run it.
When the above screen appears, click the "Continue" button. The installation will not
proceed if the current OS version is older than 10.2.
39
After reviewing the information, click the "Continue" button.
After reviewing the copyright information, click the "Agree" button (if you agree).
40
Select the hard disk where the software will be installed. When multiple hard disks
are available in the system, the one where the software can be installed is displayed.
Select it by clicking on it and press the "Continue" button.
41
When the software installation is complete, click "Close" to exit the installation
program.
The UF-80 Viewer software is installed in the "Applications" folder on the selected
hard disk.
42
Running the UF-80 Viewer
UF-80 Viewer Screen
1. Adjusting image size
Adjusts the size of an input image. According to user selection, the size of the image
is changed to 1024x768, 512x384, or 256x192.
Displays 1024x768 image.
Displays 512x384 image.
Displays 256x192 image.
43
When an image size is larger than the size of the display area in the window, the
image is fitted to the display area. If pressed again, the image is displayed in its
original size, but a part of it may be hidden. If the user enlarges the size of the
window, the entire image is displayed regardless of the current display mode.
2. Function Status Display
Displays the function status of the current set on the screen.
3. Configuration
In the configuration menu, the user can specify a location and a file format in which
an image will be saved through quick saving. By clicking the "Set…" button, the user
can specify a location where an image will be saved.
In the image format popup menu, the user can select from TIFF, JPG, or PNG.
44
4. Capture
English
Saves an image input from a set as an image file.
Quick image saving: When this button is pressed, the current image is saved into
the folder specified at the configuration menu. If the size of the current display is
not the same as the overall size of the image being displayed, the "Capture"
function saves it in its overall size. (Available only in USB 2.0 mode)
Capture: Captures the current image and displays it in a separate capture window.
When the capture window is closed, the user can click this button to display it
again.
5. Control Button
The control button area provides a collection of functions to control a set. For more
detailed information, please refer to "UF-Viewer Control Buttons".
6. Display Area
An image taken through the lens of the digital visual presenter is displayed in this
area. The resulting image, adjusted by using the control buttons, operation panel or
remote control, can be checked on this screen.
45
UF-80 Viewer Control Buttons
By using the Samsung Digital Visual Presenter
program, the user can change an input image by
controlling the visual presenter.
1. Image Control Slider
With the control slider, the user can control zooming,
focusing screen brightness & color.
Press a function selection button below the slider to activate
the slider and fine control buttons, and control the selected
function. The initial state is zoom control.
Zoom: Activates zoom control.
Focus: Activates focus control.
46
Brightness: Activates image brightness (iris) control
Red: Adjusts the screen color (red).
Blue: Adjusts the screen color (blue).
2. Image Adjustment
Performs automatic color adjustment.
When pressed, toggles between image mode and text mode.
Performs automatic focusing.
When pressed, the image in the digital visual presenter is rotated by 90 , 180 ,
270 or 0 . Images in the display area are not affected by this change.
3. Lamp Power Button
When pressed, the visual presenter lamp toggles on or off.
4. Device Control
Converts an input image to an internal image.
Coverts an input image to an external image. An image imported from an external
device is not displayed in the display area.
47
When pressed, the digital visual presenter image frequency toggles between 60
Hz and 75 Hz. Images transmitted via USB are not affected by this change.
When pressed, the freeze function is toggled on or off. Images transmitted via
USB are not affected by this change.
5. Memory
Turns off Freeze, Image Divide, 3x3 Multi, Recall and Rotate.
(For the UF-80DX only)
Divides the current image and an image saved in the memory of the digital visual
presenter into two images, and displays them at the same time. After pressing the
button, select a number button (1-8) in the dialogue box.(For the UF-80DX only)
When an image is displayed in Image Divide mode, the saved image is moved to
the left side of the screen.(For the UF-80DX only)
Divides all the images saved in the memory of the digital visual presenter into 9
screens and displays them at the same time.(For the UF-80DX only)
Saves the current image in the memory of the digital visual presenter.
After pressing the button, select a number button (1-8) in the dialogue box.
(For the UF-80DX only)
Displays an image saved in the memory of the digital visual presenter. After
pressing the button, select a number button (1-8) in the dialogue box.
(For the UF-80DX only)
Saves the values changed by the user, including zoom/shrink, focus, brightness
and color controls. After pressing the button, select a number button (1-4) in the
dialogue box.
Executes the values changed by the user, including zoom/shrink, focus,
brightness and color controls. After pressing the button, select a number button
(1-4) in the dialogue box.
48
Image Capture/Save/Output
Images in their current format can be captured and saved in JPG, TIFF or PNG
format on a Macintosh hard disk and output to a printer.
1. Capturing Images
When images from the digital visual presenter are transmitted to the display area,
press the capture button (
).
Select a capture size in the dialogue box. The entire image is captured in 1024x768,
1/4 in 512x384 and 1/16 in 256x192.
When capturing is complete, the captured image is displayed in the capture window.
49
2. Saving Images
To save a captured image, press the "Save image…" button.
After specifying a filename and a saving format, press the "Save" button to save the
image.
50
3. Image Output
Press the "Print" button in the capture window and the print dialogue box appears.
The contents of the dialogue box may differ depending on the type of printer.
The detailed print configuration including paper type and printing method are set
according to the printer driver. Please refer to the manual of the printer currently
being used.
Pressing the "Preview" button converts the current image to PDF format, allowing the
user to check its condition before printing.
4. Copying Images
Press the "Copy" button in the capture window to copy an image to the clipboard.
Images copied into the clipboard can be used in other applications, with the "Paste"
function. This function can be also accessed by pressing the shortcut key "Ctrl-C" or
selecting "Copy" in the "Edit" menu.
51
Quick Saving and Configuration
When an image is being displayed on the digital visual presenter, the user can
quickly save it by pressing the shortcut key "Ctrl-K". The image is saved in 1024x768
size in quick saving mode.
The location and format in which an image will be saved can be specified at the
configuration menu.
Images can be saved in TIFF, JPG or PNG format. TIFF format is a non-compressed
format, whilst in JPG or PNG format images are compressed. With PNG format,
there is no loss of image, but the number of colors in the image may be reduced.
The filename in which an image will be saved cannot be specified by the user, but
consists of the current date and time.
✔ Notice : The Quick Saving function works in USB 2.0 mode only.
Image Rotation
The image in the capture window can be rotated by 90 horizontally. This rotation is
applied when it is saved or printed.
Quick saving does not support image rotation.
52
Troubleshooting(Macintosh Program)
Symptom
If the UF-80 Viewer
does not run
Solution
To run the UF-80 Viewer, the digital visual presenter
must be connected to a Macintosh. The digital visual
presenter power must also be turned on.
Check the USB connection and the digital visual
presenter power.
The device operates in
USB 1.1 mode even
when it is connected to
a USB 2.0 compatible
system.
To operate in USB 2.0 mode, the device must be
connected to a USB 2.0 compatible port or hub.
The device is connected
to a USB 2.0 compatible
port but the screen
display is slow.
Close any other applications that are running at the
same time.
Connecting the device to a USB 1.1 hub connected
to a USB 2.0 compatible port or a keyboard/monitor
USB port makes it operate in 1.1 mode.
The screen display may be slow for some systems
with a low-specification graphics board.
53
Memo
54
■ HEAD OFFICE: SAMSUNG TECHWIN CO., LTD
145-3 Sangdaewon 1-Dong, Jungwon-Gu,
Sungnam, Kyungki-Do,Korea 462-703
TEL : 82-31-740-8137~8141
FAX : 82-31-740-8145
■ SAMSUNG OPTO-ELECTRONICS UK LTD (SOUK)
Samsung House,1000 Hillswood Drive Hillswood Business
Park Chertsey Surrey KT16OPS
TEL :44-(0)1932-45-5308 FAX :44-(0)1932-45-5325
■ U.S.A OFFICE: SAMSUNG OPTO-ELECTRONICS AMERICA, INC.
40 Seaview Drive, Secaucus N.J.07094, U.S.A
TEL : 201-902-0347
FAX : 201-902-9342
■ TIANJIN SAMSUNG OPTO-ELECTRONICS CO.,LTD (TSOE)
7 Pingchang Rd,Nankai Dist,Tianjin,P.R China Post Code :300190
TEL :86-22-2761-9698
FAX :86-22-2761-6514
■ SAMSUNG TECHWIN MOSCOW OFFICE
LENNINGRADSKY PR-KT, 37-A. KORP.14
RUSSIA, 125167, MOSCOW
TEL: +7-095-258-9296, 9298
FAX: +7-095-258-9297
P/No : 6806-0560-01A