1
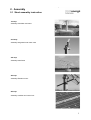
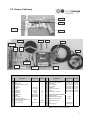
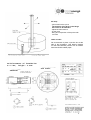
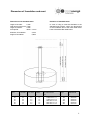
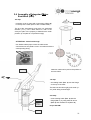
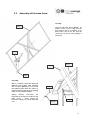
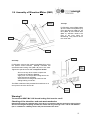
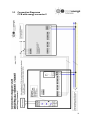
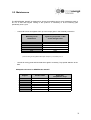
Assembly Instruction
DEGERtraker 7000NT
Latest update: 04/2007
List of contents
1
Security advices / Intended use………………………………………….
2
Assembly
2.1 Short assembly instruction.…………………………………………………...
2.2 Scope of delivery………………………………………………………………
2.3 Foundation and mast ………………………………………………………….
2.4 Integrated motor east-west (IMO) ……………………………………………
2.5 Base frame………………………………………………………………………
2.6 Elevation motor (EMO)………………………………………………………...
2.7 Module carry system……………………………………………………………
2.8 Modules………………………………………………………………………….
2.9 Control unit assembly.………………………………………………………….
3
5
6
7
10
11
12
13
14
15
Technical characteristics
3.1 Functional characteristics………………………………………………………
3.2 Data sheet energy converter V…………………………………………………
3.3 Connection diagramm CCB with energy converter V…..………………
4
4
16
17
18
Certificates
4.1 Declaration of conformity..…..…..…………………………………………….... 19
4.2 Declaration of commitment……………………………………………………... 20
5
Trouble shooting / Maintenace
5.1 Trouble shooting…….…………………………………………………………… 21
5.2 Maintenance……………………………………………………………………… 22
Start-up protocol…………........................................................................... 23
Fault report…………………………………………………………………………. 24
IMPORTANT INSTRUCTIONS!!
The start-up protocol (page 23) should be filled out on initial operation and faxed to
the company DEGERenergie within 4 weeks of start-up. The entitlement to warranty
claims for material defects will be only extended from the statutory two-year period
warranty to three years if this protocol is submitted within the specified timeframe.
A fault report (page 24) must be submitted in order to process complaints.
Complaints cannot be processed if fault reports have not been filled out correctly!!
2
Introduction
Congratulation for aquiring a DEGERtraker 7000NT. You decided for a high quality dual-axis solar
tracking system which can be used for all current photovoltaic solar modules.
Maximum solar yield...
can be achieved with the DEGERtraker tracking system. By using the DEGERtraker tracking
system, you are truly acknowledging the signs of our times: you are not only protecting our
environment and nature but you are increasing your yield and thus achieving amortisation sooner.
Maintenance-free. Long-lived. Recyclable.
The systems designed to these exacting parameters are mass-produced in an ISO 9001-certified
factory under environmentally sound conditions. DEGERtraker systems are truly 99.9% recyclable.
Compared with rigid systems, the amount of electronic scrap after useful life is 40% lower!
Quick installation.
Pre-assembled components and detailed instructions allow an installation within about two hours
(after the mast has been erected).
A technology to rely on.
The fact that the patent-protected control system and the utility model-protected mechanical
system were awarded the inventor’s prize of the federal state of Baden-Württemberg in SouthGermany in 2000 shows that the DEGERtraker meets the demands of both experts and investors.
The proven static design of the DEGERtraker is based on DIN 1055-4 (8.86) and DIN 1056
(10.84) for installation up to 8m.
Scope of delivery.
Complete dual-axis tracking system, mast, aluminium solar module carrier system to fit the
respective module type, DEGERconecter control electronics with energy converter for extremely
economical operation, foundation plan, construction plan.
3
1. Security advices
The installed DEGERtraker tracking system has to be protected against trepassing in its hole
sphere of action by adapted measures, for example by errecting a fence.
While assemblage of the DEGERtraker 7000NT or parts of the system and while the system is
put into operation some risks of injury exist caused by moveable parts of the tracking system. To
protect injuries caused by eventually existing burrs or sharp angles we imperatively recommend
to wear gloves when mounting the steel parts of the system.
In case of checks or changes at the DEGERtraker 7000NT all parts of the system have to be
free of potential. Zero-potential and mechanical protection have to be proven and guaranteed
due to the “Allgemeinen Regeln zur Unfallverhütung”. When voltage supply is indispensable for
checking the system injuries of persons have to be ruled out by adapted actions.
Lightning protection and earthing have to be achieved due to DIN VDE 0185 or 0100 as with all
photovoltaic systems.
The hole sphere of action has to be free of any objects.
The DEGERtraker 7000NT can be moved manually by activating with 24VDC to the clamps 1617 (Elevation-axle) or to the clamps 18-19 (East-West-axle) for example by using a pushbutton.
Therefore please pay attention to chapter 3.2 and 3.3 of this assembly instruction.
The development of the DEGERtraker 7000NT is based on the DIN 1055-4. With application of
the windguard the system resits to higher demands than the values that are given in the norm.
In case of accumulation of snow on the module surface with more than 35kg/m² it is necessary
to broach the module surface. It is possible to do this by activating manually the elevation-drive
as described above.
Intended Use
The DEGERtraker 7000NT is designed and dimensioned to be applied with StandardPhotovoltaic modules and is therefore not adapted to be applied with Concentrator-modules,
mirrors, solar thermal collectors etc. The denoted maximum modulespace of 60m² must not be
exceeded in any case and has to be reduced according to regional conditions and regulations if
necessary. As soon as the modules are mounted an operating wind guard has to be assembled
or the modulespace has to stay in the horizontal position.
Permissible ambient temperature:
Sound level :
-20°C to +55°C
Distance 10m:
Distance 20m:
40 dB(A)
no difference to the sound level
of the surrounding measurable
Reference value:
40 dB(A) corresponds to:
- tweet of a bird
- usual background
sound level in a house
4
2. Assembly
2.1 Short assembly instruction
1st step:
Assembly foundation and mast
2nd step:
Assembly integrated motor east -west
3rd step:
Assembly base frame
4th step:
Assembly Elevation motor
5th step:
Assembly modules and control unit
5
2.2 Scope of delivery
Pos.2
Pos.4
Pos.16
Pos.1
Pos.15
Pos.5-6
Pos.8
Pos.27
Pos.11-13
Pos.
17-19
Pos.
20-22
Pos.28
Pos.23-25
Pos.14
Pos.9-10
Pos.26
DEGERtraker 7000NT
Pos.
1
2
3
4
5
6
8
9
10
11
12
13
14
15
16
17
Appellation
Mast
Rotating head
Base frame (10,60 x 2,60m)
EL-motor
Bolt M14x70
Nut M14
Bolt M12x50
Bolt M16x45
Washer M16
Bolt M24x180
Nut M24
Washer M24
Tread locking fluid 5g
Cover for mast with boomerang
Aluminium profiles
Clamp MTH M10
Application
EL-motor
EL-motor
EL-motor
Flange
Flange
Base frame
Base frame
Base frame
Mast
Alu/Base frame
Amount Pos.
1
1
1
1
1
1
2
18
18
2
2
4
1
1
12-22*
24-44*
18
19
20
21
22
23
24
25
Appellation
Sliding nut M10, 30x20x6
Bolt M10x35
Clamp MTH M8
Sliding nut M8
Bolt M8x30
Clamp plate 25x6,4x2
Bolt M6
Sliding nut M6, 18x18x5
Control unit energy converter V
26 casing with plate
27 DEGERconecter east-west
28 DEGERconecter elevation
Optional (without picture)
29 CCB
30 Power pack 24V
Application
Amount
Alu/Base frame
Solar module
Solar module
Solar module
Solar module
Solar module
Solar module
24-44*
24-44*
24-44*
24-44*
24-44*
32-154*
32-154*
32-154*
Sensor
Sensor
1
1
1
Control unit
Control unit
1
1
Alu/Base frame
* depends on size and amount of modules
6
2.3 Assembly Foundation and Mast
1st step:
- build soil
- build in ductwork (not in the picture)
- arrange reinforcement mat to support
the bracing (proposal to create a round
bracing)
(dimensions of the foundation see page 8
and 9)
- build in reinforcement ( Pos. 2
plan of reinforcement ).
use reinforcing bar spacer
2nd step:
- build in staff steel (Pos. 2 plan of
reinforcement) (also see step 4)
- build in bearing for mast (high ca. 10 cm)
in central position
- build in reinforcement (Pos. 1 plan of
reinforcement) in central position
ATTENTION: ductwork has to be within the
mast
3rd step:
- build in staff steel (Pos.
reinforcement)
1 plan of
4th step:
- build in bracing for quiver (40 x 40cm)
- errect and fix staff steel (Pos. 2 plan of
reinforcement)
5th step:
- Build in bracing for the foundation
(suggestion: galvanized sheet metal)
- bracing for the foundation has to be fixed in
that way the force of the concrete can be
accepted. (suggestion: additional protection
by a tension belt)
- filling and compaction of the foundation
with concrete (without quiver)
7
6st step:
Pos.1
- point mast into the quiver
The position of the drills in the flange
don`t have to be attended
- adjust the mast vertical
- fix the mast
- filling and compaction of the quiver with
concrete
Cable conduit
We recommend to place a junction box at the
side of the foundation. (see drawing beside)
For the lines between junction box an rotation
head use flexible rubber pipes.
Reinforcement of foundation
Ø 2.70m; height: 0.80m
STAFF STEEL 500/550
TOP VIEW:
SECTION:
Quiver 40/40/70 cm
Concrete Belated
Cutting draft:
reinforcement mesh
reinforcement mesh Nr.2
crosswise
2 reinforcement mesh
R 377; weight: 92,2kg
For DEGERtraker 7000NT
Total Length of the mast 3.30m
Concrete C20/25, XC2
Cover of concrete 4cm
8
Dimension of foundation and mast
Dimensions with standard-mast:
Deviation of standard-mast:
length of the tube:
2,70m
total length of the mast: 3,30m
length of restraint:
0,70m
mast profile:
323.9 x 7.1mm
In case of using a mast that deviates to the
standard-mast (length 3.30m) the dimensions
of the foundation and of the mast listed below
have to be abode like listed below.
diameter of foundation:
height of foundation:
Solarmodule- total length
space
of the mast
m²
m
60
60
60
60
60
3,3
4,0
4,5
5,0
5,5
2,70m
0,80m
free length
of the mast
m
2,6
3,3
3,8
4,3
4,8
length of
restraint
m
0,7
0,7
0,7
0,7
0,7
MAST PROFILE
Ø / wall thickness
mm
TUBE 323.9 x 7.1
TUBE 323.9 x 8.0
TUBE 323.9 x 10.0
TUBE 323.9 x 11.0
TUBE 323.9 x 14.3
mast
weight
kg
120
170
240
280
380
FOUNDATION
DIMENSIONS
cm
Ø270x80
Ø280x80
Ø290x80
Ø300x80
Ø310x80
9
2.4 Assembly of Integrated Motor
East-West (IMO)
7th step:
- mounting cover for mast with „boomerang“ (Pos. 15)
on the top of the mast (drive in with a rubber mallet)
Pos.15
The tip of the “boomerang” must point in a southward
direction (+/-3°). Use a GPS device or refer to the
surveyor’s plan of the property to determine the south
position. (a compass is not precise enough)
Pos.1
ATTENTION! Cable feed through
Use flexible rubber pipes. Insert the cable screw
connections into the plastic cover in accordance with the
corresponding wiring.
Pos.2
Attention needs not be paid to the position of
the bore holes.
1st step:
- set rotating head (Pos. 2) onto the flange
on the top of the mast.
The IMO unit should roughly point south (+/30°) while being screwed tight.
2nd step:
Pos.10
Pos.9
M16x45
- screw rotating head (Pos. 2) with the
flange (Pos. 1) by using bolts M 16x 45
(Pos. 9) and washers M 16 (Pos. 10).
torque 200 NM.
Pos.1
10
2.5
Assembly of the base frame
1st step:
Pos.3
Suspend the base frame (Pos.3) by
using a crane in such a way that the
bore holes at the tip of rotation of the
base frame are at the top and the
connection for the EL motor (EMO) is
on the left.
.
Pos.2
Pos.12 +
Pos.13
Pos.3
Pos.1
2nd step:
Built in stainless steel bolt M24x180
(Pos.11) with washer M24 (Pos.13)
and nut M24 (Pos.12). Do not screw
the stainless steel bolts too tightly, to
ensure that the shackles at the rotating
head are not pressed together.
Sliding
bearing
connectors
are
integrated in the point of rotation of the
base frame – these should be
lubricated slightly for initial assembly
only.
Pos.13
Pos.2
Pos.11
M24x180
11
2.6 Assembly of Elevation-Motor (EMO)
Pos.6
Pos.5
M14x70
1st step:
Fix Elevation motor (EMO) (Pos.
4) at the base frame (Pos. 3) by
using bolt M14x70 (Pos. 5), nut
M14 (Pos. 6) and washer M14
(Pos. 7). Attention needs to be
paid to the bore holes for
dewatering. They need to be on
the lower side.
Pos.4
Pos.3
Pos.2
2nd step:
Fix Elevation motor at the rotation head (Pos.2) by using
the spezial screws M12x50 (Pos.8). Therefore the
enclosed thread locking fluid (Pos. 14) has to be used.
Tighten the special screws with a tarquet of 35 Nm.
Pos.8
M12x50
- Do not use any other screws except those
included in the delivery (Pos.8)!
- Apply max. one drop of the locking fluid to the
internal thread of the EMO.
- Ensure that no locking fluid enters into the
sliding bearing connector!
The EMO is delivered with preseted limit switches so no
set up work has to be done at all.
Pos.4
Pos.8
M12x50
Warning!!
The enclosed BEST-MK 1325 thread locking fluid must be used!!
Checking of the elevation- and east-west-mechanics
Extend and retract the complete way of the drive, to guarantee that the mechanics moves freely,
doesn't knock agaist anything and that the cables are long enoungh. Use a 12V or 24V batterie
(for ex. suitable for a battery-driven drill) for the head of the drive.
12
2.7 Assembly of module carry system
Module arrangement:
The following dimensions have to be abode and
have to be reduced according to regional
conditions if necessary:
- Module surface:
- length of Module surface:
- high of Module surface:
max. 60m²
max. 11,40m
max. 5,30m
The limit for the whole module surface is 60m²
1st Step:
Arrangement of aluminium profiles:
Following points have to be attended:
- in both axels modules have to be
arranged symmetrically to the center
of gravity
- 2 aluminium profiles for each row of
modules
- attend the connecting socket on the
backside of the modules
x
y
= width of module / 2
= (length of aluminium profile –
2.60m) / 2
Pos.3
2nd step:
Pos.16
Pos. 19 M10 x35
+ Pos. 20
Assemble aluminium profile (Pos. 16)
at the base frame (Pos. 3) by using
clamp MTH (Pos. 17), bolt M 10 x 35
(Pos. 19) and sliding nut M10 (Pos.
18)
torque: 35NM
The clamp MTH has to be slided inside
the aluminium profile towards the base
frame until the bolt contacts the base
frame
ATTENTION:
Pos.17
Extend and retract the complete way of
the drive, to guarantee that the
mechanics moves freely, doesn't knock
agaist anything and that the cables are
long enoungh.
13
2.8 Assembly of the modules
Between the modules
Pos. 24 M6
+ Pos. 25
Pos.23
Assemble modules on the aluminium
profiles (Pos.16) by using bolt M6
(Pos. 24), clamp plate (Pos. 23) and
sliding nut M6 (Pos. 25)
Pos. 22 M8x30
+ Pos. 25
Pos.16
At the end of the module-surface
Pos.20
Pos.16
Both the clamp MTH and the bolts will have to
be assembled with a sliding nut as shown
beside. The sliding nuts have to be mounted in
that way the side with the sharp, not rounded
angles is pressed against the Aluminium
profile.
Tip:
Assemble modules on the alumnium
profiles (Pos.16) by using clamp MTH
(Pos. 20), bolt M8x30 (Pos. 22) and sliding
nut M8 (Pos. 21)
Torque: 18 Nm
Pos. 21 bzw. 25
sliding nut
Bring the DEGERtraker in a horizontal position - then it will be easier to install the modules
ATTENTION:
The limit for the whole module surface is 60m² and is not allowed to exceed.
Defects resulting from a too large module surface are not covered by the warranty. As soon as the
solar modules are installed you have to install a functioning wind guard or the module surface has
to stay in a horizontal position.
AFFIX OF WARNING
NOTICE
The delivered warning notice
has to be affixed to the mast
of every system well
observeable.
14
2.9 Assembly of the control unit
1st step:
Fixing energy converter
Pos.26
Pos.2
The energy converter (Pos. 26) can be
mounted at the rotating head (Pos. 2) or at
the base frame (Pos. 3).
Pos.3
Pos.27
2nd step:
Controlling the East-West axis
Mount the DEGERconecter with the inscription ‘OstWest’ (Pos. 27) pointing UPWARDS above the solar
module surface.
Connect the cable of the IMO (drive motor east-west)
Blue cable connection 3
Brown cable connection 4
3rd step:
Controlling the elevation axis
Function test:
Check if the drive rotates the module surface towards the
brightest spot in the sky. If you are not sure, you can
cover a sensor cell at the DEGERconecter with your
hand – now the module surface should rotate in the
direction of the non-covered sensor cell. Otherwise
change connection 3 / 4
Mount the DEGERconecter with the inscription
‘elevation’ (Pos. 28) LATERALLY at the solar module
surface. (left side; seen from the front side)
Connect the cable of the EMO (drive motor for
elevation)
Blue cable connection 1
Brown cable connection 2
Pos.28
Function test:
Check if the drive rotates the module surface towards
the brightest spot in the sky. When the sky is cloudy the
control will move the module surface into the horizontal.
In this case, too, if you are not sure, you can cover a
sensor cell at the DEGERconecter – then the module
surface should rotate in the direction of the noncovered sensor cell. Otherwise change connection 1 / 2
Checking of the elevation- and east-west-mechanics
Extend and retract the complete way of the drive, to guarantee that the mechanics moves freely,
doesn't knock agaist anyting and that the cables are long enoungh. Use a 12V or 24V batterie (for
ex. suitable for a battery-driven drill) for the head of the drive.
15
3. Technical describtion
3.1 Functional describtion
A technology to rely on.
The fact that the patent-protected control system and the utility model-protected mechanical
system were awarded the inventor’s prize of the federal state of Baden-Württemberg in SouthGermany in 2000 shows that the DEGERtraker meets the demands of both experts and investors.
The proven static design of the DEGERtraker is based on DIN 1055-4 (8.86) and DIN 1056
(10.84) for installation up to 8m.
Functioning
The DEGERconecter control unit detects the brightest spot in the sky and adjusts the module
surface’s position to face it. The DEGERtraker’s mechanical system allows the accurate
adjustment of the module surface to the sun all year round. This technology also works in
cloudy, rainy or foggy conditions. If, for example, a day starts off sunny with clouds moving in
from the west in the afternoon, the module surface will then move back slightly towards the east.
On a completely overcast day, the module surface is adjusted to a horizontal position, or to face
the point of the strongest irradiation. This allows to make the most out of adverse weather
conditions.
The control unit is designed to work preferably efficiently and only to do activities that cause a
direct increment of the solar yield. In particular the system doesn`t move east globally at night but
does this with the sunrise in the morning.
16
3.2
Data sheet energy converter V
Power supply of the DEGERconecter and the drive
- for power net feed systems of 80V...380V DC
- or 80...265V AC (Grid)
- or for self-contained supply of the drives
17
3.3
Connection Diagramm
CCB with energy converter V
18
4. Certificates
4.1 Declaration of conformity
19
4.2 Declaration of commitment
DEGERenergie GmbH
Steinshalde 56
72296 Schopfloch-Oberiflingen
Telephone: 07443-240 60
Fax: 07443-240 610
E-mail: [email protected]
DEGERtraker 7000NT
You have purchased a product that was submitted to careful examination prior to delivery. If, in spite of all our
care, the system which you purchased and we delivered is defective, we will accept liability for defects to the
following extent:
Liability for Defects
DEGERenergie GmbH undertakes to its contracting partner that it shall accept liability for defects as follows:
Contrary to the statutory two-year period for enforcing claims in respect of defects, the period granted for
enforcing claims in respect of defects shall be extended to three years only when the start-up protocol is filled
out completely and sent to DEGERenergie within 4 weeks of start up.
The compensation of exchange workings during the statutory warranty is exclusively based on the current
version of the DEGERenergie time target indemnification which can be provided on demand.
This extended liability for defects shall apply only in respect of replacing the defective material, but not for any
other costs, in particular the cost of labour.
In the event of any damage, DEGERenergie GmbH’s contracting partner undertakes to notify said damage to
DEGERenergie GmbH without delay.
Proof
DEGERenergie GmbH is only obligated to provide liability for defects to the contracting partner if the unit
constituting the object of the complaint is returned to DEGERenergie GmbH together with a copy of the invoice
issued to the contracting partner. The unit identification plate must be fully legible.
Conditions
The defective part is to be returned free of charge to DEGERenergie GmbH in its original packaging or, at the
very least, in equivalent transportation packaging.
Insofar as the object of the contract exhibits a defect attributable to DEGERenergie GmbH, DEGERenergie
GmbH shall be obligated to repair or exchange the defective part for a new part unless DEGERenergie GmbH is
entitled to refuse to remedy the defect under the terms of the law. DEGERenergie GmbH’s contracting partner
must allow the latter a reasonable period of time in which to remedy the defect.
The repair or replacement of the defective part shall be free of charge for DEGERenergie GmbH’s contracting
partner.
The DEGERtraker 5000NT can be only started in combination with a suitable wind guard designed to move the
solar module area into a horizontal position in the event of stormy weather. The contracting partner must
guarantee that the wind guard is in place at all times and functions correctly.
Exclusion of liability
DEGERenergie GmbH shall not be liable for additional costs incurred as a result of using higher masts than the
standard version of 3,3 m in total, or for damage due to incorrect operation by the contracting partner, in
particular by making the module surface area too large.
The respective specifications from the data sheet must be observed. DEGERenergie GmbH cannot accept any
liability damage caused by over-dimensioning the module area.
Neither can DEGERenergie GmbH accept liability for consequential damage caused by a defective tracking
system.
DEGERenergie GmbH shall not be liable for:
- Defects due to improper use;
- Defects due to the insert of foreign components for example mounting profiles;
- Defects due to changes to the mechanics and/or electronics;
- Defects due to acts of God (lightning, over voltage, storm, fire, etc.);
- Defects due to a higher upright height (statics shows max. 8m permitted);
- Defects due to interventions, changes, or attempted repairs;
- Defects due to non-compliance with the instructions in the assembly and connections guide.
Our General Terms and Conditions for Deliveries and Services shall apply in all other respects, correct
as of: September 2005.
20
5. Trouble shooting / Maintenace
5.1 Trouble Shooting
Precondition for trouble shooting:
The DEGERtraker has been assembled step by step as in the assembly instruction described
Type of error
Both axles do not move
Test
step
1
2
Check / Measurement
Result
Check voltage supply in the energy
converter at connection A /B
Check voltage between connections
/ 6 (EL) and 7 / 8 (AZ): Target:
20...28V
Solution
no distribution voltage >
reconnect >
OK
voltage contact >
continue with
step 2
5 not between 20 and 28V >
voltage contact >
continue with
step 3
continue with
step 4
3
Disconnect both DEGERconecters
voltage contact >
(sensors) at the circuit board and check
again
not between 20 and 28V >
change
conecter >
OK
change
circuit board
> OK
One axle does not move
4
Disconnect elevation drive at connection drive does not run >
1/2 or east-west drive at
connection 3/4 and power directly from drive runs >
storage battery (12..24V e.g. from
battery-driven drill)
change drive
> OK
change
conecter >
OK
East-west drive whirrs
but system does not
move
5
Uncover and check planetary back
geared motor in the aluminium housing
assemble
motor
correctly >
OK
change
geared motor
> OK
motor not actuated >
motor is assembled
correctly>
Does not start reorienting
itself towards the sun
until after 10 am
6
adjust limit
Check end position west with compass Rotates too far towards
or better with GPS Target: Rotation up to north-west in the evening > switch > OK
290° north-west (east=90°, south=180°,
west=270°)
Does not rotate further than continue with
290° towards north-west > step 7
7
Check DEGERconecter east-west axis
for correct installation
Conecter is not assembled adjust
correctly >
conecter eastwest further
to the front >
OK
21
5.2 Maintenance
The DEGERtraker 5000NT is designed for as less as possible service- and maintenace work to
do. For a safe and long-life running of the system it is necessary to do the following jobs
periodically once a year:
-
controll all screws and tighten them up to the torque given in the assembly instruction.
Mounting screw
Dimensions
Tightening torque MA1) in Nm
screw strength class
M6
M8
M10
M12
M14
M16
7,8
19,1
38,0
66,5
107,0
168,0
1) MA according to VDI-guideline 2230 (Feb. 2003) for µA=0,08 and µB=0,12
-
controll all moving parts and lubricate them again if necessary. Pay special attention to the
IMO.
Addapted Lubricants for DEGERtraker 5000NT:
Supplier
Avia
Bechen
Bechen
Bechen
Castrol
Fuchs
Rhenus
Product name
Avialith 2 EP
High-Lub L 474-2
Beruplex EP-O
RHUS LT 2 EP
Longtime PDD
Renolit Duraplex EP2
Norplex LKP2
Applicable
temperature range
-30
+130
-20
+120
-35
+150
-25
+120
-40
+140
-30
+160
-20
+150
22
Report of implementing
DEGERtraker 7000NT
Operator:
_____________________________________________
(name, addres, Tel. of operator)
Installer/Planer:
_____________________________________________
(name, addres, Tel. of Installer/Planer)
Date of implementing :
Amount:
Serial number(s):
____________
_____________
year of construction: _____________
___________________________________________________
Assembley:
□ free standing traker
□ traker integrated in building
□ total height
__________m
(top edge module surface)
□ standard-mast (3,30m)
□ Mast extention_______m
□ wind guard type : ________________________________
□ direct current____ V / DC
Power supply:
□ Energy converter □ V □ II
□ alternating current___ V/AC
Control of the assembly
reinforcement of the foundation was build in due to the plan
hole sphere of action is free of objects
mechanic moves freely, cables are long enough
bore holes for dewatering of the EL-motor on the lower side
locking fluid EL-motor (Pos.8) is applied
dimensions of module arrangement are abode
symetrical arrangement of the modules to the center of gravity
lightning protection and grounding is connected
conecter East-West axle is mounted pointed upwards above the solar module surface
conecter elevation axle is mounted laterally at the solar module surface
Control of the function
East-West drive rotates towards the brightest spot (cover one sensor cell)
Elevation drive rotates towards the brightest spot (cover one sensor cell)
activation by use of wind guard drives traker into horizontal position
Measured data
Power supply
clamp A-B
Conecters:
Power supply to conecter elevation
clamp 5-6
Output from conecter elevation
clamp 11-12
Power supply to conecter east-west
clamp 7-8
Output from conecter east-west
clamp 13-14
Motors:
Power supply to motor elevation
clamp 1-2
Power supply to motor east-west
clamp 3-4
current consumption motor elevation
current consumption motor east-west
O.K.
inplementing
current
reference
V
V
20-24V
20-24V
20-24V
20-24V
V
V
V
V
V
V
V
V
20-24V
20-24V
0,4-1,1A
0,4-1,1A
V
V
A
A
V
V
A
A
Date: ________
Signatures:
_________________________________
_____________________________________
Installer/Planer
Operator
IMPORTANT INSTRUCTIONS!!
The start-up protocol should be filled out on initial operation and faxed to the company
DEGERenergie within 4 weeks of start-up. Fax-No. 07451 / 5391410
The entitlement to warranty claims for material defects will be only be extended from the statutory
two-year period warranty to three years if this protocol is submitted within the specified
timeframe.
23
Fault report
To give any help in case of problems with our systems it is necessary to have this fault report
on hand. Without a completely filled out fault report there can not be given any support!!
Please send this report to the following fax number:
0049-7451 / 5391410
Please give necessarily the phone number to contact you as soon as possible.
RECALL-NUMBER: ________________________ (obligatory given)
Type:
□ TOPtraker
□ DEGERtraker 300EL □ DEGERtraker 1000EL
□ DEGERtraker 1200EL □ DEGERtraker 1600EL □ DEGERtraker 2500EL
□ DEGERtraker 4000EL □ DEGERtraker 5000NT □ DEGERtraker 7000NT
Operator:
_____________________________________________
(name, addres, Tel. of operator)
Installer/Planer:
___________________________________________
(name, addres, Tel. of Installer/Planer)
Date of implementing :
Quantity:
Serial number(s):
____________
_____________
year of construction: _____________
___________________________________________________
Assembly:
□ free standing traker
□ traker integrated in building
□ total height
__________m
(top edge module surface over ground)
□ standard-mast
□ Energy converter □ I □ II □ III □ V
□ wind guard type : □ ELTAKO □ ELERO □ CCB
□ direct current____ V / DC
□ alternating current___ V/AC
Power supply:
Control of the assembly
reinforcement of the foundation was build in due to the plan
hole sphere of action is free of objects
mechanic moves freely, cables are long enough
bore holes for dewatering of the EL-motor on the lower side
locking fluid EL-motor (Pos.8) is applied
dimensions of module arrangement are abode
symetrical arrangement of the modules to the center of gravity
lightning protection and grounding is connected
conecter East-West axle is mounted pointed upwards above the solar module surface
conecter elevation axle is mounted laterally at the solar module surface
Control of the function
East-West drive rotates towards the brightest spot (cover one sensor cell)
Elevation drive rotates towards the brightest spot (cover one sensor cell)
activation by use of wind guard drives traker into horizontal position
Measured data
Power supply
clamp A-B
Conecters:
Power supply to conecter elevation
clamp 5-6
Output from conecter elevation
clamp 11-12
Power supply to conecter east-west
clamp 7-8
Output from conecter east-west
clamp 13-14
Motors:
Power supply to motor elevation
clamp 1-2
Power supply to motor east-west
clamp 3-4
current consumption motor elevation
current consumption motor east-west
O.K.
inplementing
current
reference
V
V
20-24V
20-24V
20-24V
20-24V
V
V
V
V
V
V
V
V
20-24V
20-24V
0,4-1,1A
0,4-1,1A
V
V
A
A
V
V
A
A
Description of problem:
_________________________________________________________________________________
_________________________________________________________________________________
_________________________________________________________________________________
_________________________________________________________________________________
Date:
________
signature:
________________________________
Installer/Planer
24