1
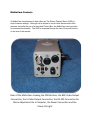
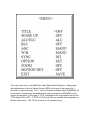
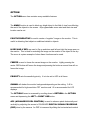
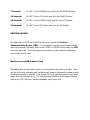
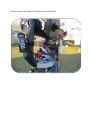
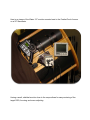
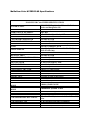
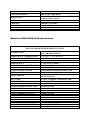
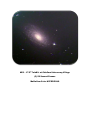
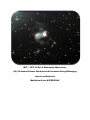
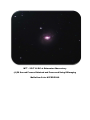
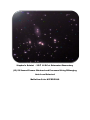
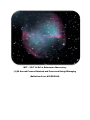
Using the MallinCam HYPER PLUS
For Deepsky Imaging Users
http://www.deepskysoftware.net
By Jack Huerkamp
Introduction
The MallinCam is an individually-made, hand assembled astronomical video CCD
camera designed and manufactured by Rock Mallin at Pro-Com Electronics in Ottawa,
Ontario, Canada. The MallinCam is available in both B&W and Color versions. These
cameras, although optimized for “live” observing, make it easy to create images of your
favorite deep sky objects for sharing with your family and friends, as well as for
documenting your observations. To date I have used my MallinCams to create images
used to secure the Astronomical League’s Silver Comet Club and Arp Peculiar Galaxy
Club awards; and I well along on completing the requirements for the AL’s Gold Comet
Club, Globular Club and Galaxy Groups and Clusters Clubs through images obtained
with a MallinCam.
From 1968 through the beginning of 2004, I was a “visual” observer. In the Fall of 2004,
I obtained a MallinCam B&W PRO and a MallinCam II Color, upgraded to the
MallinCam ULTRAs when they were introduced, and am now using MallinCam Color
and B&W HYPER PLUS models – the latest versions of the cameras manufactured by
Rock Mallin.
My #1 TIP: Spend time on achieving the best focus. I set the MallinCams to the 2.1
second imaging mode, look at the monitor and tweak the focus. I wait 2.1 seconds and
see if the fainter stars begin to appear. If so, I tweak again until I see the faintest stars
on the monitor. This, to me, indicates the best achievable focus.
MallinCam Controls
All MallinCam manufactured to date utilize an “On-Screen Display” Menu (OSD) to
control camera settings. Although not as simple to use as other astronomical video
cameras that enlist the use of a hand-held Control Box, the MallinCam menu provides
for increased functionality. The OSD is accessed through the use of five push buttons
on the rear of the camera.
Rear of the MallinCam showing the OSD Buttons, the BNC Video Output
Connection, the S-Video Output Connection, the RS-232 Connection for
Menu Adjustment Via a Computer, the Power Connection and the
Power On Light
This is the main menu on all MallinCam Video Observational Systems. Simply press
the middle button on the On Screen Display (OSD) on the rear of the camera for 2
seconds to access this page. The “>” next to a function indicates which SUB MENU will
be accessed. Simply press the middle button again to access the SUB MENU of the
function by the arrow. In the case of TITLE, pressing the left or right button will turn the
TITLE feature ON or OFF. If TITLE is ON, the title that you created will be displayed on
the live video screen. The TITLE can be up to 12 characters long.
SENSE UP (Sensitivity)
This menu item will increase the frame integration of the CCD sensor from X2 (1/30th of
a second) to X128 (2.1 seconds). To operate the external HYPER switches (explained
later), the camera must have SENSE UP set to X128.
ALC/ELC (Automatic Level Control/Electronic Level Control)
This is the “Shutter Speed”. To select either ALC or ELC, lightly push the LEFT or
RIGHT OSD button to change between the two. In ALC mode, there are numerous
preset shutter speeds used for planetary, lunar and solar (with proper filtration)
observing. Shutter speeds down to 1/12,000th second are available. When observing
deep sky objects (DSOs), ALC must be set to OFF. To access the preset exposures,
lightly push the center OSD button for 2 seconds and the menu will appear. The shutter
speeds are listed by their denominator. For example, 1/12,000th second is shown as
“12000”. In ELC mode, the shutter can be made totally variable by adjusting the LEVEL
bar LEFT or RIGHT while observing the monitor.
BLC (Back Light Compensation)
BLC is used for variable background or foreground adjustment on bright objects,
generally when in the HYPER and HYPER PLUS modes (explained later). A 48 zone
programmable screen is defined by choosing the area of the CCD sensor to apply the
BLC to.
AGC (Gain)
This is perhaps the most important function in the menu. AGC controls
the final GAIN of the camera. For LIVE and IMAGING modes, setting the AGC to MAN
(MANUAL) is recommended. Lightly push the LEFT or RIGHT OSD button to tile
through ON, MAN, and OFF. Use MAN at all times when observing DSOs. Start with
the LEVEL bar set to the middle position in MANual mode and adjust as necessary to
achieve the best live view on the monitor. For lunar, planetary and solar (with proper
filtratin) observing, set the AGC to OFF and use the shutter settings under ALC/ELC to
obtain the best live view.
Whenever AGC is adjusted, the SENSE UP will reset and the camera should be left in
the 2.1 second (HYPER OFF) mode (explained later) for 3 minutes while the camera
achieves full integration.
If amplifier glow appears in the upper/left corner of the monitor, the AGC is set too high.
Reduce the AGC, allow the camera to achieve full integration and then go back to the
HYPER mode (explained later).
W/B (White Balance)
White Balance is a function for the MallinCam Color HYPER and HYPER PLUS
cameras. There are three OPTIONs available – ATW (Auto Trace White Balance),
AWC (One Push White Balance) and Manual. For most DSO observing in dark skies,
ATW is recommended. Under urban, light polluted skies, Manual mode in the USER
preset option is recommended. Separate RED and BLUE adjustments are possible to
achieve the most pleasing live view under light polluted sky conditions.
SYNC
The SYNC function is set at the factory depending upon whether the camera is an
NTSC model (US, Canada, Mexico or Japan, generally) or PAL. It is not adjustable.
OPTION
The OPTION menu item contains many available features.
The MASK function is used to block any bright object in the field of view from affecting
the rest of the objects in the screen. 48 programmable zones exist and their size and
location can be set.
POSITIVE/NEGATIVE is used to create a “negative” image on the monitor. This is
useful in detecting faint objects or additional details in objects.
H REV AND V REV are used to flip up and down and left and right the image seen on
the monitor. This is ideal for matching the image on the monitor to the object in the sky.
The moon is a prime example of when these functions can be used.
FREEZE is used to freeze the current image on the monitor. Lightly pressing the
center OSD button will freeze the image and pressing the button a second time will unfreeze the image.
PRIORITY sets the sensitivity priority. It is to be set to AGC at all times.
GAMMA will darken the monitor background depending on the setting. 0.45 is
recommended for high resolution CRT monitors and 1.0 is recommended for LCD
displays.
The OPTION 2 menu is accessed by scrolling down to RETURN in the OPTION
menu and depressing the LEFT or RIGHT OSD button.
APC (ADVANCED PIXEL CONTROL) is used to enhance pixels horizontally and
vertically by adjusting the amount of ON BOARD DIGITAL SIGNAL PROCESING
(DSP) done by the camera. As DSP is increased by sliding the horizontal and vertical
LEVELs to the right, additional detail becomes visible in DSOs. However, if bright
stars are in the field of view, star artifacts in the form of dark halos will appear. The
value of H and V APC should be selected to provide the most pleasing monitor image
to the viewer. Generally for imaging, these values are set to their minimum value with
the sliders full LEFT. This decreases the size of Hot and Warm pixels.
HIGH LIGHT is used to darken an area that is too bright through the use of a LEVEL
slider. When viewing the sun with an H-Alpha filter, adjusting the High Light value
can effectively “block out” the surface of the sun and enhance the view of prominences.
COLOR BAR is used to calibrate the monitor used for observing. For B&W
MallinCams, a GRAY BAR pattern is displayed, while for the Color MallinCams, a
COLOR BAR pattern is displayed. The COLOR BAR pattern can also be called up
while observing by lightly depressing the TOP and BOTTOM OSD buttons
simultaneously. To turn off the bars, just depress the two buttons lightly again.
ZOOM is used to activate the electronic zoom function. A LEVEL slider with 16 steps
between 1X and 2X is provided.
MOTION DETECT is used for observing moving objects in the sky – like meteors. 10
second, 30 second and 60 second triggers are provided along with a SENSITIVITY
adjusting slider to allow the used to make adjustments for varied sky conditions. A 48
zone lattice is programmable to set the active section of the CCD sensor. Switching
(10, 30, 60,OFF) is done via the Auxiliary Port on the back of the camera using pins 5
and 6.
EXIT has two options – SAVE and RESET. SAVE is used to save the adjustments
made to the menu items.. RESET is used to restore the factory default settings.
HYPER and HYPER PLUS Modes
In addition to 1/12,000th second to 2.1 second exposure modes: the MallinCam HYPER
has two long exposure modes – 7 seconds and 14 seconds. The MallinCam HYPER
PLUS adds two additional long exposure modes – 28 and 56 seconds. These modes
area activated through the use of switches on the side of the camera.
There is one switch on the HYPER (14-OFF-7) and a second is added to the PLUS
(X4).
Here are the possible exposure configurations:
2.1 seconds
14-OFF-7 in the MIDDLE Position and X4 in the DOWN Position
7 Seconds
14-OFF-7 in the DOWN Position and X4 in the DOWN Position
14 Seconds
14-OFF-7 in the UP Position and X4 in the DOWN Position
28 Seconds
14-OFF-7 in the DOWN Position and X4 in the UP Position
56 Seconds
14-OFF-7 in the UP Position and X4 in the UP Position
PELTIER COOLER
The MallinCam HYPER and HYPER PLUS has an internal mild Peltier or
Thermoelectric Cooler (TEC). It is activated through the use of a switch on the
side of the camera. Generally, when in the HYPER or HYPER PLUS modes, the TEC
should be set to ON. This will minimize the formation of warm pixels as well as help
control dark current noise.
Monitor versus USB Capture Card
The MallinCam has dual video outputs – one composite video and one S-video. Both
are live all the time and using both simultaneously does not degrade the image of either
as separate circuitry is involved. I use a small 3.5” LCD monitor mounted on my scope
either next to the focuser on my 17.5” AstroSystems TeleKit or on the base of the fork
arms on my CPC1100 and I use the composite video output for it.
Here is a view of the Watec 3.5” monitor on the CPC1100:
Here is an image of the Watec 3.5” monitor mounted next to the FeatherTouch focuser
on a 20” Starmaster
.
Having a small, shielded monitor close to the scope allows for easy centering of the
target DSO, focusing, and menu adjusting.
I use a 50’ S-video cable to send the MallinCam’s S-video signal to an amplified S-video
splitter that normally resides on a table either under the awning on my travel trailer or
inside my EZ-Up canopy. Here is a picture of my setup at Chiefland Astronomy Village
in February of 2008:
Connected to the amplified S-video splitter, I usually have the following items:
•
•
•
•
•
DVD Recorder for saving the sessions to DVD
Speco VM-905C 9” 500 line resolution CRT monitor with Sharpness, Color,
Contrast, Tint and Brightness control knobs for easy and quick live image
tweaking.
USB Capture device feeding the signal to my laptop
AverTV Cardbus PC Card in my laptop.
10” Portable DVD Player (used as an alternate monitor
•
Archos 605 PVR with internal 160GB internal drive
Regarding USB devices, I have used the ADSTech Video Express (about $40) and the
USB 2.0 device sold by Rock Mallin. I am currently evaluating the USB Converter sold
by The Imaging Source as an alternate to the ADSTech device. It has been highly
recommended by many who have been in the field of video astronomy and other related
video fields. I will have a better appreciation for the Imaging Source device once I get it
out under the stars.
Preparing the MallinCam for imaging
1. Install the MallinCam in the telescope’s focuser using either the 1.25” supplied
adapter, the MallinCam MFR-3 focal reducer with Extension Rings, the
MallinCam Optical Window, or other optical accessories.
2. Set the HYPER/HYPER PLUS switches to the 2.1 second mode
3. Connect the video outputs from MallinCam to the monitors and then connect the
power to the camera. The 110 VAC to 12 VDC regulated power supply is
recommended; however, a 12 volt battery can be used.
4. Call up the MENU using the OSD and set the parameters to match the sky
conditions and type of targets to be observed. When the parameters have been
adjusted, SAVE them and EXIT the menu.
5. Call up the COLOR BARS and adjust the monitor parameters.
6. Focus the telescope using the tip mentioned at the start of these instructions.
7. Engage one of the HYPER modes and turn on the TEC
8. Start observing.
Taking Images of Deep Sky Objects
Once the camera is sending the image of a DSO to your monitor and/or computer via an
input device:
1. Start Deesky Imaging.
2. Click on the VIDEO icon and select your Capture Device. You should now see
the MallinCam’s output on the Preview window (assuming that the “Preview On”
box is checked.
3. If you only want one snapshot image, click on the “Capture Video Frame” button
4. If you want to capture a series of frames for stacking and processing, click on
the “Capture” tab.
5. Type in the Name for the object being viewed.
6. Set the interval between frame captures. This is normally set to match the
exposure time that the MallinCam is in. For example, if the camera is in 14
second mode, set the interval between captures to 14 seconds.
7. Determine how many frames you want to capture and place this number in the
“Stop after count reaches this value” box.
8. Click the “Start Sequence” button. The “Image Counter for this Sequence” will
start advancing and the “Seconds until next capture” will count down.
9. You can manually stop the sequence if you want to move onto another target by
depressing the “Stop Sequence” button. Or you can let the sequence run until
the desired number of frames has been obtained.
10. To create an image from the frames obtained, click on the “Image” button on the
top bar in Deepsky Imaging and select “Align and Stack by File Selection”.
11. The Deepsky Stacker Interface window will appear.
12. Go to the folder where the frames have been saved. The default is Program
Files/Deepsky Imaging/MyVideoCapture.
13. Look for the folder with the name of the object whose frames you just grabbed.
14. Highlight the list of frames and import them into the “Light Frames” folder.
15. If you have taken any Dark Frames, Flat Frames, and Bias Frames, they can be
placed in their respective folders in the Deepsky Stacker Interface.
16. Click on the “Process Images” button.
17. The frames will be aligned and stacked into a “Final Processed Image” that will
appear in the appropriate window.
18. Click on the window and depress the “Accept Selected Image” button if the
image is acceptable.
19. The selected image will appear in Deepsky Imaging for further processing.
I rarely use an equatorially mounted telescope and find that for alt/az mounted scopes
like my CPC1100 and 17.5” AstroSystems TeleKit, the 28 second exposure mode on
the MallinCam can consistently be used for good imaging. Occasionally the 56 second
mode can be used, but it is highly dependent upon where in the sky the scope is aimed.
Taking Images of the Planets, the Moon and the Sun
1. Make sure good focus is achieved.
2. High power is needed for planetary images due to the small size of the target.
So the use of a Barlow is recommended.
3. For full disk lunar and solar imaging, a focal reducer and/or a short focal length
telescope is needed.
4. Call up the Menu using the OSD.
5. Set the AGC to the midrange of the LEVEL slider.
6. Set the ALC/ELC to ALC and select one of the shorter exposure settings like
4000 (1/4,000th second).
7. Start Deesky Imaging.
8. Click on the VIDEO icon and select your Capture Device. You should now see
the MallinCam’s output on the Preview window (assuming that the “Preview On”
box is checked.
9. If you only want one snapshot image, click on the “Capture Video Frame” button
10. If you want to capture a series of frames for stacking and processing, click on
the “Capture” tab.
11. Type in the Name for the object being viewed.
12. Set the interval between frame captures. This is normally set to match the
exposure time that the MallinCam is in.
13. Determine how many frames you want to capture and place this number in the
“Stop after count reaches this value” box.
14. Click the “Start Sequence” button. The “Image Counter for this Sequence” will
start advancing and the “Seconds until next capture” will count down.
15. You can manually stop the sequence if you want to move onto another target by
depressing the “Stop Sequence” button. Or you can let the sequence run until
the desired number of frames has been obtained.
16. To create an image from the frames obtained, click on the “Image” button on the
top bar in Deepsky Imaging and select “Align and Stack by File Selection”.
17. The Deepsky Stacker Interface window will appear.
18. Go to the folder where the frames have been saved. The default is Program
Files/Deepsky Imaging/MyVideoCapture.
19. Look for the folder with the name of the object whose frames you just grabbed.
20. Highlight the list of frames and import them into the “Light Frames” folder.
21. If you have taken any Dark Frames, Flat Frames, and Bias Frames, they can be
placed in their respective folders in the Deepsky Stacker Interface.
22. Click on the “Process Images” button.
23. The frames will be aligned and stacked into a “Final Processed Image” that will
appear in the appropriate window.
24. Click on the window and depress the “Accept Selected Image” button if the
image is acceptable.
25. The selected image will appear in Deepsky Imaging for further processing.
MallinCam Color HYPER PLUS Specifications
MALLINCAM Color HYPER SPECIFICATIONS
12 VOLT DC Regulated at 435ma with Peltier
Cooler and Integration ON
OPERATIONAL TEMPERATURE -31 C to 52 C ( -23 F to 125 F)
OPERATIONAL HUMIDITY
<90% RH
GAMMA CORRECTION
0.45 AND 1.0 Adjustable by OSD
VIDEO OUTPUT
1.1 Volt, P-P at 75 Ohms
COLOR BAR GENERATOR
Selectable by OSD
HIGH LIGHT SUPPESSOR
Selectable by OSD
IMAGE ENHANCE MODE
Vertical and Horizontal Selectable by OSD
RS-482
Mini DIN Connector - 8 Pin
Selectable by OSD or Remote Via RS-482 (Up to
IMAGE FREEZE
128X SENSE Only)
AGC (GAIN)
ON, OFF, or Manual - Selectable by OSD
MASKING AREA
Selectable by OSD
NEGATIVE IMAGE SELLECTION Selectable by OSD
REVERSE IMAGE SELLECTION
Selectable by OSD
DIGITAL ZOOM
2X MAX Selectable by OSD
BLC SELECTION
Selectable by OSD
IMAGE MIRROR FUNCTION
Selectable by OSD
ELECTRONIC SHUTTER
1/60th to 1/12,000 Second
S/N RATIO
62 dB with AGC OFF
GAIN CONTROL
0 to 20 DB (AGC)
RESOLUTION
570 Lines (Tested at 660 Lines)
LUX at F/1.4 STANDARD MODE
0.00006 @5600K 30 IRE
LUX at F/1.4 HYPER MODE
0.0000000005 @5600K 30 IRE
LUX with PELTIER ON STANDARD
0.00004 @5600K 30 IRE
MODE
LUX with PELTIER ON HYPER
0.0000000002 @5600K 30 IRE
MODE
SCANNING SYSTEM
525 Lines, 60 fields per second
CCD SENSOR SPECIFICATIONS
ICX 418 AKL-AB (Astronomical Grade Class 1-2)
CCD SENSOR SPECIFICATIONS
Color
CCD SENSOR TYPE
CCD with MicroLens Pixel Technology
IMAGE SIZE TYPE
1/2 Inch
SYSTEM
NTSC or PAL (ICX 419 AKL)
POWER SUPPLY
TOTAL PIXELS
EFFECTIVE PIXELS
SENSITIVITY
UNIT CELL SIZE
CHIP SIZE
PACKAGE
SUBSTRATE MATERIAL
811H X 508V (410K Pixels)
768H X 494V (380K Pixels)
1,300 mV (Tested at Shutter Speed of 1/250th
Second at Center Screen)
8.4H x 9.8V
7.40mm H X 5.95mm V
Ceramic-DIP
Silicon
MallinCam B&W HYPER PLUS Specifications
MALLINCAM B&W HYPER SPECIFICATIONS
12 VOLT DC Regulated at 435ma with Peltier
Cooler and Integration ON
OPERATIONAL TEMPERATURE -31 C to 52 C ( -23 F to 125 F)
OPERATIONAL HUMIDITY
<90% RH
GAMMA CORRECTION
0.45 AND 1.0 Adjustable by OSD
VIDEO OUTPUT
1.1 Volt, P-P at 75 Ohms
GRAY SCALE BAR GENERATOR Selectable by OSD
HIGH LIGHT SUPPESSOR
Selectable by OSD
IMAGE ENHANCE MODE
Vertical and Horizontal Selectable by OSD
RS-482
Mini DIN Connector - 8 Pin
Selectable by OSD or Remote Via RS-482 (Up to
IMAGE FREEZE
128X SENSE Only)
AGC (GAIN)
ON, OFF, or Manual - Selectable by OSD
MASKING AREA
Selectable by OSD
NEGATIVE IMAGE SELLECTION Selectable by OSD
REVERSE IMAGE SELLECTION Selectable by OSD
DIGITAL ZOOM
2X MAX Selectable by OSD (16 Steps)
BLC SELECTION
Selectable by OSD
IMAGE MIRROR FUNCTION
Selectable by OSD
ELECTRONIC SHUTTER
1/60th to 1/12,000 Second
S/N RATIO
65 dB with AGC OFF
GAIN CONTROL
0 to 20 DB (AGC)
RESOLUTION
600 Lines (Tested at 760 Lines)
LUX at F/1.4 STANDARD MODE
0.00002 @5600K 30 IRE
LUX at F/1.4 HYPER MODE
0.000000000003 @5600K 30 IRE
POWER SUPPLY
LUX with PELTIER ON STANDARD
0.00001 @5600K 30 IRE
MODE
LUXwith PELTIER ON HYPER
0.000000000001 @5600K 30 IRE
MODE
SCANNING SYSTEM
525 Lines, 60 fields per second
CCD SENSOR SPECIFICATIONS
ICX 428 ALL-A (Astronomical Grade Class 1)
CCD SENSOR SPECIFICATIONS
Monochrome
EXview HAD CCD with MicroLens Pixel
CCD SENSOR TYPE
Technology
IMAGE SIZE TYPE
1/2 Inch
SYSTEM
EIA or CCIR
TOTAL PIXELS
811H X 508V (410K Pixels)
EFFECTIVE PIXELS
768H X 494V (380K Pixels)
1,400 mV (Tested at Shutter Speed of 1/250th
SENSITIVITY
Second at Center Screen)
UNIT CELL SIZE
8.4H x 9.8V
CHIP SIZE
7.40mm H X 5.95mm V
PACKAGE
Ceramic-DIP
SUBSTRATE MATERIAL
Silicon
Where to Find MallinCam HYPER and HYPER PLUS
I am Rock Mallin’s sole authorize US distributor for the line of astronomical video
cameras that he produces. I can be contacted at:
[email protected]
My website is:
www.WaningMoonII.com
Images I have taken with various MallinCam Video Cameras
No dark frames, flat frames or bias frames were used on the following images. Different
telescopes at different locations were used to obtain the frames used for the final posted
images.
Comet Swan – C-8 at f/3.3 at my home in Pearl River, LA
October 24, 2006
(5) 28 Second Frames
MallinCam Color HYPER PLUS
M100 – 17.5” AstroSystems TeleKit at the Kisatchie Starparty
(5) 2.1 Second Frames
MallinCam ULTRA
The ULTRA was the first Peltier cooled MallinCam
Hickson 68 – 17.5” Astrosystems TeleKit at New Mexico Skies
(10) 2.1 Second Frames
MallinCam B&W PRO DOB
M63 – 17.5” TeleKit at Chiefland Astronomy Village
(3) 56 Second Frames
MallinCam Color HYPER PLUS
M76 – 25.5” f/4 RC at Rainwater Observatory
(13) 56 Second Frames Obtained and Processed Using DSImaging
Auto Level Selected
MallinCam Color HYPER PLUS
M77 – 25.5” f/4 RC at Rainwater Observatory
(4) 56 Second Frames Obtained and Processed Using DSImaging
MallinCam Color HYPER PLUS
Stephan’s Quintet – 25.5” f/4 RC at Rainwater Observatory
(13) 56 Second Frames Obtained and Processed Using DSImaging
Auto Level Selected
MallinCam Color HYPER PLUS
M27 – 25.5” f/4 RC at Rainwater Observatory
(3) 56 Second Frames Obtained and Processed Using DSImaging
MallinCam Color HYPER PLUS
M17 – 25.5” f/4 RC at Rainwater Observatory
(13) 56 Second Frames Obtained and Processed Using DSImaging
Auto Level Selected
MallinCam Color HYPER PLUS