1
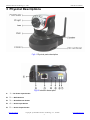
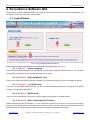
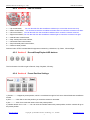
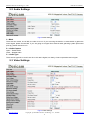
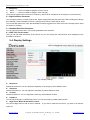
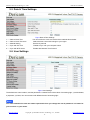
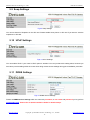
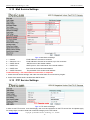
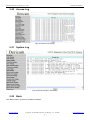
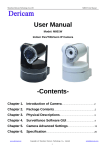
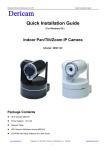
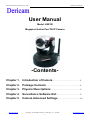
Shenzhen Dericam Technology Co.,LTD H501W User Manual User Manual Model: H501W Megapixel Indoor Pan/Tilt IP Camera -ContentsChapter 1. Introduction of Camera……………………………………… 2 Chapter 2. Package Contents…………………………………………………2 Chapter 3. Physical Descriptions………………………………………….3 Chapter 4. Surveillance Software GUI………………………………….5 Chapter 5. Camera Advanced Settings………………………………..10 www.dericam.net Copyright @ Shenzhen Dericam Technology Co., Limited 1 [email protected] Shenzhen Dericam Technology Co.,LTD H501W User Manual 1 Introducing Mega Pixel IP Camera H501W Dericam Megapixel Indoor Pan/tilt IP camera H501W is designed to meet the demands for High Definition indoor IP video surveillance in the DIY Home & SME & Small business security markets. This camera is specially designed to offer you a way to view what is going on inside your home, warehouse, shops or office. Key Features 1/3" CMOS image sensor, 1.0 Mega pixels Auto IR-LED illumination 10 IR LEDs IR Night vision range (up to 8 meters) Bundled with 32 Channel Surveillance Software User-friendly & Multi-lingual UI Giving alarm in cause of motion detection Wireless networks connection ( IEEE 802.11b/g/n) Support WEP/WPA/WPA2 encryption Control Panel add-in, i.e. snapshot, image setup, PT control Support Mac OS Safari browser Support iPhone through Safari browser Mobile Phone Streaming Live Video through Phone View APP Multi-level Password Protection for Restricting Camera Access DDNS, UPnP Supported H.264 video compression format 2 Package Contents IR IP Camera H501W x1 Power Adapter 5V-2A x1 Network Cable x1 WiFi Antenna (Wireless Version H501W) x1 CD-ROM with Setup Software and User Guide x1 www.dericam.net Copyright @ Shenzhen Dericam Technology Co., Limited 2 [email protected] Shenzhen Dericam Technology Co.,LTD H501W User Manual 3 Physical Descriptions Fig3.1 Physical parts description Fig3.2 Interface description 1-----DC Power Input Socket 2------WIFI Antenna 3------RJ45 Ethernet Socket 4------Audio Input Socket 5------Audio Output Socket www.dericam.net Copyright @ Shenzhen Dericam Technology Co., Limited 3 [email protected] Shenzhen Dericam Technology Co.,LTD H501W User Manual 6------Alarm Output Socket The alarm output socket is connected with a relay in the IP camera. IP camera will control the switch to trigger the alarm bell or buzzer to alarm. The relay is able to control the switch of an alarm whose voltage is no more than 36V, and current is lower than 2A. Please refer to the Figure 3.3 for the connection of an external alarm. Output Pins Switch Alarm Alarm power Figure 3.3 7-----Alarming Input Pin Please refer to the schematic Diagram of Figure 3.4 for how external detector collects alarm information. PIR Input pins Switch PIR Power Figure 3.4 The detector should be switched type (always on or always off). If the detector has detected the smoke or people or animal to enter the area, the detector will switch on or switch off. And it will send the external alarm signal into the IP camera. 8----RESET Button Reset button located in WIFI antenna installation holes below Press the RESET button and hold on more than 10 seconds, the camera will restart and recover to the factory default settings. Note Please never press reset button unless you have forget the password to login the camera. www.dericam.net Copyright @ Shenzhen Dericam Technology Co., Limited 4 [email protected] Shenzhen Dericam Technology Co.,LTD H501W User Manual 4 Surveillance Software GUI Please refer to the Quick Installation Guide if you install the camera at first time. After finishing quick installation, you can take time to learn the operation of the software. 4.1 Login Window Fig4.1 Login window of Dericam H501W Please check the login window above, it was divided to 5 sections from no. 1 to 5. 4.1.1 Section 1 Select Language Dericam M series camera supports up to 8 languages, such as English, Spanish, Deutsch and so on. You can select the language you need via click on the select language bar to switch. 4.1.2 Section 2 Dericam Website Link There is an access link to Dericam website homepage, if you need tech support you can contact Dericam directly. 4.1.3 Section 3 Live Video View If you are using IE-based browsers like IE6, IE, IE8, and standard browser like Firefox, Google chrome, please choose Live Video View login method. 4.1.4 Section 4 Mobile View If you are using mobile phone to access the camera, please choose Server Push Mode method. 4.1.5 Section 5 Note / Download OCX Controls Please download the OCX and install it if you are access the camera for the first time. You can get tech support directly from the reseller where you bought Dericam camera or refer to our tech engineer for help. Dericam provide good after-sales tech support service to help customers complete the installation successfully. www.dericam.net Copyright @ Shenzhen Dericam Technology Co., Limited 5 [email protected] Shenzhen Dericam Technology Co.,LTD H501W User Manual 4.2 Surveillance Window Fig4.2 Surveillance Window of Dericam H501W Please check the surveillance window above, it was divided to 5 sections from no. 1 to 6. 4.2.1 Section 1 Definition /Resolution Fig4.3 High Definition options Fig4.4 Standard Definition options There are two definition options, one is High Definition which has two resolutions 1280*720,960*540, and the other is Standard Definition which has two resolutions 640*480, 320*240. Please choose lower resolution if you want to get faster video stream, especially if you are accessing the camera via internet remotely. www.dericam.net Copyright @ Shenzhen Dericam Technology Co., Limited 6 [email protected] Shenzhen Dericam Technology Co.,LTD 4.2.2 Section 2 1------Up control button, H501W User Manual Pan/Tilt Control You can also left click the surveillance window up to control the camera move up. 2------Down control button, You can also left click the surveillance window down to control the camera move down. 3------Left control button, You can also left click the surveillance window left to control the camera move left. 4------Right control button, You can also left click the surveillance window right to control the camera move right. 5------Vertical Patrol control button, 6------Stop vertical patrol control button, 7------Horizontal Patrol control button, 8------Stop horizontal patrol control button, C------Restore center position Dericam indoor PTZ IP camera M801W supports movement by 4 directions, Up, Down, Left and Right. 4.2.3 Section 3 Record/Snap/Playback/SD buttons The four buttons from left to right is Record, Snap, Playback, SD entry. 4.2.4 Section 4 Preset Position Settings 1) Preset----------Support 8 preset position, which is considered enough for DIY home & small business surveillance market 2) Set----------- Click Set to save the position you need the camera to remember 3) Go----------- Click Go to make the camera move the preset position 4) Number button from 1 to 8--------You can click the number button with preset position, and the camera will go to the preset position. www.dericam.net Copyright @ Shenzhen Dericam Technology Co., Limited 7 [email protected] Shenzhen Dericam Technology Co.,LTD H501W User Manual How to do preset position? We can start preset settings from position 1. Firstly, select no. 1 within the menu of Preset on the panel. Secondly, move the camera and stop at a place where you want make preset position. Thirdly, click set button to save it as position 1 and you have done preset of position 1. After that, you can select no. 2 within the menu of Preset on the panel, and move the camera and stop at another place, and set as preset position 2. You can do all the 8 preset positions with this method showed as Fig.4.5 & 4.6. Fig4.5 Preset position 1 Fig4.6 Preset position 2 www.dericam.net Copyright @ Shenzhen Dericam Technology Co., Limited 8 [email protected] Shenzhen Dericam Technology Co.,LTD 4.2.5 Section 5 H501W User Manual For Administrator For Administrator------Path to Administrator Control Panel, Click it, and it will lead to Administrator Control Panel. Fig4.7 Administrator Control Panel 4.2.6 Section 6 Digital Zoom & Record save path & Talk & Listen buttons 1--------Digital Zoom- out; 2------------Digital Zoom+ In; 3--------Original image; 4------------- Set recoding save path 5--------Talk button; 6-------------- Listen button Note For Advanced settings, please go to chapter five Advanced Camera Settings. www.dericam.net Copyright @ Shenzhen Dericam Technology Co., Limited 9 [email protected] Shenzhen Dericam Technology Co.,LTD H501W User Manual 5 Advanced Camera Settings Click the bar “For Administrator”, goes to Administrator Control Panel to make advanced camera settings. 5.1 Device Information Fig5.1 Device Information Device ID Factory Device name Network Connection LAN Software version Firmware version Mac Address MAC ID of the camera IP Address LAN IP address of the camera Subnet Mask Subnet Mask of the LAN network Gateway Gateway of the Router Primary DNS Primary DNS of the LAN network Secondary DNS Secondary DNS of the LAN network SD Status Browser SD Card or Format SD Card www.dericam.net Copyright @ Shenzhen Dericam Technology Co., Limited 10 [email protected] Shenzhen Dericam Technology Co.,LTD H501W User Manual 5.2 Audio Settings Fig5.2 Audio Settings 1---Mode There are two modes, one is MIC, the other is Line-in. If you are using the build-in or external MIC to gather the sound signal, please choose MIC. If you are going to et signal from external audio gathering system (like sound pick-up), please choose Line-in. 2----Audio Capture Open--- Enable Audio Close--- Disable Audio 3----Audio Type There are two types G.711 and G.726. G.711 bit rate is higher, but clearly, G.726 compression rate is higher. 5.3 Video Settings Fig5.3 Video Settings www.dericam.net Copyright @ Shenzhen Dericam Technology Co., Limited 11 [email protected] Shenzhen Dericam Technology Co.,LTD H501W User Manual 1---Frequency 1) 50HZ ---------Indoor surveillance (Region: Europe, China) 2) 60HZ ---------Indoor surveillance (Region: USA, Canada) There are two options within the menu of Frequency, 50HZ, 60HZ. It depends on the frequency of the electricity. 2----High Definition Parameter You can specify stream, normally, high bit rate, higher image quality. But the frame rate need to setting according to the bandwidth, when bandwidth is narrow, if set high frame rate, the result will be worse. You can set Max frame rate, when the bandwidth is limited, suggest set to lower frame rate. Normally, above 15fps the stream is smoothly. 3----Standard Definition Parameter You can set higher frame rate if you are suing standard lower resolution. 4----OSD Time, Device name Here you can set OSD information of the camera. Or you can change the camera name which displayed on the surveillance windows. 5.4 Display Settings Fig5.4 Display Settings Brightness Default parameter is 5.You can adjust the brightness of the image by select different value. Saturation Default Saturation is 3. You can adjust the Saturation by select difference value. Contrast Default Contrast is 0. You can adjust the Contract by select difference value. Flip/Mirror You can flip the image by enabling Flip button, or mirror the image by enabling Mirror button. Night Vision Mode/ IR LED Switch control You can set Night vision mode as auto or Manual. If you want to make the IR LED off, you have to set manual, status off. www.dericam.net Copyright @ Shenzhen Dericam Technology Co., Limited 12 [email protected] Shenzhen Dericam Technology Co.,LTD H501W User Manual 5.5 Date & Time Settings Fig5.5 Date & Time Settings 1------Device Clock Time You can set Device clock time via the three methods list as below. 2------Device Clock Time zone Select the time zone which belongs to your region 3------Manual Setting Set time by manual 4------Sync with PC Time Enable to sync with your computer’s time 5------Sync with NTP Server Enable with Network Time Protocol 5.6 User Settings Fig5.6 User Settings The default user name is admin, and the password is 123456.There is three level of accessing right, 1) Administrator, 2) Operator, 3) Visitor, You can set users with different level of accessing right. . ] Note You need remember the new user name & password when you change the user & password. It is better for you to write it on your memo. www.dericam.net Copyright @ Shenzhen Dericam Technology Co., Limited 13 [email protected] Shenzhen Dericam Technology Co.,LTD H501W User Manual 5.7 Basic Network Settings Fig5.7 Basic Network Settings 1------Obtain IP from DHCP Server Enable DHCP, if disable DHCP, you can assign IP address by yourself 2------Http Port You can change port no. here by entering customized no. and click set 5.8 Wireless Lan Settings Fig5.8 Wireless LAN Settings Click Scan to search the SSID of the wireless router. Please make sure you click scan to search until the SSID of your router is list on the small window showed as Fig5.8. Select the SSID belongs to your router, and enter wireless security key password, and click set to finish the wireless setup. When the wireless settings is done, please unplug the network cable, and unplug the power & plug the power back in order to let the camera get restarted. After restart by unplug & plug back the power adapter, the camera will make wireless connection by itself. The Camera device name will disappear if you click “search” before the camera gets restarted. Just wait for around 1 minute, and click “Search” again, the device name of the camera will be showed again on the window if wireless connection is successful. Congratulations! You have done wireless connection of the camera successfully. www.dericam.net Copyright @ Shenzhen Dericam Technology Co., Limited 14 [email protected] Shenzhen Dericam Technology Co.,LTD H501W User Manual 5.9 Snap Settings Fig5.9 Snap Settings You can set interval of Snapshot on the SD card. Please enable Save picture on SD card if you want to save the snapshots on SD card. 5.10 UPnP Settings Fig5.10 UPnP Settings You can enable UPnP if your router’s UPnP option is enabled. You can just leave this setting alone, because you have done port forwarding within the router when doing remote access settings during quick installation procedure. 5.11 DDNS Settings Fig5.11 DDNS Service Settings Please set DDNS Service Settings within the camera by hostname, a user name and password you’ve got from www.dyndns.com. Please refer to Quick Installation Guide for detailed steps. www.dericam.net Copyright @ Shenzhen Dericam Technology Co., Limited 15 [email protected] Shenzhen Dericam Technology Co.,LTD H501W User Manual 5.12 Mail Service Settings Fig5.12 Mail Service Settings 1------Sender Email address to be used as a sender 2------Receiver 1 to 3 Email address to be used as a receiver, up to four receivers 3------SMTP Server SMTP Server of the Sender mailbox 4------SMTP Port SMTP port no. of the mail server of the sender mailbox 5------SMTP User ID Account of the sender email address 6------SMTP Password The password of the sender email address Trouble Shooting----The email failed to send emails or snapshots 1. Check the mail service settings, and make sure all of them are correct and try it again. 2. Check if the sender email is enabled with SMTP server. 5.13 FTP Service Settings Fig5.13 FTP Service Settings In order to use FTP function, user should apply user name and password on the FTP server first. And please apply for storage right, in order to write and create sub-category on the FTP server. www.dericam.net Copyright @ Shenzhen Dericam Technology Co., Limited 16 [email protected] Shenzhen Dericam Technology Co.,LTD H501W User Manual 5.14 Alarm Settings Fig5.14 Alarm Settings 5.15 Motion Detection Area Settings Fig5.15 Motion detection Area setup 5.16 Upgrade Device Firmware Fig5.16 Motion detection Area setup Click Browse, and select the Firmware file to open, and click set to upgrade. Please use wired connection method before you upgrading the files Please do not try to upgrade the firmware, if the existing firmware works ok. It takes risk of making the camera dead if the upgrading operation is not right. Please email to [email protected] if you want update firmware. www.dericam.net Copyright @ Shenzhen Dericam Technology Co., Limited 17 [email protected] Shenzhen Dericam Technology Co.,LTD H501W User Manual 5.17 Backup & Restore Settings Fig5.17 Backup or Restore Settings You can backup all settings by saving the settings as a .bin file. And also you can restore the existing settings by saved .bin. file. 5.18 Restore Factory Settings Fig5.18 Restore Factory Settings 5.19 Reboot Device Click option “reboot device” to get the camera restarted, which is the same as unplug the power and re-plug it. Fig5.19 Reboot Device www.dericam.net Copyright @ Shenzhen Dericam Technology Co., Limited 18 [email protected] Shenzhen Dericam Technology Co.,LTD 5.20 H501W User Manual Access Log Fig5.19 Record of access log 5.21 System Log Fig5.20 Record of login in information 5.22 Back Click Back button to go back to surveillance window www.dericam.net Copyright @ Shenzhen Dericam Technology Co., Limited 19 [email protected]