1
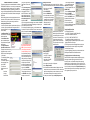
PowerRIP ScreenPrintTM Quick Start
This quick start guide covers the standard installation on Windows
XP/2000/2000 Pro/ 2000 Ser ver. It covers the 4 most used printing
setups. See the User Guide (located on your CD) for additional
detailed installation information. After installing the software you
may go to Start/Programs/PowerRIP ScreenPrint/Documentation to
see a general manual for ScreenPrint, SilkScreen and ImageSet
RIP products.
Before installing, please close all running applications. Load the
printer driver from the printer manufacturer, have the printer connected be able to print to the printer using the native driver.
Loading PowerRIP ScreenPrint
1. Insert the CD into the computer, the splash screen will give you
our choices. (If the splash screen does not appear, launch the
"setup.exe" application on the
CD’s root folder).
Install/Remove/Repair. This
option installs the main program
and all required files
View Installation Guide.
Open the installation instructions (this document). Requires
Adobe Acrobat
Connect workstation to
PowerRIP ScreenPrint Server.
This option is used when connecting workstations to PowerRIP
ScreenPrint remotely, as a client.
EXIT. Closes the installer application
1. Select Install
2.The Install Shield Wizard
will start, Click NEXT
3.The License Agreement
will be presented, review
then click NEXT
4.The Customer
Information screen will
include
User Name
Company
Serial Number
(this is your 16 digit Product
Code) Please fill in then click
NEXT
5.The Select Components is
next. Select your printer. If you
wish to generate TIFF files
and/or PDF files as well, select
these output devices as well.
Insure a check mark is next
to the printer selected. When
finished, click NEXT.
6.The select program folder will display, leave it as default. Click NEXT
7.The program will now be installed. Depending on the speed of your
system, this may take a few minutes.
8. After the system installs the program, you will be asked to install
the printer in the "Select Printer Entries To Create" screen Select your
printer (or Printers)Click Continue
9. A window will now tell you that
the printer has installed. Click OK
10. You must carefully select the
port the printer is connected to.
STOP if you do not know which
port the printer is connected to.
It could be USB001 or 002, etc.
Go to Start/Control Panel And
Open Printers and Faxes. Right
click on the “Epson Stylus Color
3000” printer and go to Properties,
then Ports. See what printer port
the Epson Stylus Color 3000
native driver is connected to and
use this for PowerRIP. Now select
the port, click CONTINUE.
11.This will finish the installation,
The final window will ask you to
click FINISHED before rebooting
the system, remove the CD.
Setting the Printer Driver
Click on the get activation tab.
After the system restarts, go to the printer folder (Start > Settings >
On the validation page select
Printers on Windows 2000 or Start/Printers and Faxes onWindows XP) ENGLISH as your language.
Fill in the registration form, click
1. Right Click on the PowerRIP
SUBMIT
FORM
Output Queue 1
Select
the SilkScreen/ImageSet
2. Select PROPERTIES
product,
and
VALIDATE.
3. Select the ADVANCED tab
Type
in
your
product code, and
4. In the driver window, use the arrow
user
code,
click
SUBMIT.You will
(on the right side of the window) to
be
presented
with
a new window
change the driver from PowerRIP
and
an
ActivationCode.
Stylus 3000 to the Epson Stylus
6. Go back to the PowerRIP
3000 driver for this por t
ScreenPrint Validation window (step 5) insert the activation code in the
Click APPLY, then OK
activation window. ClickOK
PowerRIP printer port drivers use
MicroSoft’s generic USB and parallel
code. Selecting Epson’s own printer
port driver can sometimes speed up
communication speeds over the
generic port drivers from MicroSoft.
This is especailly true on the Stylus
2200/2100 printers
Installing Validation
1. Start PowerRIP
Go to START > Programs >
PowerRIP SilkScreen
double click on PowerRIP
ImageSet selection
Testing PowerRIP ScreenPrint
1. Start PowerRIP ScreenPrint
Go to START > Programs > PowerRIP ScreenPrint
double click on PowerRIP ScreenPrint
2. Go To FILE > PRINT POSTSCRIPT FILE.
The open Dialog will display, you should be in the
PowerRIP ScreenPrint (PowerRIP Imageset) folder, if not find it
Highlight TRAIN.PS and click open.
3.The configure output window will display. Make sure the correct
printer and printer port is selected. Specfiy settings. Click OK
The file will process and print.
To print from applications, please refer to the documentation in the
Start/Programs/PowerRIP ScreenPrint/Documentation.
Printing Using Stochastic or Halftone Screening
PowerRIP ScreenPrint supports stochastic and halftone screening
technologies. Stochastic screening, the default for PowerRIP
ScreenPrint, is basic to all PoweRIP software. Halftone screening
2. In the upper left corner click on Configure tab
starts at 30 line per inch (lpi) and goes to 150 lpi on the Stylus Color
3000.The back side of this Quick Start gives you a general overview of
3. Select Validate PowerRIP.
how to do four basic print setups of the Properties/Advanced printing
4.The PowerRIP Server Validation window will display a User Code
options for screening, resolution, and media type of paper or film posiand provide a box to place the Activation Code. User codes are protives to generate output for proofs or film.
grammed to change randomly, so leave this screen open, so the
user code does not change with a reopening of the screen.
5. To obtain your activation code go to www.iproofsystems.com
Where do I find the Printer settings?
PowerRIP SilkScreen provides the Windows PostScript driver a
PPD (PostScript Printer Description).The Windows PostScript
driver uses this PPD to set the features needed, when it receives
print data from Screenprint Separator, Corel, Illustrator, Quark or
other applications and "creates" PostScript files to be processed
and printed by the PowerRIP ScreenPrint program. Detailed
explanations follow on printer features and the chart at the far
right shows four basic print
settings you can use.
Choose
Print go to Properties
and then Advanced.
This Printer Features screen
shot is setup to make film
positives and instead of a
stochastic screen a halftone
screen ruling is set by the
application.
Graphics
Set Print Quality (Resolution) selection depends on the desired
print quality. Normal is 720 dpi for rulings below 90 lines per inch,
select higher resolutions of 1440, when printing finer screen rulings
(90lpi up), for better halftone dot shape.
Printer Features
Set Color Mode "Grayscale" for film seps sent from Corel, Illustrator,
Quark,or use “CMYK” for color proofs or separations made in the RIP.
Set Halftone Mode Press Target assigns a profile to separate RGB
colors into CMYK. SilkScreen uses SWOP/Max Black with GCR.
Set Proofing Paper Profile Auto Select lets PowerRIP pick the one
iProof made automatically, or you choose an ICC for the proof paper. .
Set Rendering Intent Perceptual for RGB pictures, Absolute
Colorimetric or Relative Colorimetric for accurate proofing.
Set RGB Source Defines the color space for incoming RGB data.
Set CMYK source Defines the color space for incoming CMYK data.
Set Make Composite From Separation (Yes or No) Yes, when
recombining separations for a color proof. No, all other times
Set Make Separations In PowerRIP (Yes or No).When printing from
an application that does not support separations, you set the "Make
Separations in PowerRIP” to "Yes." Separations will be in CMYK.
Set Mirrored (Yes or No) Used for right reading or wrong reading
film emulsion up. “No,” right reading, is for silk screen and yes foroffset.
Set Negative as desired (Yes or No). WARNING: Making negatives
uses a large amounts of ink on a printer and is NOT recommended.
Set Paper Type choose an output media; film positive for silk screen.
Set Generate Pure Blacks (Yes or No) Useful when making color
proofs to avoid black type being made from multiple colors.
Set True Spot Colors (Yes or No) When making composite proofs
from separations, special handling is done to spot colors.
Set Screening choose Document Defined if the screen frequency
and angle are determined by the application (Corel, Illustrator, Quark,
etc.). Choose pre-defined screen rulings to override the application's
halftone screen request or if printing from applications that do not support specifying halftones. Stochastic is also available.
Set MicroWeave (On or OFF) Leave On.
Set Nesting (Yes or No) Gangs page output on multi-page files.
Set Nesting Output Media Size Paper size to be nested on.
Set Job Priority Can be used to push urgent jobs through printing.
Set Output Stock Simulation for color proofs, defines the paper
stock and color densities of the printing press used to print a job.
Settings for four basic print outs are on the chart to the right.
1. Printing Separations made in applications to film
For printing silkscreen or offset film separations to film as stochastic or
halftone, the resolution chosen depends on the desired print quality.
Keep in mind, when using halftone screen rulings (90lpi and up), a
higher resolution will shape your halftone dots better. Densities of 3.8
to 4.0 can be achieved using the proper ink and film combinations.
2. Making Separations from RGB/CMYK composite data
PowerRIP can separate RGB/CMYK composite data at the RIP and
create CMYK separations as stochastic or halftone. The RIP does not
make spot color separations. Most users prefer to create spot color
separations in Screenprint Separator, Illustrator, Corel, Quark,
InDesign, or Freehand.
3. Making a Color Composite Proof “directly from an application”
This is the most common color proof made. It is called a “CMYK composite” proof, or in Quark 6.5, for a RGB/CMYK composite, it is an
“As Is” proof on output.“Direct composite proofs” are good for a quick
color check, but do not show trapping and overprints in all file elements, which is done by the next type of proof.
4. Make a Composite Color Proof from Separations
Youcanmake compositecolorproofsfromseparationsgenerated from
applications such asScreeprintSeparator,Corel,Quark, Illustrator,
InDesign, or Freehand, selecting "Make Composite from Separations"
feature.This is useful for viewing trapping, overprints, and moire,
before making your screens or offset films. Proofing how separations
overprint can prevent mistakes and is the most accurate way to proof.
Where to Get Help
Your PowerRIP ScreenPrint CD contains a user manual to help you
print from popular applications, answer frequently asked questions,
and identify PostScript and system errors you may encounter.
iProof Systems Support is available via phone, fax, mail, e-mail and
the Internet. Telephone support hours are 9AM to 6PM EST (Monday
to Friday).Telephone: 321-777-3982 Fax: 321-777-6025.
We suggest iProof's free e-mail support to get a prompt answer to
questions you may have.You can e-mail iProof Systems at:
[email protected].
When calling or emailing for technical assistance please identify
yourself, your computer platform, operating system, and printer model.
Include a description of the problem you are encountering, so that a
technical support representative can e-mail or respond to your question. Please include your product code or state you are using a demo.
Advanced Printer settings for typical Silk Screen and Offset
work for items
1
2
3
4
Paper Output
Pick a paper size to print on
Graphics Settings
Print Quality (High Resolution) 1440
1440
1440
1440
Print Quality (or Faster)
720
720
720
720
Image Color Management
All use ICM Method disabled
ICM Intent
Not used since ICM disabled
Scaling
All normally 100% or you choose
True Type Font
All substitute with device font
Document Options
Advanced Printing Features
All use Enabled
PostScript Options
PostScript Output Option
All normally Optimized for Speed
TrueType Download Option
All normally Automatic
PostScript Language Level
All normally 3, will also work at 2
Send PostScript Error Handler All normally Yes
Mirrored Output
Always No here; apply below
Printer Features Settings
Color Mode
Gray
CMYK CMYK Gray
Halftone Mode Press Target
SWOP SWOP SWOP SWOP
Proofing Paper Profile
Auto
Auto
Auto
Auto
Rendering Intent
Default Default ABS
ABS
RGB Source
Default Default Default Default
CMYK source
Default Default Default Default
Composite From Separation
No
No
No
Yes
Make Separations In PowerRIP No
Yes
No
No
Mirrored (Set for Silk Screen)
No
No
No
No
Mirrored (Set for Offset)
Yes
Yes
No
No
Negative
No
No
No
No
Paper Type
Film
Film
Paper Paper
Generate Pure Blacks
No
No
Yes
Yes
True Spot Colors
No
No
No
Yes
Screening
Stochastic or Halftone Dots
MicroWeave
On
On
On
On
Print direction
All unidirectional for better quality
Nesting
Off
Off
Off
Off
Nesting Output Media Size
A3+B+ A3+B+ A3+B+ A3+B+
Job Priority
Normal Normal Normal Normal
Output Stock Simulation
SWOP or Silk Screen for all four
Copyright 2005 iProof Systems/DGIS Inc. 10/05 PowerRIP, iProof, and ImageSet are trademarks
of iProof Systems Inc.All other trademarks are of their respective companies