1
__A/RS
operator's r
manual '
•
•
•
•
Assembly
Operation
Maintenance
Repair Parts
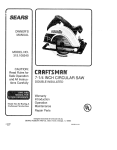
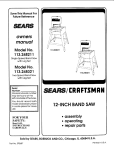
MODEL NO.
358.34021 - 2.0/12"
358.34031 - 2.0/14"RS.
SEAJ,_SI£RRF1"$MI:1N®l
2.0!12"
2.0f!4"P.S.
ELECTRIC CHAIN SAWS
THIS CHAIN
,
z_WARNING:
.3arefully read and follow
Safety Rules, Precautions
and
Operating
Instructions. Failure to do so can
result in serious personal
injury.
, u
,,
SAW IS FOR OCCASIONAL
,H,,,U,,
,
Record in the space provided below the Model No. and Serial.No. of
your saw. These numbers are located on the starting instructions
decal.
Model No.
Serial No.
Retain these numbers
Se___s,
66572
- 2 ._-26685
- 1 - 26685
USE ONLY.
u,
Roebuck
and
Co.,
Chicag(),
for future reference°
IlL 60684
U.S.A.
PRtNTED I N U. S. A.
FULL 1 YEAR WARRANTY
ON ELECTRIC
(Excluding
For one year from date of purchase,
CHAIN
SAW
Bar & Chain)
Sears will repafr defects
in material
:_
or workmanship
in this elecldc
chain saw st no
><:_
charge.
This warranty excludes bar & chain, which are expendable parts and become worn during normat use.
If this chain saw is used for commercial or rentaI purposes, this warranty applies for only 30 days from date of purchase. WAR RANTY
SERVICE IS AVAILABLE BY RETURNING THE CHAIN SAW TO THE NEAREST SEARS SERVICE CENTER IN THE UNITED
STATES.
This warranty gives you specific legal ++_ghts,and you may also have other rights which vary from stale to slate.
_:_<_
Sears,Roebuckand Co., SearsTower,Dept. 698/731A, Chicago,i L 60684
TABLE
OF CONTENTS
Specifications ........................
.......
2
SPECIAL SAFETY SECTION ...............
3, 4 & 5
Know Your Chain Saw ........................
6
Preparing Your Saw For Use ...................
7
A, Getting Ready ...........................
7
B. Power,Source and Extension Cord ..........
7
C. Attach'+,m,+g_:the
Bar and Chain ................
8
D. Chain _Tension ............................
g
E. Bar ar_ Chain Oil ........................
g
Using Yours,Saw . . ...........................
10
A. Control Devices ..........................
10
B. Pro-Operation Checks ....................
10
C. Starting and Stopping the Saw, .............
10
Uslng,the Power Sharp _ System ..............
11
Types of "Cutting
A. Basic Cutting Technique .............
".....
B. Tree Felting Techniques ..................
C. Bucking ...............................
D. Debranching and Pruning .................
Maintenance
"
. .......
A. Cleaning the Saw ..........
;; .............
B. Guide Bar and Chain ........................
C. Sprocket ..............................
D. Storage ...............................
E. Maintenance Accessories .................
F. Trouble Shooting Cllart ...................
Parts List ..................................
Quick Reference Page .......................
13
t3
13
15
16
17
17
17
19
20
20
21
22
27
SPECIFICATIONS
_zt
MODEL
POWER
(Z.O:t23
;_S.34_
'" 110_'2_)rolls AC
SUPPLY
50-60 Hz
RATED CURRENT
MAXlMUM"'M_TOROUTPUT
SPROCKETIOR|VE
...........
,
50-60 Hz
12 A,m,ps
12 Amps
....2,0 Horsepo wet
CHAINiO_gon"
(_-o _4"P.SJ
1t0-_20 Volts AC
_
2.0 Horsepower
s Too,!_:,St_,p
ciut_:h,
6 rool..s_ipcl_|c.
3,_Pi_ch, LowProfile
3/8 Pitct_, Low Profile,
Ch_omedCu_tms-
Power
Sharp=
Chromed
....
G'UIOE
S_ - Lo._t_o'
OILER
CHA,%NSHARPENiNG''
Manual
:_
Manuai'-
Manual
I
&,.A.ulomati¢
....
Power Sharl_ +_ System
Stub Handie
Lock.out Button
Power
Sharp _
Knob
(Model 358.34031, oni_
Powe!Cord
Low-KickbackChain
"Oil
indicator
(xtr. Guard
+)
Motor Housing
Td_ger
(Lo-_Ck+),
,
SPECIAL
GUARD
SAFETY
AGAINST
SECTION
KICKBACK
REDUCE
Kickback Is a dangerous reaction that can lead to
ser[o us pe rso hal Injury, Do not rely only on the safety
devices provided with yoursaw. As achain saw user, you
must take special safety precautions to help keep your
cutting jobs free from accident or Injury,
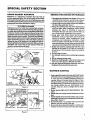
KICKBACK WARNING
Kickback'can occur when the moving chain contacts
an objec,tat the upper portion of the tip of the guide bar
or when the wood closes in and pinches the saw chain
In the cut. Contact at the upperportlon of the tip of the
guidebarcan causethe chain to dig into the object and
stop the,chain for an instant, The result is a lightning
fast, reverse reaction which kicks the guide bar up and
back toward the operator. If the saw chain is pinched
along the top of the guide bar, the guide bar can be"
driven _apidiy backtoward the operator. Eitherofthesa
reactions can cause loss of saw control which can
result in serious persona/ injur_,
KICKBACK
PATH
"_
THE
CHANCE
OF KICKBACK
1. Recognize that kickback can happen, With a basic
understanding of kickback, you can reduce the element of surprise which contributes to accidents.
2. Never let the moving chain contact any object at
the tip of the guide bar. Figure 1.
3. Keep the working area free from obstructions
such as other trees, branches, rocks, fences,
stumps, etc, Figure 2. Eliminate or avoid any
obstruction that your saw chain could hit while you
are cutting through a particular log or branch.
4. Keep your saw chain sharp _ and properly
tensioned. A loose or dull chain can increase the
chance of kickback. Follow manufacturer's chain
sharpening and maintenance instructions. Check
tension ,at-regular-intervals with the motor stopped,
neverwith the rnotorrunning. Make surethatbar clamp
nutsare securely tightenedafter tensioning thechain.
5: Begin and continue cutting only with the chain
moving at full speed. If the chain is moving at a
slower speed, there is greater chance for kickback
to occur.
6. Cut one log at a time.
7. Use extreme caution wheri reentering a previous
cut.
8. Do not attempt plunge cuts.
9. Watch for shifting logs or other forces that could
€losea cut and pinch or fall into the chain.
10. Use the Reduced.Kickback Guide Bar and LowKickback Chain speciffed for you r saw,
Figure I
J
I
AVOID
OBSTRUCT|ONS
CLEAR
WORKING AREA
Figure 2
"
J
\
_
"_,_
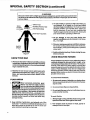
KEEP A FIRM GRIP
_U_ . '\
_:.-_
WITH
WITH
BOTH HANDS
LEFTTHUMB
NEVER REVERSE
HAND POSITIONS
NDL_:BAR
LEFT
RIGH
ANI
CORRECT
GRIP
INCORRECT
GRIP
CORRECT
Figure 3
POSITION
MAINTAIN
CONTROL
1. Keep a good firm grip on the saw with both hands
when the motor is running and don't let go. F3gure
3. A firm grip can neutralize kickback and help you
maintain control of the saw; Keep the fingers of your
lefthand encirclingand yourleftthumb under the front
handlebar.Keepyourrighth_ndcompletelyaroundthe
rear handle whether you are right handed=or left
handed. Keep your ]eft arm straight with the elbow
locked.
2. Never reverse right and left hand positions. Figure3.
3. Stand with your weight evenly balanced on both
feet.
4. Stand stightly to t he left side of the saw, to keep
yourbody from being In a direct line with the cutting chain, Figure 3.
5. Do not overreach. You could be drawn or thrown off
balance and lose control of the saw.
6. Do not cut above shoulder height. It is difficult to
maintain control of the saw above shouider height,
SPECIAL
SAFETY
SECTION
(continued)
Because a chain saw is a high-speed wood-cutting tool, special safety precautions must
accidents. Careless or improper use can cause
I be observed to reduce the risk of personal
!hWARNING
serious Injury.
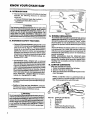
SNUG
FITTING
.AI.._-
SAFETY HAT
HEARING PROTECTION
HEAVY DUTY GLOVES
3. Do not handle or operate a chain saw when you
are fatigued, i11,or upset; or if you have taken
alcohol, drags or medication. Youmust be ingood
physical condition and mentally alert. Chain saw
work is strenuous. If you have any condition that
might be aggravated by strenuou.swork, check with
your doctor before operating a Chain saw.
.
Do no attempt to use your saw during bad
weatherconditions such as strongwind, rain, snow,
etc., or at night.
Plan your sawing operetio ns carefully in advance.
Do not start cutting until you have aclear work area,
secure footing, and if you are felling trees, aplanned
retreat Dath.
Figure4
' KNOW
YOUR
SAW
i, Read yourOperator's Manual carefully until you
completely understand and can follow all safety
rules and operating Instructions before attempting to operate the unit.
2. Restrict the use of your saw to adult users who
• understand and follow the safety rules, precautions, and operating instructions found in this
manual
6. Avoid accidental starting. Always unplug the saw
when not in use.
AVOID
REACTIVE
FORCES
Pinch-Kickback and Pull-in occur when the chain is
suddenly stopped by being pinched, caught, or by
contacting a foreign object in the wood, This resultsin
reversal of the chain forcebeing used to cut wood and
causesthe saw tomove in the oppositedirectionof chain
rotation. Pinch-Kickback drives the saw straight back
toward the operator.Pull-in pulls the saw away from the
operator.Eitherreactioncan resultin thelossofcontroland
possibleserious injury.
To avoid Pinch-Kickback:
PLANAHEAD
1,
Wear personal protective gear.
Always use steel-toedsafety footwear
with non-slipsoles;snug-fiRingclothing
with reinforcedcutting resistantinserts;
heavy-dutI non.slipgloves;eye protectionsuchas nonfogging, vented gogglesor face screen; an approved
safety hard hat. and sound barriers--ear plugsor mufflerstoprotectyourhearing.Regu_r Usarsshouldhave
hearing checked regularly as chain saw noise may
damage hearing.
2. Keep children, bystanders, and animals out of the
work area-- a minimum of 30 feet (10 meters). Do not
allow other people or animats to be near the chain saw
when startingor operatingthe chain saw.
1. Be extremely aware of situations or obstructions
that can cause materialtopinch thetopofor otherwise
stop the chain.
2. Do not cut more than one log at a time.
3. Do not twist the saw as the baris withdrawnfrom an
under-cutwhen bucking.
To avoid Pull-in:
I. Always begin cutting with the chain movlng at fuU
speed and the saw frame against the wood.
2; Use wedges made of plastic or wood, (never of
metal) to holdthe cut open.
SPECIAL
OPERATE
SAFETY
YOUR
SECTION
(continued)
SAW SAFELY
1. Do not operate a chain saw that is damaged,
improperly adjusted, or not completely and
securely assembled.
2. Do not use the saw if the trigger switch does not
tumth e unit on and off pmpedy. Repairs to thetrigger switch must be made by your Sears Service
Centero_
3. Keep chain and guide bar clean and properly
lubricated.
4. Keep oil cap, screws and fasteners tight.
5. Keep the handles dry, clean, and free of oil.
Stop the saw if the chain strikes a foreign object.
Check for alignment, binding,breakage, and mounting of movingparts and any other condition thatmay
affect the operation ofthe unit. Check guards and all
other parts to see if each will operate°properlyand
perform its intended function. Any part that is damaged should be pmpedy repaired or replaced by
using the_instructions in this manual or by seeing
your Sears Service Center.
.
3. DO n0t'operate the saw from a ladder or in a tree.
4. Position all parts of your body to the left of cut
when:the motor is running.
5. Cut WOodonly, Do not use a chain saw for any purpose other than those described in this manual.
6. Make sure the chain will not make contaclwith
any object before starting the motor. Never try to
start the saw when the guide bar is in a cut or kerf.
7. Becertain the saw chain stop s moving when the
trigger switch is released.
.
7. Use extreme caution when cutting small size
brushandsaplings. Slender material can catch the
saw chain and be wh!pped toward you or pull you off
balance.
8. Be alert for springback when cutting a limb that is
under tension toavoid being struckby the iimbor saw
when the tension in the wood fibers is released.
9. Do not force the saw through a cut. Exert light
pressure.only. Pressure on the saw atthe end of a
cut could cause toss of control when the cut is
completed.
10. Avoid body contact with the chain anytime the
saw is plugged into a power source. The chain will
continue to move for a short time after the trigger is
released.
11.'Avotddangerous
s_tuatlons. Do not m'..pose the
saw to rain, or use in damp, wet, gaseous, or
explosive locations.
-12. Unplugthepowerconnection
in use.
MAINTAIN
YOUR
GOOD,WORKING
whenthesawisnot
SAW IN
ORDER
1. Unplug the saw before servicing or changing
accessories,
Make certain thatall hand tools are removed from
• the saw before connecting the saw to the power
source.
9. Never modifyyoursawinanyway.
Useontyattachments supplied or specifically recommended by the
manufacturer.
O. Always replace the handguard immediately if it
becomes
damaged,
broken or otherwise
removed.
CARRY AND STORE
YOUR SAW SAFELY
1. Never carry your saw while climbing. Both hands
are needc-d ,vr _,,,_. ,..m,,,,,g.
• 14=._
!, _ d", by the front handle,
Carry the un,.
,.,,p.ugue
finger offthe trigger switch, and with the guide
bar and chain to the rear.
2.
3. Carry the saw with guide bar and chain covered
by the scabbard.
.
Before transporting in any vehicle or storing in
any enclosure, allow your saw to cool completely,
cover the.bar and chain and properly secure toavoid
turnover or damage.
5. Drain oil tank before storing your saw for 30 or
2. Have all chain saw service(other than the sermore days,
,#Ice described In the maintenance section of
this manual)performed
by yourSeara Service
8. Store In a dry area out of the reach of children.
Center.
SAVE THESE INSTRUCTIONS
Notice:
Refer to the Cooe of Federa= r_egulat{ons,oection 1910,266(5); 25.1 of Amenu=. _.u=_=_ oL=_d=ru S_ ely Requ,rements for Pulpwood Logging, ANSI 03.1:1978; and relevant state safety codes when using a chain saw for logging
purposes.
•5
KNOW YOUR CHAIN
SAW
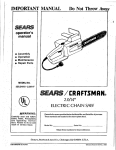
A, INTRODUCTION
• Yoursaw has been designed with satetyin mind and
includes the following features as standard
equipment:
-- Reduced-Kickback Guide Bar (Lo-Kick _)
Low-KickbackChain (Xtra-GUARD")
Handguard
_
At.L
•
_HG_UGE
• KICK_X
FORCE &_
Z_ WARNING
Thefollowing features are included on your saw to help
reduce the hazard of kickback, however, such features
wt!l not totally eliminate this dangerous reaction. As a
chain saw user, do not rely only on safety devices. You
must follow all safety precautions, instructions and
maintenance in this manual to help avoid kickback and
other forces which can result in serious personal injury.
B. KICKBACK
SAFETY
FEATURES
•-- Red,cad-Kickback Guide Bar,designedwithasmall
radiust;'pwhichreducesthesizeofthekickbackdanger
zone on the bar tip. F=gure5. A Reduced I_ckback
Guide Bar is one which has been demonstratedto
significantlyreduce the number and seriousnessof
kickbackswhen testedin accordance with the safety
i;eqUifementsforgasolinep<_wered
ct'_n saws as set
by the American National Standards Institute,Inc.,
StandaPd8175.1- 1985.
Low-Kickback Chain, designed with a contoured
" 'depth gaugeand guardlinkwhichdeflectthe kickback
force and allow woodto graduallydde intothe cutter.
Figure 5, LowKickbackSaw Chainis chain whichhas
met the kickback performancerequirementsofANSI
B17_t (Safety Requirementsfor.Gasoline-Powered
Chain Saws)whentestedona mpresentath_sampteof
chain saws below3,8cubic inchdisplacementspeci.
fled in ANSI B175.1.(American NationalStandards
Institute,Inc., Standard B175ol- 1985).
M_T£RIAI_
s_t_l_r
K_JUL
¢_LttI_E _U_R
Figure 5
C. DOUBLE
INSULATION
Your Chain Saw is double insulated to help protect
against electric shock. Ad0ubfe insulatedtool is constructedthroughout with twb separate "layers" ofelectrical insulation or one double thickness of insulation
.between the operator and the electrical system of the
tool
Tooisbuilt with this insulation system are not intended
to be grounded. As a result, the extensiOn cord used
with yoursawcan be plugged intoany conventional 120
volt electrical outlet without concern for maintaining a
ground connection.
Safety precautions
must be observed when
operating any electrical tool. The double insulation
system only supplies added protection against injury
resulting from a possible electrical insulation failure
within the saw.
D. CARTON
CONTENTS
After you unpack the carton:
i. Check the contents against the list below.
2: Examine the items for damage.
& NotifyyourSearsstoreimmediate/yifapartismissing or damaged,
NOTE:, A rattie-like noise in a powerhead with an
empty oil tank is a normal condition caused by the
filter moving against thewail of the tank.
m Handguard, designedto reducethe chanceofyour!e_t..
handcontactingthechainifyour handslipsoffthefront
handlebar.
--Position of front and rear handlebars, designed
w_thdistance betv,_n handles whichprovides better
balance and resistance if kickback occurs.
....
::.....
Z_WARNING
Do not operate the chain saw unless the safety devices
ortheirspeclfied replacements are properly Installed
and maintained according to the Instructions in this
manual. Do not use anyothergutde barand chain combination that Is not equtvalentto the odglnai equipment
or not certified to comply with ANSI B175.1.Failure
to follow these Instructions can result In serious personal Injury.
6
KEY NO.
1
2
3
4
' ,_,,_.
CARTON CONTENTS:
Powerhead
Guide Bar
Scabbard
Chain
Loose Parts Bag (Not Shown)
Operator's Manual (Not Shown)
QTY.
1
1
1
!
I
1
PREPARING
A. GETTING
YOUR SAW FOR USE
READY
1. READ YOUR OPERATOR'S MANUAL CAREFULLY.YourOperator's Manual hasbeen developed
to helpyou prepare your saw for use and to understand itssafe operation: It is important that you read
:yourman ual completely to beco me familiar with the
unit before you begin assembly.
i,,,,,,,,
,,,,
2. HAVE THE FOLLOWING AVAILABLE:
a. Protective Gloves.
b. V=Inch wrench or equivalent.
c. Screwdriver
d. Bar and Chain Lubricant (see page 9).
_ ....
B. POWER
SOURCE
AND
EXTENSION
CORD
3. IMPORTANT POINTS
1.,POWER SOURCE
Use only an A.C. voltage supply identical to that
shown on thename plate_ofthe sawto power this
•.chain saw.
m
Z_WARNING
All electrical repairs to this saw, including housing,
switch, motor, etc., must be diagnosedand repaired by
your_Sears Service Center or nearest Sears store.
Failure to do so can cause the double Insulation
construction to become Ineffective andresuit in
serious personal injury,
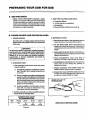
2. EXTENSION CORD
a. The extension cord used to reach the power
source must be:
1.) Specifically marked as suitable for outdoor
use. The suffix, W-A, must be includedon the
cord label.
2.)
Hemty enoughto oarryths current frem the
power source to the distance st which the
saw Is to be used. Otherwise, loss of power
and Dyerheating can occur causing damage
to lhe unit. Refer to Rgure 6for minimumwire
gauge recommendations.
a._Seeurethe:toolcord
to the extension cord as
shown in_FigureT to prevent diseonnection.
not abuse cords. Never carry saw by the
power cord oryank it todisconnect. Keep toolcord
and extension cordaway from heat, oil, and sharp
edges.
borDo
<:. Guard against electric shock. Avoid body con*
tact withany grounded conductor,such as metal
pipes and wire fences.
d. Avoid entanglement.
Keep cords clear of
operator, saw chain, _nd branches at all times.
e. Avoiddangeroussituations,
Donotexposethe
saw to rain, or use in damp, wet, gaseous, or
explosive locations.
L Inspect extension cords before each use.
Replace before using the saw if damaged.
g. Inspect chain saw cord before each use. Do not
use the unit with a damaged cord, Take the unit
to a Sears _ervice Center for repairs.
SECURE TOOL CORDTO
EXTEHS{ON COP,[},
3.) In good condition. Cord insulation must be
intact with no cracks or deterioration. Plug
connectors must be undamaged.
_. Suitable extension cords are available at your
Sears Retail or Catalog Store.
Figure7
MINIMUM WIRE GAUGE
RECOMMENDATIONS
I
AMP7
VOLTS
25 FT.
50 FT.
100 F_.
120
16
A.W.G.
14
A.W.G.
12
A.W.G.
Figure
6
_;AVE THES_ iNSTRUCTIONS
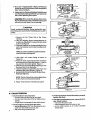
TURN AOJfJST{NGSCREW_K_'_II
COUNT_RCLGCK_/9_ISE
•
'_
_
Your saw is equipped with a Reduced-Kickback
Guide Barand a Low-Kickback Chain designed to
help reduce kickback.
• Always use the Reduced-Kickback Guide Bar and
low-Kickback chain specified foryour particular
saw, when replacing these parts.
ICAUTION:J Wear protective gloves when handling oroperaUng your saw. The chain is sharp and
can cut you even when it is not moving!
ADJUS_"ING
PIN }iDLE
EIARCLAMP
NUTS
Figure 8
MOUNT G_]IDE BAR
ON THE MOUNTING
STUDS
=___
WARNING
Avoid accidental starting. Always unplug the saw
from the power source before installing a bar and/or
chain.
1. Remove the Bar Clamp Nuts & Bar Clamp
Housing.
2, "rum the Adjusting Screw counterclockwise to
•posit_onthe AdjustingPin nearlyas far as it will go
to the rear. Figure 8.
3. Place the Guide Bar on the saw byfitting the long
slot in the Guide Bar overthe two mounting studs,
Figure 9,
Figure g
NOTE: Besurethe GuideBar ispositionedwiththe
round hole below the largeslot.
Ngute 10
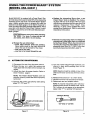
4. Hold chain with cutters facing as'shown in
Figure 10.
5. Place the chain around the sprocket and fit the
drive links intothe Guide Bar grooves-- first the
top and then the bottomgroove. Figure 11.
6. Slidethebarforwardandfittheadjustingpin
into
the round hold in the Guide Bar.
7. Hold the Guide Bar againstthe saw frame and
install the Bar Clamp Housing. Figure 12.
8. Secure the BarClamp Housingwiththe BarClamp
Nuts finger tighton/y.
SPROCKET AND
GUIDE BAR
Figure 11
SECUR_
NOT.E:The BarClamp Nuts must be slightly loose
for:the chain" tobe-tensioned propejrt_'......
9. FolTow Chain Tension Instructions on page 9.
BAR C_AMP
NUT_
Figure 12
,,,,,,
D. CHAIN
,,,,,,,,u,,,
i
TENSION
• Chain tenslonis very Important:
--A loose chain will wear the bar and itself.
•_A loose chain can jump off the bar while you are
cutting
L- A tight chain can damage the saw andlor break.
•8
,,,, j
• Chain tension is correct when the chain:
_-; can be liffedabout 1t8" from the Guide Bar at a
point near the middle of the bar, and
wi!l move freely around the bar.
• The Bar Clamp Nuts must be loosened to propedy
tension the chain.
• The chain stretches during use, especial|y when
new. Check tension:
each time the saw is used
more frequently when the chain is new
_as the chain warms up to normal operating
temperature.
_-
/t_WARNING
I Avoid accidental starting. Always unplug the saw
I from the power source before adjusting chain
AOJUSTING
I tension.
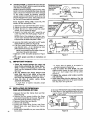
TURN
1, Hold the tip ofthe Guide Bar up and turn the Adjusting Screw clockwisejust until the chain does not sag
beneath the Guide Bar. Figure 13.
TO T_HTIEN
TENSION
2. Check the tension bylifting the chain from the Guide
Ba_"at the center of the bar. Figure 14.
3: C_ntinueturning the AdjustingScrew until the tension is correct,
4, Hold the tip of the Guide Bar up and tighten the Bar
Clamp Nuts with a wrench.
5. Recheck tension.
BAR
AND
CHAIN
OIL
• The guide bar and cutting chain require continuous lubrication in order to remain in
operating condition.
--Lack of oil will quickly ruin the bar and
chain.
--Too little oil will cause overheating shown
by smoke coming from the chain and/or
discoloration of the guide bar raits.
e_0se
Sears Bar and Chain Lubricant #7136554 to fill the oil tank. Clean SAE 30W oil
may also be.used. Never use waste oil for this
,purpose.
1. IMPORTANT
POINTS
a.;Fill the oil tank every time you use the saw.
b. Wipe off surfaces before filling with oil to
avoid sawdust or debris accidently falling
into the tank and causing damage.
c. Use a funnel to fill the tank and wipe up all
spills. Do not use the saw until it is wiped
clean an_3is completely dry fr_om spil+iedoil.
.d, Reptace the oil c=,p securely to ensure
proper operation of the oiler.
e, Check the oil level indicator frequently
during use. Locate the indicator in the saw
frame just betow and behind the front handle. Figure 10. If oil is not visible in the slot
when saw is upright on a level surface, the
tank requires filling,
_fJ,_bet-.saw stand unplugged for 15 minutes
before stodng. It is normal for a small
amount of oil to drip off the bar and chain
when the saw is not in use. The excess oil
should be wiped from the saw before storing.
2. USING THE MANUAL
(Model 358.34021)
TO LOOSEN
TF3415_ON
Figure 13
NOTE: To tighten tension, turn the adjusting screw
clockwise _
.Toloosen tension, turn the adiusting!screw counterclockwise _.
Ell
TUR_
Figure 14
oftenenough to maintain a thin filmof oil on the
-barand chain w'nile the sawis cutting, It is recommsnded that the oileractivater be operated six (6)
times a minute and held for approximately th me
(3) seconds each time itis pressed.
a. Operate the offer by pressing down on the
oiler activator with your right thumb. Figure
10.
b. Be sure that you continue to grip handles
firmly while using the oiter activator.
.
USING THE AUTOMATIC OILER
(Model 358.34031)
Model 358.34031 is equipped with an automatic
and manual oiler. The automatic oiler supplies
lubrication to the bar and chain at all times.
The manual oiler can be used to prime or supplement the automatic oiler, it may be necessaw to prime the automatic oiler when the saw
is new, after the oil tank has been emptied, or
after a storage period.
a. Operate the manual oiler by pressing down
on the oiler activator with your right thumb.
Figure 10.
b. Be sure that you continue to grip handles
firmiy while using the oiler activator.
c. Prime the oiler by holding clown the button
for about 3-seconds with the sawrunning,
d. Supplement the automatic oiler:
--dudng a long letting cut.
--when
cutting
a tree or log which is
greater in diameter than the guide bar.
_anytime
an additional supply of oil is
desired.
OlLERf
AC 1"1VATO
R
OILER
Model 358.34021 is equipped with an oiler activator which manually suppfies oil to the bar and
chain,
The oiler activator must be used regularly
and
....
Figure 10
9
USING
YOUR
A. CONTROL
SAW
DEVICES
Understanding the control devices on your saw [s
an Important part of learning how to properly and
safely operate the unit. Figure 16.
FRONT HANDLE
OIL
ACTWATOR
The Trigger Switch startsor stops the motor and is
located in the rear handle. The Trigger Switch is
designed to be used with the Lockout Button.
2. TheLockout Button isa controlfeature designed to
prevent the motor from being acefdently started.
When the rear handle isgdpped in a normal cutting
position,the LockoutButtoncan be pushed in by the
thumb permitting the index finger to squeeze the
Trigger. It is not necessary to maintain pressure on
the Lockout button once the Trigger has been
engaged.
LOCKOUT
BUTTON
TRIGGER
REAR
HANDLE
,,,,,i =ll
Figure 16
3. The Front and Rear handles _'e the supports which
allowyou togripthesawin the normalcuttingposition.
Yourgrip on the handles,is most important because
proper gdpgivesyoumaxfmumabilitytocontrolthesaw
for safe operation,See page 3 Figure3 for propergrip.
_._._,.
B.
PRE=OPERATION
CHECKS
Before operating your unit always:
1..-Check over safety rules and precautions in
this manual. Make certain you completely
understand and follow each one.
5. _-Check the unit for loose bolts, nuts or fittings. Tighten, repair, or replace parts as
necessary.
2. ,,-Checkpersonal protective gear, Always use eye,
hearing,and head ptotectfondevices;safetyfootwear,
protectivegloves,and snug titling clothfng.
6. -P,, Check tool cord and extension cord. Inspect all wire insulation w{th care. Oo not operate
with cracked or deteriorated insulation. Take the
saw to your Sears Service Cente r for all electrical
repairs.
3. _-'Check the work area. Keep children,
bystanders,and animals a safe distance away from
the work area when starting or operating the saw.
-- a minimumof3Ofeet (10 meters).
|. ,.-Check weather conditions. Do not use your
saw in bad weather, such as strong wind, rain,
snow, etc., or at night.
C.
STARTING
.1. Connect
source.
AND
STOPPING
THE
8. ,,-Check the oil tank. The tank should be filled
each time the saw is used.
9. ,.-Check the handles.Handles
and free of _i!
should be dry
SAW
the saw to a proper electric, power
2. Start the saw by pushing the LOckout Button
with your right thumb and squeezing the Trigger Switch with your right index finger.
NOTE: it is not necessary to continue pressing
the Lockout Button once the Trigger Switch
can be operated.
3. Stop the saw by re_easlng the Trigger Switch,
10
7. ,.-Check the saw chain. The chain should be
sharp and at the correct tension.
4, Unplug the connection to the power source.
!CAUTION:J Damage to the tdgger switch can
occur if the switch is turned on and off while the
saw Is cutting: Operate the tdggerwith firm and
decisive action. The saw must be running at full
- speedbefore starting the cut and turned off only
afterleavingthe material to avoid damage.
USING
THE POWER SHARP
(MODEL
358.34031
)
® SYSTEM
Model 358.34031 is equipped with a Power Sharp® System that will perform approximately 80% of the sharpening
necessary for the saw chain. The Power Sharp® System
uses a built-in gdnding stone to sharpen the cutter top
plates:_.nd set depth gauges. As the built-in sharpener is
used, the cutter side plates gradually wilt be altered_ About
every:3rd to 5th time the Power Sharp® System is used,
hand filing is required to correct the cutter side platesand
depth • gauges.
• Replace the sharpening Stone when a new
Power Sharp '_ chain is installed. The sharpening stone will wear to the shape of the worn chain
and will cause excessive wear to a new chain if not
replaced. Replacement Power Sharp,_ Chain.
Stock No. 71-3618, comes supplied with a Sharpening Stone Replacement, Refer to replacement
instrucUons in thissection.
jCAUTION:JAIways wear gloves when handling
the chain. The chain is sharp and can cut
you easily, even when it is not moving.
• Remove the sharpening stone if a standard or
conventional, chisel-type chain is substituted
'for the P0wer Sharp '-_Chain. See instructions for
removing the sharpening Stone below, Use as replacement chain Stock No. 71-3623. Follow standard chain,sharpening instructions, page 18.
• _Sharpen the saw chain when:
--wood
chips become small and powdery.
Wood chips made by the chain should be
about the size of the teeth of the chain.
--saw cuts to one side.
--saw has to be forced through the cut.
A.
AUTOMATIC
SHARPENING
1. Disconnect the saw from the Dower source.
2._Pt'ace the saw on a solid, flat surface and
make sure that the chain will not contact any
object.
3. Adjust the chain for proper tension. Refer to
Chain Tension, page 9.
,
Turn the Power Sharp ®Knob clockwise, one
click at a time, whilepushing
down on the
knob. Figure 17.
NOTE: Sparks should be visible on top of the
chain as thechain comes out of the bar clamp
a_'ea.
NOTE: The Power Sharp ® System will not
sharpen correctly unless the chain is property
tensioned.
. Release knob and turn 1 or 2 more clicks.
7. Depress knob for 8-10 seconds and release.
8. Disconnect saw and inspect cutters.
4. Connect the power cord and run saw during
steps "5", "6", and "7".
NOTE: A propedy sharpened cutter will show
grinding marks across its entire width. Figure
18. if cutters do not appear to be sharpened,
repeat step "7" for another 5-10 seconds.
GRINDING MARKS
SPARKS ARE SEEN HERE
TOP VIEW OF CUTTER
pOWER SHARP® KNOB
,
•Figure !?
,,,L,
F{gure 4.8
11
_w
r=AP=_ r =L|NI,t M Hequiredafter every 3rdto 5th
time thePower Sharp ® System is used to correctthe
side l_lates and depth gauges.
NOTE: If abrasive materials such as rocks, nails,
sand, or.dirt are contacted by the chain, the side
plates should be checked more often. Damage
to the cutters caused by abrasive materials
usually results in discoloration spots where the
chrome has been Worn away. Side plates should
be filed until these spots are removed.
suPPoRT FLATSiDE
OF FILE HOLDER
ONTOP OF
_-X_
................
-
i ROUND FILE
DEPTHGAUGE
TOP PLATE,/_
SIDE PLATE
"_
Figure 19
Items Required: Gloves, 5!32" round file, File
holder, flat file, screwdriver, Vise.
1. Disconnect your saw from the power source.
2. Adjust the chain for proper tension, page 7.
3.'Clamp the bar in a vise to hold the chain
steady. Do not clamp the chain.
4. Support file holder with 5/32" round file on
cutter top plate and depth gauge. Figure 19.
NOTE: Work at the midpoint of the bar, moving the chain forward with the slotted end of
a screwdriver as each side plate is filed.
5. HoJd.{he file holder feve!iwith the 22 ° guide
mark:parallel to guide bar. Figure 20.
6. File_.,{rom inside toward outside of cutter in
one direction only -- 2 or 3 strokes per side
plate should be enough Figure 20.
NOTE: Avoid hitting the top edge of the cut.
ters when filing the side plate.
.:T.:Maintain
a 1/32" side plate projection. Figure
21.
8. Ble.depth gauges according to instractions on
page l&
C.
IMPORTANT
-12
Figure
S!DE
PLATE is
\ --_ L<---11._P,,
....
,
20
StDE PLATE
':pROJECTION
1132"
Figure 21
POINTS
1. Check the contact between the stone and
chain before advancing the Power Sharp •
Knob. If stone is contactin.g the chain, the
chain can be sharpened without advancing
the knob.
2, Do not advance the Power Sharp® Knob
more than one or two clicks at any one
sharpening. Otherwise, excessive wear to
the chain and sharpening stone can occur.
.3. No_re. the flow of =.sparks visi.b!e during
automatic sharpening:
-.Ai,_ight
flow of sparks indicates proper
sharpening.
D.
CENTER OF
THEGUIDE
BAR
REPLACING
OR REMOVING
THE SHARPENING
STONE
1. Remove the two Bar Clamp Nuts and Bar
Clamp Housing.
2. Remove the two screws holding the Slone
and Carrier Assembly on the saw. Figure 22.
3. Unscrew Knob as shown in Figure 22.
4. Remove Clicker Ring and Spring.
5. Discard old assembly.
6. Install your Clicker Ring, Spring; and Power
Sharp ® Knob into new Stone and Carrier
Assembly.
7. install entire assembly on your saw with the
two screws.
--A heavyflow of sparks or no sparks indicates improper sharpening.
Keep
all cutters the same length, The aide
4.
plates should always be kept approximately
t/32 of an inch longer than the top plate.
Figure 21.
Preserve the origina! cutter angles carefully
5,
and uniformly,
Avoid
hand filing into the bottom.of the top
6.
plates.,Keep guide lines on file guide aligned
with the chain and guide bar.
8. Reinstall BarClampHousingandBarClampNuts.
9. Place stone in the operating position by turning the Power Sha_p_Knobcounterclockwise
,_
until it stops.
.
-SPRING
STONE
AND
CARRIER
ASSEMBLY
TYPES
A. BASIC
OF CUTTING
CUTTING
TECHNIQUE
1. IMPORTANT POINTS
a. Cut wood only. Do not cut metal, prastics,
masonry, non-wood, building materials; etc.
b. Stop the saw if the chain strikes a foreign
object. Inspectthe unit and repairorreplace parts
as necesary.
c_:Keep the chain out of dirt and sand. Even a
small amount of dirt will quickly dull a chain and
_tbus,increase the possibility of kickback.
Z_ KICKBACK WARNING
Kickback can occur when the moving chain contacts
anobjectatthe upperportionofthetip oftheguidebar
orwhen the wood closesin and pinches the saw chain
in the cut. Contact at the upper portion of the b'pof the
guidebarcan cause the chain to dig into the object and
stop the chain for an instant. The result isa lightning
fast, re_erae reaction which kicks the guide bar up and
back toward the operator. If the saw chain is pinched
along the top of the guide bar, the guide bar can be
ddvenrapidlybacktowardthe operator. Either of these
•reactions can cause loss of saw control which can
result in serious petsonal injury.
2. UNDERSTAND REACTIVE FORCES
Pinch,Kickback and Pull-in occur when the chain
Is suddenly stopped by being pinched, caught,
or by contacting a foreign object In the wood. This
results in a reversat of the chain force used to cut
wood and causes the saw to move in the opposite
direction ofchain rotation. Either reaction can result
in loss ofcontroland possibleserious personalinjury.
, Pinch-Kickback;
occurswhen the chain, on topof the bar,issud.
deniy stopped when the top of the bar is used
for cutting.
--ddves the saw straightback towardthe operator.
occurs when the chain on the bottom of the bar
is suddenly stopped
_pults thesaw forward.
B. TREE
FELLING
BEGIN CUTT[NG WITH THE SAW
FRAME UP AGAINST THE LOG.
Figure 23
FCAU'I'ION;J Do not stall the chain'in the cut. This
will overheat the motor and cause damage.
3. PROCEDURE
Practice.cutting a few small logs using the following
technique,to get the."feel'" of using your sa_wbefore
you begin a major sawing operation
a. Assume the proper cutting stance described in
the section,Special Safety Section:'page 3,-firm
gdp- on front :and rear handles, weight evenly
batanced on both:feet, and body stightly to the left
side of the saw.
b. Make sure the extension cord is completly
away from the saw and your body so the cord •
cannot be cut or become wrapped around your
feet or legs
c. Press the trigger to start the chain moving
before beginning the Cut
d. Begin-cutting with the saw frame up against
the log. Figure23.
e. Allow the chain to cut for you. Exert only light
downward pressure. Ifyou force the cut, damage
to the bar, chain or motor can result.
f. Do not put pressure on the saw at the end of
the cJ.'t to _void losing contro! when t,he cut is
complete.
g. Release the trigger sw_tch as soon as the cut
Is €ompleted.
h. Unplug the unit after each cutting operation.
TECHNIQUES
I_:PLAN YOUR SAWING OPERATION CAREFULLY
tNADVANCE
a, Clear the work area. You need a clear area aJf
around the tree where you can have secure
footing.
b. Study the natural conditions that can cause
the tree to fall In a particular direction,
1.)The WIND direction and speed
2o)The LEAN of the tree
3.)WEIGHTED withBRANCHES on one side
4.)Surrounding TREES and OBSTACLES
c. Look for decay and tot. If the trunk is rotted, it
could snap and fall toward the operator,
d. Check for broken or dead branches whichcould
fall on you while cutting.
e. Make sure thereis enough room for thetree to
fall. Maintaining a distance of 2Vz tree lenghts
from the nearest person or other objects. Motor
noise may drown out warning call.
f. Removedtrt, stones, loosebark, nails, staples,
and wire from the tree where cuts are to be
made.
g. Plan to stand on the up-hill side when cutting
on a slope.
• h, Plan a clear retreat path to the rear and
diagonal to the lin e of fall, Figure 24.
13
a. Ify0iJ know the direction of fall:
1.) Make a single felling cut on the side away
from the direction of fall.
2.) Cut alt the way through.
3.) Stop the saw, put it down, and get away
quickly on your planned retreat path.
b. If you are not sure which way the tree will fall,
use the notch method described for felling
large trees.
• j
OFFALL
"_-j:J
,_,
45
F{gure 24
Figure 25
L_,WARNING
Do not cut a tree in any manner that would endanger people, cause property damage, or strike
a utility line. Notify the utility company immediately if a tree makes any contact with a utility
line. _
CLOSING
.
FELLING LARGE TREES-OR MORE
6" DIAMETER
The _notch method is used to cut large trees. A
notcl_!:_scut on the sideofthe tree in the desired
direction of fall. After a felling cut is made on the
opp0_ite side of the tree, the tree will tend to fag
intotildenotch.
\
Figure26
HOLDS
THE TREE ON STUMI_
_o CO.TROLST_E
_J..
.
Figure27
.!_WARNING
Stay on the uphill s{de of the terrain to avoid the
tree rolling or sliding downhill,after it is felled.
NOTE: If the tree has large buttress roots, re*
move before making the notch. Cut into the buttresses vertically, then horizontally. Figure 25.
NOTE: Before the felling cut is complete, drive
wedges to open up the cut when necessary to
controlthe-direction of fa!l, Use wood, plasticor
light alloy wedges but never steel or iron, to
avoid kickback and Chain damage.
a. Make the notch cut. Figure 26.
1.) Cut the bottom of the notch first, through
1!3 of the diameter of the tree.
2.) Complete the notch by making the slant
cut.
3.) Remove the notchofwood.
b. Make the felling cut on the opposite side of the
notch about 2" higher than the bottom of the
notch.
c. Leave enough uncutwood between the felling
cut and the notch to form a hinge. Figure 27.
Be atert for signs that the tree is ready to falt :
1.) cracking sounds
2.) widening of the felting cut
3.) movement inthe upper branches.
f. As the tree starts to fa_l, stop the saw; put it
down, and get away.quickly on your planned
retreat path.
g. Be extremely cautious with partially fallen
trees that may b e poorly supported. When a
b_eedoesn't fat{ compieteiy, set the saw aside
and pull down the tree with a cable winch,
block and tackle or tractor. Do not cut it down
with your saw to avoid injuq/.
e.
NOTE.."The hLnge heJps.tokeep t,he tree from
twisting and falling in the wrong direction.
• d. Usea wedge if there is ar,y chance that the
tree will not fall in the desired direction.
DON'T PUT YOURSELF
HINGE
IN THESE
POSITIONS
\1
Check the wind.
Don'tcutdownwind.
14
f
Check the tean.
O0n't cut on lean side,
Check the balance.
Don'tcuton weighted side,
C.
BUCKING
ISTCUTPRESSURESIDE
Bucking is the term used for cutting a fallen
tree to the desired log size.
1. IMPORTANT
POINTS
2ND CUT
a. Cut only one log ata time.
b. Cut shattered wood very carefully. Sharp
pieces of wood could be flung toward the
operator.
c. Use a sawhorse to cut small logs. Never
allow another person to hold the log while cutting and never hold the log with your leg or foot.
d. Do not cut in an area where logs, limbs and
roots are tangledsuch as in a blown down
area, Drag the logs intoa clear area before cutting by pulling out exposed and cleared logs
first.
e. Make the first bucking cut 1/3 of the way
through the log and finish with a 2/3 cut on
the opposite side. As the log is being cut, it
will tend to bend. The saw can become
pinched or hung in the log if you make the first
cut deeper than 1/3 of the diameter of the log.
f. Give special attention to logs under strain
to prevent the saw from pinching. Make the
first cut on the pressure side to relieve the
stress on the log. Figure28.
2.
TYPESOFCUTTING
2ND CUT
.---+
Figure28
OVERCUT
UNDERCUT
Figure 29
USED(Figure29)
Ow_-cutting - begin on the top side of the log
with the bottom of the saw against the log;
- exertlightpressuredownward.
Undercutting - begin on the under side of the tog
with the top of the saw against the fog; exert light
pressure upward. During undercutting, the saw
will tend topush bac k at you, Be prepared for this
reaction and hold the saw firmly to maintain controL
ii"
Never turn the saw upside down to undercut. The
saw cannot be controlled In this position,
.
Z._WARNING
If saw becomes ptnched or hung in a log, don't try to
fome it out. You could lose control of the saw resulting
in pensonal injury andlor damage to the saw, Stop the
saw and drive a wedge of plastic or wood Into the cut
I untltsawc_nberemovedeasii¥Figure24. Restartthe
I saw and carefully reenter the cut. Do not use a metal
Figu re 30
1
1
Figure 31
2ND CUT
IST CUT
•l wedge to avoid klckbackand chain damage,
3, BUCKING_WITHOUTA
SUPPORT
a. Overculwitha t/3diametercut.
b. Roll log ove_ and finish with an overcut.
1ST
CUT
2ND
CUT
Figure 32
1ST
CUT
15
SUPPORT
/_.kWAHNIN_
DO not stand on the log being
(Fig ure 31 ):
a. In area A:
1.) Undercut ; 13of the way through the log.
2.) Finish with an overcut.
b. Inarea B:
t,) Overcut, 1/3 of the way through the log.
2.) Finish with an undercut.
.
DEBRANCHING
AND
PRUNING
• W0rk!sfowly, keeping, both hands on the saw
wit.ha firm grip. Maintain secure footing and balance_
o Watch out for springpoles. Use extreme caution
when cutting small size limbs. Slender material
may catch the saw chain and be whipped toward
you or pull you offbalance.
= Be alert for springback. Watch out for branches
that are bent or under pressure as you are cutting
to avoid being struckby the branch or the saw when
the tension in the woodfibers is released.
• Keep a clear work area. Frequently clear branches out ofthe way to avoid trippingover them.
_WARNING
Never climb into a tr_e to debranch or prune. Do not
stand on ladders, platforms, a log or in any position
which can cause you to lose control of the saw.
1. DEBRANCHING
a. Always debranch a tree after it Is cut down,
.,0nly{hen can debranching be done safelyand
.... :properly.
b. Leave the larger lower limbs to support the
:tree as you work,
c. Start at the base of the felled tree and work
towards the top, cutting branches and limbs.
Remove small limbs with one cut. Figure33,
d. Keep the tree between you and the chain.
Cut from the side of the tree opposite the
branch youare cutting.
e. Remove larger, supporting branches with
the 1/3, 2/3 cutting techniques described in
the bucking section.
1.) Start with an overcut
2.) Finish with an overcut
f. Always use an overcut to cut small and freely
hanging limbs. Undercutting could cause
limbs to falt and pinch the saw.
USECOMMONSENSE
MAINTAIN SECURE FOOTING
2. PRUNING
a_ Limit pruning to limbs shoulder height or
below. Do not cutif branches are higher than
your shoulder. Get a professional to do the
job.
b. Refer to Figure 34 for pruning
technique.
1.) Undercut 1/3 of theway through the limb
near the trunk of the tree.
2.) Finish with an overcut farther out from the
trunk.
3.) Keep out of the way of theialting limb.
4.) Cut the stump flush near the trunk of the
tree.
Z_WARNING
Be alert for and guard against kickback. Do not atiow
the moving chain tocontact any other branches or
objects at the nose of the guide bar when debranchIng or pruning. Allowing such contact can result in
serious personal Injury,
REMOVE SMALL LIMBS
WiTH ONE
CUT
F
Figure33
luJ,
i
/.27" _'//"
[_t__ {I Ill " SECONDPRUNINGCUT
1,
THIRD ¥_
..
PRUN|NG _!_#
RRST PRUNINGCUT
•Figure34
!6
t
I
BUCKING-USING A STAND (Figure 32):
a. In area A:
1.) Undercut 1/3 of the way through the log.
2.) Finishwith an overcut.
b. in area B:
1.) Overcut 1/3of the way through the log.
2.) Finish with an undercut.
D.
cut. The cut potion
will roll down hill.
MAINTENANCE
A good maintenance program of regular inspection and care will increase the service life and
help to maintain the safety and performance of
your saw.
Avoidacmdental starting, Always unplugthe sawfrom|
befor_ cleaning or performing any]-]
I the power, sourceZ_WARNING
maintenance to the saw or when not in use.
|
Z_WARNING
All electrical repairs to this saw, including] housing, switch, motor, etc., must be diagnosed and
repairedby your Sears Service Center or nearest
Sears store. Failure to do so can cause the
double insulation construction to become ineffective and result in serious personal injury.
Inspect all wire insulation carefully before each
period of use. Donot operate or try to repai r the
.saw if wire insulation Js cracked or deteriorat.
cal.Take the unit to your Sears Service Center
for repair.
•
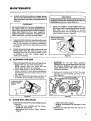
Check and retighten screws holding front handle at least once for every five (5) hours of operation. Make sure the handguard i's securely
clamped between the front handle and housing
after tightening screws. Figure35.
CHECK HANDLEBAR
SCREWSFREQUENTLY
Check the saw for loose bolts, screws, nuts, and
fittings daily when the saw is in use. Loose
fasteners_ca,qcause
an unsafe condition as wetl
as damage to your saw. Tighten,. repair, or .......
replace as necessary.
A.
CLEANING
THE
SAW
Clean and inspect the saw after each day of use.
1. Remove the bar and chain from the saw.
NOTF_: A/ways c/ean the Guide Bar and
Chain when the chain is sharpened.
2. Use a small brush or the air discharge of a
vacuum cleaner to clean debris and sawdust
from the air inlet and exhaust slots on housing. F3gure36.
3. Wipe saw clean with rags. Make sure there is
• no.oil.film on the handles or saw housing.
!CAUTION:I Do not use water, gasoline,
kerosene or any type of cleaning fluid to clean
the :housing. Moisture can. :cause. short circuits. Hydrocarbons will attack and deteriorate the housing.
4. Remove all sawdust and oil from the drive
sprocket and bar-mounting pad area of the
saw. Figure37.
CLEAN AIR INLET
AND EXHAUST
SLOTS .
Figure36
B,
GUIDE
BAR
AND
Fig ure 37
CHAIN
• increase the service life of your Guide Bar and
Chain by:,
--Using
the saw properly and as recommended in this manual.
--Maintaining
page 9,
the correct Chai n Tension,
--Proper lubrication, page 9.
--Regular maintenance as described in this
section.
• Remove the Guide Bar from the saw for all
maintenance.
17
ling thechain;Thechaincanbesharpenough to
cut you even though it may be too dull to cut
wood.
1. CHAIN MAINTENANCE
• Sharpen the chain when:
Wood chips are small and powdery, Wood
c_ips made by the saw chain should be
about the size of the teeth of the chain.
-- Saw has to be forced through the cut.
-- Saw cuts to one side.
a. CLEAN TREE SAP FROM THE CHAIN
BEFORE IT IS SHARPENED:
1.) Soak chain in a petroleum based solvent
or a detergent and water solution
2.) Dry chain thoroughly,
3.) Immersethecleanchalnin tightoil untiloil
seeps into the rivet holes,
NOTE: Do not run achain which has been
cleaned without lubricating it first.
b, SHARPENING INSTRUCTIONS
-___OUN
OF FILE HOLDER
ON TOP OF CUTTER
D FILE
DEPTH
GAUGE
T?_P "
PLATE
'-
!
_b
SIDE PLATE
Figure 38
KEEP
30 ° MARK
PARALLEL TO
THE CENTER OF
THE
GUIDE
L_K..//'/
30°///
BAR_/
Figure39
CUTTERS
REMOVE
SAME t.ENGTif
DAMAGE
Items required:
Gloves
5/32" file
6" file holder
Rat file
Depth Gauge Tool
Screwdriver
Vise
5.) Sharpen cutters.
a.) Support the square rod on the file holder
(with 5/32" round file) on cutter top plate.
Figure 38.
b.) Holdthe file holderlevei with the30o guide
mark paralle! to the center of the chain.
Figure 39.
c.) File from inside toward outside of cutter,
straightacross, on forwardstrokeonly.Use
2 or 3 strokes per cutting edge. Figure 39.
d.) Keep all cutters the same length. Figure
40.
e.) File enough to remove anydamage to cutting edge (side &top plate) ofc utter.Figure
40.
f,) File91SG chaintomeetspecifications
shown
in Figure 41,
SIDE PLATE
Figure40
J
Figure 41
iAUGE
6.) Correct Depth Gauges
a.) Place depth gauge tool (Catalog No.
71.36557) over each cutter depth gauge.
Figure 42,
•b.) File level with the flat fife if depth gauge is
higher than the depth gauge toot.
c.) Maintain rounded front corner of depth
gauge with a fiat file. Figure 42 &43.
NOTE: The very top of the depth gauge
should be flat with the front half rounded
off with a flat file,
18
TOOL
DEPTH GAUGE
Fiaum 42
/_WARNING
Maintain the proper hook angle according to the
manufacturer's specification for the chain you are
Using. Too much hook angle will lncrese the chance of
kickbeck which can result In serious personal Injury,
Figures 41 and 43.
TOP PLATE
HOOK
TOO MUCH
SQUARED
[
ANGLE
HOOK ANGLE_,
OFFCORNER
_
* .........
0;Z,_
.
----
|
Figure43
Depth gauge tool ts mqutred to Insure proper depth
gauge. RIIng the depth gauge too deep will Increase
the chance of kickback
Z_WARNING
which can result In serious I
personal Injury.
C. CHAIN REPLACEMENT
bar will damage the chainan d make cutting
more difficult,
1.) Replace the chain when cutters or links
break.
Replace the guide bar when:
2.) See your Sears Service Centerto replace
and sharpen individual cutters to match
your chain.
-- the inside groove of the guide bar rails is
worn,
the guide bar is bent or cracked.
3.) Always replace a worn sprocket when
installing a new chain to avoid excessive
wear to the chain.
a.
b.
2. GUIDE BAR MAINTENANCE
• Conditions which can require guide bar
maintenance:
C_
saw.cuts to one side
d.
saw has to be forced through a cut
inadequate supply of oiltobar and chain.
,, Check the condition of the guide bar each
time the chain is sharpened. A worn guide
REMOVE SAWDUST
"
_
Remove the guide bar to service.
Clean oil holes at least once for each
five hours of operation.
Remove sawdust from the guide bar
groove periodically with a putty knife or
a w_re. Figure44.
Remove burrs by filing the side edges
of the guide bar grodves square with a
fiat file. Figure45.
e. Restore square edges to an uneven rail
,top by fiiing with a flat file. F_gure45 .
""'_
FROM GUIDE BAR GROOV_j_/"
GUIDE BAR
GROOVE
WORN GROOVES
Figure 45
Figure 44
C.
FILE EDGES
SQUARE
SPROCKET
• Clean the sprocket and surrounding area
daily during heavy use of the saw.
• Inspect the sprocket regularly for wear. A
worn sprocket will cause the chain to run er•ratically and will shorten the life of the bar
and chain, Figure46o
• Replace the sprocket whenever a new chain
iS_installed. The sprocket matches the pitch
of the chain. If both the chain and sprocket
are replaced at the same time, they will wear
together. A worn sprocket will be out of pitch
with the new chain and thereby can cause unnecessary wear.
Items required:
Pliers
7116"or adjustable wrench
1/2_wrench, or equivalent
a. Remove the bare|amp nuts andthe bar clamp
. housing:
b. Grasp_the sprocket with pliers as shown in
Figure 47,
c. Remove the outer n utfrom the end of the shaft
with a 7116"or adjustable wrench.
d, Slide washer from shaft. Figure48.
e. Slide sprocket off the shaft.
WEAR IS
f. Reverse procedure to instal{ sprocket.
g. Tighten the end nut securely with a 7116"or
• adjustable wrench while holding sprocket with
pliers.
' g re46
19
GRASP
THRUST
WASHER
WITH
PLIERS
BEVELEDWASHER CURVES
"_
.4_. AWAY FROM POWERHEAD
POWERHEAD
Flgure 47
D.
Figure 48
STORAGE
When your saw is to be stored for over 30 days
always:
1. Drain oil tank.
2. Remove, clean, and dry the bar and chain,
3. S tqre.the chain in a container fitted with oil to
prevent rust.
E,
MAINTENANCE
4. Apply a coating of oil to the entire surface of
the bar and wrap it in heavy paper, cloth, or
plastic.
5. Wipe off the outside, surfaces of the unit.
6. Store the. saw in a dr_y place out of the reach
of children,
ACCESSORIES
Available th rough yournearest Sears Store, Catalog Sales Office,orService Center, but may not be furnished
with you_ saw.
Key
No,
1
2
3
m
4
-m
2O
Part
No.
55004
55046
-m
51192
51t16X
44245
44244
Catalog No.
71-36524
71-36565
71-36557
71-36554
71-3623
71-3618
71-36365
71-36462
Description
File (5/32" dia.) Twin pack
File Guide
Depth Gauge Tool
Bar and Chain Lubricant
Xtra GUARD "-Chain 35834021
Power Sharp" Chain 35824031
Lo-Kick': Guide Bar- 14" - 35834031
Lo-Kick -*Guide Bar - t2" - 35834021
F.
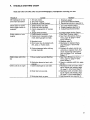
TROUBLE
SHOOTING
CHART
Read and follow all safety rules and precautions{pages 3, 4 and 5)before servicing your saw.
CAUSE
TROUBLE
REMEDY
Oil inadequate for bar
and chain lubrication
1, Oil tank empty,
2. Oil pump clogged.
3. Guide bar 0il hole blocked.
1. Fill oil tank, page 8.
2. Contact Sears Service Center.
3. Remove bar and clean, page 6 & t9.
Chain does,not move
when trigger switch is
engaged.
1. Chain tension too tight.
2. Guide bar rails pinched.
3. Clutchslipping(2.0
HP models
only)
4. Trigger Switch failure.
I. Chain tension incorrect.
2. Cutters dull, improperly sharpened; depth gauges too high.
1. See Chain Tension, page 7.
2. Repairorreplace, page6& 19.
3. Contact Sears Service Center.
Chain clatters or cuts
roughly
3. Sprocket worn.
4. Chain wear due to contactW:ith
dirt, sand, or frozen wood.
5. Cutters damaged'after
foreign material,
Chain stops within the
cut
Chain
cutsat
an angle
striking
1. Chain cutter tops not filed flat.
2. Guide bar burred or bent; rails
uneven.
1. Gutters damaged on one side.
2. Chain dull on one side,
3. G_,_de bar.bent,
or worn°
4. Contact Sears Service Center.
1. See Chain Tensiop, page7.
2. See Chain Sharpening Instructions, page 18.(page 11*12for
.. Power:Sharp® ).
3..Replace, page 19.
A.Resharpen or replace Chain,
page 18 (page 11-12 for Power
S harp _ .)
5. Sharpen aft.cutters evenly and
uniformly or replace chain. See
chain sharpening instructions,
page 18. (page 11:12 forPower
Sharp _ .)
1. See Chain. Sharpening instructions, page18. (page11-12for
Power Sharp ®.)
2. Repair or replace guide bar, page
6&19.
1. Resharpenuntil all cutters have
equal angles and lengths, page
t 8. (page 11-12 for Power Sharp -_)
2. Resharpen until all cutters have
equal angles and lengths, page
18. (-page 11-12 for Power Sharp'_).
3. Replace guide bar, page6& t9.
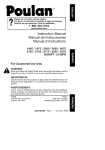
21
358.34021-2.0/12"
358.34031-2.0/14"PS
MODEL (3583403_)
33
co.l_
MODEL
25
42
\
23
_Q
-_ ,_,_.
_
53
SEARS
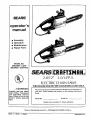
CHAIN
SAW PARTS
LIST---
MODEL
NO.
358.34021-2.1/12"
•358.34031-2.1 [14"PS
KEY
NO.
PART
NO.
QTY.
1
2
3
4
5
6
7
8
9
I0
11
12
13
14
26448
25458
28567
89752
25B73
25518
89764
25644
28566
15491
15485
15488
25517
1
1
1
1
5t t 92
51116)(
1
1
1
•
15
1
1
1
1
1
1
1
3
1
442z1_4
44245
92062
15502
25463
STD582031
1
1
1
1
21
10718
10719
15541 .
1
1
3
22
15542
16
17
18
19
20
23
24
25
26
27
28
29
30
31
26455
26456
31104
2_55O8
15504
15251
25546
_5465
26119
10511
1
1
I
32
33
34
63456
25461
15274
1
1
1
2
2
1
I
1
I
KEY
NO.
PART
NO.
QTY.
Housing -Motor
35
Drive- C_utch
36
,Drum - Clutch
37
Assembly- Motor
88
Safety Lock Button
Switch w/SafetyLock Button
39
Cordset- 2 Prong (1,6-2Wire)
40
Scabbard
S£mcket - 6 Tooth
44
Washer- Inner
42
Washer-Thrust
43
.Washer- Beveled
44
Collar - Retainer
45
Chain. Oregon®
46
35824021 -Xtra-Guard _
35834031 -'Power Sharp _
B_r * Lo-Kick_
47
35834021 - 12"8.N.
48
358.34031 - 14"8.N.
,- 49Washer-Outer
50
Nut - Sprocket
51
Gear- Pinion
F_Jng- Retain|rig(Motor Shaft)
52
Assembly- Main Housing (incl. 42)
53
35834021
54
35834031 •
55
Screw- Motor Ass'y. to Main Hag.
56
15496
21048
10525
15494
2
1
1
4
DESCRIt:q'ION
(#t0 - 24 x JB75
_,.T_,ew/washer)
Screw- Motor Ass y.to Main Hsg.
57
(//10- 24 x .625 l"aptite w/washer)
Bar Clamp Housing
58
&5824021
35824031
59
Tool-Gaug'e (oil Pump)
Decals
A._sembty-Odve Gear
" 10I
• W_sher - ThrUst
102
Nut .Bar Clamp
OilCap
.AcbJater
- Oiler
103
-Check Valve
Oil TankAssembly
104
(Incl. line, filterand 80)
105
Spring- Oil Une
106
Grommet - OII Lines (35834031 }
Washer .Oil, Pump Mtg, (35834031)
Screw-Oil Pump Mtg, (35834031)
Line - Pump to Bar Pad (35834031)
Oil Pump Assembly
Screw - Motor Hsc3.to MainHag,
(#10 x 1,50)
Screw (For Main Housing)
Assembly-Oil Pump Bodyw/line
15495
10526
23535
15503
15494
25451
25457
15499
15499
25458
23492
.....25466
15514
3t06-3
52O73
25524
25462
25543
69107
DESCRIPTION
Spacer -Chain Catcher
Bolt- Bar Stud
Screw-Chain CaP,her.
Handguard
,
.-Har|diebar - Wl'aparound (358.34031)
Screw- Handlebar
358,34031
35834021
I
Handlebar - Stub Type(35824021)
1
Pin - Bar Adjusting
I,
I
, Rate,- Keeper (Bar Adjusting)
I
Screw - Bar/_usfing
I - .Wrench- Bar w/Screwdriver
I
,2
I
I
I
(Optional)
I'
1
1
1
1
15495
Chain Repair _Jt ° 358,34021 only
Adjustment Knob (35824031)
Clicker Ring (358_34031)
Spring - (358.34031)
atone and Cartier Assembly
• (_&34031)
"
Screw ° PowerSharp ® Assembly
(35834031)
69098
WJt-Power Sharp ® ASS'y.
66572
Opemfor's Manual
26458
26985
••26986
255_
(35824o31)
0ncL5._-_
1
I
-' 1
2_4_
1
1
1
26884
26885
--
26457
Decal - MetorHous_ng
Decal -Specifica'don
- 358.34021
35834031
.D_Sharpening Instru_ons
35824031
Decal - Bar Clamp Housing
Decal - Handguard
Decal - Rep{anement Bar and Chain
- 35824021
3582403t
23
24
26
Read
and follow
Failure
SAFETY
2.
3.
4.
5.
40
1
6.
7.
.
Instructions.
in serious personal injury,
-.......
. ..................
page
3, 4&5
............................................................
3, 4 & s
9
THE SAW ...........................................................
Connect the saw to a.proper power source.
Make sure the exte.nsioo°cord
iscompletely away from the saw and cannot be:cut.
Start the saw by pushing the lockout button and squeezing the trigger before.entering
Begin cutting with the saw frame against the log.
Allow the chain to cut, for you; exert only light downward pressure.
Release the trigger,switch as soon as the cut is completed.
Unplug the unit after each cutting operation.
10
the cut,
-. ...........................................................
17
Take your saw to a Sears Service Center forall electrical related repairs,
Check and retighten screws holding front handle at least once for each five hours of operation.
Check the guide bar for wear each time the chain is sharpened.
Install a new sprocket each time a new chain is installed,
Let saw stand unplugged for 15 minutes and wipe oll from saw and bar before storing,
Store saw in a dry place out of the reach of children.
COMMON
2.
3.
can result
...............
and OperaUng
Fill the oil tank with clean oil each time the saw is used.
Use a funnel to fill ihe tank and wipe up all spills.
Replace the oil cap securely.
Operate the oiler activator,six times a minute and hold down for approximately three seconds each time the
activator is pressed, (Model 358,34021)
MAINTENANCE
1,
2.
3,
4.
5,
6.
Precautions
CHAIN OIL ..........................................................
OPERATING
1.
2,
3.
4.
5.
6.
7,
Rules,
Wear personal protective gear --gloves;
safety footwear; snug fitting clothing; and eye,
hearing, and head protection.
Check for worn, loose, or damaged parts and repair or replace before using the saw.
Check the chain for sharpness and tension.
Keep children;bystandersand animalsout ofthe work area-- a minimum of.30 feet (10 meters)away.
Plan your sawing operation carefully !n advance.
BARAND
t.
2.
3.
4.
to do so
RULES AND PRECAUTIONS
PREPARATION
1.
all Safety
CHAIN
SAW TERMS
Front Handle -- The support handle located at or toward the front of the chain saw.
RearHandle
-- The support handle located at or-toward the rear of the saw,
TrtggerSwitch -- A device that when operated witl complete or interrupt an electrica! power cir.
cubit to the motor of the c.h_n saw.
Lockout Button _ A movable stopthat prevents.the unintentional operation,of the switch until
manually actuated,
Oiler Activator _ A system' for oiling the guide bar'and saw chain.
Guide Bar -- A solid, railed structure that supports and guides the saw chain,
Saw Chain,-- A loop of chain having cuttir_g teeth (that cut the wood) that is driven by the motor
and supported by:the guide bar.
Sprocket -- The toothed part that drives the saw chain,
Clutch -- A mechanism
for connecting and disconnecting
a driven member to and from a
rotating source of power,
10.
Spiked Bumper (Spike) -- The pointed tooth or teeth for, use when felling or bucking to pivot the
saw and maintain posttlon while sawing.
11.
Kickback -- The backward andlor upward motion of the guide bar occuring when the saw chain
near the nose of the top area of the guide bar contacts:anyobject
such as another log or
branch; or when the wood closes in and pinches the saw _ohain in the out,
:12. Normal Culling Position -- The position assumed in performing the bucking and felling cuts.
13,
Felling -- The process of cutting down a tree.
14,
Notch Cut -- A notch out in a tree that directs the fall of the tree,
.15.
Felling Cut--The final cut in a,tree felling operation made on the opposite side of the tree from
the not_;h cut.
16.
Bucking -- The process of cross-cutting
a felled tree or log into lengths.
!7.
goring -- The process involved in cuing with the saw chain at ti_enose (tip) of _qe guide bar, in order
to make a hole. ! .WARNING: Sears does not recommend performing plunge or boring cuts due
tothe dangers of kickback.
27
The Model Number will be found under the handle with the Serial
Number. Always mention the Model Number when requesting service
or repair parts for your Chain Saw.
All parts listed herein may be ordered from any Sears Service Center
and most Sears Stores.
WHEN ORDERING REPAIR PARTS ALWAYS GIVE THE FOLLOWING
INFORMATION AS SHOWN IN THIS LIST.
1. The PART NUMBER
3,
The PART DESCRIPTION
2.
4.
The NAME OF ITEM-Chain Saw
The MODELNUMBER
358.34021 -- 2.0112"
358.34031 -- 2.0/14"PS
If the parts you need are not stocked locally, your order will be etectronically transmitted
to a Soars Repair Parts Distribution
center for
expedited handling.
When you buy merchandise
from
Sears you get an extra something
that nobody else can offer. Sears
Service.
MODEL NO.
358,34021-2.1_2"
358.34031-2.1/14"PS
Across town or across thecountry,
Sears Service follows
you, providing trustworthy,
competent service technicians
using only Sears
specified factory par_s.
How to Order
Repair Parts
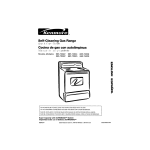
BAR .AND CHAIN
LUBRICANT
SEARS SERVICE
IS AT YOUR SERVICE
Available in Gallons (#71.36554)
and in Quarts (#71.36556) at your
nearest Sears Store, Catalog
Sales Office, or Service Center.
S(:aI_,
66572
- 2 - 26685
- 1 - 26685
Roebuck
and
C<)., Chie_E,_),
Ill. 60684
U.S.A.