1
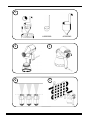
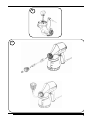
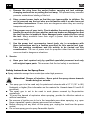
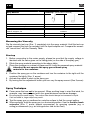
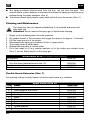
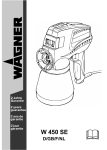
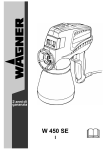
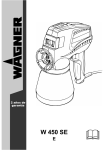
2 JAHRE
GARANTIE
2 YEARS
GUARANTEE
2 ANS DE
GARANTIE
W 95
D/GB/F/NL
1
# 0209058
2
3
4
5
# 0050342
6
7
3
8
W 95
GB
Read the operating instructions carefully before using the tool and observe the
safety instructions. Keep the operating
instructions in a safe place.
General Safety Instructions
Caution!
Read all the instructions. Non-observance of the instructions below can
cause electric shock, fire and or serious personal injuries. The term
"power tool" used below covers both mains-operated power tools (with
mains lead) and accumulator-operated power tools (without mains
lead).
KEEP THESE INSTRUCTIONS IN A SAFE PLACE:
1. Workplace
a)
Keep your workplace clean and tidy. Untidiness and unlit working areas can
lead to accidents.
b)
Never use the tool in hazardous areas that contain flammable liquids,
gases or dusts. Power tools generate sparks that can ignite the dust or
vapors.
c)
Keep children and other persons away when using the power tool. You
can lose control of the tool if you are distracted.
2. Electrical Safety
a)
The tool plug must fit into the socket. The plug may not be modified in
any form. Do not use adaptor plugs together with protective-earthed
tools. Unmodified plugs and suitable sockets reduce the risk of an electric
shock.
b)
Avoid physical contact with earthed surfaces such as pipes, heating
elements, stoves and refrigerators. The risk through electric shock increases
if your body is earthed.
c)
Keep the equipment away from rain and moisture. The risk of an electric
shock increases if water penetrates electrical equipment.
d)
Do not misuse the mains lead by carrying the tool by the lead, hanging it
from the lead or by pulling on the lead to remove the plug. Keep the lead
away from heat, oil, sharp edges or moving tool parts. Damaged or twisted
leads increase the risk of an electric shock.
9
W 95
GB
e)
If you work outdoors, use only extension leads that are approved for
outdoor use. The use of an extension lead that is suitable for outdoors reduces
the risk of an electric shock.
3. Safety of Persons
a)
Be attentive. Pay attention to what you are doing and work sensibly with a
power tool. Do not use the tool if you are tired or under the influence of
drugs, alcohol or medication. Just a moment of inattentiveness while using
the tool can lead to serious injuries.
b)
Wear personal safety equipment and always wear safety goggles Wearing
personal protective equipment, such as dust mask, non-slip safety shoes,
safety helm or ear protection, depending on the type of power tools, reduces
the risk of injury.
c)
Avoid accidental starting-up. Ensure that the switch is in the "OFF"
position before inserting the plug into the socket. Accidents can occur if
you carry the power tool while your finger is on the switch or if you connect the
power tool to the power supply which it is on.
d)
Remove setting tools or wrenches before switching on the power tool. A
tool or wrench that is in a rotating tool part can lead to injuries.
e)
Do not overestimate your abilities. Ensure that you are standing securely
and have your balance at all times. This ensures that you can control the tool
better in unexpected situations.
f)
Wear suitable clothing. Do not wear wide clothing or jewelry. Keep your
hair, clothes and gloves away from moving parts. Loose clothing, jewelry or
long hair can be caught in moving parts.
g)
If dust extraction or collection devices can be mounted, ensure that these
are connected and are being used properly. Using these devices reduces
the danger caused by dust.
4. Careful Handling and Use of Power Tools
10
a)
Do not overload the tool. Use the power tool designed for the work that
you are doing. You work better and safer in the specified performance range if
you use the suitable power tool.
b)
Do not use power tools whose switch is defective. A power tool that cannot
be switched on or off is dangerous and has to be repaired.
W 95
GB
c)
Remove the plug from the socket before carrying out tool settings,
changing accessories or putting the tool away. This precautionary measure
prevents unintentional starting of the tool.
d)
Store unused power tools so that they are inaccessible to children. Do
not let persons use the tool who are not familiar with it or who have not
read these instructions. Power tools are dangerous when they are used by
inexperienced persons.
e)
Take proper care of your tools. Check whether the moving parts function
trouble-free and do not jam, whether parts are broken or damaged so that
the tool function is impaired. Have damaged parts repaired before using
the tool. Many accidents have their origin in power tools that have been
maintained badly.
f)
Use the power tool, accessories, insert tools, etc. in accordance with
these instructions and in a fashion specified for this special tool type.
Take the working conditions and the activity to be carried out into
consideration. The use of power tools for purposes other than the intended
ones can lead to dangerous situations.
5. Service
a)
Have your tool repaired only by qualified specialist personnel and only
with original spare parts. This ensures that the tool safety is maintained.
Safety Instructions for Spray Guns
●
Spray materials emerge from nozzle tips under high pressure.
Attention! Danger of injection - Never point the spray stream towards
human beings or animals.
●
●
●
●
●
●
The spray gun is to be used only for paints and solvents with a 21° C (32° in UK)
flashpoint or higher (See information on the material tin. Hazard class A II and A III
permitted).
The spray gun is not to be used in work places covered by Ex-protection
regulations.
To avoid the hazard of explosion when spraying, provide for effective natural or
artificial ventilation.
No sources of ignition are to be in the immediate area when spraying, e.g. open
flame, cigarettes, sparks, glowing wires and hot surfaces.
Before carrying out any work on the spray gun, unplug the lead from the power
socket.
Do not use spray guns to spray flammable liquids.
11
W 95
GB
●
●
●
●
The spray guns are not to be cleaned with flammable solvents which have a
flashpoint under 21°C.
Take precautionary measures against potential hazards from the spray liquid and
follow any instructions given on containers or laid down by the manufacturer of the
liquid.
Do not spray any liquid of unknown hazard potential.
Wear a breathing mask and ear protection.
Technical Data W 95
Max. delivery ratee
Max. viscosity
140 g/min
(runout time) 60 sec.
Max. pressure spikes: 120 bar
Power source:
Power consumption:
Round spray nozzle:
Weight:
230 V, 50 Hz
70 W
0,8 mm
1,5 kg
Container capacity:
Double insulation:
Pump:
Pump cylinder:
Piston:
Oscillation level:
Sound pressure level:
Sound pressure output:
600 ml
Replaceable
Special steel
Special steel Ø 5 mm
10,5 m/s²
86 dB(A)
99 dB(A)
Materials to be used:
Paints and varnishes containing solvents, acrylic enamel paints, water-soluble
varnishes, glazes, polishes, wood preservatives, disinfectants, plant protectives,
saturants, as well as oils and other watery liquids.
The following spray substances are not suitable for use:
Dispersion and latex paints, materials containing strong abrasives, glazes with coarse
particles, strippers and caustic solutions, silicate paints.
Use of these spray materials can lead to increased wear or corrosion damage in the
pump area, which are not covered by the WAGNER-Guarantee.
Preparing the Spray Material
The paints usually need to be diluted for use with the spray gun. You will find guidelines
for sprayable dilutions in the following viscosity table (viscosity = consistency of the
paint). You can achieve the correct dilution by using the viscosity test cup.
12
W 95
GB
Spray Material
Handling Table for Viscosity
Thinner-soluble varnishes/ primers
Water-soluble varnishes / primers
Automobile spray paint
Wood preservatives, disinfectants, plant protectants,
polishes, strippers, oils
Hammer effect enamel
Aluminium paints
Viskosity: (Runout time in seconds)
20-35
20-50
18-22
20-45
20-60
18-22
undiluted
25-35
20-30
30-45
20-30
Measuring the Viscosity
Dip the viscosity test cup (Illus. 1) completely into the spray material. Hold the test cup
up and measure the time (in seconds) until the liquid empties out. Compare the measured "runout time" with the Viscosity Table.
Start-up
1. Before connecting to the mains supply, please be sure that the supply voltage is
identical with the value given on the rating plate (on the side of the spray gun).
2. Dilute the spray material according to the above table.
3. Place the container on a sheet of paper and fill it with the prepared spray material.
Attention! Do not operate the spray gun without spray
material in the container.
4. Position the spray gun on the container and turn the container to the right until the
container fits tightly (Illus. 2, arrow).
5. Activate the switch to start up the spray gun.
6. By turning the fine adjustment button you can vary the spray amount (Illus.3,arrow).
Spray Technique
● Cover areas that are not to be sprayed. When woriking keep in mind that wind, for
example, may transport paint mist over great distances and cause damage.
●
Do not spray the vessel empty. The suction tube should always be immersed in liquid.
If air is sucked in, larger drops may result.
● Test the spray gun on cardboard or a similar surface to find the correct setting.
● When spraying, hold the spray gun in a horizontal position. Use the flexible nozzle
extension (Illus. 7, arrow, special accessories) for spraying upwards (e.g. a
ceiling)or downwards (e.g. an unhinged door laid on the floor).
13
W 95
GB
● The spray movement should come from the arm, not just from the wrist. This
ensures that a uniform distance is maintained between the spray gun and the spray
surface during the spray operation (Illus. 4).
● To achieve optimal spray results, spray back and forth over the surface (Illus. 5).
Cleaning and Maintenance
The spray gun can only operate satisfactorily if it is cleaned and preserved
after each use.
Attention! Never immerse the spray gun in liquid when cleaning.
1
2.
3.
4.
5.
6.
7.
Empty out the remaining paint from the container.
Put proper thinner in the container and trigger the sprayer for approx. 2 seconds.
Pull the main plug out of the socket.
Disassemble the spray gun as shown in Illus. 8 (spare parts).
Thoroughly clean all soiled parts.
Reassemble the parts in reverse order.
Put a few drops of oil (e.g. sewing machine oil) in the intake and runback holes
(Illus. 6, arrow). Briefly switch on the spray gun.
Accessories W 95 (not included in scope of delivery)
Designation
Order No.
Round spray nozzles for various spray materials:
Very thin spray materials/nozzle size: 0,5
0046 894
Paint container with cover
0414 906
Flexible nozzle extension with atomiser
0046 675
Flexible Nozzle Extension (Illus. 7)
For spraying ceilings, resting objects or hard-to-reach areas e.g. radiators
Pos
1
2
3
4
5
6
7
8
9
10
14
Spare Parts List W 95
Name
Suction tube
Paint container with cover
Nozzle 0,8 mm
Locking nut
Valve
Pump housing
Piston spring
Piston
Nozzle spanner
Viscosity measuring cup
Order No.
0413 305
0414 906
0046 903
0413 310
0209 042
0500 255
0033 028
0198 207
0199 327
0209 058
W 95
GB
Malfunction
Cause
Correction
Spray gun buzzes and does
not work
Piston stuck
Disassemble pump and
clean with thinner
Send spray gun to customer
service center
Insert valve
Clean
Clean
Defective drive
Spray gun does not suck in
Spray gun sucks in but does
not spray
Spray gun works but sprays
unevenly
No valve in the pump
Nozzle clogged
Ducts and holes in atomiser clogged
Spray material in container running
out
Spray gun held inclined leading to
sucking in of air
Viscosity of spray material too high
(too thick)
Fine adjustment button not set
correctly
Nozzle worn out
Valve worn out
Wrong valve inserted
Refill
Use flexible nozzle
extension (see accessories)
Dilute accordingly
Reset according to spray
material
Replace
Replace
Use correct valve
Environmental protection
The appliance and accessories should be recycled in an environmentally friendly
way. Do not dispose of the appliance with household waste. Support
environmental protection by taking the appliance to a local collection point or
obtain information from a specialist retailer.
Important Note Regarding Product Liability!
Using other accessories and spare parts can lead to partial or total loss of liability and
guarantee claims. With original WAGNER accessories and spare parts, you have the
guarantee that all safety regulations are fulfilled.
15
W 95
GB
2 - Year Guarantee
The warrantee is valid for two years, starting on the day of sale (receipt). It includes and is limited to
elimination of the defect, proven to have been caused by inferior production materials or
mistakes during assembly, free of charge or replacement of the defective parts. Use, start-up or
do-it-yourself assembly or repairs which are not listed in our operating instructions are not covered
by the warrantee. Parts subject to wear are also excluded from the warrantee. The warrantee does
not cover commercial use. We reserve the exclusive right to make judgements on warrantee
obligations.The warrantee is void if the unit was opened by persons other than WAGNER Service
personnel. Transport-related damage, maintenance work and damage and malfunctions caused by
improper maintenance work are not covered by the warrantee. For implementation of the
guarantee, proof of purchase of the unit must be provided, i.e. submitting the original receipt. To the
fullest legal extent possible, we are not liable for any personal, material or consequential damages,
especially those resulting from use of the unit other than as intended in the operating instructions,
start-up or repair in a manner other than described in our operating instructions or repairs performed
by a non-professional. Repairs going above and beyond those dealt with in these operating
instructions are reserved for our factory.
In case of guarantee or repair, please refer to your point of sale.
Warning
If the supply cord of this appliance is damaged, it must only be
replaced by a repair shop appointed by the manufacturer, because special purpose tools are required.
Warning: Do not connect the blue or brown wire to the earth
terminal of the plug! The wires in this mains lead are coloured in
accordance with the following code:
blue = neutral brown = live
As the colours of the wires in the mains lead of this appliance
may not correspond with the coloured markings identifiying the
terminals in your plug, proceed as follows:
◆ Should the moulded plug have to be replaced, never re-use
the defective plug or attempt to plug it into a different 13 A
socket. This could result in an electric shock.
◆ Should it be necessary to exchange the fuse in the plug only
use fuses approved by ASTA in accordance with BS 1362. 5
Amp fuses may be used.
◆ To ensure that the fuse and fuse carrier are correctly mounted
please observe the provided markings or colour coding in the
plug.
◆ After changing the fuse, always make sure that the fuse carrier is correctly inserted. With out the fuse carrier, it is not permissible to use the plug.
◆ The correct fuses and fuse carriers are available from your
local electrical supplies stockist.
16
W95
D
CE Konformitätserklärung
Wir erklären in alleiniger Verantwortung, dass dieses Produkt den folgenden einschlägigen Bestimmungen entspricht: 73/23/EWG, 89/336 EWG; 2002/95/EG; 2002/96/EG.
Angewandte harmonisierte Normen: EN 60745-1:2003; EN 50144-2-7:2000; EN 55014-1:2002; EN 55014-2:2001;
EN 61000-3-2:2005; EN 61000-3-3:2001
GB
CE Declaration of Conformity
We declare under sole responsibility that this product conforms to the following relevant stipulations:
73/23/EWG, 89/336 EWG; 2002/95/EG; 2002/96/EG.
Applied harmonised norms: EN 60745-1:2003; EN 50144-2-7:2000; EN 55014-1:2002; EN 55014-2:2001;
EN 61000-3-2:2005; EN 61000-3-3:2001
F
CE Déclaration de conformité
Nous déclarons sous notre responsabilité que ce produit est en conformité avec les réglementations suivantes :
73/23/EWG, 89/336 EWG; 2002/95/EG; 2002/96/EG.
Conforme aux normes et documents normalisés : EN 60745-1:2003; EN 50144-2-7:2000; EN 55014-1:2002;
EN 55014-2:2001; EN 61000-3-2:2005; EN 61000-3-3:2001
NL
CE Conformiteitsverklaring
Wij verklaren dat dit product voldoet aan de volgende normen: 73/23/EWG, 89/336 EWG; 2002/95/EG; 2002/96/EG.
En normatieve dokumenten: EN 60745-1:2003; EN 50144-2-7:2000; EN 55014-1:2002; EN 55014-2:2001;
EN 61000-3-2:2005; EN 61000-3-3:2001
J. Wagner GmbH
Otto-Lilienthal-Str. 18
A. Aepli
i. V. J. Ulbrich
D-88677 Markdorf
Division Manager
Development Manager
D/A
J. Wagner GmbH
Otto-Lilienthal-Str. 18
D-88677 Markdorf
Hotline: 0180/1 00 02 27
+49/75 44/505-0 +49/75 44/505-200
B
Wagner Spraytech Belgie
Veilinglaan 58
1861 Meise-Wolvertem
+32/2/2 69 46 75
GB
+32/2/2 69 78 45
Wagner Spraytech (UK) Ltd.
Haslemere Way,
Tramway Industrial Estate
Banbury, Oxon OX16 8TY
+44/12 95/26 53 53 +44/12 95/26 98 61
DK
Wagner Spraytech Scandinavia A/S
CZ
+420/2/57 95 04 12 +420/2/57 95 10 52
E
+45/43 27 18 18
CH
+45/43 43 05 28
J. Wagner Spraytech Ibérica S.A.
Ctra. N-340, Km 1245,4
08750 Molins de Rei (Barcelona)
+34/93/6 80 00 28 +34/93/6 68 01 56
SLO
PUT Wagner Service
Industriestraße 22
9450 Altstätten
+41/71/7 57 22 11
S
Wagner Sverige AB
Muskötgatan 19
S-254 66 Helsingborg
+46 42 15 00 20
NL
+41/71/7 57 23 23
+46 42 15 00 35
Wagner Spraytech Benelux B. V.
Zoonebaan 10
3542 EC Utrecht
+31/30/2 41 41 55 +31/30/2 41 17 87
F
Wagner France S.a.r.l.
5, Aveneu du 1er Mai - B.P. 47
91122 Palaiseau-Cédex
+33/1/69 19 46 50 +33/1/69 81 72 57
Part. No. 0402 872
©
02/2006
Copyright by J. Wagner GmbH
+386(1)/518 38 03
Magyarországi szerviz
Hondimpex KFT.
Kossuth L. u. 48-50
8060 Mór
+36(-22)/407 321 +36(-22)/407 852
PL
J. Wagner AG
Adresa servisa:
GMA Elektromehanika d.o.o.
Cesta Andreja Bitenca 115,
Ljubljana 1000/Slowenien
+386(1)/583 83 04
H
Kornmarksvej 26
2605 Bro
/ ndby
Wagner Spol s.r.o.
Nedašovská 345
15500 Praha 5
ul. E. Imieli 14
41-605 Swietochlowice
+48/32/2 45 06 19
+48/32/2 41 42 51
HR
Adresa servisa:
EL-ME-HO
Horvacanska 25
10000 Zagreb/Kroatien
+385(-1) 3 01 02 68
AUS
Wagner Spraytech Australia Pty. Ltd.,
14-16 Kevlar Close,
Braeside, VIC 3195/Australia
+61/3/95 87 20 00 +61/3/95 80 91 20
www.wagner-group.com
Änderungen vorbehalten.
Wijzigingen voorbehouden.
Sous réserve de modifications.
We reserve the right to make modifications.
Ci riserviamo cambiamenti.
Ret til aendringer forbeholdt.
Salvo modificationes.