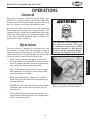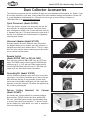
1
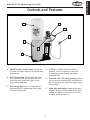
MODEL W1727 1 HP Dust collector OWNER'S MANUAL (FOR MODELS MANUFACTURED SINCE 5/09) Phone: 1-360-734-3482 • On-Line Technical Support: [email protected] COPYRIGHT © SEPTEMBER, 2004 BY WOODSTOCK INTERNATIONAL, INC. REVISED NOVEMBER, 2010 (BL) 247569 WARNING: NO PORTION OF THIS MANUAL MAY BE REPRODUCED IN ANY SHAPE OR FORM WITHOUT THE WRITTEN APPROVAL OF WOODSTOCK INTERNATIONAL, INC. #6269CR Printed in Taiwan K_`jdXelXcgifm`[\jZi`k`ZXcjX]\kp`ejkilZk`fejfek_\gifg\ij\klg# fg\iXk`fe#dX`ek\eXeZ\#Xe[j\im`Z\f]k_`jdXZ_`e\&kffc%JXm\k_`j [fZld\ek#i\]\ikf`kf]k\e#Xe[lj\`kkf`ejkilZkfk_\ifg\iXkfij% =X`cli\kfi\X[#le[\ijkXe[Xe[]fccfnk_\`ejkilZk`fej`ek_`jdXelXc dXpi\jlck`e]`i\fij\i`fljg\ijfeXc`ealipÇ`eZcl[`e^XdglkXk`fe# \c\ZkifZlk`fe#fi[\Xk_% K_\fne\if]k_`jdXZ_`e\&kffc`jjfc\cpi\jgfej`Yc\]fi`kjjX]\lj\% K_`ji\jgfej`Y`c`kp`eZcl[\jYlk`jefkc`d`k\[kfgifg\i`ejkXccXk`fe`e XjX]\\em`ifed\ek#g\ijfee\ckiX`e`e^Xe[ljX^\Xlk_fi`qXk`fe# gifg\i`ejg\Zk`feXe[dX`ek\eXeZ\#dXelXcXmX`cXY`c`kpXe[Zfdgi\$ _\ej`fe#Xggc`ZXk`fef]jX]\kp[\m`Z\j#Zlkk`e^&jXe[`e^&^i`e[`e^kffc `ek\^i`kp#Xe[k_\ljX^\f]g\ijfeXcgifk\Zk`m\\hl`gd\ek% K_\dXel]XZkli\in`ccefkY\_\c[c`XYc\]fi`ealipfigifg\ikp [XdX^\]ifde\^c`^\eZ\#`dgifg\ikiX`e`e^#dXZ_`e\df[`]`ZXk`fejfi d`jlj\% Jfd\[ljkZi\Xk\[Ypgfn\ijXe[`e^#jXn`e^#^i`e[`e^#[i`cc`e^#Xe[ fk_\iZfejkilZk`feXZk`m`k`\jZfekX`ejZ_\d`ZXcjbefnekfk_\JkXk\f] :Xc`]fie`XkfZXlj\ZXeZ\i#Y`ik_[\]\Zkjfifk_\ii\gif[lZk`m\_Xid% Jfd\\oXdgc\jf]k_\j\Z_\d`ZXcjXi\1 C\X[]ifdc\X[$YXj\[gX`ekj% :ipjkXcc`e\j`c`ZX]ifdYi`Zbj#Z\d\ekXe[fk_\idXjfeipgif[lZkj% 8ij\e`ZXe[Z_ifd`ld]ifdZ_\d`ZXccp$ki\Xk\[cldY\i% Pflii`jb]ifdk_\j\\ogfjli\jmXi`\j#[\g\e[`e^fe_fnf]k\epfl [fk_`jkpg\f]nfib%Kfi\[lZ\pfli\ogfjli\kfk_\j\Z_\d`ZXcj1 Nfib`eXn\ccm\ek`cXk\[Xi\X#Xe[nfibn`k_Xggifm\[jX]\kp\hl`g$ d\ek#jlZ_Xjk_fj\[ljkdXjbjk_XkXi\jg\Z`Xccp[\j`^e\[kf]`ck\i flkd`ZifjZfg`ZgXik`Zc\j% SAFETY ELECTRICAL SET UP OPERATIONS MAINTENANCE INTRODUCTION...................................................................................................2 Woodstock Technical Support............................................................................. 2 About Your New W1727 Dust Collector.................................................................. 2 Specifications................................................................................................ 2 Controls and Features...................................................................................... 3 SAFETY.............................................................................................................4 Standard Machinery Safety Instructions................................................................. 4 Additional Safety for Dust Collectors.................................................................... 6 Avoiding Potential Injuries................................................................................. 7 POWER SUPPLY..................................................................................................8 Circuit Requirements....................................................................................... 8 Grounding Requirements................................................................................... 9 Extension Cords............................................................................................. 9 SETUP............................................................................................................ 10 Base & Supports........................................................................................... 11 Duct Grounding............................................................................................ 12 Power Connection......................................................................................... 13 Test Run..................................................................................................... 14 OPERATIONS.................................................................................................... 15 General..................................................................................................... 15 Operation................................................................................................... 15 Dust Collector Accessories............................................................................... 16 MAINTENANCE.................................................................................................. 17 General..................................................................................................... 17 Collector Bag Cleaning................................................................................... 17 Machine Cleaning......................................................................................... 17 Maching Storage........................................................................................... 17 SERVICE.......................................................................................................... 18 General..................................................................................................... 18 Rewiring for 240V......................................................................................... 18 120V Wiring Diagram..................................................................................... 19 240V Wiring Diagram..................................................................................... 20 Troubleshooting........................................................................................... 21 PARTS............................................................................................................ 22 Main......................................................................................................... 22 Parts......................................................................................................... 22 WARRANTY...................................................................................................... 27 INTRODUCTION Contents SERVICE PARTS USE THE QUICK GUIDE PAGE LABELS TO SEARCH OUT INFORMATION FAST! INTRODUCTION Model W1727 (For Machines Mfg. Since 5/09) INTRODUCTION Woodstock Technical Support We stand behind our machines! In the event that a defect is found, parts are missing, or questions arise about your machine, please contact Woodstock International Technical Support at 1-360-734-3482 or send e-mail to: [email protected]. Our knowledgeable staff will help you troubleshoot problems, send out parts, or arrange warranty returns. If you need the latest edition of this manual, you can download it from http://www.shopfox.biz. If you still have questions after reading the latest manual, or if you have comments please contact us at: Woodstock International, Inc. Attn: Technical Support Department P.O. Box 2309 Bellingham, WA 98227 About Your New W1727 Dust Collector Your new Model W1727 SHOP FOX® 1 HP Dust collector has been specially designed to provide many years of trouble-free service. Close attention to detail, ruggedly built parts and a rigid quality control program assure safe and reliable operation. Depending on the design of the dust collection system, this dust collector can draw up to 800 CFM. The Model W1727 can be used for household or commercial purposes. Woodstock International, Inc. is committed to customer satisfaction in providing this manual. It is our intent to make sure all the information necessary for safety, ease of assembly, practical use and durability of this product be included. Specifications Motor.......................................1 HP, 9A/4.5A, 120V/240V, 3450 RPM, Single-Phase Impeller.................................................................... 10" Radial Fin (6-Blade) Static Pressure......................................................................5.67" (of water) Air Suction .................................................................................. 800 CFM Lower Bag Capacity................................................................ 2.1 (cubic feet) Upper Bag (Filter Bag).............................................2.5 Micron Non-Woven Fabric Lower Bag (Storage Bag)......................................................................Plastic Bag Dimensions...................................................... 14 3⁄4" Diameter x 24 3⁄8" Tall Height............................................................................................ 54 1⁄4" Base....................................................................................... 15 1⁄4" x 26" Dust Port and Elbow Size.......................................................................... 4" Footprint and Overall Height...................... 30 3⁄4" Wide x 15 3⁄4" Deep and 54 1⁄2" High Approximate Machine Weight................................................................55 lbs. -2- INTRODUCTION Model W1727 (For Machines Mfg. Since 5/09) Controls and Features E B F E C A D F Figure 1. Dust collector controls and features. A. ON/OFF Lockout Switch w/Key—Allows you to lockout the dust collector to prevent unsupervised use. B. Dust Filtration Bag—Filters wood dust down to 2.5 microns from the collected air, and allows the dust to fall and collect in the lower dust storage bag. C. Dust Storage Bag—Stores 2.1 cubic feet of collected dust in a plastic bag with a quick disconnect bag clamp. D. 4" Elbow—Included with dust collector; however, it can be removed to allow for a smoother bend in ducting and slightly increased CFM. E. Prewired 120V 1 HP motor and plug—Allows you to use most existing 120V receptacles so you can get your dust collection system operating quickly. F. Roller Base and Handle—Supports the lower bag and the dust collector, and allows you to quickly and easily roll and locate your dust collector where you want it. -3- Model W1727 (For Machines Mfg. Since 5/09) SAFETY SAFETY J8=<KP For Your Own Safety, Read Manual Before Operating Machine K_\ gligfj\ f] jX]\kp jpdYfcj `j kf XkkiXZk pfli Xkk\ek`fe kf gfjj`Yc\ _XqXi[flj Zfe[`k`fej% K_`j dXelXclj\jXj\i`\jf]jpdYfcjXe[j`^eXcnfi[j`ek\e[\[kfZfem\pk_\c\m\cf]`dgfikXeZ\f]k_\ jX]\kpd\jjX^\j%K_\gif^i\jj`fef]jpdYfcj`j[\jZi`Y\[Y\cfn%I\d\dY\ik_XkjX]\kpd\jjX^\jYp k_\dj\cm\j [f efk \c`d`eXk\ [Xe^\i Xe[ Xi\ efk X jlYjk`klk\ ]fi gifg\i XZZ`[\ek gi\m\ek`fe d\X$ jli\jÇk_`ji\jgfej`Y`c`kp`jlck`dXk\cplgkfk_\fg\iXkfi @e[`ZXk\jXe`dd`e\ekcp_XqXi[fljj`klXk`fen_`Z_#`]efkXmf`[\[# N@CCi\jlck`e[\Xk_fij\i`flj`ealip% @e[`ZXk\jXgfk\ek`Xccp_XqXi[fljj`klXk`fen_`Z_#`]efkXmf`[\[# :FLC;i\jlck`e[\Xk_fij\i`flj`ealip% @e[`ZXk\jXgfk\ek`Xccp_XqXi[fljj`klXk`fen_`Z_#`]efkXmf`[\[# D8Pi\jlck`ed`efifidf[\iXk\`ealip% EFK@:< K_`jjpdYfc`jlj\[kfXc\ikk_\lj\ikflj\]lc`e]fidXk`feXYflk gifg\ifg\iXk`fef]k_\\hl`gd\ek#Xe[&fiXj`klXk`fek_XkdXp ZXlj\[XdX^\kfk_\dXZ_`e\ip% Standard Machinery Safety Instructions JkXe[Xi[DXZ_`e\ipJX]\kp@ejkilZk`fej FNE<IËJD8EL8C% Read and understand this owner’s manual BEFORE using machine. Untrained users can be seriously hurt. ?<8I@E>GIFK<:K@FE% Always wear hearing protection when operating or observing loud machinery. Extended exposure to this noise without hearing protection can cause permanent hearing loss. <P<GIFK<:K@FE% Always wear ANSI-approved safety glasses or a face shield when operating or observing machinery to reduce the risk of eye injury or blindness from flying particles. Everyday eyeglasses are not approved safety glasses. D<EK8C8C<IKE<JJ% Be mentally alert when running machinery. Never operate under the influence of drugs or alcohol, when tired, or when distracted. ?8Q8I;FLJ;LJK% Dust created while using machinery may cause cancer, birth defects, or long-term respiratory damage. Be aware of dust hazards associated with workpiece materials, and always wear a NIOSH-approved respirator to reduce your risk. ;@J:FEE<:K@E>GFN<IJLGGCP% Always disconnect machine from power supply before servicing, adjusting, or changing cutting tools (bits, blades, cutters, etc.). Make sure switch is in OFF position before reconnecting to avoid an unexpected or unintentional start. N<8I@E>GIFG<I8GG8I<C% Do not wear clothing, apparel, or jewelry that can become entangled in moving parts. Always tie back or cover long hair. Wear non-slip footwear to avoid accidental slips which could cause a loss of workpiece control. ;8E><IFLJ<EM@IFED<EKJ% Do not use machinery in wet or rainy locations, cluttered areas, around flammables, or in poorly-lit areas. Keep work area clean, dry, and welllighted to minimize risk of injury. -4- Model W1727 (For Machines Mfg. Since 5/09) JK89C<D8:?@E<% Unexpected movement during operations greatly increases the risk of injury and loss of control. Verify machines are stable/secure and mobile bases (if used) are locked before starting. =FI:@E>D8:?@E<IP% Do not force machine. It will do the job safer and better at the rate for which it was designed. FECPLJ<8J@EK<E;<;% Only use machine for its intended purpose. Never modify or alter machine for a purpose not intended by the manufacturer or serious injury may result! 8NBN8I;GFJ@K@FEJ% Keep proper footing and balance at all times when operating machine. Do not overreach! Avoid awkward hand positions that make workpiece control difficult or increase the risk of accidental injury. LJ<I<:FDD<E;<;8::<JJFI@<J% Consult this owner’s manual or the manufacturer for recommended accessories. Using improper accessories will increase the risk of serious injury. LE8KK<E;<;FG<I8K@FE% Never leave machine running while unattended. Turn machine off and ensure all moving parts completely stop before walking away. :?@C;I<E9PJK8E;<IJ% Keep children and bystanders a safe distance away from work area. Stop using machine if children or bystanders become a distraction. D8@EK8@EN@K?:8I<% Follow all maintenance instructions and lubrication schedules to keep machine in good working condition. An improperly maintained machine may increase the risk of serious injury. I<DFM<8;ALJK@E>KFFCJ% Never leave adjustment tools, chuck keys, wrenches, etc. in or on machine—especially near moving parts. Verify removal before starting! :?<:B;8D8><;G8IKJ% Regularly inspect machine for damaged parts, loose bolts, mis-adjusted or mis-aligned parts, binding, or any other conditions that may affect safe operation. Always repair or replace damaged parts, wires, cords, or plugs before operating machine. J<:LI@E>NFIBG@<:<% When required, use clamps or vises to secure workpiece. A secured workpiece protects hands and frees both of them to operate the machine. =<<;;@I<:K@FE% Unless otherwise noted, feed work against the rotation of blades or cutters. Feeding in the same direction of rotation may pull your hand into the cut. D8@EK8@EGFN<I:FI;J%When disconnecting cord-connected machines from power, grab and pull the plug—NOT the cord. Pulling the cord may damage the wires inside. Do not handle the cord/plug with wet hands. Avoid cord damage by keeping it away from heated surfaces, high traffic areas, harsh chemicals, and wet or damp locations. >L8I;J:FM<IJ% Guards and covers can protect you from accidental contact with moving parts or flying debris. Make sure they are properly installed, undamaged, and working correctly before using machine. <OG<I@<E:@E>;@==@:LCK@<J% If at any time you are experiencing difficulties performing the intended operation, stop using the machine! Contact our Technical Support for help at (360) 734-3482. E<M<IJK8E;FED8:?@E<% Serious injury or accidental contact with cutting tool may occur if machine is tipped. Machine may be damaged. -5- SAFETY 8GGIFM<;FG<I8K@FE% Untrained operators can be seriously hurt by machinery. Only allow trained or properly supervised people to use machine. When machine is not being used, disconnect power, remove switch keys, or lock-out machine to prevent unauthorized use—especially around children. Make workshop kid proof! Model W1727 (For Machines Mfg. Since 5/09) SAFETY Additional Safety for Dust Collectors @EK<E;<;LJ<% This dust collector is only intended for collecting wood dust and chips from woodworking machines. DO NOT use this dust collector to collect metal, dirt, pebbles, drywall, asbestos, lead paint, silica, liquids, aerosols, or any flammable, combustible, or hazardous materials. <DGKP@E>;LJK% When emptying dust from the collection container, wear a respirator and safety glasses. Empty dust away from ignition sources and into an approved container. =@I<JLGGI<JJ@FE% Only operate the dust collector in locations that contain a fire suppression system or have a fire extinguisher nearby. FG<I8K@E>CF:8K@FE% To reduce respiratory exposure to fine dust, locate permanently installed dust collectors away from the working area, or in another room that is equipped with a smoke detector. DO NOT operate the dust collector in rainy or wet locations—exposure to water may create a shock hazard or decrease machine life. JLJG<E;<;;LJKG8IK@:C<J8E;@>E@K@FE JFLI:<J% DO NOT operate the dust collector in areas where explosion risks are high. Areas of high risk include, but are not limited to, areas near pilot lights, open flames, or other ignition sources. ;@J:FEE<:K@E>GFN<IJLGGCP% Turn the switch F==, disconnect the dust collector from the power supply, and allow the impeller to completely stop before leaving the machine unattended or doing any service, cleaning, maintenance, or adjustments. 8MF@;@E>JG8IBJ% DO NOT allow steel or rocks to strike the impeller—this may produce sparks. Sparks can smolder in wood dust for a long time before a fire is detected. If you accidentally cut into wood containing tramp metal (nails, staples, spikes, etc.), immediately turn F== the dust collector, disconnect it from power, and wait for the impeller to stop—then empty the collection container into an approved airtight metal container. @DG<CC<I?8Q8I;J% DO NOT place your hair, loose clothing, hands, or tools near the open inlet during operation for any reason. Only operate machine with ducting attached to inlet. The powerful suction could easily cause accidental contact with the impeller, which will cause serious personal injury or damage to the machine. Always keep small animals and children away from open dust collection inlets. JK8K@:<C<:KI@:@KP% High amounts of static electricity are generated when plastic ducting is used for dust collection lines. Although rare, sparks caused by static electricity can cause explosions or fire. To reduce this risk, thoroughly ground all plastic ducting used in the dust collection system. ?8Q8I;FLJ;LJKÇN<8II<JG@I8KFI% Fine dust that is too small to be caught in the filter will be blown into the ambient air during operation. Always wear a NIOSHapproved respirator during operation and for a short time after to reduce your risk of permanent respiratory damage. I<>LC8I:C<8E@E>% Regularly check/empty the collection bags or drum to avoid buildup of fine dust that can increase the risk of fire. Make sure to regularly clean the surrounding area where the machine is operated— excessive dust buildup on overhead lights, heaters, electrical panels, or other heat sources will increase the risk of fire. ;LJK8CC<I>@<J% Dust from certain woods may cause an allergic reaction in people and animals. Make sure you know what type of wood dust you will be exposed to in case there is a possibility of an allergic reaction. -6- Model W1727 (For Machines Mfg. Since 5/09) Avoiding Potential Injuries SAFETY Figure 2. ALWAYS wear a respirator and safety glasses when emptying dust bags. Figure 4. Never leave the dust collector plugged in and unattended. Figure 3. NEVER stand or ride on the dust collector base. Figure 5. NEVER work around the intake port when the dust collector is operating. Figure 6. NEVER operate the dust collector without the dust collection bags installed. -7- Model W1727 (For Machines Mfg. Since 5/09) POWER SUPPLY Circuit Requirements ELECTRICAL ELECTRICAL This machine must be connected to the correct size and type of power supply circuit, or fire or electrical damage may occur. Read through this section to determine if an adequate power supply circuit is available. If a correct circuit is not available, a qualified electrician MUST install one before you can connect the machine to power. K_\ dXZ_`e\ dljk Y\ gifg\icp j\k lg Y\]fi\ `k `j jX]\ kf fg\iXk\% ;F EFK Zfee\Zk k_`j dXZ_`e\ kf k_\ gfn\i jfliZ\ lek`c `ejkilZk\[ kf [f cXk\i `e k_`jdXelXc% A power supply circuit includes all electrical equipment between the breaker box or fuse panel in the building and the machine. The power supply circuit used for this machine must be sized to safely handle the fullload current drawn from the machine for an extended period of time. (If this machine is connected to a circuit protected by fuses, use a time delay fuse marked D.) Full-Load Current Rating The full-load current rating is the amperage a machine draws at 100% of the rated output power. On machines with multiple motors, this is the amperage drawn by the largest motor or sum of all motors and electrical devices that might operate at one time during normal operations. Full-Load Current Rating at 120V.....................9 Amps Full-Load Current Rating at 240V.................. 4.5 Amps Circuit Requirements for 120V (Prewired) This machine is prewired to operate on a 120V power supply circuit that has a verified ground and meets the following requirements: Circuit Type................ 110V/120V, 60 Hz, Single-Phase Circuit Size.............................................. 15 Amps Plug/Receptacle..................................... NEMA 5-15 Circuit Requirements for 240V This machine can be converted to operate on a 240V power supply (details about voltage conversion can be found later in this manual). The 240V power supply circuit must have a verified ground and meet the requirements that follow: Circuit Type................220V/240V, 60 Hz, Single-Phase Circuit Size.............................................. 15 Amps Plug/Receptacle..................................... NEMA 6-15 -8- @eZfii\Zkcp n`i`e^ fi ^ifle[`e^ k_`j dXZ_`e\ZXeZXlj\\c\ZkifZlk`fe#]`i\# fidXZ_`e\[XdX^\%Kfi\[lZ\k_`ji`jb# fecp X hlXc`]`\[ \c\Zki`Z`Xe fi j\im`Z\ g\ijfee\c j_flc[ [f Xep i\hl`i\[ \c\Zki`ZXcnfib]fik_`jdXZ_`e\% EFK@:< K_\ Z`iZl`k i\hl`i\d\ekj c`jk\[ `e k_`j dXelXc Xggcp kf X [\[`ZXk\[ Z`iZl`kÇ n_\i\fecpfe\dXZ_`e\n`ccY\ilee`e^ Xk X k`d\% @] k_`j dXZ_`e\ n`cc Y\ Zfee\Zk\[ kf X j_Xi\[ Z`iZl`k n_\i\ dlck`gc\ dXZ_`e\j n`cc Y\ ilee`e^ Xk k_\ jXd\ k`d\# Zfejlck X hlXc`]`\[ \c\Zki`Z`Xekf\ejli\k_Xkk_\Z`iZl`k`j gifg\icpj`q\[]fijX]\fg\iXk`fe% Model W1727 (For Machines Mfg. Since 5/09) Grounding Requirements This machine MUST be grounded. In the event of certain types of malfunctions or breakdowns, grounding provides a path of least resistance for electric current to travel—in order to reduce the risk of electric shock. Check with a qualified electrician or service personnel if you do not understand these grounding requirements, or if you are in doubt about whether the tool is properly grounded. If you ever notice that a cord or plug is damaged or worn, disconnect it from power, and immediately replace it with a new one. For 120V Connection (Prewired) This machine is equipped with a power cord that has an equipment-grounding wire and NEMA 5-15 grounding plug. The plug must only be inserted into a matching receptacle (see =`^li\) that is properly installed and grounded in accordance with local codes and ordinances. 120V GROUNDED 5-15 RECEPTACLE Grounding Prong 5-15 PLUG Neutral Hot Figure 7. NEMA 5-15 plug & receptacle. 240V GROUNDED 6-15 RECEPTACLE Current Carrying Prongs 6-15 PLUG For 240V Connection A NEMA 6-15 plug has a grounding prong that must be attached to the equipment-grounding wire inside the included power cord. The plug must only be inserted into a matching receptacle (see =`^li\) that is properly installed and grounded in accordance with all local codes and ordinances. Extension Cords We do not recommend using an extension cord with this machine. Extension cords cause voltage drop, which may damage electrical components and shorten motor life. Voltage drop increases with longer extension cords and the gauge smaller gauge sizes (higher gauge numbers indicate smaller sizes). Any extension cord used with this machine must contain a ground wire, match the required plug and receptacle, and meet the following requirements: Minimum Gauge Size at 240V........................ 14 AWG Maximum Length (Shorter is Better)..................50 ft. -9- Grounding Prong Figure 8. NEMA 6-15 plug & receptacle. ;F EFK df[`]p k_\ gifm`[\[ gcl^ fi lj\ Xe X[Xgk\i `] k_\ gcl^ n`cc efk ]`k pfli i\Z\gkXZc\% K_`j `j Xe `e[`ZXk`fe k_Xk pfli gfn\i jlggcp Z`iZl`k [f\j d\\k k_\ i\hl`i\d\ekj ]fi k_\ dXZ_`e\2 _Xm\ Xe \c\Zki`Z`Xe `ejkXcck_\Zfii\Zkgfn\ijlggcpZ`iZl`k% @] k_\ dXZ_`e\ dljk Y\ i\Zfee\Zk\[ ]fi lj\ fe X [`]]\i\ek kpg\ f] \c\Zki`Z Z`iZl`k# k_\ i\Zfee\Zk`fe j_flc[ Y\ dX[\ Yp X hlXc`]`\[ \c\Zki`Z`Xe fi j\im`Z\ g\ijfee\c2 X]k\i i\Zfee\Zk`fe# k_\dXZ_`e\dljkZfdgcpn`k_XcccfZXc Zf[\jXe[fi[`eXeZ\j% ELECTRICAL Improper connection of the equipment-grounding wire will increase the risk of electric shock. The wire with green insulation (with/without yellow stripes) is the equipmentgrounding wire. If repair or replacement of the power cord or plug is necessary, do not connect the equipmentgrounding wire to a live (current carrying) terminal. K_\ dXZ_`e\ dljk Y\ gifg\icp j\k lg Y\]fi\ `k `j jX]\ kf fg\iXk\% ;F EFK Zfee\Zk k_`j dXZ_`e\ kf k_\ gfn\i jfliZ\ lek`c `ejkilZk\[ kf [f cXk\i `e k_`jdXelXc% Model W1727 (For Machines Mfg. Since 5/09) SETUP Inventory The following is a description of the main components carefully packaged with your SHOP FOX® Model W1727 1 HP Dust collector. See Figure 9 and refer to the list below and inventory your shipment. If any part is missing, examine the packaging carefully to be sure the part is not among the packing materials. If the part is not found, find the part number in the back of this manual and contact Woodstock International, Inc. at 360-734-3482 or at [email protected] Immediately discard all plastic bags and packing materials to eliminate a choking and suffocation hazard for children and animals. J SETUP B L F E K G I A H D C M Figure 9. Dust collector inventory. READ and understand this entire instruction manual before using this machine. Serious personal injury may occur if safety and operational information is not understood and followed. DO NOT risk your safety by not reading! A. Elbow 4" B. Base C. Upper Bag D. Lower Bag E. Round Support F. Rectangle Supports (2) G. Bag Support H. Swivel Casters (2) I. Fixed Casters (2) J. Impeller/Separator K. Bag Clamps (2) L. Handle M. Hardware Bag •Hex Bolt 5⁄16"-18 x 1⁄2" (6) •Acorn Nut 5⁄16"-18 (2) •Flat Washer 5⁄16" (2) •Flat Head Screw 5⁄16"-18 x 1" (2) •Flange Screw 10-24 x 3⁄8" (1) •Open-End Wrench 10-12MM (1) •Hex Wrench 5mm (1) •Cap Screw M6-1 x 10 (4) •Phillips Hd Screw #10-24 x 1⁄2" (1) UNPLUG the power cord before you do any assembly or adjustment tasks! Otherwise electrocution may occur! -10- Model W1727 (For Machines Mfg. Since 5/09) Base & Supports For quiet and vibration-free operation, assemble your dust collector as outlined below. DO NOT modify this dust collector for any other purpose than what it is designed for. To assemble this dust collector, do these steps: 1. MAKE SURE THE DUST COLLECTOR MOTOR IS UNPLUGGED! 2. Install two swivel casters with the two 5⁄16"-18 acorn nuts and 5⁄16" flat washers (see Figure 10). 3. Install the two fixed casters with the four M6-1 x 10 cap screws (see Figure 10). 4. Place the round and rectangle support mounting flanges against the base, and install with six 5⁄16"-18 x 1⁄2" hex bolts (see Figure 10). Round and Rectangle Support Mounting Flanges Fixed Caster Bag Support 6. Position the elbow as shown in Figure 11, and secure it in place with the 10-24 x 3⁄8" flange screw. 7. Position the handle as shown in Figure 11, and secure it in place with two 5⁄16"-18 x 1" flat head screws. Handle Receiver 9. Insert the bag clamps into the hemmed rim of each dust collector bag. 10. Install the dust filter bag on the top of the dust collector bag housing (the SHOP FOX® logo is printed on it), and snap the bag clamp lever closed. 11. Install the lower plastic dust collection bag, and snap the bag clamp lever closed. Impeller/Separator Assembly Elbow Figure 11. Basic assembly. -11- SETUP Figure 10. Base assembly. 5. With the help of an assistant, attach the impeller/ separator assembly to the supports with the remaining six 5⁄16"-18 x 1⁄2" hex bolts (see Figure 11). 8. Insert the ends of the bag support into the receivers welded to the impeller/separator assembly until the ends are completely seated (see Figure 11). Swivel Caster Model W1727 (For Machines Mfg. Since 5/09) Duct Grounding Under some circumstances, static electricity can be generated in dust collection systems and can collect on the plastic ducting surfaces. If this static electricity is discharged through a spark, there is a potential for the dust and oxygen in the ducting to ignite. SETUP Therefore, your dust collection system must be grounded one of three ways. • First, the ground is achieved by means of using metal ducting throughout the system. All static electricity buildup is carried through the continu- ous metal ducting and dissipated through the dust collector impeller housing. • Second, for plastic pipe or hose ducting systems, install an uncoated bare copper wire inside the entire length of all ducting. An additional wire must be spiral-wrapped on the outside of all the ducting (see Figure 12). Both wires must be connected to the dust collector impeller hous- ing (see Figure 13) so all static electricity inside and out of the ducting is carried through the wires and dissipated through the dust collector ground. If the system has branches, place wires in the same fashion and connect to the wires on the main pipe/hose with wire nuts. If blast gates are to be used, drill exit and entrance holes on either side of the blast gate to allow wire to be fed out of and into the system (see Figure 14). • Third, if you use a combination of metal and plastic ducting, make sure that you use a copper grounding wire to ground all plastic connections with the metal ducting so no part of the ducting is insulated by the plastic. Figure 12. Typical dust collector with ground wire installed inside and around pipe. Figure 13. Typical dust collector impeller housing with ground wires secured to the housing. Note: For more in-depth information on Dust Collection System design, refer to refer to The Dust Collection Handbook (ISBN 0-9635821-2-7), which is available for purchase through any Woodstock/SHOP FOX® Dealer. Figure 14. Ground wires bypassing a blast gate. -12- Model W1727 (For Machines Mfg. Since 5/09) Power Connection Before the machine can be connected to the power source, an electrical circuit and connection device must be prepared per the POWER SUPPLY section on Page 8, and all previous setup instructions in this manual must be complete to ensure that the machine has been assembled and installed properly. Always make sure the machine is turned OFF before connecting power. Insert the plug attached to the machine power cord into a matching power supply receptacle. The machine is now connected to the power source. If you need to disconnect the machine from power later, pull the plug completely out of the receptacle. SETUP -13- Model W1727 (For Machines Mfg. Since 5/09) Test Run Once the assembly is complete, test run your machine to make sure it runs properly and is ready for regular operation. The test run consists of verifying the following: 1) The motor powers up and runs correctly, and 2) the safety disabling mechanism on the switch works correctly. If, during the test run, you cannot easily locate the source of an unusual noise or vibration, stop using the machine immediately, then review Troubleshooting on Page 21. If you still cannot remedy a problem, contact our Tech Support at (360) 734-3482 for assistance. SETUP To test run the machine: 1. Make sure you understand the safety instructions at the beginning of the manual, and verify that the machine is setup properly. 2. Make sure all the dust collection ducting and fastners are tight, and that all tools and objects used during set up are cleared away so they will not get sucked into the dust collection intake. 3. Verify that the machine is operating correctly by turning the machine ON. —When operating correctly, the machine runs smoothly with little or no vibration or rubbing noises. —Investigate and correct strange or unusual noises or vibrations before operating the machine further. Always disconnect the machine from power when investigating or correcting potential problems. 4. Turn the machine OFF. 5. Remove the switch disabling key (Figure 15). 6. Try to start the machine with the paddle switch. —If the machine does not start, the switch disabling feature is working as designed. —If the machine starts, immediately stop the machine. The switch disabling feature is not working correctly. Call Tech Support for help. Figure 15. Removing switch key from paddle switch. -14- Model W1727 (For Machines Mfg. Since 5/09) OPERATIONS General Depending on your dust collection ducting design, your Model W1727 1 HP Dust collector can draw up to 800 CFM. However, system CFM can be reduced greatly if the wrong duct size, length, or too many duct bends are used. We recommend that you read books, trade articles or seek training with the proper use of dust collectors. This research will pay off with your increased safety and better results from your machine. For in-depth information, refer to The Dust Collection Handbook (ISBN 0-9635821-2-7), and above all, safety comes first. Operation This dust collector is designed for collecting dust from one machine at a time and is NOT designed to power a whole-shop dust collection system, nor serve as a central whole-house vacuum. For safe operation and the best dust collection results, please follow the rules below: DO NOT collect metal pieces, glass, or liquid with this dust collector. It is intended for collecting wood dust only (Figure 16). Metal pieces may spark when they contact the impeller and cause a fire. • USE a 4" dust collection hose that is as short as possible. Remember, the longer the hose the less CFM your dust collector will draw. • AVOID using additional 90˚ elbows or 45˚ elbows. These fittings will decrease the overall efficiency of the dust collector. • GROUND your dust collection hose to protect against unpleasant static shock, and in the worst case, an accidental fire. • USE smooth-walled ducting whenever possible; corrugated flexible ducting typically has a higher potential for static pressure loss. -15- OPERATIONS • Dust collectors do not eliminate the fine, and most harmful, dust from the workshop. Always wear a NIOSH approved respirator to help protect yourself from the respiratory dangers caused by the inhalation of fine dust. Figure 16. DO NOT collect metal pieces, glass, or liquid with this dust collector. Model W1727 (For Machines Mfg. Since 5/09) Dust Collector Accessories The following accessories may be available through your local Woodstock International Inc. Dealer. If you do not have a dealer in your area, these products are also available through online dealers. Please call or e-mail Woodstock International Inc. Customer Service to get a current listing of dealers at: 1-800-840-8420 or at [email protected]. Quick Disconnect (Model W1038) This is the perfect accessory for those who will use the dust collector for multiple machines. The quick disconnect is designed to attach to a 4" hose and press onto any 4" diameter dust port. The quick disconnect works with a friction fit to eliminate the inconvenience of tightening/ loosening hose clamps. Universal Adapter (Model W1039) Providing options for seven different sizes, this universal adapter allows you to connect your dust collector to machines with dust ports smaller than 4". This is a "musthave" for miter saws or when connecting your dust collector to common vacuum hoses. OPERATIONS Remote Switch (Model D3038 120V or D3346 240V) Turn your dust collector ON or OFF from up to 75 feet away. The D3038 remote switch controls 120V-20A dust collectors up to 11⁄2 HP, and the D3346 remote switch controls 240V-20A dust collectors up to 3 HP. Each unit comes with two hand-held remote controllers. Grounding Kit (Model W1053) All dust collectors generate static electricity in the ducting system. If a series of conditions are in place, and the dust collection ducting is not grounded, a spark from static electricity buildup could ignite the fine wood dust particles in the dust collector. To reduce this ignition hazard, install a grounding kit. Deluxe Ceiling (Model W1690) Mounted Air Cleaner Air cleaners are a great solution for removing airborne dust particles. This air cleaner has three speeds (556, 702, and 1,044 CFM) and a primary and secondary filter to remove dust particles as small as 21⁄2" Micron. Install this air cleaner on a work bench, on a wall, or suspend it from your shop ceiling. -16- Model W1727 (For Machines Mfg. Since 5/09) MAINTENANCE General Regular periodic maintenance on your SHOP FOX® Model W1727 will ensure its optimum performance. Make a habit of inspecting your dust collector each time you use it. Check for the following conditions and repair or replace when necessary: • • • • Loose mounting bolts. Worn or damaged switch, switch-safety key, electrical cords and plugs. Any other condition that could hamper the safe operation of this machine. Loud rubbing, vibration or tapping noises coming from motor or impeller housing. Make sure that your machine is unplugged during all maintenance procedures! If this warning is ignored, serious personal injury may occur. Collector Bag Cleaning The lower dust storage bag is intended to be cleaned by simply emptying it. To clean the collector bag, do these steps: 1. Put on your safety glasses and respirator. 2. Unlatch the retaining band clamp, and remove the lower bag from the dust collector. 4. Reinstall the bag on the dust collector. Machine Cleaning Put on your respirator and safety glasses and blow-off sawdust with compressed air. Dust build-up around the motor is a sure way to decrease its life span. Maching Storage Before placing the machine in storage, empty the dust collection bag. Roll up the cord and secure it to the machine so it cannot be damaged by nearby traffic. Store the machine away from all heat sources, wet locations, and hazardous/flammable liquids. -17- MAINTENANCE 3. Position the bag over the garbage can, and gently shake the collector bag to empty the sawdust. Emptying the collector bag exposes you to harmful dust. Always wear a respirator and safety goggles when emptying the collector bag! Model W1727 (For Machines Mfg. Since 5/09) General SERVICE This section covers the most common service adjustments that may need to be made during the life of your machine. If you require additional machine service information not included in this section, please contact Woodstock International Technical Support at (360) 734-3482 or send e-mail to: [email protected]. Rewiring for 240V If you want to run your dust collector on 240V, then it must be rewired inside the switch box and a new plug must be installed on the machine. The rewiring job must be inspected by a qualified electrician before the machine is reconnected to a power source. Please read the Power Supply section on Page 8 before beginning this procedure. To rewire your dust collector for 240V operation, do these steps: Make sure that your machine is unplugged during all service procedures! If this warning is ignored, serious personal injury may occur. Electrical Box Screw 1. UNPLUG THE DUST COLLECTOR! 2. Open the switch box cover by removing the screw that secures it (as shown in Figure 17). 3. Rewire the wires inside the switch box, according to the 240V diagram shown on the inside cover of the switch box. Note: Refer to the 240V Wiring Diagram on Page 20 or contact our technical support personnel if you need additional help with this procedure. SERVICE 4. After rewiring, make sure the wire nuts are tight and are secured in place with electrical tape. 5. Install a 6-15 240V plug as specified in the Power Supply section on Page 9. 6. Have your wiring job inspected by a qualified electrician, then replace the switch box wiring cover. -18- Figure 17. Electrical box. Model W1727 (For Machines Mfg. Since 5/09) 120V Wiring Diagram Prewired 120V Connection Gray Bl ue Gray Gray ue Bl Yellow #4 Wire Capacitor Wire #2 #3 re Wi Start Switch #1 re Wi Red Bla ck White Black Green SERVICE 5-15 Plug (120V) -19- Model W1727 (For Machines Mfg. Since 5/09) 240V Wiring Diagram 220V Wiring Diagram Optional 240V Connection Gray Bl ue Gray ue Bl Yellow Wire #2 #4 Wire Capacitor 1 e# Wir Start Switch Wire #3 y Gra Red Black White Black SERVICE Green 6-15 Plug (240V) -20- Model W1727 (For Machines Mfg. Since 5/09) Troubleshooting This section covers the most common dust collector problems. DO NOT make any adjustments until the dust collector is unplugged and moving parts have come to a complete stop. SYMPTOM Motor will not start, or it growls on start up. POSSIBLE CAUSE corrective action 1. Power supply fuse or circuit breaker has tripped. 2. Toggle switch is broken inside. 3. Start capacitor is at fault. 4. Motor fan cover is dented, stopping the fan from being able to spin. 5. Motor is at fault. Motor runs slower than normal. 3. Motor is at fault. 1. Dust collector is not on a flat surface and wobbles. 2. Impeller fan is damaged and unbalanced. 3. The motor mounting is loose. 4. Impeller is loose on the motor shaft. 5. Motor fan cover is dented, causing the motor fan to hit the cover while spinning. Dust collector does not adequately collect dust or chips; poor performance. 5. Replace motor. 1. Inspect the power supply for loose, corroded, or overheated electrical connections and repair. 2. Have the power source voltage checked; reduce the length of extension cord. 3. Replace the motor. 1. Poor electrical connection. 2. Low power source voltage. Loud, repetitious noise, or excessive vibration coming from dust collector. 1. Disconnect power, and inspect circuit for electrical shorts and repair. Replace circuit breaker if it is old or has tripped many times. 2. Disconnect power, and use an ohmmeter to check switch terminals for continuity, and replace switch if required. 3. Replace start capacitor. 4. Replace motor fan cover (and fan, if damaged). 1. Dust collection bags are full. 2. There is a restriction at the inlet grate. 8. The dust collector is too small for the dust collection system. -21- 2. Unplug dust collector, and inspect the impeller for dents, bends, loose fins. Replace impeller if any damage is found. 3. Make sure all fasteners on the dust collector are tight. 4. Replace the motor and impeller as a set if the motor shaft and the impeller hub is damaged. 5. Replace motor fan cover. 1. Empty bags. 2. Remove dust line from dust collector inlet and clean debris from the inlet grate (and wireconnector, if installed). 3. Relocate the dust collector closer to the point of suction, and rework ducting without sharp bends. Refer to the Dust Collection Basics handbook (ISBN 0-9635821-2-7) to help configure your dust system. 4. Process lumber with less than 20% moisture content. 5. Rework the ducting as to eliminate all leaks, and refer to the Dust Collection Basics handbook (ISBN 0-9635821-2-7) for more solutions. 6. Rework the ducting as to eliminate all restrictions, and refer to the Dust Collection Basics handbook (ISBN 0-9635821-2-7) for more solutions. 7. Ask your dealer for proper dust collection accessories or the Shop Fox® Dust Collection Nozzle on Stand. 8. Install a larger dust collector to power your dust collection system. SERVICE 3. The dust collector is too far away from the point of suction, or there are too many sharp bends in the ducting. 4. The lumber is wet and not flowing through the dust lines smoothly. 5. There is a leak in the ducting, or a series of small leaks, or too many open ports. 6. There is a restriction in the ducting, or the ducting and ports are incorrectly sized. 7. The machine dust collection design is inadequate. 1. Stabilize the dust collector. Model W1727 (For Machines Mfg. Since 5/09) Parts PARTS PARTS Main -22- Model W1727 (For Machines Mfg. Since 5/09) Main Parts List refpart # 1 2 3 4 5 6 7 8 9 10 11 12 13 14 15 16 17 18 19 20 23 24V2 25 X1727001 X1727002 XPFS03 X1727004 X1727005 XPFH25 X1727007 X1727008 X1727009 X1727010 X1727011 X1727012 X1727013 X1727014 XPB04M XPW07 XPN40 X1727018 X1727019 XPB09 X1727023 X1727024V2 XPSS17 description IMPELLER/SEPARATOR HOUSING 4" ELBOW FLANGE SCR 10-24 X 3/8" HAND RAIL FOAM HAND GRIP FLAT HD SCR 5/16"-18 X 1" PLASTIC CAP 5/8" DUST STORAGE BAG (LOWER) DUST FILTRATION BAG (UPPER) BAG CLAMP BAG SUPPORT BASE SWIVEL CASTER FIXED CASTER HEX BOLT M6-1.0 X 10 FLAT WASHER 5/16" ACORN NUT 5/16"-18 RECTANGULAR SUPPORT LEG ROUND SUPPORT LEG HEX BOLT 5/16"-18 X 1/2" SHAFT SEAL IMPELLER ASSEMBLY 10" V2.05.09 SET SCREW 5/16"-18 X 5/16" refpart # 26 27 28 29 30 31 31-1 31-2 31-3 31-4 31-5 31-6 31-7 31-8 31-9 32 33 34 35 36 37 38 39 X1727026 XPSB02M X1727028 X1727029 XPS09M X1727031 XPC030A XPSW09 XPSW09-1 X1727031-4 X1727031-5 X1727031-6 XPFS03 X1727031-8 X1727031-9 XPK01M XPB19 XPW06 XPWR1012 XPAW05M X1727037 X1666039 X1666040 description SPECIAL 6MM CONCAVE WASHER CAP SCREW M6-1.0 X 20 INLET COVER FOAM GASKET PHLP HD SCR M5-0.8 X 10 1 HP MOTOR S. CAPACITOR 30M 300V SWITCH SWITCH KEY FAN FAN COVER SWITCH HOUSING FLANGE SCR 10-24 X 3/8" SWITCH COVER POWER CORD KEY 5 X 5 X 22MM HEX BOLT 1/4"-20 X 1/2" FLAT WASHER 1/4" OPEN-END WRENCH 10-12MM HEX WRENCH 5MM DATA LABEL HAND WARNING LABEL READ MANUAL LABEL PARTS -23- Model W1727 (For Machines Mfg. Since 5/09) FOLD ALONG DOTTED LINE Place Stamp Here NFF;JKF:B@EK<IE8K@FE8C@E:% G%F%9FO)*'0 9<CC@E>?8D#N80/)).$)*'0 FOLD ALONG DOTTED LINE TAPE ALONG EDGES--PLEASE DO NOT STAPLE WARRANTY N8II8EKP Nff[jkfZb@ek\ieXk`feXc#@eZ%nXiiXekjXccJ_fg=fodXZ_`e\ipkfY\]i\\f][\]\Zkj]ifdnfibdXej_`g Xe[dXk\i`Xcj]fiXg\i`f[f]knfp\Xij]ifdk_\[Xk\f]fi`^`eXcgliZ_Xj\Ypk_\fi`^`eXcfne\i% K_`jnXiiXekp[f\jefkXggcpkf[\]\Zkj[l\[`i\Zkcpfi`e[`i\Zkcpkfd`jlj\#XYlj\#e\^c`^\eZ\fi XZZ`[\ekj#cXZbf]dX`ek\eXeZ\#fii\`dYlij\d\ekf]k_`i[gXikp\og\ej\j`eZlii\[% Nff[jkfZb@ek\ieXk`feXc#@eZ%n`cci\gX`ifii\gcXZ\#Xk`kj\og\ej\Xe[Xk`kjfgk`fe#k_\J_fg=fo dXZ_`e\fidXZ_`e\gXik#n_`Z_`eefidXclj\_Xjgifm\ekfY\[\]\Zk`m\#gifm`[\[k_Xkk_\fi`^`eXc fne\ii\kliejk_\gif[lZkgi\gX`[kfXJ_fg=fo]XZkfipj\im`Z\Z\ek\in`k_giff]f]k_\`igliZ_Xj\ f]k_\gif[lZkn`k_`eknfp\Xij#Xe[gifm`[\jNff[jkfZb@ek\ieXk`feXc#@eZ%i\XjfeXYc\fggfikle`kpkf m\i`]pk_\Xcc\^\[[\]\Zkk_ifl^_`ejg\Zk`fe%@]`k`j[\k\id`e\[k_\i\`jef[\]\Zk#fik_Xkk_\[\]\Zk i\jlck\[]ifdZXlj\jefkn`k_`ek_\jZfg\f]Nff[jkfZb@ek\ieXk`feXc@eZ%jnXiiXekp#k_\ek_\fi`^`eXc fne\idljkY\Xik_\Zfjkf]jkfi`e^Xe[i\klie`e^k_\gif[lZk% K_`j`jNff[jkfZb@ek\ieXk`feXc#@eZ%jjfc\ni`kk\enXiiXekpXe[XepXe[XccnXiiXek`\jk_XkdXp Y\`dgc`\[YpcXn#`eZcl[`e^Xepd\iZ_XekXY`c`kpfi]`ke\jj#]fiXepgXik`ZlcXigligfj\#Xi\_\i\Yp c`d`k\[kfk_\[liXk`fef]k_`jni`kk\enXiiXekp%N\[fefknXiiXekk_XkJ_fg=fodXZ_`e\ipZfdgc`\j n`k_k_\gifm`j`fejf]XepcXnfiXZkj%@eef\m\ekj_XccNff[jkfZb@ek\ieXk`feXc#@eZ%jc`XY`c`kple[\i k_`jnXiiXekp\oZ\\[k_\gliZ_Xj\gi`Z\gX`[]fik_\gif[lZk#Xe[Xepc\^XcXZk`fejYifl^_kX^X`ejk Nff[jkfZb@ek\ieXk`feXc#@eZ%j_XccY\ki`\[`ek_\JkXk\f]NXj_`e^kfe#:flekpf]N_XkZfd%N\j_Xcc `eef\m\ekY\c`XYc\]fi[\Xk_#`eali`\jkfg\ijfejfigifg\ikpfi]fi`eZ`[\ekXc#Zfek`e^\ek#jg\Z`Xcfi Zfej\hl\ek`Xc[XdX^\jXi`j`e^]ifdk_\lj\f]fligif[lZkj% <m\ip\]]fik_XjY\\edX[\kf\ejli\k_XkXccJ_fg=fodXZ_`e\ipd\\kj_`^_hlXc`kpXe[[liXY`c`kp jkXe[Xi[j%N\i\j\im\k_\i`^_kkfZ_Xe^\jg\Z`]`ZXk`fejXkXepk`d\Y\ZXlj\f]fliZfdd`kd\ekkf Zfek`elfljcp`dgifm\k_\hlXc`kpf]fligif[lZkj% =^\]FjVa^inBVX]^cZhVcYIddah LddYhidX`>ciZgcVi^dcVa!>cX#XVgg^Zhi]djhVcYhd[egdYjXihYZh^\cZY idbZZii]ZcZZYhd[idYVnhlddYldg`ZghVcYbZiValdg`Zgh# 6h`ndjgYZVaZgVWdjii]ZhZ[^cZegdYjXih/