1
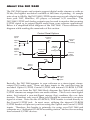
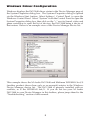
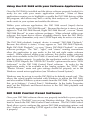
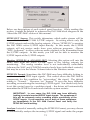
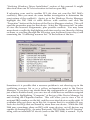
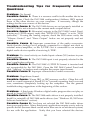
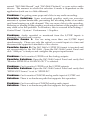
Delta DiO-2448 Manual
version: D2448-110901
Table Of Contents
Introduction
. . . . . . . . . . . . . . . . . . . . . . . . . . . . . . . . . . . . . . . . . . . . . . . .2
What’s in the Box? . . . . . . . . . . . . . . . . . . . . . . . . . . . . . . . . . . . . . . . . . . .2
Product Features and Specifications
. . . . . . . . . . . . . . . . . . . . . . . . . . . . . .2
Minimum System Requirements . . . . . . . . . . . . . . . . . . . . . . . . . . . . . . . . .2
About the DiO 2448 . . . . . . . . . . . . . . . . . . . . . . . . . . . . . . . . . . . . . . . . . .3
The DiO 2448 Adapter Card . . . . . . . . . . . . . . . . . . . . . . . . . . . . . . . . . . . .5
Quick Guide to Getting Started . . . . . . . . . . . . . . . . . . . . . . . . . . . . . . . . . .5
Hardware Installation . . . . . . . . . . . . . . . . . . . . . . . . . . . . . . . . . . . . . . . . .6
Windows 98/95 Driver Software Installation . . . . . . . . . . . . . . . . . . . . . . . .6
Windows 98 Installation . . . . . . . . . . . . . . . . . . . . . . . . . . . . . . . . . . . . . . .6
Windows 95 Installation . . . . . . . . . . . . . . . . . . . . . . . . . . . . . . . . . . . . . . .7
Windows Driver Configuration . . . . . . . . . . . . . . . . . . . . . . . . . . . . . . . . . .9
Using the DiO 2448 with your Software Applications . . . . . . . . . . . . . . . .10
DiO 2448 Control Panel Software . . . . . . . . . . . . . . . . . . . . . . . . . . . . . . .10
Windows Sound System . . . . . . . . . . . . . . . . . . . . . . . . . . . . . . . . . . . . . .12
Typical DiO 2448 Setup . . . . . . . . . . . . . . . . . . . . . . . . . . . . . . . . . . . . . .13
Transferring From DAT TO DiO 2448
. . . . . . . . . . . . . . . . . . . . . . . . . . .14
Transferring From DiO 2448 TO DAT, Monitoring with DAT . . . . . . . . . .16
Troubleshooting
. . . . . . . . . . . . . . . . . . . . . . . . . . . . . . . . . . . . . . . . . . . .17
Troubleshooting Tips for Frequently Asked Questions . . . . . . . . . . . . . . . .20
Lifetime Limited Warranty . . . . . . . . . . . . . . . . . . . . . . . . . . . . . . . . . . . .22
Introduction
Thank you for purchasing the DiO 2448 PCI Digital I/O Card by M Audio.
Please take the time to read this instruction manual — we want you to get
the most out of your DiO 2448. This manual contains valuable information
on how to install, configure and operate your card. As soon as your
DiO 2448 based system is up and running, you will be enjoying the world of
digital audio from your computer.
What’s in the Box?
Your DiO 2448 box contains:
This instruction manual.
The DiO 2448 adapter card.
Driver diskette for Windows 95/98 installation.
M Audio warranty registration card.
Product Features and Specifications
2-in, 2-out 24-bit/48kHz full-duplex PCI audio interface.
S/PDIF coaxial inputs & outputs on gold-plated RCA jacks.
S/PDIF optical inputs & outputs on TOSlink style jacks.
Stereo analog output on gold-plated RCA jacks (consumer signal levels).
On-board headers accept analog audio from internal CD-ROM players.
On-board header accepts digital audio from internal CD-ROM players.
Built-in D/A converter may be used to monitor digital input or output.
Supports popular 44.1 kHz and 48 kHz sample rates.
Windows 95/98 drivers included.
Minimum System Requirements
Windows 95 or 98
Pentium 200 MMX
32 MB of RAM
UDMA EIDE or SCSI 2 Hard Disk drive
2
About the DiO 2448
The DiO 2448 inputs and outputs support digital audio streams as wide as
24 bits, the highest resolution available at this time of printing. At sample
rates of up to 48kHz, the DiO 2448 S/PDIF inputs may record a digital signal
from your DAT, MiniDisc, CD player, or external A/D converter. The
DiO 2448 S/PDIF and Analog outputs may be used to monitor the incoming
S/PDIF signal or to output digital audio from your software applications.
Below is a simplified block diagram of the DiO 2448. Please reference this
diagram while reading the remainder of this section.
Control Panel Options
S/PDIF
Inputs:
Optical
S/PDIF-In
Format
Software
WAV
Recording
+
Coax
CD
S/PDIF
Outputs:
S/PDIF-Out
Source
Optical
Monitor
S/PDIF-In
at
Analog-Out
Software
WAV
Playback
Coax
WAV
Master
Volume
Analog
Outputs
+
CD
Analog
CD
Inputs
Basically, the DiO 2448 appears to your software as a stereo-input, stereooutput (2x2) audio card. There are three inputs to the card that may be
recorded: Optical S/PDIF, Coaxial S/PDIF and internal CD-ROM S/PDIF.
As you can see from the DiO 2448 block diagram the Optical and Coaxial
S/PDIF streams are merged into one audio stream. This is not a true digital
mixer, but instead a non-intelligent merger that combines the raw data
streams. Therefore, only one of these jacks should be connected to an active
signal at a time. Note also the CD-ROM S/PDIF header is wired directly to
the Coaxial S/PDIF jack. In most cases, utilizing the internal CD-ROM
S/PDIF header will prevent you from using the Optical and Coaxial S/PDIF
inputs. Therefore, this header is primarily for using your DiO 2448 and
computer as a “dedicated CD-ROM recording station” and not for recording
from external S/PDIF devices.
3
The DiO 2448 also supplies two CD-ROM analog audio headers internally,
with both popular formats supported. These provide a connection to the
analog output of your computer’s internal CD-ROM drive (if you have one
installed). Only one of these headers may be connected at a time. CD-ROM
analog audio may be monitored at the DiO 2448’s Analog output only and
may not be recorded. In order to retrieve data from an audio CD-ROM, we
recommend the use of a “CD Ripper” software program. These are widely
available programs (sometimes even available as shareware on the Internet)
that allow reading audio tracks directly from your CD-ROM and storing the
retrieved data to WAV format audio files. The resulting WAV format files
may be imported into most audio programs.
The DiO 2448 provides three sets of outputs: Optical S/PDIF, Coaxial
S/PDIF and Analog Audio. Any combination of these outputs may be
connected at any given time. The two S/PDIF outputs are wired in parallel
and therefore carry the same audio stream. The S/PDIF outputs may carry
data from a software application, or they may be used to monitor the audio
received at the S/PDIF inputs. On the other hand, the Analog Audio outputs
may carry a different audio stream than the S/PDIF outputs. The Analog
Audio outputs are connected to the output of an integrated digital mixer
controlled by the Windows Sound System, and are therefore more flexible
than the digital outputs.
➐
➏
➊
➋
➌
➍
➎
4
The DiO 2448 Adapter Card
1.
2.
3.
4.
5.
6.
7.
Coaxial S/PDIF Input: This RCA connector receives a S/PDIF stereo
signal from an external coaxial S/PDIF device.
Coaxial S/PDIF Output: This RCA connector transmits a S/PDIF stereo
signal to an external coaxial S/PDIF device.
Optical S/PDIF Input: This TOSlink connector receives an optical
S/PDIF stereo signal from an external optical S/PDIF device.
Optical S/PDIF Output: This TOSlink connector transmits an optical
S/PDIF stereo signal to an external optical S/PDIF device.
Analog Audio Outputs (Left & Right): These RCA connectors carry the
left and right line-level signals to an external monitoring or mix-down
device. The signal levels of these outputs are compatible with most
consumer gear.
Internal CD-ROM headers, Analog: These headers (connectors) accept
analog line-level audio from a CD-ROM player or similar source internal
to the computer. Only one of these headers may be in use at one time.
Internal CD-ROM header, Digital: This header (connector) accepts a
digital audio S/PDIF signal from a CD-ROM player or similar source
internal to the computer. This header is wired in parallel to the coaxial
S/PDIF input. Therefore only one of these connectors may be used at a
time.
Quick Guide to Getting Started
Here is a list of the steps required to get your DiO 2448 up and running:
1.
2.
3.
4.
5.
Physically install the card in your computer (see ‘Hardware
Installation’).
Start Windows and allow Windows’ Plug-and-Play to prompt you for
the DiO 2448 drivers via the Add New Hardware wizard.
Install drivers and support software (see ‘Driver & Software
Installation’).
Configure your digital recording software to select the DiO 2448 ports as
its active audio input and output devices (see ‘Using DiO 2448 with
Software Applications’ and also your applications software manual).
Hook your digital audio gear up to the DiO 2448 (see ‘Typical DiO 2448
Setup’).
5
Hardware Installation
To mechanically install the DiO 2448, follow these steps:
1.
2.
3.
4.
5.
6.
7.
8.
9.
Turn off your computer.
Remove the computer’s cover and position the computer so that you
may easily access its PCI slots.
Select the PCI slot where you will install your DiO 2448 card. Make sure
it is a PCI slot. If you don’t know what “PCI slot” means, check the
owner’s manual for your computer. PCI slots are distinguishable from
ISA slots by being shorter and set back farther from the outside of the
computer, however some newer computers have only PCI slots.
Before removing the DiO 2448 from its protective anti-static bag, touch
the metal power supply case of the computer in order to dissipate any
static electricity your body may have accumulated. You might want to
pick up a grounding wrist strap (available from electronics stores like
Radio Shack) if you want to be doubly sure you aren’t carrying a static
charge that could damage the card.
Remove the metal bracket that covers the access hole on the back of the
computer. This bracket is usually fastened to the computer with a single
screw. Save the screw for a later step.
Position the DiO 2448 card over the target PCI slot, fitting the card
loosely over it with the DiO card upright. Press the card gently but
firmly downward into the slot until the card is completely and squarely
seated in the slot. If the card seems difficult to seat, a slight rocking
motion may help.
Secure the DiO 2448 metal bracket down into the screw hole on the back
of your computer using the screw you removed in step 5 above.
Connect the audio output of your internal CD-ROM player to the
DiO 2448 if you wish to monitor it through the DiO 2448. A standard
cable may have been supplied with the CD-ROM, either analog or
digital, or one can be purchased at an electronics store. Please note that
only one CD header may be used at a time.
Place the cover back on your computer.
Windows 98/95 Driver Software Installation
Included with the DiO 2448 is one or more Windows driver diskette(s)
containing the software drivers for your particular operating system. To
install the drivers, please follow these steps:
Windows 98 Installation
1.
After installing the DiO 2448 hardware, boot your system and start
Windows. During the Windows boot procedure, new hardware will be
automatically detected as shown here.
6
2.
3.
4.
5.
6.
The ‘Add New Hardware Wizard’ will now ask how you want to find
the driver. “Search for the best driver for your device” is already
selected. Click ‘Next>’.
Windows will give you a selection of locations to search. Make sure that
‘Floppy disk drives’ is checked, or click on the check box to do so. Insert
the “DiO 2448 Windows 95/98 Driver” software disk into your disk
drive. Click ‘Next>’.
The ‘Wizard’ reports that its Windows driver file search has found the M
Audio DiO 2448. Click ‘Next>’.
Windows is now ready to install the driver files from the specified
location. Click ‘Next>’. Windows will start to copy the files and show
you a progress report screen.
The Wizard reports that Windows has finished installing the software.
Click ‘Finish’. Your DiO 2448 is ready for action.
After completion of the driver installation, Windows may require you to
restart Windows. If it does request a restart, remove the DiO 2448 disk from
the disk drive and respond by clicking “Yes.” The system will restart and
your DiO 2448 will be ready for play.
Windows 95 Installation
1.
2.
3.
After installation of the DiO 2448 hardware, boot your system and start
Windows. During the Windows boot procedure, new hardware will be
automatically detected.
Choose the Install of “driver from disk provided by hardware
manufacturer,” then click OK.
An “Install From Disk” dialog box will prompt you to copy files from the
7
4.
A:\ drive (if your floppy drive is a different letter, change it at this time).
Insert the DiO 2448 Windows 95/98 Driver software disk into the drive
and click OK.
Windows will start to copy files, with a progress indicator on the screen.
Once this process completes itself, your DiO 2448 will be ready for
action.
After completion of the driver installation, Windows may require you to
restart Windows. If it does request a restart, remove the DiO 2448 disk from
the disk drive and respond by clicking “Yes.” The system will restart and
your DiO 2448 will be ready for play.
8
Windows Driver Configuration
Windows displays the DiO 2448 driver status in the Device Manager page of
the System Properties dialog box. The Systems Properties dialog is opened
via the Windows Start button. Select Settings | Control Panel to open the
Windows Control Panel. Select “System” from the Control Panel to open the
System Properties dialog box, then click on the “+” next to Sound, video and
game controllers to open the list of devices, the DiO 2448 being a device of
that nature. Below is an example view of the Device Manager device list.
This example shows the M Audio DiO 2448 and Midiman WINMAN 4x4/S
(another product shown here only as an example) entries in the Windows
Device Manager device list. The DiO 2448 is properly installed with no
conflicts, as is the WINMAN 4x4/S. If you do not see your M Audio
DiO 2448 in your Device Manager in this fashion, please jump ahead to the
“Troubleshooting” section of this manual.
9
Using the DiO 2448 with your Software Applications
Once the DiO 2448 is installed and the driver software properly loaded, it is
ready for use with your music application software. Some of these
applications require you to highlight or enable the DiO 2448 drivers within
the program, and others may have a utility that analyzes or “profiles” the
audio cards in your system and enables the drivers.
Within your software application, the DiO 2448 record (input) device
typically appears as “DiO-2448 Record”. Because this device is stereo, it may
appear as “Left DiO-2448 Record, Right DiO-2448 Record”, or even “Stereo
DiO-2448 Record” in some software packages. When selected within your
software, this input device allows recording directly from the DiO 2448’s
S/PDIF inputs (remember, only one S/PDIF input may be active at a time).
The DiO 2448 playback (output) device is named “DiO-2448 Playback.”
Because this device is stereo, it may appear as “Left DiO-2448 Playback,
Right DiO-2448 Playback”, or even “Stereo DiO-2448 Playback” in some
software packages. The “left”, “right”, and “stereo” naming conventions
allow the application to pan audio to the left and right under software
control. When selected within your software, this device makes outgoing
audio data available to the DiO 2448’s Coaxial and Optical S/PDIF outputs
plus the Analog outputs. In order for the application audio to be available
at the S/PDIF outputs, the “SPDIF-OUT Source” option must be set to “WAV
(software)” in the DiO 2448 Control Panel software. In order for the
application audio to be available at the Analog outputs, the “WAV” and
“Master Volume” mute and gain settings should be properly set in the
Windows sound mixer application (see ‘Windows Sound System’).
Windows may be set up to use the DiO 2448 as its default sound card. This
allows the sound applets included with Windows to utilize the DiO 2448,
and also enables Windows system sounds from the DiO 2448. To accomplish
this, go to Settings | Control Panel | Multimedia. In the Audio Properties
page, set the Playback and Record devices to the DiO 2448 playback and
record devices.
DiO 2448 Control Panel Software
Once your DiO 2448 software drivers are properly installed in your system,
you will see a “Dio2448” icon on your Windows desktop. This icon may be
used to launch the DiO 2448 Control Panel software. The DiO 2448 Control
Panel allows you to configure the various DiO 2448 monitoring options, and
also “Analyze” an incoming S/PDIF signal so that the DiO 2448 may record
it properly.
10
Below are descriptions of each control panel function. While reading this
section, it might be helpful to reference the DiO 2448 block diagram in the
‘About the DiO 2448’ section of this manual.
SPDIF-OUT Source: This switch determines which audio stream will be
transmitted at the DiO 2448 S/PDIF outputs. Its setting affects only the
S/PDIF outputs and not the Analog outputs. Choose “SPDIF-IN” to monitor
the DiO 2448’s active S/PDIF input directly. In this mode, the S/PDIF
outputs will not receive audio from your software programs. Choose
“WAV (software)” to allow software audio playback to be transmitted from
the S/PDIF outputs. In this mode, you will not be able to monitor the
S/PDIF inputs at the S/PDIF outputs.
Monitor SPDIF-IN at ANALOG-OUT: Selecting this option will mix the
audio data from the active S/PDIF input to the Analog outputs for
monitoring. The analog monitor level is not individually controllable
(whereas the WAV and CD-ROM monitor levels have individual controls),
but may be set via the Master Volume fader in the Windows mixer.
SPDIF-IN Format: Sometimes the DiO 2448 may have difficulty locking to
certain inverted S/PDIF input signals. This control allows the DiO 2448 to
compensate for this condition by “re-inverting” the signal. The default
setting is “Normal.” However, set “Inverse” if you ever have difficulty
recording or monitoring the incoming S/PDIF signal. You should only have
to set this control once for a problem signal – the driver will automatically
remember the SPDIF-In Format each time the system restarts.
IMPORTANT: In rare cases the DiO 2448 may have difficulty
locking to certain inverted S/PDIF input signals. The symptoms of
this will be extremely noisy recording and/or monitoring of the
S/PDIF inputs. If you encounter one or both of these symptoms,
go immediately to the DiO 2448 Control Panel and verify the
SPDIF-IN Format setting.
Analyze: Instead of manually setting the SPDIF-IN Format, you may choose
to automatically analyze the incoming S/PDIF signal and make the proper
11
SPDIF-In Format setting. To do this, click the “Analyze” button and follow
the on-screen instructions. You will be prompted to start playback on your
S/PDIF device. After you have pressed play on your S/PDIF source device,
press the Analyze button and the driver will automatically configure its
receiver to the proper input format. You may also choose to cancel this
operation. If your S/PDIF input signal is valid, you will receive a message
stating that “Your S/PDIF signal is OK for recording now.” Press OK. You
may close or minimize your DiO 2448 Control Panel and proceed to your
music recording application. If the DiO 2448 does not see a valid S/PDIF
signal at one of the S/PDIF inputs, you will receive a DiO 2448 Audio Driver
Alert stating that “S/PDIF recording doesn’t work. Verify your S/PDIF in
connection to the DiO 2448 then try again.” Check your connections to the
DiO inputs, make sure your source is in play mode, and click OK. If there is
still no valid signal at the S/PDIF input, you will receive another message
stating “Error, there is no S/PDIF signal for testing.” Click OK, then recheck
your S/PDIF source and connections.
Windows Sound System
Provided with the Windows operating system is the Windows Sound System
(WSS) software. Many sound cards use the WSS mixer to control input and
output levels. The DiO 2448 uses the WSS mixer for controlling levels to its
Analog outputs only. If there is more than one audio card installed in your
computer, you may prefer the mixer to default to the DiO 2448. To
accomplish this, go to Settings | Control Panel | Multimedia. In the Audio
Properties page, set the Playback and Record devices to the DiO 2448
playback and record devices.
There are three ways to open the WSS mixer:
1.
2.
3.
At the Windows Start menu select Programs | Accessories |
Entertainment (or ‘Multimedia’ in Windows 95) | Volume Control.
Double-click your mouse on the little “speaker” icon on the Windows
taskbar. If this speaker icon is not present on your taskbar, you may
enable it by selecting Settings | Control Panel | Multimedia from the
Windows Start menu, checking “Show volume control on the taskbar”
and clicking the “OK” button.
From Settings | Control Panel | Multimedia Properties | Audio, click on
the icon to the left of the playback device to bring up the playback mixer.
Once open, you may view and adjust the mixer that controls the Analog
outputs. The leftmost fader controls the overall output level to the Analog
outputs; this “Volume Control” fader is a master volume control that adjusts
the overall level of the S/PDIF In monitor, WAV software playback, and
analog CD-ROM input.
12
The middle fader “Wave Output” controls the level of the WAV software
playback, prior to the master volume fader. The rightmost fader “CD
Audio” controls the monitor level of the analog CD-ROM input, again prior
to the master volume fader.
NOTE: If these three controls do not appear in the WSS mixer,
then you must go into the WSS program settings and configure
them properly. To do so, select Options | Properties from the
Volume Control menu. The Properties dialog box will then pop up.
Find the list box at the bottom named “Show the following volume
controls:” and from within this list check only the items ‘Volume
Control’, ‘Wave Output’ and ‘CD Audio’. All other items should not
be checked. Then press OK to return to the mixer page. You
should now see only the three devices.
Typical DiO 2448 Setup
Now that we’ve visited the DiO 2448 Control Panel and WSS mixer, let’s look
at a setup that involves a typical transfer of information from DAT-tocomputer and then computer-to-DAT.
NOTE: Because improper connections can potentially make very
loud noises, it’s a good idea to have monitor levels down while
hooking up audio equipment. You may even choose to have your
computer turned off before making the connections.
In this example, we’ll connect a DAT to the DiO 2448 coaxial S/PDIF input
using a coaxial cable (typically RCA-to-RCA type, 75-ohm impedance).
We’ll also hook the analog outputs of the DiO 2448 to a sound system for
monitoring purposes. A setup like this may be used if you were transferring
13
a number of mixes from a DAT into an editing program, performing the
appropriate edits, and transferring the edited material back to DAT.
Transferring From DAT TO DiO 2448
1.
2.
3.
Connect the DAT coaxial S/PDIF output to the DiO 2448 coaxial S/PDIF
Input using a good quality digital cable. Since only one S/PDIF input
may be active at a time, leave the DiO 2448 optical S/PDIF input
disconnected.
Connect the DiO 2448 analog outputs to some type of amplified sound
system. The sound system should be equipped with speakers or
headphones.
Open the DiO 2448 Control Panel software. Within the control panel,
verify that “Monitor SPDIF-IN at ANALOG-OUT” is selected. This
enables you to monitor the incoming S/PDIF audio via your sound
system.
Coaxial
Out
DAT
Analog
Out
L
OUT
IN
OUT
DiO 2448
SOUND SYSTEM
14
IN
S/PDIF
AUDIO
R
Coaxial
In
4.
5.
6.
7.
Open the WSS mixer. Verify that the Volume Control fader is set loud
enough and “mute all” is not selected.
After verifying that your sound system is set to safe levels, start your
DAT material playing. You should immediately hear the DAT material
monitoring through the sound system.
If the monitored sound is
extremely noisy, you will need to reconfigure the S/PDIF input. To do
this, open the DiO 2448 Control Panel. Change the “SPDIF-IN Format”
manually, or click the “Analyze” button and let the driver do the
configuration automatically. Once you’re happy, rewind the DAT to the
start of its material.
Within your recording software, select “DiO-2448 Record” as the audio
input device (see the section “Using the DiO 2448 with your Software
Application”). Also, set the sample rate to match that of your DAT
player, and set the data width to 16- or 24-bits. Most likely you will use
48kHz, 44.1kHz or 32kHz sample rates and 16-bit data widths with a
DAT machine.
Start your software recording and then start your DAT material playing.
You should again be able to hear the DAT material through your sound
system once more — you are now monitoring exactly what is being
recorded. Once the recording is complete, stop or pause your software
recording.
15
Transferring From DiO 2448 TO DAT, Monitoring with DAT
Coaxial In
Analog Out
DAT
Coaxial
Out
L
OUT
IN
OUT
IN
S/PDIF
AUDIO
R
DiO 2448
SOUND SYSTEM
1.
2.
3.
4.
5.
6.
Connect the DiO 2448 coaxial S/PDIF output to the DAT coaxial S/PDIF
input using a good quality digital cable.
Connect the DAT analog outputs to some type of amplified sound
system. The sound system should be equipped with speakers or
headphones.
Open the DiO 2448 Control Panel software. Within the control panel,
verify that “SPDIF-OUT Source” is set to “WAV (software).” This routes
data from your recording software to the S/PDIF outputs.
Within your recording software, select “DiO-2448 Playback” as the
audio output device.
Start your DAT recording, then start your software program playing.
You should be able to hear the DAT outputs through your sound system.
This verifies that the digital audio is making it into the DAT correctly.
Stop your DAT when the recording is complete.
16
Troubleshooting
This section addresses potential problems that can occur in all operating
system environments, with emphasis on hardware troubleshooting. Within
the PC environment there are a limited number of hardware resources (I/O
addresses, IRQs, and DMA channels) available for use. Since audio cards
require many resources, most audio card installation problems arise from
unavailable or improperly set resources.
IMPORTANT: Most sound card installation problems result from
attempting to use system resources (IRQs, address locations)
already in use by other hardware (or software acting as “virtual”
hardware) in the system.
The DiO 2448 has been carefully designed to minimize the number of
resources consumed (it requires just one IRQ and does not require any DMA
channel resources). It is also capable of sharing an IRQ in some cases.
However, the possibility of resource conflicts still exists due to the nature of
the Windows environment. Many resource conflicts are automatically
recognized by Windows’ Plug-and-Play (PnP) system. When a resource
conflict is detected, it is displayed in the Windows Device Manager. The
Device Manager places a yellow exclamation point on top of the icon
associated with the problem device. For an example of how the Device
Manager should look when a DiO 2448 is successfully installed, see the
“Verifying Windows Driver Installation” section of this manual. If a yellow
exclamation point appears over your DiO 2448 icon, you may have a
resource conflict. There are several ways to approach this problem.
NOTE: When resolving conflicts between PnP and non-PnP
devices, it is recommended to re-adjust the resource settings of
the non-PnP device first. Typically, Windows is only aware of the
resource settings of the installed PnP devices and has no
information available to it for adjusting the PnP devices’
resources around those of the non-PnP devices. The exceptions
to this are when: (1) a non-PnP device has a true Windows 95/98
driver written for it, (2) the BIOS setup allows reserving an IRQ for
a legacy device as opposed to a PnP device, or (3) resource
requirements for the non-PnP device have been manually entered
into the Windows Device Manager. In these cases Windows is
aware of the non-PnP device’s resource requirements.
One of the quickest ways to change the resources assigned to a PCI card like
the DiO 2448 is to merely relocate the card to another PCI slot. With the
computer’s power off, remove the DiO 2448 from its current PCI slot, move
it to another available PCI slot, and turn your computer back on. More often
than not, this will change the IRQ assignment of the DiO 2448 when you reenter Windows. After returning to Windows, follow the steps outlined in the
17
“Verifying Windows Driver Installation” section of this manual. It might
take more than one PCI slot relocation to find an open IRQ.
If relocating your card to another PCI slot does not cure the DiO 2448’s
conflict(s), then you must do some further investigation to determine the
exact nature of the conflict(s). Again, go to the Windows Device Manager,
highlight the DiO 2448 or other devices with conflicts and click the
“Properties” button at the bottom of the Device Manager window. This will
open the properties page for that device. Select the “Resources tab” in order
to view the resource assignments, plus possible conflicts. You may learn
more about a conflict by highlighting each item one-by-one (done by clicking
on them, or scrolling through the list using your keyboard cursor keys) and
examining the “Conflicting resource list:” at the bottom of the box.
Sometimes it is possible that a resource problem is not showing up in the
conflicting resource list or as a yellow exclamation point in the Device
Manager. If you have any doubt about the configuration of your device (or
just want to double-check), you can view all of the devices and their assigned
resources by highlighting “Computer” at the top of the Device Manager list
and clicking the Properties button. This will allow you to view a list of
assigned IRQ numbers on the left, and the associated devices on the right. If
a number does not show up in this list, it means that it is available for use.
Look also for IRQs that are shared by more than one device. While the DiO
2448 may sometimes share an IRQ with some devices, not all devices are
capable of sharing IRQs. An entry that reads “IRQ Holder for PCI Steering”
along with an installed PCI device (such as the DiO 2448) is normal. If you
18
see another device showing up on the same IRQ as the DiO 2448 (such as a
video card, SCSI adapter, or USB Host Controller), then it is possible that this
is the source of the conflict. Typically, if you move one of the conflicting
cards to another PCI slot, an IRQ conflict will disappear.
Address conflicts are rare amongst PCI devices, but if there is no obvious
IRQ conflict, why not check for I/O Address conflicts while in the Device
Manager? You may view the list of assigned I/O addresses by selecting the
“Input/output (I/O)” radio button below the “Interrupt Request (IRQ)”
radio button at the top of the Device Manager page. I/O addresses are
displayed as 16-bit hexadecimal numbers, therefore one might note that an
address of 300 hex will read “0300” in this list.
If scanning all the resource lists in the Device Manager does not provide an
answer or clue to the resource conflict, you might want to exit Windows and
do a final inspection of your computer’s BIOS setup. Some newer BIOS’s
(see your computer manual) allow the reservation of an IRQ for each PCI slot
on the motherboard. This may be very handy in resolving IRQ assignments
for PCI devices.
Also, sometimes a BIOS is configured to direct a particular IRQ to an ISA
legacy device (non-PnP ISA card), and needs to be told to look for a PCI/ISA
PnP device (some systems default to this, especially with IRQs 3 and 4).
Consult your computer or motherboard manual for advice on how to do
this.
Finally, with some systems you will reach the dead-end realization that you
have no available IRQ’s — every one of them is assigned to some device in
the system. This most typically occurs with pre-packaged computers made
by the big-name O.E.M. computer companies. These computers have so
many features packed into them that every IRQ is consumed. In this type of
situation, some kind of reconfiguring or reprioritizing your system is in
order. Optionally, Windows may allow you to create a second “hardware
configuration” which disables some of the installed devices and makes their
resources available for general use. See your Windows documentation for
information on this subject.
19
Troubleshooting Tips for Frequently Asked
Questions
Problem: No Sound.
Possible Cause 1: There is a resource conflict with another device in
your computer. Check the DiO 2448 configuration (Address, IRQ) against
those of the other devices on your computer. If necessary, change the
settings for the one or more of the devices
Possible Cause 2: The DiO 2448 drivers are not properly installed or
the DiO 2448 is not selected as the current audio output device.
Possible Cause 3: Misrouted outputs in the DiO 2448 Control Panel.
If using an S/PDIF output, verify that “SPDIF-OUT Source” is set to “WAV
(software).” If using the Analog outputs, check the WSS mixer verify the
“Volume Control” and “Wave Output” faders are set properly and not
muted.
Possible Cause 4: Improper connections of the audio accessories.
Verify that the Analog Out is properly connected to a digital mix deck or
external mixer/amplifier, or the S/PDIF Out is connected to an external
digital audio device capable of receiving S/PDIF.
Problem: No visual activity on Audio Input volume (VU) meters in your
music software.
Possible Cause 1: The DiO 2448 input is not properly selected in the
user’s application software.
Possible Cause 2: The DiO 2448’s S/PDIF IN format is inverted and
not recognizable by the DiO 2448. Open the DiO 2448 Control Panel and
click “Analyze” to analyze and configure the proper input format.
Possible Cause 3: Improper connections to audio accessories.
Problem: Repetitious Sound.
Possible Cause: Wrong IRQ, or IRQ resource conflict. Often this will
result in a small segment of sound (0.5 to 1 second) repeating itself over and
over, sometimes completely locking up the computer. See the general
troubleshooting suggestions at the beginning of this section.
Problem: A third party Windows digital audio program does not play or
record to/from DiO 2448.
Possible Cause 1: The DiO 2448 audio driver is not properly installed.
Install (or reinstall) all DiO 2448 audio drivers (see “Windows 95/98 Driver
Software Installation” section).
Possible Cause 2: You have not selected the DiO 2448 audio driver
from your application. Many third-party applications require you to select a
specific driver (because there can be more than one in an advanced system)
for use with the application. Verify that you have selected the devices
20
named “DiO-2448 Record” and “DiO-2448 Playback” as your active audio
drivers. The manner in which this selection is made is dependent on the
application (each one is a little different).
Problem: I’m getting some pops and clicks in my audio recording.
Possible Solution: Some accelerated graphics cards use excessive
amounts of system bandwidth, preventing the recording buffer of an audio
card from keeping up with demand. This can cause clicks in the recording.
Reducing or turning off the graphics acceleration feature of the graphics card
may often solve this problem. In Windows, this is accessed from Settings |
Control Panel | System | Performance | Graphics.
Problem: Audio recorded or monitored from the S/PDIF inputs is
extremely distorted and/or noisy.
Possible Cause 1: You are using more than one S/PDIF input
simultaneously. Please use only the optical or coaxial input at a time and
disconnect the opposite if attached to a live device.
Possible Cause 2: The DiO 2448’s S/PDIF IN format is inverted and
not recognizable by the DiO 2448. Open the DiO 2448 Control Panel and
click “Analyze” to analyze and configure the proper input format.
Problem: Can’t monitor S/PDIF in at the Analog outputs.
Possible Solution: Open the DiO 2448 Control Panel and verify that
“Monitor SPDIF-IN at ANALOG-OUT” is selected.
Problem: Can’t monitor S/PDIF in at the S/PDIF outputs.
Possible Solution: Open the DiO 2448 Control Panel and verify that
“SPDIF-OUT Source” is set to “SPDIF-IN”.
Problem: Can’t monitor CD-ROM analog audio input at S/PDIF out.
Solution: There is no hardware path that supports this operation.
Problem: Can’t record from CD-ROM analog audio input.
Solution: There is no hardware path that supports this operation.
21
Lifetime Limited Warranty
MIDIMAN warrants that this product is free of defects in materials and
workmanship under normal use so long as the product is owned by the
original purchaser and that purchaser has registered his/her ownership of
the product by sending in the completed warranty card.
In the event that MIDIMAN receives written notice of defects in materials or
workmanship from such an original purchaser, MIDIMAN will either
replace the product, repair the product, or refund the purchase price at its
option. In the event any repair is required, shipment to and from MIDIMAN
and a nominal handling charge shall be born by the purchaser. In the event
that repair is required, a Return Authorization number must be obtained
from MIDIMAN. After this number is obtained, the unit should be shipped
back to MIDIMAN in a protective package with a description of the problem
and the Return Authorization clearly written on the package.
In the event that MIDIMAN determines that the product requires repair
because of user misuse or regular wear, it will assess a fair repair or
replacement fee. The customer will have the option to pay this fee and have
the unit repaired and returned, or not pay this fee and have the unit returned
unrepaired.
The remedy for breach of this limited warranty shall not include any other
damages. MIDIMAN will not be liable for consequential, special, indirect, or
similar damages or claims including loss of profit or any other commercial,
damage, even if its agents have been advised of the possibility of such
damages, and in no event will MIDIMAN’s liability for any damages to the
purchaser or any other person exceed the price paid for the product,
regardless of any form of the claim. MIDIMAN specifically disclaims all
other warranties, expressed or implied. Specifically, MIDIMAN makes no
warranty that the product is fit for any particular purpose.
This warranty shall be construed, interpreted, and governed by the laws of
the state of California. If any provision of this warranty is found void,
invalid or unenforceable, it will not affect the validity of the balance of the
warranty, which shall remain valid and enforceable according to its terms. In
the event any remedy hereunder is determined to have failed of its essential
purpose, all limitations of liability and exclusion of damages set forth herein
shall remain in full force and effect.
22
23
24