1
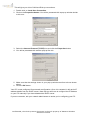
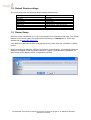
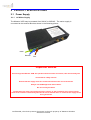
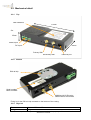
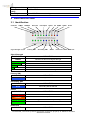
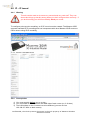
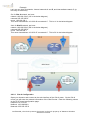
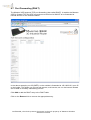
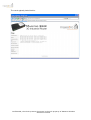
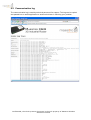
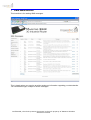
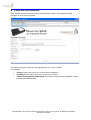
Maestro 3G Industrial Router
GSM/GPRS/EDGE/3G/UMTS Modems
USER MANUAL
Rev.2.1
www.maestro-wireless.com Email: [email protected]
Tel: 852 2869 0688Fax: 852 2525 4701 Address: Room 3603-3609, 36/F, 118 Connaught Road West,
Sheung Wan, Hong Kong
TABLE OF CONTENTS
TABLE OF CONTENTS .......................................................................................................... 2
1.1
Configuring client PCs .....................................................................................5
1.1.1
1.2
1.3
2
Default Router settings ....................................................................................7
Router Setup....................................................................................................7
PRODUCT SPECIFICATIONS ......................................................................................... 8
2.1
Power Supply...................................................................................................8
2.1.1
2.1.2
2.2
Identification...................................................................................................11
Error indication...............................................................................................14
CONFIGURING THE ROUTER ...................................................................................... 15
4.1
4.2
4.3
4.4
4.5
4.6
LAN configuration ..........................................................................................16
DNS Configuration .........................................................................................17
DHCP Configuration ......................................................................................18
APN Name configuration ...............................................................................19
NTP Client – Network Time Protocol .............................................................21
IP – IP tunnel .................................................................................................22
4.6.1
4.6.2
4.6.3
4.6.3.1
4.6.3.2
4.6.4
4.7
4.8
4.9
4.10
4.11
4.12
4.13
4.14
4.15
4.16
5
Top..................................................................................................................... 10
Bottom ............................................................................................................... 10
Physical ............................................................................................................. 10
LED INDICATORS.......................................................................................................... 11
3.1
3.2
4
AC Mains Supply ................................................................................................. 8
DC Supply............................................................................................................ 9
Mechanical detail ...........................................................................................10
2.2.1
2.2.2
2.2.3
3
Windows 2000 ..................................................................................................... 5
Warning ............................................................................................................. 22
Prerequisites...................................................................................................... 22
Example............................................................................................................. 23
Site A Configuration ...................................................................................................................23
Site B Configuration ...................................................................................................................24
Further reading .................................................................................................. 24
Port Forwarding (DNAT) ................................................................................25
Bounce (DNAT + SNAT)................................................................................26
Mirror..............................................................................................................27
Routing and Routes .......................................................................................28
Dynamic DNS ................................................................................................29
SIM Configuration ..........................................................................................30
Connection Preference ..................................................................................31
Scheduled Daily Reconnect...........................................................................32
Password .......................................................................................................33
Router Status .................................................................................................34
GENERAL OPERATION ................................................................................................ 36
5.1
5.2
Restart Connection ........................................................................................36
Restart Router................................................................................................37
www.maestro-wireless.com Email: [email protected]
Tel: 852 2869 0688Fax: 852 2525 4701 Address: Room 3603-3609, 36/F, 118 Connaught Road West,
Sheung Wan, Hong Kong
6
DIAGNOSTIC TOOLS .................................................................................................... 38
6.1
6.2
Ping................................................................................................................38
Communication log ........................................................................................40
7
SMS MESSAGES ........................................................................................................... 41
8
PREPAID RECHARGE................................................................................................... 42
9
COMPLETE CONFIG ..................................................................................................... 43
10
UPGRADE ................................................................................................................... 44
11
GLOSSARY ................................................................................................................. 45
12
REVISION INFORMATION ......................................................................................... 45
www.maestro-wireless.com Email: [email protected]
Tel: 852 2869 0688Fax: 852 2525 4701 Address: Room 3603-3609, 36/F, 118 Connaught Road West,
Sheung Wan, Hong Kong
Quick Start Guide
The Maestro 3GIRrouter is a self-contained router solution, so no other devices such as
power supplies or modems are required. It contains a built-in power supply and a built-in
GPRS/EDGE/3G engine capable of 216kb/s downlink speed.
To immediately start using your router, follow these simple steps:
1.
2.
3.
4.
Insert your SIM card in the SIM Card socket if one is not already installed.
Connect the router in to a mains socket.
Connect the PC to the router using a crossover Ethernet cable*
Switch the router on and wait until the status LED is no longer red. Orange indicates
GPRS, Green indicates EDGE and blue indicates UMTS.
5. Switch the PC on.
6. The router will assign an IP address to the PC.
7. Start browsing the Internet.
* If the Maestro 3GIRis connected to a switch, then a normal Ethernet cable will also work.
Confidential, the whole present document is the sole property of Maestro Wireless
Solutions Limited.
1.1 Configuring client PCs
Each client PC must be set to get is IP address details from a DHCP server. The SPRi, with
its built-in DHCP server will assign the following details:
•
•
•
1.1.1
IP Address range
Default gateway
DNS Server
Windows 2000
To enable auto-configuration in Windows 2000 (if it is not already configured), open the
Control Panel and double-click the Network and Dial-up connections icon.
Confidential, the whole present document is the sole property of Maestro Wireless
Solutions Limited.
This will give you a list of LAN and Dial-up connections.
1. Double click on Local Area Connection.
2. Click on the Properties button. You will be presented with a pop-up window similar
to this one:
3. Select the Internet Protocol (TCP/IP) line and click the Properties button
4. You will be presented with another pop-up like this:
5. Make sure that the settings shown in your pop-up window conform to those shown
above.
6. Click the OK button.
Your PC is now configured for automatic configuration. Once it is restarted, it will get its IP
address details from the DHCP server. Note that you will have to configure the IP address
on your PC manually if you have disabled the DHCP server.
If you are uncertain, ask your network administrator to assist you in configuring your PC.
Confidential, the whole present document is the sole property of Maestro Wireless
Solutions Limited.
1.2 Default Router settings
The router ships with the following default settings and services:
Setting
User name
Password
IP Address
Subnet Mask
DHCP Server
DHCP Pool
DNS Server
APN name
Default value
admin (fixed)
Password
192.168.217.1
255.255.255.0
Enabled
192.168.217.10 – 192.168.217.100
Enabled
internet
1.3 Router Setup
Once the router has started up, it can be configured via an interactive web page. The default
address of the router (when it is shipped from the factory) is 192.168.217.1, so the web
address will be http://192.168.217.1/
If the default IP address has been changed previously, make sure this information is safely
stored.
When accessing the Maestro 3GIR for the first time from a browser, the following password
dialogue will appear. Enter the default username (“admin”) and password (“password”) to
gain access to the Maestro 3GIR configuration interface.
Confidential, the whole present document is the sole property of Maestro Wireless
Solutions Limited.
2 PRODUCT SPECIFICATIONS
2.1 Power Supply
2.1.1
AC Mains Supply
The Maestro 3GIR may be powered from 90VAC to 265VAC. The mains supply is
connected to the terminal block as shown in the following picture:
Earth
Neutral
Live
Important Notices
Even though the Maestro 3GIR will operate without an earth connection, this should always be
connected for safety reasons.
Ensure that the supply wires are inserted and fixed in the correct terminals.
Always use SABS approved mains cables.
Do not use frayed cables.
Please take care when connecting the mains supply, as the possibility of an electric shock
exists if the installer inadvertently touches the live or neutral wires or connects the supply to the
wrong terminals.
Always take all relevant safety precautions. If you are unsure about this – please contact a
qualified person to connect and secure the mains connections
Confidential, the whole present document is the sole property of Maestro Wireless
Solutions Limited.
2.1.2
DC Supply
An optional Low voltage DC Supply Cable allows the integrator to configure the Maestro
3GIR in such a way that a backup battery can keep the router alive after loss of mains
supply.
Please note that the Low voltage DC supply must be capable of supplying at least 18VA.
This means that, at 12V, the supply must be able to supply 1.5A. This is not the continuous
current that the Maestro 3GIR requires, but the pulses required when the router is in
communication during a download.
Confidential, the whole present document is the sole property of Maestro Wireless
Solutions Limited.
2.2 Mechanical detail
2.2.1
Top
LED indicators
173mm
Screen shot 2010-04-07 at 10.22.51
35mm
Mains Input
DC Input
82mm
Primary SIM
Secondary SIM
2.2.2
Ethernet port
Bottom
DIN rail clip
Serial number,
MAC and IMEI
MAIN and AUX Diversity
SMA Antenna connectors
Fixing is via the DIN rail clip mounted on the bottom of the casing.
2.2.3
Physical
Size
Weight
82mm x 173mm x 35mm
750g
Confidential, the whole present document is the sole property of Maestro Wireless
Solutions Limited.
Casing material
Temperature
rating
Humidity
Metal alloy
-20°C to 60°C
Up to 90% RH non-condensing
3 LED INDICATORS
3.1 Identification
Collusion
10Mbs
100Mbps
Signal Strength 1,2,3,4
Signal Strength
COLOUR
ETH Link
Primary SIM
Full Duplex
Secondary SIM
HSPA
3G
Status
EDGE
INDICATION
Indicates the Received Signal Strength
1,2,3,4
> -63dBm
1,2
Power
Heart beat GSM WAN Link
GREEN
1,2,3
GPRS
> -73dBm
> -83dBm
1
> -93dBm
All OFF
Primary SIM
COLOUR
BLUE
Secondary SIM
COLOUR
BLUE
Status
COLOUR
No sufficient GSM coverage.
INDICATION
Primary SIM is selected
INDICATION
Secondary SIM is selected
INDICATION
Flashing RED
Flashing
ORANGE
Flashing GREEN
Network related Error is present see 3.2 below
GREEN
Attached to network
Heart beat
COLOUR
SIM related Error is present see 3.2 below
Logged onto network busy attaching
INDICATION
Confidential, the whole present document is the sole property of Maestro Wireless
Solutions Limited.
Flashing RED
All Okay
RED
Error: Connection application is not running
GSM
COLOUR
INDICATION
Flashing GREEN
Data connection is present
GREEN
No data connection
WAN Link
COLOUR
BLUE
Collusion
COLOUR
RED
10Mbps
COLOUR
GREEN
100Mbps
COLOUR
GREEN
ETH Link
COLOUR
GREEN
Full Duplex
COLOUR
INDICATION
WAN is CONNECTED
INDICATION
Error: Collusion detected on LAN network
INDICATION
LAN speed: 10Mbps
INDICATION
LAN speed: 100Mbps
INDICATION
LAN Link detected
INDICATION
GREEN
LAN Duplex: FULL
OFF
LAN Duplex: HALF
HSPA
COLOUR
INDICATION
BLUE
Current connection: HSPA
COLOUR
INDICATION
GREEN
Current connection: 3G
3G
EDGE
COLOUR
ORANGE
GPRS
COLOUR
RED
INDICATION
Current connection: EDGE
INDICATION
Current connection: GPRS
Confidential, the whole present document is the sole property of Maestro Wireless
Solutions Limited.
Power
COLOUR
INDICATION
BLUE
Power is present
Confidential, the whole present document is the sole property of Maestro Wireless
Solutions Limited.
3.2 Error indication
If the Status LED is flashing fast on and off, the signal strength LED’s becomes error
indicators.
Status
COLOUR
INDICATION
Flashing RED
Network Related Error is present see Signal strength LED’s to
decode.
Flashing
ORANGE
SIM Related Error is present see Signal strength LED’s to decode.
Signal Strength
COLOUR
INDICATION
SIM NOT READY
SIM NOT PRESENT
SIM FAILURE
PIN REQUIRED
PUK REQUIRED
NOT SEARCHING
SEARCHING…
REGISTRATION DENIED
REGISTRATION UNKNOWN
Confidential, the whole present document is the sole property of Maestro Wireless
Solutions Limited.
4 CONFIGURING THE ROUTER
Once you have logged in to the router web interface, you can click on the Configuration
menu item. You will be presented with a page similar to the one below. From here, all the
router options can be configured.
Confidential, the whole present document is the sole property of Maestro Wireless
Solutions Limited.
4.1 LAN configuration
Click on the LAN Configuration link from the main menu. The screen shown below will be
displayed. Enter the desired IP address in the IP Address edit-box. The default subnet
mask is 255.255.255.0, but can be changed if the need arises. The LAN IP address only
has to be changed if you already have a pre-existing network.
For most configurations the default values do not have to be changed.
Be careful to change this, as this is the IP you are using to access the
web interface.
Confidential, the whole present document is the sole property of Maestro Wireless
Solutions Limited.
4.2 DNS Configuration
The Maestro 3GIR has a built-in DNS caching system. To automatically have DNS servers
assigned, simply check the “Use Peer DNS” check-box.
To specify your own DNS server manually, uncheck the checkbox and enter two DNS
servers in the edit-boxes shown. It is advisable to always enter two DNS servers to ensure
that the DNS service keeps working in the event of an upstream DNS server failure.
Click on submit to save the DNS server settings. The settings will take effect immediately
and the unit does not have to be restarted.
Confidential, the whole present document is the sole property of Maestro Wireless
Solutions Limited.
4.3 DHCP Configuration
The Maestro 3GIR has a built-in DHCP server that automatically assigns IP addresses, DNS
servers and default gateway information to the client PCs that are connected to it. By
default, the DHCP server is enabled and will service IP addresses from a pool starting with
192.168.217.10 and ending with 192.168.217.100 for up to 90 PCs.
The default IP pool can be changed by clicking on the DHCP configuration link from the
main menu. Enter the starting and ending addresses in the edit-boxes and click submit to
save the changes.
The new DHCP pool will become active immediately when the changes are saved.
Uncheck the DHCP Server check-box to disable the DHCP server. When you click submit,
the DHCP server will immediately be disabled and the setting will be saved for subsequent
restarts.
Note: Care must be taken when configuring the IP address pool so that
it falls within the netmask assigned to the IP Address of the router.
Confidential, the whole present document is the sole property of Maestro Wireless
Solutions Limited.
Incorrect DHCP ranges and netmasks will cause client PCs to be unable to reach
the APN or even be assigned IP addresses.
4.4 APN Name configuration
To change the APN that the Maestro 3GIR connects to, click on the APN name change link.
The default APN name (internet) is shown in the edit-box. Change this to the desired APN
name, observing capitalisation. Please note that your SIM card has to be activated for a
different APN name if you want to use another APN. Also note that the Primary and
Secondary SIM each has its own APN configuration.
If your APN requires a username/password authentication, enter your username in the
username field and the password in the password field. Note that these fields must not be
empty, even if your APN does not require authentication.
Choose the authentication method from the drop-down box. Your APN provider will be able
to assist you with the authentication method.
Click submit to store the new APN name. Note that the HSDPA connection will have to be
restarted in order for the new APN name to take place. Click on the Restart Connection link
from the main configuration screen.
Confidential, the whole present document is the sole property of Maestro Wireless
Solutions Limited.
Check the Status page to make sure that the connection has been re-established and that
the APN has assigned the correct IP address to the router.
Confidential, the whole present document is the sole property of Maestro Wireless
Solutions Limited.
4.5 NTP Client – Network Time Protocol
The Maestro 3GIR has a built-in time synchronisation client that will keep the router's time
correct whenever it re-connects to the Internet. This is important for tracking events in the
Communication log.
Enter the DNS name or IP address of your upstream NTP server and click submit to save
the changes.
Confidential, the whole present document is the sole property of Maestro Wireless
Solutions Limited.
4.6 IP – IP tunnel
4.6.1
Warning
Tunnels can be used to do some very unusual and very cool stuff. They can
also make things go horribly wrong when you don't configure them correctly. If
you do this wrong you will most certainly brick your router.
To configure point-to-point tunnelling, an IP-IP tunnel must be created. The Maestro 3GIR
supports standard IP-IP tunnelling and can interoperate with other Maestro 3GIR routers or
Cisco routers using IP-IP tunnelling.
4.6.2
Prerequisites
1) You must test this before you go to site…
2) You need static IP addresses on the WAN side of each router (so, 2 of them)
3) The LAN subnet on the 2 routers has to be different (you can not use
192.168.217.0/24 on both routers)
Confidential, the whole present document is the sole property of Maestro Wireless
Solutions Limited.
Example
Let's say you have 3 networks: Internal networks A and B, and intermediate network C (or
let's say, Private APN).
So, for Site A network, we have:
network 192.168.100.0 (A2 in the below diagram)
netmask 255.255.255.0
router 192.168.100.1
This router has address 10.123.0.80 on network C. This is A1 in the below diagram.
And, for Site B network, we have:
network 192.168.200.0 (B2 in the below diagram)
netmask 255.255.255.0
router 192.168.200.1
This router has address 10.123.0.97 on network C. This is B1 in the below diagram.
4.6.2.1 Site A Configuration
Open your browser and connect to the web interface of the Site A router. On the Site A
router you will enter the network information of the Site B router. Enter the following values
on the IP-IP tunnel configuration page:
Endpoint: 10.123.0.97
Network: 192.168.200.0
Netmask: 255.255.255.0
Confidential, the whole present document is the sole property of Maestro Wireless
Solutions Limited.
After you entered the values hit the Submit button. The first halve of the IP-IP tunnel
configuration is now completed.
4.6.2.2 Site B Configuration
Open your browser and connect to the web interface of the Site B router. On the Site B
router you will enter the network information of the Site A router. Enter the following values
on the IP-IP tunnel configuration page:
Endpoint: 10.123.0.80
Network: 192.168.100.0
Netmask: 255.255.255.0
After you entered the values hit the Submit button. The second halve of the IP-IP tunnel
configuration is now complete. Your tunnel is ready to use.
4.6.3
Further reading
The use and configuration of IP-IP tunnels is well documented on the Internet. Google is
your friend here! Some links:
http://lartc.org/howto/lartc.tunnel.html
http://www.shorewall.net/IPIP.htm
http://www.linuxfoundation.org/en/Net:Tunneling
Make sure you understand the fundamentals of IP routing and IP tunnelling and test your
scenario before you take your equipment to site.
http://www.ralphb.net/IPSubnet/index.html
http://www.w3schools.com/tcpip/default.asp
Confidential, the whole present document is the sole property of Maestro Wireless
Solutions Limited.
4.7 Port Forwarding (DNAT)
The Maestro 3GIR supports TCP port forwarding (also called DNAT). It enables the Maestro
3GIR to forward TCP and UDP connections received on its WAN IP to be forwarded to
internal devices on the internal network.
In the above example, port 25 (SMTP) on the outside is forwarded to 192.168.210.2, port 25
on the inside. This allows you to host web servers, mail servers, etc. on the internal network
and is ideal for remotely maintaining servers.
Click Add to add the DNAT entry to the DNAT table.
Click on the Remove link to remove the appropriate entry.
Confidential, the whole present document is the sole property of Maestro Wireless
Solutions Limited.
4.8 Bounce (DNAT + SNAT)
This works in similar way than the basic DNAT. It will forward TCP connections coming into
the router to an internal address. The difference is that, with this option, the internal server
will always see the connection coming from the Router's internal LAN IP address. It is useful
to have this for internal devices on which the default route cannot be changed/configured.
Click Add to add the Bounce entry to the Bounce table.
Click on the Remove link to remove the appropriate entry.
Confidential, the whole present document is the sole property of Maestro Wireless
Solutions Limited.
4.9 Mirror
The Maestro 3GIR supports Mirror. It enables the Maestro 3GIR to forward TCP and UDP
connections received on various ports to the specified IP.
Click Add to add the mirror entry.
Click on the Remove link to remove the appropriate entry.
Confidential, the whole present document is the sole property of Maestro Wireless
Solutions Limited.
4.10 Routing and Routes
The Maestro 3GIR includes a fully manageable router which allows you to create routes to
other subnets on your network via different gateways.
The above example shows routes to 10.10.10.0/24 via gateway 10.10.10.1 and
20.20.20.0/24 via gateway 20.20.20.1 already configured, with a third route I the process of
being configured.
Click Add to add the route to the Maestro 3GIR routing table.
Click Remove to remove the appropriate route.
All routes are persistent across reboots.
Confidential, the whole present document is the sole property of Maestro Wireless
Solutions Limited.
4.11 Dynamic DNS
Your external IP address can be updated at one of several dynamic DNS providers. Enter
the details required and the Router will update the DNS as your assigned IP address
changes.
Supported dynamic DNS providers:
• dyndns
• zoneedit
• changeip
• noip
Confidential, the whole present document is the sole property of Maestro Wireless
Solutions Limited.
4.12 SIM Configuration
The Maestro 3GIR enables the user to use two networks one as primary and the other as
secondary.
If failover is selected the Maestro 3GIR will automatically switch over to the secondary SIM
if connection is lost and can’t be re-established. If the connection remains on the secondary
SIM, a reconnection will only be done on the Primary SIM when the scheduled daily
reconnect (see section 4.14) is enabled.
Confidential, the whole present document is the sole property of Maestro Wireless
Solutions Limited.
4.13 Connection Preference
The Maestro 3GIR enables the user to select the preferred connection type.
If for example UMTS is available in the area but the signal strength is lower than 30% it is
better to force the connection to be GPRS/EDGE, this will enable the router to stay on the
preferred connection type.
Confidential, the whole present document is the sole property of Maestro Wireless
Solutions Limited.
4.14 Scheduled Daily Reconnect
By default the router will restart only it’s WAN and LAN connection at 01:00. This time can
be changed by selecting the desired interval from the drop down menu.
When selecting “Restart everything” the router will restart all its services at the desired time.
The user can also decide to switch this function off although this is not recommended to
ensure no network lock-up taking place.
The Scheduled daily reconnect will be applied and saved if you click the submit button.
Confidential, the whole present document is the sole property of Maestro Wireless
Solutions Limited.
4.15 Password
The username is always admin and the default password is password. To change the
default password, click on the Password link. The user configuration page will allow you to
change the default password.
The user can also open the routers web interface from the Internet, this will enable the user
to browse the web interface remotely via a private APN.
The password configuration will be saved if you click the submit button.
Confidential, the whole present document is the sole property of Maestro Wireless
Solutions Limited.
4.16 Router Status
The Router Status page will show all the current information relevant to the operation of the
router. For example: MAC address, the current network on which the Maestro 3GIR is
registered, all the hardware and software versions and information on the SIM cards:
The eth0 interface represents the LAN interface and the ppp0 interface represents the WAN
interface. The IP associated with the ppp0 interface is the internet-facing address. All
outbound traffic will go through NAT via this interface.
Signal strength must be at least 30% in order for a good connection to be established to the
GSM network.
The module temperature can vary from 0 ºC to 95 ºC and must never exceed 100 ºC.
Click on “Routing table” to display the following:
Confidential, the whole present document is the sole property of Maestro Wireless
Solutions Limited.
Confidential, the whole present document is the sole property of Maestro Wireless
Solutions Limited.
5 GENERAL OPERATION
5.1 Restart Connection
To restart your Internet or APN connection, simply click the Restart Connection menu option.
This will restart the connection, using any new configuration changes made to the APN
name and authentication details.
Confidential, the whole present document is the sole property of Maestro Wireless
Solutions Limited.
5.2 Restart Router
To restart your router, simply click the Restart Router menu option. This will restart the
router, making live any changes to the LAN IP address and/or subnet masks.
Confidential, the whole present document is the sole property of Maestro Wireless
Solutions Limited.
6 DIAGNOSTIC TOOLS
There are a couple of tools that can be used to check connection to the Internet and provide
additional information if no connection can be established.
6.1 Ping
The “ping” page can be used to check the connection to various other machines on the
network.
Enter the IP address that you want to ping in the edit-box and press enter. The router will
send 4 ping packets to the destination address and report each echo-reply.
If no replies are returned, it means that the remote IP address is not reachable from the
router.
Confidential, the whole present document is the sole property of Maestro Wireless
Solutions Limited.
The result typically looks like this:
Confidential, the whole present document is the sole property of Maestro Wireless
Solutions Limited.
6.2 Communication log
The communication log is used by technical personnel for support. This log can be copied
and pasted into an email application to assist technicians in resolving your problem.
Confidential, the whole present document is the sole property of Maestro Wireless
Solutions Limited.
7 SMS MESSAGES
This Interface is for reading SMS messages.
This is handy when your service provider sends you information regarding your data bundle.
You can delete single, multiple or all the messages.
Confidential, the whole present document is the sole property of Maestro Wireless
Solutions Limited.
8 PREPAID RECHARGE
This interface provides access to the prepaid balance enquiry and prepaid recharge
functions of your service provider
The command string is what you will typically type in on your handset.
For example:
•
•
•
*100# will query and return your current account balance.
*100*02# will query and return your current time window.
*100*01*RechargeVoucherNumber# will load the money from the supplied voucher
onto the selected SIM card.
Confidential, the whole present document is the sole property of Maestro Wireless
Solutions Limited.
9 COMPLETE CONFIG
This interface provides your routers complete configuration in a text format. This can also be
used by technical personnel for support. The current config text can be copied and pasted
into an email application to assist technicians in resolving your configuration problems.
A config file for example received back from the technical support team, can be uploaded by
browsing to the desired config file and clicking submit.
Config file upload.
Warning: no validation is done on the values submitted from your file. This could
render the router unusable.
Confidential, the whole present document is the sole property of Maestro Wireless
Solutions Limited.
10 UPGRADE
This interface allows you to update specific areas of the router.
For Example:
Web interface
USB driver
Connection application etc.
Confidential, the whole present document is the sole property of Maestro Wireless
Solutions Limited.
11 GLOSSARY
Abbreviation
API
ASN.1
CDR
CSV
DB
DNS
FQDN
GAIN
HTTP
HTTPS
IVR
I/O
IP
LAN
MMS
MMSC
PDA
SMS
SMSC
SMPP
USSD
WIG
WAN
WAP
WML
WASP
XML
Description
Application programmers Interface
Abstract Syntax Notation One
Charge Data Record
Comma Separated Values
Database
Domain Name System
Fully Qualified Domain Name
Gateway Application and Interface Node
Hypertext Transfer Protocol
HTTP Secure
Interactive Voice Response
Input/Output
Internet Protocol
Local Area Network
Multimedia Message Service
Multimedia Messaging Service Centre
Personal Digital Assistant
Short Message Service
Short Message Service Centre
Short Message Peer to Peer Protocol
Unstructured Supplementary Services Data
Wireless Internet Gateway
Wide Area Network
Wireless Application Protocol
Wireless Mark-up Language
Wireless Application Service Provider
Extensible Markup Language
12 REVISION INFORMATION
Date
Version
Comments
17 March 2008
30 April 2008
24 June 2008
1.0
1.1
1.2
Creation
Updated screen shots
Added Chapter 2 (Product Specifications)
25 Sep 2009
1.3
Expand on IP-IP tunnel section
28 Sep 2009
30 March 2010
1.4
2.1
Added new Screen captures
Converted for new 3GIR
Author
Tiaan van Aardt
Tiaan van Aardt
Eric Guldemond
Deon van der
Merwe
Lucas Rossouw
Lucas Rossouw
Confidential, the whole present document is the sole property of Maestro Wireless
Solutions Limited.
Warning
WARNING: Do not open this equipment under any circumstances. High risk of electrical shock exists that may
and probably will lead to injuries and/or death.
Contacting Maestro Wireless Solutions
Telephone
Web
email
+852 2869 0688
www.maestro-wireless.com
[email protected]
Maestro Wireless Solutions Ltd
3603-09, 36/F, 118 Connaught Road West
Sai Yin Pun, Hong Kong
HONG KONG SAR
Copyright Notice
Copyright © 2010 Maestro Wireless Solutions LTD. All rights reserved. No part of this document may be
reproduced in any form or by any means without prior written authorization from Maestro Wireless Solutions LTD.
Trademarks
Maestro Wireless Solutions and the Maestro corporate logo are trademarks of Maestro Wireless Solutions. All
other trademarks appearing in this guide are the exclusive property of their respective owners.
General Notice
Maestro Wireless Solutions reserves the right to revise this document without obligation to provide notification of
such changes. Maestro Wireless Solutions provides this documentation without warranty expressed, implied,
statutory, or otherwise, and specifically disclaims any warranty of merchantability or fitness for a particular
purpose. Maestro Wireless Solutions may make improvements or changes in the product(s) and/or the
program(s) described in this documentation at any time. Maestro Wireless Solutions assumes no responsibility
for product reliability and/or performance if any party other than Maestro Wireless Solutions modifies the device
configuration or if the installation is not performed in accordance with this manual.
Version
30 March 2010 V2.1.
Confidential, the whole present document is the sole property of Maestro Wireless
Solutions Limited.