1
(
,
the possibilities
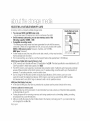
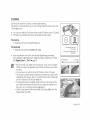
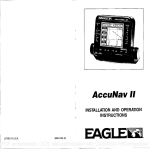
Thank you for purchasing this Samsung product.
To receive more complete service, please
register your product
at
www.samsung.com/global/register
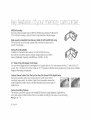
key fe tLJre,sof voLJrmemow c mcorder
J
J
J
MPEG4 Encoding
Records enhanced quality video in MPEG4 ASP(Advanced Simple Profile) format
(720 x 480) onto memory cards at 3(} fps for high resolution, life like images.
High-capacity
embedded Flash Memory (4GB) (SC-MX1 OA/MX10AU only)
The camcorder has built in high capacity flash memory that allows you to
record movie images.
Various Recording Media
In addition to the built in flash memory (SC MX10A/MX10AU only),
this memory camcorder supports various storage media such as SDHC
(Secure Digital High Capacity) and MMCplus. (128 MB - 8 GB)
2.7" Wide (16:9) LCD Display (112K Pixels)
You can see the bigger picture by enlarging the 4:3 aspect ratio into 16:9 wide screen with the 2.7" wide (16:9) LCD
screen. The 112K pixel LCD monitor rotates up to 270 degrees for flexible viewing angles and provides sharp, detailed
image for monitoring and playback.
Capture Visions Farther Than The Eye Can See (34x Optical/1200x Digital Zoom)
Samsung's powerful optical zoom lenses bring the world closer without
sacrificing image quality, in addition, Digital Zoom interpolation means that
extreme digital zooming is clearer, with less distortion than previous types of
digital zooms.
Various Recording Features
The memory camcorder supports Anti Shake(EIS) (Electronic Image Stabilize o, Digital Effects
and a wide range of other functions that you can select according to the scene you are recording.
_,_pages 48 - 56
Eng/sh
Enjoying
Various
Playback
Features
Unlike
tape
operation,
playback
issimple
andeasy
inthismemory
camcorder
since
notimeisneeded
forrewinding
orfastforward
operations.
Various
functions
areavailable
forenjoying
many
different
types
ofplayback.
_*page
58, 61
PlaybackonyourPC
USB
2.0enables
thesmooth
transfer
ofmovies
you've
recorded
toacomputer.
Withthebundled
software,
youcaneasily
transfer
andplay
back
movies
onyourPC.
_page75
PCCam
formulti-entertaining
Connect
thememory
camcorder
toaPCviaaUSB
2.0cable
andinstantly
communicate
vialivevideo
withbusiness
associates,
friends
andfamily
wherever
youare.
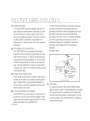
Versatile
16:9Wide
&4:3Display
option
YOU
caneas.,
select
tneols slay option wnen r_coralng
or playbacK (16:9 Wide/4:8 ). Samsung's 16:9 Wide disD ay
option _e_syou monitor mere wide, on the 2.7" wide LCD screen wnen recorc g or playback wJtn your memor_
ca _corder. Ensure your entire movies are recoraeo _n4:3 aspect rauo regardless of the d splay ootion/16:9 Wide/4:3
aspect rauo
< 4:3 aspect
ratio >
< 16:9 Wide aspect
ratio >
_ ng/ish
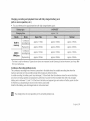
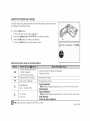
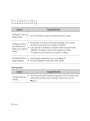
What the icons and signs in this user manual mean :
Ax
Means that death or serious personal injury is a risk.
WARNING
Means that there is a potential risk for personal injury or material damage.
CAUTION
CAUTION
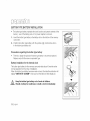
To reduce the risk of fire, explosion, electric shock, or personal injury when using your memory
camcorder, follow these basic safety precautions:
Means hints or referential pages that may be helpful when operating the memory camcorder.
These warning signs are here to prevent injury to you and others.
Please follow them explicitly. After reading this section, keep it in a safe place for future reference.
I
,s f tv n,stnActon,s
J
This symbol indicates that dangerous voltage consisting a risk of
electric shock is present within this unit.
OAUTION: TO REDUCE THE RISK OF ELEOTRICSHOCK,
DO NOT REMOVECOVER (OR BAOK)
NO USER SERVICFASLEPARTS INSIDE
REFERSERVICINGTO QUALIFIED SERVIOEPERSONNEL
/
This symbol indicates that there are important operating and
|
maintenance instructions in the literature accompanying this unit.
Warning
To Reduce The Risk Of Fire Or Electric Shock, Do Not Expose This Apparatus
J
To Rain Or Moisture.
Caution
Apparatus shall not be exposed to dripping or splashing and no objects filled with liquids, such as vases, shall be
placed on the apparatus.
To disconnect the apparatus from the mains, the plug must be pulled out from the mains socket, therefore the
mains plug shall be readily operable.
vEnq ish
1.
2.
3.
4.
5.
6.
7.
Read
these
instructions.
12.Use
only
withthecart,
stand,
tripod,
bracket,
ortable
specified
bythe
Keep
these
instructions.
manufacturer,
orsold
withtheapparatus.
Heed
allwarnings.
When
acartisused,
usecaution
when
Follow
allinstructions.
moving
thecart/apparatus
combination
toavoid
injury
fromtipover.
Donotusethisapparatus
near
water.
thisapparatus
during
lightning
Clean
only
withdrycloth.
13.Unplug
storms
orwhen
u
nused
forlong
periods
Donotblock
anyventilation
openings.
Install
in
oftime.
accordance
withthemanufacturer's
instructions.
14.Refer
allservicing
toqualified
service
personnel.
8. Donotinstall
near
anyheat
sources
such
as
Servicing
isrequired
when
t
he
apparatus
hasbeen
radiators,
heat
registers,
stoves,
orother
apparatus damaged
inanyway,
such
aspowersupply
cordor
(including
amplifiers)
thatproduce
heat.
plugisdamaged,
liquid
hasbeen
spilled
orobjects
9. Donotdefeat
thesafety
purpose
ofthepolarized
have
fallen
intotheapparatus,
theapparatus
has
orgrounding
typeplug.
Apolarized
plughastwo
been
exposed
torainormoisture,
does
notoperate
blades
withonewider
thantheother.
Agrounding
normally,
orhasbeen
dropped.
typeplughastwoblades
andathirdgrounding 15.Apparatus
shall
not
b
eexposed
todripping
or
prong.
Thewideblade
orthethirdprong
are
splashing
andnoobjects
filled
withliquids,
such
as
provided
foryoursafety.
Iftheprovided
plugdoes
vases,
shall
beplaced
on
the
apparatus.
notfitintoyouroutlet,
consult
anelectrician
for
replacement
oftheobsolete
outlet.
16.VENTILATION:
Slots
andopenings
inthecabinet
areprovided
10.Protect
thepower
cordfrombeing
walked
on
forventilation
toensure
reliable
operation
ofthe
orpinched
particularly
atplugs,
convenience
CAMCORDER
andtoprotect
itfromoverheating.
receptacles,
andthepoint
where
theyexitfrom
the
These
openings
must
notbeblocked
orcovered.
apparatus.
Never
place
yourCAMCORDER
onabed,sofa,
11.Only
useattachment/accessories
specified
bythe
rug,orother
similar
surface:
onornear
aradiator
manufacturer.
orheat
register.
This
CAMCORDER
should
notbe
placed
inabuiltininstallation
such
asabookcase
orrackunless
proper
ventilation
isprovided
orthe
manufacturer's
instructions
have
been
adhered
to.
,s f tv n,StrLA On,S
t
m
J
17. POWER SOURCES:
The CAMCORDER should be operated only from the
type of power source indicated on the label. If you are
not sure of the type of power supply at your home,
consult your appliance dealer or local power company.
A CAMCORDER is intended to be operated from
battery power, or other sources, refer to the operating
instructions.
18. GROUNDING OR POLARiZATiON:
This CAMCORDER may be equipped with either a
polarized 2 wire AC line plug (a plug having one blade
wider than the other) or a 3 wire grounding type plug,
a plug having a third (grounding) pin. If you are unable
to insert the plug fully into the outlet, try reversing the
plug. If the plug still fails to fit, contact your electrician
to replace your outlet. Do not defeat the safety purpose
of the polarized plug.
70 1984, provides information with respect to proper
grounding of the mast and supporting structure,
grounding of the lead in wire and supporting structure,
grounding of the mast and supporting structure,
grounding of the lead in wire to an antenna discharge
unit, size of grounding to conductors, location of
antenna discharge unit, connection to grounding
electrodes and requirements for the grounding
electrode.
See figure below.
19. POWER-CORD PROTECTION:
Power supply cords should be routed so that they are
not likely to be walked on or pinched by items placed
upon or against them, paying particular attention to
cords or plugs, convenient receptacles, and the point
where they exit from the unit.
20. OUTDOOR ANTENNA GROUNDING:
CAMCORDER, be sure the antenna or cable system is
grounded to provide some protection against voltage
surges and built up static charges, Section 810 of the
National Electrical Code, ANSI/NFPA No.
vi Enf_ish
21. LIGHTNING:
For added protection of this CAMCORDER during a
lightning storm or when it is left unattended and unused
for long periods of time, unplug it from the wall outlet
and disconnect the antenna or cable system. This will
prevent damage to the CAMCORDER due to lightning
and powerline surges.
22.POWER
LINES:
a.When
thepower
supply
cordorplugis
Anoutside
antenna
system
should
notbelocated
in
damaged.
thevicinity
ofoverhead
power
lines
orother
electric
b.Ifanyliquid
hasbeen
spilled
onto,
orobjects
have
fallen
intotheCAMCORDER.
light
orpower
circuits
where
itcanfallintosuch
power
lines
orcircuits.
When
installing
anoutside
¢.IftheCAMCORDER
hasbeen
exposed
torain
orwater.
antenna
system,
extreme
care
should
betaken
to
keep
fromtouching
such
power
lines
orcircuits
as
d.IftheCAMCORDER
does
notoperate
normally
contact
withthem
might
befatal.
byfollowing
theoperating
instructions,
adjust
only
those
controls
thatarecovered
bythe
23.OVERLOADING:
operating
instructions.
Improper
adjustment
Donotoverload
walloutlets
andextension
cords
as
ofother
controls
may
result
indamage
and
thiscanresult
inariskoffireorelectric
shock.
will
often
r
equire
extensive
work
b
yaqualified
24.OBJECTS
AND
LIQUIDS:
technician
torestore
theCAMCORDER
toits
Never
push
objects
ofanykindintothis
normal
operation.
CAMCORDER
through
openings
astheymay
touch
e.IftheCAMCORDER
hasbeen
dropped
orthe
dangerous
voltage
points
orshort
outapartthat
cabinet
has
b
een
d
amaged.
could
result
inafireorelectric
shock.
Never
spill
f. When
theCAMCORDER
exhibits
adistinct
liquids
ofanykindonto
theCAMCORDER.
Should
change
inperformance,
this
indicates
aneed
for
spillage
occur,
unplug
unitandhave
itchecked
by
service.
atechnician
before
use.
27.REPLACEMENT
PARTS:
25.SERVICING:
When
replacement
parts
arerequired,
besure
the
Donotattempt
toservice
thisCAMCORDER
service
technician
has
used
r
eplacement
parts
yourself.
Opening
orremoving
covers
may
expose
specified
bythemanufacturer
andhaving
thesame
youtodangerous
voltage
orother
hazards.
Refer
all
characteristics
as
the
original
part.
Unauthorized
servicing
toqualified
service
personnel.
substitutions
may
result
infire,
electric
shock
or
26.DAMAGE
REQUIRING
SERVICE:
other
hazards.
Unplug
thisCAMCORDER
from
thewalloutlet
and 28,SAFETY
CHECK:
refer
servicing
toqualified
service
personnel
under
Upon
c
ompletion
ofanyservice
orrepairs
to
thefollowing
conditions:
thisCAMCORDER,
asktheservice
technician
toperform
safety
checks
todetermine
thatthe
CAMCORDER
isinsafeoperating
order.
_ngiish
vii
rn or nt
I
s fotv nstr Aotons
J
29. To prevent damage which may result in fire or shock
hazard, do not expose this appliance to rain or
moisture.
30. If this power supply is used at 240V ac, a suitable
plug adapter should be used.
31. This product is covered by one or more of the
following U.S. patents:
5,060,220 5,457,669 5,561,649 5,705,762 5,987,417
6,043,912 6,222,983 6,272,096 6,377,524 6,377,531
6,385,587 6,389,570 6,408,408 6,466,532 6,473,736
6,477,501 6,480,829 6,556,520 6,556,521 6,556,522
6,578,163 6,594,208 6,631,110 6,658,588 6,674,697
6,674,957 6,687,455 6,697,307 6,707,985 6,721,243
6,721,493 6,728,474 6,741,535 6,744,713 6,744,972
6,765,853 6,765,853 6,771,890 6,771,891 6,775,465
6,778,755 6,788,629 6,788,630 6,795,637 6,810,201
6,862,256 6,868,054 6,894,963 6,937,552
USERINSTALLERCAUTION:
Your authority to operate this FCCcertified equipmentcould
be voided if you make changes or modifications not expressly
approved by this party responsiblefor complianceto part 15
FCC rules.
NOTE:
(_
LAMP(S)INSIDETHIS PRODUCTCONTAINMERCURYAND
MUSTBE RECYCLEDORDISPOSEDOFACCORDING
TO LOCAL,STATEORFEDERALLAWS.Fordetails see
lamprecycle.org,eiae.org,or callt 800 Samsung(7267864)
CALIFORNIA USA ONLY
This Perchlorate warning applies onlyto primary CR
(Manganese Dioxide) Lithium coin ceils in the product sold
or distributed ONLY in California USA
" Perchlorate Material - special handling may apply,
See www.dtsc.ca,gov/hazardouswaste/perch
orate.
NOTE:This equipment has been tested and found to comply
with the limits for a Class B digital device, pursuant to part 15
of the FCC Rules.
These limits are designed to provide reasonable protection
against harmful interference in a residential installation.
This equipment generates, uses and can radiate radio
frequency energy and, if not installed and used in accordance
with the instructions, may cause harmful interference to
radio communications. However, there is no guarantee that
interference will not occur in a particular installation.
If this equipment does cause harmful interference to radio or
television reception, which can be determined by turning the
equipment off and on, the user is encouraged to try to correct
the interference by one or more of the following measures:
Reorient or relocate the receiving antenna.
Increase the separation between the equipment and
receiver.
Connect the equipment into an outlet on a circuit different
from that to which the receiver is connected.
Consult the dealer or an experienced radio/TV technician
for help and for additional suggestions.
The user may find the following booklet prepared by the
Federal Communications Commission helpful : "How to
Identify and Resolve Radio-TV Interference Problems."
This Booklet is available from the U.S. Government
Printing Office, Washington, D.C. 20402, Stock No.
004-000-00345-4.
FOC Warning
The user is cautioned that changes or modifications not
expressly approved by the manufacturer could void the user's
authority to operate the equipment.
This device complies with Part 15 of FCC Rules.
Operation is subject to the following two conditions;
(1) This device may not cause harmful interference, and
(2) This device must accept any interference received,
including interference that may cause undesired operation.
p e .LAtion,s
Warning!
Thiscamcorder shouldalways be connectedtoan AC outlet
witha protective
groundingconnection.
Danger of explosion if batten/i 8 incorrectly replaced.
Replace only with the same or equivalent type.
I
If this power supply is used at 240V ac, a suitable plug adaptor should be Used.
I
cLASS1
USER
pRoDucT
I
KLASSE 1 LASER PRODUKT
LUOKAN 1 LASER LAITE
KLASS 1 LASER APPARAT
I
I
PRODUCTO
I
LASER CLASE 1
Eng!is s x
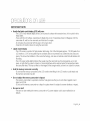
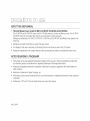
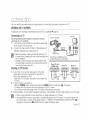
BEFORE USING THIS CAMCORDER
® This memory
camcorder
records
video in MPEG4 format
camcorder
is not compatible
and at Standard
Resolution
(SD-VIDEO}.
e
Please note that this memory
®
Before recording important video, make a trial recording.
Play back your trial recording to make sure the video and audio have been recorded properly.
Samsung cannot compensate for any damage caused when a recording
cannot be played back because of a defect in the memory camcorder or memory card.
Samsung cannot be responsibb for your recorded video and audio.
Recorded contents may be lost due to a mistake when handling this memory camcorder or memory card,
etc. Samsung shall not be responsible for compensation for damages due to the loss of recorded
contents.
with other digital video formats.
Make a backup of important recorded data
Protect your important recorded data by copying the files to a PC. We also recommend you copy it from
your PC to other recording media for storage. Refer to the software installation and USB connection guide.
Copyright: Please note this memory camcorder
is intended for individual use only.
Data recorded on the card in this memory camcorder using other digitaVanalog media or devices is protected
by the copyright act and cannot be used without permission of the owner of copyright, except for personal
enjoyment. Even if you record an event such as a show, performance or exhibition for personal enjoyment,
it is strongly recommended that you obtain permission beforehand.
x Engiish
reo ution
on
I
IMPORTANT NOTE
e
Handle the liquid crystal display (LCD) with care:
The LCD is a very delicate display device: Do not press its surface with excessive force, hit it or prick it with a
sharp object.
If you push the LCD surface, unevenness in display may occur. If unevenness does not disappear, turn the
camcorder off, wait for a few moments, and then turn it on again.
Do not place the camcorder with the open LCD screen down.
Close the LCD monitor when not using the camcorder
® Liquid crystal display:
The LCD screen is a product of high precision technology. Out of the total pixels (approx. 112,000 pixels of an
LCD monitor ), 0.01% or less pixels may be out (black dots) or may remain lit as colored dots (red, blue, and
green). This shows the limitations of the current technology, and does not indicate a fault that will interfere with
recording.
The LCD screen will be slightly dimmer than usual when the camcorder is at low temperature, as in cold
areas, or right after the power is turned on. Normal brightness will be restored when the temperature inside
the camcorder rises. This has no effect on the images in the storage media, so there is no cause for concern.
,
Hold the memory cameorder correctly:
Do not hold the memory camcorder by the LCD monitor when lifting it: the LCD monitor could detach and
the memory camcorder may fall.
® Do not subject the memory camcorder
to impact:
This memory camcorder is a precision machine. Take great care that you do not strike it against a hard
object or let it fall.
Do not use the memory camcorder on a tripod in a place where it is subject to severe vibrations or impact.
® No sand or dust!
Fine sand or dust entering the memory camcorder or AC power adaptor could cause malfunctions or
defects.
Eng!is s xi
p e Ljtion,s on Lj,se
No water or eiIX
Water or oil entering the memory camcorder or AC power adaptor could cause electric shock, malfunctions
or defects.
®
Heat on surface of product:
The surface of the memory camcorder will be slightly warm when in use, but this does not indicate a fault.
e
Be careful of unusual ambient temperature:
Using the memory camcorder in a place where the temperature is over 140°F (40°C) or lower than 32°F (0°C)
may result in abnormal recording/playback.
Do not leave the memory camcorder on a beach or in a closed vehicle where the temperature is very high
for a long time: This could cause a malfunction.
Do not point directly at the sun:
if direct sunlight strikes the lens, the memory camcorder could malfunction or a fire could occur.
Do not leave the memory camcorder with the LCD screen exposed to direct sunlight:
This could cause a malfunction.
®
Do not use the memory camcorder near TV or radio:
This could cause noise to appear on the TV screen or in radio broadcasts.
®
Do not use the memory camcorder near strong radio waves or magnetism:
If the memory camcorder is used near strong radio waves or magnetism, such as near a radio transmitter
or electric appliances, noise could enter video and audio that are being recorded. During playback
of normally recorded video and audio, noise may also be present in picture and sound.
At worst the memory camcorder could malfunction.
x++ English
®
Do not expose the memory camcorder to soot or steam:
Thick soot or steam could damage the memory camcorder case or cause a malfunction.
®
Do not use the memory camcorder near corrosive gas:
If the memory camcorder is used in a place where there is dense exhaust gas generated by gasoline or diesel
engines, or corrosive gas such as hydrogen sulfide, the external or internal terminals could corrode, disabling
normal operation, or the battery connection terminals could corrode, so that power will not turn on.
Do not use the memory camcorder near an ultrasonic humidifier:
Calcium and other chemicals dissolved in water could scatter in the air, and white particles could adhere to
the optical head of the memory camcorder, which could cause it to operate abnormally.
Do not clean the memory camcorder body with benzene or thinner:
The coating of exterior could peel off or the case surface could deteriorate.
When using a chemical cleaning cloth, follow the instructions.
Keep the memory
card out of reach of children
to prevent
swallowing,
_ ng/ishxiii
reoautions on use
I
ABOUT THIS USER MANUAL
®
This User Manual covers models SC-MXIO, SC-MXIOP, SC-MXIOA and SC-MXIOAU.
The SC MX10A and SC MX10AU have a built in 4 GB flash memory, but also use Memory cards. The SC MX10,
SC MX10P does not have builtqn flash memory and uses Memory cards exclusively.
Although some features of SC MX10, SC MX10P, SC MX10A and SC MX10AU are different, they operate in the
same way.
®
Illustrations of model SC MX10A are used in this user manual.
o
The displays in this user manual may not be exactly the same as those you see on the LCD screen.
®
Designs and specifications of storage media and other accessories are subject to change without any notice.
NOTES
REGARDING
A TRADEMARK
® All the trade names and registered trademarks mentioned in this manual or other documentation
your Samsung product are trademarks or registered trademarks of their respective holders.
provided with
® Windows® is registered trademark or trademark of Microsoft Corporation, registered in the United States and
other countries.
+ Macintosh is trademark of Apple Computer, Inc.
® All the other product names mentioned here in may be the trademark or registered trademarks of their respective
companies.
® Furthermore, "TM" and "R" are not mentioned in each case in this manual.
x+v Eng ish
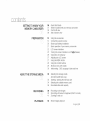
GETTING TO KNOW YOUR
MEMORY CAMCORDER
06
07
08
09
Quick Start Guide
What's included with your memory camcorder
Front & left view
Side & bottom view
PREPARATION
10
12
Using the accessories
Connecting a power source
20
21
22
Button type battery installation
Basic operation of your memory camcorder
LCD screen indicators
25
26
Turning the screen indicators on/off (Ir_l / iCHECK)
Using the LCD enhancer
27
27
28
29
Adjusting the LCD screen
Using the MENU button
Using the Control buttons
Shortcut menu (OK Guide)
30
Initial setting : OSD Language & date and time
32
Selecting the storage media
33
(SC MX10A/MX10AU only)
Inserting / ejecting the memory card
34
36
Selecting the suitable memory card
Recordabletime and capacity
RECORDING
38
40
41
Recording movie images
Recording with ease for beginners (EASY.Q mode)
Zooming In and out
PLAYBACK
42
Movie Images playback
ABOUT THE STORAGE MEDIA
English
03
content
04 D g/ish
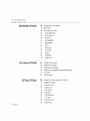
RECORDING OPTIONS
45
47
48
48
49
50
51
52
53
54
55
55
56
56
Changing the menu settings
Menu items
Recording menu items
Scene Mode (AE)
White Balance
Exposure
Anti shake(EIS)
Digital Effects
Focus
Back Light
16:9 Wide
Quality
Resolution
Digital Zoom
PLAY BACK OPTIONS
57
58
59
60
61
61
Setting the play option
Deleting movie images
Protecting movie images
Copying movie images (SC-MX10A/MX10AU only)
16:9 Wide
File Information
SETTING OPTIONS
62
63
64
64
64
64
65
65
65
66
Changing the menu settings in "Settings"
Setting menu items
Date/Time set
Date format
Time format
Date/Time
LCD Brightness
LCD color
Auto Power Off
Beep Sound
66
File no.
66
67
67
68
68
68
68
68
Memory type (SC MX10A/MX10AU
Memory info
Format
Default set
Version
Language
USB Connect
Demo
only)
USB INTERFACE
69
71
73
74
75
76
System requirements
Installing the software
Connecting the USB cable
Viewing the contents of storage media
Transferring files from the memory camcorder to your PC
Using the PC Cam function
CONNECTION
77
78
Viewing on TV Screen
Recording (Dubbing) Images on Other Vide() Devices
MAINTENANCE & ADDITIONAL
INFORMATION
79
80
Maintenance
Additional information
TROUBLESHOOTING
81
Troubleshooting
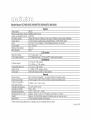
SPECIFICATIONS
93
WARRANTY (SEA USERS ONLY)
94
Eng }si_ 05
QUI©K
Jl©@
o
•
This chaoter introauces, Du to tne oasic features of, bur memor, camcoraer.
See the reference pages for more information
Preparation
•
3onnectir j a
,,
.Check out the storage meala ,_page 32
ower source ,_page 12
,,
Setting the Date/Time and OSD Language re, page 3C
Recording
Recording me movie mpage
Playing
,,
58
back
Selecting an image _o play back from the thumbnail
aaex views wpage
/lewlng playback frorT ,our camcoraer or , )ur PC or TV
,_page 73
42
G_ n_ to l<nowVOLAr
r_r_orv c_r_cord_r
_
J
J
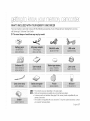
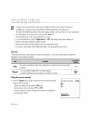
WHAT'S INCLUDED WITH YOUR MEMORY CAMCORDER
Your new memory
call Samsung's
O
The exact
camcorder
Customer
shape
comes
with the following
accessories.
If any of these
items
is missing
from
your box,
Care Center.
of each
item
may
vary
by model.
• The contents may vary depending on the sales region.
Parts and accessories are available at your local Samsung dealer.
A memory card is not included. See page 34 for memory cards compatible with your
memory camcorder.
• : The Cradle is not supplied with your camcorder. To buy this optional accessory, contact
your nearest Samsung dealer.
f_,,s_ 07
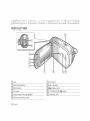
FRONT & LEFT VIEW
%@
MENU button
OK button
Control button ( ^/v/(/)/W/T)
Q' Recording start/stop button
08 English
_lQI//'CHECK
button
LOB ENHANCER([])
button
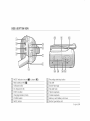
SIDE & BOTTOM VIEW
%
®
®
®
[#
MODE indicator (record(_)
_:
G
/ player (_]))
Recording start/stop button
Multi cable jack (AV/_)
Grip belt
USB jack (USB)
Swivel Hand grip
DO IN jack (DO IN)
Grip belt hook
EASY.Q button
Tripod receptacle
Charging indicator (CHG)
Cradb receptacle
POWER switch
Mer'nory card/Battery
MODE button
Button type battery slot
slot cover
Er gFish 09
This
section
provides
information
onusing
thismemory
camcorder
:such
ashow
tousethe
provided
accessories,
how
tocharge
thebattery,
how
tosetup
theoperation
mode
andinitial
setup.
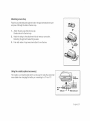
USING THE ACCESSORIES
Attaching
a Grip Belt
® Insert your right hand from the bottom of memory camcorder up to the base of your thumb.
Put your hand in a position where you can easily operate the Recording start/stop button and the Zoom lever.
® Adjust the length of grip belt so that the memory camcorder is stable when you press the Recording start/stop
button with your thumb.
1.
Detach the belt.
2.
3.
Adjust the length of grip belt.
Attach the belt.
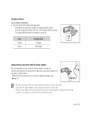
Angle Adjustment
® Rotate the swivel hand grip at the most
convenient angle.
You can rotate it downward upto 150 degrees.
10 English
Attaching
a LensCap
Pass
theprovided
string
through
theholeinthegripbeltattachment
part
andpass
itthrough
theholeinthelens
cap.
1. Attach
thelens
capstring
tolens
cap.
Shorter
sideisforthelens
cap.
2. Attach
thestring
totheattachment
hole
ofmemory
camcorder.
Detaching
thegripbeltmakes
things
easier.
3. Push
both
sides
ofcapinward
andattach
itover
thelens.
Usingthecradle(optional
accessory)
TheCradle
isaconnection
plate
which
canbeused
tomake
thecamcorder
more
stable
when
charging
thebattery,or
connecting
toaTVoraPC.
Ergiish11
preparation
CONNECTING A POWER SOURCE
®
There are two types of power source that can be connected to your memory camcorder.
Do not use provided power supply units with other equipment.
The battery pack: used for outdoor recording.
The AC power adapter : used for indoor recording. Uw.page 19
To Charge
the Battery
Pack
® Be sure to charge tile battery pack before you start using your memory
camcorder.
Battery
Pack
installation
/ ejection
It is recommended
you purchase one or more
continuous
use of your memory camcorder.
Inserting
1.
2.
3.
2.
3.
battery
packs
to allow
the battery
pack
Slide and open the battery slot cover and push the battery lock.
® Gently push the battery lock in the direction as shown in the figure to eject
the battery out.
Pull the ejected battery out in the direction as shown in the figure.
Slide and close the battery slot cover.
12 English
iii¸¸
pack
Slide and open the battery slot cover as shown in the figure.
Insert the battery pack into the battery slot until it softly clicks.
® Make sure that the SAMSUNG logo is facing up and the camcorder
is placed as shown in the figure.
Slide and close the battery slot cover
Ejecting
1.
the battery
additional
ii
i
i_i
About battery
packs
® The battery pack should be recharged in an environment that is between 32°F (0°C) and 104°F (40°C).
However, when it is exposed to cold temperatures (below 32°F (0°C)), its usage time becomes reduced and it may
cease to function. If this happens, place the battery pack in your pocket or other warm, protected place for a short
time, then reattach it to the memory camcorder.
The recording time shortens dramatically in a cold environment. The continuous recording times in the operating
instructions are measured using a fully charged battery pack at 77 °F (25 °C). As the environmental temperature
and conditions vary, the remaining battery time may differ from the approximate continuous recording times given
in the instructions.
On handling a battery pack
To preserve battery power, keep your memory camcorder turned off when you are not operating it.
® For power saving purposes, the memory camcorder automatically turns off after 5 minutes in standby mode.
(Only if you set "Auto Power Off" from the menu to "On" (5 min).)
® Do not touch or let metallic objects come into contact with the terminals.
® Make sure that the battery pack fits firmly into place. Do not drop the battery pack as it may cause damage.
Be careful to keep the battery pack out of the reach of children. There is danger that a child might .swallow it.
® Frequent use of the LCD screen or using the fast forward or rewind buttons wears out the battery pack faster.
Er giish 13
preparation
The recording time is affected by temperature and environmental conditions.
® We recommend only using the original battery pack that is available from your Samsung retailer. When the battery
reaches the end of its life, please contact your local dealer. The batteries have to be dealt with as chemical waste.
Clean the terminals to remove any foreign substances before inserting the battery.
® Do not put the battery pack near any heat source (i.e. fire or a heater).
Do not disassemble, apply pressure to, or heat the battery pack.
Do not allow the + and terminals of the battery pack to be short circuited.
It may cause leakage, heat generation, induce overheating or fire.
Do not expose the battery pack to water. The battery pack is not water resistant.
® When fully discharged, a battery pack damages the internal cells.
The battery pack may be prone to leakage when fully discharged.
Remove the battery from the camcorder when it is not in use. Even when the power is switched off, the battery
pack will still discharge if it is left attached to the memory camcorder.
When not using the memory eamcorder
for an extended period:
It is recommended that you fully charge the battery pack once a year, attach it to memory carncorder and use it up
: then remove the battery pack and store it in a cool place again.
About the battery life
Battery capacity decreases over time and through repeated use. If decreased usage time between charges
becomes significant, it is probably time to replace it with a new one.
Each battery's life is affected by storage, operating and environmental conditions.
Use only Samsung-approved battery packs. Do not use batteries from other manufacturers.
Otherwise, there is a danger of overheating, fire or explosion.
Samsung is not responsible for problems occurring due to using unapproved batteries.
14 English
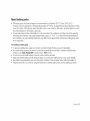
Charging,
recording
andplayback
timeswithfullycharged
battery
pack
(withnozoomoperation,
etc.)
*
For your reference, the approximate time with fully charged battery pack:
Built-in
memory
SDHC/
MMCplus
Continuous
recording time
approx. 115rain.
approx. 120rain.
approx. 125rain.
Playback time
approx. 230rain.
approx. 230rain.
approx. 230rain.
Continuous
ecording time
approx. 120rain.
approx. 125min.
approx. 130min.
Playback time
approx. 230rain.
approx. 230min.
approx. 230min.
TIqe time is only for reference. Figures show above are measured under Samsung's test environment, and may differ
from your actual use.
Continuous
Recording (without zoom)
The continuous recording time of memory camcorder in the table shows the available recording time when the
memory camcorder is in the recording mode without using any other functions.
In actual recording, the battery pack may discharge 2 3 times faster than this reference since the record start/stop
and zoom are being operated, and playback is performed. Assume that the recordable time with a fully charged
battery pack is between 1/2 and 1/3 of the time in the table, and prepare type and number of battery packs to allow
for the time you are planning to record on the memory camcorder.
Note that the battery pack discharges faster in cold environment.
The charging time will vary depending on the remaining battery level.
Er giish 15
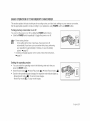
Tochecktheremaining
battery
charge
® When
thecamcorder
isturned
off(battery
isinstalled)
press
andrelease
the
IDI/ iCHECKbutton to display the remaining capacity of the battery capacity.
® When the camcorder is turned on (battery is installed) press and hold the
IIDI / [CHECK button for more than 2-3 seconds to display the remaining
battery capacity. Press the IQI / iCHECK button again or any other button to
return to the initial OSD while the battery information is displayed.
_.
•
When the battery is installed and the AC adapter is connected,
if you press IQI / iCHECK button, the remaining battery capacity
is displayed.
When the AC adapter alone is connected, pressing the IQI / [CHECK
button will display "No Battery" message.
Batten/
Recording capacity (apprex.)
Remainingbattery(approx.)--
1_ English
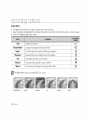
Battery Level Display
The BatteryLevel Displayshows the amount of batterypower remainingin the battery pack.
Fully charged
20,_40% used
E!
(!
C3
-L23t
40,_60% used
60,_80% used
80,_95% used
Exhausted(flbkers):
The devicewill soon turn off.
Changethe Battery Packas soon as possible.
(flickers):The device will be forced to turn off
after 5 seconds.
"Low battery"
Er gFish 17
preparation
Charging
the Battery
Pack
The IA BP85ST battery pack provided with this memory camcorder may be
charged a little at purchase time: Charge it fully before using the memory camcorder.
,, Use IA BP85ST battery pack only.
1.
2.
3.
4.
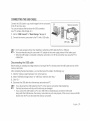
Slide the POWER switch downward to turn off the power.
Insert the battery pack.
()pen the LCD screen and jack cover.
Connect the AC power adapter to the DC IN jack of your
memory camcorder.
5. Connect the AC power adapter to a wall socket.
The charging indicator will start to blink, showing that the battery pack is
charging.
6. When the battery pack is fully charged, disconnect the AC power adapter
from the memory camcorder.
Even
if your
is turned
(house
current)
is still
supplied
to itcamcorder
while connected
to off,
the AC
wall power
outlet via
the AC
power
adaptor.
/_xo
Do not
the AC adaptor placed in a narrow space, such as between a
wall
anduse
furniture.
CAUTION
° Before detaching the power source, make sure that the camcorder's
power is turned off. Failure to do so can result in camcorder malfunction.
° Use a nearby wall outlet when using the AC power adaptor. Disconnect
the AC power adaptor from the wall outlet immediately if any malfunction
occurs while using your camcorder.
18 English
Charging
indicator
Tipsforbattery
identification
Thecolor
oftheLED
indicates
charging
status.
Ifthebattery
hasbeen
fullycharged,
thecharge
indicator
isgreen.
Ifyouarecharging
thebattery,
thecolor
ofthecharge
indicator
isorange.
Thecharge
indicator
flickers
ifthebattery
isabnormal.
Using memory
camcorder
with AC power
adaptor
It is recommended that you use the AC power adaptor to power the
memory camoorder from a household AC outlet when you perform settings on it,
play back, or use it indoors.
Make the same connections as you do when charging the battery pack.
Uw.page 18
_.
Be sure to use the provided AC power adaptor to power the memory camoorder.
Using other AC power adaptors could cause deotrio shock or result in fire,
• The AC power adaptor can be used around the world. An AO plug adaptor is required in some foreign
countries, if you need one, purchase it from an electronics store.
Er giish 19
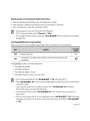
BUTTON TYPE BATTERY INSTALLATION
® The button type battery maintains the clock function and preset contents of the
memory : even if the battery pack or AC power adapter is removed.
1.
Insert the button type battery in the battery slot on the bottom of the memory
camcorder.
2.
Position the button type battery with the positive ((_)
in the button type battery slot.
Precautions
®
regarding
the button
terminal face down
type battery
There is a danger of explosion if button type battery is incorrectly replaced.
Replace only with the same or equivalent type.
Battery
installation
for the internal
clock
The button type battery for the memory camcorder lasts about 6 months under
normal operation from the time of installation.
When the button type battery becomes weak or dead, the date/time indicator will
display "2007/01/01 12:00AM "when you turn the date and time display on.
V
ili
iil}i
Iiii/ ii
Y
Keep the button type battery out of reach of children.
WARNING
Should a battery be swallowed,
consult a doctor immediately,
20 English
iii
BASIC OPERATION OF YOUR MEMORY CAMCORDER
This section explains the basic techniques of recording movies, and also basic settings on your memory camcorder.
Set the appropriate operation mode according to your preference using POWER switch and MODE button.
Turning memory camcorder
on or off
You can turn the power on or off by sliding the POWER switch down.
® Slide the POWER switch repeatedly to toggle the power on or off.
_*
Power
In thesaving
settingfunction
at the time of purchase, the power turns off
automatically if you leave your camcorder without any performing
any operation for approximately 5 minutes, to save the battery
power. _page 65
* If warning messages appear on the screen, follow the instructions.
i, page 81
iI
Setting the operating
modes
® You can switch the operating mode in the following order each time you
press the MODE button.
Movie Record mode (_) .e Movie Play mode (_)
.e Movie Record mode (_)
Each time the operational mode changes, the respective mode indicator lights up.
Movie Record mode (4_): To record movie images.
Movie Play mode (_):
To play movie images.
Er giish 21
preparation
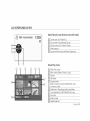
LCD SCREEN INDICATORS
Movie
Record
mode
Move Record mode
[]_.....-_
m
"M,
_--....-._
_-.-..-._
Operating status
([STBY](standby) or [ @] (recording))
Time counter
(movie
reeording
time:remaining
recordab_e
time)
,_-.--._
Battery info.(Remaining battery level/time)
LCD Enhancer*
Anti Shake(EIS)(Electronic
Image Stabilizer)
Back Light*
EASY.Q*
_.
The above screen is an example for explanation:
The displays in this user manual may not be exactly
the same as those you see on the LCD screen.
• The OSD indicators are based on memory capacity
of 2GB(MMC plus).
• Functions marked with * won't be kept when the
memory camcorder is shut down.
• For enhanced performance, the display indications and
the order are subject to change without prior notice.
22 English
Zoom (Optical zoom / Digital zoom)
Date/Time
White balance
Scene Mode (AE) / Exposure (Manual)*
Resolution
LCD SCREEN INDICATORS
Movie Record mode: Shortcut menu (OK Guide)
Screen size (16:9 Wide/4:3)
Focus (Auto Focus/Manual
5_J
%--
Focus)*
@ Shortcut menu (OK Guide) / Return
White balance*
Exposure (Auto Exposure/Manual Exposure)
Movie Play mode
Movie Play mode
Menu name (Delete, Protect, Copy)
Protect
File Name
Battery info. (Remaining battery level/time)
Copy Selected (SO MX10A/MX10AU
only)
Scroll bar
Button Guide
Delete Selected
E_giish 23
preparation
LCD SCREEN INDICATORS
Movie Play mode
Movie Playmode
Play Status
Time code (Elapsed time / Recorded time)
Storage media
(Built in memory (SC MX10A/MX10AU only)
or memory card)
Battery info.(Remaining battery level/time)
LOD Enhancer*
Protect
File Name
Date/Time
volume
Play Option
Resolution
Movie Record mode: Shortcut
_"
FF(fast forward)
Volume Down
Button Guide
Play/Pause
PEW(rewind)
Volume Up
24 English
menu (OK Guide)
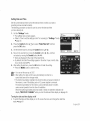
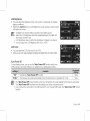
TURNING THE SCREEN INDICATORS ON/OFF ( INI / _'CHECK)
Switching the information display mode
You can switch the displaymode of on screen information:
Press the 11:31
/ Z'CHECK button.
The full and minimum display modes will alternate.
® Full display mode: All types of information will appear.
® Minimum display mode: Only operating status indicator will appear.
Checking
the remained
battery
and
memory
capacity
When the camcorder is turned off (battery is installed) press and release the
11:31
/ iCHECKbutton to display the remaining capacity of the battery capacity.
When the camcorder is turned on (battery is installed) press and hold the
11:31
/ iCHECKbutton for more than 2 3 seconds to display the remaining
battery capacity.
The approximate recordabb time in the selected storage (internal Memory or
Memory Card) and battery information appear for about 10 seconds.
Battery
0'yo
I Z::
50O/o /00%
I
I
R_ty
(approx.) J
Remainingbattery(approx.)--
Er giish 25
preparation
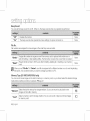
USING THE LCD ENHANCER
"
1.
2.
Contrast is enhanced for a clear and bright image oil the LCD screen.
This effect is also implemented outdoors in bright daylight.
Press the LCD ENHANCER (_) button.
The selected function icon is displayed.
To exit LCD ENHANCER, press the LCD ENHANCER
([}_J})button again.
LCD ENHANCER function does not affect the quality of the image being
recorded.
LCD POWER SAVING FUNCTION
® The LCD screen is turned off after a certain period of time has passed (see below) in each mode
in order to prevent unnecessary battery power consumption.
® Press any button to go back and turn on the LCD screen.
STBY
Mode
10 min
2_5 English
Wh . e
Pay
Recording
(single view)
!_num_a!!
Mode
None
None
10 min
None
.
Pay
.
E@'no I
RC
60 sec
Mass
Camera
Storage
60 sec
60 sec
ADJUSTING THE LCD SCREEN
1.
Open up the LCD screen 90 degrees with your finger.
2.
Rotate it to the best angle to record or play.
If you rotate the LCD screen 180 degrees to the lens side, you can
close the LCD screen with it facing out.
This is convenient during playback.
_.
65 to
adjust
brightness
color
of the
LCD
screen.
• See
Over page
rotation
may
cause
damage and
to the
inside
of the
hinge
that
connects the LCD screen to the memory camcorder.
//_
Do not lift the memory camcorder with holding the LCD screen.
WARNINGit can be a cause of sudden fall.
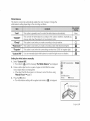
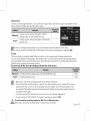
USING THE MENU BUTTON
1.
2.
3.
4.
Set the desired mode by pressing the MODE button.
Press the MENU button.
Move the cursor by pressing the Control button (A/V/</>).
to select desired menu item, and then press Control button
OK to confirm.
Press the MENU button to finish.
_MENU
button dose not operate in the EASY.Q mode.
Er gFish 27
re r tion
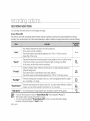
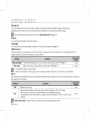
USING THE CONTROL BUTTONS
Used for playback, pausing, fast forwarding, and rewinding. Also used as directional
buttons (up, down, left, right) and to make a selection when selecting movie imac es
or menus.
1.
2.
Press the Control button (</>)
to move left / right.
Press the Control button (A/v)
to move up / down.
Confirm your selection by pressing the OK button.
, Control button (OK / (< / >)) does not operate in the EASY.Q mode.
• Using the OK button, you may directly access the shortcut menu.
_-page 29
Using
the Control
OK
v
button
Access the Shortcut menu
Zoom (wide)
Zoom (tele)
Playback/Pause
Confirms selection
Increases the volume
Decreases the volume
Moves the cursor up
Moves the cursor down
Search playback
RPS (Reverse Playback Search) rate:
x2_x4_xS_xl
6_x32_x64
- Skip Playback
Moves to the previous
menu
Search playback
FPS (Forward Playback Search) rate:
x2 >x4 >x8 >x16_x32_x64
Skip Playback
- Frame-by-frame
playback
28 English
Moves to the next
menu
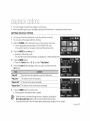
SHORTCUT
MENU(OK GUIDE)
Shortcut menu (OK guide) represents the most frequently accessed functions
according to the selected mode.
f.
Press the OK button.
2.
® Shortcut menu (OK guide) is displayed.
Press the Control button (A/V/</>)
to control the setting.
3.
Press the OK button to confirm your selection.
® Press the OK button to exit the shortcut menu.
Shortcut
function
using the Control
buttons
B:6tto5
OK
Access the shortcut menu
Confirm selection
Exit the shortcut menu
Shortcut menu (OK guide) is displayed
Playback/Pause
I_.
Exposure (Auto / Manual)
Increases the volume
v
Focus (Auto / Manual)
Decreases the volume
I
White Balance
Auto ,- Custom WB)
16 : 9 Wide
(Off / On)
Search playback
RPS (Reverse Playback Search) rate: x2_x4_xS_x16_x32_x64)
- Skip Playback
Search playback
FPS (Forward Playback Search) rate: x2_x4 >x8 >xl 6_x32
Skip Playback
- Frame-by-frame
playback
OK button dose not operate in the EASY.Q mode.
>x64)
Er {7,,>h 29
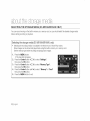
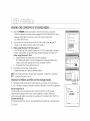
INITIAL SETTING : OSD LANGUAGE & DATE AND TIME
Initial setting is available in all operating modes.
To read the menus or messages in your desired language, set the OSD language.
To store the date and time during recording, set the date/time.
How to set the settings
mode
1.
2.
Slide the POWER switch downward to turn on the memory camcorder.
Press the MENU button.
3.
4.
Press the Control button ({
Press the OK button.
/ )) to select "Settings".
® The settings menu screen appears.
Selecting
the OSD language
You can select the desired language to display the menu screen and the messages.
1.
2.
3.
4.
Set the "Settings" mode.
,, The settings menu screen appears.
® Refer to "How to set the settings mode" for accessing to" Settings" rqode.
Press the Control button ({/))
to select "Language".
Press the Control button (A/v)
to select the desired OSD language.
and then press the OK button.
® English / _-_0t / Frangais / Deutsch / Italiano / Espafiol / Portugu_s /
Nederlands / Svenska / Suomi / Norsk / Dansk / Polski / Magyar /
YKpatHCbKa/ PyccK_ / _
/TOrkge
Press the MENU button to exit the menu.
® The OSD language is refreshed in the selected language.
_.
Even if the battery pack or AC power are removed, the language
setting will be preserved.
• "Language"
options may be changed without prior notice.
30 English
Setting
DateandTime
Setthecurrent
date
andtimesothatthedate
andtimeatwhich
youmake
a
recording
canberecorded
correctly.
Thefollowing
procedure
canalso
beused
tocorrect
thedate
andtime
youhave
already
set.
1. Setthe"Settings"
mode.
®Thesettings
menu
screen
appears.
®Refer
to"How
tosetthesettings
mode"
foraccessing
to" Settings
" mode.
--page
30.
2. Press
theControl
button
(< /> ) to select "Date/Time Set" and then
press the OK button.
3.
Set the desired value by moving the Control
4.
Move to the next item by moving the Control button (< /> ), and then
set values by moving the Control button (A/V).
Items are displayed in the order of the date format.
® By default, the Date/Time setting appears in the order of year, month, date,
hour, minute and AM/PM.
After setting the last item, press the OK button to finish the setting.
® Press the MENU button to exit the menu.
5.
[][
button (A/V).
You
set the
to time
2037.are automatically recorded on a
After can
setting,
the year
date up
and
special data area of the storage media.
• The button type battery maintains the clock function and preset contents of
the memory : even if the battery pack or AC power adapter is removed.
The button type battery for the memory camcorder lasts about 6 months
under normal operation from the time of installation.
When the button type battery becomes weak or dead, the date/time indicator will
display "2007/01/01 12:00AM "when you turn the date and time display on. _page
20.
Turning the date and time display on/off
® To switch the date and time display on or off, access the menu and change the date/time
mode. =page 64
Er giish 31
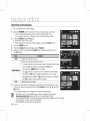
SELECTING
THE STORAGE
MEDIA
(SC-MX10A/MX10AU
ONLY)
You call record moving oil the built in memory or a memory card, so you should select the desiredstorage media
before starting recording or playback.
Selecting the storage media (SC-MX10A/MX10AU
only)
® Selectingthe recording mediumis availableill the Movierecord / Movie Playmodes.
Movieimages can be stored and played back using the built in memory or a memorycard.
Set the memory type before recordingand playingback images.
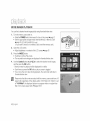
1.
2.
3.
4.
5.
Press the MENU button.
• The menu list will appear.
Press the Control button (</>)
then press the OK button.
Press the Control button (</>)
then press the OK button.
PresstheControlbutton(A/v)toselect
then press the OK button.
Press the MENU button to exit.
32 Er giish
to select "Settings",
to select "Memory
Type",
"Memory"or"Card"
Using the built-in memory (SC-MX10A/MX10AU
only)
This memorycamcorder has all embedded 4GB memorywhich can be recordedon.
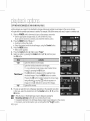
Using a memory card (not supplied)
® This memorycamcorder has multi card slot for access to SDHC (Secure DigitalHigh Capacity)and MMCplus.
Some cards are not compatible dependingon the memory card manufacturerand memory card type.
[]
• If you insert a memory card when the memory camcorder is on, the pop up message will prompt you
automatically to select the storage type.
• If there is no memory card inserted, only the built in memory will be available.
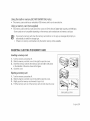
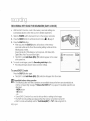
INSERTING / EJECTING THE MEMORY CARD
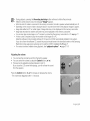
Inserting
1.
2.
3.
4.
Ejecting
1.
2.
3.
4.
a memory
card
Turn the memory camcorder off.
Slide the memory card slot cover to the right to open the cover.
Insert the memory card into the memory card slot until it softly clicks
in the direction of the arrow shown in the figure.
Close the cover.
a memory
card
Turn the memory camcorder off.
Slide the memory card slot cover to the right to open the cover.
Slightly push the memory card inwards to pop it out.
Pull the memory card out of the memory card slot and close the cover.
label pasting portion
Er giish 33
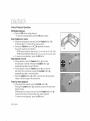
SELECTING A SUITABLE MEMORY CARD
A memory card is a compact portable storage media.
® You can use SDHC and MMC plus cards.
You call also use a SD memory card, but it must be less than 4GB.
® On this memory camcorder, you can use memory cards of the
following capacity: 128MB ~ 8GB
® Compatible
recording media
The following recording media have been guaranteed to work with this memory
camcorder. Others are not guaranteed to work, so buy such products with caution.
SDHC or SD memory cards: Panasonic, SanDisk, and TOSHIBA,
MMC plus: Transcend
® If other media are used, they may fail to record data correctly, or they may lose data
that has already been recorded.
For movie recording, use a memory card that support faster wirte speed(at least 1.25 MB/sec).
SDHC (Secure Digital High Capacity) Memory Card
SDHC memory card complies with new SD specification Ver.2.00. This latest specification was established by SD
Card Association to realize data capacity over 2GB.
The SDHC memory card supports a mechanical write protection switch. Setting the switch prevents accidental
erasure of files recorded on the SDHC memory card. To enable writing, move the switch up to the direction of
terminals. To set write protection, move the switch down.
Due to change In File Allocation System and physical specifications, SDHC memory card can not be
used with current SD enabled host devices. SDHC memory card can be used with only SDHC enables
host devices which carry SDHC logo on devices its self or on its operation manual.
MMCplus (Multi Media Card plus)
® In the case of MMCplus, they have no protection tab so please use the protect function in the menu.
Common cautions for memory card
® Damaged data may not be recovered. It is recommended you make a back up of important data separately
on the hard disk of your PC.
Turning the power off or removing a memory card during operation such as formatting, deleting, recording,
and playback may cause the data loss.
After you modify the name of a file or folder stored in the memory card using your PC, your camcorder may
not recognize the modified file.
34 Er giish
Handling
amemory
card
Itisrecommended
thatyoupower
offbefore
inserting
orremoving
thememory
card
toavoid
data
loss.
Itisnotguaranteed
thatyoucanuseamemory
card
formatted
byother
devices.
Besure
toformat
yourmemory
cardusing
thiscamcorder.
Youhave
toformat
newly
purchased
memory
cards
ormemory
cards
withdata
thatyour
camcorder
cannot
recognize
oraresaved
byother
devices.
Note
thatformatting
erases
alldataonthememory
card.
® Ifyoucannot
useamemory
card
thathasbeen
used
withanother
device,
format
itwithyour
memory
camcorder.
Note
thatformatting
erases
allinformation
onthememory
card.
® Amemory
card
hasacertain
lifespan.
Ifyoucannot
record
new
data,
youhave
topurchase
anew
memory
card.
Donotbend,
drop,
orcause
astrong
impact
toyour
memory
card.
Donotuseorstore
inaplace
thathashigh
temperature
andhumidity
ordusty
environment.
® Donotplace
foreign
substances
onthememory
card
terminals.
Use
asoftdrycloth
toclean
theterminals
ifrequired.
Donotpaste
anything
other
than
exclusive
label
onlabel
pasting
portion.
® Becareful
tokeep
memory
card
outofthereach
ofchildren,
whomight
swallow
it.
@
The memory
camcorder
supports
SDHC and MMCplus
memory cards for data storage.
* The data storage speed may differ, according to the manufacturer and production system.
SLC(single level cell) system: faster write speed enabled.
MLC(multi level cell) system: only lower write speed supported.
. The user using a lower write speed memory card for recording a movie may have difficulties storing the
movie on the memory card. You can even lose your movie data during the recording.
. In an attempt to preserve any bit of the recorded movie, the memory camcorder forcibly stores the movie
on the memory card and dispbys a warning: "Low speed card. Please record at lower quality."
To facilitate movie recording, you are recommended to use a memory card that supports faster write
speed.
. If you are unavoidably using a low speed memory card, lower the recording quality by one level
"Fine" _ "Normal" or decrease the movie size to 352P to reduce the data size.
. You can have three quality options to record a movie with the memory camcorder :
"Super Fine", "Fine", "Normal"
* You can record the same scene in three quality levels of "Super Fine", "Fine", "NormaR
However, the better the quality is, the bigger the data size is.
* For optimal performance of the memory camcorder, ensure that you purchase a fast speed memory card.
Er giish 35
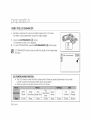
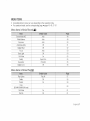
RECORDABLE TIME AND CAPACITY
Recordable
time for movie
images
iiiiiiiiiiiiiiiiiiiiiiili_i_iliiiiil_llililililiiilil_i!i!llilili!_i!i!i!i!i!i!i!i!i!i!i!i!i!i!i!i!i!i!i!i!i!ii_i_iii
iiiiiiiiiii_iiii!i!i!!_i_iii!iiiiiii!!i!!iiiiliiiii!i!i!i!i!i!i!ii
¸
built-in
memory
SDHC/
MMCplus
4GB
approx. 170min. approx. 112min. approx. 256min. approx. 170min. approx. 512min. approx. 256min.
1GB
approx. 43rain.
approx. 28min.
approx. 64min.
2GB
approx. 85min.
approx. 56min.
approx. 128min. approx. 85min.
4GB
approx. 43min.
approx. 128min.
approx. 64rain.
approx. 256min. approx. 128min.
approx. 170min. approx. 112min. approx. 256min. approx. 170min. approx. 512min. approx. 256min.
I 1GB=l,0OO,OOO,OOObytes
i actual farmattad capacity rnay be lass as the internal firmware uses a Portion af the memary:
_*
352p, 720i/720p refer to resolutions the camcorder will record at.
* The above figures are measured under Samsung's standard recording test conditions and may differ
depending on actual use.
* The memory camcorder provides three quality options for movie recordings:
"Super Fine", "Fine", "NormaL".
* The compression rate increases while lowering the quality (in the order of "Fine", "Normal").
The higher the compression rate is, the longer the recording time will be. However, the picture quality
will be lower.
* The compression rate automatically adjusts to the recording image, and the recording time may vary
accordingly.
36 Er 9iish
I
_o
To
facilitate
the
movie
recording,
itisrecommended
touseamemory
cardthatsupports
faster
write
speed.
(Write
speed:
1.25
MB
/ sec or higher) If you use a low write speed memory card, recording may stop with
o
*
*
*
*
a message of "Low speed card. Please record at lower quality",
If you inevitably use a low speed card, select a lower quality ("Fine" e "Normal") or set the movie size to
352p.
Memory cards of bigger than 8GB in capacity may not work properly.
The memory card that is used to store a movie can cause unwritable area, which may result in reduced
recording time and free memory space.
The maximum size of a movie (MPEG4) file that can be recorded at one time is 2GB.
You can store up to 5000 movie images on a memory card.
Movie image files recorded on other equipment are not playable on this memory camcorder.
To check capacity that remains memory
® Press thelDI / :_CHECK button. _,page 16
Er gFish 37
recordnq
_J
Basic procedures to record movie images described below.
RECORDING MOVIE IMAGES
® Memory camcorder provides two Recording start/stop
the other one is on the LCD panel. Select the Recording
buttons. One is oil the rear side of the camcorder and
start/stop
button that works best for you.
1.
Turn the memory camcorder on.
® Connect a power source to the memory camcorder. _pages 12,18
(A battery pack or an AC power adapter)
® Slide the POWER switch downward to turn on the power. _page 21
Set the appropriate storage media : Internal Memory or Memory Card.
(SC MX10A/MX10AU only)
(if you want to record on a memory card, insert the memory card.)
2.
Check the subject on the LCD screen.
3.
Press the Recording start/stop button.
The recording indicator ( @ ) will display and recording will start.
Pressing the Recording start/stop button again during recording
will set the memory camcorder to recording pause mode.
4.
When recording is finished, turn the memory camcorder off.
]
• Setting the display option of "16:9 Wide" does not imply wide angle (wide
aspect ratio) recording. Camera output, recording and playback signal is
formatted to 4:3 aspect ratio.
• Please note that all movies recorded with this memory camcorder have
4:3 aspect ratio regardless of the display option (16:9 Wide/4:3). When it
is set to "16:9 Wide", the displayed picture may appear wider or rougher
than that of 4:3 screen aspect ratio. =pages 55,61
38 Er 9iish
Eject
thebattery
pack
when
youhave
finished
recording
toprevent
unnecessary
battery
power
consumption.
Foron-screen
information
display.
_page
22
Forapproximate
recording
time.
_page
36
Forvarious
functions
available
when
yourecord
movie
images.
_page
45-_56
Iffocusing
isdifficult,
usethemanual
focus
function.
_page
53
During
recording,
some
button
operations
areunavailable.
(MENU
button,
etc.)
Sound
isrecorded
fromtheinternal
stereo
microphone
onthefrontofthememory
camcorder.
Take
care
thatthismicrophone
isnotblocked.
o While
recording,
don'tinsert
oreject
thememory
cardasitmayrecord
noise.
(SCMX10A/MX10AU
only)
Donotoperate
thepower
switch
orremove
thememory
card
while
accessing
thestorage
media.
Doing
somaydamage
thestorage
media
orthedata
onstorage
media.
Before
recording
animportant
movie,
make
sure
totestontherecording
function
tocheck
ifthere
isany
problem
withtheaudio
andvideo
recording.
Youcannotusealocked
memory
cardforrecording.
Youwillseeamessage
saying
recording
isdisabled
duetothelock.
Ifyoupress
theRecording
start/stop
button
while
amenu
operation
isinprocess,
theproduct
returns
to
recording
pause
mode.
Ergiish39
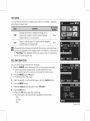
ng
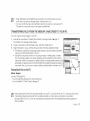
RECORDING WITH EASE FOR BEGINNERS (EASY.Q MODE)
With the EASY.Q function, most of the memory camcorder settings are
automatically adjusted, which frees you from detailed adjustments.
1.
2.
Slide the POWER switch downward to turn on the memory camcorder.
Press the MODE button to set Movie Record mode ( 4_ ). _,_page 21
3.
Pressthe EASY.Q button.
,, When you press the EASY.Q button, all functions on the memory
camcorder will be set to off and the recording settings will be set to the
following basic modes.
(Scene Mode (AE). White Balance. Auto Exposure. Anti Shake (EIS).
Digital Effect. Auto Focus and Back Light)
,, The EASY.Q and Anti-Shake (EIS} ((_) indicator appear on the screen
at the same time.
4.
To record movie images, press the Recording start/stop button.
,, Recording will begin using the basic automatic settings.
To cancel
EASY.Q mode
Press the EASY.Q button again.
,, The EASY.Q and Anti-Shake
(EIS) (O) ) indicators disappear from the screen.
Unavailable buttons during operation
* The following button and menu operations are unavailable because the items are automatically set.
And the corresponding message (" Release the EASY.Q ") may appear if unavailable operations are
attempted.
MENU button
OK button
etc.
. Cancel EASY.Q function if you want to add any effect or settings to the images.
. The EASY.Q mode settings are released when the memory camcorder is turned off.
. EASY.Q mode automatically sets the "Anti-Shake(EIS}"
to "On" while using EASY.Q.
40 Er giish
ZOOMING
Use the zoom function for close-up or wide angle recording.
This memory camcorder allows you to record using optical 34x power zoom and
1200x digital zoom.
® You can zoom with the Zoom lever or the zoom(W/T) button on the LCD panel.
* The further you slide the Zoom lever, the quicker the zoom action.
To zoom in
® Slidethe Zoom levertowards T (telephoto).
To zoom out
Slidethe Zoom levertowards W (wide angle).
® Zoom magnification over 34x is done through digital image processing,
and is therefore called digital zoom. Digital zooming is possible up to 1200x.
Set "Digital Zoom" to "On". _,_page 56
o
o
o
o
o
Be sure to keep your finger on the Zoom lever. If you move your finger
off the zoom lever, the operation sound of the Zoom lever may be also
recorded.
You can also zoom with the Zoom (W/T) button on the LCD panel.
The minimum possible distance between camcorder and subject while
maintaining sharp focus is about 1 cm (about 0.39 inch) for wide angle
and 50 cm (about 19.68 inch) for telephoto.
Focusing may become unstable during zooming, in this case, set the
zoom before recording and lock the focus by using the manual focus,
then zoom in or out during recording. _page 53
Optical zoom preserves the movie quality, but during digital zoom the
image quality may suffer.
Er giish 41
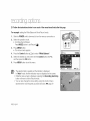
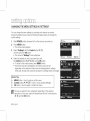
MOVIE IMAGES PLAYBACK
You can find a desired movie image quickly using thumbnail index view.
1.
Turn the memory camcorder on.
Slide the POWER switch downward to turn on the power._page
21
® Set the appropriate storage media :Internal Memory or Memory Card
_page 32 (SC MX10A/MX10AU only)
(if you want to record on a memory card, insert the memory card.)
2.
Open the LCD screen.
® Adjust brightness or contrast of the LCD screen._,_page 65
Press the MODE button.
Switches to Movie Play mode.
® The recorded movie images are displayed in thumbnail index view.
3.
4.
Use the Control button (A/V/</>)
to select the desired movie images,
and the press the OK button.
Shortcut menu for playback will be displayed for a while.
® Each time you press the OK button, play or pause is toggled.
If you move the zoom lever during playback, the camcorder switches to
thumbnail index view.
Please note that all movies recorded with this memory camcorder have 4:3
aspect ratio regardless of tile display option (16:9 Wide/4:3). When it is set
to "16:9 Wide", the displayed picture may appear wider or rougher than
that of 4:3 screen aspect ratio. _pages 55,61
42 Er giish
@
During playback, pressing the Recording start/stop
button will move to Movie Record mode.
If there is no file stored to view, the message "Empty" appears.
When the multi AV cable is connected to the memory camcorder, the built in speaker will automatically turn off.
Depending on the amount d data to be played back, it may take some time for the playback images to appear.
Image data edited on PC or certain types of image data may not be displayed on this memory camcorder.
Image data recorded on another camcorder may not be playable on this memory camcorder.
You can also play movie images on a TV screen by connecting the memory camcorder to a TV. _,_page 77
A video codec is required to play the recorded movie images on a PC.
Install the software in the provided software CD to have the CODEC automatically installed in the system.
If you do not have the software CD, search the product model name in the download center on the Samsung
Electronics home page (www.samsung.com) to get the CODEC installation file._page 71
For various functions available during playback, see "playback options".
_,pages 57,-61
Adjusting
the volume
® You can hear the recorded sound from the built in speaker.
You can control the volume by using the Control button (A/V).
The level can be adjusted anywhere between 0 and 10.
(if you close the LCD screen while playing, you will not hear the sound
from the speaker.)
Press the Control
button (A/V)
to increase or decrease the volume.
The volume bar disappears after 1-_2 seconds.
English
43
Various
Playback
Operations
stillplayback
(pause)
_,Press
theOKbutton
during
playback.
Toresume
normal
playback,
press
theOKbutton
again.
Search
playback or movie
® During normal playback, press and hold the Control button ( > )
for forward search, or to the left for reverse search.
® Moving the Control button to ({/_)
repeatedly increases
the search speed for each direction.
RPS(Reverse Playback Search) rate: x2 ,_x4 >x8 >xl 6 >x32 >x64
FPS(Forward Playback Search) rate: x2 ,_x4 >x8 ,_xl6 ,_x32 ,_x64
To resume normal playback, press the OK button.
Skip playback of movie
® During playback, press the Control button ()) to locate
the start point of next file. Pressing the Control button (_)
repeatedly skips files in forward direction.
During playback, press the Control button (<) to locate the
start point of the current file, pressing the Control button (<)
repeatedly skips files in reverse direction.
Press the Control button (<) within 3 seconds from the start point,
it skips to the first image of the previous file.
Frame-by-frame
playback
While playback is paused, press the Control button ()).
Pressing the Control button (_) repeatedly advances the still picture
frame by frame.
While playback is paused, press and hold the Control button to ()),
it plays back frame by frame just like slow motion playback.
To resume normal playback, press the OK button.
44 Er 9iish
recordng options
aHANGING THE MENU SETTINGS
You can change the menu settings to customize your memory camcorder.
Access the desired menu screen by following the steps below, then change the various settings,
1.
Slide POWER switch downward to turn the memory camcorder on.
2.
Select
® For
® For
Press
3.
4.
_*
the operation mode.
Movie Record Menus: Press MODE button to set Record (_).
Movie Play Menus: Press MODE button to set Play (0_:_]).
MENU button.
® The menu screen appears.
Select the desired sub menu and menu item with the Control buttons and
the OK button.
To return to the normal screen, press MENU button.
Even if the menu item is displayed, some items cannot be
set depending on the selected mode (movie recording/playback, settings).
In this case, sub menu cannot be accessed or setting cannot be changed.
_,page 85
Control
MODE
You can also access tile shortcut menu using the OK button. _page 29
* While tile menu screen is displayed, pressing the Recording start/stop
button will move to Movie Record mode.
I Button Tips
a.
b.
MENU button : Use it to enter or exit the menu.
Control button (A/V/</>)
: Use it to move up/down/bft/right
c.
OK button : Use it to select or confirm the menu.
Er giish 45
r cord ng option
O Follow the instructions below to use each of the menu items listed after this page.
For example:
setting the White Balance in Movie Record mode.
1,
Slide the POWER switch downward to turn the memory cameorder on.
2,
Select the operation mode.
® For Movie Record Menus:
3,
Press MODE button to set Record (_).
Press MENU button.
® The r'qenu screen appears.
4,
Press the Control
5,
Select the desired sub menu item with the Control
and then press the OK button.
6,
Press MENU button to exit the menu.
_*
button ((
/> ) to select "White Balance".
button (A/V),
The selected item is applied and the indicator is displayed.
In "Auto" mode, the item indicator may not displayed on the screen.
* While the menu screen is displayed, pressing the Recording start/stop
button will move to Movie Record mode.
* You can also change the menu setting, using the shortcut menu
represents the most frequently accessed functions. _ page 29
@} Er 9iish
MENU ITEMS
"
,,
Accessible items in menu can vary depending on the operation mode.
For operation details, see the corresponding page. _,pages 45,-46, 57,-61
Menu items in Movie Record(4_)
Scene Mode (AE)
White Balance
Auto
Auto
48
49
Exposure
Anti-Shake (EIS)
Auto
Off
50
51
Digital Effect
Focus
Off
Auto
52
53
Back Light
16:9 Wide
Off
On
54
55
Quality
Resolution
Digital Zoom
Super Fine
720x480i
Off
55
56
56
Menu items in Movie Play([_B)
..........................................................................................................
8:_ifvai_
Play Option
Delete
Protect
Play All
OK
On
(SC-MX10A/MX10AU only)
16:9 Wide
File Info
57
58
59
60
On
OK
61
61
Er {_Fish47
r cord ng option
RECORDING MENU ITEMS
You can setup the menu items for movie images recording.
Scene Mode (AE)
This memory camcorder automatically sets the shutter speed and aperture according to the subject brightness for optimum
recording: You can also specify one of five modes depending on subject conditions, recording environment or purpose of filming.
Auto balance between tile subject and the background.
To be used in normal conditions.
':A
tue
n
The shutter speed is automatically adjusted from 1/60 to 1/250 per second.
depending on the scene.
'!Sports"
None
Reduces blurring when recording rapidly moving subjects such as in golf or tennis.
If the Sports mode is used under a fluorescent light, the image may flicker.
In this case. use the Auto mode for recording.
- Creates a shallow depth of field so that the person or subject appears against a
"Pc
r i "
rt a t
,Spotlight,
'!Beach/Snew'!
"High Speed"
8.
softened background.
The portrait mode is most effective when used outdoors.
The shutter speed is automatically adjusted from 1/60 to 1/1000 per second.
Prevents overexposure of subject's face. etc. when strong light strikes the subject.
as in a wedding or on stage.
Prevents under exposure of subject's face. etc. in a place where reflection of light is
intense, such as at the seaside in midsummer or on a ski slope.
- For recording fast moving subjects such as players in golf or tennis games.
If you set the Exposure to manual. "Scene Mode (AE)" will be disabled. _,-page 50
* This function will not operate in the EASY.Q mode.
* You can check the selected "Scene Mode (AE}" on the on screen information display.
However. nothing will appear in "Auto" mode.
48 Er 9iish
85
@
White
Balance
This memory camcorder automatically adjusts the color of subject. Change the
white balance setting depending on the recording conditions.
"Auto"
This option is generally used to control the white balance automatically.
,,Daylight'=
"Cloudy"
. Fluol_escent.
"Tungsten"
"Custom
WB"
Nolle
This controls the white balance according to the outdoor ambience, especially for
close up and when the subiect is of one dominant color.
O
This option is used when you make a recording in cloudy weather,
db
This option is used when you make a recording under white fluorescent lights.
This option is used when the surroundings are less than 3200K of tungsten light.
You can manually adjust white balance to match the light source or situation.
Setting the white balance manually:
1. Select "Custom WB".
® Tile indicator (i_) and tile message "Set White
Balance"
are displayed.
2.
Frame a white object such as a piece of paper so that it fills the screen.
Use an object that is not transparent.
® If the object that fills the screen is not focused, correct the focus using
3.
Press the OK button.
® The white balance setting will be applied and indicator (_)
"Manual Focus" _-page 53
[8
_
L
EZ]_
1
t
/ '_-'_:t'a'_÷_
_-'_'_'_
is displayed.
Er giish 49
_.
Asubject
can
berecorded
under
various
types
oflighting
conditions
indoors
(natural.
fluorescent.
candlelight,
etc.).
Because
the
color
temperature
isdifferent
depending
onthe
light
source.
thesubject
tintwilldiffer
depending
onthewhite
balance
settings.
Use
thisfunction
foramore
natural
result.
• Thewhite
balance
also
canbesetintheshortcut
menu.
_-page
29.
• Thewhite
balance
cannotbesetusewhile
EASY.Q
isinuse.
•
•
•
•
It is recommended that you specify "Digital Zoom" to "Off" before setting white balance. _page
Reset the white balance if lighting conditions change.
During normal outdoor recording, setting to auto may provide better results.
Do not use a colored object when setting white balance: The appropriate tint cannot be set.
56
Exposure
The memory camcorder usually adjusts the exposure automatically. You can also manually adjust the exposure
depending on the recording conditions.
None
,Auto"
Marius
Setting
•
This option automatically adjusts image brightness according to the environmental light
conditions.
You cantheadjust
the brightness
an image
manually.
Adjust
brightness
when theofsubject
is too
bright or too dark.
the exposure
Press tile Control
manually:
button (< / ) ) to adjust the exposure while viewing the
Confirm your selection by pressing the OK button.
Exposure value can be set between "0" and "29".
If you set exposure to manual, the higher the exposure, the brighter the
recorded picture will be.
50 Er 9iish
_s_:__ _u:_.J_-a_
(£3_
Manual exposure is recommended
in situations
listed below
:
When shooting using reverse lighting or when the background is too bright.
When shooting on a reflective natural background such as at the beach or when skiing.
® When the background is overly dark or the subject is bright.
• The exposure also can be set in the shortcut menu. _,page 29
• EASY.Q mode automatically sets the "Exposure"
to "Auto".
• If you manually change the exposure value when "Scene Mode(AE)" function is selected, manual changes
are applied first.
Anti-Shake(EIS)
(Electronic
Image Stabilizer)
When you use zoom to record a magnified subject image, it will correct fuzziness in the recorded image.
"Off"
Disables the function.
None
,'On'!
Compensates for unstable images caused by camera shake, particularly at high
magnification.
@
Anti-Shake(EIS)
® Recording
Recording
® Recording
® Recording
•
o
o
o
o
provides a more stable image when:
while zooming
small objects
while walking or moving
through the window of a moving vehicle
EASY.Q mode automatically sets the "Anti-Shake(EIS}"
to "On" while using EASY.Q.
When "Anti-Shake(EIS)
: On" is set, there will be a slight difference between the actual movement and the
movement on screen.
Gross camcorder shake may not be entirely corrected even if "Anti Shake(EIS} : On" is specified.
Firmly hold the memory camcorder with both hands.
It is recommended that you specify "Anti-Shake(EIS}:
Off" when using the memory camcorder on a
desk or tripod.
When you record pictures with 34x or more magnification and the "Anti-Shake(EIS}"
is "On" in dim places,
alter images may stand out. In this case, we recommend using a tripod and turning the "Anti-Shake(EIS}"
to "Off".
Er giish 51
r cord ng option
Digital
Effect
® The digital effect enables you to give a creative look to your recording.
Select the appropriate digital effect for the type of picture that you wish to record and the effect you wish to create.
There are 6 different digital effect options.
Disables the function.
"Black&White"
"Sepia "
"Negative"
None
q_
Changes the images into Black and White.
This mode gives the images a reddish brown pigment.
q_
Reverses the colors, creating the look of a negative.
"Ar["
Adds artistic effects to your movie file.
"Mosaic"
A mosaic overlay appears on your movie file.
"Mirror"
This mode cuts the image in half using a Mirror effect.
q#
The digital effects can not use while EASY.Q is in use.
Black&White
52 Er 9iish
Sepia
Negative
Ar[
Mosaic
Mirror
FOCUS
® Thememory
camcorder
usually
focuses
onasubject
automatically
(auto
focus).
Youcanalso
manually
focus
asubject
depending
ontherecording
conditions.
Focusing
manually
during
recording
This memory camcorder automatically focuses a subject from close up to infinity.
However, the correct focus may not be obtained depending on the recording
condition. In this case, use the manual focus mode.
1. Set "Focus" to "Manual".
® The manual focus adjustment indicator appears.
2. Use the zoom lever to zoom in on subject.
3. Press the Control button ( </))
to adjust the focus,
while viewing the subject on the LCD screen.
Focusing on a further subject
To focus on a further subject, press the Control
button (<).
Focusing in a nearer subject
To focus on a nearer subject, press the Control
button (_>).
Manual focus is recommended in the following situations :
a. A picture containing several objects, some close to the
memory camcorder, others further away.
b. A person enveloped in fog or surrounded by snow.
c. Very shiny or glossy surfaces like a car.
d. People or objects moving constantly or quickly like an athlete or a crowd.
L
p
<Nearersubject >
* The focus also can be set in the shortcut menu. _page 29
* EASY.Q mode automatically sets the "Focus" to "Auto".
* Be sure to zoom in on your subject before manually focusing on it.
If you bring the subject into focus at the "W" control side, focus will be faulty when you turn
the zoom lever to the "T" control side to zoom in on the subject.
....
<Furthersubject >
Er gFish 53
option
Back
Light
When subject is lit from behind, this function will compensate for lighting so that the subject is not too dark.
"Off
On
Disables the function.
Backlight compensation
Backlight compensation
Back lighting
None
is executed.
brightens the subject quickly.
influences recording when the subject
is darker than the background:
The subject is in front of a window.
® The subject is against a snowy background.
® The subject is outdoors and the background is overcast.
The light sources are too bright.
® The person to be recorded is wearing white or shiny
clothes and is placed against a bright background:
The person's face is too dark to distinguish his/her features.
<BLC off>
_The
"Back Light" function can not use while EASY.Q is in use.
54 Er 9iish
<BLC on>
16:9Wide
Youcanselect
thedesired
LCD
display
aspect
ratio
forrecording
orplayback
(16:9
Wide/4:3
aspect
ratio).
"Off"
"On"
Disables
thefunction.
Displays
theimage
in4:3aspect
ratio.
None
Select
tousethestandard
display
aspect
ratio
of4:3onthescreen.
Select
toview
movies
of4:3aspect
ratio
byenlarging
andfitting
into16:9
aspect
ratio. None
[* * 16:9
wnote
idesetting
also
canbeset
inthe
shortcut
menu.
_page29.
Please
thatall
movies
recorded
with
thismemory
camcorder
have
4:3aspect
ratio
regardless
ofthe
display
option
(16:9
Wide/4:3).
When
itissetto"16:9 Wide", the displayed picture may appear wider or
rougher than that of 4:3 screen aspect ratio.
Quality
You can select the quality of a movie to be recorded. This memory camcorder can record in the SF (super fine), F (fine)
and N (normal) modes.
"Super Fine"
"Fine"
"Normal"
[]You
Records at the best quality.
Records at high quality.
Records at normal quality.
can record a scene at three quality levels: "Super Fine, Fine, or Normal".
However, the better the quality is, the more memory is used.
Er giish 55
r cord ng option
Resolution
® You can select the resolution of a movie to be recorded.
"720x480i"
Resolution of the movie played on a TV screen.
[]
"720x480p"
Higher resolution of the movie played on a PC screen.
[]
"352x240p"
Lower resolution of the movie played on a PC screen.
[]
• High resolution images use more memory than lower resolution images. Therefore the higher the resolution
selected, the less recording time available.
• The recording times depend on the resolution. _page 36
• When the screen size is set to 352(352x240p), it is played back in smaller size than 720(720x480p) on a PC.
Digital Zoom
You can select the maximum zoom level in case you want to zoom to a level greater than 34x (the default setting)
during recording. Up to 34x zoom is performed optically, and after that, up to 1200x zoom is performed digitally.
Note that the image quality decreases when you use the digital zoom.
"Off"
On'
_.
Only optical zoom is available up to 34x.
Digital zoorn is available up to 1200x.
Moving the zoom lever will display the digital zoom bar.
You can also zoom with the zoom (W/T) button on the LCD panel.
• The image quality may deteriorate depending on how much you
zoom in on the subject.
• Maximum zooming may result in lower image quality.
5¢ Er 9iish
Youcanmanage
recorded
movie
images
invarious
ways.
® Each
thumbnail
image
shown
inthedisplay
represents
thefirstframe
ofaseparately
recorded
movie.
SETTING THE PLAY OPTION
You can play all movies continuously or play the selected movie only.
You can also set the repeat option for all movies.
1.
Slide the POWER switch downward to turn on the memory camcorder.
® Set the appropriate storage media. (SC MX10A/MX10AU only)
(If you want to record on a memory card, insert the memory card.)
2.
Press the MODE button._page
21
® Switches to Movie Play mode.
The recorded movie thumbnail images, are displayed in a thumbnail index view.
3.
Press the MENU button.
® Press the Control button (</>)
4.
Press the Oontrol
OK button.
button (A/V)
to select "Play Option".
to select an option, and then press the
"Play A!l"
Plays back from the selected movie to the last movie.
"Play One"
The selected movie will be played.
,,Repeat All"
Repeat One
All movies will be played repeatedly.
The selected movie will be played repeatedly.
5.
Press the MI=NU button to exit the menu.
® During playback, the selected item is applied
_.
While the menu or thumbnail image screen is displayed, pressing the
Recording start/stop
button will move to the Movie Record mode.
It operates identically in the full image display (single image displayed on the screen).
Er giish 57
DELETING MOVIE IMAGES
You can delete saved movie images.
1.
2.
3.
4.
5.
Slide the POWER switch downward to turn on the memory camcorder.
® Set the appropriate storage media. (SC MX10A/MX10AU only)
(if you want to record on a memory card. insert the memory card.)
Press the MODE button. _page 21
® Switches to Movie Play mode.
® Select the desired movie thumbnail images, using the Control button.
Press the MENU button.
Press the Control button ( <[/))
to select "Delete".
Select all option by pressing the Control button (A/V)
the OK button.
and then press
ite_
"OK"
Deletes the selected movie.
Deletes tile individual selected movies.
To delete individual movie images, select tile desired thumbnail
movie images for deletion by pressing the OK button.
'!Multi Select,
Then press the MENU button to delete.
The (_) indicator is displayed on tile selected movie images.
Pressing the OK button toggles between the movie image
being selected for deletion ((_) indicator appears on image) or
not (_1) indicator is removed from image).
Deletes all movie images.
"All"
6.
The pop up selection menu will appear depending on the selected menu item.
In this case. select the desired item with the Control buttons ( _/))
and the
OK button.
® The deleted images also disappear in thumbnail image display.
• Recording
While the menu
or thumbnail
screen
is displayed,
start/stop
button image
will move
to Movie
Record pressing
mode. the
• It operates identically in tile full image display (single image displayed on the screen).
• Once deleted, a movie can not beTestored.
° Protected files (movies) will not be deleted.
58 Er 9iish
PROTECTING MOVIE iMAGES
You can protect saved important movies from accidental deletion.
Protected movies will not be deleted unless you release the protection or format the memory.
1.
2.
3.
4.
5.
Slide the POWER switch downward to turn on the memory camcorder.
® Set the appropriate storage media. (SC MX10A/MX10AU only)
(if you want to record on a memory card, insert the memory card.)
Press the MODE button. _page 21
® Switches to Movie Play mode.
Select the desired movie thumbnail images, using the Control button.
Pressthe MENU button.
® Menu screen appears.
Press the Control button ( _/>)
to select "Protect".
Select an option by pressing the Control button (A/M)
the OK button.
"On"
"Multi Select"
6.
and then press
Protects the selected movie from deletion.
Protects individual selected movie from deletion.
To protect individual movies, select desired movie thumbnail
images by pressing the OK button.Then press the MENU
button to confirm.
The ((_ indicator is displayed on the selected movie thumbnail images.
Pressing the OK button toggles between the movie image
being selected for protection ((_) indicator appears on image)
or not (_ ) indicator is removed from image).
"All On"
Protects all movie images from deletion.
"All Off"
Cancels the protection for all movie images.
The pop up selection menu will appear depending on the selected menu item.
In this case, select the desired item with the Control buttons ( _ / >) and the
OK button.
* While
the menu
or thumbnail
screen
is displayed,pressing
Recording
start/stop
button image
will move
to Movie
Record mode. the
It o )erates identically in the full image display sinqle image disDlaved on the screen.
Protected movie images will show the )rotectlon i'_dicat6r I_when
they are displayed.
If the write protection tab on the memory card is set to lock, you cannot set image protection.
Er giish 59
COPYING
MOVIE
IMAGES
(SC-MX10A/MX10AU
ONLY)
" Movie
images
arecopied
tothedestination
storage
while
leaving
original
movie
images
inthesource
storage.
,,Itcopies
from
thecurrently-used
memory
toanother.
Forexample,
ifthebuiltqn
memory
was
used,
itcopies
toamemory
card.
1. Slide
thePOWER
switch
downward
toturnonthememory
camcorder.
®Settheappropriate
storage
media.
(SCMX10A/MX10AU
only)
(Ifyouwant
torecord
onamemory
card,
insert
thememory
card.)
2. Press
theMODE
button.
W,
page
21
®Switches
toMovie
Play
mode.
Select
the
desired
movie
thumbnail
images,
using
theControl
button.
3. Press
the
MENU
button.
®Menu
screen
appears.
4. Press
theControl
button
(< />) to select "Copy".
5.
Select all option by pressing the Control
the OK button.
"OK"
button (A/V)
and then press
Copies the selected movie images.
copies
the
individual
seleeted
movie
images
To copy
individual
movie
images,
select
desired movie
images by pressing the OK button.
'!Multi Select"
"All "
6.
_.
The ([_) indicator is displayed on the selected movie
thumbnail images. Press the MENU button to confirm.
Pressing the OK button toggles between the movie image
being selected for copying (( [_ ) indicator appears on
image) or not ([_) indicator is removed from image).
Copies all the movies.
The pop up selection menu will appear depending on the selected menu item.
In this case, select the desired item with the Control buttons ( < />) and the
OK button.
While
the menu
or thumbnail
screen
displayed,
Recording
start/stop
buttonimage
will move
to is
Movie
Recordpressing
mode. the
• It operates identically in the full image dis )lay single image displayed on the screen.
• if a memory card is not inserted, you can not pertorm the "Copy"function.
60 Er 9iish
16:9 WIDE
You can select the desired LCD display aspect ratio for recording or playback
(16:9 Wide/4:3 aspect ratio).
!!Of!!!
Disables the function. Displays the image in 4:3
aspect ratio. Select to use the standard display
aspect ratio of 4:3 on the screen.
None
"On"
Select to view movies of 4:3 aspect ratio by enlarging
arid fitting into 16:9 aspect ratio.
None
[]Please
note that all movies recorded with this memory camcorder have 4:3
aspect ratio regardless of the display option (16:9 Wide/4:3). When it is set
to "16:9 Wide", the displayed picture may appear wider or rougher than
that of 4:3 screen aspect ratio.
FILE INFORMATION
You can see the image information for all images.
1. Slide the POWER switch downward to turn on the memory camcorder.
® Set the appropriate storage media. (SC MX10A/MX10AU only)
(If you want to record on a memory card, insert the memory card.)
2. Press the MODE button. _page 21
® Switches to Movie Play mode.
3.
4.
Select the desired movie thumbnail images, using the Control
Press the MENU button.
5.
6.
Press the Control button (_ /_ ) to select "File Info".
Press the OK button.
button.
Press the OK button again after confirming.
® The information of the selected file is displayed as shown below.
Date
Duration
Size
Er giish _51
CHANGING THE MENU SETTINGS IN "SETTINGS"
You can change the menu settings to customize your memory camcorder.
Access the desired menu screen by following the steps below and change the
various settings.
1.
Slide POWER switch downward to turn the memory camcorder on.
2.
Press MENU button.
® The menu screen appears.
3.
Select "Settings" with the Control button (</>),
and then press the OK button.
® The menus in "Settings"
mode will appear.
Select the desired sub menu and menu item with
the Control buttons (A/M/</>)
and the OK button.
To return to the normal screen, press MENU button.
® Even if the menu item is displayed, some items cannot be set
depending on the selected mode (movie recording/playback, settings).
In this case, the sub menu cannot be accessed or a setting cannot be changed.
4.
I Button Tips
a.
b.
MENU button : Use it to enter or exit the menu.
Control button (A/V/</>)
: Use it to move up/down/left/right
c.
OK button : Use it to select or confirm the menu.
_The
pop up selection menu will appear depending on the selected
menu item. In this case, select the desired item with the Control buttons
(</>)
and the OK button.
62 Er giish
You can setup the date/time, OSD languageand display settingsof the memory camcorder.
SETTING
MENU ITEMS
Date/Time Set
2007/01/01
Date Format
12:00 AM
YY/MM/DD
64
Time Format
12 Hr
64
Date/Time
Off
64
LCD Brightness
4(}%
65
LCD Coloi
5O%
65
Auto Power off
Off
65
Deep Sound
On
66
File No.
Series
66
Memory Type
(SC-MX10A/MX10AU
66
only)
Memory Info
OK
67
Format
OK
67
Default Set
OK
68
Version
_
64
68
Language
English
68
USB Connect
Mass Storage
68
Demo
Off
68
These Items and Default values may be changed without notice.
Er giish _53
Date/Time
Set
Setthedate
and
time
sothey
canberecorded
correctly.
_page
31
DateFormat
Youcanselect
thedate
format
todisplay.
"YY/MM/DD"
Thedateisdisplayed
intheorder
ofyear
/ month /
"DD/MM/YY"
MM/DD/YY
date.
The date is displayed in the order of date / month / year.
The date is displayed in the order of month / date / year.
Time Format
You can select the time format to display.
"12 Hr"
The time is displayed in 12 hour units.
"24 Fir"
The time is displayed in 24 hour units.
Date/Time
You can set the date and time to display on the LCD screen.
,, Before you use the "Date/Time"
function, you must set the date/time. =page
"Off"
"Date"
"Time"
Date & T me
_The
The date and time are not displayed.
The date is displayed.
The time is displayed.
The date and time are displayed.
date/time will read "2007/01/01 12:00 AM" in the following conditions.
When the button type battery becomes weak or dead.
64 Er giish
31
None
2007/01/01
12:00AM
2007101101 12:00AM
LCDBrightness
® Youcanadjust
thebrightness
oftheLCD
screen
tocompensate
forambient
lighting
conditions.
® Moving
theControl button up will brighten the screen whereas moving it down
will darken the screen.
• A brighter LCD screen setting consumes more battery power.
• Adjust the LCD brightness when the ambient lighting is too bright and
the monitor is hard to see.
• LCD Brightness does not affect the brightness of images to be stored.
• You can adjust the LCD Brightness from 0% to 100%.
LCD Color
® You can adjust the LCD color from 0% to 100%.
When you set color range, the higherthe figures the brighter the LCD monitor will be.
Auto Power
Off
To save battery power, you can set the "Auto Power Off" function which turns
off the memory camcorder if there is no operation for a certain period of time.
° The "Auto Power Off" will not function when you connect the AC power adapter to the memory camcorder.
The "Auto Power Off" functions when the battery pack is the only power source.
° If you connect the camcorder to the USB device (PC, etc.) through USB cable, the "Auto Power Off" will not
function.
Er gFish _}5
,settingoption
Beep Sound
You call set the beep sound to on/off. When on, the beep sounds when ally operation is performed.
None
None
File No.
Fib numbers are assignedto movie images inthe order they were recorded.
,!Series!!
Reset
after formatting,
or after
deleting alleven
files.ifThe
number
is reset
when a
newanother
folder is
created.
I
Assigns
file numbers
in sequence
the file
mernory
card
is replaced
with
one
or
None
card.Resets
the file number to 0001 even after formatting, deleting all or inserting a new memory
None
_When
you set "File No," to "Series", each file is assigned with a different number so as to avoid duplicating
file names, it is convenient when you want to manage your files on a PC.
Memory Type (SC-MX10A/MX10AU
only)
You can record movie images on the built in memory or a memory card, so you should select the desired storage
media before starting recording or playback. _page 32
"Men_ory"
'Card"
66 Er giish
Select the built in memory for storage medium. So you can record or play back movie
images on the built in memory.
Select a memory card for storage medium. So you can record or play back movie images
on memory card.
[_
Memory
Info
Itshows
youthestorage
information.
Youcanviewthestorage
media,
used
memory
space
andavailable
memory
space,
andtherecordable
time
according
tothequality.
storage
media.
(SC
MX10A/MX10AU
only
) in
'=Memory,,
Itshows
youthe
memory
information
ofbuilt
Itshows
youthememory
information
oftheinserted
Card memory
card.
Ifthere
iosnostorage
inserted,
itcan
notbeselected
willbcard
edimmed
onthe
menu."OK".
Incase
fmodel
SCmedia
MX10/MX10P.
the
information
oftheand
memory
appears
byselecting
Format
Theformat
function
completely
delete
allfiles
andoptions
onthestorage
media,
including
protected
files.
Youcanformat
(initialize)
recording
data
inthestorage
media.
Youhave
toformat
thepreused
storage
media
or
newly
purchased
memory
cards
withthismemory
camcorder
before
using
them.
This
enables
stable
speeds
and
operation
when
accessing
therecording
medium.
Beaware
thatallfilesanddataincluding protected files will be erased.
"Memory"
"Card"
_.
Formats the built in storage media. (SC MX10A/MX10AU
only)
None
Formats the memory card.
None
Make sure to format the recording medium on tlqe memory camcorder.
• Do not remove the recording medium or perform any other operation (such as turning off the power)
during format. Also. be sure to use the provided AC power adapter, as the recording medium may
be corrupted if the battery becomes exhausted during formatting. If the recording medium becomes
corrupted, format it again.
• A memory card with the protection tab set to lock will not be formatted. _page 59
• In case of model SC MX10/MX10P. the format is executed by selecting "OK".
Do not format the recording medium on the PC or a different device.
WARNING
Make sure to format the recording meclium on the memory camcorder.
E_giish _;7
Default
Set
Youcaninitialize
thememory
eameorder
settings
tothefactory
defaults
(initial
settings
atthefactory).
Initializing
thememory
camoorder
settings
tofactory
defaults
does
notaffect
recorded
images.
[]After resetting
thememory
camcorder,
set"Date/Time
Set"._page31
Version
Youcanseethefirmware
version
information.
Language
Youcanselect
adesired
language
todisplay
themenu
andmessages.
=page
30
USBConnect
Connect
thememory
camcorder
toaPCviaaUSB
2.0cable
andyoucantrander
yourmovie
images
from
the
storage
media,
orusethiscamcorder
asawebcamera.
"Mass
Storage"
"PC Cam"
Transfers the data files with your memory camcorder and a PC. =page
Uses your memory camcorder as a web camera. =page
75
76
None
None
[.
The default setting is mass storage.
• Before connecting the USB cable, check if the appropriate USB mode you want to use is selected.
Demo
Demonstration automatically shows you the major features that are included with your memory camcorder so that you
may use them more easily.
"Off"
"On" i
[]"Auto
68 Er giish
Disables the function
After it exit
to the menu, mode
the derqonstration
is autonqatically
operated.
Activates
demonstration
and shows various
features on
the LOB screen.
Demonstration mode will resume if you operate any other function in STBY mode for about
6minute.
Power Off "function
does not operate during the demonstration mode.
None
None
t
ntQri oQ
This chapter explains how to connect the camcorder to a PO using the USB cable for various functions.
When connecting a USB cable to a PO, refer to the software installation instructions and PC specifications
below.
SYSTEM REQUIREMENTS
Transferring
a Digital
Image
through
a USB Connection
® The memory camcorder supports USB 2.0 High speed. (Depends on the PC specification)
You can transfer a recorded file in storage media to a PC via a USB connection.
® If you transfer data to a PC, you need to install the software (DV Driver, Video Codec, DirectX 9.0) supplied with the
memory camcorder.
USB Connection
Speed
(depending
on the System)
® High speed USB connection is supported by Microsoft (Windows) device drivers only.
Windows 2000 High speed USB on a system with Service Pack 4 or later installed.
® Windows XP High speed USB on a system with Service Pack 1 or later installed.
® Windows Vista High speed USB on a system with Service Pack 1 or later installed.
System Requirements
Windows
operating
systems
CPU: Intel® Pentium 4TM, 2GHz or higher, or the equivalent
Operating systems: Windows® 2000/XP/Vista (32bit)
Standard installation is required. If you have upgraded your current operating system, we can not guarantee
the proper operation of the product.
® Memory: 512MB RAM or higher
® Hard Disk: 2GB or higher
Resolution: 1024x768 dots, 24bit color
® USB port: USB2.0 High Speed
System requirements mentioned above are recommendations. Even on a system that satisfies the requirements
operation is not ensured depending on the system.
This memory camcorder is recognized just as a removable storage device on the Macintosh computer.
(Mac OS 10.3 or above that support High Speed USB standards)
Eng isi_ _9
t
n Qri oQ
_
®
®
®
®
®
On a slower PC than recommended, movie playback may not be smooth or video editing may take a
long time.
On a slower PC than recommended, movie playback may skip frames or operate unexpectedly.
If your OS is Windows 2000/XP/Vista (32bit), log in as the Administrator(administrator of the PC)
(or a user with the equivalent privileges) to install the software.
Check out the storage media of the memory camcorder before connecting USB cable. If no memory
card or an unformatted memory card is inserted, the PC will not recognize your memory camcorder as a
removable disk.
If you disconnect the USB cable from the PC or the memory camcorder during the data transfer, the data
transfer will stop and the data may be damaged.
If you connect the USB cable to a PC using a USB HUB or with other devices at the same time, it may
cause conflict and may not work properly. If this occurs, remove all other USB devices and try the
connection again.
Intel® Pentium IIITM or Pentium 4 TM iS a trademark of the Intel Corporation.
Windows ® is a registered trademark of the Microsoft ® Corporation.
All other brands and names are property of their respective owners.
70 English
INSTALLING THE SOFTWARE
Installing DV Media Pro Program
You need to install DV Media Pro to play back recorded movie files or the transferred data from
memory camcorder with the USB cable on your PC. When you install the DV Media Pro
software on your Windows computer, you can enjoy the following operations by connecting your
memory camcorder to your computer via a USB cable.
View movie recordings on PC: DV Driver - DirectXg.0 - Video Codec
PC camersVUSB streaming function: DV Driver - DirectXg.0 - Video Codec
Before you start!
Turn on your PC. Exit all other applications running.
® Insert the provided CD into the CD ROM drive.
The setup screen appears automatically soon after the CD was inserted.
If the setup screen does not appear, click on "Start" on the bottom left corner and select "Run" to display a
dialog. Type "D:\autorun.exe" and then press ENTER, if your CD ROM drive is mapped to "D:Drive".
Installinq
Driver
- DV Driver and DirectX
9.0
DV Driver is a software driver that is required to support establishing connection to a PC.
(if it is not installed, some functions will not be supported.)
1.
2.
3.
Click on "DV Driver" on the setup screen.
® Driver software required is irlstalled automatically. Following drivers will be irlstalled:
USB PC CAMERA driver
USB streaming driver (USB video transfer)
Click on "Confirm" to finish driver installation.
if the "Direct)( 9.0" is not installed, it is installed automatically after setting "DV Driver".
® After installing DirectX 9.0, PC needs to be restarted.
If DirectX 9.0 is installed already, there is no need to restart the PC.
Application
Installation
- Video
Codec
Click on "Video Codec" on the setup screen.
Video Codec is required to play movie files recorded by this memory camcorder on a PC.
Eng }si_ 71
t JSB ntQri cQ
Application
1.
Instalation
- Quick
Time
Click "Quick Time" on the setup screen.
® QuickTime is Apple's technology for handling movie, sound, animation,
graphics, text, music, and even 360 degree virtual reality (VR) scenes.
CyberLink Power Director is software for easily editing MPEG, AVI, and other video files, still images, and other contents
for creating a movie. This software has an interface that alows editing in either time line or storyboard mode, maintains
superior image quality, uses SVRT for high speed rendering, and has a host of other advanced video editing features.
Settinq
up CvberLink
Power
Director
® After inserting another CD("Cyberlink Power Director"), the setup screen displays
automatically. Follow the instruction to start installation.
This manual only refers to software installation and PC connection.
For more details on software, refer to the "Online help/Readme"
on the CyberLink Power Director CD.
. Please install by using the Software CD that came with
this memory oamcorder. We do not guarantee compatibility with other CDs.
• For movie playback on a PC, install software in this order :
DV Driver - DirectX 9.0 - Video Codec
• For movie editing, use the CyberLink Power Director.
• For PC Cam use, instal software in this order:
DV Driver - DirectX 9.0 - Video Codec
• You have to instal "DV Driver", "Video Codec" and "DirectX 9.0" to run
DV Media Pro properly.
• During installation, if the Microsoft LOGO test warning is shown, just click 'Continue(C).'
• If a message saying "Digital Signature not found" or something similar appears,
ignore the message and continue with the installation.
72 English
CONNECTING THE USB CABLE
Connect the USB cable to copy movie images from the camcorder
to the PC and vice versa.
You can use various other functions with USB connection.
(as a PC camera, data storage, etc.)
1. Set the "USB Connect"
to "Mass Storage."
_page
PC
Memory camcorder
i_8
68
2. Connect the memory camcorder to the PC with a USB cable.
USBCabb
_,.,_
, Don't apply excessive force when inserting or extracting a USB cable into/from a USB jack.
* We recommended using the camcorder's AC adapter as the power supply instead of the battery pack.
* When the USB cable is connected, turning the camcorder on or off the camcorder may cause the PC to
malfunction.
Disconnecting
the
USB
cable
Before loading or unloading recording mediums or turning off the PC, first disconnect the USB cable and turn off the
memory camcorder.
After completing the data transmission, you must disconnect the cable in the following way:
1. Click the "Unplug or eject hardware" icon on the task tray.
2. Select "USB Mass Storage Device" or "USB Disk," and then click "Stop."
3. Click "OK."
4. Disconnect the USB cable from the memory camcorder and PC.
* If you disconnect the USB cable from the PC or the memory camcorder while transferring,
the data transmission will stop and the data may be damaged.
• If you connect the USB cable to a PC via a USB HUB or simultaneously connect the USB cable
along with other USB devices, the memory camcorder may not work properly. If this occurs, remove all USB
devices from the PC and reconnect the memory camcorder.
}ng }si_ 73
t JSB ntQA cQ
VIEWING THE CONTENTS OF STORAGE MEDIA
1.
2.
3.
4.
Slide the POWER switch downward to turn on the memory camcorder.
Select the desired recording medium. _page 32 (SC MX10A/MX10AU only)
Make sure that there is a memory card in the memory camcorder
(SC MX10/MX10P only).
Connect the memory camcorder to the PC with a USB cable. _page
Check out the USB connection on the LCD monitor.
73
When using Windows® XP,Vista version :
The "Removable Disk" window appears on the PC's screen after a moment.
Select "Open folders to view files using Windows Explorer" and click "OK."
When using Windows® 2000:
a. Doubbclck the "My Computer" icon on the desktop.
The "Removable Disk" icon which represents the storage media in the
memory camcorder appears in the "My Computer" window.
b. Doubleclick the "Removable Disk" icon.
The folders in the storage media appear.
- Different file types are stored in different folders.
If the "Removable Disk" window does not appear, confirm the connection
or perform the steps 1 and 2.
Structure
"
,,
of folders and files on the storage media
The folder and file structure for built in memory or memory card is as follows.
Don't arbitrarily change or remove the folder or file name. It may not be playable.
Movie images file (1)
The SD quality movie images have SDV ####.AVl format. The file number
automatically increases when a new movie image fib is created. When the
number exceeds 9,999, a new folder is created and it is stored in SDV 0001 .AVI.
General data file (2)
It is the place where the user can save general document files as a storage device.
74 En{tiish
11
IC[£1 ii= !
..........
='_!ii;111!iliiii!IiI
,
.=
i';iiiiii:+='"
i .....
>s
iii 's-li£i;II{)iliiI
.: _,. £
isi
[_
o When 999 folders and 9,999 files are recorded, you cannot record any more.
In this case, format your storage media. (memory card, etc.)
You may modify the name of a file/folder stored in the memory card using a PC.
This memory camcorder may not recognize modified files.
TRANSFERRING FILES FROM THE MEMORY CAMCORDER TO YOUR PC
You can copy the movie images to your PC.
1.
Execute the procedure in "Viewing the contents of storage media." Uw.page74
2.
The folders in the storage media appear.
Create a new folder, enter the folder name, and then double click it.
3.
Select the folder to copy, and then drag and drop it into the destination folder.
® The folder is copied from the storage media (memory card (all models) or internal
memory (SC MX10A/MX10AU) to the PC.
® Saving the wrong kinds of files in a recording medium or deleting files or folders
from a recording medium can cause problems with the operation of the memory
camcorder. When it is necessary to delete a file from a storage media (memory card
(all models) or internal memory (SC MX10A/MX10AU), delete it through the memory
camcorder. Also, do not move or rename folders and files within the medium on PC.
Playing
Back
Files on the PC
Movie images
Use the "DV Media Pro".
You can install this software from the provided CD.
For more details of "Video Codec". _page 71
[_
When playing back a file in the recording medium on your PC, copy the file to your PC, and then play it back.
If video file is played back directly from recording medium (i.e. the memory camcorder is connected
through USB to your PC), it may be not played back properly due to the inadequate processing speeds or
other problems.
Eng }si_ 75
t JSB ntQri cQ
USING THE PC CAM FUNCTION
You can use your memory camcerder as a PC camera for video chatting, video conference and ether PC camera applications.
Before you start!
For PC Cam use, you must install the DV Driver. _,_page 70
1.
2.
3.
4.
5.
6.
7.
Slide the POWER switch downward to turn on the memory camcorder.
® The Movie Record mode screen appears.
Press the MENU button and select the "Settings".
_._page 62
® The Settings screen appears.
Press the Control button ( </_)
to select "USB Connect".
Press the Control button (A/V)
to select "PC Cam" and then
press the OK button.
Turn on your PC.
Connect the memory camcorder to your PC with the USB cable.
The memory camcorder can be used as a PC Cam for programs such as
Windows Messenger.
Various applications take advantage of the "PC Cam" function.
Refer to respective product documentation for further details.
When finished, disconnect the USB cable.
* We recommended using the AC Power Adapter during data transfer to avoid unintended power outages.
• When the USB port connection is changed, it may require DV Driver re installation. _,_page 71
• If you connect more than two USB devices to a single PC or use a hub for USB connection,
the PC camera function may not work properly.
• You may see a popup message for compatibility confirmation, depending on the PC specification.
Press "Continue" and follow the on screen instructions to complete the installation.
• If the DV Media Pro is not properly installed on your PC, during connection, you may see the Found
New Hardware Wizard on the screen during connection. Follow the on screen instructions to complete
the installation.
76 English
connectmon
i
You call view the recorded movies on a large screen by connecting the memory camcorder to a TV.
VIEWING ON TV SCREEN
To playback your recordings, the television must be NTSC compatible. _
Connecting
page 80
to a IV
_orm_w
Use the provided multi-AV cable to connect the memory
camcorder to a TV as follows:
1.
Connect the end of the Multi AV cable with the single plug
to the AV jack of the camcorder.
2. Connect the other end with S Video or Video (yellow) and
left(white)/right(red) audio cables to the TV.
_*
Before
make sure
that cause
the volume
on TV
is turnedconnecting,
down: forgetting
this may
feedback
from
the TW speakers,
* Carefully connect the input and output cables to the
corresponding connections on the device the memory
camcorder is being used with.
usa the S-Vide_
Stereo TV with
S-VIDEO
Jack
Stereo
TV
Mono
TV
1.
Turn onon
the TV
TV and
set the input selector to the Input
w
Viewing
Screen
connection the memory camcorder is connected to.
n_d_ _ _Y_,o_ _
@
This is often referred to as "line".
_ _
Refer to the TV instruction manual for how to switch the
Wh_t_
i
TV input.
2. Turn the memory camcorder on.
Slide the POWER switch downward and press the MODE button to set Player (liE]). _ page 21
The image from the memory camcorder will appear on the TV screen.
You can also monitor the image on the LCD screen of the memory camcorder.
3. Perform playback. You can perform playback, recording or make settings in the menu while viewing on your TV screen.
* When a copy protected movie is played back. no image will appear on TV screen.
* Information that the memory camcorder is recording will appear on the TV screen: You can also display orlly
part of information or switch off ft?e display. Refer to "TURNING THE SCREEN INDICATORS ON/OFF ( 11:31
)"
on page 25. and press the IQI / ZCHECKbutton to switch the display status.
nglish
77
i
RECORDING (DUBBING) IMAGES ON OTHER VIDEO DEVICES
You can record (dub) images played back on this
memory camcorder, onto other video devices.
Use the multi AV cable(provided) to connect the
memory camcorder to another video device as
shown in the following figure:
1.
2.
3.
Press the MODE button to set Player( [] ).
_page 21
Choose the recorded (dubbed) movie on the
thumbnail view and then press the OK button.
Press the record button on the connected device.
Memo ry Carncorde[
VCRs or DVD/HDD
recoraers
--
INPUT--_
Multi-AV cable
The memory camcorder will start playback
and the recording device will record (dub) it.
• Using S VIDEO will deliver clearer images.
• Be sure to use the AC adaptor to power the memory camcorder to prevent battery power from shutting off
during recording on another video device.
78 Er giish
MAINTENANCE
Your memory camcorder is a product of superior design and craftsmanship and should be treated with care.
The suggestions below will help you fulfill any warranty obligations and allow you to enjoy this product for many years.
O For safekeeping of the memory camcorder, turn off the memory camcorder.
Remove the battery pack and AC power adaptor. _,_page 13
Remove the memory card. _,_page 32
Cautions on Storing
Do not leave the memory, camcorder
of time:
in a place where the temperature
is very high for a long period
The temperature inside a closed vehicle or trunk can become very high in a hot season. If you leave the memory
camcorder in such a place, it could malfunction or the case could be damaged. Do not expose the memory
camcorder to direct sunlight or place it near a heater.
Do not store the memory camcorder in a place where the humidity is high or in a dusty place:
Dust entering the memory camcorder could cause malfunctions. If humidity is high, the lens could become moldy,
and the memory camcorder could become inoperative. It is recommended that you put the memory camcorder in
a box together with a desiccant when storing it in a closet, etc.
® Do not store the memory camcorder
This could cause malfunctions.
in a place subject
to strong magnetism
or intense vibrations:
® Detach the battery pack from the memory camcorder and store it in a cool place:
Leaving the battery pack attached or storing it at high temperature could shorten its life.
Cleaning
the
memory
camcorder
O Before cleaning, turn off the memory
® To clean the exterior
camcorder
and remove
the battery
pack and AC power adapter.
Wipe gently with a soft dry cloth. Do not apply excessive force when cleaning, gently rub the surface.
Do not use benzene or thinner to clean the camcorder. The coating of exterior could peel off or the case could
deteriorate.
Er giish 79
To clean the LCD monitor
Wipe gently with a soft dry cloth. Be careful not to damage the monitor.
To clean the lens
o
o
Use all optional air blower to blow out dirt and other small object. Do not wipe the lens with cloth or your fingers.
If necessary, wipe gently with lens cleaning paper.
Mold may form if the lens is left dirty.
if the lens looks dimmer, turn off the memory camcorder and leave it for about 1 hour.
ADDITIONAL INFORMATION
Using your memory camcorder abroad
• Each country or region has its own electric and color systems.
Before using your memory camcorder abroad, check the following items.
Power sources
Tile provided AC adapter features automatic voltage selection in the AC range from 110 V to 240 V.
You can use your camcorder in any countries/regions using the AC power adaptor supplied with your camcorder
within the AC 100 V to 240 V, 50/60 Hz range.
Use a commercially available AC plug adaptor, if necessary, depending on the design of the wall outlet.
About TV color systems
Your camcorder is an NTSC-system based camcorder.
If you want to view your recordings on a TV or to copy it to an external device, it must be an NTSC-system based
TV or an external device having the appropriate Audio/Video jacks. Otherwise, you may need to use a separate
video format transcoder (NTSC PAL format converter).
e
•
NTSC-Compatible
Countries / Regions
Bahamas, Canada, Central America, Japan, Mexico, Philippines, Korea, Taiwan, United States of America, etc.
PAL-Compatible
Countries/Regions
Australia, Austria, Belgium, Bulgaria, China, CIS, Czech Republic, Denmark, Egypt, Finland, France, Germany,
Greece, Great Britain, Holland, Hong Kong, Hungary, India, Iran, Iraq, Kuwait, Libya, Malaysia, Mauritius, Norway,
Romania, Saudi Arabia, Singapore, SIovak Republic, Spain, Sweden, Switzerland, Syria, Thailand, Tunisia, etc.
80 Er 9iish
I
I
I
I
I
troLAbhootina
_J
TROUBLESHOOTING
O Before contacting
a Sarnsung authorized
They may save you the time and expense
Warning
indicators
and
service center, perform the following
of an unnecessary call.
simple
checks.
messages
Power source
InfOrms that,**
_ow Batter,
Auto Power Off
The battery pack is almost discharged.
If no button is pressed for about 5
minutes, the memory camcorder is
automatically turned off.
("Auto Power Off"}.
'
Action
Change to a charged one or use
AC adaptor.
Charge the battery pack.
To disable this option, change the
setting of "Auto Power Off" to
"Off" _page 65
English
81
troLAbhootinq
_J
Storage
media
Mees_
Recording
82 English
Action
Memor_ --ul
There is not enough space to record
on built in memory.
Delete unnecessary files on tile
built in memory. (SC-MX10NMX10AU)
Use a memory card.
nsert Card
There is no memory card inserted in
the card slot.
Insert a memory card.
Use the built in memory.
(SC MX10A/MX10AU)
Card Fu
There is not enough space to record
on memory card.
Delete unnecessary files on the
memory card.
Use the built in memory.
(SC MX10A/MX10AU)
Card Error
The memory card is corrupted.
Format the memory card or replace
it with a new one.
The memory card is not supported in
this camcorder.
Change the memory card that we
recommended.
Not SuoDorted Card
Editing files
In_e_ms
that...
CAUTION
When
there
isdew
condensation,
donotusethecamcorder
forawhile
What
isdew
condensation?
,,
Dew condensation happens when a memory camcorder is moved to a place where there is a significant
temperature difference from the previous place. In other words, the water vapor in the air turns into dew
because of the temperature difference, and it condensates like dew on the external or internal lenses of
the memory camcorder and on the reflection lens.
When this happens, you temporarily may not use the record or play functions of the memory camcorder.
Also, it may cause a malfunction or damage to the memory camcorder when using the device with the
power on while there is dew condensation.
What can I do?
,,
Turn the power off and detach the battery pack, and leave it in a dry area for 1,_2 hours before using it.
When does the dew condensation occur?
When the device is relocated to a place with a higher temperature than the previous location, or when
using it in a hot area suddenly, it will cause condensation.
When recording outside in cold weather during the winter and then using it in indoors.
When recording outside in hot weather after being indoors or inside a car where the AC was running.
Note before sending your camcorder for repair.
,, If these instructions do not solve your problem, contact your nearest Samsung authorized service center.
,, Depending on the problem, current hard disk may need to be initialized or replaced and the data will be
deleted. Be sure to back up the data on the hard disk on the other storage media before sending your
camcorder to repair. Samsung cannot guarantee any loss of your data.
English
83
troLAb
e hootina
_J
G If you encounter
any problem using your camcorder,
check the following before requesting service.
If these instructions do not solve your problem, contact the nearest Samsung authorized service
center.
Symptoms
and solutions
Power
,,
The cower aces no_ tur
or
,,
,,
,,
o
The Dower au_oma_ca ly turns off.
"
Power cannot De turnea off.
The battery paCK ISqUiCKly
ahscnaraea.
84 English
,,
The battery pack may not be installed on your memory camcorder. Insert a
battery pack to the memory camcorder.
The inserted battery pack may be discharged. Charge the battery pack or
replace it with a charged one.
If you use an AC power adaptor, make sure it is properly connected to the
wall outlet.
Your memory camcorder has been left for more than 5 minutes without any
button operation. To turn on your memory camcorder, press the Record
start/stop
button.
Is "Auto Power Off" set to "On"?
If no button is pressed for about 5 minutes, the memory camcorder is
automatically turned off ( "Auto Power Off"). To disable this option,
change the setting of "Auto Power Off" to "Off" m,_page 65
The battery pack is almost discharged. Charge the battery pack or replace
it with a charged one.
Remove the battery pack or unplug the AC power adaptor, and connect
the power supply to the camcorder again before turning it on.
The temperature is too low.
® The battery pack is not fully charged. Charge the battery pack again.
_ The battery pack reached its lifespan and cannot be recharged.
Use another battery pack.
Displays
,,
Thescreen
ofq%/or
LCD
screen
displays
distorted
images,
o
Unknown image appears Onthe
LCD screen.
o
All movies recorded with this memory camcorder have 4:3 aspect ratio.
It can occur when recording or viewing a 16:9 ratio image on the LCD
screen. For more details, see the display specifications. _page 55, 61
If you want to display properly on your TV, check out your TV type and set
the proper screen mode (4:3 aspect ratio).
The memory camcorder is in "Demo" mode.
Change the setting "Demo" to "Off". _*page 68
A warning indicator or message appears on the screen. _,_page 81
The afterimag e remains on the
LCD screen.
This occurs if you disconnect the AC power adaptor or remove the battery
pack before turning the power off.
The image 0n the LGD Scree n
looks dark.
Ambient light is too bright. Adjust the brightness and angle of LCD.
Menu
sym#tbrn
Explanati_6/S#lutiOn
.
L4enu items are grayeo out
You canno_ selec_ grayed items in the current recording/playback mode.
There are some functions you cannot activate simultaneously. The following list
;nows examples of unworkable combinations of functions and menu items.
If you want to set the desired functions, do not set the following items first.
<Cannot Use>
Scene Mode(AE)
*
<Because of the following
Exposure (Manual)
setting>
Most of menu items cannot be selected when you set the EASY.Q function.
f there is no storage media inserted, it can not be selected and will be dimmed
_n _ne menu : " Memory Info", "Format", etc.
English
85
troLAb
e hootinq
_J
Recording
Media (Memory card, etc)
Memor', card functions are not
operable
Insert a memory card into your camcorder properly. _page 33
® If you use a memory card formatted on a computer, format it again directly
on your camcorder. U.page 67
mage cannot De ae_etea.
The recorded images are protected. Remove protection from the files and
delete them. _page 59
You cannot delete images protected by another device.
Release the protection of the image on the device.
® Release the lock on the write protect tab of the memory card
(SDHC. standard SD memory card etc). if any. U.page 34
Release the lock on the write protect tab of the memory card
¥ou cannot format the memory
carc
The data f e name is not nalcatea
correcu
8¢ English
(SDHC. standard SD memory card. etc). if any. _*page 34
Copy any important recorded files to your PC before formatting.
Samsung shall not be responsible for any loss of data. (it is recommended
that you copy the data to your PC or other storage media.)
The file may be corrupted.
® The tile format is not supported by your camcorder.
® Only the file name is displayed, if the directory structure does not comply
with the international standard.
Recording
Pressing
theRecording
start/step
star_
_ecora
DUIIO
aces
"
,,
Press the MODE button to set Movie Record mode (_).
There is not enough free space to record on the built in memory or memory
card.
,,
Check if the memory card is write protected or if SDHC memory card is
inserted.
not
g,
The _ctual recoralng time is ess
tnan tne estimated ume
The recordings_ops
automatical,
When recording a SuDJec]
umlnatea D_,Drlgn_ ugnt
vertical lines appear.
,, The internal temperature of your camcorder is unusually high. Turn off your
camcorder and leave it for a while in a cool place.
Your camcorder is damp and moist inside (condensation). Turn off your
camcorder and leave it for about 1 hour in a cool place. _,_page 79
o
o
The recording time is measured under Samsung's standard recording test
conditions and may differ depending on actual use.
When you record an object that moves fast, the actual recording time may
be shorten.
If you make a frequent recording or deletion of files, the performance of the
built in flash memory will deteriorate. In this case, format the built in memory
again.
This is not a malfunction.
English
87
troLAb
e hootinq
_J
Sym m
When
tne
screen
clffect
sur
gnI
is exposed
clunng
ii_}iiii_:ii
¸¸_i_
_i_i_¸_ii_ii_
_i_!_i!
_i
_i
_i
_i
_i_i
_i
_i
_i
_i
_i
_i
_i_i
_i
_i
_i
_i
_i
_i_i
_i
_i
_i
_i
_i
_i_i
_i
_i
_i
_i
_i
_i
_i_i
_i
_i
_i
_i
_i
_i_i
_i
_i
_i
_i
_i
_i_i
_i
_i
_i
_i
_i
_i
_i_i
_i
_i
_i
_i
_i
_i_i
_i
_i
_i
_i
_i
_i_i
_i
_i
_i
_i
_i
_i
_i_i
_i
_i
_i
_i
_i
_i_i
_i
_i
_i
_i
_i
_i
_i_i
_i
_i
_i
_i
_i
_i_i
_i
_i
_i
_i
_i_i!
_!_!:_!II
to
recorolng
tne screen Decomes recl or DlaOK
for an ms-cam.
During recording, tne date/time
aces not alSpla}
This is not a malfunction.
"Date/Time"
is set to "Off". Set the "Date/Time"
to "On". Uw.page64
There is a time difference
Detweer [Be 9oInI where you
eress Recording start/step
DUI[Onaria tne DOIRIwnere tne
recorclea movie SlarlS/SlQDS
-he recording stops
® On your camcorder, there may be a slight time delay between the point
when you press Recording start/stop
button and the actual point where
the recorded movie starts/stops. This is not an error.
® The internal temperature of your camcorder is unusually high. Turn off your
camcorder and leave it for a while in a cool place.
® Your camcorder is damp and moist inside (condensation). Turn off your
camcorder and leave it for about 1 hour in a cool place. U.page 79
88 English
Adjusting
theimage
during
recording
o
Focus
Goes
notadjust
au-[omatlca
,
*
o
This occurs when recording images under a fluorescent lamp, sodium lamp,
or mercury lamp. Cancel "Scene Mode (AE}" to minimize this phenomena.
_,_page 48
•
White balance adjustment is required. Set proper "White Balance".
_,_page 49
•
A warning indicator or message appears oil the screen.
The image appears too Dngnt or
flickering, or cnanges ir comor
Color balance of image is no1
natural.
URKRQW
qCilCator
aE oears or
the screen.
The backlight
function.
Set "Focus" to "Auto". _*page 53
The recording conditions are not suitable for auto focus. Adjust the focus
manually. _*page 53
The lens is dusty on the surface. Clear the lens and check the focus.
Recording is being made in a dark place. Light up to brighten the place.
_unctiQn does not
While recording in EASY.Q mode, the backlight function does not work.
English
89
troLAb
e hootinq
_J
Playback
on your camcorder
Pressing the
Play/Pause button does
not start playback.
The Skip or Search
function does not work
properly.
Playback is interrupted
unexpectedly.
Playback
on other devices
*
Press the MODE button to set Movie Play mode. ( _
)
Irqage files recorded using other device rqay not be played on your rqerqory carqcorder.
Select a proper recording medium.
,,
If the temperature inside the camcorder is too high, it can not function properly.
Turn the camcorder off, wait for a few moments, and turn it on again.
,,
Check the AC adaptor or battery pack is properly connected and stable.
(TV, etc.)
Connect the audio line of the multi AV cable to your camcorder or to the connected
device (TV, DVD recorder, etc). (Red color right, White color left)
The multi AV cable is not connected properly. Make sure that the multi AV cable is
connected to the proper jack. _,opage 77
When you are using the S VIDEO cable, make sure to connect red and white plugs
of your multi AV cable separately since S VIDEO cable does not support audio.
_,_page 77
You canno_ view tne
"sage or near tne souna
on tne connectea aevice
o
The "sage appears
als[oRed on the 16:9 wide
TV.
90 English
o
All movies recorded with this memory camcorder have 4:3 aspect ratio.
So this happens when viewing recorded movies on a 16:9 wide screen TV.
If you want to display properly on your TV, check out your TV type and set the
proper screen mode (4:3 aspect ratio).
Connecting/Dubbing
withother
devices
(TV,
DVD
player,
etc)
Connecting
toacomputer
The comou-[er
recogRize
does
Install the provided software program. _page 71
Disconnect the USB devices other than the keyboard, the mouse and the
camcorder from the computer.
Disconnect the USB cable from the computer and camcorder, restart the
computer, then connect it again correctly.
no[
your camcorder.
A video codec is needed to play the file recorded on your memory camcorder.
Install the software provided with your camcorder _*page 71.
Please install by using the software CD that came with this camcorder.
We do not guarantee compatibility for different CD versions.
Make sure you insert the connector in the correct direction, and connect the USB
cable to the USB jack on your camcorder firmly.
Disconnect the cable from the computer and camcorder, restart the computer.
And connect it again properly.
Cannot play _ moviefile
properly o a PC.
Cannot use the c "ovlded
software, "DV Media Pro',
on a Macintosh computer,
•
•
You cannot use "DV Media Pro" for a Macintosh computer.
This camcorder is recognized just as a removable storage device on the Macintosh
computer. (Mac OS 10.3 or above supported.)
English
91
troLAb
e hootin<
_J
"DV Media Pro'! does not
function properly,
The image Or Sound On
your camc0rder is not
played on your computer
The playback screen is
paused or distorted,
Overall operations
92 English
.
Exit the "DV Media Pro" program, and restart the Windows computer.
Movie playback or sound may stop temporarily depending on your computer.
®
The movie or sound copied to your computer is not affected.
®
If your camcorder is connected to a computer that does not support Hi speed
USB(USB2.0), the images or sound may not be played back correctly.
The images and sound is copied to your computer is not affected.
* Check the system requirements to play a movie. _._page 69
® Exit other all applications running on the current computer.
pecification
Model Name: SC-MX10/SC-MX10P/SC-MX10A/SC-MX10AU
Video siqnal
Picture compression format
Audio compression format
Recordinq quality
Imaqe device
Lens
Focal Length
Minimum Illumination
Filter diameter
Size/dot number
LCD screen method
System
NTSC
MPEG4 ASP Format
ADPCM
Super Fine (about 12Mbps), Fine (about 10Mbps/, Normal (about 8Mbps/
CCD/Charqe Coupled Device)/Max/Effective : 680K/350K pixels)
F1.6 to 4.3, 34x (Optical), 1200x (Diqital) Electronic zoom lens
2.3,-78.2mm
3.0 Lux
©30
LCD screen
2.7 inches wide, 112k
1.6 nter aced scan, LCD pane/TFT actve matrix system
Connectors
S Video output
Composite video out
Audio output
USB output
Y:IV (p_p), 75_, analog
C:0.286Vp p, 75[_, analog
1.0V (p p), 75_, analog
( 7.5dBm 47K[_, analog, stereo/
m n USB B type USB2.0 H qh Speed
General
Power soume
Power souree type
8.4V (Using AC adapter), 7.4V (Using Lithium Ion battery pack)
Power supply (100V,-240V} 50/60Hz, Lithium Ion battery pack
Power consumption
(LCD on/LCD off}
Operating temperature
Operating humidity
Storacle temperature
Dimensions (W x H x D/
Weic_ht
Internal MIC
2.96W, 0.4A / 2.4W (0.3A)
d,_40_ (32°F,_104°F)
30% -_80%
2tic ,_60_ ( 4_F ,_ 14dF)
Approx. 2.36" x 2.46" x 4.76" (60mm x 62.5mm x 121 mm)
Approx. 0.611bs (280@ (expect for battery pack or memory card/
Omni directional stereo microphone
These technical specifications and design may be changed without notice.
Er giish 93
VY rr Fl
SAMSUNG
LIMITED WARRANTY
SAMSUNG Electronics America Inc. (SEA), warrants that this product is free from defective material and
workmanship.
SEA further warrants that if product fails to operate properly within the specified warranty period and the failure is due
to improper workmanship or defective material, SEA will repair or replace the product at it's option.
All warranty repairs must be performed by a SEA authorized service center. The name and address of the location
nearest you can be obtained by calling toll free: 1 80() SAMSUNG (1 800 726 7864).
Labor
90 days carry in
Parts
1 year
On carry in models, transportation
to and from the service center is the customer's
responsibility.
The original dated sales receipt must be retained by the customer and is the only acceptable proof of purchase.
It must be presented to the authorized service center.
EXCLUSIONS
(WHAT IS NOT COVERED)
This warranty does not cover damage due to accident, fire, flood and/or other acts of God; misuse, incorrect line
voltage, improper installation, improper or unauthorized repairs, commercial use, or damage that occurs in shipping.
Exterior and interior finish, lamps, and glass are not covered under this warranty.
Customer adjustments which are explained in the instruction manual are not covered under the terms of this warran
ty. This warranty will automatically be voided for any unit found with a missing or altered serial number. This warranty
is valid only on products purchased in the United States and Puerto Rico.
Some States do not allow the exclusions or limitations of incidental or consequential damages, or allow limitations on
how long an implied warranty lasts, so the above limitations or exclusions may not apply to you.
This warranty gives you specific legal rights, and you may also have other rights which vary from State to State.
94Er
giish
Ifyou
have
any
questions
orcomments
relating
toSamsung
products,
please
contact
theSAMSUNG
customer
care
center.
Re_ion
Nor_qAmerica
Count_]
CANADA
MEXICO
USA
BRAZILARGENTINE
CHILE
Customer Care Center
1 800 SAMSUNG (72678641
0/ 800 SAMSUNG/7267894)
1 800 SAMSUNG/7267864/
0800 333 3733
0800/24 42/4004 0000
800 726 7864/SAMSUNG)
0 800 507 7267
1 800 /0 7267
800 6225
1 800 299 00/3
1 800 234 7267
800 7267
1 800 682 3/80
1 800 751 2676
1 800 7267 864
0 800 100 5303
0/ 8000112112
02 20/ 24/8
844 000 844
Distribulor plo Ceskou rei)ubl ku Samsunq Zrt _eska erqaniza_
38 322 887
09 693 79 5_4
3260 SAMSUNG or 08 25 08 65 65 (@0 15/Min)
01805 /2/213 (€ 0,/4/M n)
06 80 SAMSUNG [72678641
800 SAMSUNG (72678641
0032 (0)2 20/ 24/8
0900 20 200 88/€ 010/M n)
231 627 22
0 801 80/88/
80 8 200/28
0800 SAMSUNG [7267861
902/0 I/30
08 585 367 87
0870 SAMSUNG /7267864)
0818717100
0800 7267864
8 800 200 0400
8 800 0% //88
8 800 120 0400
8 800 502 0000
8 800 77777
800 7267
800 7267
1300 362 603
800 8/0 5858, 010 6475 1880
3698 4698
www
www
www
www
www
www
www
www
www
www
www
www
www
www
www
www
www
www
ECUADoRCOSTAR'CA
Lali!/America
EL SALVADOR
GUATEMALA
JAMAICA
PANAMA
PUERTO RICO
REP DOM_NICA
TRIN DAD & TOBAGO
VENEZUELA
COLOMBIA
BELGIUM
CZECH REPUBLIC
DENMARK
FINLAND
FRANCE
GERMANY
HUNGARY
EUroPe
ITALIA
LUXEMBURG
NETHERLANDS
NORWAY
POLAND
PORTUGAL
SLOVAKIA
SPAIN
SWEDEN
UK
Republicof ireland
Switzerland
RUSSIA
CIS
KAZAHSTAN
UZBEKISTAN
UKRAINE
LATVIA
ESTONIA
AUSTRAUA
CHINA
HONG KONG
INDIA
Asa Pacific
Mddle East & Africa
JAPAN
MALAYSIA
PH LIPPINES
SINGAPORE
THAILAND
TAIV_AN
VIETNAM
SOUTH AFRICA
U AE
0800//2
8888
0/20 327 527
1800 88 9999
1800/0 SAMSUNG/7267864)
1800 SAMSUNG 17267864)
1800 29 3232, 02 689 3232
0800 329 999
1 800 588 889
0860 7267864 (SAMSUNG)
800SAMSUNG (7267864}, 8000 4726
slo2ka Wsko_ bva 4,14000 Plaha 4
Web Site
sarr sunq tom/ca
sarr sun# com/rr x
samsunq tom
samsun# com/ar
sarr sunq com/br
sarr sun# tom/el
samsunq com/lat n
samsun# com/lat n
samsunq corn/let r]
sarr sunq tom/let n
samsunq com/lat n
samsunq com/lat n
sarr sunq com/lai n
sarr sunq tom/let n
samsunq com/lat n
samsung com/lat n
samsun# tom co
samsunq tom/be
www samsung com/cz
www
www
www
www
www
www
www
www
www
www
www
www
www
www
www
www
www
www
www
www
www
www
www
www
www
www
www
samsunq
sarr sunq
sarr sunq
samsunq
samsunq
sarr sunq
sarr sunq
samsunq
samsunq
sarr sunq
samsunq
samsunq
samsunq
samsunq
samsunq
samsung
samsung
samsun#
samsung
samsung
samsun#
samsun<
samsung
samsunq
samsunq
samsunq
samsunq
com/dk
com/fi
com/fr
de
com/hu
tom/it
]u
comml
commo
com/pl
com_pt
com/sk
comics
com/se
comluk
comluk
corn/oh
_u
kz
uz
comlur
www
www
www
www
www
www
www
www
www
www
samsunq
samsunq
samsunq
samsunq
samsunq
samsunq
samsunq
samsunq
samsun#
samsunq
comlid
com_ip
tom,my
com_ph
com/sq
com_th
comlh,¢
comNn
com/za
comlmea
totally/index htm
ee
comlau
corn cn
comlhk
If you have any questions
or comments
relating
to Samsung
products, please contact the SAMSUNG customer
center Samsung Electronics America, inc.
1-800-SAMSUNG
care
(726-7864)
ww-_v.samsung.com
RoHS compliant
Our product
complies
Hazardous
Substances
with "The Restriction
in electrical
and we do not use the 6 hazardous
(Pb), Mercury
Biphenyls
(Hg), Hexavalent
materials-
Chromium
(PBBs), Poly Brominated
our products.
Of the use of cedain
and electronic
equipment",
Cadmium(Cd),
Lead
(Cr +6), Poly Brominated
Diphenyl
Ethers(PBDEs)-
in
Code No. AD68 01307A
00