1
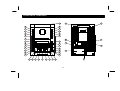
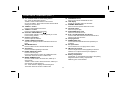
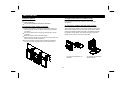
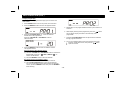
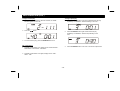
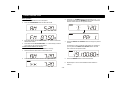
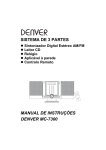
Digital AM/FM Stereo Tuner
CD/MP3 Player
Clock
Wall Mountable
Remote Control
WWW.denver-electronics.com
IMPORTANT NOTES
SAFETY CERTIFICATION
* Avoid placing the unit in locations described below:
CAUTION
- Places exposed to direct sunlight or close to heat radiating
appliances such as electric heaters.
RISK OF ELECTRIC SHOCK
DO NOT OPEN
- On top of other stereo equipment that radiates too much heat.
- Places lacking ventilation or dusty places.
CAUTION: TO REDUCE THE RISK OF ELECTRIC SHOCK,
DO NOT REMOVE COVER.
NO USER-SERVICEABLE PARTS INSIDE.
REFER SERVICING TO QUALIFIED SERVICE PERSONNEL
- Places subject to constant vibration.
- Humid or moist places.
* Do not attempt to clean this unit with chemical solvents as this
might damage the finish. Use a clean dry cloth.
DANGEROUS VOLTAGE
Uninsulated Dangerous voltage, that may be of sufficient
magnitude to constitute a risk of electric shock to
persons, is present within this product's enclosure.
* Be careful not to obstruct the ventilation opening on the rear panel.
* Operate the controls land switches as described in the manual.
* Before turning the power switch on for the first time, make certain all
connecting cords and power cord are properly installed.
ATTENTION
The Owner's Manual contains important Operating and
maintenance instructions.
For your safely, it is necessary to refer to the manual.
* When moving the set, be sure to first pull out the power plug and
remove cords connected to other equipment.
CAUTION:
When operating this unit on 230V mains supply, please note that when
the power switch is in the off mode, this does not disconnect the unit
from the mains supply, However, please be assured that it is perfectly
safe to leave the unit connected to the mains supply.
WARNING: TO PREVENT FIRE OR SHOCK HAZARD, DO NOT
EXPOSE THIS APPLIANCE TO RAIN OR MOISTURE.
THIS SYMBOL MEANS THAT THIS UNIT IS DOUBLE
INSULATED AN EARTH CONNECTION IS NOT REQUIRED.
-1-
LOCATION OF CONTROLS
23
1
24
2
25
3
26
4
27
5
28
6
7
29
8
30
9
31
10
32
11
33
12
34
13
35
14
15
16
17
18
19
20
36
43
37
42
38
39
40
41
21 22
-2-
LOCATION OF CONTROLS (cont. .)
1. SNOOZE Button
Press the SNOOZE button to turn off the sound temporarily
(for about 5 minutes). (Operates in conjunction with the
wake-up timer.)
10. SURROUND button
Press to turn the surround sound ON or OFF.
11. FOLDER DN button
Press to retrieve MP3 folder down.
2. SLEEP / HOUR Button
Press for “sleep to Radio or CD.”
Select 12/24 hour format.
12. MUTE button
Press to temporarily reduce listening volume.
3. TIMER button
Press to set wake-up and shut-off time.
13. HEADPHONE Jack
Connect a pair of stereo headphone (not supplied)
for private listening.
4. PRESET UP / REPEAT button
TUNER - Press to retrieve radio station memories presets.
CD - Press to repeat one or all tracks while a CD plays.
14. FOLDER UP button
Press to retrieve MP3 folder up.
5. MEMORY / CLK-ADJ button
TUNER - Press to preset stations.
CD - Press to program tracks.
CLOCK - Press to set hours and minutes.
15. BASS / + button
Press to increase the bass level.
16. BASS / - button
Press to reduce the bass level.
6. POWER Standby Indicator
This indicator lights when AC power cord is connected
properly or fresh batteries are installed and unit is OFF.
17. CD / TUNING / SKIP downward setting button
CD - Press to skip/search backward.
TUNER - Press to radio stations scan downward.
CLOCK or TIMER - Press select the time downward
while setting the clock or timer.
7. POWER On / Off Button
Press to turn the power ON or OFF-Standby.
8. REMOTE Control Sensor
Receives infrared data signals from the remote control.
18. VOLUME Control knob
Turn left or right to adjust sound level up or down.
9. BACKLIGHT On / Off Button
Press this button to turn LCD display backlight on or off.
-3-
LOCATION OF CONTROLS (cont. .)
19. CD / TUNING / SKIP forward setting button
CD - Press to skip/search forward.
TUNER - Press to radio stations scan forward.
CLOCK or TIMER - Press select the time forward while
setting the clock or timer.
20. TREBLE / - button
Press to reduce treble sound level.
21. TREBLE / + button
Press to increase treble sound level.
)
22. CD PLAY / PAUSE Button (
Press to begin CD play, to stop temporarily or to scan
tuner memory presets.
23. CD door open button
Press to open the CD door.
24. TUNER / BAND select button
Sets to tuner (radio) mode and selects the AM or FM
band.
25. MP3 MODE button
Press to select TITLE or ALBUM at MP3 mode.
26. AUX button
Press to activate operating mode AUX.
27. INTRO / MONO-ST. button
Press to CD Intro play.
Press to select Stereo or Mono at TUNER FM mode.
This button does not function in MP3 mode.
28. MODE / REMAIN button
CLOCK - Press mode to set clock time, wake-up or
shut-off time.
TUNER - Press mode to select clock time, wake-up or
shut-off time of radio frequency.
CD - Press remain to display the remaining time.
This button does not function in MP3 mode.
29. SUREWAKE button
Press to turn ON the SureWake function.
30. LCD display
Shows the operating status in all modes.
31. DYNAMIC BASS button
Press to turn the dynamic bass ON or OFF.
32. CD STOP button
Press to stop CD play.
33. AUX IN MINI Stereo Jack
AUX IN for external sources
34. & 35. Left and Right AUX OUT Socket
Connect with other external musical instruments to
perform AUX OUT functions.
36. Carrying Recess
37. SUBWOOFER Jack
To connect with external subwoofer speaker (not
included)
38. AC input socket
To connect the AC cord plug into the socket.
39. FM Antenna Terminal
Connect single antenna wire (supplied) to terminal
marked 75Ωor dipole antenna (not supplied) to
terminals marked 300Ω
40. Battery compartment
Install eight “C” size batteries according to the polarity
diagram inside the battery compartment.
Alkaline type is recommended.
-4-
LOCATION OF CONTROLS (cont. .)
41. Left channel speaker terminal
Connect the left speaker cable here.
1.
2.
Tuner - To recall preset stations
CD - To recall tracks.
For 1-9, press 0 and 1-9 buttons.
For 10, press 1 and then “0”
For 11 - 19, press 1 and then 1 - 9.
For 20, press 2 and then “0”
For 21 - 29, press 2 and then 1 - 9.
For 30, press 3 and then “0”
42. Right channel speaker terminal
Connect the right speaker cable here.
43. Slot for Wall-Mounting Bracket
Used to connect the mounting (included) to
mount the unit on the wall.
3.
REMOTE CONTROL
4.
1
12
13
14
15
16
17
18
19
10
Power ON/OFF - Standby button
Program select buttons
11
12
13
14
15
16
17
5.
6.
7.
8.
9.
10.
11.
12.
13.
18
19
20
14.
21
15.
16.
17.
18.
19.
20.
21.
-5-
MEM/CLK-ADJ: CD - Use to program CD tracks for
programmed play / TUNER - Use to programmed preset
memory / CLK-ADJ - Press to set hours and minutes
RANDOM/PRESET DN: CD Random play / Tuner - To select
Preset down station
MP3 MODE: Press to select TITLE or ALBUM at MP3 mode
AUX: Press to activate operating mode AUX
SLEEP/HOUR: Press to select the sleep/hour
CD - Skip/Search backward / TUNER - Tuning down
CD - Skip/Search forward / TUNER - Tuning up
VOLUME: Volume up or down
MUTE: Muting ON/OFF
INTRO/MONO-ST.: CD Intro play / Press to select Stereo or
Mono at TUNER FM mode
REPEAT/PRESET UP: CD - Repeat play / This button does
not function in MP3 mode - To select
Preset up station
REMAIN/MODE: CD - Check the remaining and clock
time / TUNER - Check clock and frequency
/ This button does not function in MP3 mode
FOLDER UP: Press to retrieve MP3 folder up
FOLDER DN: Press to retrieve MP3 folder down
BAND/TUNER: Press to select the AM/FM band in Tuner
mode / Press to select the Tuner mode
PLAY/PAUSE: CD Play/Pause
STOP: CD Stop
D-BASS (DYNAMIC BASS) button
Battery Compartment
INSTALLATION
Installation options:
To install center section on a table or shelf:
Wall mount
shelf placement
one or both speakers attached or detached
Insert the base from the back of the unit, push until it clicks
into position.
To connect the speakers with the center section:
To mount the center section on the wall:
Attach left and right speakers to the center section by sliding down
each speaker straight along the side of the center section cabinet.
Connect the left/right speaker lead wires to the speaker terminals.
Pay attention to the polarity. The polarity wires (gray with black
stripe) should connect to the red color terminals.
Position the bracket on the wall (as shown below) where you
want to hang the center unit. Drill 2 holes slightly undersized
for a firm fit.
Secure the bracket on the wall using 2 dowels and 2 screws
(supplied)
Mount the center unit onto the wall bracket.
Make sure the mounting tab on the center unit fits securely into
the mounting slot on the wall bracket.
Screws and plastic dowels are also provided for speakers if
they are to be wall-mounted away from the center section.
TO ATTACH THE MAIN UNIT TO
THE BASE
-6-
TO RELEASE THE MAIN UNIT
FROM THE BASE
GENERAL OPERATION
Power on
To set the clock
When power is connected for the first time, or if the power cord
was unplugged and reconnected.
1. Press the POWER button to turn the unit off “standby”.
2. Press the MEMORY button ONCE. The Minute segments display
“00”. The Hour segments flash continuously.
Note: Press the SLEEP/HOUR button to select 24 hour format.
Clock time won’t be showed AM or PM if select 24 hour format.
1. The STANDBY LED lights, and the LCD panel appears as follows
2. Press the POWER button. The STANDBY LED turns off and the
unit defaults to the tuner function, FM band.
3. Press the CD-TUNING-SKIP + or - button to select the desired
hour.
4. Press the MEMORY button again and the minute segments flash.
Afterward, when the POWER is turned on, the previously chosen
function will be selected.
5. Press the CD-TUNING-SKIP + or - button to select the desired
minute.
6. Press the MEMORY button once more. The flashing stops and
the time is set.
-7-
CD OPERATION
Basic operation
1.
Press POWER button to turn on the power.
2.
Open the CD door, display shows “OPEN”, then load the Disc
with the label side up and press it onto the spindle until it
“CLICKS” on the central support of the compartment. Close the
door.
OPEN
LOAD
POSITION
If there is no disc in the CD compartment and the CD button is
pressed, the LCD will show “NO DISC.”
5.
Adjust the VOLUME control to a comfortable level.
6.
Press and release the CD-TUNER-SKIP + or - button to skip to the
desired track.
7.
Press and hold the CD-TUNER-SKIP + or - button to search for the
desired section within a track.
8.
Press the
button to pause temporarily. The LCD will appear
as shown below.
CLOSE
Step 1 - Push the CD door open button to open CD door.
Step 2 - Loading disc as shown.
Step 3 - Be sure that disc is located in proper position.
Step 4 - Push CD door close.
3.
4.
The disc will spin and the unit will read, display shows
“READING”, the display will show the total number of tracks and
the playing time of the disc. Press the CD-play/pause button
once. The display will show the first track number on the disc,
then indicate the elapsed time as shown, and play will start.
Press
9.
-8-
again to resume.
Press the STOP button to stop playing. The display will show the
total number of tracks and the playing time of the disc.
CD OPERATION (cont.)
To begin program play
5. Repeat steps 3-4 to program additional tracks up to a maximum of
32 tracks.
The CD player can be programmed to play up to 32 tracks in the
order desired.
6. While display showing tracks programmed, press the
The CD player will play the tracks in the order they were
programmed.
1. Press POWER button to turn on the power, then load a disc.
2. Press the MEMORY button until the LCD appears follows:
button.
7. Press the CD-TUNING-SKIP button to skip forward or backward
through programmed tracks.
8. Any on of the following actions will cancel program play mode.
Press the STOP button twice, then press the
button.
Open the CD door
3. Press the CD-TUNING-SKIP + or - button to select the
desired track to be programmed.
4. Press the MEMORY button to store the selection.
When operate the Remote Control, you must press the “0” +
NUMBER button (for example: 01, 02 …) then press the MEMORY
button to store the selection.
-9-
CD OPERATION (cont.)
To begin random play
To begin repeat play
1. Press the RANDOM button by Remote Handset, the “RDM”
indicator appears on the LCD.
1.
Press the REPEAT button once and the selected track will play
repeatedly. The “REPEAT” indicator flashing on the LCD.
2.
Press the REPEAT button again and all tracks will play
repeatedly. The “REPEAT” indicator stops flashing on the
LCD.
3.
Press the REPEAT button once more to cancel the repeat mode.
2. Press the
button.
3. To cancel random play, press the RANDOM button once.
-10-
MP3 OPERATION
Basic operation
6. Adjust the VOLUME control to a comfortable level.
1. Press the CD door button to open the CD door.
2. Put a disc inside and then close the CD door. After that,
reading TOC will start.
After reading TOC
7. Press the
button to pause temporarily. The LCD will appear
as shown below.
3. Press the FOLDER UP or DN button to select desired folder.
Press
again to resume.
8. Press the STOP button to stop playing. The display will show the
total number of folder and tracks.
4. Press the CD-TUNING-SKIP + or - button to select desired
track.
5. Press the
button to play the track.
-11-
MP3 OPERATION (cont.)
To begin program play
The CD player can be programmed to play up to 32 tracks in the
order desired.
1. Press POWER button to turn on the power, then load a disc.
2. Press the MEMORY button once the LCD appears follows:
5. Repeat steps 3-4 to program additional tracks up to a maximum of
32 tracks.
6. While display showing tracks programmed, press the
The CD player will play the tracks in the order they were
programmed.
3. Press the CD-TUNING-SKIP + or - button to select the
desired track to be programmed.
Press the “FOLDER DN or FOLDER UP” button to
select the folder.
button.
7. Press the CD-TUNING-SKIP button to skip forward or backward
through programmed tracks.
8. Any on of the following actions will cancel program play mode.
Press the STOP button twice, then press the
button.
Open the CD door
4. Press the MEMORY button to store the selection and the
LCD appears follows:
Store the memory thru Remote control.
1.) Press the MEMORY button once.
2.) Press the “FOLDER UP or FOLDER DN” button to selector the
desired folder. Press the “
SKIP / SEARCH
” to
selector the desired file.
3.) Press the MEMORY button to store the selection.
Re-call the memory thru Remote control
1.) Press the MEMORY button to select the pre-store file.
2.) Press CD-PLAY/PAUSE button to play the pre-store file.
You can’t use the direct access button function thru Remote
control. (Press the MEMORY button then press the NUMBER
button directly.)
-12-
MP3 OPERATION (cont.)
To begin random play
To begin repeat play
1. Press the RANDOM button by Remote Handset, the “RDM”
indicator appears on the LCD.
1.
Press the REPEAT button once and the selected track will play
repeatedly. The “REPEAT” indicator flashing on the LCD.
2.
Press the REPEAT button again and all tracks will play
repeatedly. The “REPEAT” indicator stops flashing on the
LCD.
3.
Press the REPEAT button once more to cancel the repeat mode.
2. Press the
button.
3. To cancel random play, press the RANDOM button once.
ID3 / Folder Name
1. Press MP3 mode button once, display shown “Folder Number Folder Name - File Number - File Name”.
2. Press MP3 mode button once again, display shown “Artist Album - Title”.
-13-
TUNER OPERATION
Basic operation
1.
Press POWER button to turn on the power.
2.
Press the TUNER/BAND button to select AM or FM.
3.
Press and release the CD-TUNING-SKIP + or - button to select the
desired radio station.
4.
Press and hold the CD-TUNING-SKIP + or - button briefly to search
up or down for the next receivable station.
3.
Press the “0” + NUMBER buttons (for example: 01, 02 …) on
the remote then press the MEMORY button again to store the
selection station and the LCD appears follows:
4.
Press the PRESET UP / REPEAT button to assign the present
number.
For example, to store a particular radio station on preset #19,
you can press the PRESET UP / REPEAT button 19 times
The LCD shows the preset number.
To store favorite stations in memory
You can store up to 24 FM and 16 AM stations in memory.
1.
Select the desired radio station as described above.
2.
Press the MEMORY button and the LCD appears follows:
-14-
5.
Press the MEMORY button to store the selection.
6.
Repeat steps 4 and 5 to store additional radio stations in
memory.
TIMER OPERATION
To set the wake-up timer
6.
Press the CD-TUNING-SKIP button to select the timer-off hour.
7.
Press the MEMORY button again. The hour segment stops
flashing, the minute segment flashes.
2. Press the CD-TUNING-SKIP button to select the wake-up
hour.
8.
Press the CD-TUNING-SKIP button to select the timer-off
minute.
3. Press the MEMORY button again. The hour segment stops
flashing, the segment flashes.
9.
Press the MEMORY button to conclude the setting process.
Press MODE / REMAIN button for “Timer Check” readout
appears the “on” and “off” timers on the LCD.
1. Press the power button to turn the unit off “STANDBY”
Press MODE / REMAIN button. The TIMER ON indicator
appears on the LCD and flashes. Press MEMORY button the
hour segment flashes.
10. Press TIMER button once for timer operation. To disable timer
operation, press the TIMER button again. On and off settings will
still be kept in memory for future occasions when timer operation
is desired. (Press the TIMER button again to activate.)
4. Press the CD-TUNING-SKIP button to select the wake-up
minute.
NOTE: The timer will turn on the function last used as follows:
Previously selected radio station
CD - track 1
5. Press the MODE / REMAIN button once. The TIMER OFF
indicator appears and flashing on the LCD. Press MEMORY
button the hour segment flashes.
-15-
TIMER OPERATION
VOLUME CONTROL
SureWake function
Turn the VOLUME knob to get a satisfactory sound level when
you select the desired program.
This feature lets you adjust the night-time listening volume as low or
high as desired without affecting the wake-up volume. In the
morning, SureWake starts the music quietly and then increases it to
room-filling volume to make sure you are awake.
In SUREWAKE mode, within 10 seconds the volume will
gradually increase to a room-filling level. After that, use the
VOLUME knob on the unit or the remote control to set the
volume as desired.
1. Activate the timer as described in the previous section.
2. Press down the SUREWAKE button, “SUREWAKE” displays on
LCD.
3. To de-activate SureWake, press to release the button.
Snooze Function
Sleep-to-music function
1.
When the system turns on at the preset time, you can turn off
the sound temporarily by pressing the SNOOZE button.
The sound will come on again after 5 minutes.
Press the SLEEP button and the LCD displays:
Note: The SNOOZE function can be activated at anytime. If you
activate the snooze function accidentally, you can restore
normal operation by turning the power off, then on again.
The system will remain on for 90 minutes, then turn off
automatically.
2. To decrease the time in 10-minute-increments, press the
SLEEP button and hold until the desired time appears.
3. The SLEEP time will keep about 3 seconds, then go back to
original display.
-16-
TROUBLESHOOTING
Before requesting service, check the chart below for a possible cause of the problem you are experiencing. Some simple checks or a
minor adjustment on your part may eliminate the problem and restore proper operation.
If you are in doubt about some of the check points, or if the remedies indicated in the chart do not solve the problem, please consult your
dealer for instruction.
Problem
Checkpoint
Remedy
No operation
1. Is the AC plug connected?
Are the batteries dead?
2. Is the desired mode selected?
3. Is the disc inserted correctly?
Is the compartment closed?
4. Is the CD lens dirty?
1. Reconnect the AC plug or reinstall the batteries
properly. Change the batteries.
2. Press the desired function button.
3. Insert the disc correctly and close the compartment
lid securely.
4. Clean the CD lens or tape heads.
No display
Is the AC plug connected?
Are fresh batteries installed?
Reconnect the AC plug or replace the batteries.
No sound
1. Are the speakers connected?
2. Is the headphone plugged in firmly?
3. Is the Snooze function activated?
1. Check the speaker connections.
2. Insert the headphone plug into the phone jack firmly.
3. Turn the power off, then on again.
Noise or weak
radio reception
Is the FM antenna connected?
Rotate the unit for better reception (AM), move the FM
antenna wire for better reception (FM)
Volume goes up
Automatically
Is the Sure Wake function off?
Make sure the Sure Wake appears on the LCD
See page 16.
-17-
SPECIFICATIONS
FM Frequency Range
87.5MHz~108MHz / 50kHz Step
AM Frequency Range
522kHz~1611kHz / 9kHz Step
Power Supply (Main Unit)
AC230V, 50Hz
DC 12V (UM2 x 8PCS)
Power Supply (Remote Control)
DC 3V (UM3 x 2PCS)
Instructions on environment protection
DENVER ELECTRONICS
Do not dispose of this product in the usual household garbage at the end of its lifecycle; hand it
over at a collection point for the recycling of electrical and electronic appliances. The symbol on
the product, the instructions for use or the packing will inform about the methods for disposal.
The materials are recyclable as mentioned in this marking. By recycling, material recycling or
other forms of re-utilization of old appliances, you are making an important contribution to protect
our environment.
Please inquire at the community administration for the authorized disposal location.
ALL RIGHTS RESERVED
COPY RIGHT DENVER ELECTRONIC A/S
WWW.denver-electronics.com
18