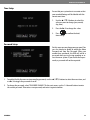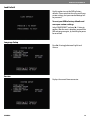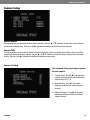
1
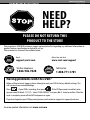
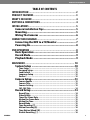
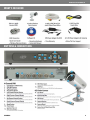
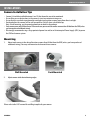
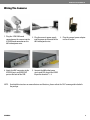
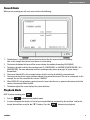
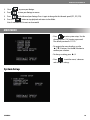
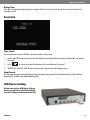
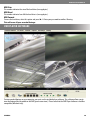
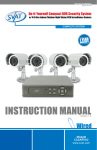
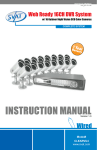
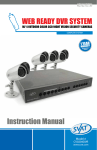
SVAT ELECTRONICS
now you can see
Do-It-Yourself Compact DVR Security System
w/ 4 Hi-Res Indoor/Outdoor Night Vision CCD Surveillance Camera
COMPLETE SYSTEM
INSTRUCTION MANUAL
Version 1.0
Model#
CLEARVU2
www.svat.com
SVAT ELECTRONICS
now you can see
!IMPORTANT! PLEASE READ!
NEED
HELP?
PLEASE DO NOT RETURN THIS
PRODUCT TO THE STORE
Please contact a DEFENDER customer support representative first regarding any additional information on
product features, specifications or help with set-up.
Please contact us via one of the methods below:
Email:
Online live web chat:
www.svat.com/support
[email protected]
Toll free telephone:
Toll free fax:
1.866.946.7828
1.888.771.1701
Having problems with this DVR?
Before calling technical support, please attempt to reset your DVR to factory default settings. This
will not erase your recorded footage.
Press
if your DVR is recording, then press
. If the DVR password is enabled, enter
your password (Default: 111111). Select “LOAD DEFAULT” and press ►/4 twice to confirm. After the
reset is complete, power off the DVR and power on again.
If you have forgotten your DVR password, please email customer support at: [email protected].
For more product information visit www.svat.com
2
SVAT ELECTRONICS
now you can see
PRODUCT WARRANTY & REGISTRATION
Please visit our website at www.svat.com to
apply for your product’s warranty registration.
We take quality very seriously. This is why all of our products come with a one year warranty from the original purchase date
against defects in workmanship and materials.
If you have warranty or support issues please contact us using any of the following methods:
Phone: 866.946.7828
Fax: 888.771.1701
Email: [email protected]
Website: www.svat.com
1.
2.
3.
4.
5.
6.
7.
8.
9.
SVAT Electronics Canada
4080 Montrose Road
Niagara Falls, ON
Canada L2H 1J9
SVAT Electronics USA
2315 Whirlpool St., Unit 333
Niagara Falls, New York
USA 14305
SVAT products are guaranteed for a period of one year from the date of purchase against defects in workmanship and materials. This warranty is limited to the repair, replacement or refund of the purchase price at SVAT’s option.
This warranty becomes void if the product shows evidence of having been misused, mishandled or tampered with contrary to the applicable instruction manual.
Routine cleaning, normal cosmetic and mechanical wear and tear are not covered under the terms of this warranty.
The warranty expressly provided for herein is the sole warranty provided in connection with the product itself and no other warranty, expressed or implied is provided. SVAT assumes no responsibilities for any other claims not specifically mentioned in this warranty.
This warranty does not cover the shipping cost, insurance or any other incidental charges.
You MUST call Defender before sending any product back for repair. You will be sent a Return Authorization form with return instructions. When returning the product for warranty service, please pack it carefully in the original box with all supplied accessories, and enclose your
original receipt or copy, and a brief explanation of the problem (include RA #).
This warranty is valid only in Canada and the continental U.S.
This warranty cannot be re-issued.
Tearing the tamper-proof sticker on the DVR case will void the product warranty.
CAUTION
RISK OF ELECTRIC SHOCK, DO NOT OPEN
TO REDUCE THE RISK OF ELECTRIC SHOCK, DO NOT REMOVE THE COVER (BACK).
NO USER SERVICEABLE PARTS INSIDE. REFER SERVICING TO QUALIFIED SERVICE PERSONNEL.
Graphic Symbol Explanation
The lightning flash with arrowhead symbol, within an equilateral triangle, is intended to alert the user to the presence of
insinuated “dangerous voltage” within the product’s enclosure that may be of sufficient magnitude to constitute a risk of
electric shock to persons.
The exclamation point within an equilateral triangle is intended to alert the user to the presence of important operating
maintenance (servicing) instructions in the literature accompanying the appliance.
CLEARVU2
www.svat.com
SVAT ELECTRONICS
now you can see
TABLE OF CONTENTS
INTRODUCTION................................................................ 2
PRODUCT FEATURES.......................................................... 3
WHAT’S INCLUDED............................................................ 4
BUTTONS & CONNECTIONS................................................. 4
INSTALLATIONS................................................................ 5
Camera Installation Tips......................................... 5
Mounting.............................................................. 5
Wiring The Cameras............................................... 6
CONNECTiON DIAGRAM..................................................... 7
Connecting the DVR to a TV/Monitor........................ 7
Powering On.......................................................... 8
DVR OPERATION............................................................... 8
Basic Operation..................................................... 8
Record Mode......................................................... 9
Playback Mode...................................................... 9
MAIN MENU................................................................... 10
System Setup.......................................................10
Time Setup.................................................................................11
Password Setup..........................................................................11
Load Default..............................................................................12
Language Setup.........................................................................12
Version......................................................................................12
Camera Enable...........................................................................13
Camera Title...............................................................................13
Camera Setting..........................................................................13
CH1-CH4 Title.............................................................................14
Record Type................................................................................14
Video Quality.............................................................................15
Timer Rec Frame Rate.................................................................15
Motion Rec Frame Rate...............................................................15
Motion Rec Time.........................................................................15
Record Mode..............................................................................15
Time Recording [T]......................................................................16
Motion Recording [A] .................................................................16
Time Motion (Mixed) [M].............................................................16
Disable Recording [–]..................................................................16
Camera Setup.......................................................13
Record Setup........................................................14
CLEARVU2
1
SVAT ELECTRONICS
now you can see
Buzzer Setup...................................................... 16
Motion Alert............................................................................. 16
Video Loss Alert........................................................................ 16
HDD Full Alert........................................................................... 16
Buzzer Time............................................................................. 17
Time Search............................................................................. 17
Event Search............................................................................ 17
Format..................................................................................... 18
Copy........................................................................................ 18
Erase Video Data....................................................................... 19
Disk Full................................................................................... 19
HDD Size.................................................................................. 20
HDD Used................................................................................. 20
HDD Format.............................................................................. 20
Event List........................................................... 17
USB Device Setting.............................................. 17
Hard Drive Setup................................................. 19
DVR PLAYER SOFTWARE................................................. 20
Software Installation.......................................... 21
Operation........................................................... 21
Capturing Images/Video to your Computer............ 22
Settings............................................................. 22
DVR PLAYER TROUBLESHOOTING..................................... 23
SPECIFICATIONS............................................................ 24
4 Channel DVR.................................................... 24
CCD Color Camera................................................ 25
INTRODUCTION
Thank-you for purchasing the CLEARVU2 DVR system. Correct installation and use of this system will greatly increase
the security in your home or business. Please read through this manual and carefully follow the instructions to get the
most out of your CLEARVU2 DVR system.
CLEARVU2
2
SVAT ELECTRONICS
now you can see
PRODUCT FEATURES
CLEARVU2
3
SVAT ELECTRONICS
now you can see
WHAT’S INCLUDED
BUTTONS & CONNECTIONS
CLEARVU2
4
SVAT ELECTRONICS
now you can see
INSTALLATIONS
Camera Installation Tips
•
•
•
•
•
•
Camera(s) should be installed between 8 and 13 feet above the area to be monitored.
Ensure there are no obstructions in the camera’s view, to maximize viewing area.
Ensure that the sunshade is positioned to avoid glare and position cameras away from direct sunlight.
Decide whether the camera will be wall-mounted or if it will sit on a desk/table top. Note: If wall mounting, use the mounting hardware included in the package.
Each camera comes with 60 feet of wire. Please make sure you mount the cameras no more than 60 feet from the DVR (unless you have purchased additional wiring).
We strongly recommend using a surge protected power bar and/or an Uninterrupted Power Supply (UPS) to power the DVR and camera system.
Mounting
1. Mount each camera in the desired location no more than 60 feet from the DVR )unless you have purchased
additional wiring). You may wall mount or desk mount these cameras.
Wall Mounted
Desk Mounted
2. Adjust cameras to the desired viewing angles.
Please refer to the CV67 manual for a drilling template for your camera
CLEARVU2
5
SVAT ELECTRONICS
now you can see
Wiring The Cameras
1. Plug the 4 PIN DIN female
2. Plug the camera’s power supply 3. Plug the camera’s power adapter connection on the camera into the into the power jack located on the into an AC outlet.
4 PIN DIN male connection on the 60 ft video/power wire.
60 ft video/power wire.
4. Attach the BNC connectors to the VIDEO IN ports and VIDEO OUT port on the back of the DVR.
5. Connect the 60ft video/power wire’s male RCA plug to the VIDEO IN port for channels 1~4.
NOTE: For detailed instructions on camera features and functions, please refer to the CV67 camera guide included in the package.
CLEARVU2
6
SVAT ELECTRONICS
CONNECTiON DIAGRAM
now you can see
Connecting the DVR to a TV/Monitor
1. Connect one end of the RCA (male) wire to the VIDEO OUT port on the DVR.
2. Attach the other end of the RCA (male) wire to the VIDEO IN port on your TV/monitor.
3. Ensure that your TV/monitor is set to the proper VIDEO INPUT channel.
Note:Refer to the TVs remote control user manual if you cannot change the input
CLEARVU2
7
SVAT ELECTRONICS
now you can see
Powering On
1. The power adapter comes in two pieces. Assemble the power adapter by plugging the power cord into the power brick, as shown on the diagram on the previous page. Plug the three pronged power cord into a power outlet. (It is strongly
recommended to use a surge protected power bar and
Uninterrupted Power Supply (UPS) backup. This will prevent power surges or outages which may cause damage to the DVR or hard drive.) Plug the opposite end of the cord into the DC IN port on the back of the DVR. (Please refer to the diagram on the opposite page)
2. To turn the DVR on and off, use the power switch on your UPS or power bar. This DVR does not have a power switch. This is for your security and helps to prevent other people from accidentally or intentionally turning the DVR off.
3. The DVR will power on and you will see a boot screen. After the DVR initializes, your cameras should be displayed and recording will begin immediately. If you want the DVR to record continuously (24hr recording), no further setup is required. However, you may wish to adjust the system time if it is incorrect (see page 11 System Setup>Time Setup for more details).
Note: If a video signal is not detected on one or more camera channels (VIDEO LOSS), the system will sound an alarm (by default). Press any button to stop the alarm. If video loss occurs on one of your camera channels during recording, the DVR will continue to record. However, if all four camera channels experience video loss, the DVR will
stop recording.
DVR OPERATION
Basic Operation
1. The DVR will automatically display all four camera views in Quad Screen. To view each camera individually, use the ▲/1,◄/2, ▼/3, ►/4 buttons to view cameras 1-4 in full screen. Press the same buttons again to return to full screen.
2. To stop or start recording, press the
button.
3. While recording, you must press the
setup menu.
button first before playing back footage or entering the
4. While in live view (not recording), press the
button to enter playback mode.
5. While in live view (not recording), press the
button to enter the setup menu. If the DVR password is enabled, a password screen will appear. Use the channel buttons (1-4) to enter the password. The default password is (111111).
CLEARVU2
8
SVAT ELECTRONICS
now you can see
Record Mode
While you are recording you will see a screen similar to the following:
1.
2.
3.
4.
5.
6.
7.
The block icon (□) beside each camera channel indicates that the camera channel is recording.
Note :in this example that camera 1 and camera 3 is not recording.
The text on the bottom left corner of the screen indicates the method of recording (EACH/QUAD).
The letter in brackets indicates the recording mode (T=TIME RECORD / A=MOTION ACTIVATED RECORD / M = MIXED RECORD). For more information on these recording modes, please go to page 16 System Setup >
Record Mode.
The channel labeled OFF in this example indicates that the user has disabled this camera channel.
The text on the top of each camera window indicates the name of the camera (This can be customized). In this example, the user has named the first camera “CAMERA1.”
When VIDEO LOSS is displayed on a camera channel, it means that there is no power to the camera or that the camera is disconnected from the DVR.
The bottom right of the screen displays the system date/time.
Playback Mode
NOTE: If you are recording, press
1. Press the
button to enter playback mode.
2. A screen will appear that displays a list of all your recorded footage, organized by date and time. Scroll to the desired date and time using the ▲/1▼/3 buttons. Press the
CLEARVU2
button to start playback.
9
SVAT ELECTRONICS
now you can see
3. Press
to pause your footage.
4. Press
to view your footage in reverse.
5. Press
to fast forward your footage. Press it again to change the fast forward speed (FF1, FF2, FF3).
6. Press the
button to stop playback and return to Live Mode.
Note: A maximum of 63 events can be recorded
MAIN MENU
to enter system setup. Use the • Press
channel buttons (1-4) to enter a password. The default password is 111111.
• To navigate the menu headings, use the ▲/1▼/3 buttons. Use the ►/4 button to confirm your selection.
• To change a setting, press ►/4
• Press
to exit the menu/ submenus and save your settings. System Setup
CLEARVU2
10
SVAT ELECTRONICS
now you can see
Time Setup
Ensure that your system time is accurate so that
your recorded footage will be labeled with the
correct event time.
1. Use the ▲/1▼/3 buttons to select the value you want to change (year, month, day, time).
2. Press the ►/4 to change the value.
to confirm the date/
3. Press
time change
Password Setup
On this screen you can change your password. You
can also choose to disable or enable the Menu
Password and Stop Rec Password. When you
enable these passwords, the DVR will ask for a
password when you try to stop recording or access the menu system. If you disable these passwords, a password will not be requested.
1. To enable/disable the menu or stop recording password, use the ▲/1▼/3 buttons to select the menu item, and use ►/4 to toggle the password on or off.
2. To change the password, select “PASSWORD CHANGE.” On the next screen, use the 1-4 channel buttons to enter
the current password. Then enter a new password, and enter it again to confirm.
CLEARVU2
11
SVAT ELECTRONICS
now you can see
Load Default
Use this option to reset the DVR to factory
defaults. Please note that this will erase all your
custom settings, but your recorded footage will
be preserved.
To reset your DVR to factory defaults and
erase your custom settings:
Select “LOAD DEFAULT” and press ►/4 twice to
confirm. After the reset is complete, power off the
DVR and power on again, by switching the power
bar on and off.
Language Setup
Press ►/4 to toggle between English and
Chinese.
Version
Displays the current firmware version.
CLEARVU2
12
SVAT ELECTRONICS
now you can see
Camera Setup
Camera Enable
This option allows you to enable/disable camera channels. Use the ▲/1▼/3 buttons to select the camera channel
you want to enable/disable. Then press the ►/4 button to enable or disable that camera channel.
Camera Title
This option allows you to enable/disable the camera title display. If you use custom camera titles, you must enable
camera title display for them to appear. Use the ▲/1 &▼/3 buttons to select the camera title you want to enable/
disable. Then press the ►/4 button to enable or disable that camera title.
Camera Setting
This submenu allows you to adjust options
for each camera:
1. Camera Select - Use the ►/4 to select the camera channel to which you would like to make changes (CH 1-4).
2. Record Enable - Press ►/4 to switch
recording on/off for the selected camera channel.
3. Motion Detection - Press ►/4 to switch motion detection on/off for the selected camera channel.
CLEARVU2
13
SVAT ELECTRONICS
now you can see
4. 5. 6. 7. Motion Sensitivity - Press ►/4 to set up the motion sensitivity level (1-5, 1 being the most sensitive).
Hue – Press ►/4 to adjust the color of the camera.
Contrast – Press ►/4 to adjust the camera contrast.
Brightness - Press ►/4 to adjust the camera brightness.
CH1-CH4 Title
To rename the camera titles, select the letter you
want to change using the ▲/1▼/3 buttons
and press ►/4 to change the letter. The “V” cursor
indicates which letter you are changing.
Record Setup
This menu will allow you to adjust recording
settings and set a 24 hr recording schedule
based on your preferences.
Record Type
Press ►/4 to select between QUAD and EACH mode. QUAD mode will record all four cameras, but will not let you
view each camera individually during playback. EACH mode will record all four cameras and allow you to view each
camera individually during playback. It is recommend that you use EACH mode.
CLEARVU2
14
SVAT ELECTRONICS
now you can see
Video Quality
Press ►/4 to select between Low, Normal and High quality settings. Lower quality settings will record a lower quality
picture but will allow you to record more footage. Higher quality settings will record a higher quality picture but will
use more storage space on the DVR’s hard drive.
Timer Rec Frame Rate
Press ►/4 to change the timer record frame rate. This is the frame rate used when the DVR is scheduled to record by
time (T). A lower frame rate will make the video footage more choppy, but will allow you to record more footage. A
higher frame rate will make the video footage more fluid, but will use more storage space on the DVR’s hard drive.
Motion Rec Frame Rate
Press ►/4 to change the motion record frame rate. This is the frame rate used when the DVR is scheduled to record
by motion alert (A). A lower frame rate will make the video footage more choppy, but will allow you to record more
footage. A higher frame rate will make the video footage more fluid, but will use more storage space on the DVR’s
hard drive.
Motion Rec Time
Press ►/4 to adjust the amount of seconds that the DVR will record after it detects motion (only when set to Motion
Detect [A] or Time Motion [M] mode).
Record Mode
This menu allows you to set up the preferred type
of scheduled recording (time,motion, time/motion
off) throughout a 24 hour day (the time displayed
is in military time (0 -24). For example, you may
want to record continuously from 9:00 AM to 5:00
PM, but only record when motion is detected the rest
of the time.
IMPORTANT: After you make changes and return to monitoring mode, you must press
to begin recording.
When you press
to stop recording, the DVR will not adhere to your Record Mode settings until you press
to begin recording again. Use the ▲/1▼/3 buttons to select the hour of the day, and press ►/4 to
change the type of recording for the specified hour of the day.
CLEARVU2
15
SVAT ELECTRONICS
now you can see
Time Recording [T]
The DVR will record continuously during the set time.
Motion Recording [A]
The DVR will record only when motion is detected during the set time.
Time Motion (Mixed) [M]
The DVR will record continuously during the set time, but when motion is detected it will record using the frame rate
you set in “Motion Rec Frame Rate.” This is useful if you want to save DVR storage space by setting the Timer Rec Frame
Rate to a lower
number and the Motion Rec Frame Rate to a higher number. When no motion is detected, the DVR will record using
less storage space (high quality footage is not needed since there is nothing happening). When motion is detected,
the DVR will use more space but the footage will be more fluid. Setting the record mode to Time Motion will allow you
more hours of recording time.
Disable Recording [–]
The DVR will not record during the set time.
IMPORTANT: After settings are changed and you exit the menu, press
to confirm your recording schedule.
Buzzer Setup
Use this menu to change the way the DVR alerts
you (audio alerts).
Motion Alert
Press ►/4 to turn motion alert ON/OFF. The motion alert will sound whenever motion is detected on one of your
cameras. Motion alerts will only sound when the DVR is recording
Video Loss Alert
Press ►/4 to turn video loss alert ON/OFF. The video loss alert will sound whenever one of your cameras loses power
or gets disconnected.
HDD Full Alert
Press ►/4 to turn HDD full alert ON/OFF. The HDD full alert will sound when the hard drive is full and you do not have
it set to overwrite.
CLEARVU2
16
SVAT ELECTRONICS
now you can see
Buzzer Time
Press ►/4 to adjust the amount of time in seconds (0-30 sec) that alerts will sound. You can also set the alert to
continuous or off.
Event List
Time Search
Use this option to search the DVR for a specific recorded event by time.
1. Use the ▲/1▼/3 buttons to select the Year/Month/Day and Hour/Minute/Second, and press ►/4 to change the values.
2. Press
to start playing the video footage at the specified time (if it exists).
3. “BEGIN TIME” and “END TIME” indicate the time/date range that recorded footage exists.
Event Search
Use this option to browse all recorded clips by event. The three event types are Time (Time Recording [T]), Alarm (Motion
Recording [A]), and Mix (Time/Motion Recording [M]).
USB Device Setting
Before entering the USB Device Setting
menu, you must insert a USB flash drive
into the USB port on the back of the DVR.
CLEARVU2
17
SVAT ELECTRONICS
now you can see
Use this option to back up your recorded footage
onto a USB flash drive for viewing on your PC.
You must use the included software CD to view
recorded footage on your PC (not Mac compatible).
In the USB Device Setting subscreen, the following options are available:
1. Copy
2. Format
3. Erase Video Data
IMPORTANT: Before copying your footage to the USB drive for the first time, you must format the drive for use in the
DVR. This will temporarily prevent you from using it as a regular flash drive. To use it as a regular flash drive again,
you must select Erase Video Data, and then allow Windows to format the drive after you have connected it to your
computer.
Format
1. Press ►/4 to format the flash drive for use in the DVR. This will delete all files
currently on the flash drive.
2. Enter your password (if enabled) to confirm (Default 111111).
Copy
1. Press ►/4 to enter the Copy subscreen.
2. Press ►/4 to change the day you want to back up.
3. Use the ▲/1▼/3 buttons to select the day, month and year from which you want to back up footage. Use the ►/4 button to change the values. To confirm this
selection, press
.
4. Select Begin Time, and press ►/4.
CLEARVU2
18
SVAT ELECTRONICS
now you can see
5. Use the ▲/1▼/3 buttons to select the hour, minute and second from which you want to start backing up
footage. Use the ►/4 button to change the values. To confirm this selection, press
.
6. Select End Time, and press ►/4.
7. Use the ▲/1▼/3 buttons to select the hour, minute and second from which you want to stop backing up
footage. Use the ►/4 button to change the values. To confirm this selection, press
.
8. Select COPY, then press ►/4. Press ►/4 again to start the file transfer.
Erase Video Data
After you have copied video footage over to your computer, select this option if you want to use the drive as a regular
flash drive again. Press ►/4 to confirm. This will erase all video data and DVR formatting from the drive. When you
try to use it as a flash drive on your computer, Windows will require you to format the drive. After formatting, the drive
will function as a regular flash drive again.
Note: If you want to use the drive with the DVR once again, you must use the Format option on the DVR.
Hard Drive Setup
Disk Full
This option allows you to switch between Disk Full Stop, or Disk Full Overwrite. Disk Full Stop will stop the DVR from
recording once the hard drive has run out of space. Disk Full Overwrite will begin to overwrite your footage once the
hard drive has run out of space. This allows for continuous, uninterrupted recording.
1. Press ►/4 to toggle between the two modes.
Note: CLEARVU2
If the DVR is on Overwrite, the hard drive will be cleared once it has reached maximum capacity. This will allow for continuous uninterrupted recording.
19
SVAT ELECTRONICS
now you can see
HDD Size
This number indicates the size of the hard drive (in megabytes).
HDD Used
This number indicates how full the hard drive is (in megabytes).
HDD Format
To erase the hard drive, select this option and press ►/4. Enter your password to confirm. Warning:
This will erase all your recorded footage.
DVR PLAYER SOFTWARE
To view recorded footage on your computer, you must use the included player software. This software allows you to
view the footage like you would on the DVR (quad screen view). Please note that the DVR Player Software is not Mac
compatible (Windows only).
CLEARVU2
20
SVAT ELECTRONICS
now you can see
Software Installation
1. 2. 3. 4. 5. 6. 7. Place the CD-ROM that was included with the DVR system into your computer’s CD-ROM drive. If your computer does not automatically open the CD folder, go to Start>My Computer and double-click on the CD-ROM icon.
Copy and paste the program called Video Player onto the C: of your computer (My Computer>C:)
Create a shortcut to this program. Right click on the program and select Send to > Desktop (Create Shortcut).
Insert the USB flash drive into a USB port on your computer.
A window may pop up showing your flash drive. The window will be empty, since Windows cannot read the DVR video files.
Open the Video Player by double clicking the shortcut on your desktop. The software will automatically create a folder called “Config” in your C: drive, which will hold your settings. Please do not move, alter or delete this folder.
When the program opens, it will detect your flash drive and automatically begin playing your footage.
Operation
Many of the player controls are very similar to the DVR’s. Below is a chart explaining the icons and their functions:
Fast Review
Review
Pause Playback
Play
Fast Forward
Quad split screen display
CH1 Full Screen Display
CH2 Full Screen Display
CH3 Full Screen Display
CH4 Full Screen Display
Click this button to capture images as an image file (JPG)
Click this button to record video footage onto your computer. Before recording videos onto the PC,
first click the “Pause” button.
Click this button to play back recorded materials (stored on PC). You must have captured footage
using
CLEARVU2
and
in order to use this function.
21
SVAT ELECTRONICS
now you can see
Capturing Images/Video to your Computer
1. Press the
button to capture a picture/screenshot of the DVR footage. Screenshots will be stored in JPEG format, in C:\Capture_MYS. These JPEG picture files can now be stored or emailed.
2.
Press the
button to record video footage to your computer. Before clicking the button, ensure that the video is paused. A window will appear, showing that the video is capturing. Press “Stop Capture” when you are done capturing. The video will be stored in C:\Capture_MYS, but will only be readable by the DVR Video Player software.
3. To view your captured video, press
playback mode.
to switch to capture 4. A dialog box will open, allowing you to select the file to play back. After you select the file, click Open to begin playback.
Settings
Click the Setting dropdown menu to change the file path of the captured footage (where the footage will be stored).
The default file path is C:\Capture_MYS.
CLEARVU2
22
SVAT ELECTRONICS
now you can see
DVR PLAYER TROUBLESHOOTING
No display on television
1. Make sure all RCA and power cables are plugged in securely and in their
proper places.
2. Make sure your television is on the correct channel (input mode).
DVR not recording
1. Make sure recording is enabled in each camera’s setting. Go to
>Camera Setup>Camera Setting and enable recording for each camera if it
has been disabled.
2. Make sure recording is enabled and set to the correct recording setting in
scheduled recording. Go to
>Record Setup>Record Mode. If a line
(-) is over any hour of the day, that means recording is disabled for that time
period. Press ►/4 to enable recording for that hour. Also make sure you
press REC when you return to Monitoring Mode, or your scheduled recording
will not take effect.
3. Your disk may be full. By default the DVR should start writing over your
recorded files, but this option may be disabled. Go to Menu>Hard Drive
Setup>Disk Full. Set it to OVERWRITE.
4. Make sure your DVR is in Monitoring Mode, and not at a menu screen or in
Playback Mode.
No playback
1. There is a delay while the DVR searches for your recorded files. Wait a few
moments and your files should appear.
2. Make sure you are not in Recording Mode. Pressing PLAY during recording
will have no effect. Press STOP first.
3. If you have just formatted the hard drive or your drive is otherwise empty,
there will be no files to play back.
During playback, I can’t switch to
different camera views.
CLEARVU2
To switch between cameras during playback, you must have recorded in
EACH mode. Change this setting using
Type.
>Record Setup>Record
23
SVAT ELECTRONICS
now you can see
SPECIFICATIONS
4 Channel DVR
Functionality
Video Compression
Live Resolution
Recording Frame Rate
Recording Time
Recording Resolution
Recording Method
Recording Qualities
Recording Modes
Recording Media
Auto Resume Recording
HDD Type
Storage Capacity
Video Format
Video Loss Alarm
Video Inputs
Video Display Output
Live Frame Rate
Live Display
Back-up/File Transfer
Play Search Mode
Play Speed
Play Mode
OSD & System Menu Display
OSD Language Display
Time and Date Stamp Display
Password Protection
Adjustable Screen Settings
Operating System
Processor
Disk Full Warning
Automatic Overwrite Option
Playback Navigation
LED Indicators
Housing Material
Housing Color
Power Input
Power Adapter Input
Power Consumption
Operating Temperature
Operating Humidity
Dimensions
Weight
CLEARVU2
Simplex
MJPEG
720 x 480
Max. 120FPS (30 FPS per camera channel)
Max 154 Days (lowest quality settings @ 1FPS)
640 x 224
Each/Quad
Low/Medium/High
Manual/Schedule/ Motion Detection
ATA 3.5" HDD
Yes
Internal (removable)
Max. 750GB, 160GB Included
NTSC/PAL
Yes
4CH Composite BNC
1CH Composite BNC
120FPS
Single/Quad
USB (1.1) Flash Drive (not included)
By Date, Time, Event
1X, 2X, 3X
Single/Quad
Yes
English/Chinese
Yes
Menu, Stop Recording
Color, Brightness, Contrast
Proprietary
Proprietary
Yes
Yes
Review, Play, Fast Forward, Pause, Stop
Yes
Aluminum
Black
DC12V/2A
AC 100~240V 50/60 Hz (adapter)
24W
41°F ~ 104°F
<80%
9.375” x 7.75” x 1.75”
3.15lbs
24
SVAT ELECTRONICS
now you can see
CCD Color Camera
Camera Type
Image Sensor
Resolution
Outdoor Use
IP Rating
Focal Length
Focus Type
Night Vision
No. of IR LEDs and Range
IR LED Control
Video Output
Min. Illumination
IR Wavelength
TV System
Microphone
Motion Detection
Viewing Angle
Electronic Shutter
BLC
AGC
ELC
Line Lock
Iris Control
White Balance
Sun Shield
IR Cut Filter
Housing Material
Housing Color
Signal/Noi se Ratio
Camera Bracket
Operating Temperature
Operating Humidity
Camera Power Input
Power Adapter Input
LED Power Indicator
Dimensions
Weight
CLEARVU2
Bullet
1/4" Color Sharp CCD
420 TV Lines
Yes
IP65
3.6mm
Fixed
Yes
12, up to 15ft
Automatic (CDS Sensor)
4 PIN DIN (60ft 4 PIN DIN to RCA male Video/Power Wire Included)
0 lux
850nm
NTSC
No
No
60 Degrees
1/60 ~ 1/100000 sec
No
Automatic
Automatic
No
No
Automatic
Yes
No
Anodized Aluminum
Black
>48dB
Yes
-14°F ~ 122°F
98%
DC 12V 300mA
120V 60Hz
No
5.5” x 5” x 2.44” (with stand)
0.85lbs (with stand)
25
SVAT ELECTRONICS
now you can see
SVAT SUPPORTS CRIME STOPPERS
Crime Stoppers programs are operated as non-profit charities and are managed by a volunteer board
of directors who raise funds and pay rewards to individuals who anonymously call with information that
helps solve crime.
Rewards are paid for tips that lead to the arrest and indictment of people charged with felony offenses,
and to date Crime Stoppers statistics show a conviction rate of approximately 95%.
CLEARVU2
P.O. Box 614
Arlington, Texas
U.S.A. 76004-0614
CRIME STOPPERS INTERNATIONAL
PLACE
POSTAGE
HERE
To receive more information about Crime Stoppers or to make a charitable donation please fill in the
fields on the back of this page, cut on the dotted line and mail in.
www.svat.com
SVAT ELECTRONICS
now you can see
SVAT SUPPORTS CRIME STOPPERS
To receive more information about Crime Stoppers or to make a charitable donation
please fill in the fields below, cut on the dotted line an mail in.
CRIME STOPPERS INTERNATIONAL
Crime Stoppers International is an organization of community based civilian Crime Stoppers
programs, which assist police in solving crime. You can find more information about Crime Stoppers
at www.c-s-i.org.
Local Crime Stoppers programs are partnerships between the public, media and local policing
organizations. Each program is run by a citizen board, whose purpose is to advertise a local telephone
number, which anonymous persons can call with information regarding a crime. Callers (tipsters)
may be eligible for a cash reward for their information.
If your community does not have a Crime Stoppers program and would like information about starting
one, return this card with the following information.
NAME:______________________________________PHONE:_ ____________________________
ADDRESS:_ _________________________________CITY:________________________________
PROV/STATE:______________ COUNTRY:_ _____________ POSTAL/ZIP CODE:_____________
E-MAIL ADDRESS:________________________________________________________________
Charitable donations can be made to “CSI” by returning this card in an envelope with your check or
money order to the address on the other side.
Amount $
THANK YOU
www.svat.com
CLEARVU2
SVAT ELECTRONICS
now you can see
NOTES
Customer Information Card
User’s Name:
Company Name:
Address:
Postal Code:
Phone Number:
Email:
Model Number of Product:
Serial Number of Product:
Purchase Date:
Place of Purchase:
NOTE: We recommend that you keep a record of your purchase receipt with your manual for any future returns or support issues.
CLEARVU2
www.svat.com
SVAT ELECTRONICS
now you can see
VISIT US ON THE WEB!
► Product Information
► Specification Sheets
► User Manuals
► Software Updates
► Quick Start Guides
► Firmware Upgrades
www.svat.com
Disclaimer
SVAT does not endorse any of SVAT products for any illegal activities.
SVAT is not responsible or liable in any way shape or form for any
damage, vandalism, theft or any other action that may occur while a
SVAT product is in use by the purchaser.
Model#
CLEARVU2
www.svat.com