1
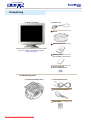
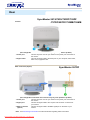
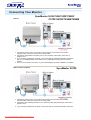
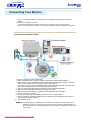
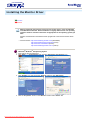
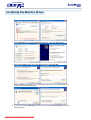
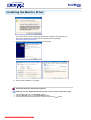
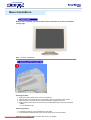
SyncMaster 591S/793S/793DF/795DF/797DF/997DF/793MB/795MB
Downloaded from ManualMonitor.com Manuals
INDEX
Main Page
Safety Instructions
Notational
Power
nstallation
Troubleshooting
Check List
Q&A
Self-Test Feature Check
Cleaning
Other
Specifications
General Specifications
Introduction
Unpacking
Preset Timing Modes
PowerSaver
Front
Rear
Bottom
Information
Service
Terms
Natural Color
Authority
Setup
Connecting Your Monitor
Installing the Monitor Driver
Automatic
Manual
Base Installation
Downloaded from ManualMonitor.com Manuals
Notational
Failure to follow directions noted by this symbol could result in bodily harm or damage to
equipment.
Prohibited
Important to read and understand at all times
Do not disassemble
Disconnect the plug from the outlet
Do not touch
Grounding to prevent an electric shock
Downloaded from ManualMonitor.com Manuals
Power
When not used for extended periods of time, set your PC to DPMS. If using
a screen saver, set it to the active screen mode.
z
If the size of your monitor is small, or if the same image is present for long
periods of time, you may see afterimages due to damage to the
fluorescent substance on the inside of the CDT.
Do not use a damaged or loose plug.
z
This may cause an electric shock or fire.
Do not pull the plug out by the wire nor touch the plug with wet
hands.
z
This may cause an electric shock or fire.
Use only a properly grounded plug and receptacle.
z
An improper ground may cause electric shock or equipment
damage.
Do not excessively bend the plug and wire nor place heavy objects
upon them, which could cause damage.
z
Failure to do so may cause an electric shock or fire.
Disconnect the plug from the outlet during storms or lightening or
if it is not used for a long period of time.
z
Failure to do so may cause an electric shock or fire.
Do not connect too many extension cords or plugs to an outlet.
z
Downloaded from ManualMonitor.com Manuals
This may cause a fire.
Installation
Do not cover the vents on the monitor cabinet.
z
Bad ventilation may cause a breakdown or fire.
Put your monitor in a location with low humidity and a minimum of
dust.
z
An electric shock or fire could result inside the monitor.
Do not drop the monitor when moving it.
z
This may cause damage to the product or human body.
Place the monitor on a flat and stable surface.
z
The monitor can cause injury by falling.
Set down the monitor carefully.
z
It could be damaged or broken.
Do not place the monitor face down.
z
The CDT surface may be damaged.
Do not use the monitor without the monitor stand.
z
z
Downloaded from ManualMonitor.com Manuals
It could break down or cause a fire due to bad ventilation.
If the monitor must be used without the supplied stand, take steps
to insure proper ventilation.
Cleaning
When cleaning the monitor case or the surface of the CDT, wipe with a
slightly moistened, soft fabric.
Do not clean Flat monitor with water. Use a water-diluted mild
detergent.
(Some detergents contain significant amounts of alcohol-based solvents,
which can damage (color change) or crack the monitor case. The
antiglare/anti-static surface coating on the CDT may also be affected.)
Dilute the detergent (1:10 ratio) with water before using.
Do not spray detergent directly on the monitor.
Use the recommended detergent with a smooth cloth.
z
z
You can prevent the coated CDT from being damaged or the
monitor cabinet from being dissolved, cracked or discolored.
You can buy a recommended detergent at any Samsung Service
Center.
If the connector between the plug and the pin is dusty or dirty,
clean it properly with a dry cloth.
z
A dirty connector can cause an electric shock or fire.
Do not set a glass of water, chemicals or any small metal objects
on the monitor.
z
z
This may cause damage, electric shock or a fire.
If a foreign substance gets into the monitor, disconnect the plug
and then contact a service center.
Downloaded from ManualMonitor.com Manuals
Other
Do not remove cover(or back). No user serviceable parts inside.
z
z
This may cause an electric shock or a fire.
Refer servicing to qualified service personnel.
If your monitor does not operate normally - in particular, if there are
any unusual sounds or smells coming from it - unplug it
immediately and contact an authorized dealer or service.
z
This may cause an electric shock or a fire.
Do not place any heavy objects on the monitor.
z
This may cause an electric shock or a fire.
For each hour of looking at the monitor, you should let your eyes
rest for 5 minutes.
z
This will reduce eye fatigue.
Do not use or store inflammable substances near the monitor.
z
This may cause an explosion or fire.
Do not try to move the monitor by pulling on the wire or the signal
cable.
z
This may cause a breakdown, electric shock or a fire due to
damage to the cable.
Do not move the monitor right or left by pulling only the wire or the
signal cable.
z
This may cause a breakdown, electric shock or a fire due to
damage to the cable.
Never insert anything metallic into the monitor openings.
z
Downloaded from ManualMonitor.com Manuals
This may cause an electric shock, fire or injury.
Other
Keep the monitor away from any magnetic substances.
z
Downloaded from ManualMonitor.com Manuals
This may cause discoloring or distortion of the image.
Unpacking
Monitor and Stand
Power Cord
Stand
Quick Setup Guide
(Some models include a stand attached. )
Please make sure the following items are included
with your monitor. If any items are missing,
contact your dealer.
Warranty Card
(Not available in all locations)
User's Guide and
Driver Installation CD
For Multimedia model
Multimedia Speaker Stand
Sound Cables(2each)
DC Power Cord (Option)
User Guide
Downloaded from ManualMonitor.com Manuals
Front
1. Menu button
2. Adjust buttons
3. Enter button
4. Power button
5. Power indicator
Opens the OSD menu. Also used to exit the OSD menu or return to the
previous menu.
These buttons allow you to highlight and adjust items in the menu.
Used to select the OSD menu.
Use this button to turn the monitor on and off.
This light glows green during normal operation, and blinks green once as
the monitor saves your adjustments.
Note: See PowerSaver described in the manual for further information regarding power saving
functions. For energy conservation, turn your monitor OFF when it is not needed, or when
leaving it unattended for long periods.
Downloaded from ManualMonitor.com Manuals
Rear
SyncMaster 591S/793S/793DF/795DF
/797DF/997DF/793MB/795MB
General
(The configuration at the back of the monitor may vary from product to product.)
1. Power port
2. Signal Cable
Connect the power cord for your monitor to the power port on the back of
the monitor.
Connect the signal cable to the video port on your computer, video board,
video card, or graphics card.
BNC Connectors (Option)
SyncMaster 997DF
(The configuration at the back of the monitor may vary from product to product.)
1. Power port
2. Signal port
3. BNC Connectors
(Option)
Connect the power cord for your monitor to the power port on the back of
the monitor.
Connect the signal cable to the 15-pin D-sub connector on the back of
your monitor.
Connect the signal cable to the BNC signal port on the back of your
monitor.
Note: See Connecting Your Monitor for further information regarding cable connections.
Downloaded from ManualMonitor.com Manuals
Bottom
1. Signal Cable
2. Power port
3. Tilt/Swivel Base
Connect the signal cable to the video port on your computer, video board,
video card, or graphics card.
Connect the power cord for your monitor to the power port on the back of
the monitor.
You can separate the base from the monitor.
Downloaded from ManualMonitor.com Manuals
Connecting Your Monitor
General
SyncMaster 591S/793S/793DF/795DF
/797DF/997DF/793MB/795MB
1. Connect the power cord for your monitor to the power port on the back of the monitor.
Plug the power cord for the monitor into a nearby outlet.
2. Connect the signal cable to the video port on your computer, video board, video card, or
graphics card.
3. If you are using a Macintosh computer, connect the cable to a Macintosh adapter, and set the
pins on your adapter(Adapter not included). A PC-compatible computer does not need an
adapter.
4. Turn on your computer and monitor. If your monitor displays an image, installation is complete.
BNC Connectors (Option)
SyncMaster 997DF
1. Connect the power cord for your monitor to the power port on the back of the monitor.
Plug the power cord for the monitor into a nearby outlet.
2. Connect the end of the signal cable to your computer's video port(video board, video card or
graphics card).
3. If you are using a Macintosh computer, connect the cable to a Macintosh adapter, and set the
Downloaded from ManualMonitor.com Manuals
Connecting Your Monitor
pins on your adapter(Adapter not included). A PC-compatible computer does not need an
adapter.
4. When you use a BNC connector.
Connect the signal cable to the BNC signal port on the back of your monitor/computer.
5. Turn on your computer and monitor. If your monitor displays an image, installation is complete.
Opstilling-For multimedia-model
1. Sluk for computeren og fjern strømkablet.
2. Tilslut signalkablet til din computers videoport (videoboard, videokort eller grafikkort).
3. Tilslut den ene ende af et lydkabel til stereo output jacket på lydkort eller computer. Tilslut den
anden ende af kablet til stereo input jacket bag på monitorens fod.
Tilslut den ene ende af det andet lydkabel til linie output jacket på lydkort eller computer. Tilslut
den anden af kablet til Mic By-Pass jacket bag på monitorens fod.
4. Tilslut DC strømkablet (jævnstrøm) fra fodstykket til den nærmeste stikkontakt.
5. Tilslut monitorens strømkabel til strømporten bag på monitoren.
6. Tilslut monitorens strømkabel og computerens strømkabel til et stik i nærheden.
7. Tænd for computer og monitor.
8. Drej op eller ned på ON-OFF knappen på monitorens fod, indtil den klikker.
9. Start et lydprogram, musik eller lydeffekt på din computer og juster lydstyrken ved at skrue op
eller ned til den ønskede lydstyrke.
10. Juster diskant og bas.
BEMÆRK: Lydforvrængning kan forekomme, hvis monitoren er placeret oven på et stort set hult
kabinet, som f.eks. din computer. Hvis det sker, kan du anbringe en skriveblok eller et
blad under monitorens fod. Høj lydstyrke kan også resultere i forvrængning af lyden; skru
ned for lyden.
Downloaded from ManualMonitor.com Manuals
Connecting Your Monitor
Fodstykke for Multimedia højttaler
1. Mic by-pass jack
For transmission af din stemme, tilslut et lydkabel fra
mic by-pass jack til mic in jack på lydkortets slot i din
computer.
2. Stereo input jack
Tilslut et lydkabel fra input kilden (lydkort, computer,
CD-ROM drev).
3. DC strømkabel
Tilsluttes til monitorens DC 12V output jack.
4. Strømindikator
Lyser grøn, når der er tændt for højttalerne.
5. On/Off lydstyrke
Tænder/slukker og justerer lydstyrken
6. Diskant kontrolknap
Bruges til kontrol af høje frekvenser.
7. Bas kontrol knap
Bruges til kontrol af lave frekvenser.
8. Mic input jack
For transmission af din stemme, tilslut en mikrofon til
dette jack.
9. Jack til øretelefoner
Øretelefoner kan tilsluttes her.
10. Aftagelig overdel til fodstykke.
Downloaded from ManualMonitor.com Manuals
Installing the Monitor Driver
Automatic
Manual
When prompted by the operating system for the monitor driver, insert the CD-ROM
included with this monitor. Driver installation is slightly different from one operating
system to another. Follow the directions as appropriate for the operating system you
have.
Prepare a blank disk and download the driver program file at the Internet web site shown
here.
z
Internet web site : http://www.samsung-monitor.com/ (WorldWide)
http://www.samsungusa.com/monitor/ (USA)
http://www.sec.co.kr/monitor/ (Korea)
http://www.samsungmonitor.com.cn/ (China)
1. Insert CD into the CD-ROM driver.
2. Click "Windows XP/2000 Driver".
3. Choose your monitor model in the model list, then click the "OK" button.
4. Click the "Install" button in the "Warning" window.
5. If you can see following "Message" window, then click the "Continue Anyway" button.
Then click "OK" button.
* This monitor driver is under certifying MS logo,and this installation don't damage your
system.The certified driver will be posted on Samsung Monitor Homepage
http://www.samsung-monitor.com/.
6. Monitor driver installation is completed.
Downloaded from ManualMonitor.com Manuals
Installing the Monitor Driver
Automatic
Manual
When prompted by the operating system for the monitor driver, insert the CD-ROM
included with this monitor. Driver installation is slightly different from one operating
system to another. Follow the directions as appropriate for the operating system you
have.
Prepare a blank disk and download the driver program file at the Internet web site shown
here.
z
Internet web site : http://www.samsung-monitor.com/ (WorldWide)
http://www.samsungusa.com/monitor/ (USA)
http://www.sec.co.kr/monitor/ (Korea)
http://www.samsungmonitor.com.cn/ (China)
Microsoft® Windows® XP Operating System
1. Insert CD into the CD-ROM driver.
2. Click "Start" —> "Control Panel" then click the "Appearance and Themes" Icon.
3. Click "Display" icon and choose the "Settings" tab then click "Advanced..".
4. Click the "Properties" button on the "Monitor" tab and select "Driver" tab.
Downloaded from ManualMonitor.com Manuals
Installing the Monitor Driver
5. Click "Update Driver.." and select "Install from a list or.." then click "Next" button.
6. Select "Don't search ,I will.." then click "Next" and then click "Have disk".
7. Click the "Browse" button then choose A:(D:\Driver) and choose your monitor model in the
model list and click the "Next" button.
8. If you can see following "Message" window, then click the "Continue Anyway" button. Then
click "OK" button.
Downloaded from ManualMonitor.com Manuals
Installing the Monitor Driver
This monitor driver is under certifying MS logo,and this installation don't damage your
system.The certified driver will be posted on Samsung Monitor Homepage
http://www.samsung-monitor.com/.
9. Click the "Close" button then click "OK" button continually.
10. Monitor driver installation is completed.
Microsoft® Windows® 2000 Operating System
When you can see "Digital Signature Not Found" on your monitor, follow these steps.
1. Choose "OK" button on the "Insert disk" window.
2. Click the "Browse" button on the "File Needed" window.
3. Choose A:(D:\Driver) then click the "Open" button and then click "OK" button.
Downloaded from ManualMonitor.com Manuals
Installing the Monitor Driver
How to install
1.
2.
3.
4.
Click "Start" , "Setting" , "Control Panel".
Double click the "Display" Icon.
Choose the "Settings" tab and then click "Advanced..".
Choose "Monitor".
Case1: If the "Properties" button is inactive, it means your monitor is properly configured.
Please stop installation
Case2: If the "Properties" button is active, click the "Properties" button then follow next
steps continually.
Click "Driver" and then click on "Update Driver.." then click on the "Next" button.
Choose "Display a list of the known drivers for this device so that I can choose a
specific driver" then click "Next" and then click "Have disk".
Click the "Browse" button then choose A:(D:\Driver).
Click the "Open" button, then click "OK" button.
Choose your monitor model and click the "Next" button then click "Next" button.
Click the "Finish" button then the "Close" button.
5.
6.
7.
8.
9.
10.
If you can see the "Digital Signature Not Found" window then click the "Yes"button.
And click the "Finish" button then the "Close" button.
Microsoft® Windows® NT Operating System
1. Click Start, Settings, Control Panel, and then double-click Display icon.
2. In Display Registration Information window, click Settings Tab and then click All Display
Modes.
3. Select a mode that you wish to use (Resolution, Number of colors and Vertical frequency)
and then click OK.
4. Click Apply button if you see the screen working normally after clicking Test. If the screen
is not normal, change to a different mode (lower mode of resolution, colors or frequency).
Note: If there is no Mode at All Display Modes, select the level of resolution and vertical
frequency by referring to the Preset Display Modes in the user guide.
Linux Operating System
To execute X-Window, you need to make the X86Config file, which is a type of system setting
file.
1.
2.
3.
4.
5.
6.
7.
Press Enter at the first and the second screen after executing the X86Config file.
The third screen is for setting your mouse.
Set a mouse for your computer.
The next screen is for selecting a keyboard.
Set a Keyboard for your computer.
The next screen is for setting your monitor.
First of all, set a horizontal frequency for your monitor. (You can enter the frequency
directly.)
8. Set a vertical frequency for your monitor. (You can enter the frequency directly.)
9. Enter the model name of your monitor. This information will not affect the actual
execution of X-Window.
10. You have finished setting up your monitor.
Execute X-Window after setting other requested hardware.
Downloaded from ManualMonitor.com Manuals
Base Installation
With the built-in pedestal, you can tilt and/or swivel the monitor for the most comfortable
viewing angle.
Note: The base is detachable.
Attaching the Base
1.
2.
3.
4.
Place the monitor upside-down on a flat work surface.
Align the tabs on the base with the corresponding slots on the bottom of the monitor.
Press the base onto the monitor until the tabs are fully engaged in the slots.
Push the base toward the front of the monitor until the release latch clicks into the locked
position.
ii
* Do not bend the snap.
Removing the Base
5. Squeeze and pull up on the release latch on the base.
6. Push the base toward the back of the monitor and lift up to remove the base.
Downloaded from ManualMonitor.com
Manuals
Note: The base will align
with the monitor slots in only one position.
Check List
Note
Before calling for service, check the information in this section to see if you can remedy
any problems yourself. If you do need assistance, please call the phone number on the
warranty card, the phone number on the Information section or contact your dealer.
Symptom
Check List
Solutions
No images on the screen. I
cannot turn on the monitor.
Is the power cord connected
properly?
Check the power cord connection and
supply.
Can you see "
Check the signal cable connection.
" on
the screen?
If the power is on, reboot the
computer to see the initial
screen(the login screen),
which can be seen.
If the initial screen (the login screen)
appears, boot the computer in
the applicable mode (the safe mode
for Windows XP/2000)
and then change the frequency of the
video card.
(Refer to the Preset Display Modes)
Note: If the initial screen (the login
screen) does not appear, contact a
service center or your dealer.
Can you see "
screen?
" on the
You can see this message when the
signal from the video card exceeds the
maximum resolution and frequency
that the monitor can properly handle.
Adjust the maximum resolution and
frequency that the monitor can
properly handle.
I cannot see the On Screen
Display.
There is no image on the
screen. Is the power indicator
on the monitor blinking at 1
second intervals?
The monitor is in PowerSaver mode.
Have you locked the On
Screen Display (OSD)
Menu to prevent changes?
Unlock the OSD by pressing the
MENU button for at least 10 seconds.
Downloaded from ManualMonitor.com Manuals
y
Press a key on the keyboard or move
the mouse to activate the monitor and
restore the image on the screen.
Check List
Symptom
Check List
Solutions
The image on the screen is
shaking.
Check the monitor
configuration to see if it is in
Interlace Mode. (Interlace
Mode: Vertical frequency
43Hz, 87Hz(i), etc)
The signal from the video card
exceeds the maximum resolution and
frequency of the monitor.
Are there any magnetic
products such as a power
adapter, speaker or a high
voltage wire near by?
Move the monitor away from anything
that can create a strong magnetic field.
Is the voltage stable?
The screen image can appear to shake
or vibrate at a particular time of day
due to low supply voltage.
The screen image can also appear to shake or vibrate if there is a
problem with the video card or the computer's main board.
The screen shows strange
colors or just black and
white.
The screen suddenly has
become unbalanced.
Is the screen displaying only
one color as if looking at the
screen through a cellophane
paper?
Check the signal cable connection.
Have the screen colors
become strange after
running a program or due to a
crash between applications?
Reboot the computer.
Has the video card been set
properly?
Set the video card by referring to the
video card manual.
Have you changed the video
card or the driver?
Adjust screen image position and size
using the OSD.
Have you adjusted the
resolution or frequency to the
monitor?
Adjust the resolution and frequency at
the video card.
(Refer to the Preset Display Modes).
Make sure the video card is fully
inserted in it's slot.
The screen can be unbalanced due to the cycle of the video card
signals. Readjust Position by referring to the OSD.
Downloaded from ManualMonitor.com Manuals
Check List
Symptom
Check List
Solutions
The screen is out of focus
or OSD cannot be adjusted.
Have you adjusted the
resolution or frequency on
the monitor?
Adjust the resolution and frequency of
the video card.
(Refer to the Preset Display Modes).
The screen is partially
distorted.
Are there any magnetic
products such as an adapter,
speaker or a high voltage
wire near the monitor?
Enter the OSD and perform a
"Degauss".
Is the frequency properly
adjusted when checking the
Display Timing on the menu?
Adjust the frequency properly by
referring to the video card manual and
the Preset Display Modes.
LED is blinking but no
images on the screen.
Keep the monitor away from any
magnetic products.
(The maximum frequency per
resolution may differ from product to
product.)
There are only 16 colors
shown on the screen. The
screen colors have
changed after changing the
video card.
Have the Windows colors
been set properly?
For Windows XP/
2000:
Set the colors properly at the Control
Panel, Display, Settings.
Has the video card been set
properly?
Set the video card by referring to the
video card manual.
Check the following items if there is trouble with the monitor.
1. Check if the power cord and the cable are properly connected to the computer.
2. Check if the computer beeps more than 3 times when booting.
(If it does, request an after-service for the main board of the computer.)
3. If you installed a new video card or if you assembled the PC, check if the installed the adapter
(video) driver and the monitor driver.
4. Check if the scanning ratio of the video screen is set at 75Hz or 85Hz.
(Do not exceed 60Hz when using the maximum resolution.)
5. If you have problems in installing the adapter (video) driver, boot the computer in Safe Mode,
remove the Display Adapter at the "Control Panel, System, Device Administrator" and then
reboot the computer to reinstall the adapter (video) driver.
Note: If problems repeatedly occur, contact an authorized service center.
Downloaded from ManualMonitor.com Manuals
Q&A
Question
How can I change the frequency?
Answer
Frequency can be changed by reconfiguring the video
card.
Note that video card support can vary, depending on the
version of the driver used.
(Refer to the computer or the video card manual for
details.)
How can I adjust the resolution?
Windows XP/2000: Set the resolution at the Control
Panel, Display, Settings .
* Contact the video card manufacturer for details.
How can I set the Power Saving
function?
Windows XP/2000: Set the function at BIOS -SETUP
of the computer or the screen saver. (Refer to
Windows/Computer Manual).
The monitor makes a sound when it
is turned on.
This is normal as some sound may be generated when
the metal case and the electromagnet, which are installed
to block any electromagnetic waves, interact with each
other.
How can I clean the outer
case/Picture tube?
Disconnect the power cord and then clean the monitor
with a soft cloth, using either a cleaning solution or plain
water.
Do not leave any remains of the detergent nor scratch the
case. Do not allow any water to go inside the monitor.
Downloaded from ManualMonitor.com Manuals
Self-Test Feature Check
SyncMaster 591S/793S/793DF/795DF/797DF/793MB/795MB
Your monitor provides a self test feature that allows you to check whether your monitor is
functioning properly.
1. Turn off both your computer and the monitor.
2. Unplug the video cable from the back of the computer.
3. Turn on the monitor.
If your monitor works normally, the following screen appears.
SyncMaster 591S/793DF/795DF
SyncMaster 997DF
Failure of any of the boxes to appear indicates a problem with your monitor. This box
also appears during normal operation if the video cable becomes disconnected or
damaged.
4. Turn off your monitor and reconnect the video cable; then turn on both your computer and the
monitor.
If your monitor screen remains blank after using the previous procedure, check your
video controller and computer system; your monitor is functioning properly.
If there is something wrong with the input signal, a message appears on the screen or
the screen goes blank although the power indicator LED is still on. The message may
indicate that the monitor is out of scan range or that you need to check the signal cable.
SyncMaster 591S/793DF/795DF
SyncMaster 997DF
The location and the position of the monitor may influence the quality and other
features of the monitor.
1. If there are any woofer speakers near the monitor, unplug and relocate the woofer to another
room.
2. Remove all electronic devices such as radios, fans, clocks and telephones that are within 3
feet (one meter) of the monitor.
3. Run the despeckling function again after moving your device.
Downloaded from ManualMonitor.com Manuals
Self-Test Feature Check
l
A monitor recreates visual signals received from the PC. Therefore, if there is trouble with the
PC or the video card, this can cause the monitor to become blank, have poor coloring, noise,
Sync. Out of Range, etc. In this case, first check the source of the problem, and then contact
a service center or your dealer.
l
Judging the monitor's working condition
If there is no image on the screen or an "Sync. Out of Range" message comes up, disconnect
the cable from the computer while the monitor is still powered on.
¡ If there is a message coming up on the screen or if the screen goes white, this means
the monitor is in working condition.
¡ In this case, check the computer for trouble.
Downloaded from ManualMonitor.com Manuals
General
Model Name
General
PowerSaver
Preset Timing
Modes
SyncMaster 797DF
Picture Tube
Type
17"(43cm) DynaFlat (40.6cm viewable)
Deflection angle
90 °
Dot Pitch
0.20mm (Horizontal)
Screen type
Aluminized tri-color phosphor dot trio with black matrix.
Anti-doming invar shadow mask.
Multi-layer coated with anti-static.
Maximum Resolution
1600 x 1200@76Hz
Active Display
Horizontal
312 ± 4 mm
Vertical
234 ± 4 mm
Synchronization
Horizontal
30 ~ 96 kHz
Vertical
50 ~ 160 Hz
Input Signal Definition
Video Signal
RGB, Analog 0.7 Vpp positive at 75 ohms
Sync Signal
Separate H/V sync, TTL level, positive or negative
Display Color
Unlimited
Maximum Pixel Clock
250 MHz
Power Supply
90 ~ 264VAC rms, 60/50 Hz ± 3Hz
Power Consumption
Less than 90W
Dimensions (WxDxH)
401 x 410 x 378mm (After installation of Stand)
Weight
14.3kg
Environmental considerations
Operating Temperature 32°F ~ 104°F(0°C ~ 40°C)
Humidity 10% ~ 80%, non-condensing
Storage Temperature -4°F ~113°F (-20°C ~ 45°C)
Humidity 5% ~ 95%, non-condensing
Plug and Play Capability
This monitor can be installed on any Plug & Play compatible system. Interaction of the monitor and
computer systems will provide the best operating conditions and monitor settings. In most cases,
monitor installation will proceed automatically, unless the user wishes to select alternate settings.
Note: Design and specifications are subject to change without prior notice.
Downloaded from ManualMonitor.com Manuals
General
PowerSaver
Preset Timing
Modes
This monitor has a built-in power management system called PowerSaver. This system saves
energy by switching your monitor into a low-power mode when it has not been used for a certain
amount of time. The monitor automatically returns to normal operation when you move the
computer's mouse or press a key on the keyboard. For energy conservation, turn your monitor OFF
when it is not needed, or when leaving it unattended for long periods. The PowerSaver system
operates with a VESA DPMS compliant video card installed in your computer. Use a software utility
installed on your computer to set up this feature.
State
Normal Operation
Power-off Mode EPA/ENERGY
2000
Power Indicator
Green
Green, Blinking
Power Consumption
Less than 90W
Less than 2.0W
This monitor is EPA ENERGY STAR® compliant and ENERGY2000 compliant when
used with a computer equipped with VESA DPMS functionality.
As an ENERGY STAR® Partner, SAMSUNG has determined that this product meets
the ENERGY STAR® guidelines for energy efficiency.
Downloaded from ManualMonitor.com Manuals
If the signal transferred from the computer is the same as the following Preset Timing Modes, the
screen will be adjusted automatically. However, if the signal differs, the screen may go blank while
the power LED is on. Refer to the video card manual and adjust the screen as follows.
General
Table 1. Preset Timing Modes
Horizontal
Frequency
(kHz)
Vertical
Frequency
(Hz)
Pixel Clock
(MHz)
Sync Polarity
(H/V)
VESA, 640 x 480
37.500
75.000
31.500
-/-
VESA, 1024 x 768
68.677
84.997
94.500
+/+
VESA, 1280 x 1024
91.146
85.024
157.50
+/+
PowerSaver
Preset Timing
Modes
Display Mode
Horizontal Frequency
The time to scan one line connecting the right edge to the left edge of the
screen horizontally is called Horizontal Cycle and the inverse number of
the Horizontal Cycle is called Horizontal Frequency. Unit: kHz
Vertical Frequency
Like a fluorescent lamp, the screen has to repeat the same image many
times per second to display an image to the user. The frequency of this
repetition is called Vertical Frequency or Refresh Rate. Unit: Hz
Downloaded from ManualMonitor.com Manuals
General
Model Name
General
PowerSaver
Preset Timing
Modes
SyncMaster 795DF/795MB
Picture Tube
Type
17"(43cm) DynaFlat (40.6cm viewable)
Deflection angle
90 °
Dot Pitch
0.20mm (Horizontal)
Screen type
Aluminized tri-color phosphor dot trio with black matrix.
Anti-doming invar shadow mask.
Multi-layer coated with anti-static.
Maximum Resolution
1600 x 1200 (NI)
Active Display
Horizontal
312 ± 4 mm
Vertical
234 ± 4 mm
Synchronization
Horizontal
30 ~ 85 kHz
Vertical
50 ~ 160 Hz
Input Signal Definition
Video Signal
RGB, Analog 0.7 Vpp positive at 75 ohms
Sync Signal
Separate H/V sync, TTL level, positive or negative
Display Color
Unlimited
Maximum Pixel Clock
185 MHz
Power Supply
90 ~ 264VAC rms, 60/50 Hz ± 3Hz
Power Consumption
Less than 90W
Dimensions (WxDxH)
401 x 410 x 378mm (After installation of Stand)
Weight
14.3kg
Environmental considerations
Operating Temperature 32°F ~ 104°F(0°C ~ 40°C)
Humidity 10% ~ 80%, non-condensing
Storage Temperature -4°F ~113°F (-20°C ~ 45°C)
Humidity 5% ~ 95%, non-condensing
Plug and Play Capability
This monitor can be installed on any Plug & Play compatible system. Interaction of the monitor and
computer systems will provide the best operating conditions and monitor settings. In most cases,
monitor installation will proceed automatically, unless the user wishes to select alternate settings.
Note: Design and specifications are subject to change without prior notice.
Downloaded from ManualMonitor.com Manuals
General
PowerSaver
Preset Timing
Modes
This monitor has a built-in power management system called PowerSaver. This system saves
energy by switching your monitor into a low-power mode when it has not been used for a certain
amount of time. The monitor automatically returns to normal operation when you move the
computer's mouse or press a key on the keyboard. For energy conservation, turn your monitor OFF
when it is not needed, or when leaving it unattended for long periods. The PowerSaver system
operates with a VESA DPMS compliant video card installed in your computer. Use a software utility
installed on your computer to set up this feature.
State
Normal Operation
Power-off Mode EPA/ENERGY
2000
Power Indicator
Green
Green, Blinking
Power Consumption
Less than 90W
Less than 2.0W
This monitor is EPA ENERGY STAR® compliant and ENERGY2000 compliant when
used with a computer equipped with VESA DPMS functionality.
As an ENERGY STAR® Partner, SAMSUNG has determined that this product meets
the ENERGY STAR® guidelines for energy efficiency.
Downloaded from ManualMonitor.com Manuals
If the signal transferred from the computer is the same as the following Preset Timing Modes, the
screen will be adjusted automatically. However, if the signal differs, the screen may go blank while
the power LED is on. Refer to the video card manual and adjust the screen as follows.
General
Table 1. Preset Timing Modes
Horizontal
Frequency
(kHz)
Vertical
Frequency
(Hz)
Pixel Clock
(MHz)
Sync Polarity
(H/V)
VESA, 640 x 480
37.500
75.000
31.500
-/-
VESA, 1024 x 768
68.677
84.997
94.500
+/+
VESA, 1280 x 1024
79.976
75.025
135.00
+/+
PowerSaver
Preset Timing
Modes
Display Mode
Horizontal Frequency
The time to scan one line connecting the right edge to the left edge of the
screen horizontally is called Horizontal Cycle and the inverse number of
the Horizontal Cycle is called Horizontal Frequency. Unit: kHz
Vertical Frequency
Like a fluorescent lamp, the screen has to repeat the same image many
times per second to display an image to the user. The frequency of this
repetition is called Vertical Frequency or Refresh Rate. Unit: Hz
Downloaded from ManualMonitor.com Manuals
General
Model Name
General
PowerSaver
Preset Timing
Modes
SyncMaster 793S
Picture Tube
Type
17"(43cm) Full square type (40.6cm viewable)
Deflection angle
90 °
Dot Pitch
0.23mm (Horizontal)
Screen type
Aluminized tri-color phosphor dot trio with black matrix.
Anti-doming invar shadow mask.
Multi-layer coated with anti-static.
Maximum Resolution
1280 x 1024 (NI)
Active Display
Horizontal
312 ± 4 mm
Vertical
234 ± 4 mm
Synchronization
Horizontal
30 ~ 70 kHz
Vertical
50 ~ 160 Hz
Input Signal Definition
Video Signal
RGB, Analog 0.7 Vpp positive at 75 ohms
Sync Signal
Separate H/V sync, TTL level, positive or negative
Display Color
Unlimited
Maximum Pixel Clock
110 MHz
Power Supply
90 ~ 264VAC rms, 60/50 Hz ± 3Hz
Power Consumption
Less than 90W
Dimensions (WxDxH)
401 x 410 x 378mm (After installation of Stand)
Weight
14.3kg
Environmental considerations
Operating Temperature 32°F ~ 104°F(0°C ~ 40°C)
Humidity 10% ~ 80%, non-condensing
Storage Temperature -4°F ~113°F (-20°C ~ 45°C)
Humidity 5% ~ 95%, non-condensing
Plug and Play Capability
This monitor can be installed on any Plug & Play compatible system. Interaction of the monitor and
computer systems will provide the best operating conditions and monitor settings. In most cases,
monitor installation will proceed automatically, unless the user wishes to select alternate settings.
Note: Design and specifications are subject to change without prior notice.
Downloaded from ManualMonitor.com Manuals
General
PowerSaver
Preset Timing
Modes
This monitor has a built-in power management system called PowerSaver. This system saves
energy by switching your monitor into a low-power mode when it has not been used for a certain
amount of time. The monitor automatically returns to normal operation when you move the
computer's mouse or press a key on the keyboard. For energy conservation, turn your monitor OFF
when it is not needed, or when leaving it unattended for long periods. The PowerSaver system
operates with a VESA DPMS compliant video card installed in your computer. Use a software utility
installed on your computer to set up this feature.
State
Normal Operation
Power-off Mode EPA/ENERGY
2000
Power Indicator
Green
Green, Blinking
Power Consumption
Less than 90W
Less than 2W
This monitor is EPA ENERGY STAR® compliant and ENERGY2000 compliant when
used with a computer equipped with VESA DPMS functionality.
As an ENERGY STAR® Partner, SAMSUNG has determined that this product meets
the ENERGY STAR® guidelines for energy efficiency.
Downloaded from ManualMonitor.com Manuals
If the signal transferred from the computer is the same as the following Preset Timing Modes, the
screen will be adjusted automatically. However, if the signal differs, the screen may go blank while
the power LED is on. Refer to the video card manual and adjust the screen as follows.
General
Table 1. Preset Timing Modes
Horizontal
Frequency
(kHz)
Vertical
Frequency
(Hz)
Pixel Clock
(MHz)
Sync Polarity
(H/V)
VESA, 640 x 480
37.500
75.000
31.500
-/-
VESA, 800 x 600
53.674
85.061
56.250
+/+
VESA, 1024 x 768
68.677
84.997
94.500
+/+
PowerSaver
Preset Timing
Modes
Display Mode
Horizontal Frequency
The time to scan one line connecting the right edge to the left edge of the
screen horizontally is called Horizontal Cycle and the inverse number of
the Horizontal Cycle is called Horizontal Frequency. Unit: kHz
Vertical Frequency
Like a fluorescent lamp, the screen has to repeat the same image many
times per second to display an image to the user. The frequency of this
repetition is called Vertical Frequency or Refresh Rate. Unit: Hz
Downloaded from ManualMonitor.com Manuals
General
Model Name
General
PowerSaver
Preset Timing
Modes
SyncMaster 793DF/793MB
Picture Tube
Type
17"(43cm) DynaFlat (40.6cm viewable)
Deflection angle
90 °
Dot Pitch
0.20mm (Horizontal)
Screen type
Aluminized tri-color phosphor dot trio with black matrix.
Anti-doming invar shadow mask.
Multi-layer coated with anti-static.
Maximum Resolution
1280 x 1024 (NI)
Active Display
Horizontal
312 ± 4 mm
Vertical
234 ± 4 mm
Synchronization
Horizontal
30 ~ 70 kHz
Vertical
50 ~ 160 Hz
Input Signal Definition
Video Signal
RGB, Analog 0.7 Vpp positive at 75 ohms
Sync Signal
Separate H/V sync, TTL level, positive or negative
Display Color
Unlimited
Maximum Pixel Clock
110 MHz
Power Supply
90 ~ 264VAC rms, 60/50 Hz ± 3Hz
Power Consumption
Less than 90W
Dimensions (WxDxH)
401 x 410 x 378mm (After installation of Stand)
Weight
14.3kg
Environmental considerations
Operating Temperature 32°F ~ 104°F(0°C ~ 40°C)
Humidity 10% ~ 80%, non-condensing
Storage Temperature -4°F ~113°F (-20°C ~ 45°C)
Humidity 5% ~ 95%, non-condensing
Plug and Play Capability
This monitor can be installed on any Plug & Play compatible system. Interaction of the monitor and
computer systems will provide the best operating conditions and monitor settings. In most cases,
monitor installation will proceed automatically, unless the user wishes to select alternate settings.
Note: Design and specifications are subject to change without prior notice.
Downloaded from ManualMonitor.com Manuals
General
PowerSaver
Preset Timing
Modes
This monitor has a built-in power management system called PowerSaver. This system saves
energy by switching your monitor into a low-power mode when it has not been used for a certain
amount of time. The monitor automatically returns to normal operation when you move the
computer's mouse or press a key on the keyboard. For energy conservation, turn your monitor OFF
when it is not needed, or when leaving it unattended for long periods. The PowerSaver system
operates with a VESA DPMS compliant video card installed in your computer. Use a software utility
installed on your computer to set up this feature.
State
Normal Operation
Power-off Mode EPA/ENERGY
2000
Power Indicator
Green
Green, Blinking
Power Consumption
Less than 90W
Less than 2.0W
This monitor is EPA ENERGY STAR® compliant and ENERGY2000 compliant when
used with a computer equipped with VESA DPMS functionality.
As an ENERGY STAR® Partner, SAMSUNG has determined that this product meets
the ENERGY STAR® guidelines for energy efficiency.
Downloaded from ManualMonitor.com Manuals
If the signal transferred from the computer is the same as the following Preset Timing Modes, the
screen will be adjusted automatically. However, if the signal differs, the screen may go blank while
the power LED is on. Refer to the video card manual and adjust the screen as follows.
General
Table 1. Preset Timing Modes
Horizontal
Frequency
(kHz)
Vertical
Frequency
(Hz)
Pixel Clock
(MHz)
Sync Polarity
(H/V)
VESA, 640 x 480
37.500
75.000
31.500
-/-
VESA, 800 x 600
53.674
85.061
56.250
+/+
VESA, 1024 x 768
68.677
84.997
94.500
+/+
PowerSaver
Preset Timing
Modes
Display Mode
Horizontal Frequency
The time to scan one line connecting the right edge to the left edge of the
screen horizontally is called Horizontal Cycle and the inverse number of
the Horizontal Cycle is called Horizontal Frequency. Unit: kHz
Vertical Frequency
Like a fluorescent lamp, the screen has to repeat the same image many
times per second to display an image to the user. The frequency of this
repetition is called Vertical Frequency or Refresh Rate. Unit: Hz
Downloaded from ManualMonitor.com Manuals
General
Model Name
General
PowerSaver
Preset Timing
Modes
SyncMaster 591S
Picture Tube
Type
15" (38cm) Full square type (35cm viewable)
Deflection angle
90 °
Dot Pitch
0.24mm (Horizontal)
Screen type
Aluminized tri-color phosphor dot trio with black matrix.
Anti-doming invar shadow mask.
Multi-layer coated with anti-static/Glare.
Maximum Resolution
1024 x 768(NI)
Active Display
Horizontal
267 ± 4 mm
Vertical
200 ± 4 mm
Synchronization
Horizontal
30 - 55 kHz
Vertical
50 ~ 120 Hz
Input Signal Definition
Video Signal
RGB, Analog 0.7 Vpp positive at 75 ohms
Sync Signal
Separate H/V sync, TTL level, positive or negative
Display Color
Unlimited
Maximum Pixel Clock
65 MHz
Power Supply
90 ~ 264VAC rms, 60/50 Hz ± 3Hz
Power Consumption
Less than 70W
Dimensions (WxDxH)
361 x 379.2 x 347 mm (After installation of Stand)
Weight
11.0 kg
Environmental considerations
Operating Temperature 32°F ~ 104°F(0°C ~ 40°C)
Humidity 10% ~ 80%, non-condensing
Storage
Temperature -4°F ~113°F (-20°C ~ 45°C)
Humidity 5% ~ 95%, non-condensing
Plug and Play Capability
This monitor can be installed on any Plug & Play compatible system. Interaction of the monitor and
computer systems will provide the best operating conditions and monitor settings. In most cases,
monitor installation will proceed automatically, unless the user wishes to select alternate settings.
Note: Design and specifications are subject to change without prior notice.
Downloaded from ManualMonitor.com Manuals
General
PowerSaver
Preset Timing
Modes
This monitor has a built-in power management system called PowerSaver. This system saves
energy by switching your monitor into a low-power mode when it has not been used for a certain
amount of time. The monitor automatically returns to normal operation when you move the
computer's mouse or press a key on the keyboard. For energy conservation, turn your monitor OFF
when it is not needed, or when leaving it unattended for long periods. The PowerSaver system
operates with a VESA DPMS compliant video card installed in your computer. Use a software utility
installed on your computer to set up this feature.
State
Normal Operation
Power-off Mode EPA/ENERGY
2000
Power Indicator
Green
Green, Blinking
Power Consumption
Less than 70W
Less than 2.0W
This monitor is EPA ENERGY STAR® compliant and ENERGY2000 compliant when
used with a computer equipped with VESA DPMS functionality.
As an ENERGY STAR® Partner, SAMSUNG has determined that this product meets
the ENERGY STAR® guidelines for energy efficiency.
Downloaded from ManualMonitor.com Manuals
If the signal transferred from the computer is the same as the following Preset Timing Modes, the
screen will be adjusted automatically. However, if the signal differs, the screen may go blank while
the power LED is on. Refer to the video card manual and adjust the screen as follows.
General
Table 1. Preset Timing Modes
Horizontal
Frequency
(kHz)
Vertical
Frequency
(Hz)
Pixel Clock
(MHz)
Sync Polarity
(H/V)
VESA, 640 x 480
37.500
85.008
36.000
-/-
VESA, 640 x 480
43.269
75.000
31.500
-/-
VESA, 800 x 600
53.674
85.061
56.250
+/+
PowerSaver
Preset Timing
Modes
Display Mode
Horizontal Frequency
The time to scan one line connecting the right edge to the left edge of the
screen horizontally is called Horizontal Cycle and the inverse number of
the Horizontal Cycle is called Horizontal Frequency. Unit: kHz
Vertical Frequency
Like a fluorescent lamp, the screen has to repeat the same image many
times per second to display an image to the user. The frequency of this
repetition is called Vertical Frequency or Refresh Rate. Unit: Hz
Downloaded from ManualMonitor.com Manuals
General
Model Name
General
PowerSaver
Preset Timing
Modes
SyncMaster 997DF
Picture Tube
Type
19"(48cm) DynaFlat (45.8cm viewable)
Deflection angle
90 °
Dot Pitch
0.20mm (Horizontal)
Screen type
Aluminized tri-color phosphor dot trio with black matrix.
Anti-doming invar shadow mask.
Multi-layer coated with anti-static/Glare.
Maximum Resolution
1600 X 1200@ 76Hz
Active Display
Horizontal
352 ± 3 mm
Vertical
264 ± 3 mm
Synchronization
Horizontal
30 ~ 96 kHz
Vertical
50 ~ 160 Hz
Input Signal Definition
Video Signal
RGB, Analog 0.7 Vpp positive at 75 ohms
Sync Signal
Separate H/V sync, TTL level, positive or negative
Display Color
Unlimited
Maximum Pixel Clock
250 MHz
Power Supply
90 ~ 264VAC rms, 60/50 Hz ± 3Hz
Power Consumption
Less than 110W
Dimensions (WxDxH)
445 x 457,5 x 416mm (After installation of Stand)
Weight
18,2 kg
Environmental considerations
Operating Temperature 32°F ~ 104°F(0°C ~ 40°C)
Humidity 10% ~ 80%, non-condensing
Storage Temperature -4°F ~113°F (-20°C ~ 45°C)
Humidity 5% ~ 95%, non-condensing
Plug and Play Capability
This monitor can be installed on any Plug & Play compatible system. Interaction of the monitor and
computer systems will provide the best operating conditions and monitor settings. In most cases,
monitor installation will proceed automatically, unless the user wishes to select alternate settings.
Note: Design and specifications are subject to change without prior notice.
Downloaded from ManualMonitor.com Manuals
General
PowerSaver
Preset Timing
Modes
This monitor has a built-in power management system called PowerSaver. This system saves
energy by switching your monitor into a low-power mode when it has not been used for a certain
amount of time. The monitor automatically returns to normal operation when you move the
computer's mouse or press a key on the keyboard. For energy conservation, turn your monitor OFF
when it is not needed, or when leaving it unattended for long periods. The PowerSaver system
operates with a VESA DPMS compliant video card installed in your computer. Use a software utility
installed on your computer to set up this feature.
State
Normal Operation
Power-off Mode EPA/ENERGY
2000
Power Indicator
Green
Green, Blinking
Power Consumption
Less than 110W
Less than 2W
This monitor is EPA ENERGY STAR® compliant and ENERGY2000 compliant when
used with a computer equipped with VESA DPMS functionality.
As an ENERGY STAR® Partner, SAMSUNG has determined that this product meets
the ENERGY STAR® guidelines for energy efficiency.
Downloaded from ManualMonitor.com Manuals
If the signal transferred from the computer is the same as the following Preset Timing Modes, the
screen will be adjusted automatically. However, if the signal differs, the screen may go blank while
the power LED is on. Refer to the video card manual and adjust the screen as follows.
General
Table 1. Preset Timing Modes
Horizontal
Frequency
(kHz)
Vertical
Frequency
(Hz)
Pixel Clock
(MHz)
Sync Polarity
(H/V)
VESA, 640 x 480
37.500
75.000
31.500
-/-
VESA, 1024 x 768
68.677
84.997
94.500
+/+
VESA, 1280 x 1024
91.146
85.024
157.50
+/+
PowerSaver
Preset Timing
Modes
Display Mode
Horizontal Frequency
The time to scan one line connecting the right edge to the left edge of the
screen horizontally is called Horizontal Cycle and the inverse number of
the Horizontal Cycle is called Horizontal Frequency. Unit: kHz
Vertical Frequency
Like a fluorescent lamp, the screen has to repeat the same image many
times per second to display an image to the user. The frequency of this
repetition is called Vertical Frequency or Refresh Rate. Unit: Hz
Downloaded from ManualMonitor.com Manuals
Service
AUSTRALIA :
Samsung Electronics Australia Pty Ltd.
Customer Response Centre
7 Parkview Drive, Homebush Bay NSW 2127
Tel : 1300 362 603
http://www.samsung.com.au/
BRAZIL :
Samsung Eletronica da Amazonia Ltda.
R. Prof. Manoelito de Ornellas, 303, Terro B
Chacara Sto. Antonio, CEP : 04719-040
Sao Paulo, SP
SAC : 0800 124 421
http://www.samsung.com.br/
CANADA :
Samsung Electronics Canada Inc.
Samsung Customer Care
7037 Financial Drive
Mississauga, Ontario
L5N 6R3
1-800-SAMSUNG (1-800-726-7864)
http://www.samsung.ca/
CHILE :
SONDA S.A.
Teatinos 550, Santiago Centro, Santiago, Chile
Fono: 56-2-5605000 Fax: 56-2-5605353
56-2-800200211
http://www.sonda.com/
http://www.samsung.cl/
COLOMBIA :
Samsung Electronics Colombia
Cra 9 No 99A-02 Of. 106
Bogota, Colombia
Tel.: 9-800-112-112
Fax: (571) 618 - 2068
http://www.samsung-latin.com/
e-mail : [email protected]
ESPAÑA :
Samsung Electronics Comercial Iberica, S.A.
Ciencies, 55-65 (Poligono Pedrosa) 08908
Hospitalet de Llobregat (Barcelona)
Tel. : (93) 261 67 00
Fax. : (93) 261 67 50
http://samsung.es/
FRANCE :
SAMSUNG ELECTRONICS FRANCE Service
Paris Nord 2
66 rue des Vanesses
BP 50116 Villepinte
95950 Roissy CDG Cedex
Tel : 08 25 08 65 65
Fax : 01 48 63 06 38
http://www.samsungservices.com/
GERMANY :
TELEPLAN Rhein-Main GmbH
Feldstr. 16
64331 Weiterstadt
T. 06151/957-1306
F. 06151/957-1732
* EURO 0.12/Min
http://www.samsung.de/
HUNGARY :
Samsung Electronics Magyar Rt.
1039, Budapest, Lehel u. 15-17.
Tel: 36 1 453 1100
Fax: 36
1 453
1101
Downloaded
from
ManualMonitor.com
Manuals
http://www.samsung.hu/
ITALY :
Samsung Electronics Italia S.p.a.
Via C. Donat Cattin, 5
20063 Cernusco s/Naviglio (MI)
Servizio Clienti: 199.153.153
http://www.samsung-italia.com/
MEXICO :
SAMSUNG ELECTRONICS MEXICO. S.A. DE C.V.
Saturno NO.44, Col. Nueva Industrial Vallejo
Gustavo A.Madero C.P.07700, Mexico D.F. Mexico
TEL. 52-55-5747-5100
Fax. 52-55-47 52 02
RFC: SEM950215S98
http://www.samsung.com.mx/
NETHERLANDS/BELGIUM/LUXEMBOURG :
Samsung Electronics Benelux B. V.
Fleminglaan 12 2289 CP Rijiswijk, NEDERLANDS
Service and informatielijn ;
Belgium :0800-95214, http://www.samsung.be/
Netherlands : 0800-2295214, http://www.samsung.nl/
PANAMA :
Samsung Electronics Latinoamerica( Z.L.) S.A.
Calle 50 Edificio Plaza Credicorp, Planta Baja
Panama
Tel. : (507) 210-1122, 210-1133
Tel : 800-3278(FAST)
http://www.samsung-latin.com/
PERU
Servicio Integral Samsung
Av.Argentina 1790 Lima1. Peru
Tel: 51-1-336-8686
Fax: 51-1-336-8551
http://www.samsungperu.com/
PORTUGAL :
SAMSUNG ELECTRONICA PORTUGUESA S.A.
Rua Mário Dioniso, No2 - 1º Drt. 2795-140 LINDA-A-VELHA
Tel. 214 148 114/100 Fax. 214 148 133/128
Free Line 800 220 120
http://www.samsung.pt/
SOUTH AFRICA :
Samsung Electronics,5 Libertas Road, Somerset Office Park,
Bryanston Ext 16. Po Box 70006, Bryanston,2021, South Afric
Tel : 0027-11-549-1621
Fax : 0027-11-549-1629
http://www.samsung.co.za/
SWEDEN/DENMARK/NORWAY/FINLAND :
Samsung Electronics AB
Box 713
S-194 27 UPPLANDS VÄSBY
SVERIGE
Besöksadress : Johanneslundsvägen 4
Samsung support Sverige: 020-46 46 46
Samsung support Danmark : 8088-4646
Samsung support Norge: 8001-1800
Samsung support Finland: 0800-118001
Tel +46 8 590 966 00
Fax +46 8 590 966 50
http://www.samsung.se/
THAILAND :
HAI SAMSUNG SERVICE CENTER
MPA COMPLEX BUILDING,1st-2nd Floor
175 SOI SUEKSA VIDHAYA SATHON SOI 12
SILOM ROAD ,SILOM,BANGRAK
BANGKOK 10500
TEL : 0-2635-2567
FAX : 0-2635-2556
Service
UKRAINE :
SAMSUNG ELECTRONICS REPRESENTATIVE OFFICE IN UKRAINE
4 Glybochitska str.
Kiev, Ukraine
Tel. 8-044-4906878
Fax 8-044-4906887
Toll-free 8-800-502-0000
http://www.samsung.com.ua/
United Kingdom :
Samsung Electronics (UK) Ltd.
Samsung House, 225 Hook Rise South
Surbiton, Surrey KT6 7LD
Tel. : (0208) 391 0168
Fax. : (0208) 397 9949
< European Service Center & National Service >
Stafford Park 12 Telford, Shropshire, TF3 3BJ
Tel. : (0870) 242 0303
Fax. : (01952) 292 033
http://samsungservice.co.uk/
U.S.A. :
Samsung Electronics America
Service Division
400 Valley Road, Suite 201
Mount Arlington, NJ 07856
1-800-SAMSUNG (1-800-726-7864)
http://samsungusa.com
IMPORTADO POR: SAMSUNG ELECTRONICS MEXICO. S.A. DE C.V.
Saturno NO.44, Col. Nueva Industrial Vallejo
Gustavo A.Madero C.P.07700, Mexico D.F. Mexico
TEL. 52-55-5747-5100
EXPORTADO POR: Samsung Electronics CO.,LTD.
416, Mae tan-3dong, Yeongtong-gu,
Suwon City, Kyoungki-Do Korea
Downloaded from ManualMonitor.com Manuals
Terms
Dot Pitch
The image on a monitor is composed of red, green and blue dots. The closer the dots, the
higher the resolution. The distance between two dots of the same color is called the 'Dot Pitch'.
Unit: mm
Vertical Frequency
The screen must be redrawn several times per second in order to create and display an image
for the user. The frequency of this repetition per second is called Vertical Frequency or Refresh
Rate. Unit: Hz
Example: If the same light repeats itself 60 times per second, this is regarded as 60 Hz. In this
case, flickering of the screen can be detected. To avoid this problem, there is a
Flicker-free Mode using a vertical frequency over 70 Hz.
Horizontal Frequency
The time to scan one line connecting the right edge to the left edge of the screen horizontally is
called Horizontal Cycle. The inverse number of the Horizontal Cycle is called Horizontal
Frequency. Unit: kHz
Interlace and Non-Interlace Methods
Showing the horizontal lines of the screen from the top to the bottom in order is called the NonInterlace method while showing odd lines and then even lines in turn is called the Interlace
method. The Non-Interlace method is used for the majority of monitors to ensure a clear image.
The Interlace method is the same as that used in TVs.
Plug & Play
This is a function that provides the best quality screen for the user by allowing the computer and
the monitor to exchange information automatically. This monitor follows the international
standard VESA DDC for the Plug & Play function.
Resolution
The number of horizontal and vertical dots used to compose the screen image is called
'resolution'. This number shows the accuracy of the display. High resolution is good for
performing multiple tasks as more image information can be shown on the screen.
Example: If the resolution is 1024 X 768, this means the screen is composed of 1024
horizontal dots (horizontal resolution) and 768 vertical lines (vertical resolution).
Downloaded from ManualMonitor.com Manuals
Natural Color
Natural Color Software Program
One of the recent problems in using a computer is that the color of the images printed out by a
printer or other images scanned by a scanner or a digital camera are not the same as those
shown on the monitor.
The Natural Color S/W is the very solution for this problem. It is a color administration system
developed by Samsung Electronics in association with Korea Electronics &
Telecommunications Research Institute (ETRI). This system is available only for Samsung
monitors and makes the color of the images on the monitor the same as the printed or scanned
images.
For more information, refer to Help (F1) in the software program.
How to install the Natural Color software
Insert the CD included with the Samsung monitor into the CD-ROM Drive. Then, the initial
screen of the program installation will be executed. Click Natural Color on the initial screen to
install the Natural Color software. To install the program manually, insert the CD included with
the Samsung monitor into the CD-ROM Drive, click the [Start] button of Windows and then
select [Execute].
Enter D:\color\eng\setup.exe and then press the key.
(If the drive where the CD is inserted is not D:\, enter the applicable drive.)
How to delete the Natural Color software program
Select [Setting]/[Control Panel] on the [Start] menu and then double-click [Add/Delete a
program].
Select Natural Color from the list and then click the [Add/Delete] button.
Downloaded from ManualMonitor.com Manuals
Authority
Information in this document is subject to change without notice.
© 2004 Samsung Electronics Co., Ltd. All rights reserved.
Reproduction in any manner whatsoever without the written permission of Samsung Electronics
Co., Ltd. is strictly forbidden.
Samsung Electronics Co., Ltd. shall not be liable for errors contained herein or for incidental or
consequential damages in connection with the furnishing, performance, or use of this material.
Samsung is the registered trademark of Samsung Electronics Co., Ltd.; Microsoft, Windows and
Windows NT are registered trademarks of Microsoft Corporation; VESA, DPMS and DDC are
registered trademarks of Video Electronics Standard Association; the ENERGY STAR name and
logo are registered trademarks of the U.S. Environmental Protection Agency (EPA). As an
ENERGY S TAR Partner, Samsung Electronics Co., Ltd. has determined that this product meets
the ENERGY S TAR guidelines for energy efficiency. All other product names mentioned herein
may be the trademarks or registered trademarks of their respective owners.
Downloaded from ManualMonitor.com Manuals
_