1
By
Features and user manual rel.1
Thank you for purchasing vPed. We trust that the device can fully satisfy you, offering more and more satisfaction over time. Please
read this guide about the main features and functionality in order to fully take advantage of its potential.
Introduction
vPed has been developed with the objective of using plug-ins in VST and VSTi formats (owned by "Steinberg Media Technologies
GmbH" ©) in live performances. Plug-in in this format are characterized by an awesome range of effects and virtual instruments
available, usually used only on DAW systems.
vPed already includes pre-installed VST/VSTi plugins, but the goal is to allow the user to make use of the wide availability of VST
plugins downloaded from the web (free or purchased). A vPed user can have fun creating numerous sound situations, easily recalled
during live performance. For this reason, using vPed, you don’t have to do anything but think about your music.
vPed retains a large dynamic range, and has a latency of only 3-4 mS, unrecognized by most users. Note that the latency could also
be increased by some plug-ins.
vPed allows you to load and assign 4 + 4 footswitches, for a total of 8 VST and / or VSTi plugins. Note that you can choose how all
effects are activated: in the additive mode all the plug-ins are active at the same time; in the exclusive mode , when one effect is
enabled,the previous is automatically turned off. This mode is useful in the VST that includes both effects and guitar amplifier, and
thus provides a complete set of sounds and effects in the same plug-in. (e.g. TH2©
/ KUASSA © / Audiffex FreeAmp © / Plektron © etc.).
The first 4 foot switches from the left, are characterized by a blue color, allowing you to simply activate or deactivate an effect.
However, the foot switches can also take editing functions depending on the displayed screen. In management operations or deep
editings, a mouse(included)can be helpful though not essential. It's also possible to connect a computer keyboard (not included), not
essential but useful for procedures of certain plugin installations, or for entries registering a purchased product.
vPed can be attractive for guitar/bass and keyboard players as well as singers, and in any case for those who need to use plugins in
VST / VSTi formats in live performances:
Guitar/Bass players operation modes:
As an 8 effects pedal board, connecting audio output to your amplifier.
As a standalone unit to be connected to a P.A. line input (mono or stereo), using VST plug-ins and Sfx including simulator amp
+ cab at the end of the effects chain
Keyboard players operation modes:
As a VST host for live operation, with the ability to upload up to 8 VSTi /VST Sfx controllable by a connected MIDI keyboard
(not included).
Singers operation modes:
As a VST host for live utilization, by loading for example preamps specifically for vocals, and effect chain to your liking
(compressors, reverbs, delays, pitch correctors etc.).
1
More available features
Allows you to load up to 8 plug-ins, shown in 2 pages, switched on / off in real time, using 4 traditional foot switches. Each
effect can thus be activated / deactivated via a foot switch for each specific effect.
"Page / Edit" foot switch which, in addition to numerous functions, allows you to select and load, user created presets with the
same plug-in, in real-time, or load a whole board during your performances
Displaying original plug-in graphics, with the ability to edit the effect with the mouse, or change the values within the plug-in
parameter list. Parameters can be managed by using standard external switches or expression pedals.
Ability to assign the audio source (and/or MID source) to every plug-in. Parameters are saved for each single board
Ability to adjust the audio output in Stereo/Mono mode or separated for Guitar and Mic
Possibility for connecting to remote assistance support
Ability to backup and restore all data
Data stored on a solid state drive (SSD)
Guitar/Bass built in tuner, quickly accessible
Native latency <= 4 ms. . (final latency may also depends on the plugin's accuracy)
Ability to adjust your favorite chain effects quickly
Ability to save and load boards that include all 8 VST and/or VSTi.
You can choose between two modes for the activation of plug-in:
The plug-ins are activated individually, and then activated effects are summed
When you activate a plug-in, the previous one is automatically deactivated. This mode of operation is essential when
your VST includes amplifier and effects (e.g. TH2© / Audiffex FreeAmp © / Plektron © Guitar Rig© / AmpliTube© etc.), or when using VSTi..
The request for CPU resources of each plugin is monitored individually.
Great compatibility with most of the VST plug-ins available (Windows© 32 bit DLL)
Hardware features
Audio inputs :
1) Guitar/Bass: ¼” jack with Hi/Low input sensitivity switch
2) Mic: Balanced Cannon XLR socket, with gain regulation and phantom power (12v.)
3) Aux Input: Stereo mini jack
Audio outputs:
1) Stereo audio output through 2 Cannon XLR pseudo-balanced (L/R):
2) Stereo audio output through 2 mono ¼” unbalanced jack (L/R)
3) Phones stereo mini jack
Other available connections:
1) 4 connectors for assignable external expression pedals (not included),assignable to any plug-in parameter
2) 2 connectors for 2/4 foot switches (not included), assignable to any plug-in parameter
3) 4 USB2 ports
4) 19 V DC input jack for external power supply (included)
5) 1 HDMI port
6) RJ-45 LAN port
Getting Started
Plug in the power adapter cable supplied with vPed, and connect the other end to the power outlet. The power supply is compatible
with both voltages 220v 110v. Any damage caused by the use of any other power supply than the one supplied with vPed will null the
warranty. Connect audio cables (not supplied) to the audio signal outputs, balanced XLR or Jack ¼ "unbalanced, located in the right
panel of vPed, at the input/s of the audio system or amplifier. It is strongly recommended to keep the levels of the audio system or the
volume of the amplifier, fully lowered before turning on or off vPed using the button located in the left panel. When turning off the unit,
first turn off the amplifier, and then the vPed. Any damage resulting from inaccuracy to observe this notice, will null warranty.
2
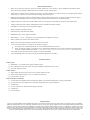
Right side panel. Audio connections and footswitches inputs
On the right side of vPed there are several audio connectors. In/Out and control connectors description is shown on the front panel to
ease use.
1
2
8
3
4
5
6
7
1) Guitar / Bass input sensitivity selector. "HI" is preferred for connecting instruments with passive “single coil” pickup and "LOW"
is more suitable for humbuker pickups or, any instruments with built-in pre-amplification.
2) ¼” jack input, for guitar/bass.
3) Balanced microphone input.
4) 2 pseudo-balanced XLR outputs, respectively left and right channels. In case you want to use only one output, use one of the
two connectors, remembering to set the audio output in MONO mode (MenuGlobal SetupMono Output). Note that all
outputs are active simultaneously, allowing you to send the output signal of vPed to multiple inputs (e.g. guitar / bass amplifier
and P.A. system).
5) 2 jack ¼” unbalanced outputs, respectively left and right channels. As already mentioned above, if you want to use only one output,
use one of the two connectors, remembering to set the audio output in MONO mode (MenuGlobal SetupMono Output).
6) Assignable external expression pedal inputs (not included).
7) Assignable external inputs switches (not included).
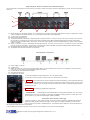
Left side panel. Connections
A) Power supply connector
B) 4 USB2 ports
C) HDMI connector. By connecting an external video device you can replicate what is shown on the display of vPed. From this
connector you can also get a 24-bit/96 kHz digital audio output
D) RJ-45 LAN port with LED status indicators
E) Aux stereo audio input
F) Headphones connector
To the right headphone output there is the On / Off power button,
On the right of the front panel of vPed, there are 2 knobs and a foot switch:
VALUE
, which assumes the function adjusting the values depending on the selected parameter,
and also other tasks always according to the type of editing that is being carried. When you are on the
main screen of a board, you can assign to the knob PAGE, the control of a specific plugin parameter
chosen by the user.
VOLUME
, to adjust the global audio output level
PAGE/ENTER , characterized by the red illumination. Pressing this footswitch once, you access
alternately the first 4 (1/4) or following 4 (5/8) slots available for loading effects. To return to the first
group of slots (1/4), press the button again "PAGE / ENTER".
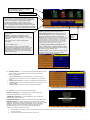
Description of the functions and usage
Turning the power on, after a few seconds, the screen related to the first 4 available effects will be
displayed, while pressing the last foot button on the right once (PAGE / ENTER), you will see the
screen that shows the other 4 available effects. The activation times depend on the characteristics of
the last board loaded at power off the device.
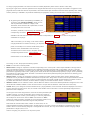
In the middle of the top bar of the main screen, there is the description of the group of slots displayed:
Displays the first group of plugins assigned in positions from 1 to 4
3
Displays the second group of plugins assigned in positions from 5 to 8
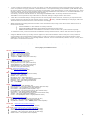
Pressing down for at least one second the footswitch "PAGE / ENTER", you will access the screen where several functions are
available :
1
2
3
4
5
6
Scroll, with the help of the pedal buttons corresponding arrows on the bottom left, the various panes, and press "PAGE / ENTER" to
enter in the corresponding panel. Alternatively, you can use left button of the supplied mouse, or type ENTER on the keyboard (not
supplied) if it's connected.
1) “TUNER”: To access the Guitar/Bass tuner.
BACK to return to the the board screen.
2) “LOAD BOARD”: To access the panel where you can
choose and load a previously saved board. For BOARD
means the set of up to 8 loaded. Scroll the board list with the
help of the footwitches corresponding to the arrows at the
bottom left of the screen (useful mode during live
performances), or by using the VALUE dial, in the right side
of the front panel of vPed
3) “SAVE BOARD”: To save the loaded board. Subsequently the selection, the page where you can type the name for the board will
be displayed. Inserting of characters is also possible by a connected computer keyboard (not included).
Note: Board settings are recorded even when the power is turned off, as long as another board is loaded. In this case, remember to
decide whether to save the board or not. vPed, however, when loading another board, the system will ask you whether to save the
loaded one or not.
.
4) “BOARD SETUP”: ”: In this panel there are important global settings that require more detailed settings. The regulations are made
to complete the vPed configuration, according to the mode of use.
To select a specific parameter, use the usual buttons that correspond to the arrows
displayed in
the bottom left.
Parameters will scroll for both the first 4 as well as for the remaining 4 slots, allowing adjustment of all 8 available plugins.
4
The top displays the graphical part of
the individual loaded plugins, making
the identification easier
Name of the loaded plugin
Adjusting the input source based on the used inputs
(Jack / XLR). In a normal chain of effects, the input
comes from the previous output effect (PREVIOUS),
however it's possible to manage different audio
sources, for example in case you want to use
simultaneously effects for guitar, keyboard and/or
voice. It's possible that this type of "multi-use" requires
a lot of resources, so to get an adequate sound quality,
it is recommended not to over load available resources.
MIDI signal source. You can select the following
parameters:
“MIDI IN”: The plugin, presumably a VSTi,
receives messages from a MIDI controller
connected via MIDI (not included) , e.g. a MIDI
keyboard
“The plugin name”, if able to detect MIDI
messages
“-“ No one MIDI input
Note: If a plugin recognize to specific MIDI
control will be possible set it as the source. This
adjustment is indispensable if are used plugins
that detect and convert the analog signal into
MIDI messages to be sent to a VSTi loaded in a
different slot of vPed
By pressing this button you access to a screen
related to options about the loaded board:
"One pedal at a time", which allows you to set
the activating plugin mode, where activating a
plugin the previously loaded is automatically
disabled. This operation mode may be indispensable using
To go back
to the
previous
screen
VSTi controlled by an external controller, in order to activate
a plugin at a time, or in the use of plugins, e.g. for guitar /
bass, providing complete sound set (amp + cab simulator
and effects). Note that the parameter is saved for single
board. "BACK" to return to the previous screen.
"Load the program while scrolling the list",
which enables (YES) or disables (OFF) the autoloading of programs (presets) that may be saved
by the user or pre-existing ones.
“Audio output” allows to adjust the audio output
to Stereo or Mono mode, or to get separate
outputs for Guitar and Mic inputs.
5) “GLOBAL SETUP”: ”: In this panel there are global settings for the
device. In this vPed software release the panel proposes the
following parameters:
" Aux input volume” to adjust the level of the audio source
connected to the mini jack connector available in the vPed’s left
panel
“Headphones volume” of course, to adjust phones output level
“Sample rate” to set the internal processing of the signal at 44.1
kHz or 48 kHz
“Current skin” to set the to set the background graphic
6) “UTILITY” This panel provides several functions:
“INSTALL EFFECTS”* To install plugins or transfer data. The
argument is detailed later in this document.
“UNINSTALL EFFECTS”* To uninstall plugins. The argument is
detailed later in this document.
“MANAGE BOARDS” To delete or rename previously saved boards.
“BACKUP DATA” To create a safe copy of the user data. Insert a
USB storage data device then activate the function by pressing "PAGE
/ ENTER". The backup will start automatically, and a notification
message to warn you when the task is finished. Duration of the
operation depends on the amount of data to be processed.
Notes about “BACKUP DATA” function:
In the USB device where a backup is performed must be available at least twice the free space than the data space occupied
in vped (see info).
The backup includes all data entered by the user.
5
A backup can only be restored on the same device.
At the end of a backup, the device will shut down and restart automatically.
If you want to rename a backup file previously executed, it is recommended not to insert spaces in the new name.
“RESTORE DATA” To restore data previously saved through “BACKUP DATA” function. Connect the USB device in which data was
saved and then activate the function.
“SYSTEM INFO” To display:
Installed software version
The amount of occupied space on the internal storage unit
MAC (Machine Code), unique for each device
“SOFTWARE UPGRADE” To update vPed software version. When in possession of an update (files with ". Upg" extension ), copy it
to an USB device than connect it to one of the 4 USB ports available on the left side of vPed. Then select the update that will be
displayed (e.g. vPed-xxx.upg) and launch "SOFTWARE UPGRADE" utility. After a few seconds, when the update will be installed,
vPed will restart automatically.
“REMOTE ASSISTANCE” With the help of this function you can receive support directly from the customer service of vPed. To enjoy
this service requires a broadband connection and vPed connected to the network via the LAN. It 'possible that the network connection
may be required during the activation of certain plugins.
“CLEAR ALLA DATA” to delete all data, including plugins and programs (presets) saved by the user. Note that you will also delete
the factory pre-installed data.
“BRIGHT SUN MODE” mode if you use vPed in particularly bright or with the device exposed to direct sunlight. The mode also lowers
to a lower value of the CPU clock vPed. Restarting vPed, the mode "BRIGHT SUN MODE" will be automatically disabled.
INSTALL / UNINSTALL EFFECTS
(Installing / uninstalling plugins)
vPed supports installations of VST / VSTi whether they are composed of simple "dll" which installation with "Setup" procedure.
Installation via "dll" files
If you install a plug composed only by a "dll" file, copy it to a USB device
and connect it to a USB port of vPed. Then go to MENU section by pressing
and holding for at least one second "PAGE / ENTER" footswitch, then select
"UTILITY" to enter the section. The menu of options shows as first item
“INSTALL EFFECTS”. Press "PAGE / ENTER" to enter the screen that
shows the contents of the USB device. Locate the "dll" relates to the effect
that you want to install, highlight it using the buttons corresponding the
arrows
, then again press "PAGE / ENTER",
or, alternatively, double click the left mouse if connected.
This screen there is also the button "BROWSE" that allows you to enter the structure of vPed.
Note:
, as reported by the message that appears subsequently pushing the "BROWSE" button, can't be held in any way
responsible for any malfunction or other due to changes executed in the section which is accessed subsequently pressing the button
corresponding to "BROWSE", therefore use caution and knowledge of the facts by applying changes to this section.
A message will ask you to confirm the installation of the plugin.
Press the buttons corresponding to "YES" to continue or "NO" to
cancel. Afterwards the confirmation of installation, press "BACK"
several times (depending on the location of the plugin), until you
see where vPed will ask to confirm by the graphical display of the
plugin. Press the button "CONFIRM" to complete the installation.
6
NOTE: In the "EFFECT INSTALLER" and confirm installation screens, is
still available the "BROWSE" option, which allows to navigate in a section
containing system files more in-depth than the one displayed by entering
"BROWSE" from the installation screen. Improper modifications may
degrade or in any way impede the proper functioning of vPed. Should it be
necessary access to this section it's highly recommended to apply
changes with caution and knowledge of the facts by applying changes to
this section. In this case too
can't be held in any way
responsible for any malfunction or other due to changes applied in this
section. Press "ACCEPT" to enter the vPed structure, or "DECLINE "
button to return to the previous screen. In this mode, the use of a mouse is
essential.
It’s 'possible that some dll installations, require to copy an entire folder (containing for example. Dat file / samples impulses / presets /
etc.). In this case, simply drag the entire folder. Exiting the installation page, vPed will install the plugin equally.
Installation with "SETUP"”
While installing plugins with setup, or in any software that install using an executable program, you will need to use the mouse. Run
the "setup" and follow the on-screen instructions provided by the program, which may vary according to the installation program that
you are using. If it should be necessary to connect a network, use the Ethernet port available on the left side of vPed. At the end of the
installation procedure, follow steps similar to the installation of dll.
Notes about plugin installation with SETUP file:
Both in case of installation using setup or dll, it is highly recommended to install a plugin at a time, confirming the installation
If during the installation it's proposed to change the address of installation, check and if necessary correct the installation path
so that it is in any of the locations included in "C: \”
During the installation using "setup", if the program requires it, you should only enable the installation of VST / VSTi, disabling
all other installation options.
It 'possible that, after after the launch of a SETUP program, it may take a few seconds before the installation begins.
Uninstalling a plugin
Enter in UTILITY and select "Uninstall EFFECT". Afterwards you
will see a list of installed plugins. Select the plugin you want to
uninstall and press "PAGE / ENTER". In the lower part of the
screen there is the "OTHER" option, which can be used in the
possible but rare case that a plugin does not appear in the
uninstall list. In this box, which proposes a standard uninstaller,
it's necessary to use the mouse. Caution is advised in the use of
the functions available in the "Add / Remove Programs", visible
after pressing the button corresponding to "OTHER".
can't be held in any way responsible for any
malfunction or other problems due to inappropriate changes applied in this section.
Loading a plugin
In the image below, the board has not uploaded any effect, and only the space available for the first group of 4 slots to which you can
assign plugins is displayed, in positions 1 to 4, corresponding to the underlying footswitches.
The first group of slots 1-4 is also shown in the upper part of the screen
To view the second group of 4 slots
, press the
footswitch corresponding to "PAGE / ENTER" once.
Once you have installed a plugin, to make it available to the
board from the Home screen press and hold the button
corresponding to the slot in which you want to load the plugin for
at least one second, accessing the list of available plugins. Select
the effect you want with the help of the “VALUE” dial.
Highlight the item you want to load and press "PAGE / ENTER"
button to load the selected plugin.
7
The plugin is now available in the selected slot within the board.
Above the name of the program is a detail that informs the user
about the request for resources by the plugin.
If the VIRTUAL LED
were to become red, it is possible that the request of resources is
greater than that available with the possibility of running into
problems in the audio.
Note that you can load the same plugin 2 or more times, adjacent
or not, in the same board. In this case, the plugin will assume the
characteristic of exclusivity, and mode “One pedal at a time”, will
automatically be assigned only for the plugin loaded in two or
more slots in the same board. This mode is useful if you want to
use the same plugin with 2 or more programs (presets) with different settings. Note that if a plugin loaded multiple times is replaced or
unloaded, also the other instances of the plugin will be discharged by the board.
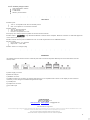
To empty a slot or replace a plugin and edit a plugin parameters
Press and hold the "PAGE / ENTER" at a slot where a plugin is loaded, and then release when you enter the editing mode of the
selected plugin. This page can be scrolled using the footswitches corresponding arrows
, to view
and load programs (presets) that may be available or created by the user. Note or the plugins factory programs, if there are any, they
will be displayed and available, but programs are not always available for all plugins, so in this case it will be necessary to take action
directly in the graphical view of the plugin, and through the use of the mouse, select the program (preset), if available. Subsequently,
the program is loaded, you can save and assign a name to the loaded program, to get immediate access to the program (preset).
This mode of programs (preset) selection, can be very useful during live performances, especially if you are using plugins that include
a complete set of effects (e.g. amp + cab + Sfx). Creating more presets to
your liking, you will be able to quickly load them scrolling the list. For this
type of use, the parameter "Load the program while scrolling the list" in
this global setup must be enabled (YES). Note that in this screen,
"VALUE" knob acts on the output level of the plugin that you are editing,
helping to adjust the output level of each plug-in, operation that in some
cases can be a bit boring.
Press
BACK
Holding down the PAGE/VALUE button for at least one
second, you will enter the list of the installed plugins. You can replace a plugin
by choosing it from the list, or empty the slot that you are working on, by
pressing the button corresponding to
NO EFF
Still in this screen, pressing and holding the "PAGE / ENTER" button for one second, takes you to the screen where you can change
the parameters of the plugin you are working on. The methods of intervention are 2:
1) Editings can be made by the use of the supplied mouse, working on the almost always available plugin GUI, but you can apply
editings without using the mouse, selecting a parameter by using the buttons corresponding to the arrows
.
The parameter name will be shown on right of the display,
as in the picture here on the right
After selecting the desired parameter, change the value using
the "VALUE" knob. The numeric value will be displayed,
during the intervention on "VALUE", in the space where before
was shown the parameter name.
Note that the editing of a parameter of a plugin can also be done
through the exclusive use of footswitches, so if necessary, it can be done quickly even during a live performance.
8
To assign a plugin parameter to an external or internal controller (Expression pedal / Switch / vSwitch / Value dial):
By using left / right arrows, select the parameter to be assigned and take action on it by turning the knob PAGE. The graphics of the
plugin will show the real-time value for the parameter, which will be stored (but remember to save the board, especially when loading
another). Entering in "PARAMS", the parameter will already be highlighted, avoiding the manual search of the desired parameter.
2) By pressing the button corresponding to PARAMS, you
access the page "EFFECT PARAMS", where you can
edit the parameters available in a display mode
alternative, which shows the list of parameters, as in the
example picture here on the side.
To select a parameter, scroll the list by the footswitches
corresponding the arrows
LEFT / RIGHT
available in the lower left of the screen. Press the button corresponding to
BACK
to return to the graphical
visualization of the plugin
Still in this window you can assign, in the column headed
Assign To
a single parameter to an external control (e.g. an expressin
pedal, not included) or to an internal virtual switch (refer to
"EXTRA" section, detailed later in this document).
To select the source control move to the option using the
corresponding buttons arrows
LEFT / RIGHT
and take action on the "VALUE" knob.
The "Assign To" box, will propose the following options:
NONE: no connection to external pedals.
PEDAL1/2/3/4 To assign an expression controller corresponding to one of the 4 jacks ¼ stereo inputs available on the right side of
vPed. The expression pedal can be assigned to any parameter proposed by the plugin that you are editing, such as e.g. the gain
parameter of an amp simulator, or a filter to open or close during a live performances. The possibilities are almost endless, giving the
performer the opportunity to take action, quickly by foot control, almost all of the parameters proposed by a plugin, which is practically
impossible for any other setup. All this, will result in new ideas for the musician particularly during live performances, allowing you to
enhance your musical creativity.
SWITCH 1/2/3/4: To assign any parameter of a plugin to a simple foot switch, similar to Pedal 1/2/3/4, with the difference that a
parameter can only be enabled or disabled. Note that the two inputs switch, being stereo connectors, also accept footswitches controls
consisting of 2 switches with output jack ¼ "stereo, it follows that there are actually 4 pedal controls hardware connected. If there is
any switch with dual stereo connector, remember that the coupling of commands would be: switch 1 & 3 and 2 & 4.
VSWITCH 1/2/3/4: Like the "SWITCH 1/2/3/4", with the difference that the control of the selected parameter is assigned to one of the
virtual switches available, loadable in a free slot of the board in use (see also the "EXTRA" section later in this document).
VALUE: Allows you to assign the "VALUE" hardware knob, a plugin parameter, to be used when the board is displayed. Of course, in
screens other than the main board in use, the “VALUE” knob will take control of the value or function specifically assigned when a
particular screen is displayed.
On the right of the control assignment box, there are two other parameters (Min
and Max columns), of course corresponding to the minimum and maximum
values of the parameter on which you are working on. Commonly adjustment
will correspond to the minimum value for "Min" and maximum to "Max",
however for certain parameters, especially by using expression pedals, it may
be necessary to restrict the intervention range of a the parameter.
Note that at the controls Pedal, Switch, vSwitch or VALUE knob, can be
assigned multiple parameters simultaneously in several plugins. In any case, at the time of allocation of a parameter to a pedal or
switch to which a control is already assigned, a message will warn the user, who may choose whether to allow assigning multiple
parameters to a single control, or not.
Notes for assigning of a parameter to an expression pedal:
9
If the expression pedal reacts in reverse, so the minimum value is set with pedal up, reverse adjusting values. Consequently,
the "Min" will correspond to the maximum value and "Max" to the minimum value.
If you notice that the pedal does not cover the entire range of values, proceed as follows:
With the pedal connected, move the box minimum ("Min") and put the pedal to the position of minimum value. Do the same for
the maximum value ("Max"). In this way vPed properly adjusts the values of any expression pedal.
Notes on editing the plugins parameters:
In the edit screen of a plugin, as already mentioned,
VALUE knob adjusts the plugin output level, but
activating “MOVE” mode, by pressing the corresponding
button, you will be able to shift a plugin from one slot to
another, changing and adapting the chain effects order to
your needs. While moving, only the selected effect
will be highlighted by the defined graphics, while the
other plugin/s will remain displayed with the veiled graphic.
Coming out of this screen, the “MOVE” mode will
automatically disable
Loading the same plugin in two adjacent slots, the plugin is actually instantiated only once and the two adjacent slots can be
useful only if each one has a different program (preset) selected. The activation remains exclusively for slot, but the function to
move plugins loaded 2 times within the chain of effects is inhibited.
When you are in the editing screen of a plugin, pressing the "PAGE / ENTER" button once will report directly to the main board
window.
When in the plugin edit screen, press the button "PAGE /
ENTER" once, the saving of the program (preset) that has
been edited, will be proposed.
Also note that when a program parameter is changed,
vPed will add the asterisk character “
* ”, to record the
change made, and the eventual saving will be performed.
The same symbol will be displayed as a suffix to the name
of a board if modified, to record that adjustments were
made. It will then be the user's choice whether or not to
save the changes. For the user, are 32 pre save settings (user presets).
Press "PAGE / ENTER" to enter the screen that allows you to enter the preset name.
In "SAVE PARAMETERS EFFECT" screen, there are up to
10 characters for the name available, by using the buttons
corresponding to those shown at the bottom of the screen,
and the VALUE knob to select the character. The left and
right arrows and "Backspace" to manage the placement of
characters. Typing can however also be made using a
computer keyboard (not included), connected to one of the
available USB ports on the left side of vPed. Inserted
character, press "PAGE / ENTER" to confirm saving.
“BACK”, of course to return to the previous screen.
Pressing and holding the MOVE for at least 1 sec., you will go to the screen that allows you to rename, delete or change the order
of user presets list. Of course the BACK button is available to go back to the previous screen.
10
EXTRA
In screen where you select the plugins to load, by pressing buttons corresponding to the arrows
you can also display the plugin list sorted "By Vendor", and still more to the right, display the
"EXTRA"
list:
This screen proposes the assignment of:
vSwitch 1/2/3/4: 4 virtual pedal controls assignable to an available slot of a board. The usage is similar to the allocation of an
external hardware foot switch, so after loading a vSwitch into an available slot, enter in the plugin display, in the view mode of
the parameters (PARAMS), to assign the parameter on which the vSwitch must intervene. In the "Assign To" select the switch
created (vSWITCH1/2/3/4), and enter the values "Min" and "Max" respectively to the minimum value for "Min" and maximum for
"Max" , or with different values in case the parameter is constituted by more than 2 positions.
vTap: To assign a tempo switch to an available slot in order to be able to transmit bpm values with the procedure of "Tap
Time" to all plugins that recognize this type of message. All active plugins, able to receive tempo information, will be influenced
by the data that this switch will send. To determine the value of the desired time, press the slot to which it is assigned "Tap
Tempo" at least 4 times. Holding down the button corresponding to “Tap Tempo”, as with all the plugins you enter the first level
of editing, with the difference that in this window you have the “LED” option, to enable or disable the flashing of the switch, in
sync with the set time. Please note that for the plugins that include this type of regulation, it is necessary to enable the receipt
of time information.
vTuner: To assign a guitar/bass tuner to an available slot, with the ability to mute or un-mute the audio signal when activated,
through the available control.
“NO EFF”, of course to empty the slot, and "BACK" button to return to the previous screen.
General notes on using vPed
It is recommended not to remove a USB device when in use, so don't unplug it until an operation that involves the USB device
is in progress, or until you exit from a page that involves the use of an USB device.
The power on timing of vPed, even extremely limited, depends on the characteristics of the board that was loaded when power
the device is off.
When the power is off in the unit, before unplugging the power cable, wait until the lighting of PAGE / EDIT button is turned off.
Connecting a MIDI keyboard, to make use of VSTi (VST instrument), use a good quality USB MIDI interface. If necessary
refer to the compatibility list available on www.vped.net.
Most of the control pedals (pedals of expression) are compatible (e.g. Roland EV5 ™, Moog EP-Z ™, M-audio EX ™, etc..), and in any case
those which feature a polarity switch. Some expression pedals that have ¼ "jack mono are also compatible, however the
linearity response may be compromised.
Compatibility of plugins that may be installed in vPed is extremely high, so it will be possible to use most of the VST / VSTi
currently available, provided that they are appropriate to the type of device used.
The pictures of plugins displayed in this document, refer to a hypothetical configuration, and do not reflect the endowment of
effects available in vPed at the time of purchase.
Using certain USB devices, it is possible that these need to be disconnected when the vPed power is on.
It’s possible that, with certain plugins and only in the graphic editing screen, audio noise may occur.
11
In case of usage of sounds libraries, you can copy these, or other items necessary for the proper functioning of a plugin, into
vPed. The operation of copying elements or whole directories, is accomplished simply in the installation panel. With the help of
the mouse, select the item you want to copy and drag it to the bottom, in the desired location. In case of large items (e.g. sound
libraries), however, you can connect, and then "read" by the plugin installed into vPed, data from a connected USB device. Of
course you will need to set the plugin where acquire the data.
If necessary, access the internal structure of vPed using the BROWSE button. As already mentioned several times,
VIRTONES is not responsible for any malfunctions or otherwise, relating to changes made in this section.
vPed offers a remarkable ability to manage resources for several plugins at the same time, however if you experience audio
troubles, please check through the CPU request resource monitor, (
CPU ), available individually for each plugin, that some
VST/VSTi absorbs excessive resources, then take action accordingly.
While simultaneously holding down the first button on the left and the fourth, turning on the device will be offered a menu of
functions that includes:
START NORMALLY: vPed software is normally launched
START WITH EMPTY BOARD: vPed software will start with an empty board
REMOTE ASSISTANCE: vPed software is launched in remote service mode (LAN connection required)
To activate this menu, press and hold the two footswitches already mentioned above, until the start menu does not appear.
Using the "MOVE" function, by scrolling over the eighth slot, vPed make available to other 4 slots (from 912). Caution is
recommended in the eventual loading of other plugins, in order not to cause an overload in the resources demand. These
additional 4 slots can be used, e.g., for inserting "EXTRA" elements, such as virtual switches (vSwitch, vTempo, vTuner), items
that require a low demand of resources.
List of plugin pre-installed in vPed
4Front <www.opensound.com>
4fbass – VSTi (VST Instrument)
4fepiano – VSTi (VST Instrument)
4fpiano – VSTi (VST Instrument)
4frpiano - VSTi (VST Instrument)
Truepianos - DEMO –VSTi (VST Instrument)
amvst <www.amvst.com>
Freehand Free -VSTi (VST Instrument)
KarBass -VSTi (VST Instrument)
Analog Warfare 2.5 -VSTi (VST Instrument)
Analog Warfare 3.1 –VSTi (VST Instrument)
Analog Warfare –VSTi (VST Instrument)
Retronix –VSTi (VST Instrument)
Audiffex <http://www.audiffex.com>
AmpLion 110 –VST (Guitar Amp)
GSi <www.genuinesoundware.com>
MrDonald – VST – (Rotary speaker simulator)
TimeVerb –VST – (Reverb)
WatKat –VST – (Tape Echo)
MrTramp2– VSTi – Full working demo
ORGANized_trio – VSTi – Full working donationware
MrRay73 –VSTi – Full working donationware
Effectizer –VST – Full working donationware
Vb3 - VSTi DEMO
7amp <http://7amp.net/>
3 Band distortion – VST (Distortion sfx)
Flying Echo Pro – VST (Up to fifteen stereo delays with tone shift)
Ec Equalizer – VST (Equalizer to put after distortion)
Ec Emulator – VST (Guitar Combo amplifier + sfx)
Ec Reverberator –VST (Reverb VST plugin with chorused echo)
Ec Speaker – VST (Guitar speaker simulator)
Guit Pre eq – VST (Equalizer to put at the start of the effects chain)
Sustain – VST (High speed peak sustainer)
Unison – VST (Multipoint chorus of slightly detuned voices)
Kuassa <http://www.kuassa.com
AmplifikationLite – VST (Guitar amp head with cab sim)
BasiQ_110 – VST (Baxandall Simulation Equalizer)
Amplifikation Vermilion – VST – DEMO (Guitar combo amplifier)
Lostin70s < http://lostin70s.monsite-orange.fr)
JAMP VST – VST (Guitar full tube amp + Cab sim)
Nick Crow <https://sites.google.com/site/nickcrowlab>
7170 Lead – VST (Amp head, needs cab sim after amp)
8505 Lead – VST (Amp head, needs cab sim after amp)
TubeDriver – VST (Amp head, needs cab sim after amp)
Guitar Combo – VST (Guitar combo amplifier)
12
Plektronfx <www.plektronfx.com>
Guitar Amp 2.0 FE – VST (Guitar amp with cab sim + sfx)
WTComp – VST (Compressor)
Guitar Amp 2.1 – VST DEMO (Guitar amp with cab sim + sfx)
Sinusweb <www.sinusweb.de>
FreeverbToo – VST (Reverb)
PeakComp2Mono – VST (Mono compressor)
SuperWave <www.superwavesynths.co.uk>
p8 –VSTi – (synthetizer)
Stylophone – VSTi (stylophone simulator)
Syncersoft < www.syncersoft.com>
Bass Landscapes – VST (bass boost sfx with analog and tube emulation)
Resonator – VST (resonance and morph effect)
Soft_Flanger – VST (Classic Flanger with analog and tube emulation)
Reverberation – VST (Reverb with analog and tube emulation)
Overloud <www.overloud.com>
TH2 Lite – VST (Guitar amplifier + sfx) – Special lite full working version specifically for vPed
Tikov <www.tikov.com/softrave/softrave.htm>
Vintage Vibe – VST (Vibrato and Chorus sfx combination, to create famous Jimi Hendrix type vibe effect)
Vintage Analog Filter – VST (analog vintage filter inspired by ElectroHarmonix© guitar pedals)
Vintage Analog Ring Shift Mod – VST (Ring modulator inspired by ElectroHarmonix© “Ring Thing” Guitar pedal)
Vintage Double Phaser – VST (Phaser inspired by ElectroHarmonix© “The Worm” guitar pedal)
Vintage Flanger Chorus – VST
Vintage SpaceChorus – VST (stereo chorus space effects inspired by ElectroHarmonix© guitar pedals)
BTE <www.bteaudio.com>
Juicy77 – VST (Guitar amp with separate pre/power amplifier sections + cabinet simulator)
Juicy77 Hot-Rodded – VST (Guitar amp with cab sim)
Juicy GUI Wrapper – VST (Guitar amp with cab sim)
TS’ Secret – VST (Vintage overdrive inspired by “Tube Screamer ©” guitar pedal)
Camel Audio <www.camelaudio.com>
Camel Crusher – VST (Distortion, Compressor & Filter Fx)
Easytoolz
<www.easytoolz.de>
Easy-verb – VST (Reverb / Equalizer)
Easy-mr-stringer – VSTi
Easy-muug-vped – VSTi
Easy-vintage bass – VSTi
Amphetamine-V2 – VSTi - DEMO
Voxengo <www.voxengo.com>
Boogex – VST (Guitar amplifier + cab sim)
Marvel GEQ – VST (linear-phase 16-band graphic equalizer)
Old Skool Verb – VST (stereo reverb)
Overtone GEQ – VST (7-band harmonic (overtone) graphic equalizer)
Sound Delay – VST (Multi-channel signal delay Fx)
Tempo Delay – VST (Delay/EQ and tremolo Sfx)
Tube Amp – VST (Microphone pre-amp)
Jam Origin <http://jamorigin.com/>
MIDI GUITAR – VST DEMO (Audio to MIDI trigger SW – Note that to try the features of this demo plugin, you will need to enter
in the plugin’s first edit level and select, with the help of the mouse, the demo mode. Playback in demo mode is subject to
interruptions of audio. This software is available also for Bass and Violin. As for all plugin demo versions, contact the
manufacturer to get the full version.
Giorgio Nottoli:
Charlie Verb
MDA (OpenSouce) <http://mda.smartelectronix.com>
Mda Combo – VST (Guitar amp + cab sim)
Mda Leslie – VST
Mda MultiBand – VST (Compressor)
Mda Dynamics – VST (Compressor/Gate)
Notes about pre installed plugins:
VST can be used as effects by taking the audio source from Guitar or MIC inputs.
VSTi can be used with a MIDI controller connected via MIDI/USB compatible interface (as the one proposed by VirTones as an
optional), or through a VST software that converts the audio input into MIDI messages.
Included software DEMO versions are to be considered as demonstration purposes only and are characterized by functions
limitations or populated by recurrent audio noise. User can then decide whether or not to purchase directly from the software
producer.
Available factory boards are examples of various possible uses and should be utilized depending on the connected
instruments.
13
vPed’s standard pakage includes:
vPed with SSD8G - 2GRam
Power supply
1 USB Mouse
Warranty documentation
TECH DATA
►Audio Inputs:
Jack ¼°: Hi impedance with Hi/Low sensitivity switch
XLR: Low Impedance. 12V Phantom Powered
►Audio Outputs
Jack ¼°: Pseudo balanced
XLR: Pseudo balanced
Phones: Low impedance 1V rms
►Accept up to 4 analog expression pedals and 2/4 mono/stereo switches
►Video Output:
High-Defnition Multimedia Interface HDCP compliant. Maximum resolution of 1920x1200 (depends
on the used monitor specs).
►USB 2.0 Ports: Use this port for USB devices such as a USB keyboard/mouse or USB/MIDI interface
►Power supply:
Input: 100-240V ~ 2.4° 50-60Hz
Output:19V – 4.74A 90W
►Sizes: 35x21x7 cm. Weight 2,4Kg
ADDENDUM
It's possible that some devices have the inside left panel with connections disposed differently from those described in the user
manual, where:
a) Power supply connector
b) Ethernet LAN port
c) Disabled connector
d ) HDMI connector. By connecting an external video device you can replicate what is shown on the display of vPed. From this
connector you can also get a 24-bit/96 kHz digital audio output.
e) 4 USB2 ports
f) Headphones connector
g) Aux audio input
© 2013
www.vped.net www.vped.it [email protected]
All trademarks are registered
Virtones reserves the right to change the products specifications and/or design at any time without notice. The information contained in this manual is based on vPed software version 1.0. This
Information is accurate and reliable, however, the company assumes no responsibility for any inaccuracies.
VST / VSTi © are trademark of Steinberg Media Technologies GmbH ©
vPed contains software components subject to license "GPL ver2" and "OpenBSD"
14