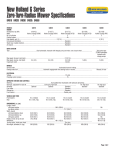
1
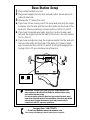
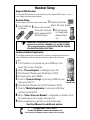
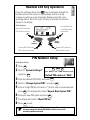
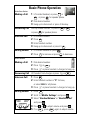
Gigaset 8825 Quick Start Guide Basic Steps for Getting Started For optimal performance of your system, please follow all of these steps. For full details, see the User Manual. Customer Care: 1-888-777-0211 Or visit our Website: www.icm.siemens.com A31008-G4035-U42-1-7619 Base Station Setup 1 2 Plug corded handset into unit. Plug power supply into base unit and wall outlet. Secure wire into cable channel lock. 3 Upwrap the Y phone line cord. a. If you have 2 lines coming out of the same wall jack, plug the single connector into the wall and the two other ends into the back of the base unit. Observe markings on base and line cord for L1 and L2. b. If you have 2 separate wall jacks, plug the 2 ends into each wall jack and the single end into the back of the base in the slot marked Line1 + (Line 2). c. If you have a single line, plug the single connector into the wall and the two other ends into the back of the base unit. Observe markings on base and line cord for L1 and L2. It will not damage phone to plug it into L2 if you only have one phone line. 2 3 1 Bottom view of base L2 L1(+L2) IMPORTANT: You are now ready to use the corded handset. See other sections of this Quick Start Guide for additional base setup and cordless handset setup. For best reception, place the base in a high central location, away from other electrical devices. The installation of the base unit should allow at least 8-inches between the base and persons to be in compliance with FCC exposure guidelines. Customer Care: 1-888-777-0211 Or visit our Website: www.icm.siemens.com Visite nuestro sitio Web para obtener instrucciones en español. Handset Setup Gigaset 8800 Handset The Gigaset 8800 handset is used exclusively on the Gigaset 8825 system. Up to a total of eight handsets may be added. Handset Setup Before using your handset, follow these steps: 2 Insert batteries 3 as shown. – + + 1 Remove protective plastic film from display. Place cover on back of handset and push gently upward until it clicks into place. – 4 Place handset in charger with display facing out. IMPORTANT: Charge batteries 12 to 14 hours before using the handset for the first time. WARNING: Use only NiCd or NiMh AA rechargeable batteries. DO NOT USE ALKALINE, LITHIUM, OR NON-RECHARGEABLE BATTERIES. Cordless Handset Registration The cordless handset that comes with the system is preregistered to the base station. Additional cordless handsets need to be registered to the base station. 1 2 3 4 5 6 7 8 9 If the handset is not already on, press PWR key in the lower right corner of handset. When Please Register is displayed, press OK. Enter System PIN and press OK (default is 0000). At base station, press MENU. Scroll to System Settings by pressing >FWD key and Power key then press SELECT. Enter System PIN and press SELECT (default is 0000). Scroll to Mobile Registration by pressing >FWD key and then press SELECT. When Select Intercom Number is displayed on handset, scroll to number you want to assign, and press OK. When completed, you will hear a confirmation beep. See User Manual for additional options. Customer Care: 1-888-777-0211 Or visit our Website: www.icm.siemens.com Visite nuestro sitio Web para obtener instrucciones en español. Handset Soft Key Operation Press the soft keys above the 0(18 key to navigate through the handset options. The screen in this example is one of many screens you will see on your handset. Always press the corresponding side of the left or right soft key to activate the function shown in the display. At the Handset: Press the RIGHT side Press the LEFT side of the of the RIGHT soft key LEFT soft key to scroll up. to select (OK). Î ↕ ↕ ↕ ↕ Right Soft Key Left Soft Key Press the RIGHT side of the Press the LEFT side of the LEFT soft key to scroll down. RIGHT soft key to return. PIN Number Setup At the Base Station: 1 2 Press 0(18 6(/(&7 . 6(/(&7 !):' Press BACK < and > FWD buttons to scroll. Default PIN number is 0000. Enter the default PIN (0000) and press 6(/(&7 . Scroll to Change System PIN? and press 6(/(&7 . Enter a 4-digit PIN (do not use # or *) that is easy to remember and press 6 7 8 %$&. Scroll to System Settings? and press 3 4 5 . 6(/(&7 . The display will prompt Repeat New System PIN. Enter your new PIN again and press 6(/(&7 . The display will confirm New PIN Set. Press 0(18 to exit. IMPORTANT: The system PIN protects settings of the entire system. You must change the default PIN (0000) in order to access the answering machine remotely. Area Code Setup If you subscribe to Caller ID from your local telephone company, complete the steps below for your 7-digit or 10-digit dialing area. If you do not have Caller ID, skip this section. At the Base Station: LOCAL DIALING AREA 1 2 3 4 5 6 7 Press 0(18 %$&. 6(/(&7 !):' Press BACK < and > FWD buttons to scroll. Default PIN number is 0000. . Scroll to System Settings? and press 6(/(&7 . Enter the default PIN (0000) or your new PIN and press Scroll to Area Codes? and press 6(/(&7 Press 0(18 . . Scroll to Local Area Code? and press Enter your area code and press 6(/(&7 6(/(&7 . . 6(/(&7 to exit. IMPORTANT: Setup of your area code is necessary for accurate dialing of local numbers from the call log. EXTRA AREA CODES These should be entered if your area includes more than one local area code. 1 2 3 4 5 6 7 Press 8 Press 0(18 . Scroll to System Settings? and press 6(/(&7 . Enter the default PIN (0000) or your new PIN and press Scroll to Area Codes? and press 6(/(&7 . . Scroll to Extra Area Code 1?and press Enter your extra area code and press 6(/(&7 6(/(&7 6(/(&7 . . Scroll to Extra Area Code 2?and Extra Area Code 3? to program extra area codes if necessary. 0(18 to exit. IMPORTANT: Leave the Local Area Code option blank in a 10-digit dialing area (metropolitan areas). Use the Extra Area Codes option instead. Setup of your area codes is necessary for accurate dialing of local numbers from the call log. Enter 000 to erase any existing area code. Basic Phone Operation At the Base Station: Making a Call 1 Lift corded handset, or press /,1( , or press 63.5 087( or /,1( for speaker phone. 2 Dial desired number. 3 Hang up to disconnect or press lit line key. Answering Call Pick up corded handset, or press lit or press 63.5 087( for speaker phone. 1 2 3 4 Setting Volume 1 2 Intercom Call /,1( or , /,1( Lift corded handset. Press . ,17 Enter handset number. Hang up to disconnect or press lit Lift corded handset or press 63.5 087( Press to increase or press ,17 . . to decrease. At the Handset: Making a Call 1 Dial desired number. 2 Press ! or . 3 Press or place handset in charger to hang up. 63.5 Answering Call Lift handset from charger or press ! or Intercom Call . 63.5 1 Press . 2 Enter handset number or 0 for base, ,17 or select ALL for all phones. 3 Setting Volume 1 2 3 Press left Press right soft key to SCROLL. soft key to SELECT. Press or place handset in charger to hang up. Press 0(18 . Scroll to Mobile Settings and press . Select Handset Volume or Handsfree Vol and press . 4 Press 5 If on or 63.5 to adjust volume and press . , press again to adjust volume. 63.5 Troubleshooting Symptoms and Possible Causes PHONE SYSTEM DOES NOT WORK AT ALL Make sure handset is powered-on. Make sure the power cord is plugged into the base and the electrical outlet is not controlled by a wall switch. Make sure handset batteries are installed properly and fully charged. NO POWER ON BASE Check connections at wall and base. Plug base into a different electrical outlet. Check outlet for power by plugging other electrical devices into it. NO POWER ON HANDSET Press the END key or return handset to charger. It should turn on when the handset is placed in the charger. Check battery orientation in handset. Make sure handset batteries are fully charged. Batteries may need to be replaced; use only AA Ni-Cd or Ni-MH rechargeable batteries. NO DIAL TONE Make sure the power cord is plugged into the base and the electrical outlet is not controlled by a wall switch. Make sure the base unit is plugged into proper telephone wall jack. Make sure the handset batteries are installed properly and fully charged. Try your Gigaset in a different wall jack and/or a different phone in that jack. If your phone works in a different jack, or no phone works in the existing jack, the problem is in your wiring or local service. Call your local telephone company. NO CALLER ID Make sure you subscribe to the service. (Note: Some calls do not contain Caller ID information, even when you subscribe to the service.) HEARING STATIC OR NOISE Check connections. Make sure you are within range of the base unit. Look for possible interfering devices (such as microwave ovens). Move handset or base to a different location. HANDSET DOES NOT RING ON INCOMING CALL Make sure the handset(s) are within range of the base unit. Make sure ringer is ON and volume is loud enough to hear. Make sure the batteries are fully charged. Cycle power on handset OFF and ON by pressing the PWR key. Cycle power on base unit by unplugging power supply and plugging back in. HANDSET CANNOT MAKE OUTGOING CALL Make sure the handset(s) are within range of the base unit. Cycle power on handset OFF and ON by pressing the PWR key. Cycle power on base unit by unplugging power supply and plugging back in. Make sure keypad is not protected. Briefly press the PWR key. If you entered a Long Distance Prefix, ensure that it is correct. CANNOT TRANSFER A CALL Make sure you are transferring to an active intercom number. CANNOT DIAL FROM CALL LOG Make sure you subscribe to local Caller ID service. Make sure the area codes, both local and extra, are set. Customer Care: 1-888-777-0211 or visit our Website: www.icm.siemens.com Visite nuestro sitio Web para obtener instrucciones en español. DO NOT RETURN THIS PRODUCT TO THE STORE! Please read the following important information. For Siemens Customer Care, product operation information, or for technical information, call our experts toll-free 1-888-777-0211 7 a.m. to 10 p.m. Central Standard Time EVERY DAY www.icm.siemens.com Visite nuestro sitio Web para obtener instrucciones en español.